1
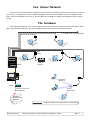
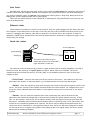
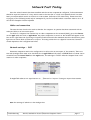
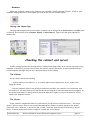
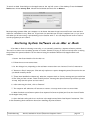
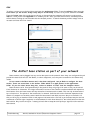
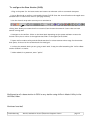
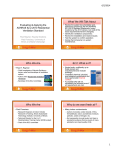
Contents
The Hardware.......................................................................................................................................2
What Can The Network Be Used For?......................................................................................... 4
Network Fault Finding....................................................................................................................... 6
Checking the Cabinet and Server...................................................................................................8
Updating and Upgrading Software................................................................................................ 9
Operating Systems............................................................................................................................. 9
Restoring System Software.......................................................................................................... 10
Printing...................................................................................................................................................11
The AirPort Base Station............................................................................................................... 12
Using FirstClass..................................................................................................................................16
Successmaker..................................................................................................................................... 19
Cloning....................................................................................................................................................21
Troubleshooting
North Lanarkshire Council Education Computer Centre
page 1
Your School Network
In order that the most benefit is gained from the network infrastructure which has been put in place in
your school, it is important to have an understanding of what has been installed, what it is capable of and
how it may be developed in the future. This document will attempt to explain and expand on each of these
points.
The hardware
This diagram shows how the various components of the network are connected. Note that iMacs, older
Macs, PCs, wireless computers, printers and photocopiers can be part of the school network
to another part of the building
data
points
network
printer
cabinet
server
Wireless
network
router
Internet connection
via ISDN line
AirPort
Base Station
Education
Intranet and
Internet
= network cables in the structure of the building
Troubleshooting
North Lanarkshire Council Education Computer Centre
page 2
Data Points
All classrooms, offices and many other areas in your school have data points for computers and printers
installed. These look like telephone sockets and computers are connected to them in much the same way as
you would a telephone, using an ethernet cable (sometimes called a patch or drop lead). Data points do not
supply power but are usually located near a power supply.
There are two double sockets in each classroom or teaching area. They should all be active but you can
check as outlined below.
Ethernet cables
These leads are necessary to connect to the network. They are usually plugged into the data point when
the computer is first switched on at the start of the day and can be left attached even when access is not
required. Unplugging the ethernet cable while a computer is on will not affect the computer or network
equipment. Cables can be disconnected from the data socket and left attached to computers at night if they
are put away for storage.
Inside the cabinet
14
in the classroom
patch panel(s)
1/14
1/15
switch(es)
this end of the cable can go in
almost any socket on a switch and a
light indicates a connection
The cables from all the data points go back to a glass-fronted cabinet located somewhere centrally in
the school. Here the cables go via a patch panel to a switch, which connects to a server. The server
communicates with the Internet Service Provider (ISP) via a broadband connection. Here is what each
component does;
• Patch Panel - connects each data point in the school to the Switch. The numbers on each data
point match the number on the patch panel. e.g. 1/14 means socket 14 on the first patch panel.
• Switch - takes the connection from each data point and connects them all through one cable to the
server. The switch can also create smaller networks within the school network. For example there is one
set up for school administration which allows it to be separate and secure from the rest of the school
network.
• Server - this is a powerful computer which runs continuously and controls internet access,
administers the network and keeps logs of internet and intranet (the school network) activity. It may
also run the school’s e-mail facility. It can also be used by staff and pupils to store personal files and
documents. Commonly used documents and files which may be required by staff can be stored here and
access can be controlled by passwords if required. The server may not always be situated beside the
cabinet but will be connected to it through the network. Once the server has been configured it should
not need attention on a regular basis, apart from backing up data on a regular basis. The server should
not be used as a desktop computer.
Troubleshooting
North Lanarkshire Council Education Computer Centre
page 3
• ISP - Internet Service Provider, this is the company, in this case Alfred McAlpine, which gives
internet access to the outside world and provides internet filtering for educational establishments.
What can the network be used for?
The main uses of the network are;
•
•
•
•
•
•
internet access
e-mail and calendaring
sharing of common resources e.g. printers, photocopier
file sharing
administration
monitoring computer use
Internet Access
To access internet facilities software called browsers are used. Every computer comes with at least one
browser installed. The two main browsers are Internet Explorer and Netscape Navigator. Apple have
introduced Safari but there are others. They all do the same job and are very similar to use but vary in the
way they look. A browser will be configured on each computer in the school.
E-mail
E-mail will be available through a program called FirstClass. This allows e-mail to be sent internally and
externally. Appropriate persons in the school will be given an e-mail account. As with internet access, this
facility is filtered and a record of access is kept. Much of the internal communication which takes place in
the school at present on paper can be transferred to e-mail.
Calendaring allows calendars, or diaries, to be set up for staff for their own use but they can also be
‘linked’ so that meetings can easily be arranged amongst associated group members. E-mails can be sent
automatically at a preset time to remind participants of impending meetings etc. Head Teachers, for example,
can create a calendar which all staff have access to, create another for his/her personal use and yet another
for access by the Senior Management Team. Calendars can also be set up for shared resources such as
projectors, Smartboards or activity rooms so that all staff are aware of what is in use and when it is in use.
Sharing of common resources
Network users can potentially ‘share’ each component on the network. Who has access to what is
something which schools will need to think carefully about. Network printers or a photocopier can be
configured to be given access by all or only some computers as required. Classroom inkjet printers can still be
used and they can be switched between by choosing the required printer from the Chooser on the Apple
menu (OS9) or via the Print Centre or Printer Setup Utility (OSX).
File sharing
Computer users can give others access to files which are stored on their computer. This can be done at
a whole school level where each group in the school community can have a folder in which to save work, or it
can be done at a personal level with individuals or groups sharing files. File sharing is a two-way process
where the person sharing the files first of all needs to indicate which files are to be shared and secondly the
person who wants the files has to know how to access them. Different levels of access can be set for files
being shared.
• ‘Guest’ access can be set up where anyone can login to your computer.
Troubleshooting
North Lanarkshire Council Education Computer Centre
page 4
OR
• You create a login for someone and give them a password to use.
Even once someone has logged onto your computer you can restrict access to what they see and can do
with it. For example you can, in order of increasing security:
• give guests Read and Write access where they can see the files download them to their
computer alter them and give them back to you
• give guests Read Only access where they can still download files but cannot alter your originals
• create a Drop Box in which as its name suggests, other users can only deposit files
This is configured through File Sharing which is in the Control Panels on the Apple menu (OS9) or in
the System Preferences (OSX). Users can choose who can access files and what level of access they have.
Guest access allows anyone on the network to see your files, or passwords can be allocated to particular
users. For security, any computers used for administration in the school are ‘hidden’ from classroom
computers.
The school server or another computer in the school can be used to store files centrally. For example
these could be forms used for administration, such as pro formas used by staff for forward plans or any
other area of school administration. These can be accessed by staff and read or printed as required. If a
school decides they want this facility please contact the Computer Centre staff who will configure it and
show relevant staff how to use it. Please remember that FirstClass can also be used to distribute documents
throughout the school.
Administration
Many of the points above highlight advantages but also have implications for several areas of school
administration. Central storage of commonly used documents on the server or other computers means that
there is a potential for saving paper and for staff not having to wait until documents are found, photocopied
and delivered to them. E-mail and calendaring should cut down on the number of messengers going round a
school and notice boards should become less cluttered.
Monitoring the Network
Apple Remote Desktop (OSX) allows Head Teachers to monitor all the Apple computers in the school.
Each class computer screen can be viewed and if necessary can be controlled or have a message displayed.
Reports on what software is installed on each computer can be requested and installing software can be done
centrally from one computer. This works particularly well after the school’s computers have been ‘cloned’,
more of which later. If a school decides they want this facility please contact the Computer Centre staff
who will configure it and show relevant staff how to use it.
Troubleshooting
North Lanarkshire Council Education Computer Centre
page 5
Network Fault Finding
Once the school network has been installed and the various components configured, little maintenance
should be required. However if at any time access to the internet or e-mail is not possible there are some
basic procedures which can be carried out to return these facilities to full connectivity. Please note that
trying any of the following needs only be attempted if you feel confident about it and have time to do it. If
not call the Computer Centre helpdesk.
Cables and connections
The most obvious check to be made is whether the computer in question has been connected with an
ethernet cable to an active data point.
To check if a computer has connectivity to other components on the network (OS9), go to the Chooser
on the Apple menu and click on AppleShare. Any other computers or server on the network will appear in the
box on the right-hand side. In OSX go to System Preferences and then Network and there should be a green
light next to either Built-in Ethernet or Airport. This only proves there is a physical connection. Internet
access depends on the configurations below.
Network settings - OS9
Classroom computers need to be configured to be able to be an active part of the network. There are
two main settings which need to be checked. One is AppleTalk and the other is TCP/IP. Both of these can be
accessed from the Control Panels on the Apple menu. The settings in TCP/IP tells the computer how it will
connect to other computers.
In AppleTalk make sure it says Connect via .....’Ethernet’ or ‘Airport’ if using an Airport base station.
Save the settings if asked to in the dialogue box.
Troubleshooting
North Lanarkshire Council Education Computer Centre
page 6
In TCP/IP ‘Connect via ......Ethernet’ or ‘Airport’ if using an Airport base station and ‘Configure......Using
DHCP Server’ should be selected.
Note that if the computer is to be used with an AirPort base station then this must be selected in
“Connect via...”.
Network Settings - OSX
1. In OSX open System Preferences and click on Network.
2. In the ‘Show’ box choose Built-in Ethernet or Airport. Make sure Configure is set to Using DHCP.
3. Then click on AppleTalk and make AppleTalk active
4. Click Apply Now and close the Network window and then the Preferences window.
5. Note that this does not necessarily mean that Internet access is now available. This will be dealt with
later.
Troubleshooting
North Lanarkshire Council Education Computer Centre
page 7
Browsers
When your network is made active a shortcut to a browser, usually Internet Explorer, is left on each
computer desktop launcher or dock. When you click on this icon the browser opens.
Setting the Home Page
The page which appears when the browser is opened can be changed from Preferences on the Edit menu
or Explorer Preferences. Click on Browser Display or Home/Search. Type in the URL (web address) of
another site.
Checking the cabinet and server
If after having checked the settings above in “Network Settings” there is no internet access from any
computer in the school, you may have to check the school’s cabinet and server. In most schools these are
located together although they can be in different parts of the building.
The Cabinet
At the cabinet check the following;
• is there power to the cabinet? i.e. are there lights on any components? If not, contact the
Computer Centre.
• has the computer which is not getting access been “patched” into a switch? To confirm this, note
the number of the data point on the wall into which the computer’s ethernet cable has been plugged. At
the patch panel ensure a cable goes from the same data point number to any of the switches. If not,
contact the Computer Centre.
The Server
If the cabinet’s components seem to be operational, you will need to check the server. The server
monitor “goes to sleep” when it is not being used. Moving the mouse or pressing the space bar should
reactivate it. If it does not, or the server has “frozen”, press the reset button at the front of the G4
server. It is the small button with a triangle on it below the on/off button.
Troubleshooting
North Lanarkshire Council Education Computer Centre
page 8
If the sever is running, check for internet access by attempting to browse the internet. If Internet
Explorer is not on the Launcher or Dock it will be in the Applications folder. If you can browse the internet
then the problem is probably within the school. Always quit Internet Explorer after using it on the server. If
only one computer is having a problem check all the settings as above. If no computer can access the internet
contact the Computer Centre.
Updating and upgrading software
Sometimes a dialogue box will appear asking you to update software running on your computer. In general it is
a good idea to do this as it is recommended by Apple and it can solve problems or potential problems. You can
schedule your computer to do this automatically, manually or even switch it off in Software Update in
System Preferences.
You can also go to the Apple website at any time and look for updates to software including operating systems.
When updating software from a website the instructions for downloading and installing are usually
straightforward.
Operating Systems
Every computer needs an operating system. All Macs now come with OSX (OS Ten) while older Macs may have
OS 9 or even 8. Most computers (not G4 iBooks) with OSX have the ability to run on either OSX or OS9 and
they can be switched between as required. OSX also has ‘Classic Mode’ which comes into play when you try to
run some older software which has been designed to run in OS9. A window appears and you are asked if you
want Classic mode to run. Your computer then looks as if it is operating in OS9. Eventually OSX will become
the main operating system, but in the meantime you have the ability to choose which OS suits your software
and your personal preference for the way your computer looks and operates.
Switching between operating systems.
In OSX click on the System Preferences icon in the dock (or from the Apple menu) and then on Startup
Disk.
You will have a choice of disks to start from. Choose the OS9.2.2 folder, click Restart and then Save and
Restart. Your computer will start in OS9.
Troubleshooting
North Lanarkshire Council Education Computer Centre
page 9
To switch to OSX from OS9 go to the Apple menu at the top left corner of the desktop. From the Control
Panels menu choose Startup Disk. Choose the OSX disk and then click on Restart.
Both operating systems allow your computer to do almost the same things but use different icons and have
different commands to carry them out. If you have not used OSX yet and your computer has it, try it out so
that when you do start using it permanently you are familiar with it. You can always switch back to OS9 to
run the programs you are used to.
Restoring System Software on an iMac or iBook
If an iMac or iBook is behaving erratically, it is occasionally caused by a System software problem.
This can be a rather time-consuming process to resolve. Instead of trying to find out exactly what is causing
the problem the System software can be restored using the Software Restore CD supplied with each
computer.
1. Insert the CD and double-click the CD icon.
2. Follow the on-screen instructions.
3. In the dialogue box, depending on the software version there are choices of level of restoration
4. “Restore in Place” keeps your files and only replaces or repairs damaged System files and is the one
you should normally choose
5. “Erase Hard Disk Before Restoring” takes the computer back to factory settings and you would lose
all the files you had created. Think carefully before choosing this option and back up all data you want
to keep. Only use this option as a last resort.
6. After selecting the level, click on “Restore”
7. The computer will take about 15 minutes to restore. You may need to insert a second disk.
8. When finished run Software Update from System Preferences (OSX) and from the Control Panels
on the Apple menu (OS9).
9. Open the Disk Utility which is in Utilities in the Applications folder. Run ‘Repair Permissions’. This
is also something which should be done after installing any new software.
Troubleshooting
North Lanarkshire Council Education Computer Centre
page 10
Other tips for computer problems
Computer will not complete the startup process or freezes (OS9)Restart the computer by pressing the reset button (or you may have to unplug the computer) and hold down
the Shift key to turn the Extensions off. When the computer starts, you may want to change some of the
Extensions or choose a different set of Extensions. If you are not sure about this simply try restarting the
computer again without switching the Extensions off.
Program not responding Hold down Ctrl, Option, Command keys (the three bottom left) and press the esc key (top left) and this
opens the Force Quit Applications dialogue box where you can force quit a program which is running.
Restarting a frozen computer Hold down Ctrl, Command and press the on/off button.
Printing
There are two main types of printer. There are printers which are attached directly to the computer by a
cable (local printer) and network printers which are connected to the network and can be used by computers
which may be in a different part of the building (remote). Inkjet printers which are connected directly to a
computer by a cable (usually a USB cable) come with a CD from which the printer drivers need to be
installed. The instructions for this are usually straightforward. From time to time printer manufacturers
update these drivers and they are available as a free download from their website. If you are having
problems with a printer it is a good idea to check out the relevant website.
OS9
In OS9, from the Apple menu select the Chooser. For a local inkjet printer click on its icon, highlight the
USB connection on the right-hand side and close the Chooser. For network printers click on the LaserWriter8
icon and a list of available printers will be displayed. Click on the one you want and click Setup to put a printer
icon on the desktop or simply close the Chooser.
Troubleshooting
North Lanarkshire Council Education Computer Centre
page 11
OSX
To select a printer go to the hard drive and open the Applications folder. From the Utilities folder open the
Print Centre (or the Printer Setup Utility may be on the dock). If there is no printer selected click Add.
From the Printer List click on the box at the top to choose how the computer will connect to the printer.
USB for a local printer and Appletalk for a network printer. Once you have selected this, available printers
will be shown. Clicking on one will make that the default printer. To switch between printers simply click on
its name and close the Print Centre.
The AirPort base station as part of your network
Base stations can be plugged into any active data point on the network. Once they are configured they will
provide the same facilities for the iBooks, or other computers, as if they were attached to the network by
cables.
Do not connect the Base Station until it has been configured. Use an iBook to configure the base
station. There are instructions in the AirPort folder which is in Apple Extras in the Applications
folder. If you are unsure about doing this, contact a member of staff from the Computer Centre.
Base stations can be fixed permanently in the position they are going to be used or they can be moved
from classroom to classroom. The range within which access to the network remains available will depend on
the distance from the base station and any obstacles in between such as walls. This can only be determined
by trial and error. The speed of the connection for network facilities such as the Internet depends on the
number of computers in wireless contact with the base station and what activities they are involved in. If
they are all trying to download files or web pages at the same time a fall off in performance may be noticed.
A maximum of about eight computers is recommended for each base station. If the school has more than one
base station they can be set up for “roaming access” where computers will pick up a signal from the nearest
base station.
Troubleshooting
North Lanarkshire Council Education Computer Centre
page 12
To configure the Base Station (OS9):
1. Plug in the power for the base station and connect an ethernet cable to a network data point.
2. On an iBook with an AirPort card installed choose TCP/IP from the Control Panels on the Apple menu
and make sure it connects via AirPort. (see page 8 above).
3. On the Control Strip make sure Airport is switched on -
clicking here allows you to switch AirPort on and off and choose the network if more than one base
station is being used.
4. Navigate to the AirPort folder on the Hard Disk. Depending on the system software version the
location varies, but is either in the Applications folder or the Apple Extras folder.
5. Open AirPort Admin Utility and the iBook searches for a base station within range. In the window
that opens, click once on the network and click Configure.
6. Select the network which you are going to work with. It may be called something like “AirPort Base
Station f6769b” or similar.
7. When asked for a password, enter “public”.
Configuration of a base station in OSX is very similar using AirPort Admin Utility in the
Utilities folder.
Continued overleaf
Troubleshooting
North Lanarkshire Council Education Computer Centre
page 13
In the Network Name box rename the
base station. This is what you will see
on the control strip of your iBook.
If you have more than one base station,
number them.
Set up this section as shown.
In the IP Address and Router Address
the third group of numbers (in this
case, 68) should be changed to your
(old) Cost Centre code number for your
school. Omit any leading zero.
e.g. Eastfield PS = EC070 so theirs
would be 10.0.70.20
If configuring a second AirPort Base
Station make the IP Address 10.0.cc.21
In this box you may need to remove the
tick from “Distribute IP addresses”.
Finally click on Update and wait for
the AirPort base station to be reset.
Troubleshooting
North Lanarkshire Council Education Computer Centre
page 14
Using An iBook at home
To access the internet from home you have to do the following:
• Set up an account with an Internet Service Provider (ISP). This can be done by obtaining a CD
from Tesco, Virgin, WH Smith etc. Instructions on the CD should guide you through the process. Note
that you will be charged normal telephone call charges and while connected you cannot use your
telephone.
• Once you have an account you will be given a name to log on with and you can choose a password.
• The iBook needs to be connected to your telephone line using the thin cable which came with it.
• Change the TCP/IP settings to “Connect via PPP” and “Use PPP server”.
• The Remote Access setting controls telephone access to the internet. Choose it from the Control
Panels. If you used a CD to register with an ISP the correct settings should already be entered here.
If not type them in and click “Save Password” and close the dialogue box. (All of this only needs to be
done once).
1. To access the internet, from the Apple menu choose Remote Access and click Connect. Dialling tones
should be heard.
2. Once the computer has connected to your ISP, open Internet Explorer and your home page should
appear.
3. To end your internet session, click on Disconnect from Remote Access on the Apple menu and close
Internet Explorer.
To use the iBook in school remember to change the TCP/IP settings back to Ethernet or AirPort.
If you have a broadband connection at home the settings are different from those described and you
may need to contact your ISP.
Troubleshooting
North Lanarkshire Council Education Computer Centre
page 15
FirstClass
The only configuration which may need to be done in order to log in to your FirstClass server is to enter the
server IP address here.
To change this click on the Setup button and in the resulting dialogue box type in the IP address for your
school’s server here and click on Save. Login with your details as normal.
Server AddressesPrimary Schools:
First Initial of School Name
All primary Schools
Support Staff and Pre-5
Secondary Schools: see page 18.
Troubleshooting
Connecting from school:
IP Address
212.219.253.16
10.50.2.7
Connecting from home:
IP Address
212.219.253.16
212.219.252.49
North Lanarkshire Council Education Computer Centre
page 16
Installing FirstClass
The software required to use FirstClass will in the first instance be installed by Computer Centre personnel.
As new computers are acquired the necessary software can be downloaded from the internet and installed by
someone in the school. Anyone requiring access to FirstClass from home can also do this and install it on their
home computer.
1. Open your browser. (Usually Internet Explorer)
2. Go to www.centrinity.com
3. Click on “Download Desktop Client”.
4. On the page which opens, click “Other Languages”.
5. Next to UK English, choose the platform, Mac OS or Windows.
6. Click on
FC8047UK.dmg (or .exe for Windows)
7. When the download is complete, close your internet browser.
8. On the desktop or in a Finder window double-click on the Install FirstClass Client UK icon. (There may be
an icon for the file to be uncompressed first).
9. Follow the on-screen instructions to install the software. Make sure a previous version of First Class is
not already running.
10. When the software opens it may tell you that you are not yet connected to a server. Click “OK”.
11. In the dialogue box which opens the “Server” option is already highlighted so type the address of the
server from the list on page 16 depending whether you are in a school or at home.
12. Click “Save” and the software is ready to use. If you are in school simply type in your User ID and
password.
13. To use FirstClass from home, connect to your ISP as normal, open FirstClass and type your User ID and
password and click Login.
If you use a laptop computer in school and at home you can set up two addresses in the Login box and all you
need to do is click on the little triangle in the Address box to switch between them.
1. Start FirstClass. In the Login dialogue box click in the Address box and type “School”.
2. Click “Setup”. In the Server box, where it now says “School”, delete it and insert the address of the
school server. Click Save.
3. For logging in from home do the same, change the Address to “Home” for example. Click “Setup”. In the
Server box, where it now says “Home”, delete it and insert the address of the server you should connect
to from home. Click Save.
4. Log in as normal with your FirstClass details.
Troubleshooting
North Lanarkshire Council Education Computer Centre
page 17
Secondary School server addresses
School
IP Address from home
Abronhill High School
Airdrie Academy
Bellshill Academy
Braidhurst High School
Brannock High School
Calderhead High School
Caldervale High School
Cardinal Newman High School
Chryston High School
Clyde Valley High School
Coatbridge High School
Coltness High School
Columba High School
Cumbernauld High School
Dalziel High School
Greenfaulds High School
Kilsyth Academy
Our Lady's High School - Cumbernauld
Our Lady's High School - Motherwell
Rosehall High School
St Aidan's High School
St Ambrose High School
St Margaret's High School
St Maurice's High School
St Patrick's High School
Taylor High School
Troubleshooting
IP Address in school
212.219.252.20
10.16.0.4
212.219.252.21
10.1.0.4
212.219.252.22
10.9.0.4
212.219.252.23
10.10.0.4
212.219.252.24
10.11.0.4
212.219.252.25
10.12.0.4
212.219.252.6
10.2.0.4
212.219.252.27
10.17.0.4
212.219.252.28
10.24.0.4
212.219.252.29
10.15.0.4
212.219.252.30
10.3.0.4
212.219.252.31
10.13.0.4
212.219.252.32
10.5.0.4
212.219.252.33
10.25.0.4
212.219.252.34
10.14.0.4
212.219.252.35
10.23.0.4
212.219.252.36
10.22.0.4
212.219.252.37
10.26.0.4
212.219.252.38
10.18.0.4
212.219.252.39
10.4.0.4
212.219.252.40
10.19.0.4
212.219.252.41
10.6.0.4
212.219.252.42
10.7.0.4
212.219.252.43
10.21.0.4
212.219.252.44
10.8.0.4
212.219.252.45
10.20.0.4
North Lanarkshire Council Education Computer Centre
page 18
Successmaker
Successmaker runs on OS 9.2. It will run on iMacs or iBooks which have OSX if you switch to OS9. All such
computers can be configured to run the software but pupils can only log in up to the number of licences the
school has.
To configure a computer:
1. From the Apple menu click on Chooser. .
2. Click AppleShare and click on G4 Server on the right-hand side.
3. Regardless of what is in the Name box, delete it and type ‘success1’ and password ‘success1’.
4. Click Connect.
5. In the following box put a tick (or cross) next to cai1 and history. Click OK.
6. On the desktop will be two sharepoints called cai1 and history.
7. Double-click the history icon and then the configure icon.
8. Click ‘Next’.
9. In the Verify Settings box the only setting which needs to be changed is the volume which should be
set to 7.
Troubleshooting
North Lanarkshire Council Education Computer Centre
page 19
10. Once the configuration is complete click restart.
11. Once your machine has restarted you should have an icon for Successmaker on your desktop. You are
now ready to use Successmaker.
12. You may want to copy this icon into the Launcher. To do this drag the icon onto a blank part of the
Launcher. Leave the original on the desktop.
• To use Successmaker simply double click on the icon on the desktop or click on the icon in the Launcher.
• When prompted enter a valid username and password. You will then be able to access the courses that
have been assigned to that user.
• Once you have finished using Successmaker you must ensure that you leave the program correctly. To
do this select ‘File’ and then ‘Quit’. You will be returned to the password login screen. Again choose
‘File’ and ‘Quit’.
• When you have finished using Successmaker for the day drag the cai1 and history sharepoints to the
trash.
• This will stop unauthorised access to the sharepoints.
Please Note - Successmaker needs to have the two sharepoints cai1 and history mounted for you to be able
to use the programme. The configuration process you have carried out will set these two sharepoints to
mount each time you switch the computer on but you will need to enter the password success1 for the
sharepoints to finish mounting each day. If at any time you click “Cancel” when the login screen appears the
sharepoints will not mount and you will receive an error message when you try to run Successmaker. If this
happens either restart the computer or go to the chooser and log onto the G4 server as before and mount
the two sharepoints.
Troubleshooting
North Lanarkshire Council Education Computer Centre
page 20
Cloning
Cloning involves making all your iBooks and iMacs have exactly the same Operating System and software
installed. It has advantages for ensuring all software is up to date and is an opportunity to clear a lot of old
software and files from computers. For computers to be cloned several conditions have to be met:
• Any files which you want to keep need to be backed up as all data will be lost.
• Computers need 128 MB of memory. Additional memory can be purchased and installed at the time of
cloning.
• Older Macs e.g. pre-iMac, drawer-loading iMacs and ‘Clamshell’ iBooks cannot have OSX installed on
them although they can have OS9 cloned.
Requests for cloning should be made to the Computer Centre helpdesk.
Click and Go
Click and Go requires OS 10.3. The software is installed as part of the clone. The software can be downloaded
free from the internet to be used in school or at home. Go to the SEEMIS website
http://nlc-intranet.seemis.com/install
and download the software for your computer, Mac or PC onto your desktop. Once the software has been
downloaded, double-click the icon and follow the instructions for installing it. After it has been installed log
in as normal. At home connect to the internet as you normally would before logging in.
Troubleshooting
North Lanarkshire Council Education Computer Centre
page 21
North Lanarkshire Council
Education Computer Department
A Teacher’s Guide to
Troubleshooting
a
October 2005
Troubleshooting
North Lanarkshire Council Education Computer Centre
page 22