1
Suitable pans
2, Fitting the hob - Flush mounting
To get the best results from your ceramic / halogen hob you should use pans of the correct
size and type. Unsuitable pans can cause the safety cut-out to operate, and can lead to less
efficient cooking. The pans should be approximately the same size and diameter as the
element. A pan that is too small wastes heat and may cause boiling over. Pans with a base
larger than 250 mm diameter should not be used.
Your hob can be flush mounted into any solid work surface.
For efficient cooking the base of the pan must make good contact with the ceramic hob.
Use only pans with a flat base - pans with bowed or ridged bases, or those with a rim (like
some kettles) will not work as well as good quality pans with flat bases. Some copper
based pans can cause inefficient cooking since although flat when cold, they become
concave when heated.
Flush mounting is not recommended in any type of work surface that may be prone to
deformation as a result of the ingress of moisture, e.g.; many chipboard based worktops. If
in doubt ask the manufacturer or supplier of your worktop.
Caution: Flush mounting the hob requires very accurate workmanship. If you are not
familiar with using a router you may prefer to call in a professional fitter.
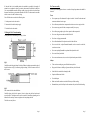
Flush mounting of the hob is demonstrated sectional view, Fig. 3.
New pans are not necessarily flat. Check by holding a straight edge, such as a ruler,
against the bottom of the pan. The straight edge should touch all the way across, with only
a small gap allowed. To avoid damage to the hob surface, always make sure that the base
of any pan is smooth, with no 'burrs' that could cause scratching. Make sure that the
surface of the hob is free from any dirt or grit, and NEVER chop or cut food on the hob
surface. Always lift pans gently on and off the hob surface, never drag then across.
Woks:
Never use a conventional round bottom wok on your ceramic
hob. Only the flat-bottomed types are suitable. Do not use any
type of stand or rack under pans on the hob.
(Fig. 3)
Pressure cookers:
Ensure that the base is flat.
Start in the same way as for proud mounting by cutting an aperture in the work surface to
the dimensions given in Fig 1.
Preserving pans:
Use a good quality pan having a flat base with a diameter no
larger than 250 mm.
Next, using a 12 mm dia. Router bit, cut a rebate as shown in Fig. 4 below. The overall
size of the rebate will be 286 x 516 mm.
Griddles:
Ensure that the base is flat and smooth so that there is no
danger that the hob will be scratched. Do not use a griddle with
feet.
Check the dimensions against the appliance before cutting!
Frying & Chip pans:
Use a good quality pan with a flat base. Use the larger rings.
Never fill a chip pan more than one third full of oil. Never
leave frying unattended, even for a short time.
Never cook directly on the hob. It is dangerous and can cause damage to the hob
(Fig 4)
Stick the self-adhesive sealing tape around the edge of the glass as shown in fig 1, but
allow a slight overhang. Take care to ensure a close fit at the comers. The hob should now
be connected to the mains supply as described below.
Carefully position the hob into the rebate, ensuring an even gap of 3 mm all round. Secure
in place using the four brackets and screws provided. The brackets can be used in a
number of orientations depending on the thickness of the worktop. Do not over tighten as
this may damage the hob.
Fill the gap with high temperature waterproof silicone sealant. Using a solution of washing
up liquid in warm water, wash away any surplus sealant on the hob or work surface. Allow
at least seven hours for the silicone sealant to harden before using the hob.
Page 6
Page 3