1
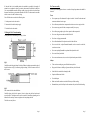
If, when the hob is in its installed position, the underside is accessible, (for example, if mounted over a cupboard or drawer), a protective sheet must be fitted below the hob base. Use a non-combustible material, allowing a small air gap at the back and at least 10mm clearance from the lowest point on the underside of the hob. The sheet must be removable to allow access to the hob for future servicing. You will find it easier to work in the following order For Your own safety As with any electrical appliance there are a number of simple precautions that should be observed. Never Never operate any of the elements if the glass is cracked. Switch off at the mains and contact an authorised service agent. 2. Connect the hob to the electricity supply. Never allow anyone other than a competent electrician to service or repair your hob. 3. Fit the hob in the work-surface. Never remove any part of the hob, or attempt to modify it in any way. Never allow young people to play with or operate the hob unsupervised. Never use a chip pan more than one third full with oil. Never leave a frying pan unattended. Never allow aluminium foil or plastic to touch the hob while hot. Never cover the hob, or place flammable materials, such as tea towels on the hob, even when not in use. Never store anything flammable in cupboards directly under the hob. Never cook directly on the hob. Never use an asbestos mat, trivet, or rack of any kind under pans on the hob. 1. Cut the aperture in the work-surface. 1. Fitting the Hob - Proud mounting Cut an aperture to the dimensions given in Fig. 1 below. (Fig 1) Carefully turn the hob upside down. Stick the self-adhesive sealing tape around the edge of the glass as shown in Fig 2, but allowing a slight overhang. Take care to ensure a close fit at the corners. Always Take care when touching any part of the hob that may be hot. Keep your hob clean as a build up of grease and fat may be a fire hazard. Switch off at the mains before cleaning the hob. Supervise children near the hob. Use suitable pans. Make sure that all controls are switched off when you finish cooking. Remember that your hob will stay hot for some time after you have finished cooking. (Fig 2) Now connect the hob as described below. Carefully replace the hob in the aperture. Secure in place using the four brackets and screws provided. The brackets can be used in a number of orientations, depending on the thickness of the worktop. Do not over-tighten as this may damage the hob. The hob is now ready for use. Page 2 Page 7