1
RadStar RS800
Operating Instructions
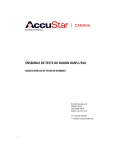
R S 8 00 F E A T U R E S
• Hourly and average readings • Internal memory to retain data
• Accurate measurement in a wide range of temperatures and relative humidity
• Sensors to measure relative humidity and temperature
• Nominal sensitivity: 24 cph/pCi/L
LCD Screen
Indicator Light
Power Jack
Printer Port
Enter Button
Next Button
Reset Button
Key Switch
INO27 - Rev D
1.0 SETTING UP THE RS800:
1.1 Plug power adapter marked “RadStar Power Supply” into any 120VAC outlet.
1.2 Plug free end of power adapter into left side of RS800 – green LED should come
on – indicating that the NiCad batteries are charging. Leave power cord plugged in at all
times during a radon test to ensure that the batteries remain charged. If no power is
available, as in new construction, the unit may be run on the batteries alone for a typical
48hr test as long as the unit has been charging overnight with the power adapter.
Note: The RadStar sample LCD display shown below indicates #.#.
The actual screen will show a version number such as Ver 1.5
2.0 TURNING UNIT ON:
Insert key into unit and turn it one click to the right to the [Keypad On] position. The
unit will beep and the display will activate and read:
RS800 Ver #.#
VIEW?
3.0 SETTING UP PARAMETERS:
3.1. ERASING STORED DATA
3.1.1 Using the [Next] button on the front panel, scroll through the options
until the display reads:
RS800 Ver #.#
ERASE?
3.1.2 Press and hold the [Enter] button (there will be an audible
tone coming from the unit) until the display reads:
RS800 Ver #.#
DATA ERASED!
This will erase any prior test stored in the memory so that the unit will test from the first hour.
Important: If prior data is not erased, new test data will be appended to the previous test data.
Note: If at any time there is some confusion during the setup of parameters, simply press the
[Reset] button to re-initialize the unit so that you can scroll through the parameters again.
This process will not change any of the other parameters that are entered [Delay Setting,
Battery Saver] .
2
3.2 DELAY MODE
This mode allows you to choose to run the unit with no delay, a 12 hour delay (the unit will print out
or download from the 13th hour), or a 24 hour delay (the unit will print out or download from the
25th hour). The unit will still test from the first hour no matter which delay mode is selected. All of
the data can be retrieved by simply entering the “No Delay” mode.
The 12 hour delay can be used to delay start of a test if closed house conditions were not in place
on arrival at a home to be tested and the 24 hour delay can be used for post-mitigation testing.
3.2.1 With the key still in the [Keypad On] position, use the [Next] button to scroll to the delay
mode. The display will read:
RS800 Ver #.#
DELAY MODE?
3.2.2 Press [Enter] button once. The display will read:
RS800 Ver #.#
NO DELAY?
Note: Test Duration per EPA Protocols must be at least 48 hours.
3.2.3 Press [Next] button again. The display will read:
RS800 Ver #.#
12 HR DELAY?
Note: Test Duration per EPA Protocols must be at least 60 hours.
3.2.4 Press [Next] button again. The display will read:
RS800 Ver #.#
24 HR DELAY?
Note: Test Duration per EPA Protocols must be at least 72 hours.
3.2.5 After selecting the desired delay mode, press the [Enter] button once. The display will read:
RS800 Ver #.#
VIEW?
3
3.3 BATTERY SAVER MODE
This mode (if activated) will shut off the display ten seconds after testing has begun
(recommended). It allows for longer battery backup time in case of a power outage or if
running the unit on batteries only.
3.3.1 With the key still in the [Keypad On] position, use the [Next] button to scroll to the Battery
Saver Mode. The display will read:
RS800 Ver #.#
BATTERY SAVER?
3.3.2 Press [Enter] button once. The display will read:
RECOMMENDED:
RS800 Ver #.#
ON?
3.3.3 Press [Next] button once. The display will read:
RS800 Ver #.#
OFF?
3.3.4 After the battery saver mode is selected (if you go by the mode you wanted, just keep pressing
the [ Next ] button. This is also true for the Delay Mode, press the [Enter] button once. The display
will read:
RS800 Ver #.#
VIEW?
4.0 MONITORING FOR RADON GAS:
4.1 After the Delay mode and Battery Saver mode have been entered, you may begin monitoring for
radon gas by turning the keyswitch to the [Measure On] position. The key may be removed in this
position to prevent tampering with the unit. The display should read:
RS800 Ver #.#
TESTING 1
4.2 The red LED next to the "Measure On" logo will stay on for forty seconds, then go out. This is
a normal condition. Every thirty seconds while the RadStar is operating the red LED will blink.
Note: When the key is turned to the [ Measure On ] position to start a new radon test and the
display is reading any other hour besides 1, the unit will “beep.” This means the data needs
to be erased from the prior test. See Section 3.1.
Note: Test Duration per EPA Protocols must be at least 48 hours.
4
5.0 OBTAINING A READING FROM THE RS800 DISPLAY:
5.1 Any time during or after a test, turn the keyswitch to [Keypad On] position. The display will read:
RS800 Ver #.#
VIEW?
5.2 Press [Enter] button once. The display will read:
RS800 Ver #.#
001 005.1 pCi/L
Hour
Radon Reading
(Typical)
5.3 Press [Next] button to scroll through the hourly readings. To continue testing, simply turn the
keyswitch to [Measure On] position. The unit will “beep” to signify continued testing.
Note: When a test is continued by going from [Keypad On] to [Measure On], the hour in
which you were testing starts over again. Also, note that if you try to view the readings
before the first hour is up, the display will read:
RS800 Ver #.#
NO DATA.
6.0 SETTING UP THE OPTIONAL PRINTER:
6.1 Plug the AC/DC adapter (the one marked “Printer Power Supply”) into any 120VAC outlet.
Plug the power jack from the adapter into the back of the printer.
6.2 Connect the D-Sub cable supplied with the unit to the printer and the Radstar.
6.3 Turn the printer on via the rocker switch. The red LED should come on.
7.0 OBTAINING A TEST REPORT PRINTOUT:
7.1 After completing a test, turn the keyswitch to [Keypad On] position. The display will read:
RS800 Ver #.#
VIEW?
7.2 Press [Next] button once. The display will read:
RS800 Ver #.#
PRINT?
7.3 Press [Enter] button once. The unit will print the test report. See Fig. A for an explanation
of the printout. Note: if you try to get a printout within the first hour of testing, the RadStar
display will read “No Data.”
5
8.0 DOWNLOADING DATA FROM THE RADSTAR:
The RadStar comes with a Data Capture Utility Program (Windows XP and Vista compatible), and a
USB/Serial Adapter Cable with driver. The accompanying RadStar Documentation Library describes
the set-up and operation of these items. You may also view the Documentation and download the
Program from the AccuStar Labs website www.accustarlabs.com
8.1 Install the RadStar Data Capture Utility Program and cable driver on your PC. In the Program,
setup the correct RadStar model number and the correct COM port. Refer to the RadStar
Documentation Library for specific instructions.
8.2 Connect the PC cable to the Print Port on the RadStar, and to your PC. Turn the RadStar
keyswitch to [Keypad On] position. The display will read:
RS800 Ver #.#
VIEW?
8.3 Press the [Next] button on the RadStar twice. The display will read:
RS800 Ver #.#
DOWNLOAD?
8.4 In the Data Capture Utility Program on your PC, click Download. On the RadStar, press the
[Enter] button once. The data will download to the PC. After the RadStar has finished downloading,
the RadStar display will read:
RS800 Ver #.#
VIEW?
Note: If you try to download data from the RadStar within the first hour of testing, the display
will read "No Data".
8.5 The test data downloaded into the Data Capture Utility can then be exported into a text file,
comma delimited file or Excel chart. README files with the software describe the set-up and
operation of the Data Capture Utility. Data Exported depends on the Delay Mode selected,
see section 3.2.
“No Delay” - All data from hour 001 is exported. Hours 001-004 are ignored when calculating
Average, Min and Max. Plot on Excel chart starts at hour 005.
“12-Hour Delay” - All data from hour 013 is exported. Hours 013-016 are ignored when calculating
Average, Min and Max. Plot on Excel chart starts at hour 017.
“24-Hour Delay” - All data from hour 025 is exported. Hours 025-028 are ignored when calculating
Average, Min and Max. Plot on Excel chart starts at hour 029.
9.0 TRANSPORTING THE RADSTAR TO A PC OR PRINTER:
If desired, you may transport the RadStar to a PC or printer to retrieve the data. Turn keyswitch
to [Off] position. The test data will be retained in the RadStar memory until you erase it. Remove
key and disconnect power supply. When your destination is reached, simply insert key into unit
and turn to [Keypad On] and print or download the data.
6
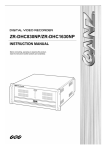
FIGURE A
E X A M PLE RS800 TEST RE SULT PRINTOUT
5DG6WDU 56
5DGRQ 'HWHFWRU0RQLWRU
9HUVLRQ 6HULDO &DOLE 7HVW,' BBBBBBBBBBBBBBBBBBBBBBBBBBBBBB
1R 'HOD\
,QWHUYDO 5HSRUW
+RXU 7 % $& S&L/ 7HPS +XPG
$OSKD
$YJ 0D[ 0LQ 6WDUW 'DWH7LPH
BBBBBBBBBBBBBBBBBBBBBBBBBBBBBB
(QG 'DWH7LPH
BBBBBBBBBBBBBBBBBBBBBBBBBBBBBB
$GGUHVV
BBBBBBBBBBBBBBBBBBBBBBBBBBBBBB
BBBBBBBBBBBBBBBBBBBBBBBBBBBBBB
/RFDWLRQ RI ,QVWUXPHQW
BBBBBBBBBBBBBBBBBBBBBBBBBBBBBB
7HVWHG %\
BBBBBBBBBBBBBBBBBBBBBBBBBBBBBB
81,7 6(5,$/ 180%(5
81,7 &$/,%5$7,21 )$&725
&86720(5 7(67 ,' 180%(5
'(/$< 6(77,1*
$/3+$ &2817
>,17(55837@ 5(35(6(176 /266 2) $&
32:(5
>,17(55837@ 5(35(6(176 /2:
%$77(5<
>,17(55837@ 5(35(6(176 3+<6,&$/
7$03(5,1* 2) ,167580(17 >7,/7@
5811,1* 0($685(0(17 7,0( ,1 +2856
5$'21 &21&(175$7,21 $9(5$*(' )520
7+( 7+ 72 7+( 7+ +285
5(/$7,9( +80,',7< )25 7+( 7+
+285
7(03(5$785( )25 7+( 1' +285
$9(5$*( 5$'21 &21&(175$7,21 29(5
727$/ 0($685(0(17 7,0( >67 +56
(;&/8'('@
0$;,080 5$'21 5($',1* 7$.(1 29(5
727$/ 0($685(0(17 7,0( >7+ +285@
0,1,080 5$'21 5($',1* 7$.(1 29(5
727$/ 0($685(0(17 7,0( >7+ +285@
86(5 (175< '$7$
7
Mode:
RS800 Instrument Specifications
Principle of Operation:
Minimum Sensitivity:
Continuous Monitor, Passive Diffusion
Pulse Mode Ionization Chamber
0.4 cpm/pCi/L (minimum 96 alpha counts per hour @ 4 pCi/L)
Units:
picoCuries per liter (pCi/L)
Linearity:
+/- 5% Corrected Curve
User Selectable Modes:
Continuous, 12 Hour Delay, 24 Hour Delay
Dynamic Range:
Data Storage (Nonvolatile):
Power:
Indicators:
0.3 to 200 pCi/L
Up to 240 hourly readings, wrap on over-run.
120VAC 60Hz Transformer, 5-8 days rechargeable battery operation.
User Selectable Battery Saver Mode (turns off LCD display during test)
2 X 16 LCD Display, Green AC Power LED, Red Testing LED
Key Switch:
3 Position, Removable Key [ Off ] [ Keypad On ] [ Measure On ]
Communications:
RS-232 port for printing or computer uploads
Pushbuttons:
Tamper Protection:
Environmental Sensors:
Operating Range:
Size:
Color:
Mounting:
Momentary [ Enter ] [ Next ] [ Reset ]
Tilt switch, AC power fail detection, key switch lock-out, LCD blackout.
Relative Humidity
Temperature
0% - 80% +/- 5%
50 oF– 90 oF +/- 2 oF
Temperature 50 oF – 90 oF
Humidity 0-80%, non-condensing
Height
Width
Depth
Weight
Blue/Black
7 inches (includes Carrying Handle)
8 inches
4 ½ inches
2 ½ pounds
(2) ¼''x 20 Threaded Tripod Mounts
Technical Support, Calibration
and Repair Service.
800-767-3703
M-F 8:30am - 5:30pm ET
Manufactured by
RadonAway
3 Saber Way
Ward Hill, MA 01835