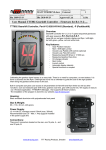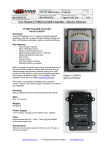
1
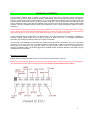
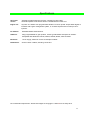
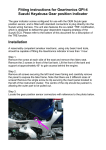
Flatshift-3 User Manual Software Version: 2.0.4.3 No unauthorised reproduction. All text and images Copyright Geartronics Ltd. May 2010. Contents Contents ---------------------------------------------------------------- Page 2 Introduction -------------------------------------------------------------Page 3 Disclaimer -------------------------------------------------------------- Page 4 Software installation ------------------------------------------------- Page 5 Hardware installation ------------------------------------------------ Page 6 ECU wiring connections ------------------------------------ Page 6 Main connector pin-out ------------------------------------- Page 7 Spark or fuel cut strategy ----------------------------------- Page 7 Gear stick load cell ------------------------------------------- Page 7 Gear position potentiometer ------------------------------- Page 8 Setting ECU parameters -------------------------------------------- Page 9 Programming gear positions ------------------------------- Page 9 Sensor type & configuration -------------------------------- Page 10 Setting spark cut ---------------------------------------------- Page 11 Saving & loading settings ----------------------------------- Page 12 Specifications ---------------------------------------------------------- Page 13 2 Introduction Before beginning installation, we recommend that you read this user manual in its entirety and familiarise yourself with the components and functions of the system. The Geartronics Flatshift system is designed to be used only with sequential dog-engagement manual transmissions. It will not operate with ‘H’ pattern dog gearboxes or conventional synchromesh gearboxes of the type fitted to the vast majority of road cars. One of the greatest advantages of sequential dog gearboxes is their ability to allow the driver to change up through the gears without using the clutch. A skilled driver will be capable of doing this by simply easing off the throttle as he/she starts to make the shift. As the torque is removed from the driving dogs, they will easily disengage and the shift can be made. When the dogs have re-engaged in the next gear, the driver presses the throttle pedal back down and the clutch-less change is complete. However, a good deal of practice is required to perfect this technique, and getting it wrong causes lost time and can lead to expensive gearbox wear or damage. The Geartronics Flatshift system replaces driver skill with an electronic control unit (ECU) and a set of sensors. As a gear change is sensed by the ECU, the engine torque is momentarily reduced to allow the drive dogs to release. When the next gear has been engaged, the engine torque is resumed and the change is complete – without the driver ever moving his or her feet! Benefits of flat shifting are: 1. Gear shift time is considerably reduced, and the time that power is applied to the driving wheels is maximised. This can add up to significantly reduced lap times, compared to conventional ‘clutched’ shifts. 2. Flat shifting means that power delivery to the driven wheels is less interrupted during the gear change. This can have significant handling benefits on a finely balanced race or rally car. 3. Because driver error is eliminated, gearbox dog wear can be considerably reduced, as every gear change is timed to perfection. 4. Many drivers of front wheel drive cars use left foot braking to balance the car and maximise grip on loose surfaces. If the driver’s left foot is on the brake pedal, it obviously can’t press the clutch at the same time! The Geartronics Flatshift system is particularly useful when using left foot braking techniques. 5. Reduced clutch wear! The Geartronics Flatshift-3 system operates on closed-loop principles. The engine torque reduction is dynamically calculated, based on gearbox barrel position. This means that there is no danger of the engine being turned back on before the dogs have been engaged, yet every shift cut is as short as possible to maintain the fastest and smoothest shifts. 3 Disclaimer The act of changing gear without use of the clutch places greater shock loadings on the gearbox and transmission system than would otherwise be experienced when changing gear using the clutch. For the purposes of this definition, the transmission system includes, but is not limited to: gearbox, prop-shaft, universal joints, drive shafts, constant velocity (CV) joints, crownwheel & pinion and differential assemblies. Furthermore, clutch-less gear changing can place additional stresses on the engine. This particularly applies to the crankshaft and camshaft drive arrangement as the engine may be mechanically forced to reduce speed over a considerably shortened period of time. It is the responsibility of the user of the Geartronics Flatshift system to satisfy themselves that their engine and transmission system is capable of accepting the increased stresses brought about by clutch-less gear changing before using this product. In an effort to reduce the possibility of damage caused by increased shock loadings, we would strongly suggest that you consider fitting a clutch driven plate with a sprung hub. Alternatively, fitting a rubber drive coupling in the propshaft of rear wheel drive cars can reduce the shock loadings. Geartronics Ltd. can accept no responsibility whatsoever for any loss, damage or personal injury brought about, either directly or otherwise, during the installation or use of this product. 4 Software installation. The Flatshift programming software is supplied on CD with the Flatshift ECU kit. Alternatively, a full working version is available for download, free of charge, from the Geartronics website. The software will operate on any PC running the Microsoft Windows® operating system. The software CD contains: Flatshift programming application. This user manual in Microsoft Word and Adobe Acrobat format. Insert the disk into the CD drive. If autorun is enabled, the setup programme will launch automatically. If the CD fails to autorun, browse the CD drive from ‘My Computer’ and double click the file ‘setup.exe’. Follow the onscreen instructions to install the programming software. A shortcut will be placed on your desktop after the installation has completed. A reboot is not necessary and the software can be run immediately after installation. The software can be uninstalled at any time by clicking on ‘Start>Program Files>Geartronics>Uninstall Geartronics’. Occasionally, we may release an updated version of the control panel software. Please contact us to ensure that later versions are compatible with the firmware version installed in your ECU. To reveal the version of your programming software, click ‘Help>About’. 5 Hardware installation The Geartronics Flatshift ECU is capable of interfacing directly with many proprietary engine management systems which provide an internal shift cut strategy. Alternatively, the ECU may be wired directly to the ignition coil(s) to cut the spark for the required duration. If your engine management system has a full power gear shift input that allows an external device to control the spark cut duration, we recommend that this facility is used in order to simplify the wiring. Note that some ECU’s will only support gear change spark cut when the appropriate ‘firmware’ version is installed. Please consult the manufacturer of your engine management system for further information. When using the engine ECU internal cut function, it MUST be configured to “cut while input active”. In other words, while ever the signal from the Geartronics ECU is present, the engine will remain cut. Not all ECU’s support this function. If in any doubt, consult either Geartronics or your engine ECU supplier. A basic wiring harness is supplied with your Flatshift ECU. This will be suitable for the majority of installations. However, custom made looms can be made on request in either PVC wire, or aerospace specification ‘Raychem’ wire & sleeving. Please contact us for further information. The first step of the installation is to decide on a suitable mounting location for the ECU. This can be anywhere inside the car, as long as it’s not in a location subject to extreme heat or likely to be exposed to water spray! The length of the harness to the gear stick sensor and gear position sensor may be a deciding factor in choosing a suitable location. We would suggest that a suitable location would be adjacent to the existing engine management ECU if possible. ECU wiring connections Please refer to the diagram below for pin-out connections to the ECU main connector. Please note: Pay particular attention to the wiring of the ignition coil(s). Incorrect wiring may cause damage to your Flatshift ECU and/or engine management ECU! If in doubt, consult Geartronics for advice. 6 Spark cut versus fuel cut In most installations the system will work reliably when using a spark cut only. When the cut is initiated, the coil supply is turned off sufficiently slowly to prevent any mis-timed sparks. Some engine builders dislike the idea of turning sparks off and leaving the injectors on, for reasons of ‘bore washing’. However, we are only cutting sparks for a handful of engine cycles and bore washing will not be a problem. If the injectors are also turned off, the engine would simply pump cold air during the cut period and the entire inlet tract could dry out. When the injectors were turned back on, there would be the potential for a couple of lean firing cycles until the inlet tract wetted again. In some applications this can actually help, because there would be a more progressive return to full power. However, in applications where the injectors are mounted some distance from the inlet valves, simply turning off the injectors alone might not cut the engine abruptly enough to cleanly release the dogs. For this reason, we would recommend using a spark cut only. The current system uses a simple off/on spark cut. Opinions vary as to the effects of abruptly turning the engine power back on after a gear change. Some engine ECU’s have provision for a ‘ramped’ system, whereby the sparks are turned back on in rotation or ignition retard is used to bring the power back on progressively. We have tested both methods and have found little difference in performance between the two Mounting the gear stick load cell The load cell is a strain gauge device that measures the bending force applied to the gear stick as the driver makes a gear change. The load cell is fitted into the gear stick so it effectively becomes part of it. You will need to cut the stick at an appropriate point and cut an M10 x 1.5 metric thread on the end of the two pieces. We normally recommend that the load cell is mounted with the cable pointing upwards, looped over and cable-tied to the sick. This will provide adequate strain relief for the cable as it exits the load cell, however, this is not essential and if the installation dictates, the load cell may be fitted with the cable pointing down. Due to high levels of vibration, lock nuts and thread locking compound must be used to prevent the load cell from turning during use. The load cell is a directional device and must be correctly orientated in relation to the gear lever motion. When using a Geartronics supplied load cell, the cable exit must point in the direction of upshifts! When mounting the load cell, a lock nut must be used on the lower portion of the gear lever to ensure correct orientation. Note: The load cell is an extremely sensitive electronic device, NEVER grip the opposite end of the load cell to the lock nut you wish to tighten, otherwise the load cell may be damaged! For most installations we would suggest mounting the load cell approximately 3-4 inches (7-10cm) below the gear knob. It’s very important that the load cell is not mounted too close to the gear knob, otherwise it will not produce the necessary output required for reliable operation. If, on the other hand, the load cell is mounted too close to the gear stick pivot point, the force on it may exceed the rating of the device, possibly leading to breakage. Clearly, some vehicles have a lighter gear shift than others, and in some circumstances it may be necessary to mount the load cell either closer to, or further away from the stick pivot point. Remember that the closer to the pivot point the load cell is mounted, the greater the force it will experience. It’s a good idea to familiarise yourself with the sensitivity of the device before you cut your gear stick. This can be done by screwing a bolt into each end and mounting one of the bolts in a vice. The ECU can be temporarily wired up so that you can experiment with different sensor threshold settings. Remember: The correct operation of the system is dependent upon a reliable signal from the load cell. 7 Fitting the gear position potentiometer Most sequential gearboxes have the provision for fitting a rotary potentiometer to measure the position of the gear selector barrel. In fact, the Geartronics Flatshift system will not function unless there is some means of measuring the barrel position. However, some gearboxes (such as those made by Holinger or OS Giken) may use a proprietary gear position switch. If this is the case, please contact us for advice regarding wiring connections to these switches. If the potentiometer was supplied with the Flatshift kit, it will already have a connector fitted to plug into the Geartronics wiring harness. If your potentiometer was supplied with the gearbox, please contact us for advice regarding pin-out connections. The potentiometer used for measuring the barrel position is capable of rotating the whole 360°. However, only about 340-350° of this rotation will provide a linear and reliable output signal. A further 5-10° of rotation will provide an output signal, but it will not change as the potentiometer is rotated. Beyond this, there is approximately 5° of rotation that does not produce any output, and is referred to as the ‘dead band’. Most gearbox manufacturers are aware of this dead band and arrange the potentiometer drive such that the barrel will never land in that position. Occasionally, some don’t, and we have seen some Hewland and Xtrac gearboxes where a gear position lands either in, or very close to the dead band. The shaft of the potentiometer has a small mark on one of the sides, when this mark is pointing away from the cable, the potentiometer is in the dead band. Conversely, when the mark is aligned with the cable, the potentiometer is mid travel. The potentiometer can be mounted with the shaft in one of two positions. In the correct position, the rotation of the barrel should not cause the potentiometer to travel through the dead band. If it does travel through the dead band, it can potentially shorten its life. More often than not, the mid position will correspond to the 2nd or 3rd gear positions. On some gearboxes, it’s not possible to avoid the dead band, so the Geartronics software has been designed to cope with such eventualities. The software routine for gear position programming will accept the pot mounted in any position. If you are in any doubt about the fitting of the potentiometer, please contact us for assistance. Geartronics can also supply hall-effect sensors that are capable of measuring 359º of rotation. These sensors can safely travel across the 0/360º position without any detrimental consequences. 8 Setting ECU parameters Before being able to adjust the ECU settings, you must first establish a communication link between the Flatshift ECU and a laptop PC. The ECU is fitted with an RS232 serial port to interface directly with the serial COM port on any computer. The serial lead must be fitted with a DB9 male connector on one end and a DB9 female connector on the other, and have ‘straight through’ connections of pins 2, 3 & 5. At the time of writing, the new generation of laptops often do not come fitted with serial ports. In this instance, it should be possible to use a USB to serial converter cable. These will provide a ‘virtual’ COM port on your machine. Please refer to the user manual for the converter cable to establish the correct COM port number. The COM port number on a built-in serial port will almost always be COM1. When the Geartronics Flatshift software was installed on your computer, a Geartronics icon was placed on your ‘desktop’. To launch the software, ‘double click’ the Geartronics icon. When the program starts, you will be presented with a control panel display. If the ECU is connected and powered up, the ‘ECU connected’ light at the bottom left of the control panel should illuminate. If it doesn’t, click on ‘Settings’ on the command line at the top of the window and select ‘Communications’. Select the appropriate COM port from the pull-down list. As mentioned above, USB converters use a virtual port and this will appear in the list if the device has been properly configured in Windows. When a successful connection has been made with the ECU, the bottom left corner will show “ECU Connected” in green, and the firmware version number will be displayed to the right. You will also be prompted to upload the current values from the ECU to the PC. Gear positions In order for the Flatshift system to function, the ECU needs to know the current gear position and all selector barrel positions in between gears. For correct system operation, it is critical that the gear positions are accurately sampled as described below. First, select the number of forward gears (not including neutral or reverse). Click on the ‘Clear Gear Positions’ button and you will see that the coloured bands on the barrel position dial will clear. Click the 'Sample Gear Positions' button. A series of dialogue boxes will appear, requesting that you select each gear in turn, starting with reverse. Note that some gearbox designs don't have a unique position on the selector barrel for reverse gear. In this case, the dial reading for reverse will be the same as neutral. If the software detects that the reverse position is the same as neutral, it will be ignored. When all gear positions have been read, the software will calculate ranges on the dial for each gear. The gear position tolerance is adjusted by means of the slider adjustment, “Gear Acknowledgement Window”. In most cases, this parameter should initially be set to 4 or 5 degrees. 9 Gearshift sensor type Depending upon the sensor type you are using, you may need to alter a ‘jumper’ setting within the ECU. Please refer to the photograph below for correct jumper settings. In the above photograph, the jumper is connected to the bottom 2 pins for use with analogue load cells – to use a simple switch, the jumper must be connected to the top 2 pins. If you are using a simple on/off switch to trigger the shift cut (Sadev & Drenth gearboxes etc.), the sensor type should be set to “Digital” from within the Geartronics software. The digital input is triggered when switched to earth. When using a load cell sensor, the sensor type must be set to “analogue” and a ‘threshold’ value must be set. When the input from the sensor exceeds this value, the ECU recognises that a gear change is about to be made and it initiates the spark cut. At the right hand side of the screen there is a value labelled “Stick Force”. This shows the real-time value of the stick sensor input. When a Geartronics supplied load cell is used, this value will fluctuate around 0-20 with no load applied to the stick. To adjust the sensor threshold, use the following procedure: Without the engine running, pull back on the gear lever with what you feel is the right force to start the gear shift. Make a note of the “Stick Force” value and adjust the sensor threshold accordingly. Press F8 to save the setting to the ECU. Pull back on the stick again and check that the “Trigger Active” light illuminates. If the light comes on when only a very small force is put on the gear stick, increase the threshold setting. If you have to pull the stick hard before the light comes on, reduce the threshold setting. Remember to download the settings to the ECU by pressing F8 after you have made any changes. If the threshold setting does not give an adequate range to allow a suitable trigger point, there is an adjustment that can be made within the ECU. Please contact Geartronics for instructions on how to do this. There are two further advanced settings for the gearshift sensor. Both may require adjustment in order to eliminate false triggering. The “Trigger Debounce” is the time that the sensor input must be constantly above the threshold for it to be accepted as a valid trigger. The “Trigger Mask” is the minimum time allowed between successive triggers. If the system is susceptible to false triggering, these settings may need to be increased from their default values. The debounce period should be set to the lowest value that is consistent with reliable operation. The disable period can usually be increased to its maximum value of 1 second without detriment. 10 Spark cuts The Flatshift-3 ECU has two modes of operation – either closed-loop, or open-loop. Clicking the “Use Gear Position Feedback” box will enter closed-loop mode and allow the system to calculate the exact cut time automatically, based on selector barrel position. This usually results in the fastest, smoothest and safest shifts possible. In ‘closed-loop’ mode, the engine is immediately turned back on after the shift is completed, therefore allowing for the fastest, yet safest shifts.! This strategy relies on receiving an accurate and reliable signal from the gear position sensor. If there is the slightest doubt about the condition of the sensor, this option should not be used! When in closed-loop model, there are two further options that need to be set. The first is the “Spark Cut Timeout” – this is the maximum engine cut duration, regardless of whether the shift has been successful or not. Note that under normal circumstances, all shifts will be completed within this period and the engine will be turned back on before this period expires. The other closed-loop setting is the “Post Shift Spark Cut”. Except in very unlikely circumstances, this parameter should be set to zero. When operating in open-loop mode, you must enter cut durations for each gear. Generally this results in inferior shift quality compared with closed-loop mode. When making adjustments you should always set the values to at least the slowest time you expect the shift to take. Adjustments are made by dragging the sliders using the mouse cursor, or, for fine adjustments, by clicking on a bar and using the cursor (arrow) keys. New settings will only take effect after pressing F8, or selecting ‘Download Settings to ECU’ from the Upload/Download menu at the top of the screen. Actual cut durations will depend on many factors, and adjustments must be made during road testing. Initially, the spark cuts should be set to a higher value and gradually reduced until the gear change becomes smooth. Longer cut durations will produce what appear to be slow and aggressive shifts as the engine will effectively be in an 'over-run' condition for a short period of time after the shift has been completed. However, it’s essential that the next gear is at least partially engaged before the engine power is reapplied. If engine power is re-applied too soon, the gear change quality may well feel acceptable, but the gearbox can suffer from premature wear or even breakages. The spark cut must be set short enough to give smooth gear changes, but long enough to prevent gearbox damage. Setting the cut times too low can result in serious gearbox damage! As a general rule, a car-derived gearbox will take slightly longer to shift gears than a motorcycle gearbox. However, typical cut durations would be expected to be in the order of 50-100ms. This figure can be significantly higher if the flywheel & clutch assembly has a high rotating inertia. It should be noted that the greater the inertia of the engine/flywheel/clutch assembly, the greater the shock loadings will be placed on the transmission. EXTREMELY IMPORTANT: Initial testing should be conducted at reduced throttle openings and engine speed in order to minimise the chances of gearbox damage! Proceed with caution until you are completely satisfied that the system is functioning correctly. 11 Saving and loading settings When the Geartronics software is started with the ECU disconnected, all the settings are default values and are not necessarily those that are programmed into the ECU. When the ECU comes ‘on-line’, you will be prompted to upload the current setting from the ECU to the PC - Always answer “yes”. You can upload the current ECU settings at any time by pressing F5. After any parameters have been changed, you should press F8 to save them to the ECU. If you attempt to close the software without saving settings to the ECU, you will be prompted to do so before the programme will close. The options 'File>Save' and 'File>Save As' will save all current settings to an .ini file, located in the profiles directory within the Geartronics installation directory. Saved settings can be loaded into the software by clicking on 'File>Open' and then selecting the required profile from the file menu. These settings will not take effect until they are sent to the ECU pressing F8 or by clicking ‘Upload/Download’ then 'Download all settings to ECU'. After the ECU has been set up, we would recommend that you save the settings to a file. It’s a good idea to include the date in the name of the file you create. 12 Specifications Gear stick sensor: Aerospace grade aluminium load cell, comprising 4-wire bridge. Nominal impedance 350 Ohms. M10x1.5 female thread on each end. Engine cut: Dynamic or 0-250ms user programmable duration for each up-shift. Output either digital, to interface with engine management system, or via internal power FET to interrupt coil or injectors. PC Comms: Standard RS232 serial interface. Software: Fully programmable for gear position, sensor type/threshold and spark cut duration. Compatible with Windows Win9x, WinNT, Win2K, WinXP, Vista and Win7 Electrical: 10-15v supply, maximum current consumption 200mA. Dimensions: 24mm x 64mm x 98mm, including connectors No unauthorised reproduction. All text and images are Copyright Geartronics Ltd. May 2010. 13