1
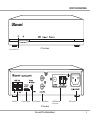
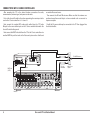
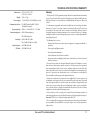
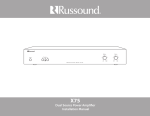
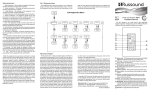
ST1
Smart Tuner
Installation Manual
SAFETY INSTRUCTIONS
WARNING: TO REDUCE THE RISK OF FIRE
OR ELECTRIC SHOCK, DO NOT EXPOSE THIS
APPLIANCE TO RAIN OR MOISTURE.
CAUTION: TO REDUCE THE RISK OF ELECTRIC
SHOCK, DO NOT REMOVE THE COVER. NO USERSERVICEABLE PARTS INSIDE. REFER SERVICING
TO QUALIFIED SERVICE PERSONNEL.
The lightning flash with arrowhead symbol,
within an equilateral triangle, is intended to alert
the user to the presence of uninsulated dangerous
voltage within the product’s enclosure that may
be of sufficient magnitude to constitute a risk of electric
shock to persons.
The exclamation point within an equilateral
triangle is intended to alert the user to the
presence of important operating and maintenance
(servicing) instructions in the literature
accompanying the appliance.
Safety Instructions
1. Read Instructions - All the safety and operating instructions
should be read before the appliance is operated.
2. Retain Instructions - The safety and operating instructions
should be retained for future reference.
3. Heed Warnings - All warnings on the appliance in the
operating instructions should be adhered to.
4. Follow Instructions - All operating and user instructions
should be followed.
5. Water and Moisture - The appliance should not be used near
water; for example, near a bathtub, washbowl, kitchen sink,
laundry tub, in a wet basement, or near a swimming pool.
The apparatus shall not be exposed to dripping or splashing
liquids and no objects filled with liquids, such as vases, shall
be placed on the apparatus. Do not touch the appliance
with wet hands. Do not handle the appliance or power cord
with wet or damp hands. If water or any other liquid enters
the appliance cabinet, take it to qualified service personnel
for inspection.
2
6. Cleaning - The appliance should be cleaned only as
16. Wall or Ceiling Mounting - The appliance should be
recommended by the manufacturer. From time to time you
should wipe off the front and side panels and the cabinet
with a soft cloth. Do not use rough material, thinners, alcohol
or other chemical solvents or cloths since this may damage
the finish or remove the panel lettering.
mounted to a wall or ceiling only as recommended by the
manufacturer.
7. Ventilation - The appliance should be situated so that
its location or position does not interfere with its proper
ventilation. For example, the appliance should not be
situated on a bed, sofa, rug, or similar surface that may
block the ventilation openings, or placed in a built-in
installation, such as a bookcase or cabinet that may impede
the flow of air through the ventilation openings. Place the
unit in a well-ventilated location, leaving at least 2 inches
(5 cm) of clearance on all sides, top and rear of unit for air
flow. If ventilation is blocked, the unit may overheat and
malfunction.
8. Heat - The appliance should be situated away from heat
sources such as radiators, heat registers, stoves, or other
appliances (including amplifiers) that produce heat.
9. Grounding or Polarization - Precaution should be taken so
that the grounding or polarization means of an appliance is
not defeated.
17. Location of the Appliance - Do not mount this unit under
a kitchen cabinet. Do not expose the appliance to direct
sun light or heating units as the appliance internal
components’ temperature may rise and shorten the life of
the components. Avoid damp and dusty places.
18. Object and Liquid Entry - Care should be taken so that
objects do not fall and liquids are not spilled into the
enclosure through the openings.
19. Servicing - The user should not attempt to service the
appliance beyond that described in the operating
instructions. All other servicing should be referred to
qualified service personnel.
20. Damage Requiring Service - The appliance should be
serviced by qualified service personnel when: A. The power
supply cord or the plug has been damaged; B. Objects have
fallen, liquid has been spilled into the appliance; C. The
appliance has been exposed to rain; or D. The appliance does
not appear to operate normally; or E. The appliance has been
dropped or the enclosure is damaged.
10. Power Cord Protection - Power supply cords should be
routed so that they are not likely to be walked on or pinched
by items placed upon or against them, paying particular
attention to cords at plugs, receptacles, and the point where
they exit from the appliance.
11. Power Sources - The appliance should be connected to a
power supply only of the type described in the operating
instructions or as marked on the appliance.
12. Main Power Disconnect - The power switch is a double-pole
switch. When the switch is in the “Off ” position, the appliance
is completely disconnected from the main power.
13. Non-Use Periods - The power cord of the appliance should
be unplugged from the outlet when left unused for a long
period of time.
14. Attachments - Only use attachments/accessories specified
by the manufacturer.
15. Carts and Stands - The appliance should be used only with
a cart or stand that is recommended by the manufacturer.
An appliance and cart combination should
be moved with care. Quick stops, excessive
force and uneven surfaces may cause the
appliance and cart combination to overturn.
Russound ST1 Installation Manual
Note: This equipment has been tested and found to comply with the limits
for a Class B digital device, pursuant to part 15 of the FCC rules. These limits
are designed to provide reasonable protection against harmful interference
in a residential installation. This equipment generates, uses and can radiate
radio frequency energy and, if not installed and used in accordance with
the instructions, may cause harmful interference to radio communications.
However, there is no guarantee that interference will not occur in a particular
installation. If this equipment does cause harmful interference to radio or
television reception, which can be determined by turning the equipment off
and on, the user is encouraged to try to correct the interference by one of or
more of the following measures: reorient or relocate the receiving antenna;
increase the separation between the equipment and receiver; connect the
equipment into an outlet on a circuit different from that to which the receiver
is connected, or consult the dealer or an experienced radio/TV technician for
help.
This Class B digital apparatus complies with Canadian ICES-003.
Cet appareil numérique de la classe B est conforme à la norme NMB-003
du Canada.
SAFETY - OUTDOOR ANTENNA CONNECTION
Grounding an Outdoor Antenna
If the AM/FM tuner is used with an outdoor antenna, the antenna must be
grounded against static charges and voltage surges. Consult the instructions
that came with the antenna or contact the antenna manufacturer for proper
installation instructions. The diagram gives a general depiction of how an
outdoor antenna should be grounded. For complete guidelines on antenna
grounding procedures, please consult the National Electrical Code, Section
810, ANSI/NFPA No. 70-1984.
Antenna Lead-In Wire
Grounding Conductors
Ground Clamps
Electric Service Equipment
Power Service
Grounding Electrode System
Russound ST1 Installation Manual
3
TABLE OF CONTENTS / PRODUCT OVERVIEW
Safety Instructions .................................................................................................................. 2
Safety-Outdoor Antenna Connection.............................................................................. 3
Product Overview ................................................................................................................... 4
Front and Back Panel Illustrations ..................................................................................... 5
Front and Back Panel Features............................................................................................ 6
Installation Options ............................................................................................................... 7
Connections with C-Series Contorllers ........................................................................ 8-9
Operation .................................................................................................................................10
Warranty / Technical specifications................................................................................11
Introduction
Thank you for purchasing your Russound product!
The ST1 Tuner is designed to complement the C-Series multiroom audio
systems’ built-in AM/FM tuner with identical features and functionality for
systems which require two independent tuners.
With sensitive tuning circuitry, the ST1 can pull in AM and FM terrestrial
broadcasts with clarity and excellent channel separation for pleasing sound
quality. A simple AM and FM antenna are included though based on the
particular location of the tuner, an outdoor antenna may be required.
The ST1 features 6 banks of user configured station presets. Each bank has 6
presets so there are a total of 36 station presets that can be used to save user
favorite AM and FM stations.
The ST1 will automatically select the proper band (AM or FM) based on the
frequency entered from a C-Series remote control or user interface. It also can
be configured by the installer to use standard North American or European
tuning which differ in the number of steps between each frequency and the
total frequency range.
The ST1 features RDS (Radio Data System) reception that will display
metadata the broadcasting station has encoded in the broadcast signal such
as station name, and song information. All of this is visible on Russound
C-Series system user interfaces which make this data available through the
RNET communication protocol for third party control systems.
4
Russound ST1 Installation Manual
FRONT AND REAR PANEL
ST1 Front Panel
Power Switch / LED
RNET Link
Firmware Update
Source ID Switches
Audio Outputs
AM/FM Antenna
Connections
AC Power Inlet
ST1 Rear Panel
Russound ST1 Installation Manual
5
FRONT AND BACK PANEL FEATURES
Power Switch / LED
Audio Outputs
The Power Switch turns the ST1 on / off by disconnecting the main power
feed. The Power Switch has an LED indicator to show if power is on or off. The
LED indicator will be lit red when the power switch is turned on and there is a
live electrical connection to AC power.
The Audio Outputs are connected to one of the C-Series controller’s source
audio inputs using the supplied RCA patch cables. This must correspond to
the ST1 Source ID switch setting and system configuration of the C-Series
controller made through SCS-C5 software.
RNET Link
AM/FM Antenna Connections
The ST1 uses the RNET link to communicate with the C-Series controller. All
Russound devices with an RNET Link are connected in series using CAT5 patch
cables terminated with RJ45 ends in the T568A configuration. Along with RNET
Data signals, the RNET Link passes source IR signals. To avoid potential crosstalk between the source-specific IR repeating signal lines, the RNET Link cable
can not exceed 18 inches in length.
The ST1 comes with both an AM loop antenna and an FM Antenna terminated
with a press-on coaxial fitting. Insert each lead of the AM loop antenna into the
spring loaded terminals on the ST1. The FM antenna fitting is pressed onto the
FM COAX terminal on the ST1. Each antenna can be individually positioned for
optimum reception.
Firmware Update
The ST1 can be updated in the field as new firmware is released using
Russound’s Advanced Programming Cable (#2500-521065) and a PC. When
new firmware updates are released, they will be made available along with the
update procedure for download from the Support Center at www.russound.
com.
Source ID Switch
The Source ID Switch is used to identify the ST1 as a particular source number
on the RNET bus for proper communication with the C-Series controller. The
ST1 Source ID Switch must be set to match the source audio input the ST1 is
connected to on the C-Series controller and must match the settings of the
system configuration made through SCS-C5 software.
6
Alternatively, an outdoor antenna may be used for better reception of distant
broadcasts or when there is significant interference from building structures.
Follow the installation instructions that come with the chosen antenna and
make sure to ground the antenna as shown in the beginning of this manual.
A coaxial splitter can be used to supply antenna signals to multiple tuners.
Depending on the outdoor antenna selected, it may be necessary to supply
an adapter to convert a 75 Ohm coaxial cable to the 300 Ohm twin lead for the
AM antenna connection to the ST1. This commonly available device is called a
matching transformer and is relatively inexpensive.
AC Power Receptacle
The AC Power receptacle accepts a 3-prong IEC 320 type connector for quick
disconnection of the supplied power cord.
Russound ST1 Installation Manual
INSTALLATION OPTIONS
The ST1 can be set on a shelf or by using the supplied brackets it can be
mounted in an A/V equipment rack, or surface-mounted. Its 1U high and ½
rack width size permits two units to be mounted alongside one another in a
single rack unit space.
Wall Mounting
The ST1 comes with two small rack ears with attachment screws that can be
used as wall mounting brackets. There are two attachment locations on each
side of the ST1 for more mounting options.
Rack Mounting
The rack mounting ears support either one or two ST1 units in a single rack
space. To install one ST1 in a rack space, use the long ear and one of the short
rack ears. The unit can be mounted either to the left or right side of the rack
space. For two units in one rack space, use the flat plate provided on the bottom
of the adjoining chassis to support and connect them, and use one small rack
ear on each outer side of the combined unit assembly. When using the twounit mounting option, the small side ventilation slots on the ST1 units will
be next to one another in the middle of the rack space. To avoid overheating
situations, make sure the top panel ventilation holes are not blocked.
Wall mounting option
Single unit rack mounting option
Dual unit rack mounting option
Russound ST1 Installation Manual
7
CONNECTIONS WITH C-SERIES CONTROLLERS
After mounting the ST1 in the desired location, connections for audio,
communication, antenna signal, and power can be made.
First set the Source ID switch to the value representing the source input to be
used on the C-Series controller i.e. 2 = Source 2.
Next, connect the supplied RCA audio patch cables from the ST1 Audio
Outputs to the source audio inputs on the C-Series controller that match the
Source ID switch setting made.
on another Russound source.
Then connect the AM and FM antennas. Make sure that the antennas are
positioned away from metal object or dense materials such as concrete to
improve reception.
Finally the AC power cable may be connected to the ST1 then plugged into
the electrical outlet.
Next connect the RNET Link cable from the ST1 to the C-Series controller or to
another RNET link port that exists in the Russound system such as that found
To AM/FM Antenna
ST1
RNET Link
(CAT5)
75 to 300
Ohm Balun
RCA Audio Cable
MCA-C5
8
Russound ST1 Installation Manual
4-Way Coax
Splitter
CONNECTIONS WITH C-SERIES CONTROLLERS
FM antenna
AM loop antenna
FM antenna
AM loop antenna
ST1
RCA Audio Cable
RNET Link
(CAT5)
MCA-C5
Russound ST1 Installation Manual
9
OPERATION
After the ST1 is connected to the C-Series multiroom audio system which has
been configured properly with SCS-S5 software to have the ST1 as a source,
the ST1 can be selected as a source. It will behave identically to the tuner
which is built into the C-Series controller. For specific details, please refer to the
user manual for the C-Series controller and the manual for the particular user
interface chosen.
10
Russound ST1 Installation Manual
TECHNICAL SPECIFICATIONS / WARRANTY
Dimensions:
Weight:
Power Supply:
Communication Ports:
Frequency Range:
Antenna Impedance:
8.5”W x 10.5”D x 1.75”H
(21.6 x 26.7 x 4.45 cm)
Warranty
3.7 lbs. (1.7 kg)
110-240 VAC @ 50-60Hz 35W (Auto-select)
(2) 2 RNET Links In/Out RJ45 / T568A 18” Max Cable Length
AM 530 - 1710 kHz, FM 87.7 - 107.9 MHz
AM 300 Ohm unbalanced
FM 75 Ohm balanced
Sensitivity:
AM: @ 20dB S/N 55 dBu,
FM: @ 30dB S/N 6 dB max 12 dBu
The Russound ST1 is fully guaranteed against all defects in materials and workmanship
for two (2) years from the date of purchase. During this period, Russound will replace any
defective parts and correct any defect in workmanship without charge for either parts
or labor.
For this warranty to apply, the unit must be installed and used according to its written
instructions. If service is necessary, it must be performed by Russound. The unit must
be returned to Russound at the owner’s expense and with prior written permission.
Accidental damage and shipping damage are not considered defects, nor is damage
resulting from abuse or from servicing by an agency or person not specifically authorized
in writing by Russound.
This Warranty does not cover:
Image Rejection:
AM: 33dB, FM: 80dB
• Damage caused by abuse, accident, misuse, negligence, or improper installation or
operation
S/N Ratio:
AM: 33dB, FM: 60dB
• Power surges and lightning strikes
• Normal wear and maintenance
• Products that have been altered or modified
• Any product whose identifying number, decal, serial number, etc. has been altered,
defaced or removed.
Russound sells products only through authorized Dealers and Distributors to ensure
that customers obtain proper support and service. Any Russound product purchased
from an unauthorized dealer or other source, including retailers, mail order sellers and
online sellers will not be honored or serviced under existing Russound warranty policy.
Any sale of products by an unauthorized source or other manner not authorized by
Russound shall void the warranty on the applicable product.
Damage to or destruction of components due to application of excessive power voids
the warranty on those parts. In these cases, repairs will be made on the basis of the retail
value of the parts and labor. To return for repairs, the unit must be shipped to Russound
at the owner’s expense, along with a note explaining the nature of service required. Be
sure to pack the unit in a corrugated container with at least three (3) inches of resilient
material to protect the unit from damage in transit.
Before returning a unit for repair, please request Return Authorization number via
email at [email protected]. Write this number on the shipping label and ship to:
Russound, ATTN: Service, 5 Forbes Road, Newmarket, NH 03857
Due to continual efforts to improve product quality as new technology and techniques
become available, Russound/FMP, Inc. reserves the right to revise system specifications
without notice.
Russound ST1 Installation Manual
11
ST1
Smart Tuner
Installation Manual
©2011 Russound. All rights reserved.
All trademarks are the property of their respective owners. Specifications are subject to
change without notice. Russound is not responsible for typographical errors or omissions.
Russound, Inc.
5 Forbes Road, Newmarket, NH 03857
tel 603.659.5170 • fax 603.659.5388
email: [email protected] www.russound.com
28-1362
09/06/11