1
QL-SD
User Manual
Contents
Contents ........................................................................................................................................................... 2
1. Introduction.................................................................................................................................................. 5
1.1. About This Manual .............................................................................................................................. 5
2. QL-SD Package Contents ........................................................................................................................... 5
2.1. Backup ................................................................................................................................................ 6
3. Hardware Installation................................................................................................................................... 6
3.1. Opening the QL Case.......................................................................................................................... 7
3.2. ROM / EPROM Considerations ........................................................................................................... 7
3.3. Installing the QL-SD Main PCB ........................................................................................................... 7
3.4. Installing the QL-SD SDHC Daughter Board ....................................................................................... 8
3.4.1. Microdrive Removal..................................................................................................................... 8
3.4.2. Daughterboard Installation .......................................................................................................... 9
3.5. Reassembly......................................................................................................................................... 9
4. First steps with QL-SD............................................................................................................................... 10
4.1. Selecting the File System Image to Use............................................................................................ 10
4.1.1. Unexpanded QL ........................................................................................................................ 11
4.1.2. QL with 256kB Memory Expansion ........................................................................................... 11
4.1.3. Fully Expanded QLs, Gold Card and SuperGold Card Users.................................................... 11
4.2. Installing the File System................................................................................................................... 11
4.3. Starting Up the First Time.................................................................................................................. 11
4.4. Changing SD Cards........................................................................................................................... 12
4.5. Switching Off ..................................................................................................................................... 12
5. Data Exchange with your PC..................................................................................................................... 13
5.1. Transfer Using Disk Drives ................................................................................................................ 13
5.2. Transfer Using a BDI Driver............................................................................................................... 13
6. QL-SD Usage Recommendations ............................................................................................................. 13
6.1. No more Reboots .............................................................................................................................. 13
6.2. Make Directories your Friends........................................................................................................... 13
6.2.1. Organise your Disk Space......................................................................................................... 14
6.2.2. Create a WORK_ directory........................................................................................................ 14
6.2.3. The MAKE_DIR Command ....................................................................................................... 14
6.2.4. Use DUP, DDOWN, DATA_USE and PROG_USE .................................................................... 15
6.2.5. Use a File Manager ................................................................................................................... 15
6.3. Important Software for Large Disk Users .......................................................................................... 15
7. Preparing the SDHC Card ......................................................................................................................... 17
7.1. Preparing the QL File System Image ................................................................................................ 17
8. QL-SD Driver S*BASIC Procedures and Functions................................................................................... 20
8.1. SDC_START ..................................................................................................................................... 20
8.2. MOUNT Number {, Drive, Partition}................................................................................................... 21
8.3. UMOUNT Number ............................................................................................................................. 21
8.4. SDC_USE Name$ ............................................................................................................................. 21
8.5. SDC_BASE()..................................................................................................................................... 22
8.6. SDC_VER$(Mode%) ......................................................................................................................... 22
9. QL-SD Hardware-Level Commands .......................................................................................................... 22
9.1. SPI_MODE Number .......................................................................................................................... 22
10. Direct Sector Access ............................................................................................................................... 23
11. QL-SD Driver ........................................................................................................................................... 23
11.1. Device Name ................................................................................................................................... 23
11.2. Buffers ............................................................................................................................................. 23
11.3. Starting the Driver............................................................................................................................ 24
11.4. Formatting ....................................................................................................................................... 24
11.5. QL-SD Driver Configuration Items ................................................................................................... 24
12. Some Technical Details ........................................................................................................................... 25
12.1. The Address Map ............................................................................................................................ 25
12.2. The Hardware.................................................................................................................................. 25
13. Known Issues .......................................................................................................................................... 26
13.1. Hardware......................................................................................................................................... 26
13.2. Driver............................................................................................................................................... 26
13.3. Acknowledgements ......................................................................................................................... 26
QL-SD User Manual
Document Version 1.01 / 12.1.2014
2
14. Copyright Notice & License ..................................................................................................................... 27
15. Disclaimer................................................................................................................................................ 27
QL-SD User Manual
Document Version 1.01 / 12.1.2014
3
IMPORTANT NOTE
By the time of writing this document, the following incompatibilities between QLSD and standard QL hardware were known:
1. QL-SD is not working reliably (sometimes it is not even working at all) in
QLs equipped with the Miracle Gold Card. It is thus not recommended to
use it together with this extension.
2. QL-SD is not working reliably (sometimes it is not even working at all) in
QLs equipped with the Miracle SuperGold Card. It is thus not
recommended to use it together with this extension.
3. QL-SD is principally incompatible with any software using the ROM slot
area (The Eidersoft ICE and mICE suite of programs and some Metacomco
compilers are known examples)
4. Unexpanded QLs with only the original 128k memory have severe
limitations on possible filesystem sizes due to shortage of memory for the
driver. It is thoroughly recommended to use QL-SD with a memory
extension.
Problems (1) and (2) are still being worked on by the time of writing. (3) and (4) are not considered
“problems” - It’s just the way it is and will (and can) not be changed.
QL-SD User Manual
Document Version 1.01 / 12.1.2014
4
1. Introduction
This is the User Manual for the QL-SD device for Sinclair QLs and other computers running various
QL-alike operating systems. QL-SD is intended for retro-computing and fun purposes, not to
process important data.
It has been developed with the aim in mind to give the QL a state-of-the-art mass storage device
given that Microdrives now nearing their 30th year tend to break a lot and replacements are very
hard to find. QL-SD has been put together for you by a number of QL enthusiasts, some of them
are listed in the acknowledgements section.
1.1. About This Manual
The QL users’ scene is manifold - It ranges from the relatively novice unexperienced retrointerested user who just obtained a QL from a flea market or a garage sale to the long-time
experienced QL-Expert who writes an S*Basic extension during lunch break. This manual tries the
impossible - it is written for both types of users (and all the rest that are located somewhere inbetween). The first (about half of it) part covers all the basics you need to know to operate this new
type of mass-storage device with your QL
The second part of the manual handles the more obscure - and potentially dangerous (to your data,
and your peace of mind, probably) aspects of the hardware and software.
Should you be willing to explore the commands and procedures described in the latter part of the
manual, it is assumed that you know what you are doing and are not trying to risk important data
but instead work on backups and test cards. For the more novice users: There is really nothing in
there you could probably need or really benefit from - Most of it is diagnostic stuff or low-level
commands. You won’t be missing any of this.
If you notoriously tend to ignore manuals:
In case you belong to the 99% of people who want to see their newly acquired gadget working in
no time and thus typically turn a blind eye to most sections of your precious manual:
Please make sure you at least read the chapter on hardware installation, followed by the quick
guide for preparing an SDHC card. Also don’t forget to make a backup copy of the supplied SD
card. Once you have seen QL-SD working, please do come back and read the rest - it is worth
it!
2. QL-SD Package Contents
QL-SD consists of the following components:
1. A small PCB board that makes up the actual QL-SD. This
is intended to go into the ROM socket of one of the QL
system ROMs (which one does not matter). It contains
the main QL-SD circuitry and has a second socket on top
to hold either the original ROM or a 64 KB EPROM with
the Operating system and QL-SD driver software.
QL-SD User Manual
Document Version 1.01 / 12.1.2014
5
2. A second small PCB board with an SD card socket to go
in place of one of the two QL in-built microdrives, allowing
you to change cards easily through the former microdrive
access slot.
3. A short piece of ribbon cable connecting the two PCB boards.
4. A 64KB EPROM with driver software and replacement operating system.
5. An SD card containing a number of QL file system images, the PC software and some QL
software we deemed too important to miss for users of large storage systems.
2.1. Backup
Before you do anything else with QL-SD, please make sure you create a backup of the
supplied SD-Card. It holds a lot of useful QL-SD support software, the documentation, and a
number of pre-built file system images.
You do not need to actually back up to another - real - SD card, you can simply copy all the
files onto a safe place on your PC hard disk (or, even better: Store it on a CD-ROM).
From a PC viewpoint, there is really nothing non-standard on this SD card, it should happily
copy all the files across.
3. Hardware Installation
As QL-SD is intended to go inside the QL's case leaving the original stylish outside intact as much
as possible, you will need to open up your QL case and replace some chips. No soldering is
required, just a bit of caution and common sense. If you have never handled electronic devices
before, please be assured installation is actually quite easy - just take your time and don't force it.
Important note regarding keyboard membranes
In order to install QL-SD, you will need to open up the QL case and handle its inner parts.
QL keyboard membranes usually become brittle with age and tend to break easily when
moved (and you need to do that when installing QL-SD), resulting in a non-working keyboard.
Sometimes, it is possible to 'repair' a broken membrane by just shortening the ends that go
into the QL main board connectors a bit, but that is not recommended and will not last long
anyway.
If your QL still has its original membrane, probably now is the time to look for a replacement.
RWAP services in the U.K are selling high-quality replacement membranes.
QL-SD User Manual
Document Version 1.01 / 12.1.2014
6
3.1. Opening the QL Case
Before opening the case, make sure you remove all Microdrive cartridges, expansion and ROM
boards from your QL. Also make sure power is disconnected.
The QL case can be opened by removing the screws holding the upper and lower parts of the body
together. The screws are located on the underside of the QL, 4 towards the front side (on a
recessed ledge) and 4 towards the back side, equally spaced along the length of the QL (Note one
of the rear screws might hide underneath a sticker). On the right side of the QL there are two
additional screws directly underneath the microdrives in about the middle of the bottom case –
Leave those alone when opening the case, they are holding other QL parts on the inside.
Once you have removed the screws, flip the QL around (making sure that it doesn't fall apart yet)
and carefully lift the keyboard and top cover. There are still some cables for the power LED and the
keyboard connection that hold the upper and lower part together. Carefully unplug those from the
QL main board and remove the upper case. QLs that weren't made in Korea by Samsung (that is,
basically all U.K. and pre-Issue 6-Models) are said to have some tricky connectors for these cables
– be careful, because if you bend the wires they seem to be very hard to slide back in.
3.2. ROM / EPROM Considerations
You should now decide whether you want to use QL-SD with its own dedicated ROM that comes
with Minerva 1.98 and the QL-SD driver. This has the advantage over any other solution that you
will not need to load the driver from disk or microdrive before you can actually start using QL-SD.
Minerva on the QL-SD's EPROM is probably the most advanced and bug-free versions of all QL
ROMs.
The disadvantages of changing to Minerva are small: There are still a small number of pieces of
software around that are said not to be compatible with Minerva, and you will need to load any nonEnglish keyboard layout from disk (or rather, QL-SD). It is thus thoroughly recommended to use the
QL-SD EPROM unless you have very good reason to do otherwise.
Unexpanded QLs will only work with the driver in ROM due to memory restrictions.
Should you go with the QL-SD EPROM, you need to remove both original QL ROMs from their
sockets, if you want to stay with your original ROMs, remove only one of them, once QL-SD is
installed, it is going to be re-fitted on top of QL-SD. If you want to go with QL-SDs EPROM, remove
both original ROMs (IC33, IC34). Actually, it does not matter which of the ROM sockets is used –
QL-SD works in both – we recommend the right one.
Please note that the QL-SD driver and hardware registers operate in the memory area
originally intended for the ROM slot ($C000 - $FFFF). With QL-SD installed, the QL ROM slot
is no longer usable for other purposes.
3.3. Installing the QL-SD Main PCB
As QL-SD goes where the QL ROMs are normally located, these need to be removed first. Either
use an IC removal tool in case you have one, or use a small screwdriver, carefully sliding between
socket and ROM repeatedly from either side, prying the ROM from its socket slowly but steadily.
Make sure you do not bend the legs, you will need the ROM intact afterwards should you decide
not to use the QL-SD EPROM.
If you intend to use the QL-SD with its own dedicated ROM you need to remove both original QL
ROMs (IC33, IC34), in case you want to retain your original ROM version, only remove one of
them.
QL-SD User Manual
Document Version 1.01 / 12.1.2014
7
Once the ROM is removed, the QL-SD goes into one of the now empty ROM sockets of the QL.
Make sure you align the pins properly and carefully insert the QL-SD into the ROM socket (the
connector to the daughterboard facing to the front of the QL), pressing firmly down once you have
made sure everything goes where it should.
If you have removed only one ROM, that one goes now into the socket on top of the QL-SD. Make
sure the small IC notch faces to the back of the QL. Put the ROM into the inner rows of connectors
on the QL-SD and push it back in, cautiously watching you do not bend the pins and all of them are
properly inserted in the socket.
Inserting the QL-SD EPROM is a bit more tricky, but is already done for you by your supplier: As
the EPROM has much more capacity than the original ROMs, it needs to be inserted a bit
differently: Some pins of the EPROM need to be bent outward a bit and do not go into the inner row
of connectors, but instead into the outer row on the QL-SD socket. If your QL-SD did not come with
the EPROM already inserted, use a pair of fine pliers to slightly bend the respective pins outward,
with a short break inwards at the bottom, so that the pin can be inserted vertically in the outer row
of socket connectors.
Make sure the EPROM is inserted with its notch facing to the back of the QL and all pins are
settled in their respective connectors properly.
3.4. Installing the QL-SD SDHC Daughter Board
The second board holds a socket into which the SDHC card is inserted. This board can be
mounted instead of a microdrive unit, allowing to insert and remove the card just like a Microdrive
cartridge.
For this, you need to remove one microdrive, we recommend mdv2_, the rightmost one.
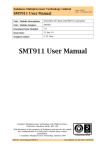
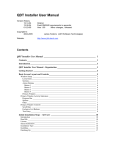
3.4.1. Microdrive Removal
In order to remove the microdrive (which one doesn't actually matter – We recommend to install
QL-SD into the right MD slot.1, that is the most convenient place requiring the least modifications)
It makes life easier if you first remove the large heat sink on the right of the QL, just behind the
microdrives. It is just a single screw in the
centre of the heat sink and some washers and,
once removed, makes access to the microdrive
connectors on the QL main board much easier.
Temporarily remove that heat sink, unplug the
Microdrive cable from the main board, then reinstall the heat sink.
The picture marks the Microdrive screws that
need to be removed. Leave the other screws in
place! You can now lift the Microdrive from the
case and store it in a safe place. You hopefully
won’t ever need it again...
You can, instead of mdv2_, alternatively remove mdv1_ and replace it with QL-SD. Note you will
have to insert a bridge between the COMMS_IN and COMMS_OUT connector of mdv1_ if you
want mdv2_ to be operative after removal of #1 - mdv2_ will the operate as mdv1_. You will have to
insert a bridge for the same signals on the mdv2_ connector if you still want the external microdrive
connector to be operative after the removal of mdv2. Genaerally: If you remove one drive in the
continuous chain of drives, you need to insert that bridge at the removed drive’s position to keep
the drives later in the chain operative.
1
QL-SD User Manual
Document Version 1.01 / 12.1.2014
8
3.4.2. Daughterboard Installation
The QL-SD daughterboard goes into exactly the same place as the Microdrive and is mounted with
the same screws. Once installed, check with the top case on whether the daughterboard fits
correctly. You want the top side of the daughterboard exactly flush or a little bit above with the
casing slot. Depending on the PCB material used, the daughterboard might sit slightly deeper than
the microdrive slot in the casing. Should that be the case, you should shim the daughterboard with
thin (plastic!) washers in order to lift it a small amount. If the daughterboard sits too deep in the
case you might have problems inserting and removing SDHC cards later or you might even
damage the SDHC card slot.
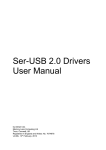
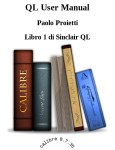
Now you should connect the two boards with the supplied ribbon cable. When you put the cable in
place, simply make sure it doesn't interfere with Microdrive #1 it would be passing by in the
recommended set-up. The cable should pass mdv1_ on its rear and use the same path mdv1's
cable takes.
This is how the installed QL-SD should look like2:
3.5. Reassembly
Bad manuals would now state „Assembly follows the exact steps as disassembly but in the
opposite order“ - And we do exactly the same.
Re-Insert the top case LED connections, the keyboard connector strips, and place the top cover on
the bottom cover. Make sure you didn't forget any screws or washers inside the case - They might
do severe damage when you switch on the QL. Also thoroughly check that you have fitted all
circuits the correct way round before applying power to the QL – QL ICs (at least the socketed
ones) all have their notches facing towards the back of the QL.
Leave the casing screws for the moment, you first want to verify everything works as intended.
Power on your QL (do not insert the SD card yet) and make sure it boots up properly – Also check
that all the keys are working. Once you have verified this, you can put the screws back in place.
Hardware cracks with some experience in soldering might want to remove the QL-SD drive LED from the
daughterboard and instead connect the original QL microdrive LED in the case with two short pieces of wire
and a connector. This is perfectly possible and will retain a bit more of the „original“ QL style. Make sure you
get the polarity right!
2
QL-SD User Manual
Document Version 1.01 / 12.1.2014
9
If you use the QL-SD driver in the EPROM, you should see the driver initialisation message on
your trusty F1/F2 selection screen:
SD-Card Driver v0.07.078
Press any key in 1.5s to abort load
Congratulations! You have just successfully installed QL-SD in your computer.
Remark: It is absolutely not mandatory to fit the QL-SD daughterboard into a Microdrive slot of the
QL – We just think it is the most convenient solution, given the declining usability of Microdrives
these days. If you want to retain the second Microdrive at all cost – Feel free to find another space
in the QL casing that can take the daughterboard without interfering with other components. Some
space near the ROM slot might as well suffice, simply make sure the daughterboard is fixed firmly
in place and does not have any electrical contact with any other QL component.
4. First steps with QL-SD
In order to operate QL-SD properly, you (obviously) need an SD card. QL-SD will only work with
SDHC card media (typically cards with a capacity of 4 GB or higher, although only a fraction of this
size is actually used with the QL), cards made according to older standards like „MMC“ or „SD“
only, will not work.
QL-SD normally uses the SD card in a way that most QL emulators do: The QL file system resides
in a large file on a DOS-formatted disk. The driver that came with the EPROM on your QL-SD is
also configured to use this mode as default.
When starting up, the driver consults the card for a file named QL_BDI.BIN and assumes it holds
the QL file system. This file needs to have a special format, otherwise the driver will refuse to load
it. Your QL-SD comes with an SD-Card that already holds a number of standard size file systems
you can (and should) use to get you going. Just pick the one you think that fits you (and your QL)
and rename it (on your PC) to QL_BDI.BIN. You can create your own QL_BDI.BIN files using the
tool MakeImage.exe. This is covered later in this manual.
4.1. Selecting the File System Image to Use
Memory Considerations for QL-SD Image Files
Any block device on the QL needs memory for various purposes, and so does the QL-SD. Memory
is used for slave blocks (temporary buffers that hold data while it is being shoved in and out to the
SD card) or drive maps (maps that hold information where on the SD-card which piece of the
respective file can be found). In a nutshell, the actual amount of memory needed mainly depends
on the chosen file system image size - The larger it is, the more memory is needed for buffers and
the map.
If you are tight on memory (maybe you only have 256kb memory extension), do not be tempted to
choose a File system too large - You may end up with an unusable system because all your
precious memory might be used up by the QL-SD driver for copies of the drive map and buffers. A
recommended sensible setup for a QL with with at least 256kB expanded memory would be a file
system size of 64MB, if you have 640kB memory, you could go for 128MB image size.
Miracle x-Card owners should be able to easily use even larger File system sizes, although this has
not been extensively tested by the time of writing.
Be aware the larger the buffer area needs to be, the longer the QL will need to search through it.
Very large file systems can severely slow down your QL.
The most extreme case is with an unexpanded QL: Originally, we thought it wouldn’t even work
with QL-SD - But a file system size of 3 MB seems to be the optimum working setup leaving just
about enough free memory to be able to do at least some sensible work with it - Maybe it’s about
QL-SD User Manual
Document Version 1.01 / 12.1.2014
10
time you consider expanding your QL’s memory?
If you are in doubt, choose a 64MB image (if you have an expanded QL) to start with. See how this
works out with your particular QL for a while and decide then.
4.1.1. Unexpanded QL
For an unexpanded QL, the choice of file systems is rather limited: There is exactly one that you
can sensibly use. This file system gives you 3MB of space to work with, on a typical unexpanded
QL with no other tools loaded, you are left with about 60kB of free memory after mounting that
image. This might be a severe limitation depending on thow you use your QL. Generally, it is not
recommended to use QL-SD on unexpanded QLs.
4.1.2. QL with 256kB Memory Expansion
For QLs with a memory expansion up to 256 kB, a sensible file system size would be either 32MB
or 64MB. This leaves you with enough elbow room to work with on the QL, while on the other hand
you have plenty of space on the SD card (Remember: The Miracle Hard disk came with 40 MB...)
4.1.3. Fully Expanded QLs, Gold Card and SuperGold Card Users
Note GoldCard and SuperGoldCard systems are at the moment not recommended for usage with
QL-SD.
Memory should not be so much an issue here - But remember, the larger you make your file
system, the slower disk handling is going to be. Depending on your storage space requirements,
128MB to 256MB seem reasonable.
In any case, it is thoroughly recommended to start with the 64MB file system image and explore
your actual requirements before building your system.
4.2. Installing the File System
This is probably the easiest step. Insert the SD card into your PC’s card slot and rename the
selected file system to „QL_BDI.BIN“ and you’re done. If you are starting with a freshly purchased
card, simply copy one of the images from the backup (you did make one, did you?) to the card and
name it „QL_BDI.BIN“. If you are using a “new” card, make sure no other files are on it before. If
the card saw other uses before, consider to format it. QL-SD assumes the file system to be a
contiguous file of data blocks - If the card was in use before or there are other files on the card, the
PC might scatter the QL_BDI.BIN file all around the card - This will not work in the QL!
4.3. Starting Up the First Time
Now comes the moment of truth: Insert the prepared SD Card (You are working with a back-up, do
you?) into QL-SD’s SD slot and power up (or reset) your computer. You should be seeing the QLSD driver’s sign-on message followed by a number of further progress messages and finally „OK“.
QL-SD should now be ready - The device name used by QL-SD is normally sdc1_. Simply try a
dir sdc1_
This should give you a directory of the QL-SD file system (note you will not see the same files as
when you do a directory of the card in your PC - QL-SD does not operate directly on the SD card,
but instead in a file system image within the QL_BDI.BIN file.)
Any file system command will work as usual, you simply use the sdc1_ device name instead of the
QL-SD User Manual
Document Version 1.01 / 12.1.2014
11
flp1_ or mdv1_ you have been using up to now.
4.4. Changing SD Cards
Keeping in mind that QL-SD has been designed as special type of „hard disk“ for your QL and is
also handled that way by the operating system, you might wonder whether you can change SD
Cards during operation. The simple answer for the casual QL user is: Don’t do it. Computers aren’t
made to have their hard disks changed while running. You might want to power down your QL
before changing cards if you are unsure.
The more complicated (but more dangerous) answer is: You can very well change SD cards while
the QL is running, provided you make sure you will always adhere to the following procedure.
Note that if you fail to use this mandatory procedure for changing SD cards on the fly, you
will sooner or later loose data. Maybe single files, maybe the complete QL file system, or
even the whole card contents.
You have been warned.
Before removing an SD card during operation, always make sure you use the new S*BASIC
command
UMOUNT 1
This tells the QL that its card is about to be removed. The driver will walk through all its
temporary buffers and write them to the card, making sure everything that still needs to be
written actually is. As an additional activity, it will update the sector map and write that as
well.
Once the UMOUNT command returns and the drive LED is off, you can safely remove the
card.
After inserting a new card (properly formatted and with a proper BDI image on it), issue the
S*BASIC command
MOUNT 1
This command tells the driver to inspect the newly inserted card for a proper FAT32 file
system and a proper BDI image, read the disk map from there and collect the root directory.
The new card is now usable.
Although there is quite a bit of protection built into the driver against destroying the image when
cards that are still mounted are removed (like frequently updating the disk map and trying to keep
the unwritten data in slave blocks at a minimum) there is still a very high chance to loose data.
Unmounting a partition that has not been mounted will not hurt, so make sure you do it.
If you are an expert user and for some reason work with several partitions on the card: Make
absolutely sure all of them are un-mounted before card removal. It is pretty easy to forget one and
destroy it.
4.5. Switching Off
As we have now discussed in length what might happen to your data if you inadvertantly remove
the SD card without the driver noticing, you might wonder what might be the right procedure to
switch off your QL and end your QDOS session.
Actually, there is not much to notice here, except: The driver waits about one second to write the
map on the SD card after your last write access to the card. (The driver waits whether there are
more write accesses to come because it does not want to constantly update the map on the card
QL-SD User Manual
Document Version 1.01 / 12.1.2014
12
and thus wear the card’s Flash memory more than necessary). You might have noticed, that after
about one second after the last write access the drive LED is switched on for a short period of time.
Do not switch off the QL before this has completed! Failing to do so will most probably result in
loss of the last writes or worse. If you want to do something extra for your data safety, you can
issue a UMOUNT 1 command and then remove the card before actually switching off.
5. Data Exchange with your PC
Nowadays, when most of the software for your QL comes from the Internet, you might probably be
wondering how you can transfer files from your Internet-connected PC to your QL. For a „normal“
PC without additional software, it is not possible to access the contents of a QL_BDI.BIN file and
thus read and write files in the QL file system contained therein.
5.1. Transfer Using Disk Drives
The least complicated way would be: Use floppy disks, if you have. QL software is typically that
small that a lot of software can be pushed onto a single (even DD) floppy disk. You can also
transfer zip files in compressed form, and you get even more software onto the disk. If you have
owned that disk drive for a while, you might already know how to best transfer from a DOS- or
Windows-based computer to a QL disk (There are some programs out there that facilitate FAT- to
QL disk transfers. Search your favourite QL software archive)
5.2. Transfer Using a BDI Driver
Disk drives and disk interfaces are becoming a scarce resource nowadays and are heavily sought
after - If you watch the prices for used devices on popular auction platforms, they are often even
higher than what the equipment used to cost new decades ago. So there must be an alternative to
using disks - and there is:
Some QL Emulators for PCs might have a BDI driver that is able to access the contents of your QL
disk images. By the time of writing this document, there are preliminary versions of such drivers
available for Q-Emulator and uqlx. Other drivers might become developed for other QL Emulators.
Please refer to the documentation that came with the BDI driver for your Emulator on how to
transfer files between the systems.
6. QL-SD Usage Recommendations
For a lot of users that are used to be using only floppy disks (or even microdrives), the huge capacity of storage that you can have with QL-SD might be some sort of „Culture Clash“. This chapter
gives some general recommendations on how to adapt your organisation of data and ways of working with this huge amount of storage. While we are trying to give some hints, this is obviously not
the place to explain all of the possible QL mass storage extensions.
TK2 is a must for every advanced QL user, so should be the first extension loaded from the SDHC
card, if not included from ROM (Through another extension like, for example, a Miracle
TrumpCard).3
If you have a disk version of TK2, load TKII like that:
base=RESPR(16384):LBYTES SDC1_TK2_EXT,base:CALL base
3
If that does not work (i.e, crashes your QL), it is because you might have a ROM binary which has
a header that needs to be skipped. Try this:
base=RESPR(16384):LBYTES SDC1_TK2_EXT,base:CALL base+PEEK_W(base+6)
QL-SD User Manual
Document Version 1.01 / 12.1.2014
13
6.1. No more Reboots
From now on, the days of „Insert Disk and re-boot“ will probably be gone for you. You can go on
working like that, but you will be losing a lot of potential of your new set-up. Instead, invest a bit of
time to develop a proper BOOT program that sets you up for rather longer sessions. There are a
number of good examples for such BOOT files around - Check your favourite QL software
repository or discuss the issue in one of the QL fora.
6.2. Make Directories your Friends
Large disk space will become largely unmanageable if you don’t organise your files into directories
(It is not the slightest bit of fun to „CTRL-F5“ yourself through screens and screens of file names
because you decided to put everything into the root directory). As QL-SD comes with a fullyfledged Level 2 device driver, you can use „real“ directories provided you are using at least TK2
(Which normally comes with the QL-SD ROM in one of the Images).
6.2.1. Organise your Disk Space
We would recommend a basic structure that employs a „sys_“ directory that is going to hold
everything that you want loaded at BOOT time using LRESPR. This makes maintenance of file
locations, versions and updates much easier. Another one would be a „progs_“ directory that would
hold all frequently used executable programs that do not expect a specific subdirectory structure
and do not store a lot of support files in their program directory (we just got rid of the mess in the
root directory - you do not want to have it here instead).
Executables that do not fall into this category (Psion Exchange or C68 might be examples) should
go into a directory of their own. Obviously, you would then have to remember where you have put
that program before you would be able to start it - This is where the pth_, dev_ and sub device drivers (see next paragraph) come into play.
Note how the example picked pretty short names for the directory names - Make sure you don’t
choose too long path names for the first level directories - A QL path name is restricted to 36 bytes
of length (not including the „sdc1_“ device name), no reason to waste a single character.
6.2.2. Create a WORK_ directory
With a large disk like QL-SD, it is very easy to end up with a completely cluttered root directory
after some time of work - Make sure that when you start a new project (programming, word
processing, whatever...), you create a new directory under sdc1_work_ and put everything that
belongs to that project into that directory. You want your root directory clean and tidy without having
to search a long time for a file you created last week.
6.2.3. The MAKE_DIR Command
MAKE_DIR is a command that comes with QL Toolkit 2. MAKE_DIR creates a „real“ Level 2
directory on QL-SD (or other Level 2 storage devices). Level 2 directories are special files in the file
system that hold the names of all further files contained in this directory. You can easily distinguish
Level 2 directories from normal files - They are marked with a “->“ following the directory name
when you issue a „DIR“ command on the drive. MAKE_DIR takes one string argument - the full
name of the directory to be created. MAKE_DIR takes account of the TK2 data defaults.
Level 2 directories should be created before the actual files that go into them are copied to the
directory - So, if you have a number of files like
QL-SD User Manual
Document Version 1.01 / 12.1.2014
14
sdc1_work_file_asm
sdc1_work_file_rel
sdc1_work_another_file
You might want to first create the directory sdc1_work (By issuing the command „MAKE_DIR
sdc1_work“) before you actually copy the files there. Doing it the other way round will work just as
well - and move already existing files with matching names into the new directory, but might waste
disk space.
Level 2 directories can be deleted just like normal files using the DELETE command, but only if
they no longer contain any files - You must first make sure a directory is empty before you can
actually delete it.
If you don’t have a proper MAKE_DIR command, the images on the supplied SDHC card have a
binary that implements MAKE_DIR and can be loaded into any QL.
6.2.4. Use DUP, DDOWN, DATA_USE and PROG_USE
When you only have been working with floppy disks or Microdrives up to now, you probably didn’t
have much use for the above TKII commands - Now you have. Make yourself familiar with those
commands and do use them.
In case you decide to use the pth_-Extension, you probably want to leave the Program Default
Directory (set with PROG_USE) left untouched and constantly set to pth1_. Just add every new
directory that is going to hold a specific program you regularly use to that path. Make sure pth_
items are sorted by usage frequency - The earlier a directory comes in there, the faster it will be
found.
6.2.5. Use a File Manager
When trying to manage a lot of files in complex directory structures, file management programs can
really help a lot. Q-Trans would be worth a recommendation.
6.3. Important Software for Large Disk Users
Make yourself familiar with at least the pth_ and sub_ device driver extensions (if you find one that
actually works, the dev_ pseudo device would also be thoroughly recommended). Instead of
searching the lost file yourself, the computer can do it for you. pth_ is useful for having the
computer find the files you want to execute spread across a number of directories, dev_ and sub_
are particularly useful for programs that assume they can put or find all their files in the root
directory or just cannot work in subdirectories (like the Psion Four).
Most of the essential drivers have already been collected for you on the example BDI images on
your SD card. The associated manuals should be in there as well.
The following is just a list of files you should at least have a look at, most are really worth installing
them (some of them are still commercial programs, but most are in the Public Domain):
Toolkit 2 - Absolutely essential
pth_ device driver
sub_ device driver
dev_ device driver (Note: Needs THING extension from HOTKEY system II - And by the time of
writing, we could not find a version that properly worked outside of SMSQ/E)
QL-SD User Manual
Document Version 1.01 / 12.1.2014
15
QPAC2 (commercial, needs Pointer Environment)
Q-Trans (Part of Launchpad, but freeware - Note needs sdc_use win or a patch to work with
QL-SD
Launchpad (commercial)
Pointer Environment
FiFi (Jochen Merz, commercial) - A fast file finder that helps you locate files by content or
name.
This is about all you need to know to be able to work with your QL-SD as a Hard Disk replacement.
The rest of this manual can actually be skipped in case you are content with mass storage you
have now ;) Most of the S*Basic commands that come with the driver will only be needed for
troubleshooting
QL-SD User Manual
Document Version 1.01 / 12.1.2014
16
7. Preparing the SDHC Card
The card needs to be freshly formatted FAT32 (A card that has been in use for a while might
possibly only be able to store the image file fragmented). In order to prepare your card for QL-SD
operation, you should have access to a PC with an SDHC-capable card adaptor (most of these
nowadays are).
QL-SD has two ways to store your data: The „native“ way of storing data on the card - that is the
one we do not recommend and you should only use this method if you
1. know what you are doing
2. know why you are doing it that way.
We can pretty much imagine (1) might be the case, but not (2) - There are actually only very few
very obscure reasons why you would want to use the cards in native mode. Data exchange with a
PC or other „modern-day hardware“ will not be possible in this mode. This manual concentrates on
the usage of QL-SD in image mode for the moment only.
The actually recommended method is to use the card in a mode that most QL emulators do: The
QL file system resides in a large file on a DOS-formatted disk. The driver that came with the
EPROM on your QL-SD is also configured to use this mode as default.
In case you don’t know how to format an SD card on your computer, refer to the text box below.
NOTE: Formatting a card will wipe all data from it!
Formatting an SD Card (Original borrowed from eLinux.org)
Windows
Download and install the SD Association's Formatting tool from
https://www.sdcard.org/downloads/formatter_4/eula_windows/
Open the Application you have just installed
Set "FORMAT SIZE ADJUSTMENT" to ON in the Options menu.
Make sure you have selected the Drive your SD Card is inserted in
Click "Format"
Mac
Download and install the SD Association's Formatting tools from
https://www.sdcard.org/downloads/formatter_4/eula_mac/
Select "Overwrite format"
Make sure you have selected your SD Card, and not something else
Click "Format"
Linux
Use gparted (or the command-line version parted if you prefer), if you don't
have it, install it as you usually would.
Format the entire disk as FAT32 (FAT16 will not work! Make sure you select
the correct disk!)
7.1. Preparing the QL File System Image
The step above has prepared the SD card for use with a PC - You want it to be usable with the QL,
QL-SD User Manual
Document Version 1.01 / 12.1.2014
17
however. So the next step is to create the DOS-File that will actually hold the QL file system. As
mentioned above, QL-SD comes with a number of pre-created file system images of various sizes If you can’t find one that suits your specific needs, you can create your own images: A QL image
file can easily be created on a PC using the tool MakeImage.exe tool that should have come with
your QL-SD or downloaded from a QL software repository on the internet.
IMPORTANT NOTE:
To keep the driver lean (to fit into the available ROM space) and fast, there is no full
implementation of a VFAT32 file system in there. For this reason, the driver will only work if
the QL_BDI.BIN image file is located in contiguous sectors on the VFAT32 SD card
partition.
This is most easily achieved by copying the image on a freshly formatted SD card, or at least
on a card that has not had files deleted from it since the last format. Deletion of files will
create small areas of free space that a ‘normal’ VFAT32 driver would collate into larger
space, re-use and allocate to files - That files are called ‘fragmented’ afterwards, because
the sectors belonging to them are not in contiguous space, but instead inter-mixed with other
files’ sectors.
The QL-SD driver is not able to handle fragmented image files. It is not even detecting
this situation, but will instead happily overwrite areas of the SD card that do not belong to the
image file - And thus might destroy other (PC-related) data on the card.
There are even tools in the PC world to de-fragment a disk (i.e. collate all files into
contiguous space on the disk) - While those tools are available and some of them would
even do the job - It is probably not worth the effort - As a general rule: If you want to put a
QL_BDI.BIN image on an SD card, simply format it first.
Start the tool, press the “New Image” Icon and select a location for the image. You then need to
decide on File system size and Group size (explained below). Press “OK” and you are done. This
new image should be stored on your freshly FAT32 formatted SDHC card under the filename
QL_BDI.BIN. („BDI“ stands for the term „Block Device Image“ and is also used in the context of a
more general interface for QL file system access from within an emulator.)
The image file must reside in the SD-Card’s root directory. It must not be resized, renamed or
otherwise tampered with other than from the QL or a QL Emulator equipped with a proper BDI
driver. The FAT32 system may contain further files, but caution must be taken so the native QL file
system image is not harmed.
MakeImage.exe needs 4 parameters in order to create the QL disk image for you:
1. Image Filename: This is the DOS-Name of the image created - It will be shown when you
display a directory of the SD Card from the PC. The name should have the drive and root
directory designation in front of it - Make sure you choose the correct drive (the SD Card) when
you use MakeImage.exe. For the name itself, there is not much of a choice: Current versions of
the QL-SD driver will only pick up image files named “QL_BDI.BIN”.
2. QL Medium Name: Choose the name of the medium that you want the QL to display when
you request a directory listing - Otherwise the name is of no further relevance.
3. File System Size in MB (Megabytes): Choose your file system size, but make sure you read
and understand the “Memory Considerations” text box below beforehand. If in doubt, enter “64”
- This will give you 64 MB of disk space. Plenty of space for a QL
4. Group Size: This is the size of a disk allocation cluster - Explained in the text box “Memory
Considerations”. If in doubt, enter “8”. (Note that by the time of writing this document, group
sizes larger than 16 have not been extensively tested. Group size 64 is known to not work with
the current driver settings)
QL-SD User Manual
Document Version 1.01 / 12.1.2014
18
The “MakeImage.exe” program will not warn you if you specify Group/Filesystem sizes your QL is
not fit for (How should it know how much memory you have?) - Most probably the QL will simply
crash when trying to mount that card for the first time and memory gets tight.
Very large group sizes might look desirable at first because you would be able to use more disk
space - But beware: They could even slow down read and write operations - The operating system
can only read and write complete groups, so your QL might end up in a situation where writing a
small file will actually have to transfer much more bytes than just the file size to the card
(Remember: The recommended group size of 8 means that the driver will read and write chunks of
at least 4kb - A group size of 64 will use a minimal allocation size of 32kb!).
A simple rule of thumb might be: Simply use a Group Size of 8 for everything smaller than 128MB,
16 for everything bigger than 256MB, 32 for 512MB and up, should you really need it. Really large
images (what would they be good for?) should use a Group Size of 64. By the time this document
is written, there is really no stable opinion on this from the beta testers. It is, however, known that
Group sizes above 32 will not work with the current driver.
Note that if you choose a group size too small for the image size, MakeImage will adapt it to the
minimum figure for that image size.
Unfortunately, for the moment we have no native support for creating BDI QDOS images other than
on MS Windows, but:
Linux Users please note: MakeImage.exe will happily run on Wine.
MacOS X Users please note: MakeImage.exe will happily run on Mac Parallels
Memory Considerations when creating an Image File
Any block device on the QL needs memory for various purposes, and so does the QLSD. Memory is used for slave blocks (temporary buffers that hold data while it is being
shoved out to the SD card) or drive maps (maps that hold information where on the SDcard which piece of the respective file can be found).
The actual amount of memory needed depends on two parameters that need to be
given when the BDI file is created: File system Size and Group Size. File system size
sounds easy - It simply specifies the amount of storage space you want in your image
file - But it has some hidden implications: The larger you specify the File system size,
the larger your disk map is going to grow - The more QL memory will be used by the
driver for buffering the map. On an expanded QL, this should not be a problem unless
you specify a ridiculously large file system - On an unexpanded box, it is - A large one.
Group size is the size (in 512-byte-sized sectors) of an allocation block on disk. The
smaller you make the group size for the same size of disk, the larger your map grows,
as there are more groups to keep track of. The larger you make it, the larger your slave
blocks grow (Groups are slaved together).
QL-SD User Manual
Document Version 1.01 / 12.1.2014
19
If you are tight on memory (maybe you only have 256kb memory extension), do not be
tempted to make your File system too large - You may end up with an unusable system
because all your precious memory might be used up by the QL-SD driver. A
recommended sensible setup for a QL with expanded memory would be a file system
size of 64MB with a group size of 8. Miracle x-Card owners can easily go for larger File
system sizes.
The most extreme case is with an unexpanded QL: Originally, we thought it wouldn’t
even work with QL-SD - But a Group Size of 8 and a file system size of 3 MB seems to
be the optimum working setup - Maybe it’s about time you consider expanding your
QL’s memory?
8. QL-SD Driver S*BASIC Procedures and Functions
The QL-SD driver (EDDE 2 core) installs the following new procedures and functions into
S*BASIC:
· SDC_START
· MOUNT
· UMOUNT
· SDC_USE
· SDC_BASE()
· SDC_VER$()
8.1. SDC_START
Activates the QL-SD driver, in case activating it during the ROM initialisation sequence has been
aborted by a key press. If you simply boot your QL without pressing a key, you will hardly ever
need this command. The ROM will then activate the driver and mount the card in the drive.
SDC_START takes an optional single Long Word parameter containing a bit field of flags and
configuration settings, one of which is bit 6 (F_NATIVE_FS) which, if set, forces the driver to look
for a native QDOS file system instead of a FAT32 image (We already told you we do not
recommend to use this mode, did we?).
SDC_START also allows you to pass the starting LBA of an image file on the FAT32 card, and the
number of buffers to use, but this is for non-standard configurations and not further explained here..
Example:
SDC_START
Note that in current versions of the driver, repeated use of SDC_START when it is not necessary,
might waste QL memory by allocating unnecessary duplicated space for the disk map and sector
buffers. So don’t do it.
Note: SDC_START is only available (and needed) in the ROM version of the driver. The RAM-based
driver will execute an SDC_START functional look-alike automatically once it is loaded and CALLed.
QL-SD User Manual
Document Version 1.01 / 12.1.2014
20
8.2. MOUNT Number {, Drive, Partition}
Mount the specified physical drive and partition as the SDC device with the given number. The
short form of the command mounts logical drive 1 from partition 1 on the physical drive with the
same number. This short form is probably all you will ever need to know about this command.
Before a storage device can be used it has to be mounted as a QL drive. There are eight drive
numbers associated with the QL-SD driver: SDC1 to SDC8. Any partition on any physical drive that
the QL-SD recognises can be mounted as any one of those drive numbers.
On startup of both the RAM- and the ROM-based version of the driver, the first partition of the first
SDHC drive (most probably the only one) is MOUNTed automatically if the driver is left at its initiel
configuration - So there is no need to do this manually.
Please refer to the paragraph on SD card changes for guidance on how to use this command
properly.
Examples:
MOUNT 1,1,1
Mount partition 1 on drive 1 as SDC1.
MOUNT 1
Mount partition 1 on drive 1 as SDC1. If the driver is configured to use BDI images, it will mount
QL_BDI.BIN. (Note With the current driver, BDI images can only be mounted from the first primary
partition of the card)
8.3. UMOUNT Number
Unmount the specified SDC device.
This removes the mapping from the physical storage device to the QDOS drive number, allowing
the drive number to be re-used by attaching it to a different physical drive/partition. Will also make
sure that all the data that might still reside in slave blocks is truly copied to the disk.
After this command has been issued, the card can be safely removed from the drive. It will not be
accessible before the next MOUNT command has been successfully executed.
Please refer to the paragraph on SD card changes for guidance on how to use this command
properly.
Example:
UMOUNT 1
Un-mount SDC1.
8.4. SDC_USE Name$
Change the device name of the driver. It is possible to rename the QL-SD driver to something else.
This can, for example, be useful for compatibility with older programs that cannot recognise
devices other than those installed on the basic QL. You can use any three characters. These must
be upper case, and the fourth character must always be a zero.
QL-SD User Manual
Document Version 1.01 / 12.1.2014
21
Example:
SDC_USE "MDV"
The QL-SD now pretends to be a Microdrive.
SDC_USE without a parameter resets the driver name to SDC.
SDC_USE "WIN" probably makes quite some sense and makes QL-SD pretend to be a real hard
disk..
8.5. SDC_BASE()
Return the address of the QL-SD driver’s variables. If this fails, it means that the QL-SD driver is
not installed. Other than checking whether the sdc device is available, this command is only useful
for debugging the driver.
8.6. SDC_VER$(Mode%)
Return QL-SD driver version information as a string.
If the optional parameter Mode% is omitted, or is zero, this function returns the full driver version
string (including core driver build number and status) as a string. Valid values for Mode% are:
1 : the four character hardware version string is returned.
2 : the four character hardware type string is returned (This will be "QRXB" for QL-SD).
3 : returns a four character string containing the compile-time options used when the driver was
built. The first character will always be a '2', signifying an EDDE 2 core, the remaining three
characters will either be a '-' or an alphanumeric option letter.
You wouldn’t normally need this command, except for reporting bugs with the driver (there are
none ;) )
9. QL-SD Hardware-Level Commands
The QL-SD driver supports some commands that control how communications with the SD card is
handled by the driver. Most of those commands will not be of much use for normal operations, but
some of them might make sense for tracing bugs and make specifically nasty pieces of hardware
work.
9.1. SPI_MODE Number
The QL-SD driver normally comes pre-configured with the best mode for fast and reliable
operations. If your hardware will absolutely not cope with this mode, you can „slow down“
communications to the SD card and try if this will work better for you.
SPI_MODE 0 Switches to the most basic SPI mode, “bit-banged SPI” - In this mode, the QL itsself
is directly transferring any single bit to and from the card without support from the
QL-SD hardware..
SPI_MODE 1 Switches to high-speed SPI mode, “fast background SPI”.
SPI_MODE 2 Switches to the medium speed mode, “slow background SPI”
QL-SD User Manual
Document Version 1.01 / 12.1.2014
22
10. Direct Sector Access
For compatibility with existing software that does direct sector I/O on hard disks, the QL-SD driver
supports this facility on native QDOS volumes.
To do this, open the special file "*D2D", as in:
OPEN #3,"SDC1_*D2D"
The driver also allows the shortened form:
OPEN #3,"SDC1_*D"
The channel so opened has the following limitations:
Data must be read or written in 512 byte blocks.
The file pointer is interpreted as a sector (LBA) number, relative to the start of the partition.
Only absolute file pointer movements are permitted.
It is not possible to read a sector beyond the end of the partition. Any attempt to do so will
return "End of File".
Note that no files can be open on the logical drive with which you wish to perform direct I/O.
11. QL-SD Driver
The QL-SD driver implements a Level 2 Directory Device Driver with subdirectories. The current
driver uses the „EDDE 2“ core, no longer the initial „QL-SD“ core. For more details, see the
Acknowledgements section. There are further „EDDE 2“ based drivers, e.g. for Ser-USB and QEmulator, which are compatible and work on the same image files.
Important: When working with the QL-SD driver a minimum of 256K expansion memory is
thoroughly recommended. You will be able to use QL-SD on an unexpanded QL, but
possible File system sizes are very limited.
Other versions of the QL-SD driver may also be used with QL clones and QL emulators.
11.1. Device Name
The name of the QL-SD device is normally sdc. If this causes problems on your system, or you
wish to change it for some other reason, you may alter the name of the device with the SDC_USE
command (changing it to win is probably a particularly good idea in order to be compatible with a
lot of software that was designed to use QL hard disks)
11.2. Buffers
The EDDE 2 driver core does not use the QDOS/SMS Slave Block system. Instead it allocates it's
own private slave blocks which are strictly limited to a configured maximum to avoid all available
RAM being taken up by them. You may use values between 0 and 2048, but the EDDE 2 core will
automatically scale back that value if it would take an excessive amount of RAM. A value of 0
causes the EDDE 2 core to allocate the most appropriate number for the amount of RAM in the
system - So better don’t even try and care.
QL-SD User Manual
Document Version 1.01 / 12.1.2014
23
11.3. Starting the Driver
The software comes in RAM or ROM versions. The ROM version starts when booting the machine.
The RAM version is started by loading the file sdcard_target_RAM_bin, where target must be
replaced by a string identifying the machine, for example qrx082 for the standard QL. It can be
loaded either with LBYTES followed by CALL or with the Toolkit II LRESPR command.
The ROM driver prints a message identifying itself to channel 0, for example:
SD-Card Driver v0.07.078
Press any key in 1.5s to abort load
At this point you have 1.5 seconds to press any key, which will keep the driver from loading. If you
hit a key in time, this message will be displayed:
Load driver with SDC_START command
The QL can then be booted as normal by pressing F1 or F2. If you then wish to load the QL-SD
driver at a later time, you must use the SDC_START command.
11.4. Formatting
The QL-SD / EDDE driver 2 can run in „native mode“ and „image mode“. Native mode allows to
format an SDHC card purely with the QL or compatible computer. However, this would restrict
usage of the card to the QL and not allow inter-operation with PCs and emulators. The default
EPROM which comes with QL-SD is configured for „image mode“.
To enforce native mode, the driver load must be aborted during the QL startup banner and done
manually with the SDC_START command. The FORMAT commands then allows to do a directly
physically format an SDHC card which has not been prepared. For example:
FORMAT "SDC1_#MySDHC"
Note: This should not be done, unless you are sure you do not wish to use the default „image
mode“. In the more versatile „image mode“, QL-SD can also access native file system image, but it
resides within a normal file of the usual FAT32 partition of an SDHC card. This is the recommended
way of using the device.
11.5. QL-SD Driver Configuration Items
The QL-SD driver provides a number of configuration items in order to be able to adapt it to specific
user or hardware environment requirements (Obviously, this makes only sense for the RAM-based
driver or for the ROM driver before it is actually burnt into EPROM). The configuration is done
using the QJump config or menuconfig programs. (QL-SD uses a level 1 config block)
The only item that could actually make some changes would be the „Buffers“ items that could be
used to adapt to very small memory sizes or, on the other end of the scale, to very large partitions.
The defaults are adjusted for partition sizes at or around 64MB.
QL-SD User Manual
Document Version 1.01 / 12.1.2014
24
Configuration Item Function
Default
SPI Mode 1
SPI mode that is used during initialisation
(initial mount) of the SD card
BITBN
= „Bit Bang“
FBGND
= „Fast Background“
SBGND
= „Slow Background“
BITBN = „Bit Bang“
SPI Mode 2
SPI mode that is used during normal
operation of QL-SD
BITBN
= „Bit Bang“
FBGND
= „Fast Background“
SBGND
= „Slow Background“
FBGND = „Fast Background“
Buffers
Number of Buffers (slave blocks of size
512) to allocate
0 - 2048
0 means „auto-allocate“ but is currently
untested
128
Note: Should correlate with
typically used partition sizes
Name
(Internal) Device name for QL-SD driver.
Any 3 Chars + „0“
SDC0
LBA0
LBA # for initial logical block of QL partition
to mount (if in „native“ mode) or „0“ for
image mode.(0-419304)
0
SDC1
Which physcal drive should be mounted as SD Card 1
initial drive (sdc1_) when working with
multiple drives. „None“ means: „Don’t mount
anything on startup“
SD Card 1-4, „None“
12. Some Technical Details
This chapter covers some of the inner workings of QL-SD for the technically interested. You don’t
actually need to read or even understand this chapter in order to operate QL-SD.
12.1. The Address Map
QL-SD uses a quite a bit of address space in the QL:
$FEE0 - $FFFF
QL-SD Hardware register space
$C000 - $FEDF
QL-SD on-board ROM (driver)
$0000 - $BFFF
Minerva 1.98 (Replacing original ROM)
Minerva replaces the original ROM which has to be removed, QL-SD itsself occupies the complete
address space originally reserved for the ROM slot for its driver software and hardware register
space.It is obvious from the above address map that QL-SD is not compatible with any other QL
extension that uses the 16k ROM slot addresses ($C000-$FFFF)
12.2. The Hardware
QL-SD’s hardware consists mainly of the Lattice Mach 4000 CPLD, a pretty modern (and fast - it
QL-SD User Manual
Document Version 1.01 / 12.1.2014
25
runs at 50 MHz) reprogrammable logic chip. The CPLD does the address decoding for the various
QL-SD hardware registers that it provides and for the QL-SD EPROM.
The CPLD provides background SPI (Serial Peripheral Interface - The standard used to access SD
cards) transfer to and from the SD card. In its normal mode, the CPLD acts as a serial-to-parallel
converter clocking the 8 bits of one byte directly in and out of the SD card without the need of
further intervention from the QL. (There is, however, SPI mode 0 which allows the QL to directly
access the data and clock lines of the SPI bus - Which is obviously much slower and normally only
used during driver startup)
As QL-SD lives in ROM space, there is actually no direct way for the QL 68008 CPU to write
access the QL-SD registers. A write of one single byte to QL-SD is thus initiated by a read acess to
a specific QL-SD register bank offset by the value of the byte to be written to QL-SD - The CPLD
translates this into a write into its internal data register.
13. Known Issues
13.1. Hardware
It is (at least at the moment) not recommended to use QL-SD with the SuperGoldCard.
Instabilities have occurred on some of such systems.
QL-SD together with the normal (especially older) Gold Cards might also work
unreliably. There have been reports of at least one Gold Card user (me, unfortunately) where
QL-SD would not work.
QL-SD will most probably not work with other hardware that uses I/O addresses in the range of
$c000 to $ffff (the ROM slot area) or copy-protected software that wants to see its ROM in this
area (The Eidersoft ICE and mICE suite of programs are known examples)
13.2. Driver
Partitions that require group sizes larger than 8 degrade performance and have caused
problems on some systems. Group sizes 64 and 128 were affected, but the exact
circumstances of these problems were not known at the time of writing. Please test large
partitions thoroughly on your system before using them for important data. Best stick to
partitions of 4 to 64 MB size.
There are a number of programs out there (especially older games) that were written assuming
the memory map of an unexpanded QL. Those programs load code onto fixed addresses
without using the proper QDOS mechanisms to actually claim that memory. They (“Cuthbert in
Space” is a known example) will happily overwrite crucial memory areas used (and properly
claimed) by the QL-SD driver and thus crash the QL.
13.3. Acknowledgements
Hardware and initial Firmware has been developed by Peter Graf.
The current QL-SD Driver, using the EDDE 2 core, was originally written by Adrian Ives, derived
from the QUBIDE hard disk driver by Andrew Reed & Phil Borman, and from the SDHC card driver
and FAT32 support written by Peter Graf.
The manual has been written by Tobias Fröschle and Peter Graf.
QL-SD User Manual
Document Version 1.01 / 12.1.2014
26
14. Copyright Notice & License
The QL-SD / EDDE 2 driver software is Copyright by Adrian Ives, Andrew Reed, Phil Borman and
Peter Graf. QL-SD/EDDE 2 is free software under the terms of the GNU General Public License as
published by the Free Software Foundation.
The source code for the driver can normally be obtained from the same place that holds this
manual.
No charge may be made for distributing copies of this manual or the software, other than
reasonable costs of duplication and postage.
15. Disclaimer
QL-SD / EDDE 2 is distributed in the hope that it will be useful, but WITHOUT ANY WARRANTY;
without even the implied warranty of MERCHANTABILITY or FITNESS FOR A PARTICULAR
PURPOSE. See the GNU General Public License for more details.
No responsibility is accepted for the loss of data or consequent damage of any kind resulting from
the use of this device.
QL-SD User Manual
Document Version 1.01 / 12.1.2014
27
And a last word....
By the time of writing this document, QL-SD is still in its test phase. Although we have done
our best to supply you with a thoroughly tested, working and secure system of software,
hardware and documentation, you still might suffer data loss, SD card corruption and other
catastrophic failure.
Please make sure you install and operate QL-SD with the best possible care and forethought
you can. Keep to the operating procedures described in this manual. If something is unclear Do come back to us, but please don’t expect professional level support. The team that
brought you QL-SD is a team of hobbyists that neither make any money from it nor have the
time to support you with fixing broken parts, damaged partitions and exploded file systems.
Before you care to bother us, thoroughly try yourself, or try and find someone around you
with a bit of QL experience who might be able to support you. QL-SD is intended as a
community project where people help each other to fix problems. The QL-Forum
(http://www.qlforum.co.uk/) or the QL Mailing lists might be a good place to start looking for
help.
This does not mean you’re left alone and on your own with any problems you might have Just make sure you support us as much as we support you. This might probably give us a bit
more hobby time to supply you with more exciting hardware and software developments
around the QL.
QL-SD User Manual
Document Version 1.01 / 12.1.2014
28