1
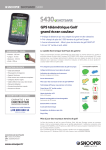
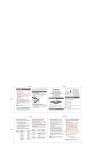
S320
User manual
S320
Contents
Page
Components 3
Quick Start Guide
4
Settings
6
Brightness
Volume
Language
Calibrate the screen
Power save
Information
Picture
Satellite Navigation & GPS Speed Trap locator
7
Troubleshooting 8
Snooper Accessories & Additional Software
10
Service under Warranty 11
Copyright
Copyright @2009 SNOOPER. All rights reserved.
Product specifications and features are for reference only and are subject to
change without prior notice.
Important Safety Information
• Please read this carefully before using S320.
• Do not open the cabinet of S320
• Always treat your product with care and keep it in a clean and dust-free place
• Do not expose S320 to moisture or humidity.
• Do not expose S320 to extreme high or low temperature.
• Do not attempt to disassemble your product.
• Use only the chargers and batteries approved by Performance Products
Limited.The use of any other type may invalidate any approval and warranty.
No reverse charging with other chargers, they may have inverse polarity.
• Never use the charger if the plug is damaged.
• Never touch the charger if your hands/ feet are wet.
• Do not expose the charger to water, it may cause electrical fires.
• Do not repair the charger yourself for your safety.
• To reduce the risk of fire or burns, do not disassemble crush or puncture the
battery.
• Do not let the metal contacts on the battery touch other metal object, it could
lead to short-circuit and damage the battery.
Declaration
This User Manual is published by SNOOPER without any warranty. Improvement
and changes to this User Manual necessitated by typographical errors,
inaccuracies of current information, or improvements to programs and/or
equipment, may be made by Performance Products Limited any time and
without notice. Such changes will, however, be incorporated into new editions of
this User Manual.
2
S320
Components Included
The following components come as standard with your Shotsaver S320:
1 x Snooper Shotsaver S320 system
1 x Quick Start Guide
1 x USB PC connection lead
1 x Download Software Disc, including the full user manual
PLEASE NOTE
Due to our desire to continually improve our products, the specification may change without notice.
Return to contents
UK • 3
S320
QUICK START GUIDE
Basic Operation and downloading golf courses
1.
Register Shotsaver FREE at www.snooperneo.co.uk
2.
Charge unit with charger provided until blue light on front button goes out.
3.
Power unit on by moving the switch on the left hand side up towards the green marker. Then
push and hold the switch on the right hand side of the unit in to the on position until the
Snooper launch screen appears.
4. Download the golf courses you require using the CD ROM provided. Put the CD in to your PC
and follow the on screen instructions. Once you have downloaded the golf courses you want
the unit is ready to use.
5.
Launch Shotsaver software by pressing the golf icon.
6. Start game.
Click here and a list of the golf courses you have downloaded will be displayed. Click on the
golf course you wish to play and then select the Tee colour. Select Play to start (Press Route if
you have sat nav software installed and want the unit to navigate you there) Next select the
hole you are starting from.
7. The hole selected will be displayed something like this. To refresh the distances displayed tap on the screen at any time.
Details of current hole
Distance to back
of the green
Distance to centre
of the green
Distance to front
of the green
Distance to
hazards
Scroll through
hazards
Main menu
Return
End hole
Battery & GPS
strength
Note: ensure that Shotsaver has GPS connectivity before you start or the distance information displayed will not be accurate.
Return to contents
UK • 4
8. Edit players.
Click here to add players names and handicap. This information must be added prior to starting play if you want Shotsaver to
save your score and calculate your Stableford points.
9. View club distances.
Click here to view any club distances previously recorded.
10. History.
View previous scores saved here.
11. Scoring.
To enter your score press Menu and then Scorecard. Then press here to enter all players scores(Show scorecard graphic and
indicate where to press to enter the score and where to press to change the players score displayed. Also indicate net score and
Stableford score) Press here to change players score.
Press here to view other
players scores
Stableford score
Press here to enter all
players scores
Net score
12. Record club distance.
Press Menu and then Record club distance. Select the club you want to record. Stand as near to your ball as possible and press
Start. Hit the ball and once you have walked up to it again, stand as close as possible to it and press End. The distance that the
ball was hit will automatically be displayed.
Return to contents
UK • 5
S320
Settings
To change the settings of your device press the Settings’ button in the main menu.
Brightness
To adjust the brightness of the display press the brightness button in the Menu. Use the + and - buttons to increase or decrease the
brightness of the screen. Press the X button to confirm and exit the setting.
Volume
To adjust the volume press the volume button in the menu. Use the + and - buttons to increase or decrease the volume. Press the X
button to confirm and exit the setting.
Language
To change the language press the language button in the menu and then the language you require. Press the X button to confirm
and exit the setting.
Calibrate the screen.
To re-calibrate the screen press the Calibrate button in the menu and then follow the on-screen instructions.
Power Save
This function allows you to programme the unit so that it will automatically shut down after a period of inactivity and to set the
backlight to switch off automatically after a certain period to save battery life.
Power down time
Use the + and - buttons to change the setting so that the unit will either always remain on ‘Always on’ or so that the unit will power
off automatically if no buttons are pressed after 10mins, 5mins, 3mins or 2mins
Backlight off time
Use the + and - buttons to either set the backlight to remain permanently on or to switch of automatically after either 1min,
30seconds, 20seconds or 10seconds to help preserve battery power.
Information
Press the information button for information on the software and hardware version of your device.
Picture
View pictures on SD card
To view pictures on this device first put the images you want to view on suitable micro SD card. Put the SD card in to the SD card slot
on the underside of the unit. Press the Picture icon and to view the pictures on the SD card tap SDMMC Card. The images you have
placed on the SD card will be shown in the Preview section. Scroll up or down using the arrows and tap the ‘thumbnail’ of the image
you want to view. Use the back and forwards arrows to scroll through your images. Tap the ‘X’ button to exit the Picture at any time.
Slide show
First select the speed of the slides to be viewed. You can select the images to be displayed for 1, 2, 3, 4, 5 or 10 seconds. Once you
have selected the time you require, press the play button and all your images will be displayed in rotation. To exit the slide show at
any time tap anywhere on the screen.
Return to contents
UK • 6
Satellite navigation & GPS speed trap locator
It is also possible to use your device as a satellite navigation and GPS speed trap locator. There are two sat nav packages available,
the Sapphire Plus S280 sat with either UK & Ireland mapping or Western Europe. Please visit www.snooper.eu for further details.
Sapphire Plus S280 sat nav comes preloaded on a micro SD card. To install the sat nav software simply take the micro SD card and
insert it in to the SD card slot on the bottom of the unit. To operate the sat nav function simply power the unit in the normal way and
press the Navi button in the main menu. The Sapphire Plus S280 sat nav software will automatically launch. For further information
on how to use this software refer to the operating instructions provided with it.
Return to contents
UK • 7
Troubleshooting Shotsaver
Downloads
If you are having difficulty performing a download to your Shotsaver you should consult the following checklist first before
contacting technical support. If you are still unable to perform a download after following this checklist then please contact our
Technical Helpline on 0870 787 0700 and select Option 3. There is also additional help available on the www.snooperneo.co.uk
website.
This guide is in two sections; the first section is a list of things to check before performing a download and the second
section consists of possible reasons and solutions to error messages encountered while trying to perform a download.
SECTION ONE
1. Have you registered your Shotsaver?
You will not be able to download the database unless the Shotsaver is registered. Please register online at
www.snooperneo.co.uk.
2. Is the USB computer cable supplied with the Shotsaver connected correctly?
Please check that the USB lead is plugged into the USB socket on the Shotsaver and is fully plugged in as far as possible. Check
the computer USB connection is secure.
3. Have you installed the USB drivers correctly for the USB cable?
After installing the USB driver from the Software Disc the computer requires rebooting. Once rebooted the Shotsaver needs to be
connected to the USB lead. The ‘Found New Hardware’ wizard will eventually launch and you need to select ‘Install the software
automatically (Recommended)’ and the wizard will complete the USB driver installation.
4. What operating system are you using on your computer?
The Snooper download software will only work on the following Windows 32 bit operating systems: Windows 2000, Windows XP
and Windows Vista THE SOFTWARE WILL NOT WORK ON WINDOWS 95/98, 98SE and Millennium. Apple Macintosh is not
supported. Windows XP and Vista 64bit systems are not supported.
To determine which operating system you have on your computer:
a) Right click on the ‘My Computer’ icon on your desktop and select ‘Properties’ from the drop down menu.
b) When the ‘System Properties’ dialogue box opens the ‘General’ tab is selected by default. Under the heading ‘System’ the
operating system is displayed.
c) If you do not have a ‘My Computer’ icon on your desktop (common in Windows XP) click on ‘Start’ and two columns will appear.
In the right hand column you will see the option of ‘My Computer’. Right click on this option as instructed in (a) above.
5. Have you installed the Snooper download software onto your computer?
If you have not installed the software you will not be able to perform a download to your Shotsaver. Once the software is installed
there will be a new icon on your desktop: ‘Shotsaver Updater’. Please check to see if you have the latest version of this software by
visiting www.snooperneo.co.uk and clicking on the link ‘Download software’.
6. Have you connected the computer to the internet?
The computer needs to be connected to the internet before you can begin to download the database to your Shotsaver. Please
make sure that your internet connection is established and that you have signed in to your broadband account (if required).
Return to contents
UK • 8
7. What version of Internet Explorer / Netscape Navigator are you using?
The software will only operate if you have Internet Explorer or Netscape Navigator 6 or above.
To check what version of Internet Explorer you have; open your browser, click on the ‘Help’ menu and select ‘About Internet
Explorer’. This should now display what version you currently have installed. If you have a version older than 6 (e.g. 5), open your
browser, click on ‘Tools’ and select ‘Windows Update’. This will take you to the Microsoft website where you can download the
latest version of internet explorer.
To check what version of Netscape Navigator you have: open the browser, click on the ‘Help’ menu and select ‘About Netscape
Navigator’.
SECTION TWO
This section is for supplying possible reasons and solutions to problems you may be experiencing whilst trying to download the
database to your Shotsaver. If after going through section one you are still experiencing difficulty or have received an error message
please read through the following:
ERROR MESSAGE – ‘Error 521 - There was a problem connecting to the Performance Products server’
If you get an error message similar to the one above this normally means there is something blocking communication between the
software, most typically a firewall, and our server. Windows XP and Vista are supplied with a firewall as standard.
If you have a Firewall on your computer the software may appear to hang and your Firewall software will inform you that the Updater
software is trying to access the internet. Please make sure that you grant/allow/permit /unblock access through the Firewall. Please
read the messages supplied by your Firewall software carefully before choosing your option. If you do not allow the program to
access the internet through the Firewall, the download process will fail.
If no message was prompted by the firewall software uninstall and then re-install the software and perform a download again.
Warning: We do not recommend disabling your firewall software in order to perform a download to your Shotsaver nor
can we advise how to alter the settings on third party software nor can we be held responsible for any action taken by
the computer user that makes the computer more vulnerable to viruses and computer hackers. Any changes made to
the computer firewall settings are at the user’s discretion. We would recommend contacting the third party software
manufacturer for information of how to configure the firewall software.
Other Problems
The unit cannot be switched on
Check that the unit has been charged.
The unit cannot acquire satellite connection
Check that the Shotsaver’s built in GPS antenna has a clear view of the sky above.
If this is the first time you have powered up your Shotsaver please remember that the first ‘cold’ start can take up to 30 minutes to
acquire sufficient satellite connection. The unit requires time to calibrate and you will find that with subsequent use that the time for
acquiring satellites will reduce. Eventually the unit should take approximately 90 seconds to acquire satellite connection.
Return to contents
UK • 9
Snooper Accessories & Additional Software
Golf Trolley bracket
only £24.99 inc vat
Mount your Shotsaver on this specially made golf trolley bracket. Fit’s most golf trolleys.
Sat Nav software
from only £64.99!
Shotsaver will navigate you perfectly round a golf course but with the addition of Snooper’s satellite navigation and speed camera
location software, your Shotsaver can also navigate you in your car as well! Mapping covering the UK & Ireland is available for only
£64.99 inc vat with the whole of Western Europe available for only £99.99 inc vat.
Visit www.snooper.eu for further details.
Return to contents
UK • 10
Service under Warranty
Your Shotsaver comes with a standard one year manufacturer’s warranty.
If, for some reason, your unit requires service under warranty return your Shotsaver, via special delivery (insured) and in suitable
packaging to:
The Returns Department
Performance Products Limited
Cleaver House
Sarus Court
Manor Park
Cheshire WA7 1UL
Enclose the following information:
(a) Your name, address and a full description of the problem.
(b) A telephone number where you can be reached during business hours.
(c) Your units’ serial number.
Disposal of Old Electrical & Electronic Equipment (applicable in the
European Union).
This symbol on a product or its packaging indicates that this product shall not be treated as household waste. It
should be handed over to an applicable collection point for the recycling of electrical equipment.
By ensuring that this product is disposed of correctly you will help/prevent potential negative impact on the
environment. The recycling of materials will help to conserve natural resources.
For further details about recycling please contact your local civic office or the shop where it was originally
purchased.
Return to contents
UK • 11