1
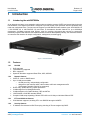
User Manual miniCMTS200a By Andrew Pico Digital Inc. www.picodigital.com Copyright © 2014 Pico Digital Inc. All rights reserved www.picodigital.com 24 July 2014 Release 1.5 subject to change CONTACT US 858.546.5050 User Manual miniCMTS200a Release 1.5 Page 1 of 29 Product Inspection Inspect the equipment for shipping damage. Should any damage be discovered, immediately file a claim with the carrier. Important Safety Instructions To ensure proper installation and operation, take a moment to read this guide before proceeding with the installation. If you have any questions or comments about the product, please contact your dealer or have him contact the Pico Digital service center at this phone number: 800-421-6511. The lightning flash with arrowhead symbol, within an equilateral triangle, is intended to alert the user to the presence of uninsulated “dangerous voltage” within the product’s enclosure that may be of sufficient magnitude to constitute a risk of electric shock to persons. 1. 2. 3. 4. 5. 6. 7. 8. 9. The exclamation point within an equilateral triangle is intended to alert the user to the presence of important operating and maintenance (servicing) instructions in the literature accompanying the appliance. WARNING: TO REDUCE THE RISK OF FIRE OR ELECTRIC SHOCK, DO NOT EXPOSE THIS APPLIANCE TO RAIN OR MOISTURE. DO NOT OPEN THE CABINET REFER SERVICING TO QUALIFIED PERSONNEL ONLY CAUTION: TO PREVENT ELECTRIC SHOCK, DO NOT USE THIS (POLARIZED) PLUG WITH AN EXTENSION CORD RECEPTACLE OR OTHER OUTLET UNLESS THE BLADES CAN BE FULLY INSERTED TO PREVENT BLADE EXPOSURE. ATTENCION: POUR PREVENIR LES CHOCS ELECTRIQUES, NE PAS UTILISER CETTE FICHE POLARISEE AVEC UN PROLONGATEUR, UNE PRISE DE COURANT OU UNE AUTRE SORTIE DE COURANT, SAUF SI LES LAMES PEUVENT ETRE INSEREES A FOND SANS EN LAISSER AUCUNE PARTIE A DECOUVERT Read Instructions: All safety and operating instructions should be read before the appliance is operated. Retain Instructions: The safety and operating instructions should be retained for future reference. Heed Warnings: All warnings on the appliance should be adhered to. Follow Instructions: All operating and user instructions should be followed. Cleaning: Unplug this appliance from the wall outlet before cleaning. Use a damp cloth for cleaning. Do not use liquid cleaners or aerosol cleansers. Do Not Use Attachments: Use of attachments not recommended by the manufacturer may cause hazards. Water and Moisture: Do not use this product near water for example, near a bathtub, washbowl, kitchen sink, laundry tub, in a wet basement, or near a swimming pool and the like. Accessories: Do not place this product on an unstable cart, stand, tripod, bracket, or table. The product may fall, causing serious injury to a child or adult, and serious damage to the appliance. Elevated Operating Ambient: If installed in a closed or multiunit rack assembly, the operating ambient temperature of the Copyright © 2014 Pico Digital Inc. All rights reserved www.picodigital.com 10. 11. 12. 13. rack environment may be greater than room ambient. Therefore, consideration should be given to installing the equipment in an environment compatible with the maximum ambient temperature 50°C. Reduced Air Flow: Installation of the equipment in a rack should be such that the amount of air flow required for safe operation of the equipment is not compromised. Mechanical Loading: The product is designed to be rack mounted in a standard EIA 19 inch width telecommunications rack. Mounting of the equipment in the rack should be such that a hazardous condition is not achieved due to uneven mechanical loading. Circuit Overloading: Consideration should be given to the connection of the equipment to the supply circuit and the effect that overloading of the circuits might have on over current protection and supply wiring. Appropriate consideration of equipment nameplate ratings should be used when addressing this concern. Reliable Earthing: Reliable earthing of rack-mounted equipment should be maintained. Particular attention should be given to supply connections other than direct connections to the branch circuit (e.g. use of power strips) subject to change CONTACT US 858.546.5050 User Manual miniCMTS200a 14. Power Sources: This product should be operated only from the type of power source indicated on the marking label. If you are not sure of the type of power supplied to your home, consult your appliance dealer or local power company. 15. Power-cord Protection: Power-supply cords should be routed so they are not likely to be walked on or pinched by items placed upon or against them. Pay particular attention to cords and plugs, convenience receptacles, and the point where they exit from the appliance. 16. Lightning: For added protection for this product during a lightning storm, or when it is left unattended or unused for long periods of time, the unit should be disconnected from power source. 17. Power Lines: An outside antenna system should not be located in the vicinity of overhead power lines, other electric light or power circuits, where it can fall into such power lines or circuits. When installing an outside antenna system, extreme care should be taken to keep from touching such power lines or circuits as contact with them may be fatal. 18. Object and Liquid Entry: Never push objects of any kind into this product through openings as they may touch dangerous voltage points or short-out parts that could result in a fire or electric shock. Never spill liquid of any kind on the product. 19. Servicing: Do not attempt to service this product yourself as opening or removing covers may expose you to dangerous voltage or other hazards. Refer all servicing to qualified service personnel. 20. Damage Requiring Service: Unplug this product from the wall outlet and refer servicing to qualified service personnel under the following conditions: a. When the power-supply cord or plug is damaged. b. If liquid has been spilled, or objects have fallen into the product. c. If the product has been exposed to rain or water. d. If the product does not operate normally by following the operating instruction. Adjust only those controls that are covered by the operating instructions. An improper adjustment may result in damage and will often require extensive work by a qualified technician to restore the product to its normal operation. e. If the product has been dropped or the cabinet has been damaged. f. When the product exhibits a distinct change in performance—this indicates a need for service. 21. Replacement Parts: When replacement parts are required, be sure the service technician has used replacement parts specified by the manufacturer or have the same characteristics as the original parts. Unauthorized substitutes may result in fire, electric shock or other hazards. 22. Safety Check: Upon completion of any service or repairs to this product, ask the service technician to perform safety checks to determine that the product is in proper operating conditions. 23. Outdoor Antenna Grounding: Before attempting to install this product, be sure the antenna or cable system is grounded so as to provide some protection against voltage surges and built-up static charges. a. Use No.10 AWG (5.3mm) copper, No.8 AWG (8.4mm) aluminum, No.7 AWG (10mm) copper-clad steel or bronze wire or larger, as ground wire. Copyright © 2014 Pico Digital Inc. All rights reserved www.picodigital.com Release 1.5 Page 2 of 29 b. c. d. e. Secure antenna lead-in and ground wires to house with stand-off insulators spaced from 4 feet (1.22m) to 6 feet (1.83m) apart. Mount TV antenna discharge unit as close as possible to where lead-in enters house. A driven rod may be used as the grounding electrode where other types of electrode systems do not exist. Refer to the National Electrical Code, ANSI/NFPA 70-1984 for information. Use jumper wire not smaller than No.6 AWG (13.3mm) copper or equivalent, when a separate antenna grounding electrode is used NOTE TO THE CATV SYSTEM INSTALLER THIS REMINDER IS PROVIDED TO CALL THE CATV SYSTEM INSTALLER’S ATTENTION TO ARTICLE 820-22 OF THE NEC THAT PROVIDES GUIDELINES FOR PROPER GROUNDING AND, IN PARTICULAR, SPECIFIES THAT THE CABLE GROUND SHALL BE CONNECTED TO THE GROUNDING SYSTEM OF THE BUILDING, AS CLOSE TO THE POINT OF CABLE ENTRY AS PRACTICAL. Equipment connected to the protective earthing of the building installation through the main connection or through other equipment with a connection to protective earthing – and to a cable distribution system using coaxial cable, may in some circumstances create a fire hazard. Connection to a cable distribution system must therefore be provided through a galvanic isolator providing electrical isolation below 5 MHz subject to change CONTACT US 858.546.5050 User Manual miniCMTS200a Release 1.5 Page 3 of 29 All rights reserved. No part of this document may be reproduced or transmitted in any form or by any means, electronic or mechanical, including but not limited to photocopying, recording, or by any information storage and retrieval system without the prior written permission from Pico Digital, Inc. Warning and Disclaimer This document is intended to provide information about installing and operating the “IPQC”. Every effort has been made to make this document as complete and accurate as possible, but no warranty or fitness is implied. The information is provided on an “as is” basis and Pico Digital, Inc. shall have neither liability nor responsibility to any person or entity with respect to any loss or damages arising from the information contained in this document. Acknowledge of Trademarks Any product or corporate names used herein may be trademarks or registered trademarks, and are only used for identification and explanation, without intent to infringe. Any terms mentioned or used that are known trademarks or service marks have been appropriately capitalized and italicized. Pico Digital, Inc. cannot attest to the accuracy of this information. Use of a term in this manual should not be regarded as affecting the validity of any trademark or service mark. Printed in the United States of America Pico Digital, Inc. 8880 Rehco Road San Diego, CA 92121 Patent Pending Warning! Approved external telecom power cross protection must be incorporated into the final installation in accordance with Annex NAC of UL/CSA standard 60950-1. Failure to comply may result in a fire or electric shock hazard and will void regulatory compliance certification. THIS DEVICE COMPLIES WITH PART 15 OF THE FCC RULES. OPERATION OF THIS DEVICE IS SUBJECT TO THE FOLLOWING TWO CONDITIONS: (1) THIS DEVICE MAY NOT CAUSE HARMFUL INTERFERENCE, AND (2) THIS DEVICE MUST ACCEPT ANY INTERFERENCE RECEIVED, INCLUDING INTERFERENCE THAT MAY CAUSE UNDESIRED OPERATION. Copyright © 2014 Pico Digital Inc. All rights reserved www.picodigital.com subject to change CONTACT US 858.546.5050 User Manual miniCMTS200a Release 1.5 Page 4 of 29 Table of Contents 1 2 3 Introduction .........................................................................................................................................................8 1.1 Introducing the miniCMTS200a....................................................................................................................8 1.2 Features .......................................................................................................................................................8 1.2.1 DOCSIS ................................................................................................................................................8 1.2.2 Network features ...................................................................................................................................8 1.2.3 IPTV and Multicast features ..................................................................................................................8 1.2.4 Security features ...................................................................................................................................8 1.2.5 Monitoring and Management features ..................................................................................................9 Installation ........................................................................................................................................................ 10 2.1 Unpacking the Unit .................................................................................................................................... 10 2.2 Before Rack Mounting ............................................................................................................................... 10 2.3 Rack Mounting .......................................................................................................................................... 10 2.4 Front Panel ................................................................................................................................................ 11 2.5 Rear Panel ................................................................................................................................................ 11 2.5.1 Ground ............................................................................................................................................... 11 2.5.2 Upstream RF connection ................................................................................................................... 11 2.5.3 Downstream RF connection............................................................................................................... 11 2.5.4 Management Ethernet ....................................................................................................................... 11 2.5.5 Data Ethernet ..................................................................................................................................... 12 2.5.6 SFP .................................................................................................................................................... 12 2.5.7 Console .............................................................................................................................................. 12 2.5.8 Power & Power Switch ....................................................................................................................... 12 2.6 Overview of miniCMTS ............................................................................................................................. 12 2.7 RF Configuration ....................................................................................................................................... 13 Basic Setup Guide ........................................................................................................................................... 14 3.1.1 Login & Language .............................................................................................................................. 14 3.1.2 Start Page .......................................................................................................................................... 15 3.1.3 Network Setup– Management IP and VLAN ..................................................................................... 16 Channel Settings - Downstream Channels...................................................................................................... 17 Copyright © 2014 Pico Digital Inc. All rights reserved www.picodigital.com subject to change CONTACT US 858.546.5050 User Manual miniCMTS200a 4 Release 1.5 Page 5 of 29 3.1.4 RF Settings - Upstream Channels ..................................................................................................... 18 3.1.5 Time Synchronization ........................................................................................................................ 19 3.1.6 Network Setup: DHCP Relay, VLAN tagging..................................................................................... 20 3.1.7 Business Model Settings – “Relay Model” ......................................................................................... 20 3.1.8 Business Model Settings: “Option60 Model”...................................................................................... 22 3.1.9 IPQAM Setup ..................................................................................................................................... 22 3.1.10 Cable Modem Analysis – basic tools ................................................................................................. 22 MiniCMTS Web Interface................................................................................................................................. 24 4.1 Start page .................................................................................................................................................. 24 4.2 Channel Settings ....................................................................................................................................... 24 4.3 Network Settings ....................................................................................................................................... 24 4.3.1 Manage IP .......................................................................................................................................... 24 4.3.2 Business IP ........................................................................................................................................ 24 4.3.3 Option60 Settings .............................................................................................................................. 24 4.3.4 Business Model Settings.................................................................................................................... 24 4.3.5 L2VPN ................................................................................................................................................ 24 4.3.6 Server Settings .................................................................................................................................. 24 4.3.7 SNMP Settings ................................................................................................................................... 24 4.3.8 CM SNMP Settings ............................................................................................................................ 25 4.4 Advanced Network Settings ...................................................................................................................... 25 4.4.1 Uplink Settings ................................................................................................................................... 25 4.4.2 Port Isolation ...................................................................................................................................... 25 4.5 Security ..................................................................................................................................................... 25 4.5.1 IP Address Check .............................................................................................................................. 25 4.5.2 Cable Security .................................................................................................................................... 25 4.6 Terminal Management .............................................................................................................................. 26 4.6.1 CM List ............................................................................................................................................... 26 4.6.2 CPE List& CPE List Advance ............................................................................................................ 26 4.6.3 Load Balancing .................................................................................................................................. 26 4.6.4 QOS ................................................................................................................................................... 26 4.6.5 MAC Aging ......................................................................................................................................... 26 4.6.6 Flap List.............................................................................................................................................. 26 4.7 System Monitor ......................................................................................................................................... 27 Copyright © 2014 Pico Digital Inc. All rights reserved www.picodigital.com subject to change CONTACT US 858.546.5050 User Manual miniCMTS200a 4.7.1 Hardware Status ................................................................................................................................ 27 4.7.2 Log Record ........................................................................................................................................ 27 4.8 Device Management ................................................................................................................................. 27 4.8.1 Version Upgrade ................................................................................................................................ 27 4.8.2 Users Management............................................................................................................................ 27 4.8.3 Config Management........................................................................................................................... 27 4.9 5 Release 1.5 Page 6 of 29 Device Tools (Right Top of Start Page) .................................................................................................... 27 4.9.1 Signal Check ...................................................................................................................................... 27 4.9.2 Snooping ............................................................................................................................................ 27 Setup a Basic System...................................................................................................................................... 28 5.1 RF ............................................................................................................................................................... 28 5.2 miniCMTS200a IP configuration .................................................................................................................... 29 5.3 Installation Procedure .................................................................................................................................. 29 5.4 Configuration Procedure ........................................................................................................................... 29 Table of Figures Figure 1 miniCMTS200a .............................................................................................................................................8 Figure 2 miniCMTS200a Front Panel ...................................................................................................................... 11 Figure 3 miniCMTS200a Rear Panel....................................................................................................................... 11 Figure 4 miniCMTS block diagram .......................................................................................................................... 12 Figure 5 Simple RF network .................................................................................................................................... 13 Figure 6 Logon Page ............................................................................................................................................... 14 Figure 7 Start Page.................................................................................................................................................. 15 Figure 8 Network Setup Page ................................................................................................................................. 16 Figure 9 Downstream Channel Page ...................................................................................................................... 17 Figure 10 Upstream Channel Page ......................................................................................................................... 18 Figure 11 Time Synchronization .............................................................................................................................. 19 Figure 12 Business IP.............................................................................................................................................. 20 Figure 13 Business Model Settings ......................................................................................................................... 20 Figure 14 Business IP - VLAN Tagging ................................................................................................................... 21 Figure 15 Business Model Settings - VLAN ID ........................................................................................................ 21 Copyright © 2014 Pico Digital Inc. All rights reserved www.picodigital.com subject to change CONTACT US 858.546.5050 User Manual miniCMTS200a Release 1.5 Page 7 of 29 Figure 16 Business Model Option 60 ...................................................................................................................... 22 Figure 17 CM List .................................................................................................................................................... 22 Figure 18 IP Address Check .................................................................................................................................... 25 Figure 19 Load Balancing ........................................................................................................................................ 26 Figure 20 QOS ......................................................................................................................................................... 26 Figure 21 Basic Network setup ................................................................................................................................ 28 Table of Tables Table 1 Revision History .............................................................................................................................................7 Revision History Rev # Date SW Version Description 1.3 7/18/2014 NA New format and consolidated documents 1.4 7/18/2014 NA Minor changes 1.5 7/24/2014 NA Minor corrections Table 1 Revision History Copyright © 2014 Pico Digital Inc. All rights reserved www.picodigital.com subject to change CONTACT US 858.546.5050 User Manual miniCMTS200a 1 Release 1.5 Page 8 of 29 Introduction 1.1 Introducing the miniCMTS200a As an alternative to larger, more expensive cable modem termination systems (CMTS) and second-hand units with low bandwidth, Pico Digital's miniCMTS is designed to provide smaller cable operators with the capabilities they need at an exceptional value. The low-cost unit supports up to 400 DOCSIS cable modems (max. 250 DOCSIS 3.0 + 150 DOCSIS 2.0 or 400 DOCSIS 2.0) and offers 16 downstream bonded channels for up to 800-Mbps downstream /120-Mbps upstream data delivery. Ideal for providing high-speed data services to commercial residential properties and academic and medical facilities, as well as the hospitality industry, the miniCMTS features an extensive Web interface for simple configuration, management, and debugging. Figure 1 miniCMTS200a 1.2 Features 1.2.1 DOCSIS QoS supported Load Balancing supported BPI+ supported Upstream Scheduler supported: Best Effort, UGS, UGS/AD 1.2.2 Network features CMTS IP - static or DHCP based Up to 3 LAN ports available o all LAN ports fully, independently configurable o designed to split customer traffic, cable modem traffic and management traffic o VLAN tagging possible (QinQ is not supported) DHCP relay, Option 60 tuning, Option 82insertion VLAN assignment for Management traffic VLANs assignment for Cable Modems, CPEs and MTAs. L2VPN based on DOCSIS standard “BSoD” Complex VLAN setup separating CM and CPE traffic into VLANs per individual CM and CPE 1.2.3 IPTV and Multicast features IPv4 Multicast supported, enabling IPTV over DOCSIS through miniCMTS. 1.2.4 Security features IP Address Check based on DHCP snooping- blocking of IPs not assigned by DHCP. Copyright © 2014 Pico Digital Inc. All rights reserved www.picodigital.com subject to change CONTACT US 858.546.5050 User Manual miniCMTS200a 1.2.5 Release 1.5 Page 9 of 29 Cable Security: blocks access from CPEs to internal miniCMTS IPs. Monitoring and Management features GUI tool monitoring US SNR and FEC per US and per CM. Cable modem monitoring: via CMTS web interface, includes main RF values read from Cable Modems via SNMP. SNMP support for main DOCSIS OIDs. SNMP support for miniCMTS environment monitoring. DHCP snooping log: provides DHCP diagnostics. MiniCMTS Time Synchronization. Hardware monitoring: temperature, voltage etc. Software upgrades Alarming TCPDUMP - Packet tracing Copyright © 2014 Pico Digital Inc. All rights reserved www.picodigital.com subject to change CONTACT US 858.546.5050 User Manual miniCMTS200a 2 Release 1.5 Page 10 of 29 Installation 2.1 Unpacking the Unit Please inspect the carton upon receiving and note any damage while inspecting for possible unit damage. Please open the carton and unpack carefully. Locate: 2.2 The miniCMTS200a unit The power cord Before Rack Mounting There are no user adjustable switches, jumpers or controls inside the unit itself, so do not open the unit. Opening the unit will result in voiding of the warranty. 2.3 Rack Mounting The unit is designed for installation in an EIA standard 19-inch (480 mm) equipment rack. When mounting in the rack, use pan or round head screws and soft washers in all four front panel mounting locations. This ensures a secure mount. You must supply screws matching your rack. To prolong service life, pay special attention that the environment in which the unit is being used is as free of dust and other airborne particles as possible. Make sure the unit is operated in a moderate temperature environment. The miniCMTS200a is fan cooled. Never place a unit near a heat source. Do not install a unit in areas of extremely high humidity or where there is any danger of water or condensate dripping into or on the unit. Where space is not an issue, allow a 1.75-inch (1RU) air gap above and below receivers for cooling purposes. However, you may install the units with no air gap between them and have reliable operation. Never install multiple units or any other equipment units in such a way that the air intake from one unit directly aligns with the outlet of another. Long-term reliability is best obtained with consistently cool environments. Copyright © 2014 Pico Digital Inc. All rights reserved www.picodigital.com subject to change CONTACT US 858.546.5050 User Manual miniCMTS200a 2.4 Release 1.5 Page 11 of 29 Front Panel Figure 2 miniCMTS200a Front Panel The front panel has a number of LED’s on it. Note the button on the left has no function assigned to it. 2.5 Rear Panel Figure 3 miniCMTS200a Rear Panel 2.5.1 Ground Securely connect the “Grounding Port” to a protective earth grounding accordance with the local legal and safety regulations. 2.5.2 Upstream RF connection The F-type connector labeled U/S is for the upstream signals or the return path, this is where the cable with the signals from the cable modem is connected. 2.5.3 Downstream RF connection The F-Type connector labeled D/S is the downstream connector, this contains the QAM channels generated by the miniCMTS. 2.5.4 Management Ethernet This can be configured to be a separate management Ethernet port, however by default this is connected to the Data Ethernet port via a switch Copyright © 2014 Pico Digital Inc. All rights reserved www.picodigital.com subject to change CONTACT US 858.546.5050 User Manual miniCMTS200a 2.5.5 Release 1.5 Page 12 of 29 Data Ethernet This is the data port used to pass Ethernet data to cable modems. 2.5.6 SFP This can be used to add fiber signals to the miniCMTS. 2.5.7 Console The console port is a serial port used to communicate with the miniCMTS. 2.5.8 Power & Power Switch Make sure the switch is in the off position before plugging the power into the unit, the unit supports 110/220V. 2.6 Overview of miniCMTS The diagram below shows the blocks within the miniCMTS. Figure 4 miniCMTS block diagram The miniCMTS takes Ethernet packets from either one of the Ethernet ports (Eth0 or Eth1) or from the SFP port, it converts these Ethernet packets to DOCSIS packets and put them out of the D/S F-Type connector in QAM channels. The cable modem then looks at these signals and converts them back to Ethernet. The modem then transmits signals to the miniCMTS and the miniCMTS receives these on the U/S connector. It converts these signals back to Ethernet and put them out of one of the Ethernet ports or as fiber on the SFP port. There is much more going on in a DOCSIS network that the above simplified explanation, as there are many MAC management messages being sent between the miniCMTS and the modems to help control and configure the network. Copyright © 2014 Pico Digital Inc. All rights reserved www.picodigital.com subject to change CONTACT US 858.546.5050 User Manual miniCMTS200a 2.7 Release 1.5 Page 13 of 29 RF Configuration The miniCMTS200a can be configured in many different ways, below is a simple configuration to allow the miniCMTS200a to be in a network with other broadcast TV channels. Figure 5 Simple RF network The RF goes to the cable TV network at the bottom of the picture, and comprises of both upstream (A) and downstream (B) DOCSIS signals. Notice the DOCSIS D/S signals are being combined with other cable TV signals to be place on the network. This allows the power settings of all the QAM channels to be configured by adding attenuation to each products feed. By measuring the power at ‘C’ they can be easily leveled The upstream should be split using a diplexer with the appropriate RF frequency range (depending on the network) Attenuation can then be applied to leg ‘A’ to adjust the signal strength so it will reach the miniCMTS200a at the correct power. This is a simple example of how to connect the miniCMTS200a, more complex setups are possible Output Power: 45dB Receive power: 6dB, depending on the modulation profile and the channel bandwidth the cable modems have a power range they can transmit in. Copyright © 2014 Pico Digital Inc. All rights reserved www.picodigital.com subject to change CONTACT US 858.546.5050 User Manual miniCMTS200a 3 Release 1.5 Page 14 of 29 Basic Setup Guide 3.1.1 Login & Language The default miniCMTS IP address is 10.7.1.77, netmask 255.255.0.0 and a gateway IP address of 10.7.1.1 An emergency (Backdoor) IP is available: 192.168.2.200/24 if you change the IP address and forget it. This IP address is a fixed static address and always untagged. In the event you lose IP connectivity to the miniCMTS, access to the miniCMTS Web GUI can be made via this address from a local subnet 192.168.2.0/24. Using a browser, type in the IP address of the miniCMTS you should see the login page: Figure 6 Login Page During the initial login into the miniCMTS web interface, select the required language from the drop-down menu. English or Chinese are supported. The default username and password is case sensitive: Username: admin Password: admin Copyright © 2014 Pico Digital Inc. All rights reserved www.picodigital.com subject to change CONTACT US 858.546.5050 User Manual miniCMTS200a 3.1.2 Release 1.5 Page 15 of 29 Start Page The start page is the main page where you can control the miniCMTS Figure 7 Start Page 1. Navigation bar (Guides) on the left: This may be hidden and un-hidden using the << button. This provides a tree structure of the available tabs to be displayed in the main area. 2. Main Tab Area (System Overview): The main tab area in the center of the page is where the tabs are loaded when the menu options from the Navigation bar are selected. 3. Middle Bottom (Net Statistics): RF value distribution bar graphs, by clicking on the displayed values a list of cable modems in each bucket can be opened 4. Right Top (Device Tools) : Advanced Feature icons 5. Right Middle (Version and Settings): Main operational information 6. Right Bottom (Cable Modem Info): Main Cable Modem statistics 7. Left Bottom Logout and Change Language Copyright © 2014 Pico Digital Inc. All rights reserved www.picodigital.com subject to change CONTACT US 858.546.5050 User Manual miniCMTS200a 3.1.3 Release 1.5 Page 16 of 29 Network Setup– Management IP and VLAN The first step to configuring the miniCMTS200a is to set the IP address, this is done by clicking on the Network Settings -> Manage IP. The “Manage IP” tab is displayed in the main Tab area. 3.1.3.1 Field names Configuration Mode – choose Static IP or DHCP IP Address, Subnet Mask, Default Gateway – required to be set in case of choosing “Static IP” Management VLAN –set for dot1.q tagging of CMTS IP management traffic Management VLAN Fixed – set VLAN tag. The configuration shown is a simple test configuration with no VLAN support. Figure 8 Network Setup Page Copyright © 2014 Pico Digital Inc. All rights reserved www.picodigital.com subject to change CONTACT US 858.546.5050 User Manual miniCMTS200a Release 1.5 Page 17 of 29 Channel Settings - Downstream Channels The next step is to configure the downstream channels. By default the miniCMTS200a is configured for annex-A, this means the channel widths will be 8MHz and will only work with annex-a configured modems. The below figure shows the setup for an Annex B configuration. Figure 9 Downstream Channel Page 3.1.3.2 Toolbar Channel_Amount: This sets the number of downstream channels which are enabled Configuration: in “Simple” mode only first downstream channel is configurable, with the remainder being set automatically adjacent to the first downstream channel, in “Complex” mode each downstream can be configured separately. Note: IPQAM channels should be configured in “Complex” mode. Power Compensation– This is to configure the power tilt compensation. Downstream channels at higher frequencies can be set to transmit at higher output levels relative to downstream channels at lower frequencies. 3.1.3.3 Table and Columns Mode–set “docsis” for DOCSIS Downstream or “ipqam” for IPQAM channel TS–displays Transport Stream name for Downstream channels set as “ipqam” Frequency– set center frequency for Downstream channel Copyright © 2014 Pico Digital Inc. All rights reserved www.picodigital.com subject to change CONTACT US 858.546.5050 User Manual miniCMTS200a 3.1.4 Release 1.5 Page 18 of 29 Symbol Rate– This is automatically set based on the annex and the modulation rate Modulation Mode– choose QAM64 or QAM256 Annex - “A” means EuroDOCSIS, “B” means DOCSIS Interleave–in case of “Annex A”, Interleave is set automatically to “ignore”. Set desired value in case of “Annex B”. Inner Power– the power level configured for the internal DOCSIS chipset output RF Power–indicates RF power level available on CMTS RF connector. This is lower than “Inner Power” due to the internal RF combining and splitting. RF Settings - Upstream Channels The next step is to configure the upstream channels. Figure 10 Upstream Channel Page 3.1.4.1 Toolbar Channel_Amount – This sets the number of upstream channels which are enabled. Configuration: in “Simple” mode only first upstream channel is configurable, with the remainder being set automatically adjacent to the first downstream channel, in “Complex” mode each upstream can be configured separately. Copyright © 2014 Pico Digital Inc. All rights reserved www.picodigital.com subject to change CONTACT US 858.546.5050 User Manual miniCMTS200a 3.1.4.2 3.1.5 Release 1.5 Page 19 of 29 Tables and columns Enable/Disable: Each upstream channel can be enabled or disabled individually. Frequency: set center frequency for upstream channel from available range. For EuroDOCSIS the available frequency range is 5-65 MHz side-to-side. NOTE: Do not set the frequency above what the RF network is capable of, if Analog TV channels are being transmitted on channel 2, the top frequency edge should be 42MHz. Channel Width: choose from 1.6MHz, 3.2MHz or 6.4MHz. ModulationProfile: choose from predefined modulation profiles. Low noise profiles have a wider power range for the cable modems to use and there are recommended for good networks. D30Mode: this option is reserved for future releases, and must be set to DISABLED. Channel type: This field is automatically set to match the chosen modulation profile. Inner Power: the power level configured for the internal DOCSIS chipset input. The available power range is related to the configured channel width and modulation profile. RF power: with the miniCMTS200a model of miniCMTS, the RF power is set to the internal power setting and is the target receive power at the upstream f-type connector. Time Synchronization The time is configured via the “Time Sync” icon under “Version & Settings” on the right side of miniCMTS Start page. The TIME protocol (TCP port 37) is used for miniCMTS Time Synchronization and two servers are available to be used for this. Figure 11 Time Synchronization 3.1.5.1 Fields Server IP 1: IP address of the external server Server IP 2: IP address of the backup external server Enable: Either on/off to enable or disable this feature Time Zone: set to the appropriate time zone for you location. Copyright © 2014 Pico Digital Inc. All rights reserved www.picodigital.com subject to change CONTACT US 858.546.5050 User Manual miniCMTS200a 3.1.6 Release 1.5 Page 20 of 29 Network Setup: DHCP Relay, VLAN tagging 3.1.6.1 Business IP Businesses IPs are used as GIADDR and as source IPv4 addresses for the DHCP Relay function. Business IPs MUST BE from the same IP subnet as IPs assigned by DHCP server. One Business IP is required for each IP subnet for which miniCMTS relays DHCP packets. Business IPs are configured as new IP addresses from the miniCMTS configuration, and require a valid Net Mask. NOTE: Business IPs are created inside miniCMTS as new IP addresses. Enabling “Cable Security” is recommended to protect access to Business IPs from CPEs The example below shows three addresses to be used as GIADDR: 10.0.1.2, 10.0.2.2 and 10.0.3.2. Figure 12 Business IP The “Gateway” field in the Business IP configuration page is optional, but needs to be set when, a VLAN is assigned to Business IP, or a Default Gateway is not provided under “Manage IP”. The setting or changing of the Business IPs does not require MiniCMTS restart. 3.1.6.1.1 Option60 Settings Option 60 identification strings can be configured. 3.1.7 Business Model Settings – “Relay Model” Figure 13 Business Model Settings Relay Model provides the DHCP Relay function, and can also be used to tag CM, CPE and other traffic based on the VLANs assigned to the Business IPs. DHCP relay can be configured for specific device types, as identified by the “Option 60” parameter. Standard device types are predefined, including CM, STB, MTA and CPE. Option 60 for “CPE” is set to “NULL” so as to capture all device types not explicitly matched by other rules. In the example above, DHCP relay is enabled for the following three element types: Cable Modems (IPs assigned for CMs are from subnet 10.0.1.0/24), relayed to DHCP server IP 10.10.10.10, with GIADDR set to 10.0.1.2. Copyright © 2014 Pico Digital Inc. All rights reserved www.picodigital.com subject to change CONTACT US 858.546.5050 User Manual miniCMTS200a Release 1.5 Page 21 of 29 CPEs (IPs assigned for CPEs are from subnet 10.0.2.0/24), relayed to DHCP server IP 10.10.10.20, with GIADDR set to 10.0.2.2 MTAs (IPs assigned for MTAs are from subnet 10.0.3.0/24), relayed to DHCP server IP 10.10.10.30, with GIADDR set to 10.0.3.2 The example shows three different DHCP server IPs, but it is also possible to use a single DHCP server IP for all relayed elements. VLAN tagging for CM, CPE, MTA or other traffic is done based on “Business IP” VLAN ID. Figure 14 Business IP - VLAN Tagging The following screen shows mapping of Business IP addresses to VLAN IDs Figure 15 Business Model Settings - VLAN ID For CPE tagging to operate correctly, a DHCP packet must be generated by CPE and seen by miniCMTS. If DHCP is not used for CPEs, a “Default VLAN ID” must be configured for all CPEs with the same VLAN ID. Option 82 is populated automatically into relayed DHCP packets when operating in “Relay Mode”. A miniCMTS restart is recommended after making changes to “Business Model Settings”. Copyright © 2014 Pico Digital Inc. All rights reserved www.picodigital.com subject to change CONTACT US 858.546.5050 User Manual miniCMTS200a 3.1.8 Release 1.5 Page 22 of 29 Business Model Settings: “Option60 Model” Option60 Model is designed to provide VLAN tagging for CM, CPE and other traffic types based on Option60 in scenarios where DHCP Relay functionality is not required. This mode can also add Option 82 into broadcasted DHCP packets. If “ADD OPTION82” is enabled, then a copy of broadcast DHCP packet is generated with Option82 filled (The “original” DHCP broadcast packet without the Option82 cannot be changed, it will still ALWAYS be generated). The screen below shows the VLAN tagging configuration based on “Option60 Model”. Figure 16 Business Model Option 60 3.1.9 IPQAM Setup We do not recommend using the IPQAM features of the miniCMTS200a, we have alternative products if you require EdgeQAM functionality. Cable Modem Analysis – basic tools 3.1.10 The primary screen for showing the Cable Modem overview and analysis is found in the “Guides” menu: Figure 17 CM List 3.1.10.1 Toolbar CM Details: opens a window showing CM details when clicked. Reboot: performs Cable Modem reboot. CM reboot is initiated via DOCSIS command. Clear Modem History: clears Cable Modem History. PING CM: performs an ICMP ping to the Cable Modem. The ICMP ping is executed from the miniCMTS and results are displayed in a Web-Browser window. SNMP Test: opens a window that allows an SNMP command to be sent to the selected Cable Modem. Move Freq: moves selected Cable Modem to particular Downstream or Upstream channel. Move Downstream and Upstream separately, do not move both at the same time. MAC Filter: filters the list of cable modems to a particular MAC substring, e.g. “01ef”. Refresh Power: polls selected Cable Modem for actual information via SNMP. Refresh: refreshes information on the web-page. Copyright © 2014 Pico Digital Inc. All rights reserved www.picodigital.com subject to change CONTACT US 858.546.5050 User Manual miniCMTS200a 3.1.10.2 Release 1.5 Page 23 of 29 Table and columns SID: internal DOCSIS Cable Modem ID. MAC Addr: MAC address of the CM. IP Addr: IP address assigned to the CM. Connect state: actual state of the CM. DOCSIS version: DOCSIS version of the CM as identified by CMTS. Up Power, Up SNR, Down Power, Down SNR: RF values: Up SNR is measured at the CMTS input. Up Power (transmit), Down Power (receive), Down SNR (receive) are read from the Cable Modem via SNMP. The CM SNMP read community can be set in “Terminal Management” → “CM SNMP Settings”. Down Total octets and Up Total octets: the number of octets transmitted and received by the CM Drops num, Last Drop time: the number of times and when the modem dropped offline. Primary Us Chanel, Primary Ds Channel: The RF channels used as primary channels for the CM. Us Channel, Ds Channel: list of CMTS channels that the CM is ranged to. Copyright © 2014 Pico Digital Inc. All rights reserved www.picodigital.com subject to change CONTACT US 858.546.5050 User Manual miniCMTS200a 4 Release 1.5 Page 24 of 29 MiniCMTS Web Interface 4.1 Start page See “Basic Setup Guide”. 4.2 Channel Settings See “Basic Setup Guide”. 4.3 Network Settings 4.3.1 Manage IP See “Basic Setup Guide”. 4.3.2 Business IP Business IPs are configured to enable DHCP Relay feature. See “Basic setup Guide” for more details. 4.3.3 Option60 Settings Allows configuration of user-defined DHCP Option 60 distinctive strings. 4.3.4 Business Model Settings This tab allows to configure Network model setup in relation to DHCP Relay function and VLAN tagging for CMs, CPEs, MTAs (and others). See “Basic Setup Guide” for more details. Available options: None–No DHCP Relay, No CM & CPE VLAN tagging Relay Model–DHCP Relay active, CM & CPE VLAN tagging available, Option 82 filled OPTION60 Model–No DHCP Relay, CM & CPE VLAN tagging, Option 82 optionally filled Bundle–No DHCP Relay, Cable Bundles (more complex VLAN setup) available Advance Relay Model–DHCP Relay active, Cable Bundles (more complex VLAN setup) available 4.3.5 L2VPN L2VPNforBusiness Services over DOCSIS (BSoD). Please contact Pico Digital to discuss implementation requirements related to L2VPN. 4.3.6 Server Settings Time Sync – Allows configuration of the miniCMTS200a to time synchronization. TCP port 37 is used. See “Basic Setup Guide” for more details. Device Log Server – When enabled, exports internal SYSLOG messages also to external SYSLOG server via UDP port 514 standard messages. A MiniCMTS restart is not needed after changing “Device Log Server” configuration. 4.3.7 SNMP Settings Allows configuration of the miniCMTS200a SNMP community strings. Default community is “publicr”. Trap Server – when enabled, generates SNMP traps. The miniCMTS200a must be restarted after changing miniCMTS200a SNMP community. Copyright © 2014 Pico Digital Inc. All rights reserved www.picodigital.com subject to change CONTACT US 858.546.5050 User Manual miniCMTS200a 4.3.8 Release 1.5 Page 25 of 29 CM SNMP Settings The MiniCMTS will automatically try to read RF values via SNMP from Cable Modems, and display them on the CM List page. Set “Read Only Community” in “Network Settings” → “CM SNMP Settings” to see Cable Modem RF values on CM List page. Pre-defined CM community is “public”. 4.4 Advanced Network Settings 4.4.1 Uplink Settings Uplink Settings enable to manipulate VLAN tagging and trunking on Ethernet ports. Be careful not to block management VLAN, as the CMTS management IP may become inaccessible. 4.4.2 Port Isolation Port Isolation defines mutual visibility of Ethernet ports ETH0, ETH1 and SFP0. 4.5 Security 4.5.1 IP Address Check Figure 18 IP Address Check 4.5.2 When enabled, the miniCMTS blocks any MAC-IP pair that was not assigned by the DHCP server. CMTS uses DHCP Snooping to create the internal database of allowed MAC-IP pairs. Cable Security When enabled, CPE traffic to the miniCMTS internal IP addresses (Manage IP, Business IPs, Back Door IP) is blocked. Only ICMP ping packets are allowed, allowing the miniCMTS to respond to ICMP Echo Requests. Copyright © 2014 Pico Digital Inc. All rights reserved www.picodigital.com subject to change CONTACT US 858.546.5050 User Manual miniCMTS200a 4.6 Terminal Management 4.6.1 CM List See “Basic Setup Guide”. 4.6.2 CPE List& CPE List Advance These lists show CPE details. 4.6.3 Release 1.5 Page 26 of 29 Load Balancing Figure 19 Load Balancing 1. General LoadBalancingconfiguration - the most typical configuration is “Dynamic” Disabled – LoadBalancing is disabled Dynamic – Dynamic LoadBalancing is activated Static – Static LoadBalancing is activated 2. Restricted LoadBalancingGroups configuration 4.6.4 QOS Figure 20 QOS DS Packet Classification is configurable via the Cable Modem configuration files using DOCSIS TLVs. DS&US Packet Classification via the MiniCMTS is not supported. NOTE: It is recommended that the Cable Modem configuration files are used to configure QoS Packet Classification in preference to configuring QOS via this tab. A maximum of 7 unique Downstream Packet Classes are supported by the MiniCMTS, identified by unique ClassifierRef’s. 4.6.5 MAC Aging The ARP table size is 4000 records. Enabling “MAC Aging” and configuring “Aging Time” is possible for scenarios where MAC addresses churn could result in ARP table exhaustion. 4.6.6 Flap List Displays Cable Modem Flaps. Copyright © 2014 Pico Digital Inc. All rights reserved www.picodigital.com subject to change CONTACT US 858.546.5050 User Manual miniCMTS200a 4.7 Release 1.5 Page 27 of 29 System Monitor 4.7.1 Hardware Status Real time monitoring of the hardware of the miniCMTS200a. The following is a list of the parameters which are monitored: 4.7.2 CPU, RAM and internal Flash-disk usage miniCMTS temperature Internal Power Supply Voltages UpTime Log Record This allows the miniCMTS200a to display the internal events log for debug and fault finding. 4.8 Device Management 4.8.1 Version Upgrade Please refer to the Upgrade Guide distributed with the FW package. 4.8.2 Users Management Allows the creation of new users and the changing of user passwords. 4.8.3 Config Management The miniCMTS200a, like all CMTS’s, is a complex product and can be configured in a fashion which means it will no longer function correctly. The factory reset allows the restoration of the factory defaults, this is used to put the miniCMTS200a back to a known state. 4.9 “Restore Factory Settings” – restore all settings, set default IP address. “Restore Factory Settings, Keep Current IP” – restore all settings, but currently configured IP address is not changed. Device Tools (Right Top of Start Page) 4.9.1 Signal Check The signal check allows the user of the miniCMTS200a to displays real time graphs for: 4.9.2 Upstream channel SNR Upstream channel Error Rate Per Cable Modem US SNR Per Cable Modem US Error Rate Snooping Snooping: This displays a log of DHCP events that the miniCMTS has recognized during DHCP Snooping TCP Dump: This is for lab use only, the TCP dump window is a graphical utility to display the output of “tcpdump” sitting inside miniCMTS Copyright © 2014 Pico Digital Inc. All rights reserved www.picodigital.com subject to change CONTACT US 858.546.5050 User Manual miniCMTS200a 5 Release 1.5 Page 28 of 29 Setup a Basic System To get a cable modem operational you need to configure the RF correctly so the mode will see the signal from the miniCMTS200a and the miniCMTS200a will see the signal from the cable modem. However this in only half of the task. The next stage is to setup a DHCP / TFTP server in the network, this give the cable modem an IP address and a configuration file, these are used to configure the cable modem so it know what level of service it should give to the customer and how to get to the internet. This DHCP / TFTP server can be call the provisioning server. This can be as simple or as complex as your number of cable modems / subscribers need. Figure 21 Basic Network setup What the following describes is a simple DHCP server which has one IP address range and offers one configuration files to the cable modems. This is good enough to prove the miniCMTS200a is functional and interoperates with your desired cable modem. The following section is intended for experience users with knowledge of the Linux environment and IP networking. This document assumes that the user has a PC configured with the Linux OS. The PC can access the internet to download and the files required to setup the DHCP Server. Also this documentation includes the configuration files required to complete the installation. Note: Linux commands are in bold print below. 5.1 RF Connect the f-type D/S and U/S connectors to a diplexer and make sure there is about 40dB of attenuation in the downstream path and 35 in the upstream path between the cable modem and the miniCMTS200a. Copyright © 2014 Pico Digital Inc. All rights reserved www.picodigital.com subject to change CONTACT US 858.546.5050 User Manual miniCMTS200a Release 1.5 Page 29 of 29 5.2 miniCMTS200a IP configuration Configure the miniCMTS200a to the following IP address: 192.168.130.99 mask 255.255.0.0 Set a router up on the network with a ip address of 192.168.130.1 5.3 Installation Procedure Start with a clean Ubuntu Linux PC. 5.4 sudo apt-get install isc-dhcp-server sudo apt-get install tftpd sudo apt-get install xinetd tftpd Configuration Procedure Configure the IP Address of the server to 192.168.130.2 mask 255.255.0.0 default gateway 192.168.130.1 Pico Digital can supply some example files please place these following files on a USB ‘stick’ drive. dhcpd.conf – this is the configuration for the DHCP server. CM-BASIC-mib.cfg - this is the configuration file for the cable modem. Plug the USB drive into the Linux DHCP server. Mount the USB drive to /mnt/tmp directory (may need to create this directory) sudo mount /dev/sdb1 /mnt/tmp (this assume the drive ID is sdb1, password required) Copy the files on USB drive to their directory change directory to tmp directory cd /mnt/tmp cp dhcpd.conf /etc/dhcp/dhcpd.conf (may need to create directory dhcp in advance) cp CM-BASIC-mib.cfg /tftpboot/CM-BASIC-mib.cfg Restart system sudo /sbin/reboot Copyright © 2014 Pico Digital Inc. All rights reserved www.picodigital.com subject to change CONTACT US 858.546.5050