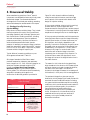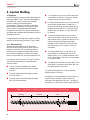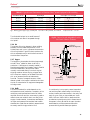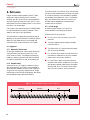
1
Processing Celcon
®
Processing Celcon
®
acetal copolymer
CE-6
acetal copolymer
Version CE-6.1Page 40 Removed for
Presentation Clarity
Celcon®
acetal copolymer
Foreword
The Celcon® Acetal Copolymer Processing and Troubleshooting guide is written for plastics processors who
require specific information on start-up, processing techniques and troubleshooting using this versatile group of
products. Material handling techniques, resin drying conditions and health and safety issues are also included.
Chapters 1 and 2 cover an introduction to Celcon acetal copolymer grades and physical characteristics,
regulatory and flammability listings, start-up and shutdown procedures, and the safety and health aspects
pertaining to handling Celcon acetal copolymer. This information is pertinent to all processing methods.
These two chapters should be read before attempting to process any grade of Celcon acetal copolymer.
Chapter 3 is devoted to the important topic of molded part dimensional stability, including part shrinkage,
annealing, dimensional tolerances and the effect of moisture absorption on part dimensions. Each of the final
four chapters of the manual describes a specific processing technique: injection molding, extrusion, blow molding
and rotational casting, and includes a troubleshooting section. Information on machine settings, mold design, and
(where appropriate) screw design is also included.
For more information on material characteristics and part and mold design, consult the following manuals:
Celcon acetal copolymer Short Term Properties (CE-4), Designing with Plastic: The Fundamentals (TDM-1)
and Designing with Celcon acetal copolymer (CE-10). They are available by contacting your local Ticona
sales representative, by calling our Technical Information Hotline at 1-800-833-4882, or on our web site,
www.ticona.com.
Comments and suggestions for improving this and other Ticona literature are always welcome, and may be sent to
us at the above phone number, by writing to us at the address shown on the back cover or by e-mailing the
webmaster on our internet site.
1
Celcon®
acetal copolymer
Table of Contents
Overview
Introduction
1.
Overview
7
1.1
1.2
1.3
1.4
1.5
Chemistry of Acetal Copolymers
General Characteristics
Product Types
Regulatory Codes and Agency Listings
Product Support
7
7
7
8
8
2.
General Guidelines
11
2.1
2.2
2.3
2.4
2.5
2.6
2.7
Storage and Handling
Safety and Health Information
Flammability
Drying
Processing Start-Up
Changing from Another Resin
Changing from a Different Grade of
Celcon® Acetal Copolymer
2.8
Processing Shutdown
2.9
Use of Regrind
2.10
Secondary Operations
2.10.1 Finishing
2.10.2 Surface Treatment
11
11
11
12
12
12
13
13
13
14
14
14
3.
Dimensional Stability
15
3.1
15
3.2
3.3
3.4
3.5
3.6
Shrinkage Caused by Processing
(Injection Molding)
Part Warpage
Post-Molding Shrinkage
Annealing
Tolerances
Moisture Absorption
4.
Injection Molding
19
4.1
4.1.1
4.1.2
4.1.3
4.1.4
4.2
4.2.1
4.2.2
4.2.3
4.2.4
Equipment
Barrel and Screw
Nozzles
Plasticizing Capacity
Clamping Force
Mold Design
General Criteria
Mold Bases
Mold Cavities and Cores
Mold Surface Finish
19
19
20
20
20
21
21
21
21
21
17
17
17
18
18
1
General
Guidelines
2
Dimensional
Stability
3
Injection
Molding
4
Blow Molding
5
Extrusion
6
Rotational
Casting
7
2
Celcon®
acetal copolymer
4.2.5
4.2.6
4.2.7
4.2.8
4.2.9
4.2.10
4.2.11
4.2.12
4.2.13
4.2.14
4.3
4.3.1
4.3.2
4.4
4.4.1
4.4.2
4.4.3
4.4.4
4.4.5
22
22
23
23
24
24
26
26
26
26
27
27
27
27
27
27
28
28
28
4.7.1
4.7.2
4.8
4.8.1
4.8.2
Sprue Bushings
Runners
Runnerless Molding
Molded-In Inserts
Outsert Molding
Gating
Vents
Cooling Channels
Draft
Parting Line
Auxiliary Equipment
Mold Temperature Control Units
Process Control
Processing
Typical Molding Conditions
Melt Temperature
Mold Surface Temperature
Injection Pressure
Cavity Pressure Measurement
(CPM) Technology
Cushion
Injection Speed
Solidification Time
Decompression Settings
Screw Speed
Cycle Time
Process Optimization: Conducting a Design
of Experiments (DOE)
Quality Control of Molded Parts
Part Weight
Part Dimensions
Effect of Molding Conditions on
Mechanical Properties
Unreinforced Celcon® Acetal Grades
Glass/mineral Coupled Celcon Acetal Grades
Molding Problems
Deposits in Mold
Troubleshooting
5.
Blow Molding
34
5.1
5.1.1
5.1.2
5.2
5.2.1
5.2.2
5.2.3
5.2.4
5.2.5
Blow Molding Methods
Extrusion Blow Molding
Injection Blow Molding
Equipment
Extruder
Screws
Screen Pack
Breaker Plate
Die Head
34
34
34
34
34
34
35
35
35
4.5
4.5.1
4.5.2
4.5.3
4.5.4
4.5.5
4.5.6
4.6
4.6.1
4.6.2
4.7
3
29
29
29
29
29
29
29
30
30
30
30
31
31
32
32
32
Celcon®
acetal copolymer
5.2.6
5.2.7
5.2.8
5.3
5.3.1
5.3.2
5.3.3
5.4
36
36
36
37
37
38
38
38
5.4.1
5.4.2
5.4.3
Die
Hopper
Molds
Processing Parameters
Barrel Temperature
Mold Temperature
Blowing Pressure
Effects of Process Variables on Part
Dimensional Stability and Part Quality
Mold Shrinkage
Surface Appearance
Impact Strength
6.
Extrusion
41
6.1
6.1.1
6.1.2
6.1.3
6.1.4
6.1.5
6.1.6
6.2
6.2.1
6.2.2
6.3
6.3.1
6.3.2
6.3.3
6.4
6.4.1
6.4.2
Equipment
Materials of Construction
Extruder Barrel
Screw Design
Screen Pack
Head and Die Design
Hopper
High Speed Tubing Extrusion
Equipment
Processing Parameters
Profile Extrusion
Equipment
Processing Parameters
Troubleshooting
Profile Extrusion
Equipment
Processing
41
41
41
41
42
42
42
42
42
43
44
44
44
44
44
44
45
7.
Rotational Casting
48
7.1
7.2
7.2.1
7.3
7.3.1
7.3.2
7.3.3
7.4
Equipment
Molds
Particle Size
Processing Parameters
Resin Drying Conditions
Part Heating Oven Parameters
Part Cooling Rates
Troubleshooting
48
48
48
48
48
48
49
49
38
39
39
Overview
1
General
Guidelines
2
Dimensional
Stability
3
Injection
Molding
4
Blow Molding
5
Extrusion
6
Rotational
Casting
7
4
Celcon®
acetal copolymer
List of Tables
Table 1.1
Table 2.1
Table 2.2
Table 2.3
Table 3.1
Table 3.2
Table 3.3
Table 4.1
Table 4.2
Table 4.3
Table 4.4
Table 4.5
Table 4.6
Table 4.7
Table 4.8
Table 5.1
Table 5.2
Table 5.3
Table 5.4
Table 6.1
Table 6.2
Table 6.3
Table 6.4
Table 6.5
Table 6.6
Table 7.1
5
Regulatory Listings
Typical Start-Up Conditions
Effect of Remolding (Regrind) on the
Properties of Unreinforced
Celcon® Acetal
Effect of Remolding (Regrind) on the
Properties of Glass-Coupled
Celcon Acetal
Effect of Processing Conditions
on Part Shrinkage
Shrinkage Before and After Annealing
Recommended Annealing Procedure
Typical Injection Molding Screw for
Plasticizing Celcon Acetal Copolymer
Typical Runner Size Recommendations
for Celcon Acetal Copolymer
Recommended Gate Dimensions for
Rectangular Edge Gates
Typical Start-Up Conditions
Approximate Cycle Times as a Function
of Wall Thickness – Unreinforced Grades
Effect of Molding Conditions on
Mechanical Properties Unreinforced Grades
Typical Molding Conditions for
Shrinkage Range - Unreinforced Grades
Troubleshooting Guide - Injection
Molding Celcon Acetal Copolymer
Comparison of Injection and Extrusion
Blow Molding Processes
Typical Screw Characteristics to Plasticize
Celcon Acetal Copolymer Blow Molding
Typical Blow Molding Conditions
Troubleshooting Guide - Blow molding
Recommended Metering Screw
Dimensions for Extruding Celcon Acetal
Typical Conditions for Tubing Extrusion
High Speed Tubing Extrusion
Troubleshooting Guide
Typical Conditions for Film
and Sheet Extrusion
Film and Sheet Troubleshooting Guide
Profile Extrusion Troubleshooting Guide
Rotational Casting Troubleshooting Guide
9
12
13
14
15
17
18
20
23
24
28
29
31
32
32
35
36
37
39
42
43
45
46
46
47
49
Celcon®
acetal copolymer
List of Figures
Overview
Fig. 3.1
Fig. 3.2
Fig. 3.3
Fig. 3.4
Fig. 4.1
Fig. 4.2
Fig. 4.3
Fig. 4.4
Fig. 4.5
Fig. 5.1
Fig. 5.2
Fig. 5.3
Fig. 5.4
Fig. 5.5
Fig. 5.6
Fig. 5.7
Fig. 5.8
Fig. 6.1
Fig. 6.2
Fig. 7.1
Effect of Molding Conditions and
Wall Thickness on Mold Shrinkage
Shrinkage due to Heat Aging for 9.0
Standard Melt Flow Grade of Celcon® Acetal
Water Absorption by Unfilled Celcon
Acetal Under Various Conditions
Dimensional Changes due to Water
Absorption by Unfilled Celcon Acetal
Typical Screw Profile for Injection
Molding Celcon Acetal
Recommended Check Valve Design
Recommended Molded-in Insert Designs
Outsert Molded Moving Parts: Gear,
Cam and Spring
Some Basic Gate Designs Suitable
for Celcon Acetal
Flow Pin Divider to Promote Smooth
Flow and Avoid Weld Lines
Parison Die with Adjustable Core
Pin for Control of Parison Thickness
Effect of Mold Temperature on Shrinkage
Effect of Cooling Time on Shrinkage
Effect of Blow Pressure on Shrinkage
Effect of Wall Thickness on Shrinkage
Landed Pinch-Off for Improved
Impact Strength
Blow Molded Fluidics Container
Recommended Metering Screw for Extrusion
Miscellaneous Post-Formed Profiles
Rotational Molding Process
16
1
17
18
General
Guidelines
2
Dimensional
Stability
3
Injection
Molding
4
Blow Molding
5
Extrusion
6
Rotational
Casting
7
18
19
20
24
24
25
35
36
38
38
38
38
39
39
41
45
48
6
Celcon®
acetal copolymer
1. Overview
1.1 Chemistry of Acetal Polymers
Acetal polymers are chemically known as
polyoxymethylenes (POM). Two types of acetal
polymers are commercially available:
Homopolymer is prepared by polymerizing
anhydrous formaldehyde to form a polymer
composed of oxymethylene repeating units
(-CH2O-). Acetal homopolymer products have
somewhat better short term mechanical properties
than the copolymer.
Copolymers, including Celcon® acetal copolymer,
are prepared by copolymerizing trioxane (a cyclic
trimer of formaldehyde) with a cyclic ether (usually
containing an ethoxy or other oxyalkylene group) to
form a polymeric chain composed of oxymethylene
(-CH2O-) and oxyethylene (-CH2-CH2-O-) or
similar repeating units. Copolymers have a wider
processing window, better long term mechanical
properties and superior chemical resistance compared
to homopolymers, and are inherently more stable and
resistant to thermal degradation during service life.
This is because the randomly dispersed comonomer
units block polymer “unzipping” under thermal
stress, or exposure to hot water or hot alkaline
solutions.
Both the homopolymer and copolymer are endcapped, and also contain specific additives to prevent
irreversible thermo-oxidative depolymerization
of the polymer backbone during processing.
1.2 General Characteristics
Celcon acetal copolymer is a high strength, crystalline
engineering thermoplastic material having an unusual
and desirable balance of properties. It is an ideal
candidate to replace metals and thermosets because
of its predictable long-term performance over
a wide range of in-service temperatures and harsh
environments. Celcon acetal retains properties such
as high strength, creep resistance, fatigue endurance,
wear resistance and solvent resistance under very
demanding service conditions.
Celcon acetal can be easily converted from pellet
form into parts of different shapes using a variety of
processes such as injection molding, blow molding,
extrusion, rotational casting and compression
molding. Rod, slab and sheet stock which can be
readily machined into desired shapes are also available.
7
1.3 Product Types
Both standard and special grades of Celcon acetal
copolymer are designed to provide a wide range of
properties to meet specific applications. Standard and
custom grades of Celcon acetal copolymer can be
obtained in pre-compounded color form or color
concentrates which may be blended with other
grades. All colorants used in Celcon resins are lead,
mercury, and cadmium-free, and all Celcon acetal
products conform to current environmental
(OSHA) regulations for these metals. Consult our
brochure: “Celcon Acetal Copolymer Short Term
Properties” (CE-4) for information on specific
grades. The most common categories of Celcon
resins are described below.
General Purpose: General purpose M-series products
are identified by melt flow rate. Divide the grade
number by 10 to obtain the melt flow rate. For
example, Celcon M90™ has a melt flow rate of 9.0
(grams per 10 minutes, per ASTM D 1238 or ISO
1133, @ 190°C and 2.16 Kg. load). In comparison to
M90, products designated by a higher melt flow rate,
i.e. M270, fill thinner walls and complex shapes more
readily, maintain the same strength and stiffness, but
exhibit a slight decrease in toughness. Products with
lower melt flow rates, i.e. Celcon M25, exhibit
increased toughness compared to Celcon M90 but
may be more difficult to mold into parts with thin
walls or long flow paths.
Glass Fiber Coupled: Glass fiber coupled (GC)
products provide higher strength, stiffness and creep
resistance than the unfilled grades. These products are
identified with a number indicating the percentage of
short glass fiber in the product and are based on
general purpose Celcon polymers. The glass fibers are
chemically coupled to the polymer matrix.
Glass Bead Filled: These glass bead (GB) filled
grades contain glass beads for lower shrinkage,
better dimensional tolerances and warp resistance,
and are especially helpful when molding large, flat
and thin-walled parts.
Low Wear: Low wear (LW) grades are chemically
modified to provide low coefficient of friction and
enhanced wear resistance, and are exceptional for
demanding applications requiring good sliding
properties, reduced gear and bearing noise and
enhanced lubricity.
Celcon®
acetal copolymer
Mineral Coupled: These mineral coupled (MC)
products contain chemically coupled mineral fillers in
varying percentages. The mineral filled grades are
recommended whenever resistance to warpage
(especially in thin sections) and dimensional stability
are key application parameters. They are generally
tougher than the glass bead filled polymers but are
more difficult to color uniformly.
Ultraviolet Resistant: The ultraviolet resistant (UV)
products are available with various melt flow rates in
natural and a wide variety of colors and are lead,
mercury and cadmium-free. They are specially
formulated for improved resistance to color shift and
mechanical degradation from ultraviolet light (both
sunlight and fluorescent lighting). Consult the Ticona
brochure, “Celcon® Ultraviolet-Resistant Grades
Extend Part Life in Harsh Environments” (CE-UV)
for further information about these products.
Weather Resistant: Weather resistant (WR) products
are formulated for maximum outdoor weathering
resistance. Several different melt flow rate grades are
offered. They are available in black color only.
Antistatic: These antistatic (AS) products are
chemically modified to decrease static build-up for
applications such as conveyer belt links and audio and
video cassette hubs and rollers.
Electrically Conductive: These electrically conductive
(EC) grades are used for applications requiring low
electrical resistance and/or rapid dissipation of static
build-up. Some electrically conductive grades contain
carbon fibers and exhibit high strength and stiffness.
Laser Markable: The laser markable (LM) grades of
Celcon acetal copolymer have been developed with
enhanced capability for laser printing. These black
products produce extremely robust white markings
for applications such as bar codes, graphic or
alphanumeric characters, and 2-D symbology.
One of the grades has good ultraviolet light stability.
Both grades have excellent toughness and dimensional
stability for many applications including
automotive parts.
Colors: Most grades are available in natural, black
and custom colors. There are standard color
concentrates available for use in all natural grades.
Custom color concentrates can also be made.
1.4 Regulatory Codes and Agency Listings
Many grades of Celcon acetal are in compliance with,
or approved under a variety of agency specifications
and regulatory standards as shown in Table 1.1. Not
all grades are covered by all regulatory listings. Call
Product Information Services at 1-800-833-4882 for
further information on which grades are approved
under the various regulations.
1.5 Product Support
In addition to our technical publications, experienced
design and application development engineers are
available for assistance with part design, moldflow
characterization, materials selection, specifications
and molding trials. Call your local Ticona Polymers
sales representative, or Product Information Services
at 1-800-833-4882 for further help.
Impact Modified: The impact modified (TX)
products are formulated to provide moderate to high
levels of improvement in impact strength and greater
flexibility compared to the standard product.
8
1
Celcon®
acetal copolymer
Table 1.1 · Regulatory Listings
Plumbing Code Bodies:
International Association of Plumbing
Mechanical Officials (IAPMO)
Building Officials Conference of America (BOCA)
Southern Standard Building Code
9
Plumbing fixtures and specific plumbing and mechanical
applications covered in the various codes
Canada Standards Association (CSA)
Plumbing fixtures, fittings and potable water contact items,
“UL” ratings in Canada
Plastic Pipe Institute (PPI)
Recommended Hydrostatic Design Stress (RHDS) rating
of 1,000 psi at 23°C (73°F) as an injection molded
plumbing fitting
Food and Drug Administration (FDA)
Repeated-use food contact applications including food
machinery components conforming to 21 CFR 177.2470
United States Pharmacopoeia (USP)
Class VI Compliant
NSF International
Standards 14, 51, 61
Items including plumbing components, beverage
dispensers, etc., for contact with potable water
Underwriters Laboratories (UL)
Various UL ratings for flammability, electrical and thermal
service use
International Association of Food Industry Suppliers (IAFIS)
Sanitary Standards 3A
United States Department of Agriculture (USDA)
Approved for direct contact use with meat and poultry
products
ASTM D 4181 [Supersedes ASTM D2133,
Military Specification LP-392-A, Mil-P-6137A(MR)]
General Material Specification
SAE J2274
Society of Automotive Engineers Global Specifications
ISO 9988-1, -2
Designation system processing conditions and
testing protocols for comparative properties.
Celcon®
acetal copolymer
Power Seat Belt
Transmission Gear Set
1
Celcon M90 Acetal Copolymer
®
™
Provides:
■
Lubricity
■
Low Coefficient of Friction
■
Resistance to Lubricants
■
Mechanical Strength
■
Fatigue Endurance
■
Surface Hardness
■
Dimensional Stability
■
Ease of Molding
10
Celcon®
acetal copolymer
2. General Guidelines
2.1 Storage and Handling
Celcon® acetal copolymer should be stored in its
original container on pallets in a dry place. Open
containers should be carefully resealed before
returning to storage. In the winter, containers of resin
should be brought into the warm processing area at
least 24 hours prior to use and allowed to come to
room temperature before opening. If this is not done,
moisture in the air may condense on the surface of
the pellets and lead to surface defects on molded or
extruded plastic parts. This is especially critical with
impact modified grades which can be moisture
sensitive and deteriorate during processing.
The use of a hopper magnet in the feedstream is
highly recommended to insure against any form of
metallic contamination which could occur while
transporting the resin and cause equipment damage.
Every effort should be made to avoid pellet spills or
loss. Spilled pellets can be very slippery and may
result in employee accidents. Pellet loss to the
environment could lead to fines or other penalties
under Storm Water Regulations issued by the
Environmental Protection Agency.
Ticona Polymers supports the Society of the Plastics
Industry Operation “Clean Sweep” program.
2.2 Safety and Health Information
The usual precautions must be observed as when
processing any hot and molten thermoplastic.
CAUTION: Normal processing temperatures
and residence times should not be exceeded.
Celcon acetal copolymer should never be heated
above 238° C (460° F) nor be allowed to remain
above 193° C (380° F) for more than 15 minutes
without purging. Excessively high temperature or
long residence time in a heated chamber can cause
the resin to discolor and, in time, degrade to release
formaldehyde, a colorless and irritating gas. This
gas can be harmful in high concentrations, so proper
ventilation is essential. If venting is inadequate, high
pressures could develop in the equipment which may
lead to blow back through the feed area. If no exit is
available for these gases, the equipment may
rupture and endanger personnel.
11
Consult the current Celcon acetal copolymer Material
Safety Data Sheets (MSDS) for health and safety data
for specific grades of Celcon acetal copolymer prior
to processing or otherwise handling these products.
Copies are available by calling your local Ticona sales
office or Customer Services at 1-800-526-4960 or
from the internet site, www.ticona.com.
2.3 Flammability
When ignited, Celcon acetal copolymer burns with
little or no smoke, and with a barely visible blue
flame. Combustion products are carbon dioxide and
water. If Celcon acetal copolymer burns with a
muffled flame and combustion is incomplete, carbon
monoxide and some formaldehyde may be released.
Exposure to high concentrations, especially in a
poorly ventilated area, can be harmful. For more
detailed information on worker exposure limits for
formaldehyde, refer to the Material Safety Data Sheet
for Celcon acetal copolymer.
WARNING: Avoid flame. Do not allow mixing
of this material with PVC, other halogen-containing
materials, and partially and/or fully crosslinkable
thermoplastic elastomers. Do not heat above
460°F (238°C). Avoid prolonged heating at or
above the recommended processing temperature.
Recommended melt temperatures 360 - 390°F
(182 - 199°C).
Avoid strong acids and oxidizing agents. Do not
allow the end use application to come in contact
with acidic solutions of pH = 4 or less, especially
mineral acid solutions like hydrochloric, sulfuric,
hydrofluoric, perchloric, nitric or phosphoric. Do not
use with strongly acid salts such as zinc chloride or
other Lewis acids. Do not use with chlorinated
water solutions which are not typical of domestic
potable water.
Celcon®
acetal copolymer
2.4 Drying
Celcon® acetal copolymer does not readily absorb
moisture and can normally be fed to the extruder or
molding machine without drying. However, if the
material has adsorbed moisture due to improper
handling or storage, drying may be necessary to
prevent splay and odor problems during processing.
It is good practice, and preferable for processing
consistency, to dry the resin before processing to
avoid potential production problems due to moisture.
Celcon acetal copolymer should be dried in a
dehumidifying oven or a hopper dryer. For oven
drying, the Celcon pellets should be spread evenly in
less than one-inch deep layers on trays and placed
in the oven for three to four hours at 82°C (180° F).
For a hopper dryer, a three hour residence time at
82°C (180°F) is sufficient.
Caution: Formaldehyde fumes may be released;
good ventilation is required in the area.
2.5 Processing Start-Up
To start up a machine which was shut down
with Celcon acetal copolymer in the cylinder, the
nozzle must not be blocked. This is one of the main
reasons a nozzle heater band is recommended. See
Table 2.1 for the typical start-up conditions.
The procedure for starting a machine with Celcon
acetal copolymer already in the cylinder is as follows:
Table 2.1 · Typical Start-Up Conditions
Cylinder Temperature:
Rear
360°F
Center
370°F
188°C
Front
380°F
193°C
Nozzle
182°C
390°F
198°C
Melt Temperature
(measured by “air shot”)
360 - 390°F
182 - 199°C
Mold Temperature
180 - 250°F
82 - 121°C
1st Stage Injection Pressure
11,000 - 20,000 psi
(75-138 MPa)
2nd Stage (Hold) Pressure
11,000 -20,000 psi
(75 - 138 MPa)
1st Stage Injection Fill Time
2 - 5 seconds
1st Stage Injection Speed
moderate
Screw Speed
20 - 40 rpm
Back Pressure
0 - 50 psi (Higher end
if using concentrates)
Cushion
1/8 - 1/4 in.
Drying
180°F (82°C) for 3 hrs.
(Usually not necessary)
Set the nozzle temperature at 400-420°F (204-216°C)
and cylinder temperatures to 250-275°F (121-135°C).
As the nozzle and cylinder come up to temperature,
the nozzle orifice should be watched for signs of
drooling. When drooling occurs (indicating that the
material in the nozzle is fully molten), cylinder
temperatures may be raised to 370-380°F (188193°C). A few purge shots should then be taken at
reduced injection pressure and speed with no booster.
If there is no blockage, cylinder and nozzle
temperatures as well as other conditions may be
adjusted as desired, the heating cylinder closed to the
mold, and molding started on cycle.
When Celcon acetal copolymer is started in an
empty cylinder, nozzle temperature should be set at
400-420°F (204-216°C) and cylinder temperature
at 370-390°F (188-199°C). Using low pressure
(approximately 5,000 psi) and slow injector speed,
pack Celcon resin into the cylinder with several short,
deliberate strokes of the screw (plunger). After a few
minutes, commence another series of strokes and
repeat this procedure.
As the material melts, successive packing strokes will
work the material farther into the cylinder until it is
full. A few air shots should then be taken to clear the
cylinder of any air bubbles which may have been
entrapped during the packing process. Cylinder and
nozzle temperatures, cycle time and other conditions
may then be adjusted as required and molding
may proceed.
In all cases, once Celcon acetal copolymer is
introduced into the cylinder, it should be kept
moving to prevent overheating. If a delay of more
than 15 minutes is anticipated, the cylinder should be
backed away from the mold and the machine purged
(on cycle or manually) every few minutes. If a longer
delay is expected, it is recommended that the machine
be shut down entirely, following the procedure
outlined under “Shutting Down a Machine
with Celcon.”
2.6 Changing from Another Resin to
Celcon Acetal
If the other resin in the processing equipment
requires a higher melt temperature than Celcon acetal
copolymer (e.g. nylon, polycarbonate, etc.) or is a
resin such as PVC (see note p. 2-1) which can
chemically react with Celcon and cause degradation,
the cylinder must first be thoroughly purged clean of
these resins.
12
2
Celcon®
acetal copolymer
High density polyethylene or acrylic is suitable for
purging and should be put in the machine directly
behind the resin already in the cylinder and kept at
the same temperature settings. After all traces of the
other resin are removed, the temperature should be
set at 188-199°C (370-390°F). After the temperature
has stabilized, Celcon® acetal copolymer can then
be placed in the machine to remove the purge
compound. The machine settings can be adjusted to
the desired production conditions.
2.7 Changing from Celcon Acetal Copolymer to
Another Resin
In changing from Celcon acetal copolymer to another
resin, similar considerations as described earlier will
apply. When the machine is started up with Celcon
acetal copolymer in the cylinder, the proper
procedure outlined in “Start-Up” must be followed
before changing over to another resin. If the new
resin requires a higher or lower temperature or is one
that can chemically react with Celcon acetal
copolymer (such as PVC), an intermediate purging
compound such as polyethylene or acrylic must first
be used to thoroughly clean the machine. The new
material should be introduced to the machine only
after proper cleaning and adjustment to the
appropriate processing conditions.
2.8 Processing Shutdown
To shut down a machine with Celcon® acetal, the
same precautions must be taken against blockage of
the nozzle as when starting up the machine. The
nozzle should be the last part of the heating cylinder
assembly to cool. Leave the screw in the forward
position.
glass fiber reinforced Celcon acetal, some loss in
mechanical properties may be seen due to breakage of
the glass fiber reinforcement.
Knife-type grinders with a 5/16 in. (8mm) screen are
recommended for grinding resin sprues, runners and
off-test pieces. As with other thermoplastics,
regrinding may produce enough dust to cause
discomfort to the operator. In addition, acetal
copolymer dust can present an explosion hazard.
Normal safety precautions such as the use of a dust
mask and adequate ventilation are highly
recommended. Dust can be minimized by keeping
knife blades sharp, and using proper clearances and
screen size.
Surface absorption of water on regrind tends to be
slightly higher than for pellets because of the larger
surface area. As a result, it is essential that regrind be
properly dried before use to avoid any moisture
related production problems.
To insure maximum retention of mechanical
properties, regrind usage should be limited to no
greater than 25% for most applications. Special care
should be taken to prevent contamination by other
resins, especially PVC, other halogenated polymers
and partially and/or fully crosslinkable thermoplastic
elastomers. For any processing technique, it is
particularly important to also avoid dirt and other
impurities which can create surface blemishes or
plug flow paths. Because of the possibility of
contaminating regrind with metal (such as from the
regrinder knife blade), the use of a hopper magnet in
the feedstream is strongly recommended.
■ Set the nozzle temperature at 204 - 221°C
(400 - 420°F)
■ Turn off the cylinder heaters.
Table 2.2 · Effect of Remolding on the Properties
of Unreinforced Celcon® Acetal
■ Shut off the feed to the cylinder.
■ Purge and run the barrel dry.
■ Leave the screw in the forward position.
■ Shut off the power to the machine.
2.9 Use of Regrind
Celcon acetal can be reprocessed a number of times
without significant change in physical properties or
processing characteristics. Tables 2.1 and 2.2 show the
effect of remolding unreinforced and fiberglass
reinforced Celcon acetal copolymer. When remolding
13
1st
Molding
5th
Molding
11th
Molding
Tensile yield strength, MPa
Value
percent retention
59.3
—
59.6
101
57.2
97
Notched Izod impact
strength @ 23°C (73°F), J/m
Value
percent retention
62.5
—
66.8
107
68.3
109
Property
Celcon®
acetal copolymer
Table 2.3 · Effect of Remolding on the Properties
of Fiberglass Reinforced Celcon® Acetal
1st
Molding
3rd
Molding
5th
Molding
110
—
92.5
81.7
85.6
75.6
Tensile modulus, MPa
Value
percent retention
8,280
—
7,660
92.6
6,970
84.2
Flexural modulus, MPa
Value
percent retention
7,250
—
6,830
94.1
6,350
87.6
Property
Tensile yield strength, MPa
Value
percent retention
2.10 Secondary Operations
2.10.1 Finishing
Celcon® acetal can be readily machined, drilled,
punched, buffed, sawed, sanded and routered by
methods commonly used on soft metals such as brass
and aluminum. It is a good idea to direct a
jet of cool, compressed air on the machined area
to prevent overheating and sticking of the shavings to
the molded part. High tool speed and slow feed is
recommended. Avoid excessive speeds and pressures.
Standard metal working tools are satisfactory for
machining Celcon acetal.
Printing by conventional silk screen dry-offset, direct
techniques, etc., require special inks for satisfactory
adhesion. Conventional surface adherent inks are
available in addition to special ones which penetrate
the material and offer outstanding abrasion resistance.
Printing inks usually require a high temperature bake
for best adhesion.
Transfer labels exhibit moderate to good adhesion to
Celcon acetal. As many as four colors can be applied
using this method. Decoration with transfer labels is
usually less costly than silk screening for multiple
color decoration, and when a very large number
(millions) of parts are involved.
Paper labels, the lowest cost decorating method, are
available in many standard types including some with
heat or pressure sensitive adhesives which give
unusually good bonding to Celcon acetal surfaces.
Hot stamping can be used as long as recommended
procedures and foil laminates are used to obtain
satisfactory adhesion.
For information on machining, consult Chapter 12,
“Machining and Surface Operations” of Designing
with Celcon Acetal Copolymer (CE-10), or call
Product Information Services at 1-800-833-4882.
2.10.2 Surface Treatment
Celcon parts can be surface treated by laser marking,
printing, labeling and hot stamping.
Black, laser markable grades are available which can
also possess good ultraviolet light stability if required,
such as for many automotive applications. These
products produce extremely robust white markings
for applications such as bar codes, graphic or
alphanumeric characters, and 2-D symbology.
14
2
Celcon®
acetal copolymer
3. Dimensional Stability
When manufacturing parts from Celcon® acetal, it
is important to understand the factors which may cause
dimensional changes. The dimensional effects of
shrinkage (both in-mold and post-molding), annealing
and moisture absorption are discussed in this chapter.
3.1 Shrinkage Caused by Processing
(Injection Molding)
Many factors influence mold shrinkage. They include
thermal properties of the resin, filler type and level,
part design (especially wall thickness), gate size, and
resin flow direction. Molding conditions, including
melt and mold temperature, injection speed and
pressure are particularly important. Variations in
mold surface temperature and mold injection
pressure, for example, can cause shrinkage in test bars
made from one specific grade (Celcon M90™ ) ranging
from 1.2 to 3.7%. As a result, it is difficult to predict
the exact mold shrinkage of a specific part.
Typical effects of processing conditions on part
shrinkage are summarized in Table 3.1.
Shrinkage of standard unfilled Celcon acetal
products measured on laboratory test specimens
cover a range from 1.2 - 2.4%. Mold shrinkage for an
actual part has been observed as high as 3.7%.
Consult the Celcon Short Term Properties
Brochure (CE-4) for typical values of specific
Celcon grades. This information should be used only
as a guide in estimating shrinkage for tool
construction. Additional guidance is provided in
Table 3.1 · Effect of Processing Conditions
on Part Shrinkage
Molding
Effect on Part Shrinkage
Wall thickness increases
Increases
Gate size increases
Decreases
Pressure increases
Decreases
Mold Temperature
increases
Increases
Melt Temperature
Decreases (for parts
up to 3.2 mm)
No effect (for parts 3.2 - 9.5
mm thick)
Resin melt viscosity
increases
15
Increases with increasing
viscosity when molded
under similar processing
conditions; i.e., Celcon
M270 has lower shrinkage
than Celcon M25
Figure 3.1 which shows the effects of molding
conditions and wall thickness on mold shrinkage,
and Chapter 4 of this manual which details mold
design for injection molding.
Of the process variables, injection hold (or packing)
pressure and time, injection speed and mold
temperature are the most significant, and about equal
in importance in controlling mold shrinkage. Material
temperature is also significant, but to a lesser degree.
Of the part and mold variables, wall thickness has the
most significant effect on part shrinkage followed by
gate size. Gate location is of lesser importance, but
still significant, and is highly dependent on part
geometry. Parts which are relatively long and narrow
and gated at the narrow end will have material flow
predominantly in one direction. This will result in
anisotropic shrinkage. For unreinforced Celcon
acetal, there will be less shrinkage in the width
(transverse) than in the length (flow) direction. For
reinforced Celcon acetal, the opposite will occur.
Shrinkage will be less in the length direction than in
the width direction.
The reason for this is that reinforcing glass fibers
align themselves in the direction of the material flow
and, when the part cools and the material solidifies,
the fibers inhibit shrinkage in this direction.
Anisotropic shrinkage increases with increasing wall
thickness and, in thick parts, with increasing gate size.
The precise shrinkage for a given part may be
obtained by initially designing the mold cavities with
oversized cores and undersized cavities. Following
this, parts should be molded at equilibrium molding
conditions, which provide the best overall results for
mold cycle time and part quality for production.
Parts should then be conditioned at room
temperature for at least 24 hours (preferably 48
hours). Dimensions of critical areas can then be
measured and the cavity and core machined, if
necessary, to bring the molded parts within
dimensional tolerances.
Celcon®
acetal copolymer
Fig 3.1 · The Effect of Molding Conditions and Wall Thickness on Mold Shrinkage for Celcon® M90™ Acetal
Part Wall Thickness
2.0 mm
Mold
Surface
Temp.
29°C
Shrinkage (%)
3.8
3.6
3.2
3.2
2.8
2.8
2.8
2.8
2.4
2.4
2.4
2.0
CB A
G
1.6
1.2
1.2
Shrinkage (%)
16
B
2.0
C,D
F,G
1.6
C,D
E,F,G 1.2
8
20
12
16
20
2.0
1.2
8
12
16
20
8
3.8
3.6
3.8
3.6
3.2
3.2
3.2
3.2
2.8
2.8
2.8
2.4
2.0
A,B,D
G
2.0
G
1.6
1.2
8
12
16
8
20
12
16
1.2
3.8
3.6
3.2
3.2
3.2
2.8
A
B
D
2.4
2.4
12
16
20
8
3.2
A
B,D
2.4
2.4
2.0
2.0
2.0
1.6
1.6
1.6
1.6
1.2
1.2
1.2
1.2
12
16
20
8
12
16
20
16
20
8
12
A
B,D
2.8
2.0
8
12
3.8
3.6
2.8
A
B
D
2.0
1.2
8
20
A
B
D
G
2.4
1.6
3.8
3.6
16
A
1.6
3.8
3.6
2.8
B
D
G
2.0
20
12
2.8
2.4
A
B
D
3
1.6
3.8
3.6
2.4
A
B
C,D
E,F,G
2.4
3.8
3.6
1.2
Shrinkage (%)
A
B
1.6
12
A
2.0
10.2 mm
3.8
3.6
3.2
1.6
Mold
Surface
Temp.
125°C
5.1 mm
3.8
3.6
3.2
8
Mold
Surface
Temp.
79°C
4.1 mm
3.8
3.6
16
20
8
12
16
20
Injection Pressure (psi x 103)
NOTE: Melt temperature: 190-204°C.
Shrinkage measured in the direction of
material flow.
Gate
A
B
C
D
E
F
G
Area (mm2)
1.9
3.9
7.7
12.2
18.1
23.9
31.3
16
Celcon®
acetal copolymer
3.2 Part Warpage
Wall thickness should be as uniform as possible.
Differences in cooling rates of thick and thin sections
is a key contributor to warping. Other factors
affecting warpage are:
Fig 3.2 · Shrinkage Due to Heat Aging for 9.0
Standard Melt Flow Grade of Celcon® Acetal
Shrinkage Due to Heat Aging, 3.2 mm Thick Specimen
Flow Direction
■ Gate size
■ Filler type/level
■ Orientation of fillers
■ Mold cooling
Shrinkage, %
■ Gate location
■ Mold temperature
115°C Oven
3.0
2.8
82°C Oven
2.6
2.4
2.2
2.0
23°C (Ambient)
0
1
2
3
4
Time, Months
5
6
3.3 Post-Molding Shrinkage
After mold shrinkage has occurred and the part
reaches ambient temperature, further mold shrinkage
may occur as time passes. This post-molding
shrinkage is usually related to stress relaxation and
additional crystallization within the molded part
resulting in a permanent shrinkage of the part and it is
affected by cooling rate, i.e. mold temperature and
part thickness. Hot mold temperatures of 82 - 120°C
(180 - 250°F) reduce post-mold shrinkage to nearly
negligible values. At ambient temperatures, this
shrinkage is relatively small, on the order of 0.1 –
0.2% for the standard unfilled 9.0 melt flow grade of
Celcon® acetal copolymer.
unfilled Celcon acetal test specimen. Annealing
molded parts will lead to dimensional changes so that
allowances must be made for any additional
shrinkage. The decision on whether to anneal parts of
Celcon acetal copolymer in a post molding operation
should be made while the part and mold design are in
the initial planning stage and certainly prior to
machining the mold cavities and cores to size. As
parts of Celcon acetal copolymer will shrink in
annealing, allowance must be made for the additional
shrinkage in determining the mold shrinkage which
should be used for the mold cavities and cores.
Continuous exposure of the molded parts to high
temperatures accelerates both the rate and magnitude
of the post-molding shrinkage. Figure 3.2 illustrates
the shrinkage behavior of the standard unfilled 9.0
melt flow grade of Celcon acetal copolymer after a six
month exposure at several temperatures in the flow
direction for a part 3.2 mm thick.
As a guide, the typical values of mold shrinkage and
total shrinkage after annealing obtained on 1/8 inch
(3.12 mm) and 1/2 inch (12.7 mm) thick test bars, 1/2
inch (12.7 mm) wide by 5 inches (127 mm) long are
shown in Table 3.2. The specimens were end-gated,
molded using a mold temperature of 200°F (93°C)
and annealed in oil at 305°F (152°C).
It is extremely important to utilize mold surface
temperature in excess of the anticipated maximum
temperature that the part may see in end use since
stress is frozen into the part at the mold temperature.
The frozen-in stresses will be relieved by annealing
causing additional deformation.
In many cases, properly molded parts will exhibit
satisfactory dimensional stability, especially at
continuous service temperatures of 82°C (180°F) or
below. A high, 82 -120°C (180 - 250° F) mold
temperature will optimize the dimensional stability of
an as-molded part for service temperatures up to
82°C (180°F).
3.4 Annealing
Annealing of Celcon acetal copolymer is
sometimes useful to relax molded-in stresses and
stabilize dimensions. The amount of shrinkage that
may occur primarily depends on cooling rate that is
affected by part thickness and mold temperature.
Table 3.2 shows examples of the shrinkage resulting
from annealing two different thicknesses of an
17
Table 3.2 · Shrinkage Before and After Annealing
Part Thickness,
mm (in.)
3.18 (0.125)
Annealed
152°C (305°F)
No
Flow
Direction, %
2.2
Transverse
Direction, %
1.8
3.18 (0.125)
Yes
2.7
2.0
12.7 (0.500)
No
2.6
2.0
12.7 (0.500)
Yes
3.0
2.0
Celcon®
acetal copolymer
Table 3.3 · Recommended Annealing Procedure
Required Service Temperature
Recommendation
In-service temperature higher than 82°C (180°F)
Annealing may be necessary to improve the dimensional stability of the molded part
Annealing Parameters
Recommendation
Time
As a general rule, anneal for 15 minutes for each 3.2 mm (1/8 in.) of wall thickness if using
an annealing liquid; longer if annealing in an air oven
Temperature
152°C ± 2°C (305°F ± 5°F)
Medium
Any refined or silicone oil which is not acidic. Oil is preferred over air because it is a better
conductor of heat and provides a blanket to minimize or prevent oxidation
Cooling
Cool annealed parts slowly (one hour for every 3.2 mm of wall thickness).
In-service temperature of 82°C (180°F) or below
Generally, properly molded parts will not require annealing
In some cases, however, because of in-service
temperatures, annealing may be required, especially
where dimensional stability is of critical importance.
Some general guidelines for annealing are given
in Table 3.3.
In cases where tighter tolerances are required,
precision tooling as well as molding by using control
feedback loops on molding equipment, and using a
minimum number of tooling cavities will help to
achieve this objective.
Circulating air ovens and oil baths capable of
providing a uniform temperature of 152 ± 2°C
(305 ± 5°F) are recommended for annealing Celcon
acetal. While equipment offering lower annealing
temperatures may be suitable for some applications, it
is not preferred because the annealing time to obtain
best results can be expected to increase significantly
with decreasing temperature.
Careful consideration should be given to the need for
very tight tolerances to avoid excessive mold and
processing costs. Also, it may be unreasonable to
specify extremely close tolerances on a part which
will be exposed to a wide temperature range.
3.5 Tolerances
Dimensional tolerance can be defined as a variation
above and below a nominal mean dimension. If
recommendations for part/mold design and proper
molding are followed, typical tolerances expected are:
■
± 0.2% up to the first 25 mm (1 inch or less)
■
± 0.1% for additional length over 25 mm (1 inch)
Fig 3.3 · Water Absorption by Unfilled Celcon®
Acetal Under Various Conditions
Water Immersion @ 82°C
1.0
Water Immersion @ 23°C
Part Exposure @ 23˚C/93% Rel.Hum.
0.5
0
(%) Contraction
Boiling Water Immersion @ 100°C
1.5
Part Exposure @ 23˚C/50% Rel.Hum.
0
20
40
60
Time, Days
80
Fig 3.4 · Change in Linear Dimensions at
23°C (73°F) and 50% Relative Humidity
(%) Extension
Water Absorbed, %
2.0
3.6 Moisture Absorption
Some dimensional change is seen when Celcon acetal
copolymer is exposed to moist environments. The
changes are usually lower than those observed for other
engineering thermoplastics. Figures 3.3 and 3.4 show
that after one year of continuous exposure to high
humidity or immersion at various water temperatures,
dimensional changes are minimal. See page 5.5 of the
Celcon Design Manual for additional data on the effects
of water on material properties.
100
0.3
0.2
0.1
0
0.1
en
im
ec ter
Sp Wa
t
e
W sing
Lo
Dry
Gain Specim
e
ing
Wa n
ter
0.2
1 Yr.
1 Day
0.3
4
10
10
5
6
10
7
10
8
10
Time, Seconds
18
3
Celcon®
acetal copolymer
4. Injection Molding
4.1 Equipment
Injection molding is the most widely used method for
processing acetals. Celcon® acetal can be successfully
processed in all types of commercially available
injection molding machines designed for
thermoplastics. These may be single or two stage,
reciprocating and stationary screw injection types.
Screw injection provides fast plastication and a
homogeneous melt which will permit molding parts
at reduced melt temperatures and pressures, as well as
decreased cycle time.
A single stage reciprocating screw injection molding
machine is most commonly used with Celcon acetal.
4.1.1 Barrel and Screw
While the standard metering screw available in
commercial reciprocating-screw injection molding
machines can be used, it is not totally satisfactory.
Problems such as excessive oxidative deterioration,
poor thermal homogeneity, unmelted resin pellets
and/or lower productivity rates can sometimes occur.
A screw such as the one shown in Figure 4.1 having
the following characteristics is recommended for
optimum results:
■ The L/D (length-to-diameter) ratio should
preferably be no less than 16/1 and no greater
than 24/1.
■ The flight clearance should be approximately
0.13 mm (0.005 in.).
■ The flight width (w) should be approximately
10% of the screw diameter.
■
For unfilled Celcon resins, the screw should be
hard faced or coated with a corrosion resistant
material such as chrome or Stellite 6.
■ For filled reinforced Celcon resins, the screw and
barrel should be hard faced or coated with a
corrosion and abrasion resistant material such as
tungsten carbide, CPM-9V or Colmonoy 56 for
screws (CPM-10V, Bimex, or Xaloy 101 or 306
for barrels).
■ The screw should be fitted with a non-return
valve to prevent back flow of resin in the screw
channel as the resin is injected into the mold. The
valve should have large clearances and wellradiused corners when open to ensure that the
melt flows freely, is not “hung-up” and is not
overheated.
■ The channel depth ratio, i.e., the ratio of the
channel depth in the feed zone to that in the
metering zone, (h1 /h2), should be between 3 and
4.5. A channel depth ratio of 4:1 is recommended
for optimum results.
■ The feed section should occupy about 40% of the
screw length, the transition zone about 30% and
the metering section about 30%.
Typical screw dimensions for injection molding
screws are given in Table 4.1.
A diagram of a recommended check valve is shown in
Figure 4.2 and indicates the need for flats to be
machined at the mating joints B and C. The flutes in
the screw tip, A, and the flow path through the check
Fig 4.1 · Typical Injection Molding Screw for Plasticizing Celcon® Acetal Copolymer
Metering
Transition
Feed
h2
h1
w
19
D
Celcon®
acetal copolymer
Table 4.1 · Typical Screw Dimensions for Plasticizing Celcon® Acetal Copolymer for Injection Molding
Screw Diameter (in.)
Metering (in.)
Channel Depth
Feed (in.)
Ratio
1 1/2
0.083
0.29
3.5
40-50
30-20
30
2
0.089
0.30
3.4
40
30
30
2 1/2
0.097
0.32
3.3
40
30
30
3 1/2
0.108
0.35
3.2
40
30
30
4 1/2
0.119
0.38
3.2
40
30
30
ring, D, should be generously proportioned and well
radiused to ensure minimum flow restriction. The
mating surfaces between the screw tip, A, and the
check ring seal, E, and the check ring seal and the
screw, F, should be cylindrical and machined flush to
ensure no projections into the flow. All surfaces
contacting the flow should have a surface finish better
than 16 r.m.s. and all flow channels should be free
from sharp turns.
Although standard unopened containers of Celcon®
acetal usually do not have to be dried, a vented barrel
machine with a two stage extraction screw may be
used if the level of moisture encountered during
molding is high enough to warrant removal. When
improved melting is required to reduce the cycle time,
a barrier flight may be introduced in the first stage.
The barrier flight clearance should be 1.02 - 1.52 mm
(0.040 - 0.060 in.)
4.1.2 Nozzles
Conventional free flow and reverse taper nylon-type
nozzles fitted with a heater band for temperature
Barrel
Nozzle
Adapter
Check Ring
E
F
Screw
B
Screw Tip
D
Check Ring Seal
control of the nozzle are recommended for Celcon
acetal copolymer.
Caution: Nozzle designs with positive shut-off
devices are not recommended for safety reasons,
although they have been successfully used.
Formaldehyde gas may be released from Celcon
acetal in the molding process, particularly if left at
elevated temperature in the heated barrel for an
extended period. This gas must be free to escape
through the nozzle. If the nozzle is blocked for any
reason such as by malfunction of the positive shut-off
device or resin freeze-off in the nozzle, sufficient
pressure could develop to cause blow-back of the
resin through the feed zone and hopper or create
other hazardous conditions.
A nozzle heating band with independent temperature
control is recommended for fine tuning nozzle
temperature to prevent nozzle drool or freeze-off of
resin in this area. While a powerstat (rheostat) can be
satisfactorily used for temperature control, indicatingtype temperature controllers are preferred.
4.1.3 Plasticizing Capacity
As with other engineering plastics, Celcon acetal
should not be exposed to excessive temperatures or
very long residence times. The shot weight for Celcon
acetal should be in the range of 50-75% of the rated
machine capacity for best results.
Fig 4.2 · Recommended Check Valve
C
Zone Length as % of screw length
Feed
Transition
Metering
4.1.4 Clamping Force
Clamping force should be high enough to prevent the
mold from opening during resin injection at
maximum pressure and speed. Usually 5-10 tons
clamping force per square inch of projected area
(including molded parts, sprue and runners) is
adequate for molding Celcon acetal copolymer. The
clamping force must exceed the projected area times
the second stage pressure.
20
4
Celcon®
acetal copolymer
4.2 Mold Design
4.2.1 General Criteria
Standard industry principles for good mold design
and construction apply to the design of molds for
processing Celcon® acetal copolymer. Conventional
2-plate, 3-plate and runnerless molds may all
be used.
4.2.2 Mold Bases
Mold bases should be fabricated in a suitable steel
grade and be made sturdy enough with pillars to
adequately support the cavities and the cores without
buckling of the retainer plates during injection
molding. They should also be large enough to
accommodate water cooling channels to provide
uniform mold temperature. This operation is essential
to produce acceptable parts.
4.2.3 Mold Cavities and Cores
The selection of steels for the mold can be critical to
its successful performance. Just as resins are
formulated to satisfy processing and performance
requirements, steels are alloyed to meet the specific
needs for mold fabrication, processing and its
intended use. There are many different parts to the
mold, e.g. cavity, gates, vents, pins, cores, slides, etc.,
and these may have different requirements. For
example, some applications may require a mold steel
with high hardness to resist wear and abrasion at the
parting line while another application may require
toughness to resist mechanical fatigue. Usually, steels
with higher hardness and wear resistance properties
tend to be more brittle and steels with higher
toughness will show less wear resistance. The
selection process of the tool steels should include
input from the tool steel supplier, the mold designer
and mold fabricator in addition to the resin supplier.
Post-treatment of the mold can be used to reduce the
propensity for wear. Inserts should be considered
where wear may be a concern and long production
runs are anticipated. For example, P-20 tool steel can
be successfully used for unfilled Celcon acetal
copolymer grades where a limited production run is
anticipated and Rc 58 -60 tool steel may be required
for molding a highly glass filled grade where an
extensive production campaign is anticipated.
Beryllium-copper cavities are also satisfactory for
manufacturing good parts and offer the advantage of
high thermal conductivity for good heat transfer and
21
prevention of hot spots in the mold. Hobbed cavities
will work but lack the inner toughness of the alloy
steels and are more susceptible to collapse under
localized stress.
For prototyping or short production runs, prehardened steel (RC 30-35), zinc alloys or aluminum
are acceptable but may not be durable enough for
long or high volume production.
4.2.4 Mold Surface Finish
A wide variety of surface finishes can be used with
Celcon acetal, as the resin exhibits excellent mold
definition. Various surface finishes, designs, script,
etc., can be obtained by using standard techniques
such as sand blasting, vapor honing, embossing and
engraving the mold cavities and cores. Flash chroming
is recommended to prevent rust and
preserve a highly polished surface condition. Matte
finishes are also achievable with an appropriate
metal surface treatment.
Several factors affect surface finish, including
condition of the mold surface itself, mold
temperature, cavity pressure, part configuration, wall
thickness, resin melt viscosity and flow pattern. A
check list of the key parameters is shown below:
For mold surface condition and surface temperature,
■ Check mold surfaces for nicks, blemishes, etc.
■ Check for worn surfaces from glass-reinforced
resins.
■ Make sure the melt temperature is not on the low
side; this can lead to abrasion from reinforced
and filled resin grades.
■ Mold surface temperatures should be high
enough to prolong freezing of the melt in the
cavity and gate, allowing better pressure transmission to the part extremities. Surface pit marks
and visible flow lines are indications of low mold
surface temperature.
■ A minimum mold surface temperature of 82°C
(180°F) is recommended for thin-walled parts
(< 1.5 mm or 0.06 in. or less). Lower surface
temperatures may be satisfactory for thickerwalled parts, but precautions should be taken
against increased post-molding shrinkage.
Celcon®
acetal copolymer
For cavity pressure,
■ Packing pressure must be adequate to force the
melt against the mold surface and keep it there
until a cooled surface film has formed to insure
adequate reproduction of the surface. If the pressure drop from the gate to the furthest point of
fill is too high, the frozen skin may pull away
from the mold surface as the resin shrinks, leading to a shiny area in an otherwise matte surface.
■ The gates should be large enough that the cavity
pressure is adequate to completely fill the part.
If necessary increase the gate size, relocate the
gate or add additional gates.
■ Ensure that the injection hold time is adequate to
prevent loss of cavity pressure before resin
freeze-off in the gate.
■ Pit marks in the surface are a clear indication of
low cavity pressure.
For part configuration,
■ Ensure that the resin melt flow path is not too
long or too complex.
■ Check the fill rate to ensure adequate cavity
pressure.
quate fill. Increasing the melt temperature and
using a faster fill rate may marginally increase
packing pressure and eliminate the problem.
Be careful not to exceed the critical melt shear
rate, which may lead to resin flow lines, splay and
pit marks. Refer to the discussion on excessive
melt shear during runnerless molding (page 4-5)
for further comments.
4.2.5 Sprue Bushings
Standard sprue bushings with a taper of 2 1/2° per
side perform satisfactorily with Celcon® acetal.
The sprue diameter should be larger than the mating
end of the molding machine nozzle to prevent an
undercut and facilitate ejection of the sprue.
The end of the sprue bushing which mates with the
runner should be larger than the diameter of the
runner and be radiused at the junction. Opposite the
junction of the sprue bushing and the runner,
provision should be made for a cold slug well and a
standard “Z” (or other design) sprue puller. The sprue
puller pin should be kept below the runner system to
prevent interference with resin flow.
Secondary sprues used for gating in 3-plate molds
should have a taper of 2° - 3° included angle and
should also be radiused where they join the runner.
The sprue size must be larger than the maximum wall
thickness of the molded part.
For wall thickness,
■ Injection fill pressure should be adequate,
especially where a part has a thick wall-thin wall
configuration. Otherwise a too low cavity pressure may result.
■ Wall thickness should not be too thick in relation
to gate size; otherwise jetting or tumbling of the
melt may occur, creating “fold-over lines” and
inadequate surface definition.
■ Gate size should not be too small for the wall
thickness; otherwise sink marks may occur. Use a
relatively coarse grain on the mold surface and a
rib thickness 50% of the adjoining wall surface in
high-shrink resins to assure sink-free parts.
For resin melt viscosity,
■ Melt viscosity may in some cases be too high to
allow adequate packing of the cavity; runners
and gates may have to be enlarged to assure ade-
4.2.6 Runners
In designing a runner system, it is preferable to
restrict the length and diameter to minimize the
amount of material that has to be recycled. Runners
should be as short as possible and adequate in crosssectional diameter to allow fill of the mold cavities
while preventing freeze-off. Avoid the use of sharp
corners; turns should be curved to promote
streamline flow and minimize stagnant areas. Full
round, half round and trapezoidal cross-section
runners are all acceptable, but full round runners are
preferred. Suggested dimensions for full round
runners are shown in Table 4.2, page 4-5. Runners
should be made thicker than the maximum wall
thickness of the molded part.
When a multi-cavity mold is used, the runner
system should be balanced, i.e., the flow paths
from the sprue to the far end of each cavity should
be equivalent.
22
4
Celcon®
acetal copolymer
Table 4.2 · Runner Size Recommendations for Celcon® Acetal Copolymer
Part thickness diameter mm (in.)
Runner length mm (in.)
Minimum runner diameter mm (in.)
Less than 0.51 (0.020)
Up to 50.8 (2)
3.18 (0.125)
0.51 - 1.52 (0.020 - 0.060)
Greater than 50.8 (2)
4.78 (0.188)
1.52 - 3.81 (0.060 - 0.150)
Up to 101.6 (4)
4.78 (0.188)
1.52 - 3.81 (0.060 - 0.150)
Greater than 101.6 (4)
6.35 (0.250)
3.81 - 6.35 (0.150 - 0.250)
Up to 101.6 (Up to 4)
6.35 (0.250)
3.81 - 6.35 (0.150 - 0.250)
Greater than 101.6 (Up to 4)
7.92 (0.312)
4.2.7 Runnerless Molding
In comparison with cold-runner molding, runnerless
molding can reduce the amount of resin per molding
cycle, shorten production cycle time, enhance
productivity and improve part quality. It is estimated
that approximately 25% of all Celcon® acetal
molding jobs are currently being performed using
runnerless molds.
Celcon acetal copolymer is well suited to the demands
of hot runner molding. Celcon acetal copolymer has
better thermal stability, important because of the
longer heat history during runnerless molding. Celcon
acetal copolymer processes at least 10°C (18°F) lower
than some other acetals, reducing heating
requirements and producing faster molding cycles.
Some applications are natural fits with runnerless
tooling; i.e. applications such as medical parts, where
regrind cannot be used. Hot runners can also be
justified because they eliminate scrap and the need for
auxiliary equipment such as sprue pickers and
granulators. Another suitable application is in highvolume jobs, where the same material is run for a
long time without switching grades or colors. Finally,
where parts with very precise surface appearance are
required, zero vestige gates can be used to virtually
eliminate gate marks.
Practically all commercial hot runner systems work
well with Celcon acetal copolymer, with the possible
exception of insulated runner systems. In general,
melt flow channels should be large and streamlined,
with generous radii and no sharp corners. This will
prevent resin hangup, facilitate resin melt flow and
reduce pressure loss.
A full range of drops are available for runnerless
molding. Either bushings or hot runner nozzles can
be used successfully, as can partial systems such as hot
sprues. A wide variety of drop designs are acceptable,
23
including hot tip, hot edge, angle gate, torpedo, angle
tip, multi-tip and E-type nozzles. Machine system
suppliers can provide extensive design services to
determine the best drops for a specific application.
A variety of gate configurations can be used for
processing Celcon acetal in hot runners, including
systems which provide thermal freeze-off. Valve
gates, especially hydraulic designs, work well with
parts requiring zero vestiges. Generally, gates should
be relatively unrestricted and should not subject the
melt to shear rates higher than 1,500 - 2,000/sec at
polymer melt temperatures. Excessive shear may
result in melt fracture. Gate design and location
influence mold filling patterns and affect mechanical
properties, dimensions and surface finish. The gate
land should be a minimum 1 mm (0.040 in.).
Tips should be hardened to reduce wear, especially
with reinforced or filled systems, and should be
designed to be easily replaced when excessively worn.
Temperatures need to be accurately controlled in all
melt channels. Thermocouple placement is critical. It
is recommended that control systems based on
proportional-integral-derivative (PID) algorithms be
used. These systems anticipate temperature
fluctuations and account for thermal inertia when
regulating heaters. The result is much finer control
over melt temperature.
4.2.8 Molded-in Inserts
A wide variety of molded-in inserts have been
successfully mated with various grades of Celcon
acetal. Because of the resin’s high strength and
excellent creep resistance characteristics, retention of
the inserts is good, even after exposure to severe
temperature and moisture cycling tests. Recommended designs for molded-in inserts are shown
in Figure 4.3.
Celcon®
acetal copolymer
Fig 4.3 · Recommended Molded-In Insert
Designs for Celcon® Acetal
Torque
retention
devices
Recommended
Coarse
knurl
Radii on
all corners
Flute
Pull-out
resistance
Flat
;;;;;;;;
;;;;;;;;
;;;;;;;;
;;;;;;;;
Round on
blind end
Poor
Sharp corners
;;;;;;;;
;;;;;;;;
;;;;;;;;
;;;;;;;;
;;;;;;;;
;;;;;;;;
Fine knurl
Fig 4.4 · Outsert Molded Moving Parts: Gear
(left), cam (center), and spring (right)
In addition to standard insert molding, inserts can be
assembled in pilot holes of molded Celcon® acetal
parts, using press fits, spin welding or ultrasonic
welding in a post-molding operation.
4.2.9 Outsert Molding
Insert molding is a well established process for mating
plastics and metals, but outsert molding extends its
advantages to produce entire subassemblies with
multifunctional acetal copolymer parts. The process is
claimed to eliminate assembly steps and improve
quality and productivity. One company, for example,
molds over 100 acetal components onto a specially
designed galvanized steel baseplate for a video
recorder. All of the parts are formed from a single
shot of an acetal copolymer, sent to four levels via a
mold with 25 pinpoint gates per level.
Celcon acetal is ideal for injection molding both fixed
and movable parts onto a metal plate clamped into the
mold. Parts can include gears, pins, bushings, wall
sections, springs, cams and other shapes. The plates
themselves are usually 0.040 - 0.080 in. thick with
tolerances of ± 0.002 in. In addition to holes used for
mounting parts, two holes secure the plate in the
mold. The distance between them must be controlled
to a tolerance of ± 0.001 in. per 4.0 in. length to
ensure precise molding locations.
Either three-plate or hot runner molds with multiple
pin gates can be used. Unlike conventional parts,
shrinkage allowance in outsert molding is determined
from the center of each individual molding on the plate.
For more information on this technique, call us at
1-800-833-4882.
4.2.10 Gating - Standard Injection Molding
Gate Type: Parts made from Celcon acetal have been
successfully made with a variety of gate types. Figure
4.5 gives examples of common gate types suitable for
molding Celcon acetal parts.
Table 4.3 · Recommended Gate Dimensions for Rectangular Edge Gates, mm (in.)
Part thickness mm (in.)
Gate width mm (in.)
Gate depth mm (in.)
Land length mm (in.)
0.76 - 2.29 (0.030 - 0.090)
0.51 - 2.29 (0.020 - 0.090)
0.51 - 1.52 (0.020 - 0.060)
1.02 (0.04)
2.29 - 3.18 (0.090 - 0.125)
2.29 - 3.30 (0.090 - 0.130)
1.51 - 2.16 (0.060 - 0.085)
1.02 (0.04)
3.18 - 6.35 (0.125 - 0.250)
3.30 - 6.35 (0.130 - 0.250)
2.16 - 4.19 (0.085 - 0.165)
1.02 (0.04)
24
4
Celcon®
acetal copolymer
Fig 4.5 · Some Basic Gate Designs Suitable for Celcon® Acetal
Sprue
Side or Edge
Secondary Sprue
(3 plate mold)
Restricted or Pin
Tab
Diaphragm
Internal Ring
External Ring
Cut runner as close
as possible to part
Flash
45°
Parting Line
Part
0.040-0.060 in. diameter
(1.00-1.50 mm)
20° – 30°
25
Submarine
Celcon®
acetal copolymer
Gate Size: Gate size should be selected so that the
molten plastic in the gate freezes before the second
stage pressure is released, thereby preventing
backflow of the plastic. Recommended gate sizes
for rectangular edge gates are given in Table 4.3 for
various ranges of thickness. The smaller gate
dimension should be one-half to two-thirds of the
maximum part wall thickness.
The minimum diameter recommended for a round
gate is 1.0 mm (0.040 in.), preferably greater than 1.5
mm (0.060 in.). Although parts have been successfully
produced with gates as small as 0.5 mm (0.020 in.).
These gate sizes should be restricted to very small
parts weighing less than 1 gram wall thicknesses of less
than 0.5 mm (0.020 in.).
Gate Location: Gating in areas of the molded parts
which will be subjected to high stress, bending or
impact during use should be avoided. Gates should
generally be located in the thickest cross-section of
the part and be in a position so that the initial flow of
plastic into the mold impinges on a wall. This will
prevent jetting and blush marks.
For round or cylindrical parts which must be
concentric, a center sprue gate, a diaphragm gate, disk
gate or a set of three gates spaced at 120° intervals
around the part is recommended.
4.2.11 Vents
Vents: With all plastics, cavities should be well vented
to allow the escape of trapped gases and air.
Inadequate venting can cause burn marks, short shots,
dimensional problems, surface defects and blushing.
Proper venting, on the other hand, will help to lower
injection and clamp pressures, reduce cycle times,
eliminate or reduce molded-in stress, and minimize
shrinkage and warpage. It is advisable to have as
much venting as possible without allowing the resin
to flow out of the mold.
Size: Vents should be 0.0254 mm (0.001 in.) maximum
deep by 3.175 - 6.35 mm (0.125-0.250 in.) wide. To
prevent blockage of the vents, they should be deepened
to 1.59 mm (1/16 in.) at a distance of 3.175-4.76 mm
(1/8-3/16 in.) from the cavity to the outside. Peripheral
venting is preferred whenever possible.
Location: Vents should preferably be located at the last
point to fill. Vents should be placed in other locations
as well including the runner system, weld line regions,
and other areas of possible gas entrapment.
Natural vents can be built into the parting line of the
tool and at the interface of the pieces of metal used to
build up the cavities. Ejector pins can also provide
some venting but should not be used as the primary
means of venting.
Ejector and core pins used for venting should be
flattened 0.0254 mm (0.001 in.) on one side. Blind
holes where gases may become trapped, can be vented
by drilling a small (3.175 - 6.35 mm; 1/8 -1/4 in.) hole
at the bottom of the cavity and inserting a small
diameter pin flattened to 0.0254 mm (0.001 in.) on
one side. When using these techniques, we
recommend that mold temperatures be kept in excess
of 180°F to avoid gas condensation on the pins and
prevent corrosion.
4.2.12 Cooling Channels
The actual mold temperature as well as temperature
uniformity is extremely important in ensuring good
quality molded parts. Each mold must contain
cooling channels to help maintain uniform heat
distribution throughout the tool. The cooling
channels should be as large in diameter as is practical
(at least 14.3 mm or 9/16 in.) and located in areas
directly behind the cavities and the cores. Channels
should be uniformly spaced to prevent localized hot
spots. Non-uniform cooling can lead to surface
blemishes, sink marks, excessive molded-in stresses,
warpage and poor dimensional control with a
possibility of excessively long cycle times.
4.2.13 Draft
Plastic parts are almost always designed with a taper
in the direction of mold movement to ease ejection
from the mold. This is commonly referred to as draft
in the line of draw. The deeper the draw, the more
draft will be required.
Some Celcon® acetal parts have been successfully
designed with no draft and have exhibited little
problem with part ejection. However we suggest a
minimum draft of 1/2 - 1° per side for best results.
4.2.14 Parting Line
Parting lines should be located away from
aesthetically important areas but should not
complicate mold construction. Where appearance is
important, the parting line should be placed in an area
where the line will be concealed, such as an
inconspicuous edge of the part, an area of changing
geometry or on a shoulder.
26
4
Celcon®
acetal copolymer
4.3 Auxiliary Equipment
4.3.1 Mold Temperature Control Units
Three types of mold temperature control units are
commercially available and suitable for molding parts
of Celcon® acetal:
1. Non-pressurized water circulating units in which
the reservoirs are open to the atmosphere.
2. Pressurized water-circulating units.
3. Pressurized oil-circulating units.
To maintain a mold surface temperature of 93°C
(200°F), the mold temperature control unit must
usually be operated in the range of 104 - 110°C (220 230°F) to compensate for heat loss in water lines,
platens, etc. In a non-pressurized unit using water
only, these temperatures cannot be attained because
the water will boil off. If the heaters, gaskets, etc. in
such a unit are operable at these high temperatures,
the boiling point of the water may be safely raised
by the addition of ethylene glycol. A solution of 60%
ethylene glycol/water (by volume) will boil at 113°C
(235°F); an 80% ethylene glycol solution boils at
138°C (280°F).
With a pressurized water-circulating unit, maximum
temperatures of 93-99°C (200-210°F) are attainable
in most molds when the unit is operated at the
extreme high limit of its temperature range.
For those moldings where mold temperatures higher
than 99°C (210°F) are needed, a pressurized oilcirculating unit is normally required. For flexible
temperature control, the oil reservoir in the unit
should be equipped with a suitable heat exchanger for
lowering the oil temperature when required.
An alternate system for mold temperature control is
to install cartridge heaters of an appropriate size in
the cooling channels of the mold and control
temperature via a powerstat (rheostat). The cartridge
heaters should tightly fit the diameter of the cooling
channel to prevent premature burn-out of the heaters
and prolong their life. While this is a relatively simple
and inexpensive system for mold temperature control,
it is not recommended as it could cause localized hot
spots and lead to various molding problems.
27
It is prudent to check the mold temperature after the
machine has been operating for about 30 minutes. If
necessary, readjust the mold heater temperature
settings to maintain the desired temperature.
4.3.2 Process Control
Where it is important to maintain tight dimensional
tolerances, a closed-loop system should be
considered. This will automatically adjust molding
conditions to provide consistently satisfactory parts.
Open-loop systems which are less costly can be set
up to stop the molding cycle or sound an alarm to
indicate that molding conditions to provide
satisfactory parts have changed and should be
readjusted to prevent rejects. Both types of systems
are suitable for molding Celcon acetal.
4.4 Processing
Before placing Celcon acetal in a molding machine, it
is highly recommended that you refer to Chapter 2 of
this publication,“General Guidelines” for safe
handling and processing information. The Material
Safety Data Sheets for specific grades of Celcon acetal
will also provide additional information related to
safety, handling and use, and may be obtained by
calling 1-800-526-4960.
4.4.1 Typical Molding Conditions
Typical processing conditions for injection
molding Celcon acetal are shown in Table 4.4.
The recommendations should be used as an initial
guide, and “fine-tuned” as necessary for each
specific application.
4.4.2 Melt Temperature
Most moldings are made using a melt temperature in
the range 182 - 199°C (360 - 390°F) to facilitate
processing and provide good quality parts at
minimum cycle. Melt temperatures substantially
above 199°C (390°F) should be accompanied by a
corresponding decrease in residence time to avoid
overheating and possible degradation of the resin.
This can be achieved by using a smaller capacity
machine relative to the shot size, decreasing the
overall cycle time, or, if practical, increase the number
of cavities in the mold.
Celcon acetal should never be processed above
238°C (460°F). If overheating is observed or
suspected, lower the cylinder temperature and purge
Celcon®
acetal copolymer
Table 4.4 · Typical Start-Up Conditions
Cylinder temperature, °C (°F)
182
188
193
198
Melt temperature, °C (°F)
182 - 199 (360 - 390)
Mold surface temperature, °C (°F)
(360)
(370)
(380)
(390)
Rear
Center
Front
Nozzle
82 - 121 (180 - 250)
1st stage injection pressure, MPa (10 psi)
76 - 138 (11.0 - 20.0)
2nd (Hold) injection pressure, MPa (103 psi)
76 - 138 (11.0 - 15.0)
1st stage injection fill time, sec.
2-5
1st stage injection speed
moderate
Back pressure, MPa (psi)
0 - 0.3 (0 - 50). Use higher end of range if running
color concentrates
Screw rotational speed, rpm
20 - 40
3
Overall cycle, secs
15 - 60 (Depending on wall thickness)
Drying
82°C (180°F) for 3 hrs.
4
the overheated material, dropping the purgings into
water. Stay away from the nozzle and the machine
hopper as much as possible to avoid inhaling any
fumes. Provide local exhaust to remove off-gases.
4.4.3 Mold Surface Temperature
Mold surface temperature required for Celcon acetal
ranges from 38 - 127°C (100 - 260°F) with 93°C
(200°F) being the most common. Typically, a mold
temperature in the range of 82 - 93°C (180 - 200°F) is
used to provide a good balance of properties, reduce
molded-in stress, provide a high surface gloss and
assure good part dimensional stability. For fiberglass
reinforced Celcon® acetal, a slightly higher mold
temperature of 93 - 127°C (200 - 260°F) is
recommended to provide a resin-rich, high gloss
surface. Molding with this higher mold temperature
will also facilitate resin flow into the cavities, reduce
molded-in stress and provide parts with improved
dimensional stability in end-use.
Uniform mold temperature control is extremely
important, especially for molding parts consistently
within precision tolerances.
4.4.4 Injection Pressure
Injection pressure will vary with several factors
including geometry of the molded part, length of
flow, design of the runner and gates, melt
temperature, clamp capacity of the molding machine,
condition of the mold with regard to flash, etc. While
most moldings of Celcon acetal are successfully
produced in the range of 76 - 138 MPa (11 - 20 Kpsi),
generally adjustments must be made to adequately fill
the mold without flash. To avoid back flow before the
gate seals, first and second stage injection pressures
should be the same for most moldings. In some cases,
it may be advantageous to reduce second stage
injection pressure, e.g., to reduce molded-in stress in
the gate area.
4.4.5 Cavity Pressure Measurement
(CPM) Technology
CPM technology has been eminently successful in
making it possible to produce high quality parts “shot
after shot” for months (and even years!). In the basic
process, pressure sensing instruments (called
transducers) are placed in the mold (usually in the
cavity, or at the gate) to track pressures during every
cavity-filling incident. Since the cavity pressure is
normally proportional to the amount of molten
polymer present in the cavity (before solidification),
you thus have a convenient means to determine shotto- shot reproducibility of the process. Should one
cavity-filling incident not agree with the “norm”, the
parts that are produced in that specific cycle are
usually segregated into a “reject” parts bin, or the
like. These systems use a computer to analyze the
data and make it rather easy to do diagnostic studies
on a molding problem. Then, you can make any
corrections that may be required to optimize the
whole molding process.
The net result is that it allows one to produce parts
that fall within very tight tolerances on weight,
dimensions, etc. Since “out of spec” parts are not
28
Celcon®
acetal copolymer
produced or are caught when they are made, the
amount of post molding QC can be reduced. Because
process “fine tuning” can usually be done through the
judicious use of the data generated at the time of
operation, it is often possible to reduce the variability
of molded part product quality.
4.5 Cushion
A 3.2 - 6.4 mm (1/8 - 1/4 in.) cushion is recommended.
The check ring non-return valve must function
properly and ensure that the recommended cushion
is held constantly throughout the molding cycle.
Malfunctioning check rings may not seat tightly and
will usually result in inconsistent parts, short shots,
poor control of dimensional tolerances and weak
weld lines.
4.5.1 Injection Speed
Rapid fill of the mold cavities is preferred for most
moldings and can be accomplished by opening the
flow control valve to the maximum and adjusting the
first stage so that it stays on for the full injection
stroke. If flash occurs, the injection speed should be
reduced (preferably by reducing the injection velocity
set point) as little as is necessary to eliminate flash.
The injection hold time should be adequate to
completely fill the mold cavities, with the screw
coming to a complete stop in the fully forward
position and then allow the gate to seal under
pressure before the pressure is released. This is
particularly important to prevent suck-back of resin
through the gate when the screw is withdrawn.
If surface imperfections such as splay or flow marks
are encountered, reduce the injection speed in small
increments.
4.5.2 Solidification Time
Solidification time should be adequate for the resin
to properly set up in the mold and maintain
dimensional tolerance and geometry without
distortion, warpage or ejector pin penetration of the
molded parts on ejection.
4.5.3 Decompression Settings
Most commercially available injection molding
machines are equipped with a decompression
(suck-back) feature. This is used to relieve pressure
on the resin after plastication in the heating cylinder
and prevent nozzle drool during the mold open time
prior to beginning the next cycle. Usually about 0.2 0.6 seconds decompression time is satisfactory for
Celcon acetal copolymer.
29
4.5.4 Screw Speed
Screw rotational speed and back pressure should be
kept to a minimum, preferably 20-40 rpm and zero
back pressure, respectively. The screw speed should be
set such that the screw fully retracts just prior to the
expiration of the mold close time. Excessive screw
speed and back pressure can cause severe overheating of
the resin and, in the case of fiberglass reinforced
products, increase glass fiber breakage leading to a
significant reduction in mechanical properties.
4.5.5 Cycle Time
Cycle time depends primarily on wall thickness
which governs the rate of cooling, and to some extent
on part design, dimensional tolerance, molding
equipment, mold design, etc. Some approximate cycle
times versus wall thickness are shown in Table 4.5
for unfilled Celcon acetal copolymer. Faster cycles
than indicated may be obtained with grades of resins
that are reinforced, filled and those with higher melt
flow rates.
4.5.6 Process Optimization: Conducting a Design
of Experiments (DOE)1
Process optimization can be handled in a number of
ways, but the technique that is recognized as the
preferred one by injection molding experts is called
the DOE, an abbreviation for Design of Experiments.
Before the DOE made its entry into the field of
process optimization, the most widely used technique
was to conduct a long series of experiments where
one process variable was changed at a time (e.g., the
temperature, or the pressure, or the speed) and the
effect noted. So, for example, mold temperature
might be raised from an initial value of 80°F to 200°F
in steps while keeping all the other molding
parameters fixed. Samples would be collected at each
step for testing. Then, after setting mold temperature
at “the best” value, the next variable (e.g. injection
pressure) would then be studied in a similar way.
Table 4.5 · Approximate Cycle Times as a Function
of Wall Thickness – Unreinforced Grades
Wall thickness, mm (in.)
Approximate total cycle
time (secs.)
1.6 (1/16)
20
3.2 (1/8)
30
6.4 (1/4)
50
12.7 (1/2)
75
Celcon®
acetal copolymer
The steps repeated until all variables were studied.
Thus, the process optimization would be studied one
variable at a time. Obviously, the whole process was a
long and involved one, and in most cases its use never
really led to the “best” conditions. The big shortcoming
was that the interactions among injection molding
parameters would not be studied directly.
weight check would be made on all production parts
as they are produced. Any part over or under the
range (10.57 to 10.63g) would be set aside, while
those within the range would be kept for the usual
subsequent QC. Causes could be identified and
corrective actions taken to improve production
efficiencies.
In conducting a DOE, you reduce the number of
experiments substantially while still being able to
measure the effects that each variable has on the
process and parts. Additionally, you are able to see
clearly the influence of interactions among variables.
For example, what effects do the interaction of
injection pressure and melt temperature (a two-factor
interaction) have on the part properties? Similarly,
what effects does the interaction of injection pressure,
melt temperature and mold temperature (a threefactor interaction) have on part properties? Thus, the
information that you obtain from the DOE provides
a very detailed map of the whole process for
optimizing the molding parameters.
4.6.2 Part Dimensions
In the same way that part weight was determined
directly after molding, part dimensions can be used as
a QC check just as soon as the part is ejected from
the mold. While we know that dimensions change
with time after molding, this could be factored into
the analysis. What one would do is to measure the
particular dimension(s) as a function of time after
molding, e.g., 0.50, 1, 4, 8, 12, 18 and 24 hours. Next,
plot these data, and extrapolate the plotted line back
to “zero” time. This would then give you a
dimension for parts “right off the mold”, and indicate
what the dimension would be 24 hours later.
Box, G.E.P., Hunter, W.G. and Hunter, J.S.,
Statistics for Experimenters, John Wiley & Sons, Inc.,
New York (1978).
1
4.6 Quality Control of Molded Parts
4.6.1 Part Weight
Molded parts most often have to meet very exacting
specifications, such as dimensions, color/appearance,
or some measurement of performance capabilities
(mechanical strength, an end-use tests, etc.). Such
QC tests are usually done many hours (24 or 48) after
the parts are molded. Over the years, we have found
that one of the best and most timely Quality Control
(QC) test that a molder can perform to predict just
how a part will measure up against the established
release specifications or end-use performance criteria
for the part is part weight. A major feature of part
weight is that it can be done almost contemporaneous
with the part’s molding, i.e., the weight can be
determined just seconds after the part is ejected from
the mold. Thus, the molder can obtain almost
immediate feedback, thus allowing very timely
corrective actions to be taken.
The procedure that is normally followed is to
determine the average weight of known “good” parts,
along with the range of deviations (+/-) from the
average (e.g., 10.6 +/- 0.03 grams). Then, a systematic
4.7 Effect of Molding Conditions on
Mechanical Properties
Celcon® acetal can be satisfactorily molded over a
broad range of conditions. However, since molding
conditions influence aesthetics, structural integrity,
mold shrinkage and physical properties of the molded
part, it is important to identify the major
requirements for a given application to select the
appropriate molding conditions.
Among the important molding conditions that can
influence physical properties are melt and mold
temperature, injection pressure, hold time, injection
speed and screw rotational speed. Slightly different
molding conditions are required to optimize
individual key properties. Because every application is
unique and new in some way, the molding conditions
discussed below should be used as a guide only. Some
adjustments will generally be necessary to ensure that
the optimum cycle time and part performance
are obtained.
The data shown in Table 4.6 were measured in a
carefully controlled DOE using standard ASTM test
specimens 3.2 mm thick. Molds had generous gates,
runners and vents. Restrictive gates, runners of
varying thickness, parts with varying wall thicknesses,
and weld lines in parts may significantly affect
these results.
30
4
Celcon®
acetal copolymer
Table 4.6 · Effects of Molding Conditions on Mechanical Properties – Unreinforced Grades
Injection
Pressure
Melt
Temperature
Mold
Temperature
Screw
Speed
Injection
Speed
To optimize tensile strength
188 - 199 °C
(370 - 390 °F)
77 - 104 °C
(170 - 200 °F)
—
—
To optimize modulus
—
188 - 199 °C
(370 - 390 °F)
> 104 °C
(> 200 °F)
—
To optimize notched bar impact
—
To decrease mold shrinkage
—
To increase mold shrinkage
—
Increase
Decrease
— No significant effect
Occasionally, part design criteria or processing
equipment parameters may require deviation from the
guidelines. Moreover, actual parts are usually more
complex in shape than laboratory test specimens.
To maximize engineering performance, the processor
should work closely with the part designer to
specify molding parameters based on actual
part performance.
4.7.1 Unreinforced Celcon® Acetal Grades
Tensile strength increases with increasing injection
pressure and is optimum with a melt temperature in
the range of 188 - 199°C (370 - 390°F ) and mold
temperature of 77 - 104°C (170 - 220°F). Screw
rotational speed and injection speed have little effect
on tensile strength.
Notched bar impact strength is highest with low
injection pressure and medium injection speed. It
increases with decreasing mold temperature, melt
temperature and screw rotational speed.
Modulus is most significantly affected by both mold
temperature and melt temperature and increases with
an increase in both temperatures. Maximum modulus
is obtained with a melt temperature of 188 - 199°C
(370 - 390°F) and mold temperature of 104°C (220°F).
Decreasing injection speed tends to increase modulus
but to a lesser degree than both melt and mold
temperatures. Injection pressure and screw rotational
speed have little effect on modulus.
Mold shrinkage, in both the flow and transverse
directions, decreases with increasing injection
pressure, increasing injection speed, decreasing mold
temperature and a melt temperature in the lower
range of 171 - 182°C (340 - 360°F). Conversely, mold
shrinkage increases with decreasing injection pressure,
decreasing injection speed, increasing mold
31
temperature and a melt temperature in the range of
182 - 210°C (360 - 410°F). By minimizing shrinkage
during molding, you will maximize the potential level
of post-molding shrinkage. Thus, during use, the part
could shrink out of dimensional tolerance. It is
recommended to adjust initially the mold cavity
dimensions for maximum shrinkage and mold at
conditions of maximum shrinkage. Typical molding
conditions for providing maximum mold shrinkage
are shown in Table 4.7.
4.7.2 Glass-Mineral Coupled and Filled Celcon
Acetal Grades
The effect of molding conditions on physical
properties should be used only as a guide. Some
variation in conditions will most likely be required to
achieve optimum performance for each part.
While screw rotational speed, back pressure
and injection speed have little or no effect on the
properties of unreinforced Celcon acetal except where
they cause severe overheating of the resin, these
conditions can have a significant effect on the
mechanical properties of fiberglass reinforced grades
due to glass breakage. Increased glass breakage can be
expected to occur mostly with increasing screw
rotational speed and to a lesser extent with increasing
injection speed and back pressure.
Tensile strength and modulus will decrease with
increasing screw rotational speed due to breakage of
glass fibers.
Mold shrinkage will increase with increasing screw
rotational speed for the same reason. When molding
fiberglass reinforced Celcon acetal, screw speed and
back pressure should be kept to a minimum, 20-30
rpm and 0 psi, respectively. Injection speed should be
medium consistent with adequate fill of the mold
cavities with flash.
Celcon®
acetal copolymer
Table 4.7 · Typical Molding Conditions for Maximum
Shrinkage of Unreinforced Celcon® Acetal Copolymer
Melt temperature, °C (°F)
180 - 210 (360 – 410)
Mold temperature, °C (°F)
121 (250)
Injection pressure, MPa (psi)
35 (5,000)
Injection speed
Minimum
Screw rotational speed has little effect on mold shrinkage
of unreinforced Celcon grades.
4.8 Molding Problems
4.8.1 Deposits on Molds
In those rare instances when deposits may build
up on mold cavity and runner surfaces, the most
likely causes are inadequate venting, mold surfaces
that are colder than recommended, or excessive shear
heating by injecting at high rates through small
diameter runners and tiny gates. To prevent deposit
build-up, assure adequate venting of the cavities and
runners, use mold surface temperatures of 82°C
(180°F) or higher, make sure runners have thicker
cross sections than the maximum wall thickness of the
molded part, and gates larger than 1 mm (0.040 in.).
To remove the deposits, we recommend heating
in a hot 82°C (180°F) detergent solution for several
hours followed by rigorous scrubbing. An alternate
approach for small cavity blocks would be to immerse
inverted in a hot 82°C (180°F) detergent solution
within an ultrasonic bath for several hours. After
deposit removal, the cavities should be dried and
treated with a rust preventative.
4.8.2 Troubleshooting Injection Molding
Table 4.8 lists common injection molding problems
with possible corrective actions in the preferred order
of implementation.
Table 4.8 · Troubleshooting Guide for Injection Molding Celcon® Acetal Copolymer
SYMPTOMS
POSSIBLE SOLUTIONS
Brittleness
- Lower material temperature
- Check for contamination
- Decrease regrind level
Burn marks
-
Decrease injection speed
Decrease injection pressure
Improve venting
Increase gate size
Discoloration
-
Purge machine
Lower cylinder temperature
Decrease back pressure
Lower screw speed
Decrease nozzle temperature
Reduce injection speed
Eliminate contamination from feed
Examine nozzle and cylinder for hold up points
Ensure molding machine has free flowing check ring
Move mold to machine where shot size is 50 - 75% of capacity
Nozzle drool
-
Lower nozzle temperature
Lower material temperature
Minimize cushion
Delay sprue break time
Decrease mold open time
Use nozzle with smaller diameter orifice
Use decompression
Poor Weld Lines
-
Increase injection pressure
Increase screw forward time
Raise mold temperature
Vent cavity at area of weld line
Raise melt temperature
Increase injection speed
Relocate gate to alter flow pattern
Provide overflow well at weld area
Check for leaking check ring
32
4
Celcon®
acetal copolymer
Table 4.8 · Troubleshooting Guide for Injection Molding Celcon® Acetal Copolymer (continued)
33
SYMPTOMS
POSSIBLE SOLUTIONS
Short Shots, Pit Marks, and Surface Ripples
-
Increase feed
Increase injection pressure
Increase mold temperature
Decrease cushion
Increase injection speed
Increase injection time
Add vents
Use larger machine
Check for leaking check ring
Sink marks
-
Increase injection pressure
Increase screw forward time
Maintain proper cushion
Reduce tool temperature
Increase injection speed
Increase feed
Enlarge gate or runner
Splay Marks/Delamination
-
Decrease injection speed
Reduce injection rate
Enlarge gate size
Reduce cylinder temperature
Increase mold temperature
Dry material
Sticking in Cavities
-
Decrease injection pressure
Decrease screw forward time
Minimize cushion
Increase mold close time
Lower mold temperature
Check for undercuts or insufficient draft
Sticking in Core
-
Decrease injection pressure
Decrease hold pressure
Minimize cushion
Decrease mold close time
Decrease core temperature
Check for undercuts or insufficient draft
Unmelted Pellets
- Machine plasticizing capacity too small for shot and cycle
speed required
- Temperatures too low, particularly at rear zone
- Increase screw speed
- Increase back pressure
- Check for proper compression screw
- Check for wear of the screw or barrel
- Check for proper screw flight depth
Voids
-
Increase injection pressure
Increase screw forward time
Decrease cushion
Increase mold temperature
Increase feed, gate, runner, sprue
Check for leaking check ring
Warpage/part distortion
-
Equalize temperature in both halves of mold
Check uniformity of ejection
Check handling of parts after ejection from mold
Increase hold time
Alter injection pressure
Increase cooling time
Reduce material temperature
Try differential mold temperatures to counteract warp
Fixture parts in a cooling jig
Celcon®
acetal copolymer
5. Blow Molding
5.1 Blow Molding Methods
Blow molding Celcon® acetal copolymer allows for
the production of hollow and irregular shapes
through either extrusion or injection techniques.
While most commercial applications are for relatively
small components such as cosmetic bottles,
dishwasher spray arms and automotive hydraulic
fluid reservoirs, blow molders have produced
plenums measuring 50 in. long and 16 in. wide in
developmental runs.
Advantages of injection over extrusion blow molding
are the ability to mold a finished neck on a container
with good dimensional control and better
dimensional control of wall thickness. This results in
better product quality, less material usage, and a
minimum of waste material to be reworked.
The major advantages and disadvantages of each
method are summarized in Table 5.1.
5.2 Equipment
The two general methods for blow molding plastics
articles are extrusion blow molding and injection
blow molding. Both methods may be used to produce
items made from Celcon acetal. The two methods
differ primarily in the method of preparation of the
“parison,” i.e., the tube of molten resin from which
the molded article is formed. Both techniques have
much in common, and information on recommended
grades of Celcon acetal for both blow molding
processes can be obtained by calling Product
Information Services at 1-800-833-4882.
5.1.1 Extrusion Blow Molding
Extrusion blow molding is more extensively used
than injection blow-molding and parts are made
either by a continuous or discontinuous (intermittent)
extrusion method.
In the continuous method, there is no interruption in
parison extrusion. When the parison reaches the
appropriate length, a mold closes around it, and the
parison is cut. Air is introduced and pressurized to
create the blow-molded part.The mold moves and a
new mold closes around the continuously moving
parison. More than half of all Celcon acetal blowmolded parts are made using the continuous method,
due to its lower cost and shorter processing cycle.
The discontinuous method is suitable only for
processing resins which are not heat sensitive, and is
not recommended for Celcon acetal.
5.1.2 Injection Blow Molding
Injection blow-molding is a two-stage process for
manufacturing completely finished thermoplastic
containers.
5.2.1 Extruder
Any conventional commercially available extruder
can be used to plasticize/melt Celcon acetal with little
difficulty for use in blow molding. It is highly
recommended that the selected machine have a screw
with an L/D (length-to-diameter) ratio of at least
16:1, and preferably higher (20:1 or 24:1). The use of
a machine with a higher L/D ratio allows more
uniform mixing of the molten resin, eliminates resin
memory and provides a more uniform melt
temperature.
In selecting an extruder, it is recommended that
particular attention be given to the quality of the
temperature controls on the machine. Parison
temperature control is critical for trouble-free
blow molding.
5.2.2 Screws
Screws for the extrusion of Celcon acetal parisons
should be of the general purpose type, having a few
flights of uniform depth in the feed zone, a tapered
compression zone, and several flights of uniform
depth in the metering zone. Screw pitch should be
uniform and equal to the screw diameter.
Compression ratio should be in the range of 3:1 - 4:1.
A typical 2 1/2 in. diameter, 20:1 L/D screw for
extruding Celcon acetal should have:
■ 3 to 5 flights of uniform depth in the feed zone,
■ 10 - 12 flights of increasing root diameter in the
compression (transition) zone, and
■ 5 flights of uniform depth in the metering zone.
34
5
Celcon®
acetal copolymer
Table 5.1 · Comparison of Injection and Extrusion Blow Molding
Equipment Costs
Extrusion
Injection
Total equipment cost
Lower
Higher
Parison die cost
Lower
Higher
Blow mold cost
Approx. equal
Approx. equal
Production rates
Lower
Higher
Finishing required
Considerable
Little or none
Waste and regrind
Some
Little or none
Overall quality achievable
Good
Excellent
Processing
Product
Sizes obtainable
Small, medium, large
Small to medium
Wall thickness control
Good
Excellent
Tolerance on neck finish
Fair
Excellent
Flight depth in the feed zone would be 0.44 in., and
0.11 in. in the metering zone. Recommended screw
characteristics to plasticize Celcon® acetal for
extrusion blow molding are summarized in Table 5.2.
5.2.3 Screen Pack
A screen pack of assorted screen sizes (e.g 20-60-8020 mesh) should be placed immediately in front of the
screw to filter out any unmelted particulates which
could lead to defective products or abrasion of the
inner head and die surfaces. The screen pack also
serves to maintain back pressure which prevents
uneven parison flow due to surging. The screen pack
should be replaced at regular intervals.
weld lines, flow “pin spiders” with helical deflectors
machined to a knife edge at the point of convergence
are often used. The melt stream can flow freely
around such a die pin without dead spots where
material could hang up. A flow divider of this type is
shown in Figure 5.1.
Fig 5.1 · Flow Pin Divider to Promote Smooth
Flow and Avoid Weld Lines
Approx.
74°
5.2.4 Breaker Plate
A breaker plate should be used to hold the screen
pack firmly in place while interfering as little as
possible with a smooth flow of the melt stream. A
breaker plate is a steel plate usually about 6.4 mm
(1/4 in.) thick and perforated with closely-spaced 6.4
(1/4 in.) holes. The holes in the breaker plate are
frequently chamfered on the side facing the screw to
improve melt flow.
5.2.5 Die Head
A die head and adapter is generally placed between
the breaker plate and the parison die to guide the melt
stream to the die entrance. Many assemblies require
that the melt stream turn 90° as it approaches the die.
To encourage smooth flow and avoid undesirable
35
To further weld the material passing the die pin and
discourage streaks, an annular restriction (“choke”)
should be placed downstream from the flow divider.
The choke serves to increase back pressure in the melt
stream by reducing the cross-sectional area between
the flow divider and the die. The higher pressure
which is achieved tends to smooth out the weld and
reduce the chance of streaking.
Celcon®
acetal copolymer
Table 5.2 · Typical Screw Characteristics to Plasticize Celcon® Acetal Copolymer for Blow Molding
Screw Diameter mm (in.)
Channel Depth
Zone Length as % of screw length
38.1 (1.5)
Metering mm (in.)
2.11 (0.083)
Feed mm (in.)
7.37 (0.29)
Ratio
3.5
Feed
40 - 50
Transition
30 - 20
Metering
30
50.8 (2.0)
2.26 (0.089)
7.62 (0.30)
3.4
40
30
30
63.5 (2.5)
2.46 (0.097)
8.13 (0.32)
3.3
40
30
30
88.9 (3.5)
2.74 (0.108)
8.89 (0.35)
3.2
40
30
30
114.3 (4.5)
3.02 (0.119)
9.65 (0.38)
3.2
40
30
30
Type - Metering general purpose type; constant pitch
L/D - 20:1 to 24:1 preferred; 16.1 minimum
The die should be kept hot to avoid freeze-off
of the molten resin after it has passed through
the “spider”.
5.2.6 Die
The parison die is a key element in blow molding
because it controls material distribution in the
finished item, and, in turn, influences the economics
of the final product. Figure 5.2 shows a parison die
with an adjustable core pin which allows control of
the thickness of the parison.
5.2.7 Hopper
The hopper on the extruder should be large enough
to hold Celcon® pellets for about a half hour’s
production. If the hopper is manually loaded, it
should be equipped with a hinged or tightly fitted lid
to avoid contamination. While Celcon resins
normally can be used directly from their original
shipping container without drying, a hopper drier
with a three hour capacity can be beneficial where
pick-up of excess moisture has inadvertently
occurred. The use of a magnetic screen or metal
detector placed in the hopper is advised to minimize
the risk of contamination or equipment damage due
to foreign metal.
5.2.8 Molds
A choice of materials for molds depends on the
anticipated volume of production, complexity of the
mold piece, technique used and number of molds
required. Aluminum and zinc are commonly used to
make the low cost molds for short runs. Berylliumcopper, a harder material, is sometimes used despite
its higher cost because it has excellent heat transfer
characteristics. Steel dies are relatively expensive and
are mostly used for long production runs.
Compression ratio - 3:1 to 4:1
Fig 5.2 · Parison Die with Adjustable Core Pin
for Control of Parison Thickness
Push Rod
(Manual Alignment)
5
Die Heater
(Zone 1)
Flow Divider
Die Heater
(Zone 2)
Pin Adapter
Die Heater
(Zone 3)
Die Bushing
(Replaceable)
Tapered Die Pin
(Replaceable)
If a mold cavity is not properly vented, trapped air
can hold the plastic material away from the cavity
surface, interfere with heat transfer in the cavity and
result in a poor finish on the molded part. Vents
0.051-0.102 mm (0.002-0.004 in.) deep should be
provided at the mold parting line in areas where air
entrapment is likely. Molds can be vapor honed or
sand blasted to provide a matte surface which
prevents sticking and facilitates part ejection.
36
Celcon®
acetal copolymer
5.3 Processing
The extruder should be started up by the procedures
outlined in Chapter 6 of this publication. As the
extrudate issues from the die, the cold parison will
appear rough and translucent. Raising the
temperature produces a well converted, clear
transparent parison. If parison temperature is too
high, bubbles and slight discoloration will appear.
Each different blow molding job will require some
variation in operating conditions to optimize the
production process. Usually the lowest material melt
temperature should be used consistent with obtaining
a fully plasticized melt (no unmelted pellets) to
provide a satisfactory parison with maximum
melt strength.
5.3.1 Barrel Temperature
Initially, barrel temperature profiles should be
relatively flat but after operation is well underway,
some benefit will be derived from raising the
temperature in the feed section and lowering the
temperature of the succeeding zones to establish a
descending profile. The highest temperature should
be at the feed zone. If extrusion rates are relatively
low and there is danger of bridging in the feed zone,
the temperature in the feed zone should be kept low
and the second zone made the high point for the
decreasing temperature profile.
Barrel temperatures can range from 165°C (329°F) to
as high as 216°C (420°F) depending on the blown
part geometry, dimensions, blowing cycle, and many
other factors. Typical operating conditions used in
preparing various blown parts are shown in Table 5.3.
Table 5.3 · Typical Blow Molding Conditions
Item
Aerosol Container
3.5 oz. Bullet shape
Aerosol Container
5 oz. Barrel shape
Float
Approx. size diam x ht.,
mm x mm (in. x in.)
40.6 x 132.1 (1.6 x 5.2)
55.9 x 83.8 (2.2 x 3.3)
63.5 x 25.4 (2.5 x 1)
Weight, grams
29
44
27
Blow molding method
Extrusion Multi-station rotary
Extrusion Multi-station rotary
Extrusion, Fixed Moldaccumulator
Extruder size, mm (in)
64 (2.5)
64 (2.5)
64 (2.5)
L/D
24:1
24:1
20:1
Compression ratio
3.5:1
3.5:1
2.5:1
Die busing ID, mm (in.)
14.9 (0.588)
17.8 (0.700)
—
Die mandrel OD, mm (in.)
8.0 (0.313)
5.6 (0.220)
—
Land length., mm (in.)
12.7 (0.500)
25.4 (1.00)
—
Mold
93 (200)
93 (200)
88 (190)
Barrel Zone 1
149 (300)
Zone 2
Zone 3
Zone 4
171
171
182
166
216
166
171
171
Adapter
188 (370)
166 (330)
204 (400)
Die Zone 1
188 (370)
Zone 2
Zone 3
166 (330)
204 (400)
210 (410)
204 (400)
166 (330)
191 (375)
210 (410)
—
210 (410)
196 (385)
199 (390)
Temperature, °C (°F)
Melt
37
(340)
(340)
(360)
(330)
(420)
(330)
(340)
(340)
Screw, rpm
30
45
70
Current, Amps
100
95
12
Back pressure, MPa (psi)
8.3 (1,200)
11.0 (1,600)
—
Blow pressure, MPa (psi)
0.83 (120)
0.83 (120)
0.45 (65)
210 (410)
204 (400)
204 (400)
Celcon®
acetal copolymer
5.3.2 Mold Temperature
A mold temperature of as high as 138°C (280°F) is
often used to achieve the optimum in part quality.
A mold temperature below 93°C (200°F) is not
recommended.
5.3.3 Blowing Pressure
Typical blowing pressure for Celcon® acetal is in the
range of 0.69 - 0.90 MPa (100 - 130 psi). Pressures
below 0.55 MPa (80 psi) can be used but are not
recommended. Blow pressures for Celcon acetal are
higher than required for polyethylene and,
consequently, require higher clamping forces on
the mold.
5.4 Effects of Process Variables on Part Dimension
and Quality
5.4.1 Mold Shrinkage
Mold shrinkage for blow molded Celcon acetal
generally ranges from 2-5%. Mold shrinkage is
dependent on such factors as mold temperature,
cooling time, blow pressure and wall thickness.
The effect of these variables on shrinkage are shown
in Figures 5.3 through 5.6. Average shrinkage values
obtained in a round 3.4 ounce container with a
nominal 1.27mm (0.050 in.) wall thickness are shown
in Figures 5.3, 5.4 and 5.5 while the effect of wall
thickness on shrinkage in a relatively hot
(127°C/260°F) mold is seen in Figure 5.6.
Fig 5.4 · Effect of Cooling Time on Shrinkage
0.050
0.050
0.040
0.040
Shrinkage, in/./in
Shrinkage, in/./in
Fig 5.3 · Effect of Mold Temperature on Shrinkage
0.030
0.020
Melt Temperature: 188°C (370°F)
Cooling Time: 20 Seconds
Blow Pressure: 85 psi
Wall Thickness: 1.27 mm (0.050 in.)
0.010
0
80
120
160
200
240
0.030
0.010
Mold Temperature, °F
0.050
0.050
0.040
0.040
0.030
Mold Temperature: 127°C (260°F)
Melt Temperature: 188°C (370°F)
Cooling Time : 20 Seconds
Wall Thickness: 1.27 mm (0.050 in.)
0.020
0.010
0
0
30
60
90
120
Blow Pressure, psi
150
0
20
10
30
Cooling Time, Seconds
40
Fig 5.6 · Effect of Wall Thickness on Shrinkage
Shrinkage, in/./in
Shrinkage, in/./in
Fig 5.5 · Effect of Blow Pressure on Shrinkage
Mold Temperature: 127°C (260°F)
Melt Temperature: 188°C (370°F)
Blow Pressure: 85 psi
Wall Thickness: 1.27 mm (0.050 in.)
0.020
0
280
5
0.030
Mold Temperature: 127°C (260°F)
Melt Temperature: 188°C (370°F)
Cooling Time : 20 Seconds
Blow Pressure: 85 psi
0.020
0.010
0
0
0.020
0.040 0.060 0.080
Wall Thickness, in.
0.100
38
Celcon®
acetal copolymer
5.4.3 Impact Strength
Impact strength in a blown container is dependent
primarily upon the general design and wall thickness
of the part, but mold temperature can have a
significant effect. Optimum impact strength is often
achieved by maintaining the mold at 93°C (200°F )
or higher. In some items where impact failures have
occurred in the pinch-off area because of poor
welding, a landed pinch-off, i.e., the use of a flat
rather than a knife-edge pinch-off as shown in
Figure 5.7 will yield significant improvement in
impact strength.
In general, a blown container will shrink slightly
more in its length than in its diameter, and slightly
more in the neck area than in other sections.
5.4.2 Surface Appearance
The surface appearance of blown Celcon® acetal
containers depends primarily on mold finish and
mold temperature, and partly on the ability to
prevent air entrapment in the cavity. Air entrapment
can be prevented by proper venting. Where air
entrapment is a problem and a high glossy surface is
not required, a textured finish on the cavity
is recommended.
Table 5.4 · Blow Molding Troubleshooting Guide
SYMPTOMS
POSSIBLE SOLUTIONS
Die Lines
-
Internal Roughness
- Increase material temperature
- Dry air supply
- Increase length of land
Low Gloss
-
Increase mold temperature
Increase stock temperature
Increase parison thickness
Improve mold surface finish
Poor Definition
-
Increase
Increase
Increase
Increase
Increase
Poor Pinch-Off Weld
- Reduce blowing pressures
- Use wider pinch-off blades
Walls too Thick
- Decrease screw speed
- Change die dimensions as required
Walls too Thin
- Increase screw speed
- Change die dimensions as required
Fig 5.7 · Landed Pinch-off For Improved
Impact Strength
MOLD CAVITY
0.60 - .100" Land
39
Polish die lip
Increase mold temperature
Increase air volume
Eliminate hang-up area in die
Modify die to eliminate weld lines
mold temperature
air volume
air pressure
stock pressure
parison wall thickness
Fig 5.8 · Blow Molded Fluidic Capacitor
Celcon®
acetal copolymer
6. Extrusion
Higher molecular weight grades of Celcon® acetal
copolymers (higher viscosity than for injection
molding, such as Celcon M25) are recommended for
extrusion. Sheets up to about 6.4 mm (0.25 in.) thick
and tubes with wall thicknesses 0.38 to 1.0 mm (0.015
to 0.040 in.) can be extruded.
Call Product Information Services at 1-800-833-4822
for recommendations on specific grades of Celcon
acetal for each type of job requirement.
If a shorter barrel (L/D less than 16:1) must be used,
the use of a high resistance die with either long lands
or a small die opening is recommended to generate
the necessary back pressure to “work” the material.
With low resistance dies, the use of a valve in the
extruder head is suggested to increase the back
pressure level in the barrel.
6.1.3 Screw Design
A metering screw as shown in Figure 6.1 is
recommended for extruding Celcon acetal.
Characteristics of this screw are:
The information on equipment given below applies
generally to all types of extrusion. Additional specific
details for high speed tubing, film and sheet, and
profile extrusion are also covered in this Chapter.
■ An L/D ratio of 16:1 (minimum); up to 24:1
preferred.
■ The flight clearance should be approximately
0.13mm.(0.005 in).
6.1 Equipment
■ The flight width, (w), should be approximately
6.1.1 Materials of Construction
At extrusion temperatures, Celcon acetal copolymer
is not affected by contact with copper, zinc, iron,
nickel, brass or bronze. The designer therefore has
freedom in selecting the most cost effective material
for a specific application for dies, sizing sleeves, etc.
6.1.2 Extruder Barrel
A barrel with an L/D (length-to-diameter) ratio of
16:1 (and preferably up to 24:1) is recommended to
allow sufficient residence time for proper melting. In
conjunction with a properly designed screw, longer
barrels tend to improve melt homogeneity and reduce
melt temperature and pressure fluctuations.
10% of the screw diameter.
■ For unfilled Celcon acetal, the screw should be
hard faced or coated with a corrosion resistant
material such as chrome or Stellite 6.
■ For filled Celcon acetal, the screw and barrel
should be hard faced or coated with a corrosion
and abrasion resistant material such as tungsten
carbide, CPM-9V or Colmonoy 56 for screws,
and CPM-10V, Bimex or Xaloy for barrels.
Fig 6.1 · Recommended Metering Screw for Extrusion
Transition
Metering
h2
Feed
h1
w
D
41
Celcon®
acetal copolymer
■ The channel depth ratio, i.e., the ratio of the
channel depth in the feed zone to that in the
metering zone, (h1/h2), should be between 3 and
4.5. A channel depth ratio of 4 is recommended
for optimum results.
■ The feed section should occupy about 35% of the
screw length, the transition zone about 30% and
the metering zone about 35%.
Recommended dimensions for extrusion screws are
given in Table 6.1.
6.1.4 Screen Pack
A 20-60-100-60-20 mesh screen pack is generally
recommended preceding the breaker plate when
extruding unfilled resins. This will remove most
unmelted contaminants. It is especially important to
use a screen pack when regrind is used. The screen
pack also helps to increase back pressure and
minimize surging while improving mixing. If the resin
contains a filler or reinforcement, a screen pack is
not used.
6.1.5 Head and Die Design
Straight-through, crosshead or offset dies may be
used to extrude Celcon® acetal copolymer. All inside
surfaces should be highly polished and streamlined. If
there are any areas of stagnation or hold-up, resin in
such areas could degrade and result in discolored
streaks in the extrudate.
Low resistance dies may not provide sufficient back
pressure. In such cases, relatively long lands are
recommended. As a rule-of-thumb, land length for
circular cross sections should be at least equal to the
diameter of the die, or the lands should be 10 to 20
times the thickness of the extruded section. An
approach angle of 20-30° to the die lands is
recommended for most types of dies.
Accurate heat control at all points on the die and die
head, as well as the ability to determine the stock
temperature in the head via a melt thermocouple are
essential. A pressure gauge should be mounted on the
die head to help establish and maintain proper
operating conditions. The gauge is also a safety
feature to alert the operator if excessive pressure
build-up should develop.
6.1.6 Hopper
The hopper on the extruder should be large enough
to hold pellets for about a half hour’s production.
If the hopper is manually loaded, it should be
equipped with a hinged or tight-fitting lid to avoid
resin contamination. While Celcon acetal grades
normally can be used directly from their original
shipping containers without drying, a hopper drier
with a three hour capacity can be beneficial where
pick-up of excess moisture has inadvertently
occurred.
The use of a magnetic screen or metal detector is
advised to minimize the risk of contamination or
equipment damage due to foreign material.
6.2 High Speed Tubing Extrusion
6.2.1 Equipment
Extruder Size: There is no strict requirement for size,
but the extruder must be able to deliver the required
resin output at a constant temperature, properly
plasticated and without surging. For example, to
make brake cable tubing with OD 5.8mm. (0.230 in)
and wall thickness 0.64mm (0.025 in.) at a rate of 91
m/min (300 ft/min), a machine must deliver 82 kg/hr
(180 lb/hr) of molten resin. Since this is the upper
limit for a 2 1/2 in. or 60mm extruder, a 3 1/2 in. or
90 mm extruder is necessary.
Table 6.1 · Recommended Metering Screw Dimensions for Extrusion
Screw Diameter mm (in.)
Channel Depth
Metering mm (in.)
Feed mm (in.)
Zone Length as % of screw length
Feed
Transition
Metering
38.1 (1.5)
1.78 (0.070)
7.11 (0.28)
35
30
35
63.5 (2.5)
2.79 (0.110)
11.18 (0.44)
35
30
35
88.9 (3.5)
3.18 (0.125)
12.70 (0.50)
35
30
35
114.3 (4.5)
3.56 (0.140)
14.72 (0.56)
35
30
35
42
6
Celcon®
acetal copolymer
Water Bath: A three axis positioning water bath is
needed to properly align the bath to the die and
extrusion path. This alignment is critical in high speed
extrusion for good surface finish. Bath length may
vary from 1.8 - 3.7 meters (6 - 12 ft.) with
temperature maintained typically between 16°C
(60°F) and 38°C (100°F).
Table 6.2 · Typical Conditions for Tubing Extrusion
Machine
3 1/2 in.
L/D Ratio
24:1
Size of Motor
75 Hp (56 kW)
Amp Rating
192
Screw type
Metering
Compression ratio 3:1
6.2.2 Processing
Die and Head Temperature: The die and head
temperatures should be in the range of 190 - 230°C
(374 - 446°F) for Celcon® acetal copolymer.
A temperature profile with a die temperature of
10 - 38°C (50 - 100°F) greater than the head
temperature gives the best results.
Metering zone depth 3.6 mm (0.14 in.)
Screw speed
33 RPM
Screen pack
20-40-80-40-20 mesh
Sizing
Four plates, 6.4 mm (2 1/2 in.)
apart:
#1. 7.1 mm (0.281 in.) diameter
#2. 6.2 mm (0.242 in) diameter
#3. 5.6 mm (0.220 in) diameter
In practice, for every 6°C (10°F) increase in melt
temperature, surface roughness is reduced by about
10 micro-inches R.M.S. Although surface roughness
decreases with increasing die temperature, a die
temperature of 230°C (446°F) usually yields the best
balance of minimum surface roughness and good
appearance. Typical processing conditions are shown
in Table 6.2.
Sizing Techniques: An external sizing sleeve
submerged in a water bath will provide good results.
A series of plates or rollers should follow the sleeve
to keep the tube below the water level in line with the
external sleeve. This will prevent “chatter marks” on
the tube.
In conjunction with the air pressure injected through
the mandrel, tube diameter is controlled by the film
of water trapped between the tube and the external
sizing sleeve. Tubing with diameter 2.5 - 5.8 mm
(0.100 - 0.230 in.) can be made using a 6.2mm (0.245
in.) diameter sleeve. Increasing the inside diameter of
the tube is accomplished using air pressure of 0.07 0.35 kg/cm2 (1 - 5 psig) transmitted into the tube via
the die mandrel.
Vacuum sizing is generally conducted at higher line
speeds and may also be used for tubing extrusion of
Celcon acetal. A draw down ratio of 1.5 to 2.1 is
recommended. The sizing plates should gradually
decrease in diameter in the direction of extrusion. The
last plate should be 1 to 5% oversize, depending on
the line speed, to allow recrystallization and shrink
down to the desired final diameter.
Orientation: When producing tubing, biaxial
orientation of the extrudate is the best way to reduce
brittleness. Heavy walled tubing can be biaxially
43
#4. 5.2 mm (0.204 in) diameter
Die dimensions
Mandrel
4.3 mm (0.170 in.) diameter
Bushing
7.2 mm (0.285 in.) diameter
Die temperature
230°C (450°F)
Barrel temperature °C (°F)
Zone 1
180 (360)
Zone 2
190 (370)
Zone 3
195 (380)
Zone 4
200 (390)
Zone 5
205 (400)
Line Conditions
Motor
24 Amps
Line speed
128 m/min (420 ft/min)
Air pressure
0.1 MPa (1 1/4 psig)
Head pressure
210 MPa (3,000 psig)
The above settings produce tubing with an i.d. of 4.1 - 4.2 mm (0.161 0.165 in.); an o.d. of 5.1 - 5.2 mm (0.200 - 0.205 in.) and a wall thickness
of 0.46 - 0.56 mm (0.018 - 0.022 in.)
oriented by drawing down the outside surface by a
factor of 1.7:1 and blowing up the inside surface by a
factor of approximately 1.6:1. For example, to make
brake cable with an o.d. of 5.84 mm (0.230 in.) and
wall of 0.64 mm (0.025 in.), use a die with an opening
of 10.2 mm (0.400 in.) and a 2.8 mm (0.110 in.)
mandrel.
o.d.
ratio
10.2mm/5.84mm
= 1.74 drawdown
(0.400 in./0.230 in.)
i.d.
4.57mm/2.79mm
(0.180 in./0.110 in.)
= 1.6 blow-up ratio
The tubing produced in this manner will be less
brittle than that extruded without biaxial orientation.
Celcon®
acetal copolymer
Troubleshooting: Table 6.3 lists some typical
problems for high speed tubing extrusion and
suggested solutions.
6.3 Film and Sheet Extrusion
6.3.1 Equipment
For highest efficiency, a long barrel extruder (L/D
24:1) is recommended. This should have a metering
screw with at least a five - turn metering section to
ensure melt homogeneity.
Standard center feed dies may be used. The die
manifold can be in a straight line or bent to form a
“Y”, but the latter is preferred because it provides a
more uniform flow from the die.
An adjustable choker bar, which acts as a valve, can
be used to regulate the thickness across the sheet. The
choker bar combines with the die lip to give enough
back pressure to force the plastic out to the ends of
the manifold. Thick or wide sheets require longer
lands and more choking to ensure die fill out. Die
lands should be 38-51 mm (1.5 - 2.0) long, depending
on the thickness of the die opening.
6.4 Profile Extrusion
6.4.1 Equipment
Extruder: Extruders with barrel diameter of 35 - 60
mm. (1 1/2- 2 1/2 in. ) and 5 -15 HP drives are
typical. The extruders used for the profile extrusion
of Celcon® acetal are generally small because most
profile cross sections are small and output rates
are low.
Screw: Metering screws as described in Figure 6.1
and Table 6.1 are recommended for profile extrusion
of Celcon acetal. Best results are obtained for
screws with:
L/D ratio
20:1 to 24:1
Pitch/diameter ratio
1:1
Compression ratio
3:1 to 4:1
Length of metering section
screw
25% length of
(5 to 6 diameters)
Tip shape
Either a two- or three-rolled stack system may be
used. The three-roll system is preferred because it
provides greater precision and control and provides a
glossy finish on both sides of the product. Rolls may
also be textured to produce a variety of patterns on
the finished sheet.
6.3.2 Processing
Extrusion conditions depend on the gauge and width
of the film or sheet being produced. A careful balance
between material temperature and roll temperature is
necessary for good surface finish, and to prevent
sticking to the roll. Typical conditions for film and
sheet of various gauges are shown in Table 6.4 on the
following page.
Die lip to roll take-up distance must be kept as small
as possible for heavy sheets, but can be greater for
thinner films. Slabs of up to 3.2 mm (1/8 in.) may be
prepared by extrusion. Thicker slabs (up to 25.4 mm
or 1 in.) have been prepared by stock shape
manufacturers using compression molding.
Conical (150°
included angle)
Die: Steel is commonly used for die construction.
Chrome plating of all internal surfaces is
recommended for long production runs. Brass and
beryllium copper are sometimes used for short runs
because they are easy to machine and are good heat
conductors.
Both straight through and cross-head dies may be
used, with straight through dies preferred in most
cases. Because of the melt elasticity and strength of
Celcon acetal, the die should be 15-20% oversize in
width and 10% in thickness. It is recommended that
land length to thickness ratio should be 8:1 - 15:1 to
provide the correct level of exit velocity, back
pressure and mixing to give a smooth, lustrous
surface to the extruded part.
Sizing and cooling: Air from an air ring or “profiled”
copper tubing should be blown on the surface of the
part. Water is generally not recommended for
cooling Celcon profiles.
6.3.3 Troubleshooting
Table 6.5 lists potential problems during film and
sheet extrusion and possible corrective actions.
44
6
Celcon®
acetal copolymer
For sizing of simple thin shapes, the extrudate should
be passed through a set of brass or aluminum sizing
plates with the first plate 5-8% oversize and the
others progressively smaller. Complex shapes can be
sized by passing through a number of adjustable brass
fingers which are appropriately positioned to produce
the desired cross section.
6.4.2 Processing
Profile extrusion processing conditions can vary
significantly depending on the geometry of the part,
thickness, equipment, resin grade and numerous other
variables. It is advisable to begin processing using the
general start up conditions outlined earlier in this
chapter and ensure that the selected Celcon® resin will
provide adequate melt strength, which is critical for
this technique.
Some complex contours can be more easily made by
extruding a simple shape - tube or sleeve - and
continuously post-forming after the die with specially
designed sizing plates, sleeves or simple brass
fingers. Examples of post-forming parts are shown in
Figure 6.2. This procedure, though versatile and
using less expensive dies, requires more care and
design to achieve dimensional control and may
eventually be more costly.
Fig 6.2 · Miscellaneous Post-Formed Profiles –
shapes such as these can be made by extruding
a simpler shape and forming it into a more complex
contour while the extrudate is still pliable.
ORIGINAL
PROFILE
INTERMEDIATE
POSTFORM
FINAL
POSTFORM
SEAL
SEAL
Table 6.3 · High Speed Tubing Extrusion Troubleshooting Guide
45
SYMPTOMS
POSSIBLE SOLUTIONS
Brittleness
-
Concentricity (poor)
- Increase take-off speed
- Increase die temperature
- Decrease cooling water temperature
Surface roughness (inside)
-
Surface roughness (outside)
- Increase die temperature
- Decrease screw speed
- Control volume in the head
Wall thickness variation
-
Increase land length
Decrease head temperature
Decrease screw speed
Biaxially orient tubing
Increase land length
Increase take-off speed
Decrease screw speed
Dry resin
Heat mandrel
Maintain minimum volume in the head
Increase land length
Use a lower melt flow rate material
Decrease screw temperature
Celcon®
acetal copolymer
Table 6.4 · Typical Conditions for Film and Sheet Extrusion
Parameter
Gauge, mm (mils)
Materials
Extruder
Screen pack, mesh size
Film
Sheet
<0.25 (<10)
Celcon® M25, M90, Special grades
90 mm (3 1/2 in.)
20/40/60/80/100
0.25 - 2.5 (10 -100)
Celcon® M25, M90, Special grades
90 mm (3 1/2 in.)
20/40/60/80/100
Barrel temperature, °C (°F)*
Zone 1 - rear
Zone 2 - rear
Zone 3 - rear
Zone 4 - rear
Zone 5 - Front
Gate temperature, °C (°F)
Die temperature, °C (°F)
Casting roll temperature, °C (°F)
Roll 1
Roll 2
Screw speed, rpm
Back pressure, MPa (psi)
Compression ratio
Die
Type “Coat hangar” or “Y”
Dimensions, cm (in.)
Land length, cm (in.)
Production rate, mpm (fpm)
185
195
195
200
200
(365)
(383)
(383)
(392)
(392)
185
195
195
200
200
(365)
(383)
(383)
(392)
(392)
195 (383)
190 (374)
195 (383)
190 (374)
115 (239)
115 (239)
56
3.4 (500)
3.25/1
115 (239)
115 (239)
80
3.4 (500)
3.25/1
“Coat hangar” or “Y”
40 (16)
3.8 (1.5)
6 - 12 (20 - 40)
40 (16)
5.1 (2.0)
0.6 - 6 (2 - 20)
* Using a reverse temperature profile for the extruder barrel may be helpful when maximum melt strength is required, especially for large
diameter and /or heavy wall profile extrusion. Call us at 1-800-833-4882 for further information.
6
Table 6.5 · Film and Sheet Troubleshooting Guide
SYMPTOMS
POSSIBLE SOLUTIONS
Dull surface
-
Lines - Across direction of extrusion
- Decrease roll temperature
- Eliminate chatter due to take-off
- Blow air between rolls and sheet/film
Lines - Curved
- Improve mixing by:
• increasing back pressure, and/or
• increasing screw speed, or
• using higher compression screw
Lines - in direction of extrusion
-
Eliminate die nicks
Eliminate lip build-up
Dry resin
Increase roll temperature
Pock marks/spots
-
Improve mixing as for curved lines
Decrease roll temperature, if sticking
Dry resin
Use vented barrel
Warping
- Increase roll temperature
- Increase tension at take-off
Increase melt temperature
Increase roll temperature
If cloudy, dry resin
If problem persists, use vented barrel
46
Celcon®
acetal copolymer
Table 6.6 · Profile Extrusion Troubleshooting Guide
47
SYMPTOMS
POSSIBLE SOLUTIONS
Distortion
- Ensure uniform temperature at all points on the die
- Change location of sizing plates and fingers
- Modify design
Gloss - Low in strips
- Eliminate cold or rough spots in die or sizing devices
Gloss - low all over
- Increase die temperature
- Increase melt temperature
- Decrease cooling rate
Lines
- Clean die to remove any hard particles
- Remove any nicks or burrs on take-off system
Pits - Bottom surface only
- Cool the part more thoroughly before placing on conveyor belt
Pits - All over surface
- Dry resin
- Check for contamination and eliminate
Surface roughness
-
Surging
- Check for broken gear tooth, worn belts, controller and repair
- Remove likely causes for any variation in temperature, pressure,
screw speed or motor load
- Increase pressure/lower rate
- Decrease temperature
- Use a die with longer lands
- Use better mixing screw
Warpage
-
Wrong shape - Too large
- Increase pull on the contour
- Change take-off speed or material temperature (either way may help)
- Use longer lands
Wrong shape - Too small
- Decrease pull on the contour
- Change take-off speed or material temperature (either way may help)
- Use shorter lands
Increase die temperature
Dry resin
Decrease exit speed at die
Use die with larger openings or longer lands
Use a smaller machine
Ensure uniform cooling
Support warping section until cool enough to hold shape
Provide more gradual cooling
Lower line speed
Celcon®
acetal copolymer
7. Rotational Casting
Rotational casting is also referred to as rotational
molding or rotomolding and is a process for
manufacturing hollow and seamless products of all
sizes and shapes. It offers significant advantages
compared to other molding techniques for the
following reasons:
■ Low equipment and mold costs
■ Little or no scrap
■ Easy adaptability for short production runs
■ Multiple products and multiple colors can be
molded simultaneously
Celcon® acetal copolymer has been rotomolded into
parts up to 20 feet long and weighing hundreds of
pounds. For information on specific grades and
processing parameters, please call Product
Information Services at 1-800-833-4882.
One disadvantage of rotational casting is the potential
for weak points in the rotomolded part since no
pressure is applied to promote complete melding of
all part sections. For applications where parts will be
exposed to one or more impact, rigorous testing is
recommended to ensure adequate strength over the
total part surface.
7.1 Equipment
Celcon acetal can be readily rotomolded using any
type of commercially available machine, including a
“carousel”, “clamshell”, “rock-and-roll”, or “shuttle”.
The “shuttle” and “rock-and-roll” type machines are
used most often to produce longer and heavier parts.
7.2.1 Particle size
Plastic powders must be used for rotational casting to
ensure rapid and adequate melting. Resin particles
greater than 30 mesh size will significantly increase
cycle time.
7.3 Processing Parameters
7.3.1 Resin Drying Conditions
Powders used for rotational casting will have a higher
surface area than the pellets normally used for other
processing methods. As a result, a higher content of
adsorbed water is expected. To avoid poor finished
part surface due to moisture, proper drying is
necessary. Six hours in an air circulating oven at
82°C (180°F) is recommended. Using a
dehumidifying hopper dryer adds extra insurance
against adsorbed moisture. Caution should be
exercised in the design of the dryer to handle the
dusting of the powder clogging of filters.
7.3.2 Part Heating Oven Parameters
Oven temperature and time must be balanced to yield
a satisfactory part while avoiding thermal degradation
of the polymer. Time is a key parameter in obtaining
a smooth surface finish.
Too little oven time will cause inadequate melting of
the plastic powder; too long oven time may lead to
resin degradation.
7
Fig 7.1 · Rotomolded Acetal Copolymer
Parts Production
7.2 Molds
For small and medium-sized parts, cast aluminum is
commonly used because of its good heat transfer
characteristics and cost-effectiveness. One major
drawback of using cast aluminum is that its surface is
easily damaged.
Sheet metal molds are normally used for prototyping
and for extremely large parts. Electro- or vaporformed nickel molds give excellent surface quality but
are much more expensive.
48
Celcon®
acetal copolymer
The optimum temperature for each situation will vary
and will be influenced by processing parameters such
as air circulation rate, mold material of construction,
and mold wall thickness, all of which affect heat
transfer. In no case should melt temperature be
allowed to exceed 238°C (460°F) nor should the resin
be allowed to remain above 193°C (380°F) for more
than 30 minutes. For thick walled parts (greater than
6.4 mm or 1/4 in.), a melt temperature of 216°C
(420°F) is recommended.
7.3.3 Part Cooling Rates
Air cooling at a moderate rate is recommended for
best finished part properties. Rapid cooling will
induce brittleness. For that reason, water cooling
should be avoided.
7.4 Troubleshooting
Table 7.1 lists some potential problems that may be
encountered during rotational casting and possible
solutions.
Table 7.1 · Rotational Casting Troubleshooting Guide
49
SYMPTOMS
POSSIBLE SOLUTIONS
Bubbles on outer wall
- Dry resin
Discolored part
- Reduce time/temperature to prevent degradation
Flash excessive
- Ensure proper venting
- Confirm good parting line seal
Long oven cycle
- Improve air circulation
- Increase temperature or check temperature calibration
- Reduce mass of rotation arms for better heat transfer
Low density (less than 1.37 g/cm3)
- Optimize temperature/time to prevent degradation
- Dry resin
Poor mold filling
- Increase rotation speed
- Increase radii or width of mold recesses
Poor properties
- Increase cooling time
- Check part density and reduce temperature/time as needed
Rough inner surface
- Increase temperature and/or time for adequate melting of powder
Surface pitting
- Use less or no mold release
- Clean mold surfaces
Uneven wall thickness
- Remove excess metal which may be acting as heat sinks from
flanges and arms
- Balance speed of each axis for uniform polymer flow
- Improve air flow path around mold
Warpage
- Ensure continuous mold rotation from heating through cooling cycle
- Clear vents to prevent vacuum formation
- Use slower rate of cooling
Celcon®
acetal copolymer
NOTICE TO USERS: To the best of our knowledge,
the information contained in this publication
is accurate; however, we do not assume any liability
whatsoever for the accuracy and completeness of such
information.
Any values shown are based on testing of laboratory
test specimens and represent data that fall within the
standard range of properties for natural material.
Colorants or other additives may cause significant
variations in data values.
Any determination of the suitability of this material
for any use contemplated by the users and the manner
of such use is the sole responsibility of the users, who
must assure themselves that the material as
subsequently processed meets the needs of their
particular product or use.
It is the sole responsibility of the users to investigate
whether any existing patents are infringed by the use
of the materials mentioned in this publication.
Please consult the nearest Ticona Sales Office, or call
the numbers listed above for additional technical
information. Call Customer Services for the
appropriate Materials Safety Data Sheets (MSDS)
before attempting to process these products.
Celcon® acetal copolymer is not intended for use in
medical or dental implants.
50
Products offered by Ticona
Celcon® and Hostaform® acetal copolymer (POM)
GUR® ultra-high molecular weight polyethylene (UHMWPE)
Celanex® thermoplastic polyester
Impet® thermoplastic polyester
acetal copolymer
Vandar® thermoplastic polyester alloy
Riteflex® thermoplastic polyester elastomer
Vectra® liquid crystal polymer (LCP)
long fiber reinforced thermoplastics
®
Celstran®
Processing Celcon
Fortron® polyphenylene sulfide (PPS)
Celanese® Nylon 6/6 (PA 6/6)
Topas® cyclic-olefin copolymer (COC)
Encore® recycled thermoplastic molding resins
Technical Information
1-800-833-4882
Customer Service
1-800-526-4960
Europe
Ticona GmbH
Industriepark Höchst,
Building C657
65926 Frankfurt
Technical Information
+49(0)69-305-4653
Customer Service
+49(0)69-305-31949
Visit our Internet Site at http://www.ticona.com
for further information.
Asia Pacific
Polyplastics Co., Ltd.
Kasumigaseki Bldg (6th Fl.)
2-5 Kasumigaseki 3-chome
Chiyoda-ku, Tokyo, 100
Japan
Telephone Number
+(81) 3-3593-2411
Fax Number
+(81) 3-3593-2455
Ticona
A business of Celanese AG
© 2000 Ticona Printed in USA 00-303/3M/0700
North America
Ticona
90 Morris Avenue
Summit, NJ 07901