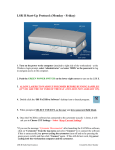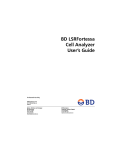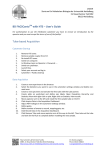
1
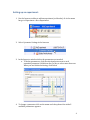
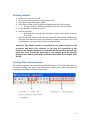
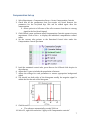
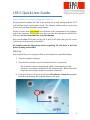
LSR II Quick User Guide Flow Cytometry Core Facility September 2013 v.5 During normal workdays the LSR II will already be up and running and the FCCF staff will have done a performance check. The software will be ready for you to log in with your personal username and password. Please be aware that every month we will delete all the experiment in the software and on the computer. Please make sure that you take the experiment and FCS files with you. You are responsible for your own backup. Only use the clear FACS tubes on the LSR II. Note: FACS tubes that you use on the Cyan do not work properly on the LSR II. All samples must be filtered just before acquiring. P2 cells have to be fixed before running on the LSRII. Start up Only required if you are using the LSR II on the weekend or on public holidays. 1. Turn on computer and log in 2. Turn the flow cytometer on (Green button in front of cytometer). The cytometer connects automatically. While connecting, the message Cytometer Connecting is displayed in the window footer. When connection completes, the message changes to Cytometer Connected. 3. Turn the UV laser ON: From the shortcut BD Coherent Connection program created in the desktop, the program window will open. Double click on this shortcut 1 4. The program window will open. The desired power can be typed in the power command window on “set” (please keep this value on 30.00 mW). 5. Start BD FACSDiva software by double-‐clicking the shortcut on the desktop, and log in to the software. Use your personal username and password to log in to the FACSDiva software. 6. Allow 30 minutes for lasers to warm up and stabilize. 7. During this time run some water on low 2 FACSDiva Workspace 1. 2. 3. 4. 5. Browser Acquisition Dashboard Inspector Global Worksheet Cytometer 3 Setting up an experiment: 1. Use the browser toolbar to add an experiment (red border). Or in the menu bar go to Experiment > New Experiment 2. Select Cytometer Settings in the browser 3. In the Inspector window delete the parameters not needed. a. To delete parameters, click the selection button next to each unneeded parameter. Hold down the Ctrl key to select more than one. When you are finished selecting, click Delete 4. To change a parameter click on the name and a drop down list with all available parameters appears 4 5. Click the New Specimen button to add a specimen and a tube to the experiment 6. Click the New Tube button to add a second tube. 7. To rename Experiment, Specimen or Tube, right click and select Rename 8. Click to set the current tube pointer to Tube_001 in the Browse The pointer changes to green, and five green tabs appear in the Cytometer window. The current tube pointer indicates the tube for which cytometer settings adjustments will apply and for which acquisition data will be shown. 9. Click the Parameters tab in the Cytometer window to check the parameters. Select H and W parameters for FSC and SSC to be able to exclude doublets 5 Running Samples 1. 2. 3. 4. Install your tube onto the SIP Set the current tube pointer to appropriate tube Press Run on the fluid control panel Click Acquire Data in the Acquisition Dashboard in the Diva Software a. Be aware that just clicking acquisition does not record any data 5. Set the number of events to record 6. Click Record Data a. Recording will stop once the cytometer reaches the number of events to record 7. Remove the tube from the SIP. Let two drops fall down before installing the next tube. This limits the carry over from one sample to the other. If rear cells are of interest, run some water in between the samples. Attention! The fluidic system is controlled by the panel located on the cytometer and not by the software. If you stop the acquisition in the software, the sample continues to be sucked into the machine and you will loose your cells. To stop the aspiration of your sample, press the standby button on the control panel of the cytometer and remove your sample from the SIP. Creating Plots and Histograms Plots and histograms are created in the Global Worksheet. The Global Worksheet is the main working area where you create plots, define gates, show statistics and population hierarchies and enter custom text. 6 Compensation Set up 1. Select Experiment > Compensation Setup > Create Compensation Controls 2. Check that all the parameters that you require are listed. Remove the parameter for the live/dead dye, this can be added again after the compensation a. Other option is to kill some of the cells to ensure that there is a strong signal in the live/dead channel. 3. Click OK and a new specimen called Compensation Controls appears in your experiment. Click on the + to display the individual compensation control tubes. 4. Set the current tube pointer to the Unstained Control tube under the Compensation Control Specimen 5. 6. 7. 8. Load the unstained control tube, press Run on the LSR and click Acquire in the software Adjust the P1 gate to include the population of interest Adjust the voltage for each parameter to ensure appropriate background signal. You should see both sides of the histogram usually the negative signal is within the first decade of the histogram. 9. Click Record Data a. The software automatically records 5000 evt 10. Select P1, right click and select “Apply to All Compensation controls” 7 11. Run and record each single color compensation tubes 12. Adjust the P2 gates to fit the positive populations 13. Select Experiment > Compensation Setup > Calculate Compensation 14. Rename the compensation with the current date and your name 15. Select “Link & Save” to apply your compensation to your acquisitions. 16. If you excluded the Live/Dead marker in the compensation setup a. Right Click on Cytometer Settings b. Select Unlink from compensation c. Run and record your PI sample 17. Switch back to the global worksheet to start creating graph to view the data Define labels for each parameter 1. Choose Experiment > Experiment Layout 2. Select a label and enter the parameter e.g. CD3 into the label text field under the Quick Entry 3. Select the next label and enter the next parameter etc 4. When all the parameters are assigned to a label are click OK 8 9 Export Experiment and FCS files 1. Select your experiment, right click and select Export > Experiment a. Note: The experiment can only be opened with the DIVA software. 2. Export your experiment to the D drive on the Data folder. 3. To export the FCS files, select your experiment, right click and select Export > FCS file a. Select FCS 3.0 b. Click OK c. In the Save Export dialog box, verify the file storage location (same as Experiment) In between users 1. 2. 3. 4. Run 3min of Decontamination solution on high Run 3min of Rinse on high Run 3min of a new tube of Water on high Log out from the software Last User of the day and Shutdown 5. Run 3min of Decontamination solution on high 6. Run 3min of Rinse on high 7. Run 3min a new tube of Water on high 8. Shut down the software 9. Shut down computer 10. Press the green button in front of LSRII to shut down the cytometer 10 Changing the Sheath and Waste Tank Always ask staff to change the tanks for you. If nobody is around: Make sure that the cytometer is set to Standby before changing the tanks 1. Sheath Tank a. Unscrew the lid and carefully remove sample line and put it in the holder to your left b. Press the Alarm button to turn off the Alarm c. Get a new full BD FACS Sheath box (on the right next to the entrance) d. Put the lid with the sample line back on the new box and put the box back to original position e. Press Restart 2. Waste Tank a. Remove the black holder that holds up the opening of the waste tank b. Unscrew the lid of the waste tank c. Get an empty waste tank from under the sink to the left of the LSR II d. Exchange the lids e. Put the full tank back under the sink 3. Prime the fluidics after changing the tanks a. Install an empty tube on the SIP b. Press the PRIME fluid control button to force the fluid out of the flow cell and into the waste container. c. Repeat the priming procedure d. Install a FACS tube (clear plastic) with 1ml of DI water on the SIP and run it on high for about 2min. 4. The cytometer is ready to use 11