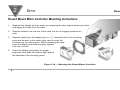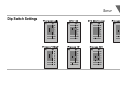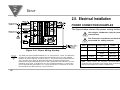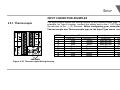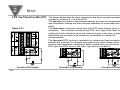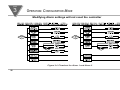
1
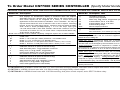
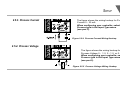
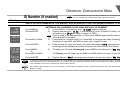
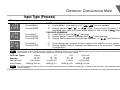
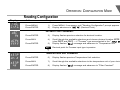
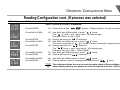
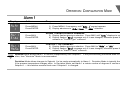
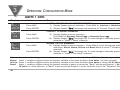
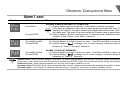
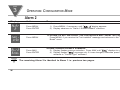
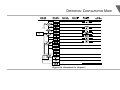
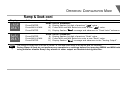
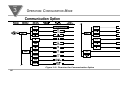
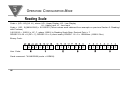
part
OPERATION: CONFIGURATION MODE
ID Number (if enabled)
Display
Action
Note ☞
3
It is recommended that you put the controller in the Standby Mode
for any configuration change other than setpoints & alarms
Response
SEE ID OPTION SUBMENU IN THE BREAK LOOP ALARM SECTION FOR ENABLE/DISABLE ID OPTION
Id
C0de
ID. C D
____
Press MENU
Press ENTER
Press MAX & MIN
Press ENTER
CK. I D
1234
STRD
1234
ENTERING OR CHANGING YOUR (NON-DEFAULT) ID NUMBER
1) Press MENU, if necessary, until "ID C0DE" prompt appears.
2) Display advances to "ID CD", if non-default ID code. If default ID code, the menu
will advance to CH.ID with default value i.e. 0000.
If
the ID code is the default value i.e. 0000, press MENU again and the menu will skip the
Note ☞
ID code to Set Point Menu.
3) Press MAX to increase digit 0-9. Press MIN to activate next digit (flashing).
Continue to use MAX and MIN to enter your 4-digit ID code.
4) If the correct ID code is entered, the menu will display CH.ID, otherwise an error
message will be displayed and the controller will return to the Run Mode.
Press MENU
or
Press MAX & MIN
5)
Press ENTER
6)
Note ☞
To leave your ID code Unchanged, press MENU and advance to "SET PoNT" Menu.
To Change your ID code use the MAX and MIN buttons to enter a new ID code.
Display flashes "STRD" message and advances to the next menu "SET PoNT".
To prevent unauthorized tampering with the setup parameters, the controller provides protection by requiring the user to enter the ID code
before allowing access to subsequent menus. If the ID code entered does not match the ID code stored, the controller responds with an
error message and access to subsequent menus will be denied.
Use numbers that are easy for you to remember. If the ID code is forgotten or lost, call customer service with your serial number to reset the
default to "0000".
19