1
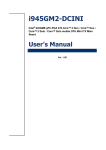
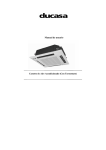
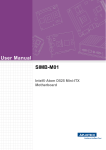
User's Manual
FPM 610 Series
FCC
This equipment has been tested and found to comply with the limits for a Class A digital device,
pursuant to Part 15 of the FCC Rules. These limits are designed to provide reasonable protection
against harmful interference in a residential installation. This equipment generates, uses, and can
radiate radio frequency energy and, if not installed and used in accordance with the instructions,
may cause harmful interference to radio communications. Operation of this equipment in a
residential area is likely to cause harmful interference in which case the user will be required to
correct the interference at own expense.
CE
This device complies with the requiements of the EEC directive 2004/108/EC with regard to
“Electromagnetic compatibility” and 2006/95/EC “Low Voltage Directive”.
SAFETY INSTRUCTIONS
1.
Read these safety instructions carefully and keep this User’s Manual for later reference.
2.
Don’t use liquid or spray detergent for cleaning. Use only a moistened sheet or cloth.
3.
Follow all warnings and instructions listed on the product.
4.
Keep this equipment from extreme humidity areas.
5.
Lay this equipment on a stable surface when installing.
6.
Do not leave this equipment in a non-air conditioned environment, or in a storage
temperature above 60∘C. Such conditions may damage the equipment.
7.
9.
10.
11.
12.
12.
Slots and openings in the cabinet are provided for ventilation, to ensure reliable operation
and to protect it from overheating. These openings must not be blocked or covered.
Place the power cord so that it will not be stepped on. Do not place anything over the
power cord. The power cord must be rated for the product and for the voltage and current
marked on the product’s electrical ratings label. The voltage and current rating of the cord
should be greater than the voltage and current rating marked on the product.
If the equipment is not used for a long time, disconnect the equipment from the mains to
avoid damage.
Never open the equipment. For safety reasons, only qualified service personnel should
open the equipment.
Never put any kind of objects into this product through cabinet slots or openings as they
may cause damage of the equipment.
If one of the following situations arises, get the equipment checked by service personnel:
a.
The Power cord or plug is damaged.
b.
Liquid has penetrated the equipment.
c.
The equipment has been exposed to extreme moisture conditions.
d.
The equipment does not work well or you cannot get it work according to the user’s
manual.
e.
The Equipment has been dropped and damaged.
f.
The equipment has obvious signs of damage.
Table of Content
Chapter 1
1.1 Packing List .........................................................................................................4
1.2 Specification ........................................................................................................4
1.2.1 System Specification ............................................................................................. 4
1.3 System View........................................................................................................5
1.3.1 Front view .............................................................................................................. 5
1.3.2 Rear view(It may vary in different MBs)................................................................. 5
1.3.3 Side view ............................................................................................................... 5
1.3.4 Dimension.............................................................................................................. 6
1.4 Connector Panels ................................................................................................7
1.4.1 Side Connector Panel........................................................................................... 7
1.4.2 Rear Connector Panel ........................................................................................... 7
Chapter 2
2.1 System Assembly ................................................................................................9
2.1.1 Installing Front IO Board........................................................................................ 9
2.1.2 Installing IO shield, motherboard, power supply, inverter and touch board......... 10
2.1.3 Installing HDD...................................................................................................... 13
2.1.5 Final Assembly .................................................................................................... 13
EEC311 Series
Chapter 1
Introduction
1.1 Packing List
•
FPM 610 series barebone system
•
CD for user’s manual and motherboard chipset drivers.
•
Power cord (Optional).
1.2 Specification
1.2.1 System Specification
•
Mini-ITX System
•
Built-in 15" TFT LCD
•
Advansus Mini-ITX MB: i852GM4-DCQI,i910GML-DCQIC6, i910GML-DCQIC10 MiniITX Main Board.
•
Scalable with more Mini-ITX MB Options
•
Ready Systems up to Intel® Core 2 Duo CPU
•
Onboard LVDS / DVI Supports Dual View
•
5.1+2-CH / 5.1-CH Audio, with 5W Audio Amplifier
•
Realtek RTL8111B / 8110SC Gigabit LAN
•
1 x CF, 1 x 2.5" HDD
•
2 Powered COM,4 USB ,2 PS2,1 VGA,1 DVI,1 RJ45,3 Audio Jack
•
Built-in 200 W PSU
EEC311 Series
1.3 System View
1.3.1 Front view
1.3.2 Rear view(It may vary in different MBs)
1.3.3 Side view
EEC311 Series
1.3.4Dimension
Dimensions
System
Dimensions
Carton
Dimensions
Outside Dimension:L435xW362xH203(mm)
EEC311 Series
1.4 Connector Panels
1.4.1 Side Connector Panel
No
Function
Description
1
ATX Power Button
ATX power switch function.
2
System Power LED
System power LED lights up when the system power is on, and blinks when
the system is in sleep mode.
3
HDD Activity LED
4
USB 2.0 connector x 2
IDE LED lights up or flashes when data is read from or written to the HDD.
These two 4-pin Universal Serial Bus (USB) ports are available for
connecting USB 2.0/1.1 devices.
1.4.2 Rear Connector Panel (IO may vary in different MBs)
No
Function
1
AC-IN Connector
2
Knock-out
3
TOP: PS/2 mouse connector
BOT: PS/2 keyboard connector
4
TOP : Serial port connector
BOT: VGA port
Description
Connect EEC410 to the AC outlet
Reserved for COM cable.
TOP: The standard PS/2 DIN is for a PS/2 mouse.
BOT: The standard PS/2 DIN is for a PS/2 keyboard.
TOP : D-sub 9-pin, male
BOT : VGA 15- pin
EEC311 Series
No
Function
TOP: LAN (RJ-45) connector
Description
TOP: This port allows Gigabit connection to a Local Area Network
(LAN) through a network hub. Refer to the table below for the LAN
port LED indications. The optional 10/100 Mbps LAN controller
allows 10/100 Mbps connection to a Local Area Network (LAN)
through a network hub.
ACT / LINK LED
Status
5
OFF
BOT: USB 2.0 connector
TOP: Line-In port (Light Blue).
6
CEN: Line-Out port (Lime)
BOT: Microphone port (Pink)
Description
No link
SPEED LED
Status
OFF
Description
1 0Mbp s connectio n
Oran ge
L inked
ORAN GE
1 00Mb ps connection
Blinkin g
Data activity
GREEN
1 Gb ps con nection
These four 4-pin Universal Serial Bus (USB) ports are available for
connecting USB 2.0 devices.
TOP: This port connects a tape, CD, DVD player, or other audio
sources.
CEN: This port connects a headphone or a speaker. In 4-channel,
6-channel, and 8-channel configuration, the function of this port
becomes Front Speaker Out.
BOT: This port connects a microphone.
EEC311 Series
Chapter 2
Assembly
2.1 System Assembly
2.1.1 Installing Front IO Board
1. Stick Panel and touch
together.
2. Screw them on the
Panel tray
(13GSMA00005C27)
3. Combine Power
button and Spring
4. Put Button and Spring
on the front I/O
bracket
5. Screw front IO board
and bracket on the
I/O bracket
EEC311 Series
2.1.2 Installing IO shield, motherboard, power supply, inverter and touch board
1. Install power
supply
2. Install IO shield
and MB as shown
in the picture
3. Please refer to the
MB manuals for
CPU, Memory
modules
installation and
other detailed MB
spec.
4. Screw inverter on
the side bracket.
5. Connect inverter
cable between
MB and inverter.
Inverter connector
locations may
vary in different
MBs..
EEC311 Series
6. Connect touch
board aside the
power supply
Front Panel Header (white dot indicates pin 1)
7. Connect Front IO
cable to
motherboard.
Header locations
may vary in
different MBs..
Front USB Header (white dot indicates pin 1).
EEC311 Series
Front Panel Connector (FPANEL1)/ Header locations may vary in different MBs.
This connector supports several chassis-mounted functions.
Pin Definition
I910GML-DCQICn
I852GM4-DCQI
USB 2.0 Connector (USBB1)/ Header locations may vary in different MBs.
These connectors are for USB 2.0 ports. Connect the USB/GAME module cable to any of these
connectors, then install the module to a slot opening at the back of the system chassis. These
USB connectors comply with USB 2.0 specification that supports up to 480 Mbps connection
speed.
Pin Definition
I910GML-DCQICn
I852GM4-DCQI
EEC311 Series
2.1.3 Installing HDD
1. Fix HDD to HDD bracket.
2. Connect HDD cable and
install HDD module to
system as picture shown.
2.1.5 Final Assembly
1. Organize Cables
2. Screw top cover
(13GSMA00002C27) on