1
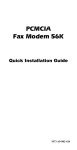
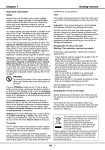
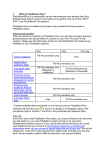
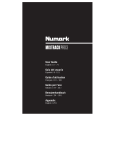
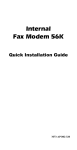
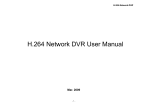
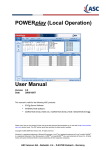
Disco XT 3.5 User Manual
21.9.2007 11.49
Disco XT
User Manual
© 2007 Aleksi Strandberg
http://www.discosw.net/discoxt/usermanual/manual.html
Page 1 of 24
Disco XT 3.5 User Manual
21.9.2007 11.49
Thank you and congratulations for downloading Disco XT for Mac OS X.
Disco XT is advanced audio playback and digital disc jockey software.
We designed Disco XT to be as easy to use as possible, but to take
full advantage of all it's features, reading this user manual is highly recommended.
Demo
Demo version of Disco XT has limited session time. You can only use it
for 20 minutes at a time. To obtain a full license, please go to our order page:
http://order.kagi.com/?CSL
Our programs are download products. You get to download as soon as we have received
your order.
http://www.discosw.net/discoxt/usermanual/manual.html
Page 2 of 24
Disco XT 3.5 User Manual
21.9.2007 11.49
Interface
1.1
Audio Players
This section consists of two identical audio playback units, similar to DJ CD player.
There are two players so you can make transitions from one song to another.
You rotate between left and right player.
In picture 1.2 you will see the decks, and below we explain what each numbered parts are.
1.2
1. Display
Deck display shows important information about the song. These include meta information such
as song title and artist. Display shows time remaining and time elapsed at the same time, you can
adjust time to display milliseconds as well, see part 4 below. Display also shows playback tempo change
set with tempo slider (6).
Display can be toggled to two modes:
http://www.discosw.net/discoxt/usermanual/manual.html
Page 3 of 24
Disco XT 3.5 User Manual
21.9.2007 11.49
Waveform mode or normal mode. You toggle between these modes with Wave button (9).
In waveform mode you will see visual representation of the song,
this helps to locate certain sections of song and helps to notice sudden end of song. Waveform mode
allows you to scroll back and forward in song by pressing the display and dragging left or right. Current
position of song is just before the display area. When part of the waveform moves away from the display
area that means it has played.
In normal mode:
At the middle of the display is timeline, which allows you to skip to any part of the song by simply clicking
in that position.
2.Tempo Adjust On/Off
Sets tempo changes on or off. If blue light above this button is not lighted, then tempo slider (6)
will have no effect.
3. Tempo Bend
Used for beatmixing; transition two songs while keeping their pace or tempo in sync. Often one player is
little late or too early than another, you will hear this as the beats ar not in sync. The idea is to temporarily
speed up or slow down one deck so it catches the other deck. Hold one of these buttons down until you are
satisfied with what you hear.
4. Time button
Shows time elapsed with ms. Very usefull when trimming the start position.
5. Mode Button
Toggles between two play modes: Single or Multi.
In Single mode, after song has finished playing, player will stop playing until you load a new song and hit play.
In most mixing situations this should be in Single Mode.
In Multi mode player works like a traditional CD player, after playing the song it loads next song and starts playing.
Next song is either from player memory (You can load more than one song by selecting multiple items) or from
Queue.
6. Tempo Control
Used to slow down or speed up song. Usually used for matching beats of two songs.
Disco XT uses advanced method for changing tempo of song without altering it's pitch.
7. Set Loop
Sets loop points for loaded song.
First press sets loop start time.
After first press you should see a loop icon half visible in the display.
Second press sets loop end time.
After second press the loop is active. To remove the loop points and return to normal playback, press this button again
so that loop icon disappears from the display.
8. Modify Loop
When player is in loop mode (as set with button 7) you can use this button to access functions to modify the loop.
You can halve the length or double the length of the loop and shift it backward or forward.
When player is not in loop mode and BPM value for this deck is visible in mixer, you can set loop points automatically
with this button. Just select how long loop you wish with this button.
9. Waveform Mode
Toggle display mode between normal and waveform display. See part 1 for more information about these modes.
10. Waveform Zoom
Only has effect when display is in waveform mode. You will see a number with letter x in display that changes when pressing
this button. Use it to zoom in or out; to have a closer look at the song or to have a larger view. Zoom goes from 1x to 64x;
where 64x is largest zoom value available.
http://www.discosw.net/discoxt/usermanual/manual.html
Page 4 of 24
Disco XT 3.5 User Manual
21.9.2007 11.49
11. Eject Button:
You might remember this icon from CD players, in CD players it is used to eject the disc and add other disc for use.
In Disco XT we don't use CDs, it is used for that second purpose; loading another music file to deck. By clicking you will
see a menu where you can select song(s) from your playlists or library to be loaded to the deck.
12. Save Point:
If you are unfamiliar with the term Cue point, let me describe: Often when deejay is making transitions he or she will need to
find appropriate starting time for a song. Usually there is silence or intro in a song which is usually not needed in DJ mix. With
cue point the deejay can store this start time. By pressing this button you save current playback position of the song as cue
point.
You can then go to that position again by pressing the Cue button (See part 13)
13. Track buttons
You can load more than one song to a deck. When you have multiple songs loaded, you can switch
between them with these buttons.
14. Nudge / fast forward buttons.
When deck is playing, you can use these buttons to go back or forward in the song in large steps. When paused, these buttons
Allow precise setting or trimming of song position.
15. Cue button
Moves song to saved cue point and sets player mode to cue mode. In cue mode changes made with timeline, trim, nudge or
waveform display
are saved to the point. To set cue point: Press cue button so that red led above cue button lights, use timeline or waveform
display to find about
a right position. You can then trim the position to more accurate with trimmer (See part 1). Make sure the cue led is lighted all
the time.
16. Play / Pause button.
This button plays or pauses a song loaded to the deck.
Queue
Below each deck is queue list. It is not visible in Automix mode. Queue lists can store songs that are to be used in the near
future.
You can drag songs from library and playlist to these lists, and when it's time, drag them to deck for use. You can remove song
by selecting it in list
and pressing backspace. If you have no need for queue lists you can hide them under 'Window' menu.
Mixer
With the mixer you do the transitions, volume correction, voice overs and eqs. In picture 1.3 below you will
see Disco XT mixer and each part numbered.
1.3
1. Filter Mode
This button toggles between three filter modes; Off, LP and HP.
Off = Filter is disabled, audio signal is unaffected.
LP = Lowpass filter. Filters out high frequencies from the signal. Use cutoff knob (2) and resonance knob (3) to alter the filter.
HP = Highpass filter. Filters out low frequencies from the signal. Use cutoff knob (2) and resonance knob (3) to alter the filter.
http://www.discosw.net/discoxt/usermanual/manual.html
Page 5 of 24
Disco XT 3.5 User Manual
21.9.2007 11.49
2. Filter Cutoff
Sets frequency where the filter cuts out. It either cuts high or low frequencies, depending on which filter you have selected.
3. Filter Resonance
Sets resonance of the filter.
4. Gain
Allows you to add additional gain to deck. Used for amplifying quieter songs to match loudness of more loud songs.
5. Brake
Simulates a vinyl start/stop. Can be used to do vinyl stop style song changes. When song is playing, song will be stopped
slowly.
For stopped songs, song will be started slowly.
6. 10 Band Equalizer
Allows to amplify or attenuate frequencies and their neighboring frequencies.
When equalizer slider is at middle, it has no effect, slide it downwards to attenuate signal or upwards
to amplify. You can save and open equalizer presets by clicking the small button with triangle below
the 10 band equalizer.
The frequencies each slider alters are, from 1 to 10:
32 hz, 64 hz, 128 hz, 256 hz, 512 hz, 1 Khz , 2 Khz, 4 Khz, 8 Khz, 16 Khz
7. 3 Band Equalizer
Three eq knobs with a wider range, allows to quickly amplifty or attenuate high, middle and low frequencies.
8. Volume
Adjusts volume of deck. Notice how RMS value changes in mixer display when changing volume.
9. Headphone Listening
Turns on headphone listening for the deck. You need to configure your additional sound device for this to work properly.
After setting up headphones you can use this button to listen to song in headphones.
When you are making transition, you have crossfader on the other deck. With headphones
turned on you can safely prepare upcoming song for the mix.
10. Microphone Input
Microphone Volume
Adjusts loudness of microphone playthrough. Mic must be turned on with Button 4.
Talkover button.
Drops playback loudness down so you can add voice over while having music in the background.
Press again to release to normal loudness.
Mic Button
Turns on microphone playthrough. When led is lighted microphone input will be directed to main output.
11. Automix
Automix button
In automix mode, the DJ do not have to transition or play songs. You simply setup or maintain a playlist for feeding the mixer.
In automix mode mixer does the following:
• Applies automatic volume correction: Each song is played at same level.
• Finds end points for songs: Often songs have empty space in the end, with automatic end point detection you get gap-free
playback.
• Transitions songs smoothly with your own settings (See Library section).
To turn off Automix and to go to manual mode, press this button so that the blue led is not lighted.
Automix Skip button.
Only has effect when Automix is On.
Sends immediate transition message to the mixer: Mixer will immediately transition and move to next song.
12. Mixer Display
Mixer display show relevant information about loaded songs:
http://www.discosw.net/discoxt/usermanual/manual.html
Page 6 of 24
Disco XT 3.5 User Manual
21.9.2007 11.49
End field shows end time of song. In manual mode this can be used as purely
informational, in automix mode this indicates how many seconds until next transition
starts.
RMS field shows RMS average of song. Disco XT calculates this automatically for songs.
In manual mode you can use these as reference for volume control.
In automix mode, Disco XT tries to set each song to same RMS; to keep volume at the same.
You may press the arrow to sync gains of both decks.
BPM displays tempo of song.
For each song loaded, Disco XT tries to find BPM value.
Tempo field doesn't actually display current state of tempo slider: that is shown in player.
Disco XT shows here how much to speed or or slow down this song to match to BPM of other deck.
You may press the arrow to auotmatically set the tempo.
13. Crossfader
Used to make transitions between the two decks. Slide it to each side to mute the other.
At middle both songs play at full volume.
14. Master Slider
Controls loudness of both decks and microphone.
15. Headphone Volume
Adjusts loudness of headphone listening: If you have headphone listening for deck enabled (button 7) or
when you are previewing song in library.
16. Recording
Allows to record mixes to disk. By default, recording will only start after each deck starts playing.
You will then see 'Hold' on this display, click this rec button again to force start recording. When Disco XT
is recording your mix, you will see time increasing in this display. You can press this button at any time
to stop recording.
17. Effects
Echo knob sets the dry/wet balance of echoing effect.
At left echo effect is disabled and has no effect on song.
At right echo effect is at max.
Rev knob sets dry/wet balance of reverb effect.
At the left it is disabled, at right reverb is at max.
Size Knob sets size of both reverb and echo.
For echo effect this sets the length of echo.
if the song has BPM you can right click this knob
to select musical length for the echo.
For reverb this sets the room size for reverb.
Source
With source you select what you see in library.
You can browse library, view and edit playlists, view iTunes playlists and add and edit dynamic playlists.
iTunes playlists have lock icon because these type of playlists are only editable in iTunes.
If you wish to make changes to these playlists: Go to iTunes and when you are done editing
select 'Refresh Library' in Disco XT.
Library
File Browser
Playlist
iTunes Playlist
http://www.discosw.net/discoxt/usermanual/manual.html
Page 7 of 24
Disco XT 3.5 User Manual
21.9.2007 11.49
Dynamic Playlist
Libary
Lets you view every song in your library.
File Browser
Integrated file browser. Allows you to browse your volumes to locate music files for use in Disco XT.
Playlist
View and edit playlists. Use the plus and minus button below the browser to add or remove playlists.
iTunes playlist
A playlist made with Tunes and imported to Disco XT.
Dynamic Playlist
Playlist used for automatic mixing. Dynamic playlist editor allows you to set rules for selecting songs, Disco XT
will then automatically refresh these playlists with new songs from the library.
Library
1.4
Library section covers your whole iTunes library: Playlists and entire song library.
Disco XT features advanced features for handling these.
It automatically organizes invidual songs to groups. Disco XT features web browser style
back and forward button which can be used to go to any previous library view. Next we
describe each part of the library as in picture 1.4
1. Back and Forward buttons
Consider each action to the library view as a page. For example if you type 'Rock' to filter field,
the library shows all songs or groups with meta data containing the word 'Rock. This is a page,
next if you select a group within this 'Rock' view, for example 'Johnny Cash', which then shows
all songs with word 'Rock' and artist 'Johnny Cash' that would be next page. If you would then
press back button it would go back to 'Rock', by pressing again it would go back to view before 'Rock'.
From there pressing forward would go to 'Rock', pressing again would go to 'Rock' and 'Johnny Cash'.
This allows quick and painless navigation through often thousands of songs in the catalog.
2. Group button
Finding songs from your whole music library, containing often thousands of songs, can be painful.
To help you with this, we created grouping of songs. For example if you have grouping by artist enabled,
you would see each artist as single row in the library view. All songs by 'Johnny Cash' would be shown
as Johnny Cash (20 songs) for example. By double clicking this row you would be taken to all those 20 songs.
With the group button, you can either disable grouping, by selecting 'Show Songs' or
you can select to group to artists, albums or genres.
http://www.discosw.net/discoxt/usermanual/manual.html
Page 8 of 24
Disco XT 3.5 User Manual
21.9.2007 11.49
3. Library Preview
If you are looking for a song to include in your playlist, you might want to preview it to hear if it is suitable
and is what you want. By simply double clicking item in library view you can play a previw of it. Controls
to that song preview are here. You can also press space bar to pause or play the song.
4. Filter Field.
Each song in your library contain information about the song creator and the song itself, like artist, title
track number album and others. You can type words here and Disco XT will search for songs which contain
these words. For example typing 'Disco' here would find all songs with genre Disco, but also would find album titled
'Disco is Dead'. You can type multiple words by separating them with spaces, for example 'Bass Drum' would find
songs with genre 'Drum&Bass'. You can also type negative words, for example filter 'Trance -Psy' would find all
songs with word 'Trance' in them but would ignore songs with genre 'Psytrance'.
By default Filter tries to autocomplete what you are writing. For example after typing 'Astral' it would try to complete
to 'Astral Projection'. If you don't like this feature it can be turned off in Preferences, see next Chapter.
6. Library Columns
Tells what information Disco XT will show for songs. You can rearrange the order of this columns
by simply dragging one of them left or right.
You can change what information is shown by selecting 'View Options' under 'Edit' menu.
You can click on any column to sort the Library view by that field.
7. Library View
This box shows songs in your library or selected playlists. This is where you edit your playlists.
You can drag song(s) to any playlist in browser or to decks or main playlist. If you have two button
mouse you can right click song in this list and you will be given a list of commands (You can also
control click with single button mouse). If the item in this list is a folder (You've selected file browser
in browser) or if the item is a group, you can double click the item to show it's content.
8. Library buttons
Remove Button.
Removes selected songs from the library. Should only be used when iTunes library is not used, because
next time Disco XT refresh from iTunes the songs will be back.
Find Song button.
Opens a song quick find window. You can search for artist, track or genre. You can also limit to certain
tempo range.
9. Library Statistics.
This is purely informational field. It shows number of items currently visible and the total length of songs.
Playlist
When you turn Automix on you will need to have song in this playlist. In automix mode Disco XT automatically loads
songs to decks from this list. After song has played it will be removed from this list. You can easily add complete iTunes
playlists here or invidual or multiple songs. You can add songs and groups from library view by selecting song in library
and pressing return key or by simply dragging to this list. Next we explain each function in depth.
Move Down
Shuffle Order
Move Up
Dynamic Playlist
Move to Top
Automix On/Off
Add Content
Automix Skip
Move Down
Moves the currently selected item down in the list.
http://www.discosw.net/discoxt/usermanual/manual.html
Page 9 of 24
Disco XT 3.5 User Manual
21.9.2007 11.49
Move Up
Moves the currently selected item up in the list.
Move to Top
Moves the currently selected item to top of the list.
When automix is on you can only move to near top, since first song cannot be
changed because it is already playing.
Add Content
Quickly add content to the playlist. For example if you have made playlists in
iTunes you can add them here. Be sure to add the playlists in desired order because
once they are added they are no longer playlists but invidual songs. You can also
add playlist made with Disco XT or you can select songs from your library.
Shuffle Order
Randomizes order of the whole list. This is a one time function and not a turn on
shuffle like in iTunes.
Dynamic Playlist
If you know what kind of music you want to play but don't really care to select
invidual songs then dynamic playlists are for you. Dynamic playlist, as the name suggests,
alter automatically. For example you could want to play Rock music, you would create
dynamic playlist with Rock genre, you would select that playlist here and simply start
automix. Disco XT would then automatically fill up new songs as played ones go off the list.
If you don't wish to use dynamic playlist then select 'Master' here. If you don't see any dynamic
playlist in the list you can select 'Create Dynamic Playlists'. More info on creating dynamic playlists
later.
Automix On/Off
In automix mode, the DJ do not have to transition or play songs. You simply setup or maintain a playlist for feeding the mixer.
In automix mode mixer does the following:
• Applies automatic volume correction: Each song is played at same level.
• Finds end points for songs: Often songs have empty space in the end, with automatic end point detection you get gap-free
playback.
• Transitions songs smoothly with your own settings (See Library section).
To turn of Automix and to go to manual mode, press this button.
Automix Skip.
Only has effect when Automix is On.
Sends immediate transition message to the mixer: Mixer will immediately transition and move to next song.
1.5
In picture 1.5 you see a playlist filled with some songs.
You can alter what song info you see by selecting 'View Options' under 'Edit' menu.
http://www.discosw.net/discoxt/usermanual/manual.html
Page 10 of 24
Disco XT 3.5 User Manual
21.9.2007 11.49
By default playlist will show 'Fade' column. This picture shows how the song will fade
to next one in the list. You can click on that area to set fade type for selected songs.
You can create your own fade types, described later.
1.6
In picture 1.6 is shown the song editor:
It is used to set start and end times for songs in playlist.
You open song to editor by double clicking it in the list
(seen in picture 1.5).
1. Playback controls.
Play or pause song and go backward or forward or by quickly pressing to load previous
or next song to editor.
2. Timeline, use to quickly jump to any part of the song.
3. Start time.
Informational as well as editable value. You can write start time in format MM:SS.MS
4. Save time
Saves current playback position (As visible in timeline) to start time.
5. Trimmer.
When you have set start position and wish to make it more precise, for example
to set start time to certain drum beat you can use this area to scroll left or right to set the start
time with 1/100s accuracy.
6. Test time
Starts playing song from start time set with controls (1-5).
7. End Time
Informational as well as editable value. You can write end time in format MM:SS:MS
8. Save time
Saves current playback position ( as visible in timeline) to end time.
9. Trimmer .
When you have set end position and wish to make it more precise, for example
to set end time just before certain drum beat you can use this area to scroll left or right to set the end
time with 1/100s accuracy.
10. Test time
Starts playing song two seconds before end time and stops at end time.
11. Fade View
Displays fade type for this song. Fade type tells how song will be faded to next song in the list.
Fade type is not selected or edited here. If you wish to set fade type to different than default,
select the item in the list and click on the fade column. You can edit fade types, more on that later
http://www.discosw.net/discoxt/usermanual/manual.html
Page 11 of 24
Disco XT 3.5 User Manual
21.9.2007 11.49
Configuration and Settings
In this chapter we explain the configurations to make Disco XT act the way you want.
Preferences
You access this window by selecting 'Preferences...' under 'Disco XT' menu.
http://www.discosw.net/discoxt/usermanual/manual.html
Page 12 of 24
Disco XT 3.5 User Manual
21.9.2007 11.49
2.1
1. Sync to iTunes Music Library
Whether you want to work with or without iTunes.
If you tick this box your iTunes library and playlists are available in Disco XT.
To keep it updated Disco XT will also sync to iTunes library at launch or when you select 'Refresh Library'
under 'File' menu.
2. Use this iTunes Music library file.
This displays and lets you select the path of the XML file iTunes creates.
If you have your iTunes library somewhere else than your music folder then
you will need to select it here.
3. Load iTunes Playlists
Only has effect when iTunes Sync is enabled.
You can untick this box to not have iTunes playlist in Disco XT.
4. Libray View Options
Row height is the height in pixels of single row in library.
Type -1 to use default, which is usually correct one.
Text Size and font tell Disco XT how to display text in rows.
5. Range
Sometimes BPM detector has problem telling whether song is for example, 120 BPM or 60 BPM.
If you know in what range your songs usually are, it is good idea to type the gap here. If BPM
detector counts, for example BPM of 160 which is greater than what we have in picture 2.1,
BPM detector will gap it to be 80 BPM.
6. Round to Nearest whole number.
Will always return BPM values as whole number. For example 120 not 120.25, or 90 not 89.9.
2.2
http://www.discosw.net/discoxt/usermanual/manual.html
Page 13 of 24
Disco XT 3.5 User Manual
21.9.2007 11.49
In the next tab, shown in picture 2.2 you see audio configuration options.
Disco XT works with most audio devices. These include USB soundcards, firewire soundcards and USB headphones.
By providing additional device to your computer's line out you can listen in headphones without affecting mix output.
1. Mic Input Device.
Sound device for microphone input, used for adding voice overs to your mix.
2. Master Output
Sound device for main output, in other words the whole mix.
3. Headphone Output.
Select sound device to be used for headphone listening. Make sure you have your device plugged in
before you launch Disco XT.
4. Tempo Control Range
Sets how much you can alter the tempoof the song.
Default is ±10% and this should usually be left alone, larger amounts are usually audible
to the listeners.
2.3
This tab allows to change behaviour of recording functionality.
1. Choose folder where to save recorded mixes. Must be on your startup disk.
2. Select file format, either MPEG4 AAC or Audio IFF.
MPEG4 takes about 50 MB for a hour, where Audio IFF takes about 600 MB.
The size difference is huge, select one which suits your needs best.
http://www.discosw.net/discoxt/usermanual/manual.html
Page 14 of 24
Disco XT 3.5 User Manual
21.9.2007 11.49
3. Will not start recording until playback starts. For example, you you want to record a mix:
You press Rec button so it says 'Hold', you press 'Automix' button to start playback, the recording
will start as soon as either deck starts playing.
4. Adds mixes to your iTunes library after recording.
5. Reveals your recorded mix file in Finder.
2.4
in next tab, titled 'Misc' (Picture 2.4) are behaviour choices.
1. Sometimes you accidentally load song to a deck which is playing. To avoid this issue, especially on live
events, you can turn this on. When this is on Disco XT will not load new song until playback has been stoppd.
2. Clears the main playlist of Disco XT at launch.
3. Syncs echo effect to BPM value, so it sounds musically correct.
4. Shows confirmation dialog before quitting. Sometimes you accidentally press Command + Q
when trying to access other short cuts. This helps there so you won't be cut out during a gig.
5. Seeks first 10 seconds of song and skips silence in it. Makes therefore smoother mixes with
automix.
6. Shows a confirmation dialog before removing songs from library.
This only has effect on library, removing songs from playlists is always without confirmation.
7. Shows confirmation dialog before deleting playlists.
This should be always enabled.
8. iPods will not be loaded to Disco XT and are ignored. If you don't need access to songs in your ipod
in Disco XT then you can tick this. Note that iPod must be enabled for disk use in order to use it in Disco XT.
9. Disables automatic BPM detection. When ticked BPM will not be searched when loading song to deck.
10. When typing to filter field above library, Disco XT will try to guess what you are typing. It knows every
song and artist you have in your library and will try to autocomplete what you are typing. Turn this off
if you don't like such feature.
2.5
http://www.discosw.net/discoxt/usermanual/manual.html
Page 15 of 24
Disco XT 3.5 User Manual
21.9.2007 11.49
1. Sets memory allocation for the deck
For optimal performance Disco XT loads songs to memory.
You can here define the size of memory reserved for each deck.
2. Sets DSP buffer size.
You shouldn't normally need to change this.
In case you experience problems with playback, increase this value.
Keep in mind that large values can make transitions and effect changes blocky, instead of smooth.
Changes take effect after restarting Disco XT.
Control Surfaces
One thing that was missing in the early days of digital dj softwares was the hand control.
Mouse or trackpad is never as comfortable to use as a slider or knob.
There are many USB controllers available.
These devices are connected to USB port and send MIDI signals to software that
support this. Many of these devices are especially designed for dj use.
You can hook any control, button or knob in Disco XT mixer or decks to slider,
Knob or button in your hardware control surface. After setting up, you can do your
mixes using the control surface. This part tells you how to setup your controller.
First step is to plug your control surface to your computer.
Disco XT must be launched after plugging the controller.
Make sure drivers are installed, if required, and that the controller is powered.
Launch Disco XT
Select 'Control Surface...' under Edit menu (See picture 2.5)
2.5
http://www.discosw.net/discoxt/usermanual/manual.html
Page 16 of 24
Disco XT 3.5 User Manual
21.9.2007 11.49
2.5.1 Control Surface Window
You will see a list of each controllable action in Disco XT.
Control surface setup in Disco XT works as MIDI learn.
That is, it maps action in Disco XT to control you move in your controller.
Select action from the list, so that a new small window opens,
waiting for your action. You will now need to press button, move
control or play note on your controller. The window should
automatically close and controller number should appear to the list
in picture 2.6
Do the same for each action in the list you want to control.
Optional toggle column in list allows you to choose a toggle mode for that action.
In toggle mode, the midi message needs to be greater than 0 for the action to work.
Use this for bend and backward forward buttons, and for others if necessary.
Once you have everything set up, click 'Done'.
Troubleshooting:
If Disco XT is unable to learn from your controller, make sure that
you have installed required drivers and that you have restarted you computer
after installation. Make sure the device is getting enough power from the USB port:
Don't add the controller to keyboard USB port or similar and if it has been added
to USB Hub make sure the Hub has separate power source.
Keyboard Shortcuts
Most actions in Disco XT can be controlled with keyboard.
We have created a well working default keyboard setup.
However, you can set whatever shortcuts you want.
To edit and view keyboard shortcuts, select 'Keyboard Shortcuts...' under Edit menu (See image 2.6)
2.6
http://www.discosw.net/discoxt/usermanual/manual.html
Page 17 of 24
Disco XT 3.5 User Manual
21.9.2007 11.49
2.6.1 Keyboard Shortcuts
You can click 'Defaults' button to restore factory settings.
Click 'Clear All' to disable keyboard shortcuts until you define
them again.
Select action from the list.
A new window opens, waiting for your input.
Press the key on your keyboard you wish to assign to this function:
Do this for each item you wish to define.
Once done, Click 'Done'.
Fade Editor
Disco XT allows you to assign different fades for each song in the list.
There is also one default fade which is assigned to songs you haven't
yet set fades for.
You can edit these fades by selecting 'Fades' under Edit menu. See picture 2.8.
2.8
http://www.discosw.net/discoxt/usermanual/manual.html
Page 18 of 24
Disco XT 3.5 User Manual
21.9.2007 11.49
Fade editing window will open, as in picture 2.8.
2.9
1. List of all fades you have made or that are included as defaults.
Select item from this list to edit it.
2. Fade In.
How many milliseconds (1000 = 1 second) the coming song will
fade in.
3. Fade out
How many milliseconds currently playing song will fade out.
4. Crossplay
How many milliseconds songs will both play at the same time.
You can set this to negative value to add gap between the songs.
5. Default
Assigns this fade type as default for all songs. Only one default
can be assigned at a time.
6. Curve
Sets curvature of the fades.
7. Fade Preview
Visual representation of how fade will happen.
8. Add or remove fades.
Automix Settings
http://www.discosw.net/discoxt/usermanual/manual.html
Page 19 of 24
Disco XT 3.5 User Manual
21.9.2007 11.49
As descriped in the previous part, fade types are not edited under 'Automix Settings'.
To open automix settings, select 'Automix Settings' under Automix menu, see Picture 3.0.
3.0
Automix settings window only has two options:
You can choose to clear decks when starting Automix.
This will ensure that the mix starts from song in your playlist and not from songs
that are left in decks.
RMS Level tells how loud you want the automixer to mix.
-1 dB being loudest and -36 dB most quiet.
Dynamic Playlist Editor
Dynamic playlists allow Disco XT to automatically select songs for you,
you only need to make a few choicse with the dynamic playlist.
In picture below you see dynamic playlist editing window.
http://www.discosw.net/discoxt/usermanual/manual.html
Page 20 of 24
Disco XT 3.5 User Manual
21.9.2007 11.49
1. Choose genres you want to hear song from.
2. Choose artists you want to hear songs from
3. Choose albums you want to hear songs from.
4. Allows you to limit songs to a certain time period.
5. Limits songs to your ratings.
6. Limits songs to a certain tempo range.
7. Only allow songs with certain duration.
8. Restrictions:
These separation rules make sure that same artist, genre or song doesn't play again too close to last time.
You tell here how many songs should be in between.
Editing Jingle Sets
Editing jingle sets is pretty straightforward. You simply create new or edit existing jingle set.
Select audio files for each Jingle and optionally type a keyboard shorcut key.
Menus
New Playlist
Creates a new empty playlist and adds it to browser.
http://www.discosw.net/discoxt/usermanual/manual.html
Page 21 of 24
Disco XT 3.5 User Manual
21.9.2007 11.49
New Playlist From Selection
Only available when you have selected one or more items from the playlist or library.
Creates a new playlist and adds selected items to it.
New Dynamic Playlist
Creates new dynamic playlists and adds it to browser.
See part 'Dynamic Playlists'.
Delete Playlist
Deletes currently selected playlist.
Only available for playlists created with Disco XT.
Add Folder to Library
Asks you to select a folder.
Disco XT scans the folder for music files and adds them to your Disco XT library.
Add Song to Library
Asks to open a music file and adds it to Disco XT library.
Find Song
Shows the song find window.
Stop All Jingles
Stops playback of jingle audio files.
Edit Jingle Sets
Allows you to edit the jingle files and keyboard shorcuts for them.
See part 'Jingle Sets'
Clear Library
Removes every song in the library.
Import Playlist
Export Playlist
Allows you to export currently open playlist to a file
and to import previously exported playlist to library.
Remove Selected Items
Removes selected items from the library.
Check for missing files
Performs scan for verifying that all songs in library are available.
Reset All Playcounts
Sets playcount of each song to 0.
Clear Play Log
Clears the play history that is available with 'Play Log' under File menu.
Play Log
Shows your play history and playing date stamps.
Calculate BPM for Selected
Finds tempo information for selected songs by looking at song data.
Note: Finding BPM for many songs can take several minutes.
Calculate BPM for Visible
Same but calculates for all visible items.
http://www.discosw.net/discoxt/usermanual/manual.html
Page 22 of 24
Disco XT 3.5 User Manual
21.9.2007 11.49
Load Song
Loads songs selected in library, playlist or queunue list.
Clear Deck
Clears the deck and stops playback in the deck.
Clear Quenue
Clears deck quenue.
Load to Queue
Adds selected songs from library or playlist to quenue.
Waveform
Turns on or off the waveform display for the deck.
Zoom Waveform
Sets waveform zoom value from 1x to 64x,
1x showing most and 64x zoomed most.
Equalizer
Save and load presets for the 10 band equalizer.
http://www.discosw.net/discoxt/usermanual/manual.html
Page 23 of 24
Disco XT 3.5 User Manual
21.9.2007 11.49
You can Minimize the main window with 'Minimiz'e'.
To restore the window back to visible, select Disco XT
icon from the dock.
For most screens you can choose Disco XT to run fullcreen.
In case you need space for library and playlists, you can hide the mixer and decks with 'Manual View'.
'Pick a Color' lets you select color for interface displays and lists.
There are two built in skins and number of included custom skins.
You can select 'Skin Editor' to edit the current skin.
I am not covering skin editing in this manual, but it is relatively
easy to customize and create your own skins.
'Show Keyboard Shortcuts' displays current keyboard shorcuts, for your reference.
'Show Album Art' ticked will enable Disco X T to show album art
for selected song, if available.
'Show Editor' displays editor below your main playlist, for setting end and start times and fade types.
'Show Queue' hides or shows the song queue.
Note that in Automix mode Queue is always hidden.
Hide Library allows you to hide the entire library and playlist part of the main window.
This is useful if you want to use iTunes for song lookup and then simply drag the songs
to Disco XT.
'BPM Tap counter'
Disco XT has built in automatic bpm counter but you can use this small manual counter if you need to.
'Jingles' window allows you to play short sound clips.
http://www.discosw.net/discoxt/usermanual/manual.html
Page 24 of 24