1
Teleserver Memo Pro
Installation and Operation Manual
SPEECH DESIGN GmbH
Industriestr. 1
D-82110 Germering
Germany
Telephone +49/89/89458 - 0
Fax +49/89/89458 - 359
www.speech-design.de
Printed in Germany
07.11.01
Subject to change without notice.
Reprinting and copying prohibited without written permission of SPEECH DESIGN.
Text and Graphics: PageMaker 6.5
(bz-sj-sl-df-ru)
76-193 / 03
Page 1
76-193-03.P65
1
08.11.2001, 12:07
Teleserver Memo Pro
Installation and Operation Manual
SPEECH DESIGN - INFORMATION AND SUPPORT
Thank you for your confidence in SPEECH DESIGN and the purchase of this product. As our valued
customer, we are pleased to offer you an assortment of support services. Our external partners as well as
our internal team are available to quickly and professionally help you attain a first rate telephone
presence in your company.
Local Support
Your local supplier (PBX-manufacturer or telephone dealer) is kept up to date on the newest information
on SPEECH DESIGN products and services. Should you require help, your supplier is the best person to
contact first.
SPEECH DESIGN Hotline
Of course, you can contact us directly at our office in Germering, Germany:
+49/89/89458 - 140
Outside of working hours or during times of high telephone traffic, please leave us a message with your
name and number in the SPEECH DESIGN helpbox. We will return your call at the very next opportunity!
SPEECH DESIGN on the internet
You can find an overview of all our products and applications at our internet site:
www.speech-design.de
Here you can request information on any SPEECH DESIGN products.
Page 2
76-193-03.P65
2
08.11.2001, 12:07
Teleserver Memo Pro
Installation and Operation Manual
Inhaltsverzeichnis
1
USING THIS MANUAL ......................................................................................5
2
IMPORTANT SAFETY PRECAUTIONS ..........................................................7
3
WHAT IS TELESERVER MEMO PRO? .........................................................9
3.1
Brief introduction .................................................................................................................... 9
3.2
Function overview ................................................................................................................ 10
3.2.1
Functions at the switchboard (the Operator) ........................................................................ 10
3.2.2
Music- and Information-On-Hold functions ........................................................................... 11
3.2.3
Voice Mail functions (at each extension) ............................................................................. 12
3.3
4
OPERATION BY SWITCHBOARD PERSONNEL ...................................... 1 5
4.1
The touchscreen .................................................................................................................. 15
4.2
Clock setting ......................................................................................................................... 17
4.3
Automatic Attendant and call transfer ............................................................................. 19
4.3.1
Setting up the Auto Attendant functions: (recording Day, Lunch, Night, and Holiday/Special
company greetings) ............................................................................................................ 20
4.3.2
Selecting greetings (manually and automatically) .............................................................. 25
4.3.3
Setting and changing target extensions .............................................................................. 33
4.3.4
Switchboard mailbox management .................................................................................... 38
4.4
On-Hold Music and Information ........................................................................................ 40
4.4.1
Recording music and texts .................................................................................................. 41
4.4.2
Combining music and text for an on-hold program .............................................................. 45
4.5
5
Features and module options for Teleserver Memo Pro ........................................... 14
'Voice Mail' control functions ............................................................................................ 49
4.5.1
Install, manage, and erase mailboxes ................................................................................ 49
4.5.2
View mailbox statistics ........................................................................................................ 54
4.5.3
Analysis of utilisation of system capacity ............................................................................ 57
OPERATION BY MAILBOX OWNER ........................................................... 5 9
5.1
Installing a mailbox ............................................................................................................. 61
5.2
Recording personal mailbox greetings .......................................................................... 63
5.3
Playing/erasing/forwarding messages .......................................................................... 65
5.4
Recording and sending inter-office messages ............................................................ 67
Page 3
76-193-03.P65
3
08.11.2001, 12:07
Teleserver Memo Pro
Installation and Operation Manual
5.5
Recording and playing of private messages ............................................................... 68
5.6
Switching message recording ON/OFF .......................................................................... 70
5.7
Switching notification by phone call ON/OFF ................................................................ 71
5.8
Activate/deactivate Assistant Function .......................................................................... 73
5.9
Changing password for mailbox control ......................................................................... 74
5.10 Select user language .......................................................................................................... 75
6
INSTALLATION BY THE TECHNICIAN ....................................................... 7 6
6.1
Parts checklist ...................................................................................................................... 76
6.2
General system requirements ........................................................................................... 77
6.3
Connecting Teleserver Memo Pro to the PBX .............................................................. 79
6.3.1
6.3.2
Installing analog ports ......................................................................................................... 81
6.3.3
Installing V.24-interfaces (COM 2) ........................................................................................ 81
6.3.4
Installing the Music On Hold port ......................................................................................... 82
6.4
8
The menu 'MAINTENANCE' .............................................................................................. 83
6.4.1
Begin operation with Teleserver Memo Pro ....................................................................... 83
6.4.2
Changing telephone parameters ........................................................................................ 87
6.5
7
Installing the modules .......................................................................................................... 79
After installation ................................................................................................................... 90
SPECIFICATIONS ........................................................................................... 9 1
APPENDIX ........................................................................................................ 9 3
8.1
Greeting examples .............................................................................................................. 93
8.2
List of text examples for company greetings ................................................................ 95
8.3
List of copyright-free titles delivered with Telserver Memo Pro .............................. 97
8.4
Information on copyrights for Music On Hold ................................................................ 98
8.5
Sound studio contact .......................................................................................................... 99
8.6
Order form for booklets
"First Steps with Teleserver Memo Pro" ..................................................................... 101
Declaration of Conformity ......................................................................................................
Page 4
76-193-03.P65
4
08.11.2001, 12:07
Teleserver Memo Pro
Installation and Operation Manual
1
USING THIS MANUAL
This manual was written for three groups of people: for end users (employees in any organization), those
responsible for the purchase and system administration of Teleserver Memo Pro together with the
company PBX (Managers, System Administrators, EDP- or Organizational Managers, etc.) as well as the
professional installer.
a ) For the user
This manual instructs you how to get the most out of Teleserver Memo Pro, whether you are at the
switchboard, in a telephone team, work in a hotline or simply have an extension number. For quick
access to the system, please see the instruction booklet "First Steps With Teleserver Memo Pro" and
the detachable "wallet card."
b ) For those responsible for purchase and system administration within the organisation
You are most likely the first person users come to when they need help. You thus have a large
amount of influence in ensuring that the system is accepted quickly and used effectively.
Please distribute the booklet "First Steps With Teleserver Memo Pro" in your organization. Should
you have more than 100 users, please order more booklets from SPEECH DESIGN (see fax form in
the Appendix) or print the information from the enclosed CD-ROM. This CD-ROM also includes this
Installation and Operation Manual in electronic form as a .pdf file (including the necessary software).
To become familiar with Teleserver Memo Pro, we recommend reading this manual carefully. Once
you have begun working with Teleserver Memo Pro, the handbook can be used for looking up
specific information.
c) For the PBX technician
Please give a short introduction to the system to the person in the organization who will be
responsible for Teleserver Memo Pro, and ensure they have the complete documentation after
installing the system.
Teleserver Memo Pro is capable of a wide variety of applications and settings which can be tailored
to customer needs. This is why we recommend reading the complete Installation and Operation
Manual carefully before installing Teleserver Memo Pro for the first time. Please pay special attention
to Chapter 6 on installation. The enclosed integration notes should provide ample information about
the PBX you are working with. Should you encounter difficulties during the installation, please call our
SPEECH DESIGN offices.
Our tip:
Store this manual close to the Teleserver Memo Pro unit. Usually, this is at the
switchboard.
Page 5
76-193-03.P65
5
08.11.2001, 12:07
Teleserver Memo Pro
Installation and Operation Manual
General:
Texts beginning with
data or configurations.
CAUTION mark important information. They warn against irretrievable loss of
NOTE informs of information that is useful for installing and working with Teleserver Memo Pro.
You will find further tips and information in the help files marked with
in the various menus in
Teleserver Memo Pro.
Our Tip:
Let Teleserver Memo Pro tell you about itself. The system talks you through the functions
with voice prompts. The enclosed booklet "First Steps with Memo Pro" gives a quick
overview of the system and helps you start quickly.
Page 6
76-193-03.P65
6
08.11.2001, 12:07
Teleserver Memo Pro
Installation and Operation Manual
2
IMPORTANT SAFETY PRECAUTIONS
Teleserver Memo Pro is a modular peripheral system designated to be connected to a PBX. Any other
use is not recommended and may result in a loss of approvals.
The system has been produced with great care and tested extensively. However, in applications where
a technical failure can cause damage or harm, the use of this system is not recommended. The
manufacturer will not be liable for any damage or harm following a technical defect or misuse, except
when such liability is dictated by law.
Please observe the following safety precautions:
Please do not operate the system near hot objects (radiators). Protect it from direct exposure to sun.
The system should not be operated in a humid environment or come in contact with moisture. Hard
mechanical shock can lead to malfunction or even permanent damage!
The unit may only be opened by a trained service technician. The power supply must be removed
before opening.
CAUTION:
It is very important that these instructions be followed. Not doing so can be dangerous!
Page 7
76-193-03.P65
7
08.11.2001, 12:07
Teleserver Memo Pro
Installation and Operation Manual
Only use the power supply delivered with the system!
The power wall outlets should be close to the system and easily accessible.
External systems connected to LINE-IN socket or to the Music On Hold interface must meet the safety
regulations of SELV according to EN60950.
Security norms and certifications
Teleserver Memo Pro fulfils the security regulations EN60950.
It is intended for operation at analog PBX extentions (private branche exchange).
Call switching and call forwarding functions are utilized which are not usually available
in puplic telephone systems. Only limited operation is possible without these funktions!
Page 8
76-193-03.P65
8
08.11.2001, 12:07
Teleserver Memo Pro
Installation and Operation Manual
3
WHAT IS TELESERVER MEMO PRO?
3.1
Brief introduction
Teleserver Memo Pro is based on SPEECH DESIGN's newest auto-attendant and voice mail technology. It
is the basis for a professional telephone presence throughout the company, is easy to use, and offers a
wide range of features.
Whether at the switchboard or at each extension, whether in the Order Processing Department or the
Technical Hotline - Teleserver has the right solution for a topnotch telephone performance within your
company.
By using insertable modules and software updated through an integrated CD-ROM drive, Teleserver Memo
Pro adapts to your company's communication needs. Thanks to its modular construction, the system
grows with your company and offers a maximum on flexibility and investment security.
Tried and true touchscreen technology makes using Teleserver Memo Pro easy: you make the necessary
settings simply by touching the corresponding symbol on the screen. The audio scrolling acoustically
supports remote access to the system by telephone: voice prompts take you through the various functions
step-by-step, instructing which buttons should be pressed when.
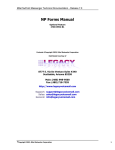
Figure 1: Teleserver Memo Pro front- and back view
Page 9
76-193-03.P65
9
08.11.2001, 12:07
Teleserver Memo Pro
Installation and Operation Manual
3.2
Function overview
3.2.1
Functions at the switchboard (the Operator)
In times of high traffic at the switchboard, Teleserver Memo Pro ensures that callers are not confronted
with continuous ringing or busy signals. Up to eight callers can be greeted and transferred
simultaneously. Callers with a touch-tone phone can transfer themselves. In this case, the company
in order to be transferred to Sales, or
to select the
greeting instructs them, for example, to press
Service department.
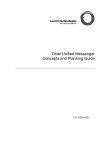
The Automatic Attendant comes into play when the switchboard is dialled, but is directly rerouted to
Teleserver Memo Pro or is forwarded to Teleserver Memo Pro in the case that the call goes unanswered
(except when Teleserver Memo Pro is on Night or Holiday/Special operation). The Automatic Attendant
is also active when a caller tries to transfer his or her call to a non-existing mailbox. The Automatic
Attendant thus provides considerable support at the switchboard.
Figure 2: Incoming calls at the switchboard: Day, Night, and Holiday/Special operation
Teleserver Memo Pro features the following:
"Digital announcer" greets callers and transfers to the operator or a hunt group of extensions
Target extension is changeable anytime
"Automatic Operator": callers with DTMF (touch-tone) phones can directly enter an extension or a
single-digit department number ("short-dial")
Announcement recording via handset, via the built in CD-ROM drive, or via LINE-Input
Remote recording and switching of greetings possible
Separate user-recordable Day, Night, Lunch, and Holiday/Special company greetings switch
manually or automatically (weekly/daily calendar), pre-programming of holidays 24 months in
advance
Multi-line: simultaneous call handling of telephone lines. Every caller hears the entire company
greeting from the beginning.
Page 10
76-193-03.P65
10
08.11.2001, 12:07
Teleserver Memo Pro
Installation and Operation Manual
Superior announcement quality, due to ISDN digitalization.
Statistics on utilization of capacity
3.2.2
Music- and Information-On-Hold functions
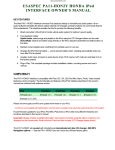
Teleserver Memo Pro productively uses the often-unvoidable time spent waiting on hold in order to play
music and information. This ensures you do not lose calls and helps prevent caller impatience.
Additionally, a positive image is projected through this "acoustic doorway" of your company.
Figure 3: Utilizing the time spent on hold for playing music and information
Music- and Information-On-Hold features:
Integrated CD-ROM drive for downloading and recording of music and information texts into memory
24 copyright-free music titles on the hard disk
Continuous playback of user-selectable music and user-recordable information
Separate message memory (2-track-technology) for separate update of music and messages
Music and messages blend automatically during playback (similar to a sound studio mix)
All recordings from integrated CD, handset, or LINE-Input
Multilingual hold messages stored in permanent memory; user selectable sequences of music titles
and messages
Music and information texts can be loaded remotely online
Page 11
76-193-03.P65
11
08.11.2001, 12:07
Teleserver Memo Pro
Installation and Operation Manual
3.2.3
Voice Mail functions (at each extension)
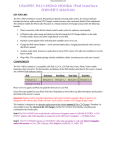
With Teleserver Memo Pro, you are always available for customers and business partners, even when
you are not in the office or on the other line. Instead of being confronted with endless ringing or busy
signals, your customers can either leave you a message, or be transferred to the operator or another
company representative of your choice.
You are immediately notified of incoming messages - whether at your desk, at home, or while travelling.
By entering a phone number for notification - for example, your home number - you determine where you
will be informed of the call. You can access the system from any telephone anywhere, and use all
mailbox functions. In this way, you can, for example, change your voice mail greeting while away from the
office.
At the press of a button, you forward messages with or without your own comments, or send internal
messages to colleagues. Instead of an - often vague - handwritten note, the recipients of your message
get clear, complete, and quick verbal information.
Figure 4: Call answering in a personal mailbox
Figure 5: Remote access and operation possibilities
Page 12
76-193-03.P65
12
08.11.2001, 12:07
Teleserver Memo Pro
Installation and Operation Manual
Voice mail features:
Complete remote access to Teleserver Memo Pro over the telephone
User instructions (audio scroll) in choice of languages
Call-answering with standard and personalized greetings
Up to three personal greetings possible at each extension
Answering of all calls rerouted (busy/no answer/diverted)
Callers not wishing to leave a message are transferred to switchboard (or representative of choice)
by remaining silent
All messages recorded with date and time stamp.
Automatic message notification by message waiting lamp and external/internal phone call (can be
activated/deactivated by mailbox owner)
Remote control of all mailbox functions from any DMTF phone, personal password
Forwarding of received messages to other mailboxes with comment option
Sending of internal messages to one or more mailbox users
Assistant function: callers can be directly transferred to an assistant or representative rather than
leaving a message
Private message for each mailbox (announcement to authorized callers, protected by separate
password)
Users can select from several mailbox languages
Mailboxes can be used for announcements of up to 8 minutes
Page 13
76-193-03.P65
13
08.11.2001, 12:07
Teleserver Memo Pro
Installation and Operation Manual
3.3
Features and module options for Teleserver Memo Pro
By using different modules (Auto Attendant (AA), Voice Mail (VM), Music On Hold (MOH)) and software
installed over the built-in CD-ROM drive, the Teleserver basic unit can fulfil a wide variety of
requirements.
Up to 4 modules, each with 2 analog ports and an MOH-Module, can be inserted in the Teleserver basic
unit.
The following table shows some configuration possibilities.
Example:
Your company has 430 employees who require a personal mailbox, and you would like to
be able to receive up to 6 callers at once. This means that up to 6 callers can
simultaneously be greeted and transferred. From the table, you can see that three Voice
Mail (VM) modules are needed in addition to the basic unit. Should your callers also be
entertained and informed while they are waiting to be transferred, you need the Music On
Hold (MOH) module.
Solution
Modules
(possible amount)
Basic unit
Number of
ports
Number of
mailboxes
Memory
(h)
AA
Auto Attendant,
Automatic call
answering
VM
Voice
Mail
MOH
Music On
Hold
Up to 8
Teleserver +
simultaneous callers
1
4
1
8
1000
37
Up to 6
Teleserver +
simultaneous callers
1
3
1
6
500
25
Up to 4
Teleserver +
simultaneous callers
1
2
1
4
200
18
Up to 2
Teleserver +
simultaneous callers
1
1
1
2
50
7
)
)
)
)
Table 1: Various module-solutions for the Teleserver basic unit
1
) Each basic unit of Teleserver Memo Pro includes the Auto Attendant function (automatic
call answering, greeting, and transfer).
With the CD-ROM drive, software updates or the addition of a language is a matter of minutes. Just ask
your local PBX system partner, or SPEECH DESIGN directly.
Page 14
76-193-03.P65
14
08.11.2001, 12:07
Teleserver Memo Pro
Installation and Operation Manual
4
OPERATION BY SWITCHBOARD PERSONNEL
4.1
The touchscreen
NOTE:
All system-level (operator) functions are operated locally at the main console. All
individual mailbox functions are operated remotely by the mailbox users via a telephone
call to the system.
After power-on and during normal operation, the main function menu is displayed. The functions are
password-protected against accidental or unauthorized activation.
Page 15
76-193-03.P65
15
08.11.2001, 12:07
Teleserver Memo Pro
Installation and Operation Manual
General operating rules
The value shown in a key on the touch screen is the currently valid one (press to change).
In case of alternative keys, the dark one (inverse text) is "pressed" (active).
When the display is in the sleep mode (illumination is off), the first touch only results in
switching the backlight on without activating a function.
Each function field of the Home menu is protected against accidental activation by a four-digit access
code. You must enter one of these factory-programmed codes immediately upon
selecting a
function.
Access codes are not changeable.
Key field in the bottom line of the sreen:
<<
>>
Home
Help
switch to previous menu (screen)
switch to nextmenu (screen)
return to main manu
display help text for current menu (screen)
The top line of each menu screen shows important information:
"
CAUTION": indicates critical information, which, if disregarded, can lead to a loss of data or
configuration.
Options and field names are surrounded by quotes and are shown in italics (example: 'Key').
Page 16
76-193-03.P65
16
08.11.2001, 12:07
Teleserver Memo Pro
Installation and Operation Manual
4.2
Clock setting
Setting the time correctly is important for the operation of the company greeting schedules (Day, Lunch,
Night, and Holiday/Special). Additionally, this is necessary for the date/time stamp recorded with each
message.
Operating steps:
Setting the date and time
Select
Make the necessary settings in the 'Date/time' menu with
.
CAUTION:
Changing the year has consequences for the calendar program, and, accordingly, for the
automatic switching of company greetings (in particular, for the Holiday/Special Greeting).
Any existing calendar entries will be erased, including all holidays which you may have
previously set for the current and following year. Before the change is made, Teleserver
Memo Pro asks you to confirm the change with a corresponding message.
When changes are made to 'Day', 'Month', 'Hour', 'Min', the Day Statistics (in the panel "24
hrs" are erased. If 'Year' is changed, all statistics ('24 hrs', '7 Days', '30 Days') are
erased. (See Chapter 4.5.2)
Page 17
76-193-03.P65
17
08.11.2001, 12:07
Teleserver Memo Pro
Installation and Operation Manual
opens the time calibration menu
Here it is possible to correct any deviations which may arise in the system clock. The maximum
correction is +/- one minute per week, with the correction setting possible at 3-second intervals.
With
, the clock can be set ahead (e.g., 3 seconds ahead, 6 seconds ahead,
9 seconds ahead, up to 1 minute), with
By pressing
, back.
twice, you return to the Home menu.
Page 18
76-193-03.P65
18
08.11.2001, 12:07
Teleserver Memo Pro
Installation and Operation Manual
4.3
Automatic Attendant and call transfer
The Automatic Attendant is activated when calls have been rerouted to
the switchboard, or
when an extension which has no mailbox is dialed externally.
Teleserver Memo Pro
distinguishes between a Day, Lunch, Night, and Holiday/Special greeting operation, and the
various greetings can be set to switch automatically
transfers calls which have been greeted by the Auto Attendant during Day operation to a set
internal extension, usually the switchboard. Alternatively, callers with touch-tone phones can select
target extensions or departments themselves.
transfers calls to the Lunch, Night, or Holiday/Special mailbox after playing the corresponding
company greeting.
Exception: the caller has chosen another extension with a DTMF (touch-tone) phone.
Page 19
76-193-03.P65
19
08.11.2001, 12:07
Teleserver Memo Pro
Installation and Operation Manual
4.3.1
Setting up the Auto Attendant functions: (recording Day, Lunch,
Night, and Holiday/Special company greetings)
Operating steps:
Recording greetings
Press ' ATTENDANT '
Enter ' 1 2 3 4 ', the password for 'ATTENDANT'
Press Greeting texts 'Hear / Record'
Page 20
76-193-03.P65
20
08.11.2001, 12:07
Teleserver Memo Pro
Installation and Operation Manual
In the menu 'Auto Attendant/Greetings', the Day, Lunch, Night, and Holiday/Special Greeting can be
recorded. To do this, use the integrated handset, the integrated CD-ROM drive, or the Line/external input.
Lift the handset.
Select the greeting to be recorded (Day, Lunch, Night, or Holiday).
Choose, for example,
as the recording medium.
Begin the recording by pressing
End the recording by pressing
, and speak into the handset.
.
Your recording is played back via the handset.
You can now repeat the recording procedure, record further greetings as described
above, or exit the recording screen by pressing
or
.
Page 21
76-193-03.P65
21
08.11.2001, 12:07
Teleserver Memo Pro
Installation and Operation Manual
Operating steps:
Recording greetings over the integrated CD-ROM drive
Select the key for the greeting you wish to record, e.g.,
Press
.
.
After the tray has opened, put in your CD containing the recorded greeting.
Press
.
Teleserver Memo Pro displays the number of titles/recordings as well as the
.
length of the CD, for example,
Wait a moment, then select
as the recording medium.
You can hear the recording over the integrated handset. Scroll backwards and
forwards with
or
. Select the greeting you require.
In the display, you see the current title number as well as the length of the title.
Press
Press
before the title you have chosen begins to play.
to end the recording.
Page 22
76-193-03.P65
22
08.11.2001, 12:07
Teleserver Memo Pro
Installation and Operation Manual
You can re-record the greeting or record further greetings in the same way, or leave this
menu by pressing
or
.
NOTE:
The key 'Recording stop' will blink when the maximum recording capacity has been
reached. You then have 15 seconds before the recording is stopped automatically.
If you wish to record from an external source (tape recorder, CD-player, etc.) please
connect the external unit to the LINE-Input as source. Select
as recording source.
Please refer to the safety precautions at the beginning of this manual and observe the
LINE-Input specifications in Chapter 7. The recording occurs automatically.
Page 23
76-193-03.P65
23
08.11.2001, 12:07
Teleserver Memo Pro
Installation and Operation Manual
Tips on creating your greetings:
Adjust your greeting to fit your target departments or extensions. Avoid formulations that could lead the
caller to think an answering machine is on, and no one is in the office. Keep the greeting as short as
possible (see also Chapter 8.1).
Examples:
Misleading for your callers:
"Hello, this is ..." or " This is Company XY..."
Better:
"Welcome to..." or "Please hold, ..."
Use as...
Automatic
call answer
Automatic
call answer
Day Greeting
Appropriate
target extension
Greeting and request for patience:
(e.g.):
Operator extension
"Welcome to...
We will answer your call shortly.
Please wait a moment."
Switchboard:...
Greeting, information about target
extensions and request to wait
(e.g.):
Switchboard extension
and other target
extensions
"Welcome to...
You can select the department you
require. Please press one for
Sales, 2 for Service, ... 9 for ..., Or
just wait a moment, and you will be
transferred to the operator."
Switchboard:...
Target 1:...
Target 2:...
Etc.
Table 2: Examples for company greetings/automatic call answering
NOTE:
You can find further examples in the Help Menu (
) of Teleserver Memo Pro.
In the Appendix, you find a form which will help you create your greeting according to your
needs. For information on a professional text concept complete with a sound studio
recording, please contact Mirror Audio (UK) or ProEmotion via the fax-forms printed in the
Appendix.
Page 24
76-193-03.P65
24
08.11.2001, 12:07
Teleserver Memo Pro
Installation and Operation Manual
4.3.2
Selecting greetings (manually and automatically)
After selecting 'ATTENDANT' in the Home menu, enter the password "1 2 3 4", and you will see the
following screen:
Operating steps:
Changing the greeting manually
Press
Make sure that the key 'Automatic' is
.
Now, change to the desired modus by pressing the corresponding key, e.g.,
.
Press
to return to the Home menu.
Page 25
76-193-03.P65
25
08.11.2001, 12:07
Teleserver Memo Pro
Installation and Operation Manual
Operating steps:
Activate the automatic change of greetings
Press
to switch the greeting mode to automatic.
Press
to determine the appropriate recording for each day of the
week.
By pressing the key
after choosing the appropriate greeting
('Day Greeting', in our example) each day is set individually. By repeatedly pressing
the arrows, you scroll backwards or forwards through the days of the week.
Press
in order to enter the times a greeting should be heard. For
example, you determine when your callers hear the Day greeting by entering your
office hours (according to the instructions below).
By repeatedly pressing the four arrow buttons
, you set the times of day when the
different greetings begin and end, and thus when the greetings switch, e.g., when the
Day Greeting switches to the Lunch Greeting, or to the Night Greeting. In the standard
setting, Teleserver Memo Pro answers calls with the Day Greeting Monday to
Thursday from 8:00 am until 5:30 pm, and Friday from 8:00 to 5:00.
Page 26
76-193-03.P65
26
08.11.2001, 12:07
Teleserver Memo Pro
Installation and Operation Manual
Repeat steps 4 and 5 to set the times for the Night and Lunch greeting.
You can also switch the Lunch or Day greeting off.
and
To do this, press
.
NOTE:
When the Day and Lunch greetings are off, the Night greeting (12:00 am to 11:59 pm) is
automatically activated!
Page 27
76-193-03.P65
27
08.11.2001, 12:07
Teleserver Memo Pro
Installation and Operation Manual
Holiday or Special greeting
In order to have the right greeting available for holidays, or to be able to play a special greeting (for
example, a greeting containing a current advertising slogan during a special promotion), you can
activate the Teleserver Memo Pro calendar program. For the current and the following year, simply enter
the date of all public holidays or other special occasions, and the system will automatically greet
incoming calls with your holiday greeting when you have the greeting mode set to 'Automatic'.
Operating steps:
Define and activate the calendar program
Make sure that the 'Automatic' Auto Attendant greeting is switched on.
Press
.
You are now in the Calendar Program. The public holidays which you enter appear in
the white area pictured in our example.
First, press
.
Page 28
76-193-03.P65
28
08.11.2001, 12:08
Teleserver Memo Pro
Installation and Operation Manual
Press
to confirm the year in which you wish to program the holiday.
Confirm with
in order to enter the month menu.
Choose the month in which the public holiday (or holidays) occurs, for example,
December.
Page 29
76-193-03.P65
29
08.11.2001, 12:08
Teleserver Memo Pro
Installation and Operation Manual
Enter the date of the public holiday in the following Day menu. In our example, we
have chosen the Christmas holiday
Button
.
will now blink. After pressing
, you will see the following
menu:
To enter the exact time of day during which callers hear the Holiday/Special Greeting
(for example, a Christmas greeting), press the four arrow-keys
. In our example,
callers hear the Holiday Greeting from 8:00 am to 6:00 pm.
By pressing
, you confirm the entry and return to the day menu, where
you can enter another holiday, or where you can erase a previously entered holiday.
Page 30
76-193-03.P65
30
08.11.2001, 12:08
Teleserver Memo Pro
Installation and Operation Manual
Should you wish to change the play times recorded for the Holiday Greeting for a
certain day, press the key with the date of the day in question, here
.
The key now begins to blink, which means you can change or delete the entry after
.
pressing
Then, enter the necessary corrections. Confirm with
To erase the entry from the Calendar, press
.
in the 'Attendant/greeting/
calendar/day' menu.
Press
three times to return to the calendar table, which now contains the
updated version of the holidays you have entered.
Page 31
76-193-03.P65
31
08.11.2001, 12:08
Teleserver Memo Pro
Installation and Operation Manual
NOTE:
You can switch off the Holiday greeting at any time by pressing
.
Page 32
76-193-03.P65
32
08.11.2001, 12:08
Teleserver Memo Pro
Installation and Operation Manual
4.3.3
Setting and changing target extensions
Target extensions for calls which are greeted by the Automatic Attendant need to be set.
For each of the operating modes (Day, Lunch, Night, Holiday/Special), a target extension can be set.
This can be the switchboard, an extension (an employee) or a mailbox.
Operating steps:
Enter, check, and change target extensions
After pressing 'ATTENDANT' in the Home menu and entering the password, you see
the following screen:
Press 'Target extension'
.
Now you are ready to enter a target extension for each operating mode (Day, Lunch
Night, Holiday/Special).
Page 33
76-193-03.P65
33
08.11.2001, 12:08
Teleserver Memo Pro
Installation and Operation Manual
Press
next to 'Day' to activate the menu in which you can enter
the extension to which calls should be transferred during the day.
Once you are in the 'Auto Attendant/operator ext./entry' menu, you can enter the appropriate target
extension, for example, 30. This is usually a member of the switchboard personnel.
Press 3 and 0 and confirm with
To retype your entry before confirming, press
.
.
The Day target extension is now defined and should appear in the 'Day' panel.
NOTE:
You can change the target extensions at any time by pressing the corresponding panel
and typing in a new target extension number in the 'Auto Attendant/target extensions'
menu.
Page 34
76-193-03.P65
34
08.11.2001, 12:08
Teleserver Memo Pro
Installation and Operation Manual
If no one is at the switchboard during lunch, then the Lunch Mailbox should be activated. Here, callers can
leave a message after hearing your company greeting made especially for this operation mode.
Press the panel
next to 'Lunch'.
You then find yourself in the 'Auto Attendant/operator ext./entry' menu once again.
Press
and enter the mailbox number in which the messages should be saved
(in our example, mailbox 41).
Press 4 and 1 and confirm with
.
NOTE:
Selecting a mailbox as the target extension is not enough to set up a mailbox. Make sure
that the mailbox number you enter (e.g., 41) has already been installed. Setting up
mailboxes is described in Chapter 4.5.1.
Page 35
76-193-03.P65
35
08.11.2001, 12:08
Teleserver Memo Pro
Installation and Operation Manual
If callers with a DTMF (touch-tone) phone should be able to transfer themselves via a short-dial number
(by pressing the digits 1 - 9), then these numbers need to be entered as short-dial numbers. Known
extension numbers can always be entered with a touch-tone phone.
Operating steps:
Enter short-dial numbers
After pressing 'ATTENDANT' in the Home menu, you see the following:
Press 'Target extension'
Press
.
to proceed to the following menu:
Press the panel
next to 'Short-dial '1''.
Page 36
76-193-03.P65
36
08.11.2001, 12:08
Teleserver Memo Pro
Installation and Operation Manual
You then see the 'Auto Attendant/operator ext./entry' screen and can enter the target extension for shortdial No. 1.
Press 3 and 0 and confirm with
.
To retype your entry before
confirming,
press
.
The short-dial target extension has now been defined. Callers with a DTMF (touch-tone) phone can now
reach the extension 30 our example by pressing 1. Up to ten such short-dial numbers can be
programmed.
Press
to return to the previous menu.
NOTE:
You can change or correct the target extension of the short-dial number at any time by
pressing the panel which contains the current extension (in our example '30'), and then
reenter a new extension in the menu 'Auto Attendant/operator ext./entry'
Page 37
76-193-03.P65
37
08.11.2001, 12:08
Teleserver Memo Pro
Installation and Operation Manual
4.3.4
Switchboard mailbox management
In the message menu, you always have a quick overview of which mailboxes - in Day, Night, Lunch, or
Holiday operation - are activated. When necessary, it is possible to switch the message recording
function of the individual mailboxes on and off.
NOTE:
The mailboxes must first be installed in the corresponding menu (see Chapter 4.5.1)
before they can be switched on and off.
Operation steps:
Switching message recording on and off
After activating the key 'ATTENDANT' in the Home menu and then entering the
password ' 1 2 3 4 ' you see the following screen:
Switch the message recording function on or off with
.
As you can see, the lunch mailbox which had been previously entered (Mailbox 41) is switched on.
Page 38
76-193-03.P65
38
08.11.2001, 12:08
Teleserver Memo Pro
Installation and Operation Manual
To switch the message recording function of Box 41 (our example) off, press the
lighted panel
(it will then switch to
).
You can also switch the mailboxes which have been installed for the short-dial numbers on and off. In the
following example, the mailbox 10 is entered as the target destination of short-dial number 1.
Press
to reach the following menu:
Press the corresponding short-dial panels to switch the message recording function on
or off.
Press
repeatedly to return to the previous menus.
Page 39
76-193-03.P65
39
08.11.2001, 12:08
Teleserver Memo Pro
Installation and Operation Manual
4.4
On-Hold Music and Information
With Teleserver Memo Pro, unavoidable time spent on hold is utilized to entertain and inform your callers
by playing an individual blend of music and current information. You can create and record on-hold music
and text at anytime. You have 24 pre-programmed copyright-free titles available with the purchase of
Teleserver Memo Pro. Additionally, your own choice of music can be recorded over the integrated CDROM drive or external recording equipment (CD-player, cassette, or DAT recorder).
A unique potpurri (music and spoken texts) can be programmed manually, i.e., over the Teleserver
Memo Pro display, or generated at random.
When generating the music and information which will be heard on hold, you can choose from an
assortment of standard multilingual texts included in the system.
Additionally, you can record your own texts.
Selection of On-Hold music:
Your Own Music1
...
Your Own Music5
Title 1
...
Title 24
No Music
For the list of music titles, please see Appendix (Ch. 8.3)
Selection of On-Hold Text:
Your Own Text 1
...
Your Own Text 5
Text D
Text UK
Text F
Text I
Text NL
...
No Text
NOTE:
You will find a complete list of the copyright-free titles stored in Teleserver Memo Pro in
the Appendix, as well as information about registering copyrighted material and
information on professional sound studios.
Page 40
76-193-03.P65
40
08.11.2001, 12:08
Teleserver Memo Pro
Installation and Operation Manual
4.4.1
Recording music and texts
Operating steps:
To record individual music over the integrated CD-ROM-drive
Press ' MUSIC ON HOLD' .
Enter the password '1 2 3 4'.
Select 'Your own music, texts'
.
Page 41
76-193-03.P65
41
08.11.2001, 12:08
Teleserver Memo Pro
Installation and Operation Manual
In the menu 'Music on Hold/Your music/texts' you can record up to 5 music titles of your choice and texts
(e.g., marketing or PR-texts). Recording media are the integrated CD-ROM drive and the integrated
handset, as well as the Line-Input found on the back of the unit. Here you can connect other recording
equipment (CD-player, DAT-recorder, cassette recorder, etc.) over the line-cable.
Select
to record your title of choice or
if you have an
information text pre-recorded on CD.
Press
to open the CD-drive.
Insert the CD when the CD-drive has opened.
Press
to close. Teleserver Memo Pro shows the CD-type, the track number as
.
well as the length of the CD
Wait a moment, then select
as the recording medium.
You can hear the title currently playing over the integrated handset.
Scroll backwards or forwards with
or
and select the title/track you desire. The
track number and length of the title is displayed.
Press
Press
to record the title being played.
to end the recording. Check your recording over the integrated
handset.
Page 42
76-193-03.P65
42
08.11.2001, 12:08
Teleserver Memo Pro
Installation and Operation Manual
If you would like to record another music title or text, press
again and follow steps
to
To blend the music and text recordings, press
menu. (Press
or
.
to return to the Music On Hold
to return directly to the Home menu.)
NOTE:
To record from an external data source (DAT, CD-player, etc. ), plug the equipment into
the Audio-Input in the back of the unit. Select
. (See also Chapter 6.3.1).
Operating steps:
To record an individual spoken message
Press 'MUSIC ON HOLD' .
Enter the password '1 2 3 4'.
Page 43
76-193-03.P65
43
08.11.2001, 12:08
Teleserver Memo Pro
Installation and Operation Manual
Select 'Your own music, texts'
.
To speak your first text, press
.
Wait a moment, pick up the handset, and press
Press
.
to begin recording. Speak clearly into the handset.
Press
to end your recording. Check the recording over the integrated
again.
handset. You can re-record anytime by pressing
If you wish to record another text, press
follow steps
to
to scroll to the next title, then
.
If you would like to mix your music on hold program, press
Music On Hold menu. Press
to return to the
to return to the main menu.
Page 44
76-193-03.P65
44
08.11.2001, 12:08
Teleserver Memo Pro
Installation and Operation Manual
4.4.2
Combining music and text for an on-hold program
With Teleserver Memo Pro, you are the program director of an entertaining and informative program
which your callers will hear while waiting on hold. Thus, you effectively use this often unavoidable time
spent waiting to pursue company marketing and PR goals.
You can mix your program with commercial music and texts recorded over the built in CDROM drive and handset. You can also use the 24 copyright-free recordings on the hard
disc, as well as the standard "please wait" texts.
Operating steps:
Mixing music and text for an on-hold program
Press 'MUSIC ON HOLD' .
Enter the password '1 2 3 4' .
Page 45
76-193-03.P65
45
08.11.2001, 12:08
Teleserver Memo Pro
Installation and Operation Manual
Select 'Program'
Press
.
or
to select the titles and tracks which should
make up your on-hold program.
Press
to take a title into the program. This title is viewable in the program
window above the cursor.
In this way, you can select several titles to be part of your program. Particularly interesting
is the selection and recording of texts, which are blended softly into the music.
Page 46
76-193-03.P65
46
08.11.2001, 12:09
Teleserver Memo Pro
Installation and Operation Manual
Press
or
to select the first text to be blended into your
program.
Press
to complete the selection. The title appears above the grey cursor in
the program window.
Operating steps:
To insert or delete music and/or texts
Scroll with
and
through the program to add or delete music and texts. Insertion
always occurs above the cursor.
To delete a title or text from the program, mark with the cursor and press
.
Page 47
76-193-03.P65
47
08.11.2001, 12:09
Teleserver Memo Pro
Installation and Operation Manual
Press
pause
5 Sec.
determine how often texts are blended into the music. The pauses can be
between 5 and 40 seconds.
If you would like to change the order of the music titles and texts, press
to return to the 'Music
On Hold' menu.
NOTE:
to hear the entire program.
Press
Operating steps:
Randomly mix music titles
Return to the following menu ‘Music On Hold‘.
Press
to have Teleserver Memo Pro randomly mix the music titles (the texts remain in the
order you programmed them).
Press
to return to the Home menu.
Page 48
76-193-03.P65
48
08.11.2001, 12:09
Teleserver Memo Pro
Installation and Operation Manual
4.5
'Voice Mail' control functions
Teleserver Memo Pro features a number of mailbox functions which can be accessed at the main
console (Overview, statistic, and administrative functions). These can be seen in the 'VOICE MAIL' menu.
Here, you find information about the use and capacity of the system, and you can install and erase
mailboxes.
4.5.1
Install, manage, and erase mailboxes
Operating steps
Install, manage, and erase mailboxes
Press ' VOICE MAIL '.
Enter the password ' 1 2 3 4 '.
You are now in the Voice Mail menu, where you first have an overview over the current memory capacity
as well as the amount of installed mailboxes.
Page 49
76-193-03.P65
49
08.11.2001, 12:09
Teleserver Memo Pro
Installation and Operation Manual
Press
next to Mailbox Management.
After pressing
, you see an overview of the mailboxes which have
already been installed. In our example, 24 mailboxes have been installed.
When the page is full, press
Press
to proceed to the next page.
to return to the previous Voice Mail menu.
Page 50
76-193-03.P65
50
08.11.2001, 12:09
Teleserver Memo Pro
Installation and Operation Manual
To erase a mailbox which has already been installed, press
.
For example, erase Mailbox 111 by pressing ' 1 1 1' .
Press
to confirm erasure of the mailbox.
In order to avoid accidental erasure of a mailbox, Teleserver Memo Pro asks you to
confirm the erasure again by pressing
.
Page 51
76-193-03.P65
51
08.11.2001, 12:09
Teleserver Memo Pro
Installation and Operation Manual
Teleserver Memo Pro then notifies you of the successful transfer of data .
Press
to return to the Voice Mail Management
menu.
Press
to create individual mailboxes or entire mailbox groups.
To create a mailbox: enter the number of the mailbox (the extension number), in our
.
example, 20, and confirm with
Page 52
76-193-03.P65
52
08.11.2001, 12:09
Teleserver Memo Pro
Installation and Operation Manual
To install a mailbox group: enter a group of mailbox numbers, for example, 30 to 40. To
do this, press '3', '0', 'To', and then '4', '0'.
Press
to confirm.
You have now returned to the Voice Mail Management menu. Press
to return
to the general Voice Mail menu, where you have access to mailbox statistics (see
Chapter 4.5.2) and to statistics on the use of the system capacity (see Chapter 4.5.3).
NOTE:
All mailboxes installed at the Teleserver Memo Pro console receive the temporary
password '1 2 3 4'. Each mailbox user should subsitute this password with a personal one
for remote access to his or her mailbox (see Chapter 5.9).
Mailbox groups must have the same amount of digits in the extension number. If you wish
to install the maiboxes 90 to 110, install the mailboxes 90 to 99, and in a second step
install the mailboxes 100 to 110.
Page 53
76-193-03.P65
53
08.11.2001, 12:09
Teleserver Memo Pro
Installation and Operation Manual
4.5.2
View mailbox statistics
Operating steps:
View statistics
After entering the ' VOICE MAIL' menu and the password ' 1 2 3 4 ' , you see the
following Voice Mail menu view.
First press 'Mailbox statistics'
.
Now press '...number of messages'
.
Page 54
76-193-03.P65
54
08.11.2001, 12:09
Teleserver Memo Pro
Installation and Operation Manual
This table gives you an overview over the amount of messages in the 160 mailboxes with the most
messages.
Press
Press
to scroll to the next page, in order to see all 160 boxes.
repeatedly to return first to the 'Voice Mail/mailbox statistics' menu, then
to continue to the Home menu.
Press '...Voice Mail memory used'
in the mailbox statistic menu.
Page 55
76-193-03.P65
55
08.11.2001, 12:09
Teleserver Memo Pro
Installation and Operation Manual
This overview shows you how much memory is currently taken up (in minutes) by each mailbox. This
table also shows the 160 mailboxes which are currently occupying the most memory.
Press
Press
to scroll to the next page, where you have an overview of all 160 boxes.
repeatedly to return to the 'Voice Mail/mailbox statistics' menu.
Press '...last incoming message'
Press
Press
.
for an overview of all 160 boxes.
repeatedly to return to the 'Voice Mail/mailbox statistics' menu, and then
to the 'Voice Mail' menu.
Page 56
76-193-03.P65
56
08.11.2001, 12:09
Teleserver Memo Pro
Installation and Operation Manual
4.5.3
Analysis of utilisation of system capacity
Teleserver Memo Pro can have 2 to 8 ports. If you have a high amount of telephone traffic, it is advisible
to equip Telelserver Memo Pro with eight ports. Statistics show how often the system capacity was fully
utilized or even overloaded. The statistics show the time (in minutes) in which the system could not handle
calls - whether internal or external - within a set period of time (30 days, 7 days, 24 hours).
In the menu 'VOICE MAIL', enter the password ' 1 2 3 4 ' and you will see the following menu.
Operating steps:
Analysis of utilization of system capacity
Press 'Use of system capacity'
.
Here, you can see if the system was overloaded at any time during the last 30 days as
well as in the last 7 days. To see the system capacity analysis of the last 24 hours,
press the panel
next to "...in the last 24 hours".
NOTE:
These statistics refer to the time of the analysis, that is, the figures displayed refer to 7 or
30 days before the time the statistics display is activated.
Page 57
76-193-03.P65
57
08.11.2001, 12:09
Teleserver Memo Pro
Installation and Operation Manual
What do the following graphs tell you?
The times that the system was overloaded in the last 24 hours can be seen on the screen in minutes. In
the form of a bar graph, the day is divided into 4 units, in order to better see the high traffic times in detail.
The dotted line shows here that every sixth call went unanswered (see Table 3).
System fully utilized
Unanswered calls (statistically seen)
3 minutes per hour
every 20th call
6 minutes per hour
every 10th call
every 6th call
9 minutes per hour
12 minutes per hour
every 5th call
Table 3: Engaged lines and unanswered calls
Press
repeatedly to return to the 'Voice Mail' menu.
Page 58
76-193-03.P65
58
08.11.2001, 12:09
Teleserver Memo Pro
Installation and Operation Manual
5
OPERATION BY MAILBOX OWNER
To access your mailbox, simply dial Teleserver Memo Pro's extension number from an internal or an
external DTMF (touch-tone) phone. Your professional installer will tell you the phone number which
connects the system to your PBX.
Depending on where you are calling from, Teleserver Memo Pro will ask you to enter your password and
mailbox number. The system guides you by vocal instructions at all times.
All you need to do is follow these "voice prompts" until you are familiar with the system. Using the keys on
any DTMF telephone, you can scroll through messages, announcements, and functions, or forward
received messages and your own messages to other mailboxes.
NOTE:
Instead of a DTMF (touch-tone) telephone, your can use a beeper.
Press
figure).
or
to scroll through all messages, recordings, and functions (see following
Page 59
76-193-03.P65
59
08.11.2001, 12:09
Teleserver Memo Pro
Installation and Operation Manual
Page 60
76-193-03.P65
60
08.11.2001, 12:09
Teleserver Memo Pro
Installation and Operation Manual
5.1
Installing a mailbox
A mailbox must be "installed" for every extension that is to be equipped with answering and messaging
functions.
The system is delivered with no mailboxes installed, since it is not known at the time of delivery which
extension shall obtain a mailbox. It is recommended to initialize the mailboxes as a part of the system
installation procedure. You can add mailboxes at any time, as long as the system's capacity has not
been reached (see Chapter 6).
You can install a mailbox either from the main unit or from your extension (see Note below).
NOTE:
Not all PBXs allow for remote installing of mailboxes from the extensions. If necessary,
ask your telephone technician.
Operating steps:
Installing a mailbox from your extension phone
Use your extension phone to call Teleserver Memo Pro. If you don't know the number,
ask your PBX technician.
When prompted, enter your personal password number with which you will control your
mailbox (use digits 0 to 9). Ask your PBX technician for the required number of digits.
CAUTION:
Don't forget your password. Without it, you can't listen to received messages.
When prompted by Teleserver Memo Pro, enter your mailbox number (= your
extension number).
Wait for the prompt, then confirm the password by entering it a second time.
Your mailbox has now been installed!
You will now hear Teleserver Memo Pro say "No user name available, no new
messages."
Page 61
76-193-03.P65
61
08.11.2001, 12:09
Teleserver Memo Pro
Installation and Operation Manual
To record your name, press
Press
repeatedly until you hear "No user name available."
, wait for the prompt, and then say your name after the tone.
End the recording with
.
NOTE:
If you don't record your name, you will hear the system recording "No user name
available" each time you check your messages. The user name is particularly important
for your colleagues, when they forward or send messages to you. Your name and mailbox
number give double assurance that the information will reach the intended recipient.
After installation, the first thing to do is record your personal greeting. Otherwise,
Teleserver Memo Pro uses the standard default greeting of "This is the voice mailbox of
extension..." (see the following Chapter 5.2).
Page 62
76-193-03.P65
62
08.11.2001, 12:09
Teleserver Memo Pro
Installation and Operation Manual
5.2
Recording personal mailbox greetings
Teleserver Memo Pro enables you to record 3 greetings for various occasions. You hear the standard
greeting recording "This is the voice mailbox of extension..." until you record your own personal
greetings.
A clear and informative greeting is essential so that your callers can leave you a message. Following are
several examples of how these greetings can sound (see also Chapter 8.1).
Examples for mailbox greeting recordings:
Example of a mailbox greeting without call transfer by remaining silent and without
option to „dial out“ of the mailbox with a touch-tone (DTMF) phone.
“This is the voice mailbox of Jane Smith, The Good Company Ltd.! I am attending a seminar today until 1
o’clock. Please be so kind as to leave a message after the tone. I will return your call after 1:30. Thank
you!”
Example of a mailbox greeting with call transfer by remaining silent (also for Personal
Assistant Extension Function)
“This is the voice mailbox of Jane Smith, The Good Company Ltd.! I am attending a seminar today until 1
o’clock. Please be so kind as to leave a message after the tone. I will return your call after 1:30. If you
would like to speak to the operator (my assistant/representative), just hold, you will be
transferred automatically.”
Example of a mailbox greeting with option to “dial out” or mailbox
“This is the voice mailbox of Jane Smith, The Good Company Ltd.! I am attending a seminar today until 1
o’clock. Please be so kind as to leave a message after the tone. I will return your call after 1:30. If you
would not like to leave a message, please press extension ... and you will be transferred
to my assistant Mr. ...”
Page 63
76-193-03.P65
63
08.11.2001, 12:09
Teleserver Memo Pro
Installation and Operation Manual
You can record up to three different mailbox greetings. This way, you have a greeting for
a variety of situations in a matter of seconds.
Operating steps:
Record a personal mailbox greeting
Call Teleserver Memo Pro. When prompted, enter your personal password.
Scroll with
or
through your mailbox until you hear the following prompt followed by
the standard default greeting "The first greeting text: This is the voice mailbox of
extension...". If you have already recorded a personal greeting you will hear this in
place of the default greeting.
Press
until you hear Teleserver Memo Pro prompt you to record your greeting.
Speak your greeting into the handset.
Press
to end the recording. (Press
at any time to correct).
You hear your new greeting through the handset. (To erase your recording and reestablish the standard text, press .)
Press
to scroll to the next greeting text. Then follow steps
to
.
The recording of your greeting has been completed. You can hang up or continue with
other mailbox functions.
NOTE:
If the caller just waits and remains silent instead of leaving a message, he/she will be
transferred to the operator.
Page 64
76-193-03.P65
64
08.11.2001, 12:10
Teleserver Memo Pro
Installation and Operation Manual
5.3
Playing/erasing/forwarding messages
Immediately upon entering your remote access password, you hear your "oldest" received message. If
there are no messages in your mailbox, you hear a corresponding system announcement.
Operating steps:
To play/erase messages
Call Teleserver Memo Pro. When prompted, enter your personal password.
Scroll with
or
to skip backwards or forwards between the messages.
You can control message playback by pressing keys (see Chapter 5, 'Operation by
mailbox owner'.
NOTE:
All messages are recorded with a date and time stamp, announced after the message.
Press
to erase the message you are hearing or just heard. Press
erasure.
again to confirm
Operating steps:
To forward received messages
Press
during playback of the message you would like to forward.
Teleserver Memo Pro will ask you if you would like to record a comment to accompany
the message.
Press
to end the recording or
to correct.
After the Teleserver Memo Pro prompt, enter the recipient's mailbox number (=
extension) and wait until you hear the recipient's name (user name).
Press
to forward the message along with your comment or
to cancel.
Page 65
76-193-03.P65
65
08.11.2001, 12:10
Teleserver Memo Pro
Installation and Operation Manual
If you would like to send this message to another recipient, just enter the new mailbox
to cancel.
number. Press
The playing/erasing/forwarding of messages has now been completed. You can hang up
or continue with other mailbox functions.
NOTE:
Messages can only be forwarded to recipients who have installed a mailbox and have
switched the message recording on. Teleserver Memo Pro will inform you if this is not the
case.
Page 66
76-193-03.P65
66
08.11.2001, 12:10
Teleserver Memo Pro
Installation and Operation Manual
5.4
Recording and sending inter-office messages
You can send an internal message to one colleague or to a group of colleagues. Teleserver Memo Pro
thus takes over an internal mail function within your company.
Operating steps:
To send inter-office messages
Call Teleserver Memo Pro.
NOTE:
In the message section, you either hear the standard text "There are no messages" or a
playback of received messages.
Press
and record your message.
Press
to end the recording. Correct with
.
Wait for the Teleserver Memo Pro prompt, then enter the recipient's mailbox number
(= extension). Wait until you hear the recipient's name (user name).
Press
to send the message, cancel with
.
The recording and sending of inter-office messages has now been completed. You can
hang up or continue with other mailbox functions.
NOTE:
Messages can only be forwarded to recipients who have installed a mailbox and have
switched the message recording on. Teleserver Memo Pro will inform you if this is not the
case.
Page 67
76-193-03.P65
67
08.11.2001, 12:10
Teleserver Memo Pro
Installation and Operation Manual
5.5
Recording and playing of private messages
In your mailbox, you can record a confidential message for authorized callers (family members, business
associates, etc.). This announcement is protected by a separate password and can be retrieved by
persons who call your extension and enter that password.
Operating steps:
To record a private message
Call Teleserver Memo Pro.
Press
or
to scroll through your mailbox until you arrive at the private message,
where you hear the prompt "Private message - No private message has been
recorded," or your old private message if you have recorded one.
Press
to erase the announcement you hear and wait until Teleserver Memo Pro
prompts you to record your private message.
Speak your private message into the handset.
Press
to end your recording. Correct with
.
You hear your new private message through the handset. (To erase your recording and
reestablish the standard text, press .)
The recording and playing of private messages has now been completed. You can hang
up or continue with other mailbox functions.
Operating steps:
Change your password for mailbox control
Call Teleserver Memo Pro.
Press
or
to scroll through your mailbox until you arrive at the function "Password
for private message...".
Press
to erase the old password (the standard system password is '5 6 7 8').
Teleserver Memo Pro prompts you to enter your new password.
Page 68
76-193-03.P65
68
08.11.2001, 12:10
Teleserver Memo Pro
Installation and Operation Manual
Enter a password of your choice (digits ' 0 ... 9 ' are possible).
For security reasons, Teleserver Memo Pro asks you to enter the password again.
Your new password for accessing the private message is now stored and you can hang up
or continue with other mailbox functions.
Operating steps:
Retrieving a private message
An authorized person calls your extension and is rerouted to Teleserver Memo Pro.
Teleserver Memo Pro starts playing your recorded greeting.
During your greeting, the caller enters
messages received from you.
, followed by the password for private
Teleserver Memo Pro plays your private message.
NOTE:
In order to access your private message, callers must call from a DTMF (touch-tone)
phone, a phone that can temporarily be switched to DTMF mode, or they must use a portable DTMF "beeper".
After listening to your private message, the caller has the option to leave you an answer,
which will be stored along with your "regular" incoming messages. Here again, your
message recording function needs to be switched on (see Chapter 5.6).
Page 69
76-193-03.P65
69
08.11.2001, 12:10
Teleserver Memo Pro
Installation and Operation Manual
5.6
Switching message recording ON/OFF
Your mailbox default records incoming messages from callers. However, it is possible to switch the
message recording facility off, which results in an "announcement only" mailbox. In this state, after your
greeting, callers receive a standard "Thank you for calling, good-bye" announcement.
Operating steps:
To switch message recording ON/OFF
Call Teleserver Memo Pro.
Press
to scroll through your mailbox until you hear "Message recording is on/off"
Press
to modify the message recording status.
Switching message recording ON/OFF has now been completed. You can hang up or
continue with other mailbox functions.
NOTE:
In this case, you can still provide callers with personal service. With Teleserver Memo
Pro, you can program your mailbox to transfer the call - after playing your greeting - to an
assistant or representative of your choice. (see Chapter 5.8), as well as to the
switchboard.
Page 70
76-193-03.P65
70
08.11.2001, 12:10
Teleserver Memo Pro
Installation and Operation Manual
5.7
Switching notification by phone call ON/OFF
If you wish to be alerted upon receiving an important message, you can store a phone number (home,
cellular, etc.) for notification in your mailbox. You can also switch the notification function ON/OFF without
having to re-enter the number.
When the phone notification function is on and the message arrives, the system calls the number stored
in the mailbox and prompts you to enter your password. After password entry, you can control your
mailbox in the usual manner (with a DTMF (touch-tone) phone or beeper).
NOTE:
The notification function can only be activated if a phone number has been stored. A
DTMF phone (touch-tone) is required to listen to the message after being notified.
Operating steps:
To switch notification by phone call ON/OFF
Call Teleserver Memo Pro.
Press
OFF".
to scroll through the mailbox until you hear "Notification by phone call is ON/
Press
to modify the status of ON or OFF. Then, enter the phone number for
notification by following steps 4 to 7 below.
Press
to scroll through the mailbox until you hear "There is no phone number for
notification programmed" or "Notification phone number:..."
Press
to modify.
Teleserver Memo Pro prompts you to enter the phone number.
Enter the new notification phone number (begin with
end your entry.
for an outside line). Press
Page 71
76-193-03.P65
71
08.11.2001, 12:10
to
Teleserver Memo Pro
Installation and Operation Manual
Press
to scroll backwards until you hear "Phone number for notification is off." Press
to switch the phone call for notification function on.
The operating steps for entering a phone number for notification has now been completed.
You can now hang up or continue with other mailbox functions.
Page 72
76-193-03.P65
72
08.11.2001, 12:10
Teleserver Memo Pro
Installation and Operation Manual
5.8
Activate/deactivate Assistant Function
During your absence, for example, while you are on holiday, you can activate the assistant function.
Callers are then informed that they will be transferred to an assistant or colleague of your choice. To do
this, program the extension number of the assistant or colleague in Teleserver Memo Pro:
Operating steps
Activate assistant function and enter assistant extension number
Call Teleserver Memo Pro.
Press
until you hear "Personal assistant extension function deactivated."
Press
to activate the assistant function. If you have not entered a number, you will
first have to enter the phone number of your assistant or representative according to
steps 5 to 7 below.
In this case, press
Press
to temporarily deactivate the function.
until you hear "No personal assistant extension programmed..."
Press , wait for the prompt, then enter the telephone number of your assistant or
representative.
Press
to end entry of the number.
Press
to scroll back until you hear "Personal assistant extension function
to switch the function on.
deactivated." Press
The operating steps for switching the assistant function on have been completed. You can
now hang up or continue with other mailbox functions.
NOTE:
In your mailbox greeting, let callers know that they will be transferred to an assistant or
representative (see Chapter 8.1). Make sure your assistant or representative has their
mailbox in recording mode.
Page 73
76-193-03.P65
73
08.11.2001, 12:10
Teleserver Memo Pro
Installation and Operation Manual
5.9
Changing password for mailbox control
Your personal multi-digit password number protects your mailbox from being accessed by others. You
defined the password number when you installed your mailbox. You are free to change it at any time.
Operating steps:
To change your password
Call Teleserver Memo Pro.
Press
to scroll in your mailbox until you hear "Password for mailbox control..."
Press
to change your password.
Teleserver Memo Pro prompts you to enter the new password.
Enter your password by using the digits
to
.
For security reasons, Teleserver Memo Pro asks you to enter the password again.
Your new password for mailbox control is now stored and you can hang up or continue with
other mailbox functions.
CAUTION:
Please memorize your password. If you forget it, you will not be able to access the
mailbox. Your mailbox must be erased and re-installed. All messages will be lost!
Page 74
76-193-03.P65
74
08.11.2001, 12:10
Teleserver Memo Pro
Installation and Operation Manual
5.10
Select user language
Teleserver Memo Pro features several languages and makes using it easy for employees with different
native languages.
Operating steps:
Select user language
Call Teleserver Memo Pro.
Press
to scroll until you hear "User language..."
Press
until you have set the language you want.
The steps for selecting the user language have now been completed. You can now hang
up or continue with other mailbox functions.
Page 75
76-193-03.P65
75
08.11.2001, 12:10
Teleserver Memo Pro
Installation and Operation Manual
6
INSTALLATION BY THE TECHNICIAN
CAUTION:
Teleserver Memo Pro may only be installed by an authorized service technician according to the
following procedures. It is important that you refer to the safety precautions listed in Chapter 2.
Before beginning with the installation, please carefully read the handbook, especially this
chapter. Make sure all requirements are fulfilled, as this could effect the proper functioning of
Teleserver Memo Pro.
6.1
Parts checklist
NOTE:
Please pay careful attention while unpacking the unit to make sure that the delivery is complete
and undamaged. Should you find damaged parts, it is very important that the unit is not installed
under any circumstances. In such a case, please contact your supplier.
Checklist:
1 Teleserver basic unit
1 power supply
1 power supply cable
1 CD-ROM containing system-software
1 documentation package consisting of:
- Installation and Operation Manual
- Configuration manual for the PBX
- Installation and Operation Manual on CD-ROM
- 100 introduction booklets "First Steps with Teleserver Memo Pro" in local language
Depending on the applications required by the customer:
1, 2, 3, or 4 Voice Mail (VM) modules
2 cables for each module
Additional with Music and Information On Hold:
1 Music On Hold (MOH) module
1 Music and Information On Hold cable
Additional with V.24-Applications:
1 V.24-Power supply cable (depending on PBX)
1 V.24-Adapter 25 pins —> 9 pins (depending on PBX)
Page 76
76-193-03.P65
76
08.11.2001, 12:10
Teleserver Memo Pro
Installation and Operation Manual
6.2
General system requirements
Teleserver basic unit and modules
Teleserver Memo Pro is for PBX systems. The PBX must always be prepared and configured for connection
to Teleserver.
Teleserver must be certified for each of the PBX types. Connection to the PBX occurs over an analog
interface.
Teleserver functions with modules. These modules are inserted into the back of the unit, after removal of
the back panel. Each module has access to 2 channels (e.g., 2 voice channels for each Voice Mail
module). The Music and Information On Hold module is an exception, where one channel is accessed by
the module.
CAUTION:
Be sure to disconnect the power supply when inserting and removing the modules. Otherwise,
the modules or unit may be damaged.
Figure 6: Back of Teleserver with modules (view without back panel)
External audio output:
Features a Music On Hold output to be connected to the corresponding input of the PBX.
NOTE:
The Music On Hold (MOH) module only functions in the lowest module-space. Other modules, for
example, a Voice Mail module, only function in the first four module spaces.
Page 77
76-193-03.P65
77
08.11.2001, 12:10
Teleserver Memo Pro
Installation and Operation Manual
Connection via a V.24-interface (COM 2):
If Teleserver is connected to the PBX via a V.24 interface, corresponding system requirements (e.g.,
equipping the PBX with a V.24 assembly group) are necessary.
This form of signalisation may be required when the Voice Mail protocol is transmitted to the Voice Mail
system via a V.24 interface.
External audio-input:
Teleserver features an input (cinch) for playing music on hold, texts, and greetings on external reproduction
equipment (e.g., DAT, CD-Player).
NOTE:
When using the audio-input, please observe the security precautions found in Chapter 2, as well
as the LINE input specification (see Chapter 7). The recording level is regulated automatically.
Page 78
76-193-03.P65
78
08.11.2001, 12:10
Teleserver Memo Pro
Installation and Operation Manual
6.3
Connecting Teleserver Memo Pro to the PBX
6.3.1
Installing the modules
Before switching Telserver on, insert the desired amount of modules into Teleserver. To do this, remove the
back panel by pushing both clips to the left and remove the white plastic covers (see Figure 7). Insert the
modules according to the sequence described in Figure 8 and Table 4. Please make absolutely certain
that Teleserver is not connected to any power supply.
CAUTION:
The power supply must be disconnected when inserting and removing modules. Otherwise, the
unit may be damaged.
Figure 7: Remove white plastic cover before insertion! Leave the plastic cover on the unused
module spaces for protection!
Figure 8: Installing the modules: remove the back panel and insert the modules (see Table 4)
Page 79
76-193-03.P65
79
08.11.2001, 12:10
Teleserver Memo Pro
Installation and Operation Manual
Position in Teleserver
Module
Name of the module
space in Teleserver
Module function
Top space in Teleserver
z.B. VM
Voice Mail
PABX Line 1/2
Channels 1 and 2 for
connection to the PBX
Second space from the top
z.B. VM
Voice Mail
PABX Line 3/4
Channels 3 and 4 for
connection to the PBX
Third space from the top
z.B. VM
Voice Mail
PABX Line 5/6
Channels 5 and 6 for
connection to the PBX
Fourth space from the top
z.B. VM
Voice Mail
PABX Line 7/8
Channels 7 and 7 for
connection to the PBX
MOH
PABX MOH
Music On Hold module
Bottom space
Table 4: Order of installment for modules
Figure 9: Removing modules: use a screwdriver if necessary to remove the modules (carefully
wiggle the module out by holding the plastic edges on the side of the module space
outwards).
NOTE:
Please observe the correct order of the channels and thus of the modules. Insert the modules into
Teleserver beginning with the first modules in 'PABX Line 1/2', the second module in 'PABX LINE
Line 3/4 ’ etc. Using the channels 3 - 8 is not possible if a module has not been installed in 'PABX
1/2' first.
CAUTION: External units connected to the Music On Hold Interface must also meet the safety
regulations of SELV according to EN60950.
Page 80
76-193-03.P65
80
08.11.2001, 12:10
Teleserver Memo Pro
Installation and Operation Manual
6.3.2
Installing analog ports
The cables enclosed with the modules are needed for connection to analog or digital ports. Please refer to
the enclosed configuration manual for connection of the Western-plugs. The enclosed integration notes will
explain how the modules should be connected.
Figure 10: Module type described in label on side of module
6.3.3
Installing V.24-interfaces (COM 2)
Teleserver features 2 serial V.24-interfaces (COM 2 and COM 1 on the back of the unit). Table 5 shows the
placement of the 25pin-connections.
Table 5: Placement of the V.24-interface COM 2 and COM 1
Assignment of V.24 interfaces in Teleserver:
V.24-interface COM 2 —> Voice Mail application (subject to change)
V.24-interface COM 1 —> diagnosis, special functions (subject to change)
The desired COM port is connected to the PBX via a V.24-cable at a designated port. Please refer to your
PBX's configuration manual for configuration of V.24 ports of the PBX.
Page 81
76-193-03.P65
81
08.11.2001, 12:10
Teleserver Memo Pro
Installation and Operation Manual
6.3.4
Installing the Music On Hold port
Connect the Music on Hold cable supplied with Teleserver Memo Pro to the Telephone Interface Unit's
Music output.
Figure 11: Connection
Standard MOH
Mode 2
600 Ohm
600 Ohm
not used
not used
not used
not used
not used
not used
Table 6: Connection of the MOH-Output for the given mode
Page 82
76-193-03.P65
82
08.11.2001, 12:10
Teleserver Memo Pro
Installation and Operation Manual
6.4
The menu 'MAINTENANCE'
6.4.1
Begin operation with Teleserver Memo Pro
CAUTION:
The telephone parameters should only be entered/modified by a qualified technician. You should
not change 'PBX type', 'Password length' or 'Digits in mailbox ext.' after the system has been in
use. Any change deletes all mailboxes including all messages and programmed options. It is
mandatory to read the security precautions before using Teleserver Memo Pro (see Chapter 2).
First, fill out the following table. You will require this information when programming Teleserver Memo Pro
for the first time. Your customer contact will also require the information.
Parameters
Setting
PBX type
Password length
Digits in mailbox extension
Operator extension number
Operating steps:
Setting telephone parameters
When all installation steps in Chapter 6.3 have been completed, connect the power supply
plug to Teleserver. Connect the cable to the power supply and then to an outlet.
Teleserver will then start a system test. Afterwards, you will see the first menu for setting the
parameters.
Page 83
76-193-03.P65
83
08.11.2001, 12:10
Teleserver Memo Pro
Installation and Operation Manual
First, enter the manufacturer password. You will find this in the accompanying installation
notes for installation of your PBX type.
Press
to confirm. The system will restart. Afterwards, you will see the
following display:
Select the PBX type with
Press
.
to confirm.
Teleserver Memo Pro will ask you to save the parameter change (i.e., the definition of
the PBX)
Press
to save the new parameters. Teleserver Memo Pro will restart. You can
return to the Home menu by pressing
.
Page 84
76-193-03.P65
84
08.11.2001, 12:11
Teleserver Memo Pro
Installation and Operation Manual
NOTE:
The blinking of the 'MAINTENANCE' panel means that the setting of essential parameters has not
yet been completed. A few may have been forgotten.
Press 'MAINTENANCE' and enter the password '5 9 9 1' to change the parameters (e.g., the
PBX type)
Select the PBX type and press
to confirm. You will then see the following
screen.
Page 85
76-193-03.P65
85
08.11.2001, 12:11
Teleserver Memo Pro
Installation and Operation Manual
Set the following parameters according to your PBX:
‘Number of digits in the extensions’
(The amount must be identical to the amount of digits in the extension numbers.)
‘Password length’
‘Operator extension number’
Press
to confirm.
NOTE:
The operation of the Automatic Attendant (automatic call answering) and the entry into the
'MAINTENANCE' menu is only possible when
1) the 'Operator extension number' has been entered and
2) when the switchboard has been rerouted to Teleserver Memo Pro.
Page 86
76-193-03.P65
86
08.11.2001, 12:11
Teleserver Memo Pro
Installation and Operation Manual
6.4.2
Changing telephone parameters
The first operation steps have been completed. You can now change the standard settings anytime using
the password '5 9 9 1'. You can also view the settings in a read only mode using the password '8 9 9 1'. In
this way, you have an overview of the settings without being able to unintentionally change them.
Operating steps:
To change telephone parameters
Select ‘MAINTENANCE’
Enter the password ‘5 9 9 1’.
After entering the password, you see the following screen:
Page 87
76-193-03.P65
87
08.11.2001, 12:11
Teleserver Memo Pro
Installation and Operation Manual
Press
to confirm your desire to change the telephone parameters. Then you reach
the first 'Telephone parameters' menu.
CAUTION:
Teleserver Memo Pro will be temporarily halted when parameters are changed. This means
current phone calls will be cut off and no more calls with be received. However, the music and
information on hold will continue to play.
Press
to scroll through three sub-menus, in which you can set the parameters.
Page 88
76-193-03.P65
88
08.11.2001, 12:11
Teleserver Memo Pro
Installation and Operation Manual
ACHTUNG:
If you restart the system, all mailboxes along with any messages and comments will be lost. You
see the following warning before a system reset is started.
The Message Waiting Sequenz
This function is only available if Teleserver is not connected to the PBX via a V.24-interface.
Operating steps:
To modify the Message Waiting Sequence
Should you have to change the Message Waiting character string, you will see the following
menu after selecting the parameter 'Message Waiting on' or 'Message waiting off':
You can freely define the character string which switches the Message Waiting Lamp on or off.
Page 89
76-193-03.P65
89
08.11.2001, 12:11
Teleserver Memo Pro
Installation and Operation Manual
Select
and enter the character string.
Example: the character string to switch on the Message Waiting Lamp is 761 for the following
extensions.
Please enter
, '7 6 1 ',
, extension number,
.
Pauses can be entered with 'P' followed by a 3-digit pause duration parameter (multiple of 10 ms) at any position in the string (e.g., P = 023 _ pause of 230 ms)
6.5
After installation
Teleserver Memo Pro is now ready for use. Look for a person within the company to be the main contact
for Teleserver Memo Pro. Install a mailbox together. Refer to the enclosed "First Steps With Teleserver
Memo Pro" booklet, as well as the attached cards. These should all be filled out by your contact and
distributed to all users.
Your contact requires the following information from you:
Teleserver Memo Pro's phone number (Number of the hunt group the system is connected
to). This is the number users will call
Length of the password for remote access to Teleserver Memo Pro (the number of
digits you determined in the 'MAINTENANCE' menu, 3, 4, 5, or 6 digits.)
Call divert
For Teleserver Memo Pro to receive calls, the telephone must be programmed to reroute that
extension's calls to Teleserver Memo Pro (all calls/busy/no answer). Please instruct your contact
on how to activate and cancel the various diverts that the system is capable of, and ask him or her
to pass this information on to colleagues.
NOTE:
Important for the telephone technician: you will also find the above information on the
Teleserver Memo Pro documentation packaging.
Page 90
76-193-03.P65
90
08.11.2001, 12:11
Teleserver Memo Pro
Installation and Operation Manual
7
SPECIFICATIONS
Number of ports (depending on the model):
2 to 8
Number of voice mailboxes (depending
on the model):
up to 1000
Recording capacity:
up to 37 hours
max. length received messages:
adjustable, 2 to 20 minutes
max. length of inter-office messsages
and comments:
8 minutes
Voice digitization:
ISDN (64 kbs)
Notification by phone call:
yes
Date/time stamp for messages:
yes
Voice prompts:
choice of several languages
Password length:
adjustable 3 to 6 digits
Private message function:
yes
Assistant function:
yes
Auto Attendant:
yes
Automatic call transfer:
with DTMF
Line-in sensitivity:
Stereo, cinch plug
Impedance: 47 kΩ
Voltage:
24m Vrms - 775 mVrms
(automatic level control)
MOH-Output:
600 Ω pot.-free, with or without loop current
Dimensions (L x W x H):
Main unit:
Module:
280 mm x 250mm x 350 mm
95 mm x 30 mm x 160 mm
Weight:
Memo Pro main unit:
Module (each):
Power supply:
ca. 5,3 kg
ca. 0,2 kg
ca. 0,7 kg
Page 91
76-193-03.P65
91
08.11.2001, 12:11
Teleserver Memo Pro
Installation and Operation Manual
Electricity supply:
Main unit:
Power consumption:
nur Netzteil UP05813010 verwenden!
100 - 250 V AC / 50 - 60 Hz
max 45 VA
Environmental:
Storage:
0 - 40° Celsius
15 - 95 %
relative humidity
10 - 35°
Celcius
15 - 75 %
relative humidity
Operation:
Page 92
76-193-03.P65
92
08.11.2001, 12:11
Teleserver Memo Pro
Installation and Operation Manual
8
APPENDIX
8.1
Greeting examples
Automatic Attendant without DTMF call-transfer option
Day greeting:
"Welcome to The Good Company. Please wait a moment, we are transferring your call."
Night greeting:
"Welcome to The Good Company. You are calling outside of our office hours. Please leave us a
message after the tone, or send us a fax at the number ... We will be happy to return
your call. Thank you."
Holiday greeting:
"Welcome to the Good Company. Due to a regional holiday, our offices are closed. Please leave us
your name, telephone number, and reason for calling. We will return your call tomorrow."
Automatic Attendant with DTMF possibility of dialling extensions
"Welcome to The Good Company. Before our operator answers, you have the possibility of transferring
your own call by pressing one of the following numbers. For the Orders Department, press 1, for Sales,
2, and for Service 3.
Individual mailbox texts
Example of a mailbox greeting without call transfer through silence and without option to
"dial out" of the mailbox with a touch-tone (DTMF) phone
"This is the voice mailbox of Jane Smith, The Good Company Ltd! I am attending a seminar today until
1 o'clock. Please be so kind as to leave a message after the tone. I will return your call after 1:30. Thank
you!"
Example of a mailbox greeting with call transfer by remaining silent (also for the Assistant
Function)
"This is the voice mailbox of Jane Smith, The Good Company Ltd.! I am attending a seminar today until
1 o'clock. Please leave me a message after the tone. I will return your call after 1:30. If you would like
to speak to the operator (my assistant/representative) just hold, you will be transferred
automatically to the switchboard."
Example of a mailbox greeting with option to "dial out" of mailbox
This is the voice mailbox of Jane Smith, The Good Company Ltd.! I am attending a seminar today until
1 o'clock. Please leave me a message after the tone. I will return your call after 1:30. If you would not
like to leave a message, please press extension... and you will be transferred to my
assistant Mr..."
Page 93
76-193-03.P65
93
08.11.2001, 12:11
Teleserver Memo Pro
Installation and Operation Manual
Example for using the Assistant Function:
"Welcome to the mailbox of Jane Smith, The Good Company. I am on holiday until
the 7th of August. Please wait a moment, and you will be transferred to my
representative Mr. Huber."
Page 94
76-193-03.P65
94
08.11.2001, 12:11
Teleserver Memo Pro
Installation and Operation Manual
8.2
List of text examples for company greetings
Page 95
76-193-03.P65
95
08.11.2001, 12:11
Teleserver Memo Pro
Installation and Operation Manual
Page 96
76-193-03.P65
96
08.11.2001, 12:11
Teleserver Memo Pro
Installation and Operation Manual
8.3
List of copyright-free titles delivered with Telserver Memo Pro
The following 24 Titles (' Title 1 ' ......' Title 24 ') are stored in Teleserver Memo Pro's digital memory.
They were composed for use in SPEECH DESIGN products and are copyright-free.
1.
2.
3.
4.
5.
6.
7.
8.
9.
10.
11.
12.
13.
14.
15.
16.
17.
18.
19.
20.
21.
22.
23.
24.
Countryside (soft pop 1)
Journey back home (soft pop 2)
The valley of golden flowers (meditation 2)
Rondo Fantastico (classic 1)
Hang loose in Kingston (Reaggae 1)
Playground (classic 2)
Flight over the mountains (soft pop 3)
Key West sunrise (modern pop 3)
Meeting the woods (meditation 3)
Sweeping guitar
Winter's grace (classic piano 1)
Ambitious love (classic piano 2)
Medieval market (classic 3)
Christmas tune
Summer breeze (soft pop 4)
Streets to paradise (modern pop 2)
Eagles in the sky (meditation 1)
Hansestadt
New York Tab (jazz)
Live so bright (modern pop 1)
Planter's kiss (Reaggae 2)
Children's song
La Cucaracha
Crystal waters (meditation 4)
Page 97
76-193-03.P65
97
08.11.2001, 12:11
Teleserver Memo Pro
Installation and Operation Manual
8.4
Information on copyrights for Music On Hold
Most countries require registration at the national copyright agency for playing music on hold from
commercial CDs. In this case, it is necessary to pay a minimal fee.
Page 98
76-193-03.P65
98
08.11.2001, 12:11
Teleserver Memo Pro
Installation and Operation Manual
8.5
Sound studio contact
Page 99
76-193-03.P65
99
08.11.2001, 12:11
Teleserver Memo Pro
Installation and Operation Manual
Page 100
76-193-03.P65
100
08.11.2001, 12:11
Teleserver Memo Pro
Installation and Operation Manual
8.6
Order form for booklets
"First Steps with Teleserver Memo Pro"
Page 101
76-193-03.P65
101
08.11.2001, 12:11