1
________________________________________________
First Steps with Mac OS X
1
Connect the interface to an available USB port on your
computer. The interface will be recognized as a USB
audio device and a universal driver is installed.
• Note for Garage Band users: Open Garage Band before
plugging in the interface to automatically select the USB
device.
2
To set the interface as the computer’s default device,
open the System Preferences from the dock or the
main Apple Menu.
3
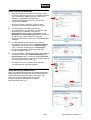
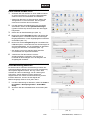
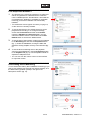
Open the Sound preference (fig. 11).
4
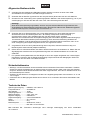
Click the Input tab and select USB Microphone. To set
the gain of the interface, adjust the Input volume slider
(fig. 12).
5
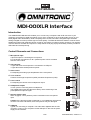
Click the Output tab and select USB Microphone. To
set the playback volume in the headphones, adjust the
Output volume slider (fig. 13).
(Fig. 11)
• You can also use the volume control on the interface
to adjust the volume.
6
At this point you can use the interface with your
recording software, but you need to select it as an input
and output device within the DAW.
________________________________________________
Activating Direct Monitoring
(Fig. 12)
When recording in your DAW with software monitoring turned
on, you may experience a delay on the signal playback,
commonly know as latency. The amount of latency depends
on the speed of your computer, available memory and the
number of tracks you are recording. You can set the interface
to Direct Monitor mode to listen to the signal directly off the
input of the microphone to eliminate the latency.
1
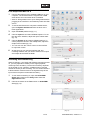
To turn direct monitoring on, open the Audio/MIDI
Setup utility located in the Utility folder inside the
Applications folder.
2
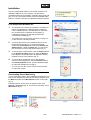
Click the checkbox in the Thru column in Audio/MIDI
Setup (fig. 14).
(Fig. 13)
(Fig. 14)
11/12
00072664.DOC, Version 1.0