1
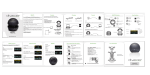
DV-HD-QUAD
DIGITAL SD TO HD-SDI CONVERTER
User's Manual
Precaution and Safety Guidelines
Please read this user’s manual thoroughly prior to use the unit for
its easy and convenient use.
• Do not install the product in the following places: extremely low or high
temperature conditions; places exposed to rain, snow, or high humidity;
places containing or exposed to oil and gas; places exposed to vibration
and shock; places under direct sunlight or exposed to outdoor weather
conditions; places exposed to radio waves (RF) or near to power lines.
It may cause low performance or malfunction of the unit.
• Do not disassemble the product or insert foreign objects.
• The unit is subject to electric shock hazard. Be careful not to get an
electric shock while using the device.
• Please use only electrical safety approved power supply unit (power
adapter) over 12V DC /0.2A with electromagnetic compatibility.
• Do not use and/or connect any devices inappropriate to the unit. It may
cause malfunction of the unit or fire.
• Use this product under temperature conditions only between 0°C and
+50°C.
• Should be careful not to have the lines changed when connecting them.
• Prior to turn on the device, check the cable insulation condition of the
data cable, connected with external devices.
• Before installing the product, check its voltage rate and then turn on the
power.
• Make sure to turn off the product prior to installation.
• Do not subject the product to physical shock or exert excessive force to
operate the product.
• Do not use the device when any smoke or smell is produced from the
unit. It may be subject to fire or electric shock. If any smoke or smell is
produced, please turn off the unit and remove the power cable
immediately, and contact your distributor to check the device properly.
• If the power does not turn ON, please check whether the power cable is
connected correctly or not.
• If the device does not work properly, please contact your distributor.
1
1. Introduction
1-1. Overview
receives analogue video signals from
The DV-HD-QUAD, Digital Converter,
4 analogue cameras and converts SD signals to HD-SDI signal and outputs
to 1 HD-SDI signal after up-scaling the resolution which the customer wants
to choose. Installer can choose to display the screen in full screen mode
from 1~4 channels or quad screen mode for 4 channels
1-2. Features
• Converting 4 SD signals to 1 HD-SDI signal by up-scaling 4 SD signals
• Transmitting 4 split screen over 1 coaxial cable (HD-SDI output).
• Possible to transmit up to 150m(RG-6) when setting output resolution as a
1920x1080, 60i.
• Possible to extend the transmission distance by using HD SDI
repeater.
• Possible to set the Video Output Resolution.
(1920x1080i 60, 1920x1080 60p)
• Support OSD (Channel Number, Title)
• Easy installation and various applications
1-3 Applications
• When it is necessary to use analogue cameras in HD-SDI System (Hybrid
solution)
• When it is necessary to install cameras (1~4 cameras) at the same
location such as a crossroad and parking lot
• Where a centralized supervisory and control system is needed such as the
control center at Subway, Airport, Port and etc.
• At a control center of large buildings and express way and etc.
2. Components
Adapter
User’s Manual
2
3. Product Parts and Peripheral Device Connection
① CVBS IN: Connect to the analogue camera or CVBS video signal
② HD-SDI OUT: Connect to the HD monitor or other equipment which is
possible to input SDI signal.
③ MENU / SET KEY: Press this button for 3 seconds in order to enter the
SETUP MENU mode. Possible to control set point in the SETUP MENU by
using UP, DOWN, SET function.
④ POWER LED: LED ON when power is on
⑤ POWER INPUT: DC 12V Input
4. SETUP MENU (Setting the MENU)
- Enter the SETUP MENU: Press the SET button on the right side of the
product. Then SETUP MENU screen is displayed.
4-1 START-UP SCREEN
OUTPUT
RESOLUTION
CH TITLE
CH01 TITLE
CH02 TITLE
CH03 TITLE
CH04 TITLE
DEFAULT ALL
EXIT
SETUP MENU
QUAD
1920x1080i 60Hz
ON
CH01
CH02
CH03
CH04
OFF
V0.20.111209
▲▼:MOVE
◀: SELECT
- How to use the MENU Screen Button: Press the SELECT(◀)button in order to
choose the menu by using MOVE(▲▼) buttons. Press SELECT(◀) button in order to
return to the MAIN MENU.
3
4-1-1. OUTPUT
: Set channel screen mode (full screen, Quad)
SETUP MENU > Press SELECT(◀) Button in OUTPUT Menu, using MOVE(▲▼) Buttons
> Press the button to set the input mode amongst 1CH↔2CH↔3CH↔4CH↔QUAD by
moving MOVE(▲▼) Buttons.
4-1-2. RESOLUTION
: Set the resolution of the outputted HD-SDI signal
SETUP MENU > Press SELECT(◀) Button in RESOLUTION Menu, using MOVE(▲▼)
Buttons > Press the button to set the output mode amongst 1920*1080i60↔
1920*1080p60 by moving MOVE(▲▼) Buttons.
4-1-3. CH TITLE
: Set to display or not display the name of the channels on the monitor.
SETUP MENU > Press SELECT(◀) Button in CH TITLE Menu, using MOVE(▲▼)
Buttons > Press the button to turn on/off the monitor display mode between ON and OFF.
4-1-4. TITLE
: Modify the letter of the Channel title. (Max. 8 Characters)
SETUP MENU > Press SELECT(◀) Button in CH TITLE Menu, using MOVE(▲▼)
Buttons > Press the button to set the name, using 8 characters by moving MOVE(▲▼)
Buttons.
4-1-5. DEFAULT ALL
: Reset to the default value.
SETUP MENU > Press SELECT(◀) Button in DEFAULT ALL Menu, using MOVE(▲▼)
Buttons > Press the button to set the default value between ON and OFF.
4-1-6. EXIT
: Exit from SETUP MENU
SETUP MENU > Press SELECT(◀) Button in EXIT Menu to exit from SETUP MENU,
using MOVE(▲▼) Buttons
5. Connection Diagrams