1
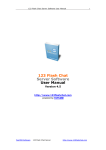
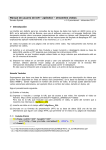
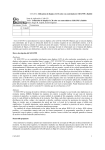
360-degree spin product animation
feuerball3D
- user manual -
(as of 2/1/2013)
1
Table of contents
1 System requirements........................................................................3
2 Introduction.....................................................................................4
3 Cover page of feuerball3D..................................................................5
3.1 Create new animation.................................................................5
3.2 Open existing project..................................................................5
3.3 Most recently used project files.....................................................5
4 Step 1: Load images.........................................................................6
4.1 Load images..............................................................................6
4.2 Change Image Position................................................................6
4.3 Create 360° animations with multi-dimensional axes.......................6
5 Step 2: General settings oft he animation............................................8
5.1 Controls bars.............................................................................8
5.2 Animation..................................................................................9
5.3 Rotation....................................................................................9
5.4 Effect......................................................................................10
6 Step 3: Zoom Setup........................................................................11
6.1 Load images............................................................................11
6.2 General Zoom Settings..............................................................11
6.3 Zoom images for animations with multi-dimensional axes (Zoom
Layers).........................................................................................12
7 Step 4: Hotspots Setup....................................................................14
7.1 Step 4.1: Create new hotspots....................................................14
Hotspot as link...............................................................................14
Hotspot as animation / image-series.................................................15
Hotspot as image and text...............................................................15
7.2 Step 4.2: Place Hotspots............................................................16
7.3 Step 4.3: General Hotspot Settings.............................................17
8 Step 5: Export/Save 360° Animation.................................................18
9 Include 360-degree animation to a website.........................................19
9.1 What needs to be uploaded?.......................................................19
9.2 How to embed the animation on websites?...................................19
9.3 How to include the animation on special sites (e.g. ebay)?..............20
10 Tips and tricks to create perfect product images for a 360° animation...22
11 FAQs & appropriate solutions..........................................................24
Is feuerball3D editor able to create a 360° animation as a single Flash file
(with all the images in one file)?.......................................................24
Which files do I have to upload to my server / website?.......................24
12 About feuerball3D.........................................................................25
2
1
System requirements
The software feuerball3D Editor is available for MAC and PC.
MAC-version
Version
Mac OS X Version 10.6 “Snow Leopard”
Mac OS X Version 10.7 “Lion”
Mac OS X Version 10.8 “Mountain Lion”
Processor
Intel-Processor with at least 1.83 GHz (Core 2 Duo)
Memory
At least 512 MB
Additional software
Adobe Air runtime (free)
Windows/PC-version
Version
Windows XP Service Pack 3
Windows Vista
Windows 7 (supports 32- and 64-bit-version)
Windows 8
Processor
At least 2.33 GHz
Memory
At least 512 MB
Additional software
Adobe Air runtime (free)
2
Introduction
Using the feuerball3D Editor you can quickly and easily create 360-degree spin
product animations of your product photos. The editor will guide you through
all the steps one by one.
In total there are five steps which are shown on the upper end of the program
symbolically. By clicking on an icon will take you directly to the desired
processing step.
Image: Navigation in the Editor
Via a link on the bottom left of the editor you are always connected to the next
step of processing.
3
Cover page of feuerball3D
Create or edit 360 ° animation quickly and easily in a few steps.
3.1 Create new animation
To create a new animation, click on the button "Create new 360° animation".
Thereby you are directly in the editor at step 1.
3.2 Open existing project
In the menu "360° Animation" you’ll find the menu item "Open Existing
Project". With it you can select a project file (XML file) and open an animation
that you have already created with the feuerball3D Editor. After selecting a file
the animation and all settings are loaded to the program.
Note: For the animation to be opened properly all used pictures of the project
may still be in the project folder.
3.3 Most recently used project files
On the right half of the page you will find a list of all recently opened / created
projects and their project name. For fast processing, you can open them just
by clicking.
Note: For the animation to be opened properly all used pictures of the project
may still be in the project folder.
4
Step 1: Load images
Load your prepared images (only the preview images and not
the zoom images) into the image list and create single-axis
horizontal animations (rotation left and right) or multi-axis
animations (rotation in all directions).
4.1 Load images
Insert new preview images from your hard drive by clicking on the button
"Insert New Image" (yet only the preview images have to be loaded, the zoom
images will be loaded in step 3). All images will be loaded into the image list.
There you can change the images order by dragging and dropping them and /
or remove images from the list. The image order is also the order of images for
single-axis horizontal animations.
Once images are loaded into the image list they will be automatically displayed
on the right side in a live-preview of the animation.
4.2 Change Image Position
All images will be automatically positioned in the upper left corner of the
animation. You can change this position as needed for each individual image.
Simply click on the image in the list for you want to change the position and
enter the desired value in the fields for the X and Y values (giving X-/Y-position
as the distance from the upper left corner of the animation).
4.3 Create 360° animations with multi-dimensional axes
To create vertical rotating animations or animations with multiple axes set the
hook at "Use Additional Axes".
After setting the hook the first horizontal axis (layer) is created automatically
and all images from the picture list are inserted there.
Use the buttons right above the first layer to add new axes (layers) or to
delete one. Select images for each layer and allocate them by drag and drop.
On the list, you can load more images and move also them to a layer.
The dark shaded axis is the starting axis of the animation. The first picture
there is where the animation starts. Viewing the animation, you can rotate the
images between different layers/axis by an additional vertical control bar as
well as by dragging the animation with the mouse.
You don’t have to add the same number of images in each layer. Instead, you
can also use filler images (button above the axes). These filler images won’t
appear in the final animation and the position won’t be viewed either. They are
just for bridging distances in the axes (layers).
Note: To create single-axis vertical animations (rotation of the product only in
direction up and down) create as many axes as you own images for the
animation. Each axis has now to be filled with one image in the first position.
5
Step 2: General settings oft he animation
In step 2, you have several options to change the look and feel
and functions of the animation and customize it to your needs.
All settings are already set by default for you, so you need to
change each value only if you are dissatisfied with the settings.
5.1 Controls bars
The look and feel of the buttons can be customized for each animation.
Basically three different layouts (Button Style: Standard, Premium and Future)
are available.
In button style Premium a particular color scheme is given. In type Standard
and Future the colors can be chosen freely. The selected colors are used for all
the buttons (control bars, buttons and hotspot links).
The control bar of the animations can be changed in width. In a multi-axis
animation, the horizontal and vertical control bar can be individually adjusted
in width or height.
If the width / height of the control bar is smaller than 120 pixels, only the
arrow buttons will be displayed. In this case all the arrow buttons will be
placed at the bottom center of the animation.
Image: Control bar/Navigation of the Animation (Button style: Premium)
You also can adjust the occurrence of the control bar (navigation). If you want
to use no control bar (navigation), then select the setting “No”. Then the
animation can only be rotated by dragging with the mouse.
Alternatively, there is the setting “Normal” for the control bar (navigation) to
disappear disappear during zoom. If you want the control bar (navigation) to
also appear during zoom, select the setting “Always”.
5.2 Animation
When loading images in step 1, the size of the animation is automatically
adjusted to the size of the images. Nevertheless this values can also be
changed by setting height and width of the animation.
The value of the background color sets the color of the background behind the
images (not the background color within the images!). Changing the value can
be seen mostly only when the size of the animation in height and / or width
exceeds that of the images.
You can also set the background of the animation transparent, for example to
see the website behind the animation. As mentioned before the background of
the images won’t be changed.
With the settings for the rotation, you can determine whether the object in the
animation can be rotated fully in every direction. Thus the animation will show
the first picture after the last one and continue the animation from the start. If
you do not want a full rotation, the animation ends on the last picture and can
only be rotated backwards from there.
5.3 Rotation
With the automatic rotation, you can specify whether the animation will be
start rotating after having loaded the images. The rotation then stops at the
first mouse interaction (e.g. by clicking on the animation) (setting: “Always) or
after one rotation (setting: “Once”).
The speed of this automatic rotation can be specified in the text box below.
The value specifies the time interval between the images of the animation.
If you want the animation to restart the automatic rotation after a certain time
in which the user did not interact with the animation, you can also specify a
value for the time of inaction.
Alternatively or in addition to the automatic rotation, you can insert a
Play-/Pause-Button into the animation. This allows the user to enable or
disable the automatic rotation of the animation by himself.
For the button styles “Standard” and “Premium” the play/pause button can be
placed individually if you want to. Just adjust the position by changing the
values (distance from the top left corner of the animation). If the values are
both zero the button will be placed automatically.
5.4 Effect
In certain situations, it can be helpful to disable the blur effect of the animation
(e.g. if you use a background image on your product images).
To enhance your animation you have the option to use additional effects. For
example, the reflection effect in which your product images are duplicated and
mirrored to the bottom of the images. In this way the animation gets a
reflection of the product.
The effect can be placed individually if you want to. Just adjust the position by
changing the values (distance from the top left corner of the animation). If the
values are both zero the effect will be placed automatically.
6
Step 3: Zoom Setup
If you want to use zoom images in high resolution next to the
preview images from step 1, then set the hook on "Use Zoom
Function" in step 3 of the software.
6.1 Load images
As in step 1 for preview images you can now select and load new zoom images
by clicking on the button "Insert New Zoom Image". All images will be loaded
into the image list. There you can change the images order by dragging and
dropping them and / or remove images from the list. The image order is also
the order of images for single-axis horizontal animations and should
correspond to the order in step 1.
6.2 General Zoom Settings
Divided Zoom Images: As with previous versions of Flash only images with a
maximum height/width up to 2880 pixels can be processed, larger zoom
images have to be divided manually first. In the animation, these parts will
then be stitched together again.
If you want to use images in a higher resolution than the described limits, then
load all split zoom images into the image list. Arrange the pictures now so that
all parts of the first image are at the beginning of the list. Then all parts of the
second image shall follow, and so on. Number and arrangement of the split
parts of an image can be specified using the dropdown box „Alignment“ on the
right.
Note: The division of the images is not been done by the editor. The images
already have to be prepared and loaded in pieces.
The layout of the zoom function is available in two different zoom variations. In
„Simple Zoom“ only one button to zoom in and out is shown. By press the
specified zoom images is loaded and fully zoomed in. With „Continuous Zoom“,
the user can set the level of the zoom step by himself using a slider.
For the button styles “Standard” and “Premium” the zoom buttons can be
placed individually if you want to. Just adjust the position by changing the
values (distance from the top left corner of the animation). If the values are
both zero the button will be placed automatically.
Within the zoom layouts there are also three modes of zoom functions which
can be chosen.
With the „Drag & Drop“ function, the image can be moved by mouse during
zoom. A rotation of the animation is not possible.
Alternatively, in „Rotation“ function, the zoom image is automatically moved
with the movement of the mouse. The animation can now also be rotated by
dragging and dropping the images.
In the third function („Button“) two additional buttons are available so the user
can choose between moving the zoom image or rotating the animation.
For the button styles “Standard” and “Premium” the zoom function buttons can
be placed individually if you want to. Just adjust the position by changing the
values (distance from the top left corner of the animation). If the values are
both zero the button will be placed automatically.
If you use zoom images in your animation, then you can also have the option
to add a fullscreen mode to your animation. This button changes the view of
animation between normal size and a view that occupies the entire screen.
For the button styles “Standard” and “Premium” the fullscreen button can be
placed individually if you want to. Just adjust the position by changing the
values (distance from the top left corner of the animation). If the values are
both zero the button will be placed automatically.
6.3 Zoom images for animations with multi-dimensional
axes (Zoom Layers)
If you selected to create an animation with multi-dimensional axes or vertical
turning animation in step 1, all zoom layers from step 1 will be shown ready to
be filled with the zoom images.
Using the mouse, you can drag the loaded zoom images from the images list
into the specified axis / layer. Place the zoom images in the same order and
the same position as the preview images in step 1. On the list, you can load
more images and move also them to a layer.
The dark shaded axis is the starting axis of the animation. The first picture
there is where the animation starts.
You don’t have to add the same number of images in each layer. Instead, you
can also use filler images (button above the axes). These filler images won’t
appear in the final animation and the position won’t be viewed either. They are
just for bridging distances in the axes (layers).
7
Step 4: Hotspots Setup
If you want to use additional images / text / animations in your
360° animation to show details or special functions of the
product then set the hook on "Use Hotspot Function" in step 4 of
the software.
You can now define additional images / text / animations (called
hotspots) which can be linked in the 360° animation by small links.
7.1 Step 4.1: Create new hotspots
First create a new hotspot and name it individually.
All created Hotspots are listed in the box on the left (there you
can delete them as well). After selecting a hotspot in this list,
the functions / setup information of the selected hotspot is
shown on the right and can be defined.
By default, the link picture of a hotspot is illustrated as small dartboard in the
colors of the navigation. Alternatively, you can also use your own picture
(including transparent PNG / GIF files). Just click on „Load Link Picture“ to
select a different picture.
In addition to the link picture a link text (text will show up by mouse moving
over the link picture) can be specified. So the user gets same information what
the hotspot is all about.
Overall there are three different types of hotspots according to their content:
hotspot as a link, hotspot as image and text, hotspot as an animation. The
three different hotspot content types and their settings are now explained
briefly.
Hotspot as link
The simplest form of the hotspot is the hotspot as a link. By clicking on the link
of the hotspot the user will be linked to a specified web address.
For further adjustment only the address of the link (e.g.
http://www.feuerball3d.de) has to be specified.
Hotspot as animation / image-series
Additional animation of a product (e.g. opening a drawer or connecting a plug)
can be represented by the hotspot as animation / image-series.
All needed images for the animation can be loaded into a new image list. The
pictures in this list will be faded in the animation in this order. The effect is a
virtually flowing movement.
The images series can be placed individually if you want to. Just adjust the
position by changing the values (distance from the top left corner of the
animation).
After playing the hotspot animation the animation ends on the last picture.
Alternatively, you can also specify that the animation should be played in a
loop. The hotspot animation then repeats until the user terminates the
animation by clicking on the „close“ button.
If you want the hotspot animation to start at a particular image of the 360 °
animation, then you can specify the „Start Image“ of the hotspot by its image
number. Result: the user clicks on the hotspot link and the animation will first
rotate to this starting image before showing the hotspot animation.
Hotspot as image and text
Certain perspectives or scenes of a product can also be illustrated by hotspots
with image and text.
As content you can use a title field (for headlines), a text box and an image.
General settings for text color, font, etc. can be made finally in step 4.3.
In the title field, you can insert the text for the title. You can also specify the
width of the title field. The position of the title field can be adjusted by
changing the values (distance from the top left corner of the animation).
In the text box, you can insert a short text information or a description of the
product. You can also specify the width of the text column. The position of the
text box can be adjusted by changing the values (distance from the top left
corner of the animation).
In addition, you can also use an static image in the hotspot. The position of the
image can be adjusted by changing the values (distance from the top left
corner of the animation).
If you want the hotspot content to start at a particular image of the 360 °
animation, then you can specify the „Start Image“ of the hotspot by its image
number. Result: the user clicks on the hotspot link and the animation will first
rotate to this starting image before showing the hotspot content.
7.2 Step 4.2: Place Hotspots
In step 4.2 all hotspot links will be positioned on all images of
the 360° animation.
All created hotspots are listed in the box on the left.
On the right side one frame of the 360° animation is displayed in original size.
Using the navigation bar below (or/and in multi-dimensional axes or vertical
360° animations on the right) you can switch between the individual frames of
the animation.
Drag any hotspot from the list onto a frame image and position it there.
Change the frame with the described navigation bars (bottom and/or left) and
set the hotspot links there as well if needed.
The exact position of a hotspot can be edited in the text boxes „Hotspot XPosition“ and „Hotspot Y-Position“ on top of the frame.
Misplaced or unnecessary hotspot links can be deleted by clicking on "Remove
Hotspot" (appears after clicking on a hotspot).
If you want to place the hotspots in all frames to the same position, then you
can copy the position of the hotspot from one frame to all other frames. Just
position the hotspots in one frame and set the hook on „Set the same Hotspot
position for all images“.
7.3 Step 4.3: General Hotspot Settings
In step 4.3, you adjust general settings for all hotspots like text
color, font family, and so on.
The text color is applied to all texts of all hotspots as well as for
the link texts of all hotspots.
The font family is also applied to all texts of all hotspots and the whole 360degree animation.
he font size is also applied to all texts of all hotspots. The font size of all title
texts will be increased by two (+2).
The background color is also applied to all texts of all hotspots as well as for
the link texts of all hotspots.
For the button styles “Standard” and “Premium” the hotspot button can be
placed individually if you want to. Just adjust the position by changing the
values (distance from the top left corner of the animation). If the values are
both zero the button will be placed automatically.
You also can disable the usage of the hotspot button so all hotspot links will be
displayed in the animation permanently. Just set a hook at „Hotspots Always
Visible“.
8
Step 5: Export/Save 360° Animation
Finally you can save/export the created animation in step 5.
If you edit an existing animation, you can choose if you want to
overwrite the existing animation. If you do not set a hook you
can save the animation with new name and directory.
Optionally, you can also also create a HTML file which includes the animation.
So you can test the 360-degree animation directly in your web browser.
There are two possible techniques. On the one hand the animation is included
as a Adobe Flash animation. And on the other hand as a JavaScript/HTML5animation.
To save the animation („Export Animation“) first enter a project name to name
the XML file of the project and to name the folder containing all pictures.
As project directory, select the directory to which the animation should be
saved. All settings will be saved in an XML file and copies of all images used
are saved in a project folder. Depending on which export technique was also
selected corresponding animation files will be stored there as well.
9
Include 360-degree animation to a website
If you have customized your animation in feuerball3D Editor and are satisfied
with the settings you are ready to embed the animation into your existing
website.
9.1 What needs to be uploaded?
First upload the project folder (containing all preview and zoom-images of your
animation) to the server of your website. Additionally, upload the XML file
(containing all settings of your animation) to the server of your website as
well.
Depending on which technique you want to use to display your animation
either upload only the flash-viewer-file (feuerball3D.swf) or the flash-viewerfile and both JavaScript-folders (style and js). Make sure that all files and
folders are in the same directory (otherwise you have to adjust the file paths in
some way). Location and name of the product images are located in the XML
file. Therefore, it is essential that the image-folder on the server bears the
project name.
Note: If you are not sure what to upload, just upload everything what was
exported by feuerball3D Editor to the server of your website. You can't go
wrong with that!
9.2 How to embed the animation on websites?
There are many different ways in which an animation can be included to a
website. Not all of them may be suitable for your website. Here two simple
examples are mentioned. For further information or questions don't hesitate to
contact us.
Example one will work almost everywhere. It is the same technique as if you
include a video (e.g. from YouTube).
For both examples you have to export a sample HTML-page of the animation in
step 5.
1. Embedding as an iFrame:
Just upload everything to your server and embed the animation by using the
following code on your website:
<iframe width="450" height="330"
src="http://www.yourserver.com/animations/example.html" frameborder="0"
allowfullscreen></iframe>
Copy the lines in your web page (HTML file/editor) and adjust the file paths
and animation size to your needs. The included HTML-file is the exported
HTML-sample file. Either the flash - or the JavaScript - (example file).
2. Direct embedding:
Just upload everything to your server except the sample HTML-file. Then open
the sample HTML-file using a text editor and copy everything between <body>
and </body>. Copy the to your web page (HTML file/editor) and use it there.
If you use the JavaScript-version you also have to include the JavaScript- and
style-files (copy everything between </title> and </head>) in your web page.
Note: Depending on where you include the animation on your site some paths
may have to be adjusted.
9.3 How to include the animation on special sites (e.g.
eBay)?
Since you can not upload animations unlike still images on eBay you first have
to upload the animation to your server or your website online.
Due to security reasons eBay does not allow to include JavaScript-animations.
You have to use the flash-animation only.
In order for the animation, located on your server, will be displayed on the
eBay auction page you need to use absolute paths. This will look like:
<object classid="clsid:d27cdb6e-ae6d-11cf-96b8-444553540000" width="450"
height="330">
<param name="movie" value="http://www.yourserver.com/animation/feuerball3D.swf?
imgdata=http://www.yourserver.com/animation/example" />
<embed src="http://www.yourserver.com/animation/feuerball3D.swf?
imgdata=http://www.yourserver.com/animation/example" width="450" height="330" />
</object>
As well as the flash-viewer-file (feuerball3D.swf), the XML file (without
extension) has to be called with absolute paths.
Note: In contrast to previous animations, it is no longer necessary to adjust
the XML file. The paths there are adjusted by the viewer files.
10 Tips and tricks to create perfect product images for a
360° animation
Basic requirement for 360-degree animations are product images shot from
different angles of the object. The animation can build by using any any
number of product images. To ensure a steady rotation, the product images
should been taken in even steps / angles (see picture). For 24 images for a
horizontal 360° rotation the perfect angle of each step is 15° (360° / 24).
Image: Example of a 360-degree animation with 24 product images
The final product images can be used for the 360° product animation with both
the existing background, as well as knocked out. Feuerball3D has a zoom
feature which can reload high resolution images of your product to runtime. If
you wish to use this zoom feature, so be sure that your product thumbnails are
miniature images of the high resolution zoom images and have not been cut
separately. Otherwise, there may be some display errors during zoom. Save all
product images as image-files (e.g., JPG file format).
In order to achieve optimal results for the 360° animation, look at the
following tips and tricks:
•
Take a photo of your products against a plain background or knock out
your product images. Thus the background will no longer interfere on the
animation.
•
Take advantage of using a turntable to shot images of the product. It
allows you to adjust the angle more evenly. So your animation will rotate
more steady.
•
The ideal number of product images, which are required for a 360°
rotation is between 20 and 36 images. Using fewer images may occur in
too much jiggle during the animation. With more than 36 images no
appreciable improvement of the process is achieved and only the loading
time will increase. In addition, the effort in image processing increases
with the number of images used.
•
Save your preview images in the smallest possible size and resolution to
keep the loading time of the animation short. The zoom images are
loaded individually as needed and won't delay the loading time of the
animation at start. Nevertheless, even the zoom images should not be
stored in an exaggerated high resolution or file size.
11
FAQs & appropriate solutions
On this page you will find a selection of frequently asked questions to
feuerball3D Editor. If you have a question that is not answered here, please
write us ([email protected]).
Is feuerball3D Editor able to create a 360° animation as a
single Flash file (with all the images in one file)?
No, feuerball3D Editor saves the settings of a 360° animation as an XML file.
This XML file is then read by an existing Flash animation and the images are
loaded accordingly.
The disadvantage is that several files have to be transferred to the server. The
advantage, however, is that the loading time is much shorter, as only those
files are loaded that are viewed by the user.
Which files do I have to upload to my server / website?
Simply upload everything you get while exporting an animation in step 5 of the
feuerball3D Editor. You can't go wrong with that!
12
About feuerball3D
Feuerball3D Editor helps you to easily create 360-degree product animations.
If you'd like more information concerning the use and licensing of the 360°
animation feuerball3D, then visit our website (http://www.feuerball3d.de) or
send us an email ([email protected]).