1
360-degree spin product animation
feuerball3D Studio
- user manual -
(As of 3/1/2014)
1
Table of contents
1 System requirements........................................................................3
2 Introduction.....................................................................................4
3 Quick start/short manual...................................................................5
3.1 Preliminary work........................................................................5
3.2 Load images..............................................................................5
3.3 Adjust animation........................................................................5
3.4 Export animation........................................................................6
3.5 View animation..........................................................................6
3.5 Include animation.......................................................................6
4 Menus.............................................................................................7
4.1 File...........................................................................................7
4.2 View.........................................................................................8
4.3 Extras.......................................................................................8
4.4 Help.........................................................................................9
5 Toolbar..........................................................................................10
5.1 Preview zoom...........................................................................10
5.2 Rotate images..........................................................................11
5.3 Crop images.............................................................................11
6 Image list......................................................................................13
7 Properties......................................................................................14
7.1 Input files................................................................................15
7.2 Animation................................................................................15
7.3 Buttons...................................................................................17
7.4 Rotation..................................................................................18
6.5 Zoom......................................................................................19
7.6 Hotspots..................................................................................21
7.7 Multiaxial Animation..................................................................22
7.8 Miscellaneous...........................................................................23
8 Hotspots sidebar.............................................................................24
8.1 Create hotspot.........................................................................24
8.2 Create Hotspot Position..............................................................29
9 Create Animation............................................................................31
10 Include 360-degree animation to a website.......................................34
10.1 What needs to be uploaded?...................................................34
10.2 How to embed the animation on websites?................................34
10.3 How to include the animation on special sites (e.g. eBay)?..........35
11 Tips and tricks to create perfect product images for a 360° animation...37
12 FAQs & appropriate solutions..........................................................39
Is feuerball3D Studio able to create a 360° animation as a single Flash file
(with all the images in one file)?.......................................................39
Which files do I have to upload to my server / website?.......................39
13 About feuerball3D.........................................................................40
2
1
System requirements
The software feuerball3D Studio is available for MAC and PC.
MAC-version
Version
Mac OS X Version 10.6 “Snow Leopard”
Mac OS X Version 10.7 “Lion”
Mac OS X Version 10.8 “Mountain Lion”
Processor
Intel-Processor with at least 1 GHz (Core 2 Duo)
Memory
At least 1 GHz
Additional software
-
Windows/PC-version
Version
Windows XP Service Pack 3
Windows Vista
Windows 7 (supports 32- and 64-bit-version)
Windows 8
Processor
At least 1 GHz
Memory
At least 256 MB
Additional software
-
2
Introduction
Using feuerball3D Studio you can create 360-degree spin product animations
of your product photos quick and easy. The software is especially designed for
the combined use with an automatic turntable. Thus it can work directly with
the output files (JPG-format) of the camera and resize or crop them.
The use of templates helps to take over settings of any previous build
animation and therefore to shorten the effort. Thus many animations using the
same style can be build in a very short time.
3
Quick start/short manual
This chapter is for helping you getting a rough introduction into the software
feuerball3D Studio. After that you should be able to create a first animation.
Upon this basic information you can use the other chapters to go into details or
customize your animation.
3.1 Preliminary work
To create a 360-degree animation you need product images (JPG file format).
Applicable are all images that show your product from different angles. Perfect
would be 16 to 36 images which have been taken in equal steps around the
product.
We recommend the usage of a turntable to take the pictures.
3.2 Load images
After having started the software feuerball3D Studio you first have to load the
images. You can use the original images because the images will be cropped
and scaled during export.
Use the menu File – Select Images to select the images and load them.
All loaded images will be shown ordered in the image list at the bottom of the
window.
3.3 Adjust animation
Having loaded all images you want to use within your animation you can adjust
the animation to your needs by using the properties sidebar. For a first start
you can use the default values.
The main important values to adjust are the size of the animation (Size of
Preview Images in Animation group) and the size of the zoom images (in
Zoom group).
3.4 Export animation
To export the animation select File – Create Animation.
You have to insert a project name and a target directory. For the first times it
is recommend to use a blank folder, so you can see what files are exported.
It is also recommend to select the options Create HTML preview page
and/or Create JavaScript animation. Thus additional html-pages will be
exported in which the animation is included. So you can open those files with
your browser to view the animations.
3.5 View animation
To view the exported animation the animation has to be included into a htmlpage (can be selected as an option during export). The html-pages can be
opened with a web browser (Mozilla Firefox, Google Chrome, Internet
Explorer,...).
To view the HTML preview page your browser needs the flash-plugin because
the animation is included in flash format.
To view the JavaScript animation your browser needs Javascript to be
activated. Usually all browsers have Javascript support activated. But some
browsers are blocking Javascript files while running in offline mode. Thus the
animation could no be displayed while using local files.
But if the animation is uploaded onto a server and is opened online the
animation can be viewed without problems.
3.5 Include animation
Upload all exported files and folders to a server by using a ftp-software. Open
the uploaded html-example files within the browser using their correct domain
and web address to test the animation is displayed correct.
Link this address with your web page or embed the address on your web page
by using an iFrame.
4
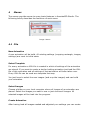
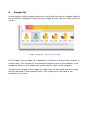
Menus
The menus provide access to many basic features in feuerball3D Studio. The
following briefly describes the functions of each menu.
Image: Menus
4.1 File
New Animation
A new animation will be build. All existing settings (cropping rectangle, images,
settings) are reset to initial state.
Select Template
For every animation a XML-file is created in which all settings of the animation
are stored. If you want to create a similar looking animation just load the XMLfile of this animation and all settings of that animation will been taken over.
Every XML-file can be used as a template that way.
You just have to select the new images (and crop the images) and can build
your animation.
Select Images
Choose a folder on your local computer where all images of an animation are
placed. Select the images you want to use or just choose all images. All
selected images will be load into the program.
Create Animation
After having load all images needed and adjusted your settings you can create
the animation. All images will then be processed and the animation will be
created according to your settings.
Recent Templates
A list containing the last five templates used.
Recent Images
A list containing the last five image folders used.
4.2 View
Toolbar
Show/hide the toolbar.
Properties
Show/hide the properties sidebar.
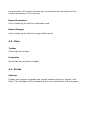
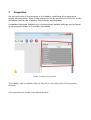
4.3 Extras
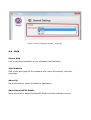
Settings
Change the program language and choose between German, English, and
Polish. The language will be updated at the next initialization of the program.
Image: Change language (Extras – Settings)
4.4 Help
Online Help
Link to the documentation of the software (manual/help).
Visit Website
Link to the web page of the software with more information, tutorials,
examples.
About Qt
More information about Qt platform application.
About feuerball3D-Studio
More information about feuerball3D-Studio and the software version.
5
Toolbar
The Toolbar is a shortcut to the most important functions of all menus.
Complemented with some image processing functions to process the images
used.
More information and explanations to all shortcut functions (New Animation,
Select Template, Select Images, Settings, Online Help, and Create Animation)
of the toolbar can be found in a previous chapter.
Image: Toolbar
The Toolbar can be added to the preview window either left or right by drag &
drop.
5.1 Preview zoom
Picture preview can be scaled so that the hole image can be seen on each
screen in total.
Image: Toolbar – Scale image preview
5.2 Rotate images
All images can be rotated by 90° in any direction.
Image: Toolbar – Rotate images
5.3 Crop images
The crop rectangle can be enabled, disabled or reset in the toolbar. If the
cropping rectangle has been enabled the rectangle can be resized by dragging
the edges and sides of the rectangle.
Settings of the rectangle will be applied to all images automatically. By clicking
on a different image in the image list, you can check whether an image does
not fit into the rectangle and therefore correct the rectangle.
Exact values for the rectangle (size, position) can be inserted in the properties
window ('Zoom – Crop Rectangle').
Image: Toolbar – Crop images
6
Image list
At the bottom of the program there is a horizontal list with all images used for
the animation. Beneath a small preview image the file name of each picture is
shown.
Image: Image list – lists all used images
If an image of the images list is selected it is shown in the preview window in
original size. The number of the selected image as well as the quantity of all
images is shown in the status bar at the bottom right of the program.
To remove an image of the image list right-click on an image and the image
can be removed in the opening menu. The image won't be used in the
animation any more.
7
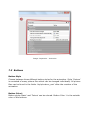
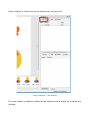
Properties
On the right side of the program is the sidebar containing all properties to
adjust the animation. Most of the properties will be stored in the XML-file of the
animation and can be loaded to the program as templates.
A standard template (default.xml) containing the default settings can be found
in the program folder in the folder 'templates'.
Image: Setting the properties
The sidebar can be added either at the left or the right side of the preview
window.
All properties are divided into these groups:
7.1 Input files
Template File
Path of the template on the local computer can be changed by File – Select
Template.
Images Directory
Path of image folder on the local computer can be changed by File – Select
Images.
7.2 Animation
Size of Preview Images
Sets the size of the preview images (as well as the size of the animation if the
next property is set true).
If a cropping rectangle is used the images will be cropped first and then scaled
to this size. If the aspect ratio of the cropping rectangle or the images differ to
the aspect ratio of this setting all images will be scaled to fit into this size.
Therefore the images could be scaled smaller than the size entered. You are
advised to consider the aspect ratio while entering a size.
Set Size of Animation automatically
Size of the animation will be adjusted automatically to the size of the images.
Only if you want to use a different size for the animation you should uncheck
this property.
Size of Animation
Final size of animation for the export (normally the same property as 'Size of
Preview Images'; but can be set smaller or bigger the the images).
Transparent Background
The Background of an animation (not the background of the images!) can be
set transparent. Areas surrounding the images (only existing if 'Size of
Animation' is bigger than 'Size of Preview Images') in an animation will thus
get a transparent background.
Background Color
Same scheme like 'Transparent Background' but using a color instead of
transparency.
Image: Properties – Animation
7.3 Buttons
Button Style
Choose between three different button styles for the animation. Style 'Custom'
is consisted of many picture files which can be changed individually. All picture
files can be found in the folder 'style/custom_navi' after the creation of the
animation.
Button Color1
Button styles 'Basic' and 'Future' can be colored. Button Color 1 is the outside
color of the buttons.
Button Color2
Button styles 'Basic' and 'Future' can be colored. Button Color 2 is the inside
color of the buttons.
Width of Horizontal Control Bar
Width of navigation (Control bar for left and right) of button style 'Basic' and
'Custom' is in pixel size.
Height of Vertical Control Bar
Height of navigation (Control bar for up and down) of button style 'Basic' and
'Custom' is in pixel size.
Display of Control Bar
Shows/hides the navigation (Control bar for left/right and up/down) in different
situations.
7.4 Rotation
Automatic Rotation at Start
Sets the animation to either rotate at start automatically for one rotation
('once'), to rotate until any user action ('always'), or to do not rotate at start
('none').
Speed of Auto. Rotation
Interval between images while rotating automatically (in milliseconds). The
smaller this property is the faster the images will be displayed in sequence
(e.g. 40). The bigger this property is the slower the images will be displayed in
sequence (e.g. 300).
Restart of Auto. Rotation after Inactivity (in s)
Restarts the automatic rotation after a time interval (in seconds) with no user
action.
Play-/Pause Button
Enables/disables the Play-/Pause button which enables the user to start/stop
the automatic rotation of an animation.
Position of Play-/Pause Button
Positions the button in x- and y-direction from the top left (values in
percentage, based on the size of the animation). Value 0 or no value will
position the button on its standard position.
Blur Images
Enables/disables the blur effect occurring while the user drags & drops the
animation.
Reverse Rotation
Inverts the order of images in the animation. The first image will stay first but
all other images will be displayed in inverse sequence.
6.5 Zoom
Zoom (zoom display/technique)
–
–
–
–
No Zoom: No zoom images will be processed and the zoom will not be
used.
Simple Zoom: Zoom images will be processed. There is only one button
controlling the zoom (totally zoom-in, totally zoom-out).
Continuous Zoom: Zoom images will be processed. By using a slider the
zoom images can be zoomed progressively.
Deep-Zoom: Each zoom image will be processed in tiles. By using a
slider the zoom images can be zoomed progressively. Ideal for huge
zoom images (e.g. from 2500 pixel size) because of optimized loading
time.
Size of Zoom Images
Size of zoom images in the animation.
If a cropping rectangle is used the images will be cropped first and then scaled
to this size. If the aspect ratio of the cropping rectangle or the images differ to
the aspect ratio of this setting all images will be scaled to fit into this size.
Therefore the images could be scaled smaller than the size entered. You are
advised to consider the aspect ratio while entering a size.
Crop Rectangle
Size and position of the crop rectangle is shown in the preview window. Every
part of an image outside the crop rectangle will be clipped. Afterward the
pictures are scaled and used for the animation.
The crop rectangle is applied to all images automatically. The crop rectangle
can be exactly defined in pixel size and pixel position. Thus exact clippings are
possible.
Size of Zoom Tiles
If Deep-Zoom is used all zoom images will be tiled. The size of those zoom tiles
can be entered in pixel size. Usually 256 pixels are used for this size.
Position of Zoom Button
Positions the button in x- and y-direction from the top left (values in
percentage, based on the size of the animation). Value 0 or no value will
position the button on its standard position.
Zoom Function
Functions of zoom images and usage of buttons during zoom:
–
–
–
Drag & Drop: Zoom images can be dragged during zoom.
Rotation: Position of zoom images is automatically bound to the position
of the mouse. While dragging the zoom images the animation is rotated.
Button: There are two additional buttons during zoom. So the user can
either drag the images to change the position of the images or to rotate
the animation.
Position of Drag Button
Positions the button in x- and y-direction from the top left (values in
percentage, based on the size of the animation). Value 0 or no value will
position the button on its standard position.
Position of Rotate Button
Positions the button in x- and y-direction from the top left (values in
percentage, based on the size of the animation). Value 0 or no value will
position the button on its standard position.
Fullscreen Button
Enables/disables the fullscreen button which enables the user to display the
animation onto the whole screen.
Position of Fullscreen Button
Positions the button in x- and y-direction from the top left (values in
percentage, based on the size of the animation). Value 0 or no value will
position the button on its standard position.
7.6 Hotspots
General settings for the usage of hotspots. Hotspot can be defined and
positioned within the hotspot sidebar.
Use Hotspot Button
Enables/disables the usage of the hotspot button to show/hide hotspots. If you
disable the button, all hotspots will be shown permanent.
Position of Hotspot Button
Positions the button in x- and y-direction from the top left (values in
percentage, based on the size of the animation). Value 0 or no value will
position the button on its standard position.
Text Color
Color of tooltip texts of hotspot links.
Text Background Color
Background Color of tooltip texts of hotspot links.
Text Background Alpha
Transparency of tooltip background of hotspot links.
7.7 Multiaxial Animation
Number of Axes
Number of axes used in the animation. The quantity of images will be divided
by this number and the images will thus be partitioned in axes.
Example: 64 images are loaded into the program. Using 4 axes partitions
images to 16 images per 4 rows/axis'.
Start Axis
Sets the axis which will be shown at start of the animation.
Complete Rotation in
Sets in which direction the user can rotate the animation.
–
–
–
All Axes: The animation is a full 3D animation and all images in all axes
are consecutive. The user can switch/rotate from the last to the first
image in every axis.
Horizontal Axis: The animation is a single axis horizontal animation or
contains vertical axis which are not completed/consecutive. The user can
switch/rotate from the last to the first image in horizontal direction but
not in vertical direction.
Vertical Axis: The animation is a single axis vertical animation or contains
horizontal axis which are not completed/consecutive. The user can
switch/rotate from the last to the first image in vertical direction but not
in horizontal direction.
–
No Axes: The animation is consecutive in no direction/axes (e.g. 180°
animation). The user can neither switch/rotate from the last to the first
image in vertical direction nor in horizontal direction.
7.8 Miscellaneous
Image Quality in %
JPG-compression of preview- and zoom images.
Font Style
Used font family for hotspot texts.
Font Size
Used font size for hotspot texts.
Audio File
Choose an audio file (MP3-format) which will be played during the automatic
rotation.
Position of Audio Button
Positions the button in x- and y-direction from the top left (values in
percentage, based on the size of the animation). Value 0 or no value will
position the button on its standard position.
8
Hotspots sidebar
With using hotspots 360-degree spin product animations can be linked with
additional information. This information can be text, images, animations, links
and audio files.
The hotspot toolbar to create and position hotspots is placed at the bottom of
the properties sidebar.
Image: Hotspots – Hotspot sidebar
The hotspot sidebar is divided in two sections. In the top section hotspots can
be created and defined. In the lower section each hotspot can be positioned in
each frame of the 360-degree spin product animation.
8.1 Create hotspot
Hotspots can be created in the top section of the hotspot sidebar. New hotspots
can be created by added. Existing hotspots can be edited or deleted.
Every hotspot is listed and can be selected by mouse-click.
Image: Hotspots – Add Hotspot
If a new hotspot is added or edited a new dialog window opens up to setup the
hotspot.
Image: Hotspots – Create Hotspot
Hotspot-Id:
The Hotspot-Id is an individual id for each hotspot which is assign by the
program.
Hotspot-Tooltip:
The Hotspot-Tooltip is the tooltip text of an hotspot. If an user is hovering the
hotspot this text will appear. This text should inform the user what will be
displayed when clicking the hotspot.
Hotspot-Icon:
Every hotspot in a 360-degree animation is linked with an icon. You can select
an image to be displayed as link icon.
If no icon is selected a default bull's-eye icon is displayed.
The hotspot icon will not be cropped and scaled but used in it original size. So
please be aware to prepare the icon first. As well as JPG-, GIF- and PNG- file
format images can be used.
Start Image:
Having clicked on an hotspot within the 360-degree animation the hotspot
details can be shown immediately (Start Image = 0). Or after rotating the
animation to a special frame (Start Image = Frame number).
Hotspot Content:
The detail information of an hotspot can be displayed in three different content
types: as Link, as Image and Text or as Animation.
As which type is selected you can insert different detail information:
1. Link:
After clicking on the hotspot a link will be opened.
This link can target a webpage (e.g. http://www.feuerball3d.com) or
another animation (e.g. file name of a XML-file of another animation:
example.xml).
2. Image and Text:
After clicking the hotspot a image and/or text will be displayed. This detail
information can be accompanied with a music file too.
So you can define four elements.
Titel:
Insert a text which will be shown as title element. The width of this text field
has to be declared. In addition the title can be positioned. Both values have to
be in percentage, based on the size of the animation.
Text:
Insert a text which will be shown as textarea. The width of this text has to be
declared. In addition the text can be positioned. Both values have to be in
percentage, based on the size of the animation.
Image:
Select an image which will be shown behind the text. The image can be
positioned. Position values have to be in percentage, based on the size of the
animation.
If Process hotspot images during export is activated the hotspot image will
be cropped and scaled, like all other images of the 360-degree animation.
Audio file:
Select an audio file (MP3 file format) which accompanies the hotspot detail
information.
3. Animation:
After clicking the hotspot several images will be crossfaded. Thus a video
animation effect is imitated. This detail information can be accompanied with a
music file too.
So you can define four elements.
Images:
Select several images which will be crossfaded. The animation can be
positioned. Position values have to be in percentage, based on the size of the
animation.
If Process hotspot images during export is activated the hotspot animation
images will be cropped and scaled, like all other images of the 360-degree
animation.
Speed:
Time (in milliseconds) each image in the animation is displayed. Thus the
speed of the animation can be adjusted.
Loop hotspot animation:
If looping is activated the hotspot animation will start again after the last
image has been displayed. Otherwise the hotspot animation will end upon the
last image.
Audio file:
Select an audio file (MP3 file format) which accompanies the hotspot
animation.
8.2 Create Hotspot Position
In the lower section each hotspot can be positioned in each frame of the 360degree spin product animation. Select an hotspot from the list in the top
section to create an hotspot position.
With Add an hotspot can be placed in the actual frame. Each position listed
only refers to this hotspot. So every hotspot has to be placed in every frame
individually.
If an hotspot should be placed on the same position in every frame of an
animation, you could use Apply to copy the position of an hotspot to every
frame.
Wrong or no more needed positions can be Edited or Deleted.
Position values have to be in percentage, based on the size of the animation.
In every frame all placed hotspots are shown with an hotspot-icon and its
hotspot id. The hotspot positions can also be adjusted in the actual frame by
using drag&drop.
Even if an hotspot icon has been customized for an hotspot the bull's-eye icon
is shown within the software. But having exported the animation the final
version will show the correct hotspot-icon.
Image: Hotspots – Position Hotspot
9
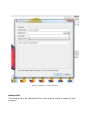
Create Animation
After having set all properties to your demand you can now create the
animation.
Just click onto the shortcut icon 'Create Animation'.
Image: Toolbar – Create Animation
Having clicked on the icon a dialog box I shown in which project name, target
directory as well as the file format can be set.
Image: Toolbar – Create Animation
Project Name
Name of the animation. The name will be used for images, image folder, the
XML-file (contains all settings) as well as the HTML pages.
Target Directory
All files needed for the animation will be stored in the target directory. In
addition to the image folder with all images and the XML-file, further files
(depending on which export format has been chosen) will be stored there.
Create HTML preview page
If set a HTML-page will be created in which the animation is included. The
animation is included as a flash animation and can be viewed in any browser
using the flash plugin.
The HTML-page is named by the project name with the ending '.html'.
Create JavaScript animation
If set a HTML-page will be created in which the animation is included. The
animation is included HTML5-ready as JavaScript animation and can be viewed
in any browser with activated JavaScript.
The HTML-page is named by the project name with the ending '_js.html'.
After having set all properties on this page you can press 'next' to start the
processing (crop and scale) of the images and finish the creation of the
animation.
Finally you can access the animation and its project folder directly with a link.
10
Include 360-degree animation to a website
If you have customized your animation in feuerball3D Studio and are satisfied
with the settings you are ready to embed the animation into your existing
website.
10.1 What needs to be uploaded?
First upload the project folder (containing all preview and zoom-images of your
animation) to the server of your website. Additionally, upload the XML file
(containing all settings of your animation) to the server of your website as
well.
Depending on which technique you want to use to display your animation
(flash, HTML5/JavaScript) you need the special player files.
Flash
You need the flash-viewer-file (feuerball3D.swf). If you use the custom button
style you will also need the style-folder.
Javascript
You need the folders named 'js' and 'style'.
Make sure that all files and folders are in the same directory (otherwise you
have to adjust the file paths in some way). Location and name of the product
images are located in the XML file. Therefore, it is essential that the imagefolder on the server bears the project name.
Note: If you are not sure what to upload, just upload everything what was
exported by feuerball3D Studio to the server of your website. You can't go
wrong with that!
10.2 How to embed the animation on websites?
There are many different ways in which an animation can be included to a
website. Not all of them may be suitable for your website. Here two simple
examples are mentioned. For further information or questions don't hesitate to
contact us.
Example one will work almost everywhere. It is the same technique as if you
include a video (e.g. from YouTube).
For both examples you have to export a sample HTML-page of the animation
during the creation of the animation.
1. Embedding as an iFrame:
Just upload everything to your server and embed the animation by using the
following code on your website:
<iframe width="450" height="330"
src="http://www.yourserver.com/animations/example.html" frameborder="0"
allowfullscreen></iframe>
Copy the lines in your web page (HTML file/editor) and adjust the file paths
and animation size to your needs. The included HTML-file is the exported
HTML-sample file. Either the flash - or JavaScript - (example file).
2. Direct embedding:
Just upload everything to your server except the sample HTML-file. Then open
the sample HTML-file using a text editor and copy everything between <body>
and </body>. Copy the to your web page (HTML file/editor) and use it there.
If you use the JavaScript-version you also have to include the JavaScript- and
style-files (copy everything between </title> and </head>) in your web page.
Note: Depending on where you include the animation on your site some paths
may have to be adjusted.
10.3 How to include the animation on special sites (e.g.
eBay)?
Since you can not upload animations unlike still images on eBay you first have
to upload the animation to your server or your website online.
Due to security reasons eBay does not allow to include JavaScript-animations.
You have to use the flash-animation only.
In order for the animation, located on your server, will be displayed on the
eBay auction page you need to use absolute paths. This will look like:
<object classid="clsid:d27cdb6e-ae6d-11cf-96b8-444553540000" width="450"
height="330">
<param name="movie" value="http://www.yourserver.com/animation/feuerball3D.swf?
imgdata=http://www.yourserver.com/animation/example" />
<embed src="http://www.yourserver.com/animation/feuerball3D.swf?
imgdata=http://www.yourserver.com/animation/example" width="450" height="330" />
</object>
As well as the flash-viewer-file (feuerball3D.swf), the XML file (without
extension) has to be called with absolute paths.
Note: In contrast to previous animations, it is no longer necessary to adjust
the XML file. The paths there are adjusted by the viewer files.
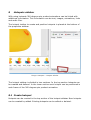
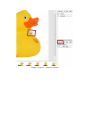
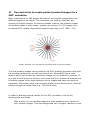
11 Tips and tricks to create perfect product images for a
360° animation
Basic requirement for 360-degree animations are product images shot from
different angles of the object. The animation can build by using any any
number of product images. To ensure a steady rotation, the product images
should been taken in even steps / angles (see picture). For 24 images for a
horizontal 360° rotation the perfect angle of each step is 15° (360° / 24).
Image: Example of a 360-degree animation with 24 product images
The final product images can be used for the 360° product animation with both
the existing background, as well as knocked out. Feuerball3D has a zoom
feature which can reload high resolution images of your product to runtime. If
you wish to use this zoom feature, so be sure that your product thumbnails are
miniature images of the high resolution zoom images and have not been cut
separately. Otherwise, there may be some display errors during zoom. Save all
product images as image-files (e.g., JPG file format).
In order to achieve optimal results for the 360° animation, look at the
following tips and tricks:
•
Take a photo of your products against a plain background or knock out
your product images. Thus the background will no longer interfere on the
animation.
•
Take advantage of using a turntable to shot images of the product. It
allows you to adjust the angle more evenly. So your animation will rotate
more steady.
•
The ideal number of product images, which are required for a 360°
rotation is between 20 and 36 images. Using fewer images may occur in
too much jiggle during the animation. With more than 36 images no
appreciable improvement of the process is achieved and only the loading
time will increase. In addition, the effort in image processing increases
with the number of images used.
12
FAQs & appropriate solutions
On this page you will find a selection of frequently asked questions to
feuerball3D editor. If you have a question that is not answered here, please
write us ([email protected]).
Is feuerball3D Studio able to create a 360° animation as a
single Flash file (with all the images in one file)?
No, feuerball3D Studio saves the settings of a 360° animation as an XML file.
This XML file is then read by an existing Flash animation and the images are
loaded accordingly.
The disadvantage is that several files have to be transferred to the server. The
advantage, however, is that the loading time is much shorter, as only those
files are loaded that are viewed by the user.
Which files do I have to upload to my server / website?
Simply upload everything you get while exporting an animation. You can't go
wrong with that!
13
About feuerball3D
feuerball3D Studio helps you to easily create 360-degree product animations.
If you'd like more information concerning the use and licensing of the 360°
animation feuerball3D, then visit our website (http://www.feuerball3d.com) or
send us an email ([email protected]).