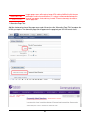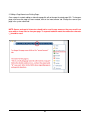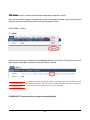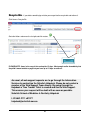
1
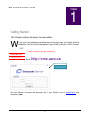
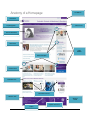
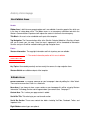
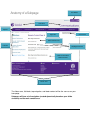
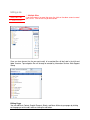
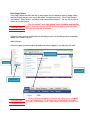
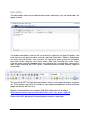
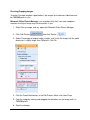
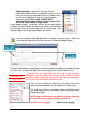
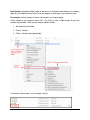
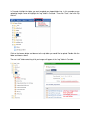
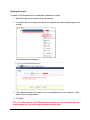
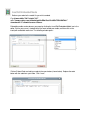
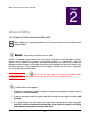
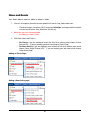
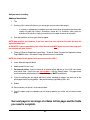
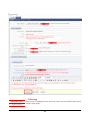
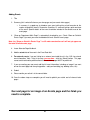
SCHULICH MEDICINE & DENTISTRY
Cascade Content Management System - November, 2015
Cascade
Web Editor Guide
Table of Contents
Getting Started ......................................................................... 1
Login ........................................................................................ 1
Anatomy of a Homepage.......................................................... 2
Anatomy of a Subpage ............................................................. 4
Editing a site ............................................................................ 5
Basic Editing ............................................................................ 7
Insert/Edit Images .................................................................... 8
Insert/Edit Embedded Media .................................................. 14
Advanced Editing ................................................................... 15
Blocks ................................................................................... 15
Banner Slideshow .................................................................. 17
News ...................................................................................... 21
Javascript Modules ................................................................ 26
Folder Structure ..................................................................... 29
Adding Pages ......................................................................... 32
Version…………………………................................................ 35
Recycle Bin ........................................................................... 36
Publishing ............................................................................. 37
W E B
A D M I N I S T R A T O R
G U I D E
Chapter
1
Getting Started
This Chapter outlines the basics for web editors.
W
e are now in the populating and editing phase of the move from the Schulich School of
Medicine & Dentistry Content Management System (CMS) to Western’s CMS, Cascade.
Login
Login using your Western credentials.
IMPORTANT
Valuable information
Go to:
http://cms.uwo.ca/
Login Screen
Use your Western Username and password. E.g. if your Western email is [email protected] your
username is jdoe
1
Anatomy of a Homepage
The Ribbon
Title Block
Top Navigation
Search Area
Banner Slideshow
News Area
Right
SideBar
Block Examples
Content Area
Social Bar Title
Social Bar Sections
Western Info
Western
Shield
Popular Resources
Topics
2
Anatomy of a Homepage
Non-Editable Areas
Header
Ribbon Area: is built into every page template and is non-editable. It contains popular links which are
in the form of a drop down menu. The ribbon serves as an emergency notification tool which the
Western Communications Department will replace the content in the event of an emergency.
Title Block: this area is also not editable and is part of the template.
Top Navigation: The Communications office at the Schulich School of Medicine & Dentistry will work
with you to create your site map. Once the map is approved it will be forwarded to Information
Services and your site will be created including your top navigation items.
Footer
Western Information: The copyright information and links to privacy are non-editable.
The contact information portion of this area is editable.
IMPORTANT
Valuable information
Key Topics: Generated dynamically and are exactly the same as the top navigation items.
Western Shield: non-editable and part of the template.
Editable Areas
Banner Slideshow: The rotating slideshow on your homepage is done by editing the “slides” block.
There can be no more than 5 items in a slideshow.
News Area: If you choose to have a news section on your homepage this will be set-up by Western
Information Technology Service and will appear above your content area. See page 17.
Content Area: This is where your page content is added.
Social Bar Title: Title referring to your social media section
Social Bar Section: These areas contain four blocks including YouTube, Facebook, Twitter, and
Important Links.
Right Sidebar: content types are optional.
3
Anatomy of a Subpage
The Ribbon
Title Block
Top Nav
Page Title
Search Area
Basic Content Area
Left Nav
Left/Right Columns
Basic Content Area
Below Columns
Footer Area
The ribbon area, title block, top navigation, and footer content will be the same as on your
homepage.
Subpages will have a left navigation (created dynamically based on your folder
structure) and the main content area.
4
Editing a site
IMPORTANT
Valuable information
Multiple Sites
If you have access to more than one site, click on the down arrow to reveal
your site list. Click on the site you want to edit.
Once you have chosen the site you want to edit, all associated files will be listed in the left-hand
folder structure. Top navigation files will already be created by Information Services Web Support
Group.
Editing Pages
You can add Basic Content, Graphic Elements, Blocks, and News Articles to your pages by clicking
on the page you wish to edit, and then clicking the edit button.
5
Basic Page Content
In the Page Content area there are four (4) areas where you can add basic content, images, tables,
and links. Each of the four areas has its own editor. The content areas are: “Basic Page Content”,
“Left Column”, “Right Column”, and “Basic Page Content Below Columns”. You can use all areas or
choose to use one or more.
IMPORTANT
Valuable information
The “left column” and “right column” areas should be used together.
If you choose to use only one you will have white space on your page which
will make your page look unbalanced.
Click on the area you want to add content to and add your text. Use the editing features for bolding,
adding styles, format, links, etc.
Adding Content:
Click on the page you want to edit in the folder area, when it appears in the edit area, click “edit”.
Edit Button
Folders
Edit Area
Page to edit
IMPORTANT
Valuable information
When pasting content copied from word or some other source you MUST
paste it into notepad first. This will remove any unwanted/unknown code.
Then copy it from notepad, paste it into cascade and do your formatting there.
6
Basic Editing
The editor window, where you can add and format content, add images, links, and embed videos, will
appear as below:
The window shown below is what you will use to format the content for your page.The buttons from
left to right are: insert special character, subscript, superscript, Bold, Italics, Underline, Strikethrough,
left, centre, right, and full align, styles, font types, cut, copy, paste, paste as plain text, find replace,
spell check, bullets, decrease and increase indent, undo, redo, insert/Edit link, unlink, anchor,
insert/edit image insert/edit embedded media, insert horizontal line, insert/edit table, cleanup messy
code, remove formatting, edit HTML Source, show/Hide guidelines/invisible elements, toggle full
screen mode.
This manual will NOT illustrate the basic buttons such as insert special character, cut/paste,
etc. These features are similar in function as most content management systems and most
people are familiar with their use.
Western Communications has created a Web Style Guide which is located at:
(http://communications.uwo.ca/comms/pdf/western_web_style_guide_sept9.pdf)
Please refer to this document for formatting basic content on your page.
7
Insert/Edit Images
Images should be sized to the appropriate dimensions prior to uploading to Cascade. Dimensions of
the most frequently used graphic elements are below:
8
Re-sizing/Cropping Images
To match Cascade template specifications, the images for the banner slideshow must
be 700X300 pixels in size.
Microsoft Office Picture Manager is an available utility that is on most computers,
however resizing an image may not be intuitive. If you:
1. Right-Click an image, and say ‘open with Microsoft Office Picture Manager’
2. Click ‘Edit Pictures’
then click ‘Resize’.
3. Select ‘Percentage of original width x height’, and shrink the image until the width
dimension is slightly larger than 700 pixels. Click Ok.
4. Click the Green Back button, in the Edit Pictures Menu, and select Crop
5. Crop the image by clicking and dragging the black bars on the image until it is
700X300 pixels.
6. Save the changes.
9
Uploading images is done by first ensuring you have
highlighted the folder you wish to upload the image to (in most
cases you will have an image folder and that is probably where
you will want to upload your image to). Once that folder is
highlighted, click on New > Image. PLEASE NOTE:
Uploading PDF document is done the same way but click
on the PDF folder instead of image folder.
A new window will open. Scroll down until you see the browse button.
Clicking on the browse button will allow you to search on your computer
for your image. Once you find the image, click on it and hit open. Your
image will appear in the image upload window, click submit.
Once your image has been uploaded, while in the editor, ensure you cursor is where you
want to add the image and click on the image icon. The following window will open:
Alternate
Text
Browse
Click on the browse button (magnifying glass icon) and navigate to the folder you uploaded the image
to. Click on the + to expand the folder, click on the image you want, and click confirm> insert
IMPORTANT
Valuable information
Alternate Text – All images MUST have an “alt tag”. Alt tags need to be
provided for accessibility and provides alternate text for an image, if it cannot
be displayed. When creating your alt tag ensure it describes the image and if it
is a link, the alt tag should explain where the link goes.
Once you have inserted your image click on the down arrow of the
styles to open the drop down menu and add one of 4 image classes.
The "image" class applies a subtle drop shadow to the bottom right of
your image. Apply this class to all images in order to have consistency
throughout the pages.
NOTE: Images and documents uploaded to Cascade should not
contain spaces or any special characters in the name.
Incorrect: nancy’s img.jpg
10
Correct: nancy_img.jpg
Bulk Uploads: Uploading multiple images or documents to Cascade can be done by first creating a
folder on your computer that you will put all of your properly sized images or your documents into.
For example, you have images of several staff members you need to upload:
Create a folder on your computer called “staff”. Put all of the 115px x 150px images of each staff
member into that folder. When you are ready to upload the folder:
1. Alternate click on the folder
2. Click on “Send to”
3. Click on “Compressed (zipped) folder”
A new folder will be created – in this example “staff.zip”
11
In Cascade, highlight the folder you want to upload your zipped folder into. In this example we are
uploading images so we will highlight the “img” folder in Cascade. Then click “Tools”, then click “Zip
Archive”.
Click on the browse button and browse to the zip folder you would like to upload. Double click the
folder and choose submit.
The new “staff” folder containing all of your images will appear in the “img” folder in Cascade.
12
Updating documents:
To update a PDF document that has already been uploaded to Cascade:
1. Make the changes to your document on your computer
2. In Cascade, click on the down arrow beside the document you need to update/replace and
click edit.
The following window will appear:
3. Click theBroswe button and navigate to the revised document on your computer. Either
double click or click and hit open.
4. Hit “Submit”
Note: This allows the link to the PDF document to remain the same thus eliminating the
need to update any links referencing the document on your page.
13
Insert/Edit Embedded Media
Retrieve your code for the media file you wish to embed.
E.g.<iframe width="560" height="315"
src="//www.youtube.com/embed/mlagH3IcRBw?list=PLA0E847DD01B0FA01"
frameborder="0" allowfullscreen></iframe>
Embedding media can be done on your page by clicking the Insert/Edit Embedded Media icon in the
editor. Ensure your cursor is located where you want to add your media, and then click on the
insert/edit embedded media icon. The following window opens:
Click on Embed Code and add your code to the new window (shown below). Replace the code
below with the code from your video. Click “Insert”.
14
W E B
A D M I N I S T R A T O R
G U I D E
Chapter
2
Advanced Editing
This Chapter will outline advanced editing skills.
B
locks, adding news, and javascript modules are a little more involved than basic editing and are
explained below.
Blocks – what are they and how/why do I use them?
A Block is a “pluggable” piece of content that can be easily substituted into any page region. Therefore,
whenever there is content that is common to many pages or regions, i.e. a “related links” section that
appears in the left sidebar in multiple pages, that content should be put into a block. Doing so allows the
appropriate content to appear in many pages while always being updated from one place, making it easy
to maintain consistency in that text/markup across many pages. Cascade users can reuse a single block
on an unlimited amount of page regions.
IMPORTANT
Valuable information
Green blocks are index blocks that should not be edited without
consultation with Nancy Fedyk in Schulich IS or Judy Steward in ITS.
xhtml/Blue Blocks can be added to:
1. A region in a configuration set where it would then automatically be applied to any page using that
Configuration Set (most common)
2. A region in the outputs section of a specific page where it would then only apply to that page (used
sparingly)
3. In a specific section in the main content of the page where it would then only apply to that page
(note this is only for certain blocks that have been set up to work this way e.g. staff listing,
footer address, footer popular resources, slide show).
15
Copying a Block
Blocks are found under _cms > blocks > xhtml
To make a copy of a block click on the down arrow on
the right-hand side of that block
Choose “copy” from the dropdown list
Give the new block a name and then click submit
An instance when you would want to copy a block is for
your directory pages. If you want to have a separate
page for your faculty directory and your staff directory
you would copy the staff listing block, name it, save it,
copy it again, give the second copy a different name and
save it. E.g. original block name is staff listing. Copy and
name the copy staff listing – admin staff; copy again
and name the second copy staff listing – faculty.
NOTE: Always make a copy of the original block to
ensure original remains in tack with no changes to any
coding it might contain.
Editing Blue Blocks
•
Click on the block you want to edit.
•
Click the edit button
•
Make your changes to the block and submit
Detailed instructions on how to edit the banner slideshow block are on the next page.
Adding the Blue Blocks to a page
•
Highlight the page you want to add the block to
•
Click edit, for the majority of blue block, click “outputs”, find the region you want to add the block to.
•
Click Search in that region, if your block isn’t in the dropdown, click browse.
•
Choose your block and submit.
16
Banner slideshow – how do I edit it?
The banner slideshow on your homepage is contained in a block. Images should be sized to the
appropriate dimensions prior to uploading to Cascade. Dimensions for homepage banner images are
300px by 700px.
To add your images (up to 5) go to: _cms > blocks > xhtml > slides.
This will open the “slides block”. Click the edit button.
17
1. Photo - click on the browse button
add.
at the end of this line to choose the image you wish to
Steps 2 – 5 are Optional:
2. Link to a page in Cascade - click on the browse button at the end of this line if you want your
image to link to a page in cascade. E.g. one of your news articles.
3. Link to an external Website – if you want your image to link to an external site add the url of the
external site on this line.
4. Title - you can add a title to your photo by putting the title in this line.
5. Caption – you can add a caption after the title by putting the caption in this line. Please note: the
caption ideally should only be one line of text (otherwise it increases the size of the title/caption
banner covering more of your image and the blue navigation dots cover your text).
6. Once you have completed adding your image(s) click Submit. Navigate back to your homepage
index file to see your results.
18
Below are examples of incorrect and correct banners:
Incorrect: If your banner image already has descriptive text, the title and caption feature is not needed.
Correct:
19
Incorrect: This description is too vague. This banner is also a link but there is nothing indicating that.
Correct:
20
News and Events
Your “News” folder is under the “About” or “About us” folder.
1. If there is an image for the article or event upload it first into the “img” folder under news.
–
Thumbnail images (for articles ONLY) should be 140x140px and images within the article
or event can be various sizes (Maximum 700x300 px).
2. Make sure you are in the correct folder
– e.g. About_us->News->2014
3. Click New->News and Events->
–
–
For Events: If you are creating an event that links to an external event choose “Events
External URL”. If you are creating your own event choose “Events Page”
For News Articles: If you are creating a news article that links to an external news article
choose “News Article External URL”. If you are creating your own news article choose
“News Article Page”
Adding an Events Page:
Adding a News Article page:
21
Add your article including:
Adding a News Article
1. Title
2. Summary (this is what will show on your homepage and your news index pages).
•
A summary is a good way to introduce your news article while giving a brief overview to the
readers to grab their interest. Summaries should be 2-3 sentences either giving an
overview of the article or simply just contain the first couple sentences of the article.
3. Start date and time you want your article to appear
NOTE: date and time are important, if you have more than one article for the same day they will
appear based on time.
ALSO NOTE: if you are post-dating your article the article will NOT appear on your index page until
the start date you have chosen.
4. Check off “Show on Department Home Page”. Check off “Show Thumbnail on Department Home
Page” ONLY if there is a thumbnail image, otherwise leave it unchecked.
NOTE: the thumbnail will appear for the most recent article ONLY.
5. Leave Alternate Page title blank
6. Add thumbnail if there is one
7. For external articles: if you are linking to an external article add the url in the “URL for external
news article” field – if that is the case, you are done – click the “Submit” button. This page cannot
and should not be published but all relevant index pages MUST be published.
8. If you are creating your own article add the full article, including an image if you want one on the
article page into the wysiwyg editor – add your formatting (e.g. bolding, italics, etc.)
9. Submit
10. Please confirm your article is in the correct folder.
11. Once the above steps are complete you will need to publish your article and all relevant index
pages.
See next page for an image of a News Article page and the fields
you need to complete.
22
IMPORTANT
Valuable information
Publishing
Once you have added your news articles or events you must publish them and all
relevant index pages.
23
Adding Events
1. Title
2. Summary (this is what will show on your homepage and your events index pages).
•
A summary is a good way to introduce your event while giving a brief overview to the
readers to grab their interest. Summaries should be 1-2 sentences giving a quick overview
of the event. Specific details of the event should be included in the content area of the
event page.
3. “Show on Department Main Page” is automatically checked for you. Check “Show on Schulich
Events Page” if you want your event included on the main Schulich events page.
Note: the “Show on Schulich Events Page” is still under construction so it will not yet appear on
the main Schulich events page.
4. Leave Alternate Page title blank.
5. Add the actual date of the event in the Event Date field.
6. For external events: if you are linking to an external event add the url in the “URL for external
event information” field – if that is the case, you are done – click the “Submit” button. This page
cannot and should not be published but all relevant index pages MUST be published.
7. If you are creating your own event add the full event information, including an image if you want
one on the event page into the wysiwyg editor – add your formatting (e.g. bolding, italics, etc.)
8. Submit
9. Please confirm your article is in the correct folder.
10. Once the above steps are complete you will need to publish your article and all relevant index
pages.
See next page for an image of an Events page and the fields you
need to complete.
24
IMPORTANT
Valuable information
Publishing
Once you have added your news articles or events you must publish them and all
relevant index pages.
25
Javascript Modules
Western Communications has created some Javascript modules that will allow editors to embed popular
JavaScript library elements without thorough knowledge of the scripting language. Many of the elements
will add interactivity and additional functionality to the page and will help present content in an appealing
format.
Accordion - The accordion element allows page content to be minimized and maximized on click. It is a
great tool that allows you to shorten the page length while keeping all relevant copy in bite-sized chunks.
The content within the accordion can be styled the same as content on a regular page (images, links and
tables can all be added). The code required is below:
<div class="accordion">
<h3><a href="#">Your first title</a></h3>
<div>Information for your first title here.</div>
<h3><a href="#">Your second title</a></h3>
<div>Information for your second title here.</div>
<h3><a href="#">Your third title</a></h3>
<div>Information for your third title here.</div>
</div>
<div class="clear"></div>
To use this code: highlight your page and click edit. Go to the wysiwyg editor, put your cursor where
you want the accordion to appear, and click on the Edit HTML Source button.
26
Paste the above accordion code into the HTML Source Editor:
The above code will give you three (3) accordion tabs.
To add more accordion tabs, copy the code below:
<h3><a href="#">Your additional title</a></h3>
<div>Information for your additional title here.</div>
While in the HTML Source Editor, put your cursor after this line of code <div>Information for your
third title here.</div> and paste the code:
27
Content in accordions should be brief including related material to the title.
Good examples of the use of accordions are: FAQs, listings of course information... etc.
NOTE: if you feel your content is too long to fit in an accordion, consider breaking the
sections into sub pages.
Information regarding other Javascript Modules and the code
required refer to the Western Web Style Guide which can be
found on the Communications and Public Affairs Web
Standards page. The page can be accessed by clicking on
“Web Standards” located in the Western Info section in the
footer of any webpage in Cascade,
or by going to this link:
(http://communications.uwo.ca/comms/pdf/western_web_style_guide_sept9.pdf)
28
Folder Structure – adding subpages and left navigation items.
IMPORTANT
Valuable information
The top navigation will be created for you by Information Services. Top
navigation items cannot be renamed and you cannot add or delete top navigation
items.
Cascade uses a folder structure for its navigation and page placement. All Navigation Folders will be
created for your site. You will not have access to add or delete any Navigation Folders as this would
change your Top navigation.
You do have access to add Navigation Sub-Folders which will appear in the left-side navigation area on
subpages.
When to use a Navigation Sub-Folder
If you have multiple sub-topics related to a main topic, create a subfolder and index page. Then create
content pages for each sub-topic.
For example: You have a Navigation Folder entitled “Future Students” which appears in your top
navigation bar. You have a topic “Admission” which has several sub-topics related to it. You would create
a Navigation sub-folder called Admissions, and index page also called Admission, and then create content
pages in the Navigation sub-folder for each of the sub-topics. You also have other topics related to Future
Students that do not have sub-topics. For these you would create content pages.
29
Adding Navigation Sub-Folders
To add a sub-navigation folder:
Click New > Folder > and the correct
Navigation Sub-Folder.
The following window will open. Add the menu item name.
Click “Submit”
IMPORTANT
The title must be exactly what you want to appear in the side navigation and
you MUST have an index page with the EXACT same title.
Valuable information
Sub-Navigation Folder Index Page.
Every folder MUST have an index page. Without it, the folder will not appear in the side navigation.
To create the sub-folder index page, ensure the folder you are adding the index page is highlighted.
Click: New > Page > Navigation Index Page
30
Confirm you are in the correct parent folder
Add the page title and click Submit.
Do this for each navigation sub-folder you need to create.
31
Adding Pages
Adding content pages is done the same way you add an index page to a folder.
Highlight the folder you want to add a page to then click New > Page > Choose type of page
The Content Page is the most common page. An example is below:
32
IMPORTANT
Valuable information
Longer page names will create a longer URL making it difficult to link from on
publications and to share with others. It is always recommended to keep the
name of your pages short and easy to read. There are two ways to create a
shorter page title:
1. Alternative Page Title:
Add the shortened version of the page name under title and use the “Alternative Page Title” to capture the
full title you require. The alternative page title will appear on the page but your URL will remain short.
33
2. Editing a Page Name to an Existing Page:
Once a page is created, adding an alternative page title will not change the actual page URL. To change a
page name once the page has been created, click on the 'move/rename' tab. Change the name of your
page in the system name field.
NOTE: Spaces and special characters should not be used in page names as they may result in an
error when a viewer tries to view your page. To separate between words the underscore character
(_) should be used.
34
Versions – what if I make a mistake and want to go back to a previous version?
Each time you make a change in Cascade a new version of your page is created. If you find that you have
made a mistake you can go into versions and review the previous version.
Click on More > Versions
Find the version you want, listed by last date modified and click on that version. The previous version will
open and you will be able to restore that version by clicking > Activate.
IMPORTANT
Valuable information
If you have made changes to a block restoring a page with that block on it will
NOT restore the block. You will have to restore the block itself from the previous
version and it will then display that version on the page.
PLEASE NOTE: Previous versions of pages are kept indefinitely.
35
Recycle Bin – if you delete something by mistake you can go into the recycle bin and retrieve it.
Click Home > Recycle Bin
Go to the Actions column on the far right and click restore
Restore
PLEASE NOTE: Items in the recycle bin are kept for 15 days. Most people realize immediately that
they didn’t mean to delete a page but you have up to 15 days to restore it.
As usual, all web support requests are to go through the Information
Services by contacting the Schulich Helpdesk. Please do not contact a
member of the Web Support Team directly. By going through the
Helpdesk a Time Tracker Ticket is created and sent to Web Support.
This ensures your request will be dealt with as soon as possible.
Schulich School of Medicine & Dentistry Helpdesk
t. 519.661.2111 x81377
[email protected]
36
Chapter
3
How Do I… Publish?
Select the Folder or Page that you would like to publish:
The Folder/Page will open in View mode. Click on the Publish tab:
The following screen appears: (Note: currently we are publishing to two (2) servers (lightninig and
live. Please ensure both are checked )
37
Click on the Submit button. (You will see the green “Publish message sent successfully” message
appear above the View mode window)
To view the Publishing Queue:
In the blue navigation ribbon, click on the double arrows->Publisher->Active Jobs.
The following screen will appear:
You can view the status of your publishing job including the name of the page or folder you
published, when you published and when the job was started, and what percentage is done.
IMPORTANT
Valuable
information
You need to publish every page affected by any changes you make. For
example, if you create a new page that appears in the drop-down menu of one of
your top navigation items, you will need to publish your homepage as well as all
menu items.
38
Publishing Times
Publishing a page or folder can be done at any time.
NEVER publish your ENTIRE site between 8 a.m. and 4 p.m. Monday-Friday. If a change requires
you to publish your entire site (i.e. substantial changes or sub navigational changes) publishing will need to
be done before or after business hours (before 8 a.m. or after 4 p.m. Monday – Friday) or during the
weekends. Following these procedures will help ensure that other Cascade users do not experience a
slower response time across campus.
How Do I… Un-publish and why would I?
Once a page is published it is on the web, deleting it in Cascade will not remove it from the web allowing viewers the ability to be able to access the page from searches or previously made
bookmarks. In order to remove this content permanently from the web, content will need to be unpublished. Un-publishing content follows a similar procedure as publishing content. To un-publish an
item select the page or folder that you would like to un-publish and click the ‘publish’ tab. In the
window that pops up ensure that all servers are checked under ‘Destination’ and then set the publish
mode to ‘un-publish’. Once these are checked hit the ‘submit’ button.
IMPORTANT
Valuable information
You need to publish every page affected by any changes you make. For
example, if you delete a page that appears in the drop-down menu of one of your top
navigation items, you will need to publish your homepage as well as all the menu
items.
39
The same holds true for renaming or moving pages and/or folders. Previously published versions of
the asset will remain on the webserver with the old path unless unpublished. Unpublishing from the
remote server will delete the out of date content from the chosesn Destinations. In the window that
pops up ensure that all servers are checked under ‘Destination’ and then set the publish mode to ‘unpublish’. Once these are checked hit the ‘submit’ button.
Alternatively, you can set your “user preferences” so “Unpublish Content” is checked by default (see
below for step-by-step instructions).
Setting your user preferences
You can set your user preferences so “un-publish” is the default when you move/rename or delete a
page or folder. You can also set your user preferences so that the “publish status page” opens
automatically after you publish allowing to you monitor the progress of your publishing job.
40
Click the double down arrow
icon in the top blue menu, then
click “Preferences”, then
“User”.
Check the “Go to publish
status page” and “Unpublish checked by default
on entity move and delete
screens” boxes.
41