1
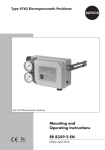
Type 3372 Electropneumatic Actuator V2001-IP Control Valve Type 3372‑0511/0531 Electropneumatic Actuator with Type 3321 Valve Mounting and Operating Instructions EB 8313-1 EN Edition July 2013 Definition of signal words DANGER! Hazardous situations which, if not avoided, will result in death or serious injury WARNING! Hazardous situations which, if not avoided, could result in death or serious injury 2 NOTICE Property damage message or malfunction Note: Additional information Tip: Recommended action EB 8313-1 EN Contents 1 Safety instructions..........................................................................................4 2 Design and principle of operation...................................................................6 2.1 Technical data................................................................................................8 3 Mounting on the valve....................................................................................9 4 Connections.................................................................................................10 4.1 Pneumatic connections..................................................................................10 4.2 Electrical connection......................................................................................12 5 Checking and adjusting zero and span..........................................................13 5.1 Actuator with "actuator stem extends" fail-safe action......................................13 5.2 Actuator with "actuator stem retracts" fail-safe action......................................15 6 Deactivating and activating the tight-closing function.....................................16 7 Version with limit switch - adjustment............................................................17 8 Customer inquiries.......................................................................................18 9 Dimensions..................................................................................................18 EB 8313-1 EN 3 Safety instructions 1 Safety instructions −− The actuator is to be mounted, started up or operated only by trained and experienced personnel familiar with the product. −− According to these mounting and operating instructions, trained personnel refers to individuals who are able to judge the work they are assigned to and recognize possible dangers due to their specialized training, their knowledge and experience as well as their knowledge of the applicable standards. −− Explosion-protected versions of this actuator are to be operated only by personnel who has undergone special training or instructions or who is authorized to work on explosion-protected devices in hazardous areas. −− Any hazards that could be caused in the mounted valve by the process medium, the operating pressure, the signal pressure or by moving parts are to be prevented by taking appropriate precautions. −− If inadmissible motions or forces are produced in the pneumatic actuator as a result of the supply pressure level, it must be restricted using a suitable supply pressure reducing station. −− The actuator springs are preloaded. A special tool is required to open the actuator. Do not open the actuator. −− Proper shipping and storage are assumed. 4 Note: Devices with a CE marking fulfill the requirements of the Directives 94/9/EC and 2004/108/EC. The Declaration of Conformity is available on request. EB 8313-1 EN Safety instructions EB 8313-1 EN 5 Design and principle of operation 2 Design and principle of operation The actuators are used for attachment to Series V2001 Valves, such as Type 3321, Type 3323, Type 3531, Type 3535 and Type 3214 (DN 65 to 100) as well as Type 3260 Valve (DN 65 and 80). The actuators mainly consist of two diaphragm cases, a rolling diaphragm and springs. They are fitted with an i/p converter and a pneumatic control system for throttling service. The converter and the control system are installed in the bottom diaphragm case of actuators with "actuator stem extends" fail-safe action and in the top diaphragm case of actuators with "actuator stem retracts" fail-safe action. The electric control signal issued by the controller as a reference variable from 4 to 20 mA is transmitted to the electropneumatic converter where it is converted into a proportional pressure signal. The pressure signal creates a force that acts on the measuring diaphragm (11). This force is then compared with the force of the range spring (13). The movement of the measuring diaphragm is transmitted by the lever (12) to the force switch (15), and finally a corresponding signal pressure is produced. Tight-closing function The electropneumatic actuator is completely filled with air or vented as soon as the reference variable falls below or exceeds a certain value. Actuator stem extends Deactivation function that becomes active when the signal falls below the switching point of 4.08 mA: the actuator is fully vented, causing a globe valve to close tightly. In three-way valves, port B is closed when the valve is used for mixing service and port A is closed when the valve is used for diverting service. Actuator stem retracts Activation function that becomes active when the signal exceeds the switching point of 19.95 mA: the actuator is filled with air, causing a globe valve to close tightly. In three-way valves, port B is closed when the valve is used for mixing service and port A is closed when the valve is used for diverting service. Changes in the input signal or the valve position cause a change in the actuator stem position, corresponding to the reference variable. 6 EB 8313-1 EN Design and principle of operation Actuator stem retracts 14 Functional drawing of positioner 8.7 8.3 8.4 8.5 ip 15 i 10 10.1 11 12 13 14 8.7 8.8 8.2 8.6 8.9 8.1 14 7 6 16 Actuator stem extends 6 Nut 7 Stem connector 8.1 Actuator stem 8.2 Yoke 8.3 Actuator springs 8.4 Rolling diaphragm 8.5 Signal pressure connection (actuator stem extends) 8.6 Vent plug 8.7 Stopper (pressure gauge) 8.8 Plug connector 8.9 Cover plate (span and tight-closing function) 10 i/p converter 10.1 Potentiometer for span 11 Measuring diaphragm 12 Lever 13 Range spring 14 Zero adjuster 15 Force switch 16 Rod nut Fig. 1: Type 3372 Electropneumatic Actuator EB 8313-1 EN 7 Design and principle of operation 2.1 Technical data Actuator area 120 cm² Rated travel 15 mm Stem retracts (FE) Stem extends (FA) Stem retracts (FE) Stem extends (FA) Bench range 0.4 to 1.4 1.4 to 2.3 1.4 to 2.3 2.1 to 3.3 Supply pressure Max. 6 bar Max. 4 bar Max. 4 bar Max. 6 bar Tight-closing function Reference variable 4 to 20 mA · Minimum current 3.6 mA Load impedance ≤6 V (300 Ω at 20 mA) Adjusting the span 25 % of travel range using potentiometer Operating direction Characteristic Hysteresis Variable position Tight-closing function (can be activated by a jumper) Air consumption in steady state Temperature range Increasing/increasing, fixed Linear · Deviation from terminal-based conformity ≤2 % ≤1 % ≤7 % Deactivation at ≤4.08 mA (stem extends) Activation at ≥19.95 mA (stem retracts) Switching accuracy: 0.14 mA w = 100 %: 6 bar ≤ 200 ln/h 4 bar ≤ 160 ln/h –30 to +70 °C Degree of protection IP 54 1) Optionally type of protection II 2G Ex ia IIC T6 Electrical connection Cable socket according to DIN EN 175301‑803, black polyamide, 8 to 10 mm clamping range Screw terminals for up to 1.5 mm² wire cross-section Weight Limit switch Type of protection Permissible load Permissible ambient temperature 3.7 kg Type 4744-2 Flameproof enclosure II 2G Ex db IIC T6-T5 AC voltage: 250 V/5 A DC voltage: 250 V/0.4 A –20 to +60 °C Degree of protection IP 66 Weight (approx. kg) 0.4 1) IP 65 if the vent plug is replaced by a filter check valve (order no. 1790-7408) 8 EB 8313-1 EN Mounting on the valve 3 Mounting on the valve NOTICE Do not unscrew the rod nuts (16) of the rod-type yoke. Actuators with "actuator stem extends" failsafe action Apply a signal pressure to actuators before mounting them onto a valve to allow the actuator stem to retract slightly. If no signal pressure or electric control signal is available during the mounting procedure, tighten the hexagon nut (6) against the force of the preloaded springs using a hexagonal wrench with width across flats (SW 36). Actuators with "actuator stem retracts" failsafe action Air only needs to be applied to actuators for attaching the stem connector clamps. The reason for this is that in three-way valves, for example, the plug stem might not reach the actuator stem after being pulled out of the valve body. If this is the case, a signal pressure must applied to the top diaphragm chamber until the plug stem and actuator stem come into contact so that the stem connector can be mounted. EB 8313-1 EN Mounting by applying a signal pressure or electric control signal Note: Apply a pressure of approx. 3 bar to the supply connection and additionally connect a control signal of approx. 10 mA to retract the actuator stem. 1. Unscrew the hexagon nut (6) from the valve bonnet and place the actuator on the valve bonnet with its stem retracted by applying signal pressure. 2. Align the actuator and secure the hexagon nut (SW 36) applying a tightening torque of min. 150 Nm. 3. Pull up the plug stem (3) until it contacts the actuator stem. 4. Place the stem connector clamps in position and screw tight using the fastening screws. 9 Connections 4 Connections Actuator stem extends (FA) 4.1 Pneumatic connections Fail-close (for globe and angle valves): The pneumatic connections are designed as a bore with G ¼ thread. Customary fittings for metal tubing or plastic hoses can be used. NOTICE −−Make sure the supply air is dry as well as free of oil and dust. −−Read the maintenance instructions for upstream pressure reducing stations. −−Blow through all air pipes and hoses thoroughly before connecting them. Note: The required supply air pressure depends on the bench range and the actuator's operating direction (failsafe action). The bench range is written on the nameplate. The direction of action is marked FA or FE, or by a symbol. ÎÎ Connect the supply air to the supply connection. 10 (Type 3372 -x51x and Type 3372-x53x) Required supply pressure = Upper bench range value + 0.5 bar Actuator stem retracts (FE) (Type 3372-x52x and Type 3372-x54x) Fail-close (for globe and angle valves): The signal pressure must be high enough so that the control valve closes tightly even against the upstream pressure in the plant. For the required supply pressure for a tight-closing valve, refer to the mounting and operating instructions of the mounted valve, or roughly calculate as follows, using the maximum signal pressure pstmax: pstmax = F + d² · π · Δp 4·A [bar] d = Seat diameter [cm] Δp = Differential pressure across the valve [bar] A = Actuator diaphragm area [cm²] F = Upper bench range value of the actuator If there are no specifications, calculate as follows: Required supply pressure = Upper bench range value + 1 bar EB 8313-1 EN Connections Signal pressure gauges To monitor the signal pressure, a pressure gauge with G 1/8 thread can be screwed into the diaphragm chamber in place of the stopper (8.7). WARNING! Only shut down the control valve over the reference variable. Do not disconnect the supply air to shut down the valve. EB 8313-1 EN 11 Connections 4.2 Electrical connection 3. Lever the plug insert (3) out of the plug connector case (2) at the opening (4) using a screwdriver. 1. Unthread the fastening screw (1) of the plug connector and remove the plug connector from the female connector on the actuator housing. 4. Connect the wires transmitting the control signal through the cable gland (6) of the plug connector case to the terminals of the insert which are marked 1 (+), 2 (–) and to its ground terminal. Secure them with screws. NOTICE Do not remove the female connector from the actuator housing. The correct ground connection can only be guaranteed when it is in its original position. 5. Reinstall the insert (3) in the plug connector case. Make sure that the cable gland (6) points to the desired direction (the plug connector case can be turned by 90° around the insert to point to all four directions). 2. Pull the fastening screw (1) out of the plug connector and remove the rubber seal (5). Plug connector case 3 Insert 4 Opening 5 Rubber seal 6 Cable gland 4 3 2 1 3 2 5 1 Fastening screw 2 4 1 6. Put on the rubber seal (5). 1 6 3 1 (+) 2 (–) Fig. 2: Terminal assignment at the plug connector (8.8) 12 EB 8313-1 EN Checking and adjusting zero and span 7. Plug the plug connector back in the actuator housing and secure with fastening screw (1). 5 Checking and adjusting zero and span We recommend, however, checking zero after the actuator has been mounted to the valve as described below: NOTICE Only make adjustments on the mounted valve. Zero and span are adjusted to determine the starting point and the upper range value of the actuator. When the control signal (reference variable) issued by the controller changes from 4 to 20 mA, the control valve must correspondingly pass through its entire travel range from 0 to 100 %. Zero is always based on the closed position of the valve. For example, in a fail-close globe valve with (Type 3372-(0/1)511 and 3372-(0/1)531 Actuator with "actuator stem extends" failsafe action), the zero (starting point) must be set to 4 mA and the upper range value to 20 mA. For example, in a fail-open globe valve with (Type 3372-(0/1)521 and 3372-(0/1)541 Actuator with "actuator stem retracts" failsafe action), the zero (starting point) must be set to 20 mA and the upper range value to 4 mA. EB 8313-1 EN Note: Zero and span of the electropneumatic actuator are calibrated to match the rated travel by SAMSON. 1. Connect an ammeter to the control signal input and apply air to the supply input. 2. Undo the fastening screw and push the cover plate (8.9) aside. 3. Pull the jumper from the pins to deactivate the tight-closing function. Zero is adjusted at the adjuster (14) and the upper range value at the potentiometer for span (10.1). NOTICE Any span adjustment results in a shift of zero. Therefore, the zero point must be readjusted after span adjustment. 5.1 Actuator with "actuator stem extends" fail-safe action Zero (starting point) 1. Set the input signal at the ammeter to 4 mA 2. Turn the zero adjuster (14) until the plug stem just starts to move from its initial position. 13 Checking and adjusting zero and span 3. Reduce the input signal to 0 mA and slowly increase it again. Check whether the plug stem starts to move at 4 (+0.1) mA. 4. Correct deviations at the zero adjuster (14). Turning the adjuster clockwise causes the valve to leave its end position earlier, whereas turning it counterclockwise delays the valve leaving its end position. Upper range value (span) 5. Once the starting point has been set, increase the input signal to 20 mA at the ammeter. 6. Adjust the potentiometer for span (10.1) until the upper range value is correct. Turn the potentiometer clockwise to increase the travel and counterclockwise to reduce it. 7. After the correction has been completed, reduce the input signal and slowly increase it again. Check the starting point (4 mA) and the upper range value (20 mA). 8. Repeat the correction procedure until both values are correct. 9. Plug jumper back on the pins again to activate the tight-closing function. At exactly 20 (–0.1) mA, the plug stem must have passed through its entire rated travel range of 100 %. Potentiometer for span (10.1) Jumper (16) Cover plate (8.9) Zero adjuster (14) Fig. 3: Type 3372‑03(5)1x and Type 3372‑03(5)3x Actuator with “actuator stem extends” fail-safe action 14 EB 8313-1 EN Checking and adjusting zero and span 5.2 Actuator with "actuator stem retracts" fail-safe action Zero (starting point) 1. Set the input signal at the ammeter to 20 mA 2. Remove the protective cap and turn the zero adjuster (14) until the plug stem just begins to move from its initial position. 3. Increase the input signal and slowly reduce it again to 20 mA. Check whether the plug stem starts to move at 20 mA. 4. Correct deviations at the zero adjuster (14). Turning the adjuster clockwise causes the valve to leave its end position earlier, whereas turning it counterclockwise delays the valve leaving its end position. Upper range value (span) 5. Once the starting point has been set, increase the input signal to 4 mA at the ammeter. At an upper range value of 4 mA, the plug stem must have passed through its entire rated travel range of 100 %. 6. Adjust the potentiometer for span (10.1) until the upper range value is correct. Turn the potentiometer clockwise to increase the travel and counterclockwise to reduce it. 7. After the correction has been completed, increase the input signal again. Check the starting point (20 mA) and the upper range value (4 mA). 8. Place the protective cap back on the zero adjuster. Cap Zero adjuster (14) Cover plate (8.9) Potentiometer for span (10.1) Jumper (16) Fig. 4: Type 3372‑0(3/5)2x and Type 3372‑0(3/5)4x Actuator with “actuator stem retracts” fail-safe action EB 8313-1 EN 15 Deactivating and activating the tight-closing function 9. Plug jumper back on the pins again to activate the tight-closing function. 6 Deactivating and activating the tight-closing function The electronic deactivation and activation of the tight-closing function integrated in the actuator ensures tight closing of the control valve whenever the control signal exceeds or falls below the switching point. Actuator stem retracts If the reference variable exceeds the switching point of 19.95 mA ±0.14 mA hysteresis, the actuator is fully filled with air to close a globe valve. Note: The tight-closing function is activated when the jumper is plugged in. Remove the jumper to deactivate this function. Actuator stem extends If the reference variable falls below the switching point of 4.08 mA ±0.14 mA hysteresis, the actuator is fully vented to close a globe valve. 16 EB 8313-1 EN Version with limit switch - adjustment 7 Version with limit switch - adjustment 1. Undo the clamps of the stem connector on the valve. Replace the front clamp with the clamp including the U-bolt from the accessories. 2. Move the valve to the switching point at which the contact is to be activated. 5. Connect the wiring according to the label on the clamping plate: Black (BK)/blue (BU) > contact open Black (BK)/brown (BN) > contact closed 6. Move the valve up and down close to the required switching position and make any fine adjustments to the exact switching point using the adjustment screw. 3. Position the clamping plate on the rodtype yoke at the point where the lever rests on the bracket of the stem connector. 4. Align clamping plate and secure it in place. Lever Adjustment screw Fig. 5: Limit switch EB 8313-1 EN 17 Customer inquiries 8 Customer inquiries Please submit the following details: −− Type designation −− Bench range (spring range) of actuator 9 Dimensions Refer to Fig. 6 for the most important dimensions. Ø168 Pressure gauge connection Ø168 PG11 236 Supply G1/4 309 G1/8 G1/4 Ø30 Types 3372‑x51x and 3372-x53x Vent plug Ø30 Types 3372‑x52x and 3372-x54x Fig. 6: Dimensions in mm 18 EB 8313-1 EN EB 8313-1 EN 19 20 EB 8313-1 EN EB 8313-1 EN 21 22 EB 8313-1 EN EB 8313-1 EN 23 Weismüllerstraße 3 · 60314 Frankfurt am Main, Germany Phone: +49 69 4009-0 · Fax: +49 69 4009-1507 [email protected] · www.samson.de EB 8313-1 EN 2015-05-06 · English SAMSON AG · MESS- UND REGELTECHNIK