1
LPEX Editor
IBM
LPEX Editor User’s Guide
Version 4 Release 0
SC09-2795-00
LPEX Editor
IBM
LPEX Editor User’s Guide
Version 4 Release 0
SC09-2795-00
Note!
Before using this information and the product it supports, be sure to read the
general information under “Notices” on page vii.
First Edition (September 1998)
This documentation applies to Version 4 Release 0 of the LPEX Editor and to all subsequent releases and
modifications until otherwise indicated in new editions. Make sure you are using the correct edition for the level of
the product.
Order publications through your IBM representative or the IBM branch office serving your locality. Publications are
not stocked at the address below.
If you have comments about this document, address them to:
IBM Canada Ltd. Laboratory
Information Development
2G/345/1150/TOR
1150 Eglinton Avenue East
North York, Ontario, Canada, M3C 1H7
When you send information to IBM, you grant IBM a nonexclusive right to use or distribute the information in any
way it believes appropriate without incurring any obligation to you.
© Copyright International Business Machines Corporation 1995, 1998. All rights reserved.
Note to U.S. Government Users — Documentation related to restricted rights — Use, duplication or disclosure is
subject to restrictions set forth in GSA ADP Schedule Contract with IBM Corp.
Contents
Notices . . . . . . . . .
Trademarks and Service Marks .
.
.
.
.
.
.
.
.
vii
vii
About the LPEX User’s Guide .
Terminology Conventions . . .
Related Publications. . . . .
.
.
.
.
.
.
.
.
.
.
.
.
ix
ix
x
Chapter 1. Introducing the LPEX Editor
1
Chapter 2. Using LPEX . . . . . . .
Starting the Editor . . . . . . . . .
Getting Help . . . . . . . . . . .
Working with Text . . . . . . . . .
Entering and Editing Text . . . . . .
Undoing Changes . . . . . . . .
Marking and Manipulating Blocks of Text
Marking Blocks of Text . . . . . . .
Unmarking a Block of Text . . . . .
Manipulating Blocks of Text . . . . .
Changing the Default Marking Mode
Using Location Marks in a File . . . . .
Finding Text or Locations in a File . . . .
Finding a Specific Line in a File . . . .
Finding a Location Mark in a File . . .
Finding Text . . . . . . . . . .
Finding and Replacing Text . . . . .
Managing Files in the Editor . . . . . .
Creating a New File . . . . . . . .
Opening an Existing File . . . . . .
Saving a File . . . . . . . . . .
Embedding Another File into the Current
Document . . . . . . . . . . .
Working with Multiple Documents . . .
15
16
Chapter 3. Editor Commands and
Parameters . . . . . . . .
Issuing Editor Commands. . . .
Issuing Multiple Editor Commands
.
.
.
.
.
.
.
.
.
21
21
22
Chapter 4. Using Parsers
.
3
3
3
3
3
5
6
6
7
7
8
10
11
11
11
12
13
13
13
14
14
.
.
.
.
.
23
Chapter 5. Customizing Editor
Appearance and Function . .
Changing Editor Tab Settings .
.
.
.
.
.
.
.
.
25
25
© Copyright IBM Corp. 1995, 1998
Changing the Base Editor Font . . . .
Changing Token Display Attributes . .
Customizing the Keyboard . . . . .
Changing Text and Background Color
Palettes . . . . . . . . . . . .
Using Profiles to Modify Editor Behavior
Changing Editor Load Profiles . . . .
Using Alternate Editor Personalities . .
.
.
.
26
26
27
.
28
29
31
32
.
.
Chapter 6. Macros and Profiles . . . .
Writing Macros for the Editor . . . . .
Specifying Conditions in Editor Macros
Specifying Arithmetic Expressions in
Editor Macros . . . . . . . . . .
Using Constants and Variables in Editor
Macros . . . . . . . . . . . .
Using the IF Statement in Editor Macros
Using Loops in Editor Macros . . . .
Using REXX Functions in Editor Macros
repeats sample macro . . . . . . . .
/* This macro repeats a command a
given number of times */ . . . . . .
’set lineread.title Repeat a Command’
’set lineread.prompt Enter the number of
times to repeat:’ . . . . . . . . .
’lineread 255’ . . . . . . . . . .
’extract lastkey’ . . . . . . . . .
if lastkey = ’ENTER’ then do . . . . .
’extract lastline’ . . . . . . . . .
if datatype(lastline) = NUM . . . . .
numrep = lastline . . . . . . . .
’MSG You must enter a valid number’
return . . . . . . . . . . . .
cmd_rep = lastline . . . . . . . .
’repeat’ numrep cmd_rep . . . . . .
35
36
36
Chapter 7. External Editor Commands
Writing External Command Source Code
Application Programming Interface
Overview . . . . . . . . . .
Program Entry and Exit Conditions .
Sample External Command: proto . . .
51
51
.
.
.
52
52
53
Chapter 8. References
Commands Summary .
.
.
55
55
.
.
.
.
.
.
.
.
.
.
.
.
38
38
40
41
42
45
46
46
46
47
47
47
48
48
48
49
49
49
49
iii
= Command . . . . .
add Command . . . .
alarm Command . . . .
all Command . . . . .
begin Command . . . .
block Command . . . .
bottom Command . . .
change Command . . .
check Command . . . .
clip Command . . . .
compare Command . . .
delete Command . . . .
detab Command . . . .
dialog Command. . . .
dup Command . . . .
end Command . . . .
entab Command . . . .
exit Command . . . .
extract Command . . .
file Command . . . . .
find Command . . . .
focus Command . . . .
get Command . . . . .
godoc Command . . . .
goring Command . . .
goview Command . . .
help Command . . . .
insert Command . . . .
keyread Command . . .
lineread Command . . .
load Command . . . .
lx Command . . . . .
lxc Command . . . . .
lxi Command . . . . .
lxn Command. . . . .
lxr Command . . . . .
macro Command. . . .
macrodrop Command . .
macroload Command . .
mark Command . . . .
msg Command . . . .
mult Command . . . .
next Command . . . .
openclose Command . .
prefixprocess Command .
prefixrenumber Command
preserve Command . . .
prev Command . . . .
primitive Command. . .
print Command . . . .
iv
LPEX Editor User’s Guide
.
.
.
.
.
.
.
.
.
.
.
.
.
.
.
.
.
.
.
.
.
.
.
.
.
.
.
.
.
.
.
.
.
.
.
.
.
.
.
.
.
.
.
.
.
.
.
.
.
.
.
.
.
.
.
.
.
.
.
.
.
.
.
.
.
.
.
.
.
.
.
.
.
.
.
.
.
.
.
.
.
.
.
.
.
.
.
.
.
.
.
.
.
.
.
.
.
.
.
.
.
.
.
.
.
.
.
.
.
.
.
.
.
.
.
.
.
.
.
.
.
.
.
.
.
.
.
.
.
.
.
.
.
.
.
.
.
.
.
.
.
.
.
.
.
.
.
.
.
.
.
.
.
.
.
.
.
.
.
.
.
.
.
.
.
.
.
.
.
.
.
.
.
.
.
.
.
.
.
.
.
.
.
.
.
.
.
.
.
.
.
.
.
.
.
.
.
.
.
.
.
.
.
.
.
.
.
.
.
.
.
.
.
.
.
.
.
.
.
.
.
.
.
.
.
.
.
.
.
.
.
.
.
.
.
.
.
.
.
.
.
.
.
.
.
.
.
.
.
.
58
59
59
60
62
62
67
67
70
70
71
73
74
75
76
78
78
79
80
81
82
85
85
86
89
90
92
93
94
94
95
96
98
99
100
101
102
103
104
105
108
109
110
111
112
112
113
114
115
116
qquit Command . . . .
query Command . . . .
quit Command . . . .
quitview Command . . .
record Command . . .
repeat Command. . . .
reset Command . . . .
restore Command . . .
save Command . . . .
saveall Command . . .
scroll Command . . . .
set Command . . . . .
setoldlines Command . .
showfont Command . .
sort Command . . . .
splitjoin Command . . .
sshow Command. . . .
start Command . . . .
submit Command . . .
substitute Command . .
top Command. . . . .
trigger Command . . .
undo Command . . . .
unlink Command . . .
Parameters Summary . . .
accelerator Parameter . .
action Parameter . . . .
actionbar parameter . . .
actionbarid parameter . .
actionbarlist parameter . .
actionlist Parameter . . .
actionprefix Parameter . .
actionprefixlist Parameter .
actions Parameter . . .
alarm Parameter . . . .
autochanges Parameter. .
autocheck Parameter . .
autocount Parameter . .
autoname Parameter . .
autonext Parameter . . .
autoparse Parameter . .
autoprefix Parameter . .
autosymbols parameter .
autotime Parameter . . .
background Parameter . .
basefont Parameter . . .
beep Parameter . . . .
beeplength Parameter . .
beeptone Parameter . . .
blockdefaulttype Parameter
.
.
.
.
.
.
.
.
.
.
.
.
.
.
.
.
.
.
.
.
.
.
.
.
.
.
.
.
.
.
.
.
.
.
.
.
.
.
.
.
.
.
.
.
.
.
.
.
.
.
.
.
.
.
.
.
.
.
.
.
.
.
.
.
.
.
.
.
.
.
.
.
.
.
.
.
.
.
.
.
.
.
.
.
.
.
.
.
.
.
.
.
.
.
.
.
.
.
.
.
.
.
.
.
.
.
.
.
.
.
.
.
.
.
.
.
.
.
.
.
.
.
.
.
.
.
.
.
.
.
.
.
.
.
.
.
.
.
.
.
.
.
.
.
.
.
.
.
.
.
.
.
.
.
.
.
.
.
.
.
.
.
.
.
.
.
.
.
.
.
.
.
.
.
.
.
.
.
.
.
.
.
.
.
.
.
.
.
.
.
.
.
.
.
.
.
.
.
.
.
.
.
.
.
.
.
.
.
.
.
.
.
.
.
.
.
.
.
.
.
.
.
.
.
.
.
.
.
.
.
.
.
.
.
.
.
.
.
.
.
.
.
.
.
.
.
.
.
.
.
118
119
120
121
121
123
124
125
125
127
128
129
130
130
131
133
134
135
136
137
138
139
140
142
143
151
152
156
158
159
160
161
162
162
163
164
165
166
167
168
169
170
171
172
173
174
175
176
176
177
blockdoc Parameter . . . .
blockend Parameter . . . .
blocklength Parameter . . .
blockshow Parameter . . .
blockstart Parameter . . .
blocktype Parameter . . .
blockview Parameter . . .
browse Parameter . . . .
changes Parameter . . . .
class Parameter . . . . .
classes Parameter . . . .
color Parameter . . . . .
commandcheck Parameter. .
commandline Parameter . .
content Parameter . . . .
creating Parameter . . . .
cursorcol Parameter . . . .
cursorpos Parameter . . .
cursorrow Parameter . . .
default Parameter . . . .
deleting Parameter . . . .
directory Parameter . . . .
dirty Parameter . . . . .
dispdepth Parameter . . .
dispwidth Parameter . . .
doccontent Parameter . . .
doclist Parameter. . . . .
docnum Parameter . . . .
doctype Parameter . . . .
documents Parameter . . .
docvar Parameter . . . .
docvarlist Parameter . . .
drive Parameter . . . . .
element Parameter . . . .
elementchangeexit Parameter.
elements Parameter . . . .
emphasis Parameter . . . .
environment Parameter . .
exclude Parameter . . . .
expandtabs Parameter . . .
filedialog Parameter . . . .
fill Parameter . . . . . .
filter Parameter . . . . .
find Parameter . . . . .
findhistory Parameter . . .
flow Parameter . . . . .
focus Parameter . . . . .
font Parameter . . . . .
fontlist Parameter . . . .
fonts Parameter . . . . .
.
.
.
.
.
.
.
.
.
.
.
.
.
.
.
.
.
.
.
.
.
.
.
.
.
.
.
.
.
.
.
.
.
.
.
.
.
.
.
.
.
.
.
.
.
.
.
.
.
.
.
.
.
.
.
.
.
.
.
.
.
.
.
.
.
.
.
.
.
.
.
.
.
.
.
.
.
.
.
.
.
.
.
.
.
.
.
.
.
.
.
.
.
.
.
.
.
.
.
.
.
.
.
.
.
.
.
.
.
.
.
.
.
.
.
.
.
.
.
.
.
.
.
.
.
.
.
.
.
.
.
.
.
.
.
.
.
.
.
.
.
.
.
.
.
.
.
.
.
.
.
.
.
.
.
.
.
.
.
.
.
.
.
.
.
.
.
.
.
.
.
.
.
.
.
.
.
.
.
.
.
.
.
.
.
.
.
.
.
.
.
.
.
.
.
.
.
.
.
.
178
179
180
180
181
182
183
183
184
185
186
187
189
189
191
192
192
193
194
195
197
198
198
199
200
201
202
202
203
204
204
205
206
206
207
208
209
210
210
211
212
214
215
216
218
219
220
222
225
226
fontsize Parameter . .
format Parameter . .
formatter Parameter . .
formwidth Parameter .
fullparse Parameter . .
global Parameter . . .
globallist Parameter . .
group Parameter . . .
help Parameter . . .
hex Parameter. . . .
highlight Parameter . .
horizscroll Parameter .
hoverhelp Parameter .
idletime Parameter . .
impmacro Parameter .
impset Parameter . .
include Parameter . .
indent Parameter. . .
inserting Parameter . .
key Parameter. . . .
keylist Parameter. . .
lastfind Parameter . .
lastkey Parameter . .
lastline Parameter . .
length Parameter . . .
level Parameter . . .
limiterror Parameter. .
linebreak Parameter . .
linenumber Parameter .
lineread Parameter . .
lines Parameter . . .
linked Parameter . . .
list Parameter . . . .
loadedmacros Parameter
mark Parameter . . .
markdeleteexit Parameter
markdirtyexit Parameter
markexclude Parameter
markfont Parameter . .
markid Parameter . .
markinclude Parameter.
marklist Parameter . .
markrange Parameter .
menuactive Parameter .
menucheck Parameter .
messageline Parameter .
messages Parameter . .
modes Parameter. . .
name Parameter . . .
noblanks Parameter . .
.
.
.
.
.
.
.
.
.
.
.
.
.
.
.
.
.
.
.
.
.
.
.
.
.
.
.
.
.
.
.
.
.
.
.
.
.
.
.
.
.
.
.
.
.
.
.
.
.
.
.
.
.
.
.
.
.
.
.
.
.
.
.
.
.
.
.
.
.
.
.
.
.
.
.
.
.
.
.
.
.
.
.
.
.
.
.
.
.
.
.
.
.
.
.
.
.
.
.
.
.
.
.
.
.
.
.
.
.
.
.
.
.
.
.
.
.
.
.
.
.
.
.
.
.
.
.
.
.
.
.
.
.
.
.
.
.
.
.
.
.
.
.
.
.
.
.
.
.
.
.
.
.
.
.
.
.
.
.
.
.
.
.
.
.
.
.
.
.
.
.
.
.
.
.
.
.
.
.
.
.
.
.
.
.
.
.
.
.
.
.
.
.
.
.
.
.
.
.
.
.
.
.
.
.
.
.
.
.
.
.
.
.
.
.
.
.
.
.
.
.
.
.
.
.
.
.
.
.
.
.
.
.
.
.
.
.
.
.
.
.
.
.
.
.
.
.
.
.
.
.
.
.
.
.
.
.
.
.
.
.
.
.
.
.
.
.
.
.
.
.
.
.
.
.
.
.
.
.
.
.
.
.
.
.
.
.
.
.
.
.
.
.
.
.
.
.
.
.
.
Contents
227
228
231
233
234
235
236
236
238
239
239
240
241
242
243
243
244
245
246
247
250
250
251
253
254
255
255
256
257
258
259
259
260
261
261
262
263
264
265
266
267
268
268
269
272
273
274
275
276
277
v
nosave Parameter . . . .
oldline Parameter . . . .
overfont Parameter . . . .
overhang Parameter . . . .
overlay Parameter . . . .
pad Parameter . . . . .
parent Parameter . . . . .
parser Parameter . . . . .
pending Parameter . . . .
popupinit Parameter . . .
popuplink Parameter . . .
popupmenu Parameter . . .
popupmenuid Parameter . .
popupmenulist Parameter . .
position Parameter . . . .
prefix Parameter . . . . .
prefixdefaulttext Parameter .
prefixdisplayformat Parameter
prefixentry Parameter . . .
prefixformat Parameter. . .
prefixprotect Parameter . .
prefixshow Parameter . . .
profiles Parameter . . . .
protect Parameter . . . .
rawtext Parameter . . . .
readonly Parameter . . . .
recall Parameter . . . . .
recentfilecmd Parameter . .
recentmenushow Parameter .
recentpathshow Parameter .
recentsize Parameter . . .
recording Parameter. . . .
resolve Parameter . . . .
rexx Parameter . . . . .
ring Parameter . . . . .
ringlist Parameter . . . .
ringnum Parameter . . . .
rings Parameter . . . . .
ringselector Parameter . . .
ruler Parameter . . . . .
rulertext Parameter . . . .
screen Parameter . . . . .
seconds Parameter . . . .
show Parameter . . . . .
showcurrent Parameter. . .
shows Parameter . . . . .
sidescroll Parameter . . . .
space Parameter . . . . .
spill Parameter . . . . .
split Parameter . . . . .
vi
LPEX Editor User’s Guide
.
.
.
.
.
.
.
.
.
.
.
.
.
.
.
.
.
.
.
.
.
.
.
.
.
.
.
.
.
.
.
.
.
.
.
.
.
.
.
.
.
.
.
.
.
.
.
.
.
.
.
.
.
.
.
.
.
.
.
.
.
.
.
.
.
.
.
.
.
.
.
.
.
.
.
.
.
.
.
.
.
.
.
.
.
.
.
.
.
.
.
.
.
.
.
.
.
.
.
.
.
.
.
.
.
.
.
.
.
.
.
.
.
.
.
.
.
.
.
.
.
.
.
.
.
.
.
.
.
.
.
.
.
.
.
.
.
.
.
.
.
.
.
.
.
.
.
.
.
.
.
.
.
.
.
.
.
.
.
.
.
.
.
.
.
.
.
.
.
.
.
.
.
.
.
.
.
.
.
.
.
.
.
.
.
.
.
.
.
.
.
.
.
.
.
.
.
.
.
.
277
278
279
280
282
283
284
285
286
287
289
290
293
294
295
295
296
297
299
300
301
302
303
304
305
305
306
307
308
310
311
312
313
314
315
315
316
317
318
319
320
320
321
322
323
324
325
326
327
328
statusline Parameter. . . . . .
submenuinit Parameter. . . . .
symbol Parameter . . . . . .
symbollist Parameter . . . . .
synonym Parameter . . . . . .
synonymlist Parameter . . . . .
tabcursorpos Parameter . . . .
tabs Parameter . . . . . . .
textlimit Parameter . . . . . .
timeout Parameter . . . . . .
toolbar Parameter . . . . . .
toolbarlist Parameter . . . . .
toolshow Parameter . . . . . .
toolview Parameter . . . . . .
trigpos Parameter . . . . . .
unprotect Parameter. . . . . .
version Parameter . . . . . .
view Parameter . . . . . . .
viewlist Parameter . . . . . .
viewname Parameter . . . . .
viewnum Parameter. . . . . .
window Parameter . . . . . .
windowid Parameter . . . . .
windowpos Parameter . . . . .
windowshow Parameter . . . .
wordchars Parameter . . . . .
wrap Parameter . . . . . . .
Primitive Functions Summary . . .
External Subroutines Summary . . .
lxcmd() Subroutine . . . . . .
lxcall() Subroutine . . . . . .
lxquery() Subroutine . . . . .
lxnext() Subroutine . . . . . .
lxprev() Subroutine . . . . . .
lxqtext() Subroutine . . . . . .
lxstext() Subroutine . . . . . .
lxqfont() Subroutine . . . . . .
lxsfont() Subroutine . . . . . .
lxqclass() Subroutine . . . . .
lxsclass() Subroutine. . . . . .
lxalloc() Subroutine . . . . . .
lxfree() Subroutine . . . . . .
Regular Expression Syntax and Usage.
Alternate Editor Personalities . . .
ISPF Editor Personality. . . . .
SEU Editor Personality . . . . .
XEDIT Editor Personality . . . .
Keys Help . . . . . . . . . .
Editor Shortcut Keys . . . . .
Keys for Text Selection and Actions
.
.
.
.
.
.
.
.
.
.
.
.
.
.
.
.
.
.
.
.
.
.
.
.
.
.
.
.
.
.
.
.
.
.
.
.
.
.
.
.
.
.
.
.
.
.
.
.
.
.
.
.
.
.
.
.
.
.
.
.
.
.
.
.
.
.
.
.
.
.
.
.
.
.
.
.
.
.
.
.
.
.
.
.
.
.
.
.
.
.
.
.
.
.
.
.
.
.
.
.
329
330
332
334
334
335
336
337
338
339
340
342
342
343
344
345
346
347
347
348
349
350
350
351
352
353
354
355
357
358
359
360
361
362
363
363
364
365
366
367
368
369
370
372
372
374
376
378
378
381
Notices
Any reference to an IBM licensed program in this publication is not intended
to state or imply that only IBM’s licensed program may be used. Any
functionally equivalent product, program, or service that does not infringe
any of IBM’s intellectual property rights may be used instead of the IBM
product, program, or service. Evaluation and verification of operation in
conjunction with other products, except those expressly designated by IBM, is
the user’s responsibility.
IBM may have patents or pending patent applications covering subject matter
in this document. The furnishing of this document does not give you any
license to these patents. You can send license inquiries, in writing, to:
Director of Licensing,
Intellectual Property & Licensing,
International Business Machines Corporation,
North Castle Drive, MD - NC119,
Armonk, New York 10504-1785,
U.S.A.
Licensees of this program who wish to have information about it for the
purpose of enabling: (i) the exchange of information between independently
created programs and other programs (including this one) and (ii) the mutual
use of the information which has been exchanged, should contact IBM Canada
Ltd., Department 071, 1150 Eglinton Avenue East, North York, Ontario M3C
1H7, Canada. Such information may be available, subject to appropriate terms
and conditions, including in some cases payment of a fee.
This publication may contain examples of data and reports used in daily
business operations. To illustrate them as completely as possible, the examples
may include the names of individuals, companies, brands, and products. All
of these names are fictitious and any similarity to the names and addresses
used by an actual business enterprise is entirely coincidental.
IBM may change this publication, the product described herein, or both.
Trademarks and Service Marks
The following terms are trademarks of the International Business Machines
Corporation in the United States and/or other countries:
© Copyright IBM Corp. 1995, 1998
vii
AIX
AIXwindows
C Set ++
IBM
OS/2
POWER
POWER2
PowerPC
RS/6000
Windows is a trademark or registered trademark of Microsoft Corporation in
the U.S. and/or other countries.
UNIX is a registered trademark in the U.S. and other countries licensed
exclusively through X/Open Company Limited.
Other company, product, and service names, which may be denoted by a
double asterisk(**), may be trademarks or service marks of others.
viii
LPEX Editor User’s Guide
About the LPEX User’s Guide
This guide presents an overview of the LPEX Editor. LPEX improves your
programming work flow by providing a user-programmable parsing editor
which you can use to create and modify source code used by your programs.
The LPEX Editor accompanies several IBM programming products on a
variety of hardware and software platforms. Examples throuhout the guide
may use either the DOS ( \ ) or AIX ( / ) style of directory path separator
notation. Unless noted otherwise, you can change the separator notation used
in an example to the separator notation used on your operating system.
Terminology Conventions
Certain conventions are used in this guide when referring to or describing
various aspects of using the Program Builder.
Highlighting Conventions
Italic font
v User-supplied variables
v Book titles
Monospace font
v Examples
v Text that is displayed on the screen
v Text that you type
Boldface font
v Command names
v Menu items
v File and directory names
v Option flags
v Language keywords, operators, function calls, and statements
v Libraries and resources
Mouse Button Terminology
When this manual refers to the three buttons on either a right-handed or
left-handed mouse:
v The term mouse button 1 refers to the inside button
v The term mouse button 2 refers to the middle button
v The term mouse button 3 refers to the outside button .
© Copyright IBM Corp. 1995, 1998
ix
If you are using a two-button mouse, click both buttons simultaneously to
perform a mouse button 2 action.
Menu Sequence Convention
Menu sequences are shown with arrows, for example:
File->Open....
This means on the File pull-down menu, select Open....
Related Publications
Optimization and Tuning Guide for Fortran, C, and C++ (SC09-1705)
Describes how Fortran, C, and C++ programs can be optimized for
the POWER, POWER2, and PowerPC architectures. This book explains
how to improve performance both by hand tuning your programs and
by taking advantage of compiler optimization features.
AIX Version 4 System User’s Guide: Operating System and Devices (SC23-2544)
Describes the AIX Version 4 Operating System for novice system
users. It describes how to run commands, handle processes, files and
directories, printing, and working with the AIXwindows Desktop. It
also introduces system commands for securing files, using storage
media, and customizing environment files.
AIX Version 4 Getting Started (SC23-2527)
Contains information for first-time users who have little or no
experience with the AIX operating system. It introduces basic system
commands covering tasks such as starting and stopping the system,
using a keyboard or mouse, logging in and out, identifying and using
the various user interfaces, and running basic file commands.
AIX Version 4 Commands Reference (SBOF-1851)
A collection of volumes that contain descriptions and examples of the
AIX commands and their available flags.
AIX Version 4 General Programming Concepts (SC23-2533 and SC23-2490)
Discusses the operating system from a programming perspective.
AIX Version 4 Technical Reference, Volumes 1 and 2: Base Operating System and
Extensions (SC23-2614 and SC23-2615)
Provides reference information about system calls, subroutines,
macros, and statements associated with the AIX base operating system
runtime services and device services.
x
LPEX Editor User’s Guide
Chapter 1. Introducing the LPEX Editor
LPEX (Live Parsing Extensible Editor) is a programmable editor that can be
used to create and edit many kinds of files, including programs,
documentation, and data files. In addition to basic editing functions, the
editor also offers the following features:
v Language parsing uses automatic indenting, color, and text effects to
emphasize different parts of your source program, such as programming
language keywords, logic structures, comment lines, and arithmetic
operators.
v Locations marking facilities let you define bookmarks that let you move
quickly from one location to another within your source file.
v Elaborate search facilities let you specify the precise scope of the search. In
addition to locating specific character strings, editor search facilities will
also accept regular expression search strings that can finding matching
search patterns in your source file.
v Multiple editing views let you have more than one file open for editing at a
time.
v Multiple editing windows let you open multiple views of the same file for
editing, letting you view different parts of the file at the same time.
Changes to the file in any view are reflected immediately in other views
containing that same file.
v An Editor programming language lets you program elaborate macros to
automate recurring editing tasks.
v Keystroke recording facilities let you record sets of keystrokes, which you
can later replay or incorporate into your own macros.
“Entering and Editing Text” on page 3
“Chapter 5. Customizing Editor Appearance and Function” on
page 25
“Chapter 6. Macros and Profiles” on page 35
“Chapter 3. Editor Commands and Parameters” on page 21
“Working with Multiple Documents” on page 16
© Copyright IBM Corp. 1995, 1998
1
2
LPEX Editor User’s Guide
Chapter 2. Using LPEX
Starting the Editor
To start the Editor, do any of the following:
v At a command line prompt, type
iedit filename.ext
where filename.ext is optional and represents the name of the file you want
to edit.
v If you have an icon for the LPEX Editor installed on your desktop,
double-click on the icon.
“Opening an Existing File” on page 14
Getting Help
The LPEX Editor provides a variety of online help.
Getting Help for an Item in a Window
To access help for a specific item on a LPEX Editor window, select the item
you want help for, then press the Help key (F1). A window appears showing
the help text associated with the item.
Using the Help Menu
Selecting Help from the menu-bar on any LPEX Editor window opens a
pull-down menu that lets you choose from several types of online help and
reference information.
Working with Text
Entering and Editing Text
Entering Text
v Click in the working area of the Editor window and begin typing.
© Copyright IBM Corp. 1995, 1998
3
v To type on the command line, click in the command line area or press the
Esc key and then begin typing.
Replacing and Inserting Text
v The status line indicates which mode the Editor is in. When the Editor is in
Replace mode, the cursor appears as a solid block, one character width in
size. Text overlaid by this block will be replaced by any new text that you
type. When the Editor is in Insert mode, the cursor appears as a thin
vertical line. Any new text that you type is inserted into the file at the
cursor position, and existing text to the right of the cursor will be shifted to
the right.
v To toggle back and forth between the two modes, press the Insert key.
Deleting Text
v There are many ways to delete unwanted text. To delete single characters,
do one of the following:
– Press the Delete key. If you are in Insert mode, the character to the right
of the cursor is deleted; if you are in Replace mode, the character that is
overlaid by the cursor is deleted. Text to the left of the cursor moves
right to fill the resulting gap.
– Press the Backspace key. The character to the left of the cursor is deleted.
Text to the right of or overlaid by the cursor moves left to fill the
resulting gap.
v To delete all the text between the cursor and the end of the current line,
press Ctrl+Delete.
v To delete a complete line, move the cursor to the unwanted line and press
Ctrl+Backspace.
Moving the Cursor
v Position the mouse pointer where you want the cursor to be, and click
mouse button 1, or,
v Press the Up, Down, Left, or Right arrow keys, or,
v Press the Home key to move the cursor to the beginning of a line, or the
End key to move it to the end of a line, or,
v Press Alt+Left arrow to move the cursor one word left, or Alt+ Right
arrow to move it one word right, or,
v Press the Page Up or Page Down keys to move the cursor up or down one
window at a time, or,
v Press Ctrl+Home to move the cursor to the beginning of the file, or
Ctrl+End to move it to the end of the file, or,
v Press Ctrl+J to return the cursor to the place in the file where you last
entered text.
4
LPEX Editor User’s Guide
Tip! If you inadvertently select text by dragging the mouse, deselect it by pressing
Alt+U, or, click the right mouse button and choose Deselect all from the pop-up
menu.
Inserting a Blank Line
v Move the cursor to any point on a line and press Ctrl+Enter, or,
v Move the cursor to the end of a line and press Enter.
A blank line is created after the current line, and the cursor moves to the
first column position of this new line.
Splitting and Joining Lines of Text
v To split a line:
– Place the cursor where you want the break to occur, and press either
Alt+S or Enter. Pressing Alt+S leaves the cursor at its current position;
pressing Enter moves the cursor to the beginning of the new line.
When you split a line, all the text to the right of the cursor is moved down
to a new line.
v To join two lines, do one of the following:
– If the cursor is at the end of a line, press the Delete key to join the
current line with the next line.
– If the cursor is at the beginning of a line, press the Backspace key to join
the current line with the previous line.
– With the cursor anywhere on a line, press Alt+J to join the current line
with the next line together.
“Undoing Changes”
Undoing Changes
The Editor records each set of changes you make to a file in the Editor
window. The number of changes made since the last file save is displayed on
the status line.
If you want to undo a set of changes to a file, do the following:
1. Select Edit from the Editor window menu bar.
2. Select Undo
3. Repeat the above steps until all unwanted changes are undone.
Chapter 2. Using LPEX
5
You can also cancel the effects of an undo operation by doing the following.
1. Select Edit from the Editor window menu bar.
2. Select Redo
3. Repeat the above steps until all the effects of all unwanted undo
operations are cancelled.
“Entering and Editing Text” on page 3
Marking and Manipulating Blocks of Text
The editor offers facilities that let you mark blocks of text in various ways to
accomplish different results. Once you have marked a block of text, you can
manipulate the marked block with either standard operating-system clipboard
facilities or the Editor’s own block manipulation facilities.
“Marking Blocks of Text”
“Unmarking a Block of Text” on page 7
“Manipulating Blocks of Text” on page 7
“Changing the Default Marking Mode” on page 8
Marking Blocks of Text
There are many ways of marking text in the Editor windows. Some are
described below.
Marking a Block of Text with the Mouse
1. Position the mouse pointer over the character that is to start the block.
2. Press and hold mouse button 1.
3. Drag the mouse pointer to the to the end of the block of text you want
and release the mouse button. The block is now marked.
Note:
Marking a Block of Text using the Keyboard
1. Use the cursor keys to move the cursor to the character that will start the
block.
2. Press Alt+B.
3. Move the cursor to the end of the block of text.
4. Press Alt+B again. Text between the two points is marked.
6
LPEX Editor User’s Guide
Marking an Entire Line of Text
v Select Edit from the main menu bar, select Block from the resulting
pull-down menu, then select Mark Line from the cascaded menu, or,
v Place the cursor anywhere on the line and press Alt+L, or,
v With the Ctrl key depressed, double-click on the line.
Marking Multiple Lines
1. Place the cursor on the first line to be marked and press Alt+L.
2. Move the cursor to the last line to be marked and press Alt+L again. The
two selected lines, and all lines between them, are marked.
“Marking and Manipulating Blocks of Text” on page 6
“Unmarking a Block of Text”
“Manipulating Blocks of Text”
“Changing the Default Marking Mode” on page 8
Unmarking a Block of Text
To unmark a block of text, use any of the following methods:
v Select Edit from the main menu bar, select Block Unmark from the
resulting pull-down menu, then select Unmark from the cascaded menu, or,
v Click the right mouse button and select Deselect all from the resulting
pop-up menu, or,
v Press Alt+U.
“Marking and Manipulating Blocks of Text” on page 6
“Marking Blocks of Text” on page 6
“Manipulating Blocks of Text”
“Changing the Default Marking Mode” on page 8
Manipulating Blocks of Text
After you have marked a block of text, you can manipulate it in any of the
ways described below.
Copying a Marked Block
1. Move the cursor to the location in the file where the blocked text will be
copied.
2. Select Edit from the main menu bar.
3. Select Block from the resulting pull-down menu.
Chapter 2. Using LPEX
7
4. Select Copy from the cascade menu. A copy of the marked block is
inserted at the
cursor position.
Alternatively, position the cursor and then press Alt+C to copy a selected
block.
Deleting a Marked Block
1. Select Edit from the main menu bar.
2. Select Block from the resulting pull-down menu.
3. Select Delete from the cascade menu to delete the marked block.
Alternatively, press Alt+D to delete a marked block.
Moving a Marked Block
1. Move the cursor to the desired location.
2. Select Edit from the main menu bar.
3. Select Block from the resulting pull-down menu.
4. Select one of the following options:
a. Select Move from the cascade menu. The block is placed below the
cursor. Existing text below the cursor shifts downward to allow room
for the moved block of text.
b. Select Overlay from the cascade menu. The block is placed below the
cursor, overwriting any existing text.
Alternatively, position the cursor and then press Alt+M, or use Alt+Z if
you want to place the block over existing text.
“Marking and Manipulating Blocks of Text” on page 6
“Marking Blocks of Text” on page 6
“Unmarking a Block of Text” on page 7
“Changing the Default Marking Mode”
Changing the Default Marking Mode
You can change the default marking mode to one of the following choices:
stream
8
LPEX Editor User’s Guide
Default. The cursor is coupled with the marked text selection. Marked
text will be deselected if you click the mouse at another location in the
file.
Similar to stream, except that the cursor is not coupled with the marked
text selection. You can mark a block of text with the mouse, and then
click the mouse at another location in the file without unmarking the
block of text already selected.
Whole elements are marked. The cursor is not coupled to the marked
text selection.
Rectangular areas can be marked starting at any character position on a
line and extending over as many lines as needed. The cursor is not
coupled to the marked text selection.
character
element
rectangle
To change the default block marking mode for the Editor window:
1. Open the edit command by pressing the Esc key.
2. Enter the following command,
set blockdefaulttype markmode
where
markmode
is one of the modes listed above.
To determine the current default block marking mode:
1. Open the edit command by pressing the Esc key.
2. Enter the following command,
query blockdefaulttype
3. The current blocking mode is returned in the message area at the bottom
of the Editor window.
“Marking and Manipulating Blocks of Text” on page 6
“Marking Blocks of Text” on page 6
“Unmarking a Block of Text” on page 7
“Manipulating Blocks of Text” on page 7
Chapter 2. Using LPEX
9
Using Location Marks in a File
Location marks function like bookmarks. You place them in your document
and use them to easily return to marked locations in your file.
Creating and Naming a Location Mark
To
1.
2.
3.
4.
create and name a location mark in your document, do the following:
Place the cursor at the position to be marked.
Select Edit from the main menu bar.
Select Name a mark.
Enter the name of the new mark in the text entry field of the Name a
mark dialog box.
5. Click on OK.
Finding a Named Location Mark
To move the cursor to a named mark, do the following:
1. Select Edit from the main menu bar.
2. Select Locate from the resulting pull-down menu.
3. Select Mark from the cascading menu.
4. A Locate - Mark dialog box appears, highlight the name of the mark you
want to move to.
5. Click on OK.
Using a Quick Location Mark
To mark one cursor position quickly, you can use the Quick Mark feature as
follows:
1. Move the cursor to the position where you want to set a mark.
2. Select Edit from the main menu bar.
3. Select Set quick mark from the resulting pull down menu. A quick mark
is set at the chosen position in your file.
To find a quick mark, do the following:
1. Select Edit from the main menu bar.
2. Select Locate from the resulting pull down menu.
10
LPEX Editor User’s Guide
3. Select Quick mark from the next pull down menu. The cursor is moved to
the position marked by the quick mark.
You can have only one quick mark per document view. Setting a new quick
mark will cause a previous quick mark to be lost.
You can also find a quick mark using the procedure described in Finding a
Named Location Mark above. The quick mark will appear in the list of
named marks as @QUICK.
“Finding Text” on page 12
“Finding and Replacing Text” on page 13
Finding Text or Locations in a File
Finding a Specific Line in a File
A quick way to find a specific line in a file is to use the Locate Line facility.
1. Select Edit from the main menu bar.
2. Select Locate from the resulting pull-down menu.
3. Select Line... from the cascading menu. The Locate line dialog box
appears. The Line number text entry field displays the line number of the
current cursor position.
4. Replace the current line number with with another number, and click on
OK. The Locate Line dialog box disappears and the cursor moves to the
beginning of the chosen line.
Note: If you try to go to a line number that is greater than the number of
lines in the file, the cursor moves to the beginning of the last line in the file.
“Finding a Location Mark in a File”
“Finding Text” on page 12
“Finding and Replacing Text” on page 13
Finding a Location Mark in a File
Location marks function like bookmarks. You place them in your document
and use them to easily return to marked locations in your file.
To find a named location mark in your file, do the following:
1. Select Edit from the main menu bar.
Chapter 2. Using LPEX
11
2. Select Locate from the resulting pull-down menu.
3. Select Mark from the cascading menu.
4. A Locate - Mark dialog box appears, highlight the name of the mark you
want to move to.
5. Click on OK.
To
1.
2.
3.
find a quick mark in your file, do the following:
Select Edit from the main menu bar.
Select Locate from the resulting pull down menu.
Select Quick mark from the next pull down menu. The cursor is moved to
the position marked by the quick mark.
You can have only one quick mark per document view. Setting a new quick
mark will cause a previous quick mark to be lost.
You can also find a quick mark using the same procedure used to find a
named location mark, as described near the top of this page. The quick mark
will appear in the list of named marks as @QUICK.
“Using Location Marks in a File” on page 10
“Finding Text”
“Finding and Replacing Text” on page 13
Finding Text
To search for an item in your document or file view, first do the following to
open the Editor - Find and Replace dialog:
1. Select Edit from the main menu.
2. Select Find and Replace from the resulting pull-down menu. The Editor Find and Replace dialog opens.
Specify the item to be searched for by doing the following:
1. Type a search item in the Find text entry area. This can be a word, a
partial word, or a sequence of such. You can also enter a pattern you want
to match, provided that the pattern follows the rules of regular expression.
2. Select your desired options. If you enter a pattern in the Find text entry
area, you must also select the Pattern match check box.
3. Click on Find. If the entered text or pattern is found, the cursor moves to
either the next or previous occurrence of the search item, according to
your chosen search direction.
12
LPEX Editor User’s Guide
“Finding a Location Mark in a File” on page 11
“Finding and Replacing Text”
“Regular Expression Syntax and Usage” on page 370
Finding and Replacing Text
To search for an item in your document or file view, first do the following to
open the Editor - Find and Replace dialog:
1. Select Edit from the main menu.
2. Select Find and Replace from the resulting pull-down menu. The Editor Find and Replace dialog opens.
Specify the item to be found and replaced by doing the following:
1. Type a search item in the Find text entry area. This can be a word, a
partial word, or a sequence of such. You can also enter a pattern you want
to match, provided that the pattern follows the rules of regular expression.
2. Type the replacement word in the Replace with text entry field.
3. Select your desired options. If you enter a pattern in the Find text entry
area, you must also select the Pattern match check box.
4. Click on Replace. If the entered text or pattern is found, the cursor moves
to either the next or previous occurrence of the search item, according to
your chosen search direction, and replaces the found text according to
your selections.
“Regular Expression Syntax and Usage” on page 370
“Finding Text” on page 12
“Finding a Location Mark in a File” on page 11
Managing Files in the Editor
Creating a New File
You can open a new file by doing the following:
1. Select File from the main menu bar.
2. Select New... from the resulting pull-down menu. The New dialog
appears.
3. Use the check boxes and selection lists to select the options you want.
4. Click on New in this dialog box. A new, empty Editor window appears.
5. You can start entering text for your new file in this view.
Chapter 2. Using LPEX
13
“Opening an Existing File”
“Saving a File”
“Embedding Another File into the Current Document” on page 15
“Working with Multiple Documents” on page 16
Opening an Existing File
You can open an existing file by doing any of the following:
v Drag a file icon from a file manager window onto an Editor icon.
v At a command line prompt, type
iedit filename.ext
where
filename.ext
is the name of the file you want to edit.
v If the Editor is already running, do the following:
1. Select File from the Editor menu bar.
2. Select Open... from the resulting pull-down menu.
3. Use the file and directory selection lists to select the file you want to
open.
4. Click on the OK push button to open the selected file for editing. An
Editor window opens showing the chosen file.
Note: The Editor will not try to open a file that is already loaded in the
Editor.
“Creating a New File” on page 13
“Saving a File”
“Embedding Another File into the Current Document” on page 15
“Working with Multiple Documents” on page 16
Saving a File
To save your work, do any of the following:
1. To save one file:
a. If you have more than one Editor window open, select the window
that contains the work you want to save.
b. Select File from the Editor menu bar.
14
LPEX Editor User’s Guide
c. Select Save from the resulting pull-down menu.
d. If you are saving an existing file, the file is saved under its current
name. If you are saving a new file, the Save as dialog box appears.
Enter a new name for the file and click OK. The new file is saved
under this name.
2. To save one file to a different file name:
a. If you have more than one Editor window open, select the window
that contains the work you want to save.
b. Select File from the Editor menu bar.
c. Select Save as... from the resulting pull-down menu. The Save as
dialog box appears.
d. Enter a new name for the file and click OK. The new file is saved
under this name.
3. To save changes to all files you are currently working with, do the
following while in any open Editor window:
a. Select File from the Editor menu bar.
b. Select Save all from the resulting pull-down menu. Existing files are
saved under their current file names. For each new, un-named file
saved, the Save as dialog box appears. Enter the new name of the file
and click on the OK push button to save the new file under that name.
“Creating a New File” on page 13
“Opening an Existing File” on page 14
“Embedding Another File into the Current Document”
“Working with Multiple Documents” on page 16
Embedding Another File into the Current Document
The Get operation embeds another file into the file currently open in the
editor. The Get operation will not load any new profiles along with the file
being inserted. Profiles already loaded remain in effect and are applied to the
file being inserted.
Embed another file into your document by doing the following:
1. Move the cursor anywhere on the line above where the inserted text is to
appear.
2. Select File from the Editor menu bar.
3. Select Get... from the resulting pull-down menu. The Get window appears.
4. Select the desired file and click on the OK push button. The inserted text
appears on the line(s) after the cursor position.
Chapter 2. Using LPEX
15
“Creating a New File” on page 13
“Opening an Existing File” on page 14
“Saving a File” on page 14
“Working with Multiple Documents”
Working with Multiple Documents
The Editor lets you have several documents (file views) open for editing at
the same time. These views can be of different documents, or different views
of the same document. Displaying multiple views of the same document can
help you perform functions like cutting and pasting from one section to
another. Any changes you make to one file view are automatically updated in
all other views of that document. You can also carry out functions like cutting
and pasting between views of different documents.
You can manage different file views with the following facilities:
v The Split window option lets you split the Editor window vertically or
horizontally to view multiple file views at the same time. Select View from
the Editor window menu bar, then Split from the resulting pull-down
menu.
v The Ring Manager lets you arrange files into groupings, or rings. You can
easily move between the rings, or between files within a given ring. To
open the Ring Manager window, select Windows from the Editor window
menu bar, then Ring manager from the resulting pull-down menu.
“Opening an Existing File” on page 14
“Managing Multiple File Views with the Ring Manager”
Managing Multiple File Views with the Ring Manager
This section describes how to use the Editor - ring manager window to work
with multiple files and views of files.
Typical ring manager operations are described below.
Setting the default ring
To set the default ring option, do the following:
1. Select View from the Editor menu-bar.
2. Select Default to ring from the resulting pull-down menu.
16
LPEX Editor User’s Guide
v If this option is enabled, a check-mark appears beside its menu
selection. Newly-opened files or views are added to the current ring,
and appear in the current editing pane.
v If not enabled, a new ring in a new Editor window is created for each
newly-opened file or view.
Creating multiple views of the same file
You can have more than one view of the same file open at a time, and these
views may reside in more than one ring. Changes made to one view of a file
are applied to all other views of that file.
To create a new view of a file already open for editing, do the following:
1. Select the file for which you want to create another view.
2. Select File from the Editor menu-bar.
3. Select Open new view from the resulting pull-down menu. Depending on
setting of the View->Default to ring pull-down menu choice, a new view
appears either in the editing pane of your current ring, or in the editing
pane of a new ring.
Alternatively, you can:
1. Select the file for which you want to create another view.
2. Select View from the Editor menu-bar.
3. Select Split from the resulting pull-down menu.
4. Select View from the resulting cascaded menu. The Editor window
containing the editing pane of the current view of the file splits to also
accomodate the editing window of a new ring. A new view of the current
file is placed into this new ring and its editing pane.
Moving a view to another ring
You may find it useful to move a file view to a new or other existing ring.
To move a file view to a new ring, do the following:
1. Open the Editor - ring manager window:
a. Select Windows from the menu-bar of any Editor window.
b. Select Ring manager from the resulting pull-down menu. The Editor ring manager window opens.
2. In the top part of the Editor - ring manager window, find and select the
icon or text representing the view that you want to move into a new ring.
3. Select Selected from the menu-bar of the Editor - ring manager window.
Chapter 2. Using LPEX
17
4. Select New ring from the resulting pull-down menu. A separate Editor
window for the new ring appears, and your file view is moved into the
editing pane of the new ring.
To move a file view to an existing ring, do the following:
1. In the top part of the Editor - ring manager window, find and select the
icon or text representing the view that you want to move into a new ring.
2. Use the mouse to drag the selected item to the icon or text representing
the new ring.
Moving between file views within the same ring
Within a file ring, only one view is accessible for editing at any given time.
You can, however, cycle through all views in the ring by doing the following:
1. Select Windows from the menu-bar of the Editor window that contains the
ring you want to work with.
2. Select either Next in ring or Previous in ring from the resulting pull-down
menu. The file visible in the editing pane is replaced with the next or
previous file in the ring.
If you have many file views in a ring, you may find it faster to go directly to
another view by using the Ring file-selector. To use the Ring file-selector, do
the following:
1. Click on the push button found above the top right corner of the editing
pane to open the ring selector.
If you have more than one view open in your current ring and the Ring
file-selector is not visible, you can enable it by doing the following:
a. Select Options from the menu-bar of the Editor window that contains
the ring you want to work with.
b. Select Controls from the resulting pull-down menu.
c. Select Ring selector from the cascade menu to enable the Ring
file-selector.
2. Click on the file view you want to work with. The selection list closes, and
the view in the editing pane is replaced with your newly chosen view.
Moving between rings
If you have more than one ring open, you can move between rings by doing
the following:
1. Select Windows from the menu-bar of any Editor window.
18
LPEX Editor User’s Guide
2. Select Next ring or Previous ring from the resulting pull-down menu. The
editing pane belonging to the next or previous ring, depending on your
choice, becomes the active window.
Moving all open file views into separate rings
To move each open file view into its own ring, do the following:
1. Open the Editor - ring manager window:
a. Select Windows from the menu-bar of any Editor window.
b. Select Ring manager from the resulting pull-down menu. The Editor ring manager window opens.
2. In the top part of the Editor - ring manager window, select the icon or text
representing any ring.
3. Select Selected from the menu-bar of the Editor - ring manager window.
4. Select All new rings from the resulting pull-down menu. Each file view is
moved into its own ring, and a new Editor window appears for each ring.
Moving all open file views into the current ring
To move all file views back into one ring, do the following:
1. Open the Editor - ring manager window:
a. Select Windows from the menu-bar of any Editor window.
b. Select Ring manager from the resulting pull-down menu. The Editor ring manager window opens.
2. In the top part of the Editor - ring manager window, select the icon or text
representing the ring to which the contents of all other rings will be
moved.
3. Select Selected from the menu-bar of the Editor - ring manager window.
4. Select Single ring from the resulting pull-down menu. All file views are
moved to the selected ring, and all other rings are destroyed.
Closing a file view
The Editor lets you have more than one file or more than one view of a given
file open at a time. This may affect the method you choose to close a file view.
To close all files or views of a file in the Editor, do the following:
1. Select File from the Editor menu-bar.
Chapter 2. Using LPEX
19
2. Select Exit from the resulting pull down menu. All Editor windows are
closed. The Editor will warn you if there are unsaved changes and give
you an opportunity to save those changes.
To close only the current view of a file, do the following:
1. Select File from the Editor menu-bar.
2. Select Close view from the resulting pull down menu. The selected view is
closed. If this is the last view of a given file, the Editor will warn you if
there are unsaved changes and give you an opportunity to save those
changes.
Closing a ring
To close a ring and all file views in it, do the following:
1. Select File from the menu-bar of the Editor window that contains the ring
you want to close.
2. Select Close ring from the resulting pull-down menu. All file views in the
current ring are closed. If the last view of any file is being closed, the
Editor warns you of any unsaved changes and gives you an opportunity
to save them.
“Working with Multiple Documents” on page 16
20
LPEX Editor User’s Guide
Chapter 3. Editor Commands and Parameters
The Editor is fully programmable through the use of an extensive command
and parameter set. You can use commands and parameters to customize your
Editor window, search for or change text in your document, or perform many
other functions. You can find more information about using commands and
parameters in the related readings below.
“Issuing Editor Commands”
“Writing Macros for the Editor” on page 36
“Using Profiles to Modify Editor Behavior” on page 29
“Commands Summary” on page 55
“Parameters Summary” on page 143
Issuing Editor Commands
You can use Editor commands to customize the Editor window, search for or
change text in your document, or perform many other functions. The Editor is
fully programmable through the use of an extensive Editor command set.
Elaborate sequences of Editor commands are probably best saved to a macro
or profile, but you can also issue commands to the Editor without having to
write a macro or profile.
To issue an Editor command:
1. Press the Esc key to bring up the Editor command line at the bottom of
the Editor window.
2. Type your Editor command on the command line, then press Enter to
perform the command.
To recall a previously-used command:
1. While in the command line, press the Up or Down arrow key. Previously
used commands will appear in the message window.
2. Select the command you want to reuse, then press Enter.
© Copyright IBM Corp. 1995, 1998
21
Issuing Multiple Editor Commands
The mult command lets you issue multiple Editor commands on one
command line. To use the mult command to issue multiple commands in one
step:
1. Change cursor focus to the editor command line.
2. Type the following command:
mult ;command_1 ;command_2 ;command_3
where command_1, command_2 and so on are the commands you want to
run.
3. Press Enter.
There are many commands you can use in the editor command line. For a
complete listing of Editor commands, see the Commands Summary.
“Chapter 6. Macros and Profiles” on page 35
“Using Profiles to Modify Editor Behavior” on page 29
“Commands Summary” on page 55
22
LPEX Editor User’s Guide
Chapter 4. Using Parsers
A parser is an editor command that acts interactively on a document to
improve the presentation of the data in the document. A parser uses colors
and fonts to highlight different items in a programming language document.
For example, language keywords are highlighted in one color, variable names
in another, and string literals in yet another. The original indentation of the
program code is maintained. LPEX comes with parsers for C, C++, COBOL,
Fortran, and for its own macros.
Invoking a Parser
When you open a file, the editor automatically runs a load macro used to
invoke a parser whose file name is composed of the extension of the file being
loaded and an extension of .lxl. This load macro, in turn, invokes a parser. For
example, if you open a file called sample.c, the editor calls the c.lxl load
macro, which invokes the C parser. If you open a file called sample.f, the
editor calls the f.lxl load macro, which invokes the Fortran parser. If you open
a file called sample.cbl, the editor calls the cbl.lxl load macro, which invokes
the COBOL parser.
Typically, the load macro and the parser:
v Set default fonts and colors
v Color and emphasize the data being displayed
v Set up special actions for keys
v Set up language-specific additions to the View pull-down menu.
You can use the load macros supplied with the Editor as examples when
developing your own load macros.
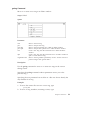
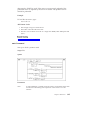
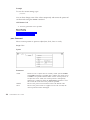
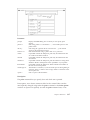
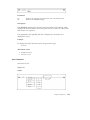
About Elements and Classes
In a programming language document, such as sample.c or sample.f in the
samples directory, each line is an element. A class definition describes the
type of data the element contains. Each element may contain more than one
class. The elements displayed below include CODE and COMMENT classes
Note: Class names are chosen by the writer of the parser.
CODE Class
COMMENT Class
Lines of C code, an element
if (x == 'test')
/*test for x*/
Lines of Fortran code, an
element
DO 10 I = 1, 10
C PURPOSE:
© Copyright IBM Corp. 1995, 1998
23
Using a Parser’s View Menu
The selections in the View menu specify which classes are displayed in the
document. For example, you can select the Functions selection from a C View
menu to display only the function headers in the C document.
Live Parsing
LPEX monitors and records all the changes that you make to a document. As
you complete each line, LPEX examines that line for defined class elements.
For example, in a C program, the parser recognizes the text between an open
comment marker (/*) and a close comment marker (*/) as being comments,
and displays those comments in the color and font specified for the comment
class. Other text, even if on the same line as a comment, is displayed
according to class.
You can change the fonts and colors associated with different elements of a
program by selecting Options->Token Attributes from the editor menu-bar.
You can also change the special keys, fonts, and pull-down menu for a file
type by modifying the load macro associated with that file type.
“Chapter 6. Macros and Profiles” on page 35
“Application Programming Interface Overview” on page 52
“Changing Token Display Attributes” on page 26
“autoparse Parameter” on page 169
“parser Parameter” on page 285
“trigger Command” on page 139
“trigpos Parameter” on page 344
24
LPEX Editor User’s Guide
Chapter 5. Customizing Editor Appearance and Function
You can customize Editor appearance and function to suit individual
preferences or project needs. Simple customizations can be made with
pull-down menu selections or by setting Editor parameters. You can also
create macros and load profiles to handle more elaborate customizations.
See the topics below for instructions on how to perform common Editor
customizations.
“Changing Editor Tab Settings”
“Changing the Base Editor Font” on page 26
“Changing Token Display Attributes” on page 26
“Customizing the Keyboard” on page 27
“Changing Text and Background Color Palettes” on page 28
“Using Profiles to Modify Editor Behavior” on page 29
“Changing Editor Load Profiles” on page 31
Changing Editor Tab Settings
You can easily change the Editor tab stops to suit the requirements of the
document you are working on.
To change the tab stops, you must first open the Editor parameters dialog.
1. Select Options from the Editor window main menu bar.
2. Select Editor parameters... from the resulting pull-down menu. The Editor
parameters dialog appears.
In the Editor parameters dialog, do the following:
1. Find and highlight the Tabs entry in the parameters selection list.
The current value for the Tabs parameter is displayed below the selection
list. For example, a Tabs parameter of EVERY 8 indicates that a tab stop
occurs at every eighth character position on a line.
2. Click on Change... . The Set Option Tabs window appears.
3. Enter your new tab stops into the Set Option Tabs window.
For example, if you want a tab stop at every third position, enter EVERY
3. You can also enter tab stops at irregular intervals.
4. Click on OK to save the new Tabs parameter setting and close the Set
Option Tabs window.
© Copyright IBM Corp. 1995, 1998
25
5. Click on OK to close the Editor parameters... window.
“Chapter 5. Customizing Editor Appearance and Function” on
page 25
Changing the Base Editor Font
To customize the base font used by the Editor, you must first open the Font
dialog.
1. Select Options from the Editor window main menu bar.
2. Select Font... from the resulting pull-down menu. The Font dialog appears.
In the Font dialog, do the following:
1. Use the selection lists to choose a font name, style, and size.
2. When you are satisfied with your chosen font, click on OK.
The chosen font is applied to the current editor window and to all future
edit sessions. To cancel all changes, click on Cancel instead.
“Chapter 5. Customizing Editor Appearance and Function” on
page 25
Changing Token Display Attributes
The Editor uses different font and character effects to emphasize different
parts of a program.
To customize the attributes assigned to different types of document elements,
you must first open the Token Attributes dialog.
1. Select Options from the Editor window main menu bar.
2. Select Token Attributes... from the resulting pull-down menu. The Token
Attributes dialog appears.
In the Token Attributes dialog, do the following:
1. Change token display attributes by doing the following:
a. Select the token type whose attributes you want to change from the
Token type selection list.
b. Select the Foreground radio button if you want to change the
foreground color, otherwise select the Background radio button.
26
LPEX Editor User’s Guide
c. Select the color button with the color combination that you want to
apply to the token type. The text in the sample window changes to
show the effect of your choice.
d. Select any combination of character emphasis (reverse, italic, bold, or
underline) for the token type. The text in the sample window changes
to show the effect of your choice.
2. Repeat the above steps to change the display attributes of other token
types as needed.
3. If you want the new display attribute settings saved for use in future
editing sessions, enable the Save settings check box. Otherwise, the new
settings will stay in effect only for the current editing session, and are lost
when you close the Editor.
4. When you have finished changing token display attributes, click on OK.
“Chapter 5. Customizing Editor Appearance and Function” on
page 25
Customizing the Keyboard
You can customize the keyboard used to work in the Editor with the set key
or set action commands.
A set key command, lets you remap the connections between the physical
keyboard and the logical keyboard. This remapping is global and affects all
Editor files.
You can use set key to use the editor with a keyboard that does not have all
of the required keys. For example, if your keyboard does not have the F11 and
F12 keys, you can remap the Alt+1 and Alt+2 key combinations to have the
same effect:
set key.A-1 F11
set key.A-2 F12
Similarly, you can use various accented characters that are not on the
keyboard by assigning them to keys. The following example assigns lowercase
and uppercase umlauts to the Alt+A and Ctrl+A key combinations,
respectively. The lowercase umlaut is represented by ascii code 132, and the
uppercase umlaut is represented by ascii code 142.
set key.A-A 132
set key.C-A 142
lowercase umlaut
uppercase umlaut
Chapter 5. Customizing Editor Appearance and Function
27
Note: Ctrl and Alt key combinations do not differentiate between uppercase
and lowercase characters. For example, using Alt+a or Alt+A in any Editor
command yields the same result.
Set action command, lets you program the logical keyboard, and assign a
command or set of commands to a key. This programming relates to a single
file, so the same key can have a different effect for different files.
When a key is pressed, the Editor performs an action dictated by the
corresponding logical key. Many keys have default actions. Any key can be
assigned an action using the set action command. For example, the following
command makes the F7 key scroll the text in a window up one screen:
set action.F7 scroll screen up
Your operating system may reserve some keys, such as F1 and F10.
The set key command is sometimes more useful than a set action because
remapping using set key is global. For example, you could define the Ctrl+H
key as the help key in all files by using the following Editor command:
set key.C-H F1
“Chapter 5. Customizing Editor Appearance and Function” on
page 25
Changing Text and Background Color Palettes
The Editor uses a set of up to sixteen colors for text and background display.
A default color palette is supplied with the Editor, but you can modify this
color palette or define and save other color palettes as you require. Changes
to the color palette apply to all open Editor windows.
To use or define a different color palette in the Editor, you must first open the
Color Palette dialog.
1. Select Options from the Editor window main menu bar.
2. Select Color Palette... from the resulting pull-down menu. The Color
Palette dialog appears with the name of the current color palette displayed
in the Palettes field.
In the Color Palette dialog, do the following:
v To change to another, previously-defined color palette:
28
LPEX Editor User’s Guide
1. Click on the down-arrow button at the right side of the Palettes field to
see a list of defined palettes.
2. Select the name of the color palette you want from this list.
v To create a new color palette:
1. Select the color button that represents the color to be changed.
2. Change the values in the Red, Green, and Blue color component fields
until the color button selected in step a shows the color you want.
Permissible values are integers from 0 to 255 inclusive, where 0
indicates lowest intensity of color, and 255 indicates highest intensity of
color.
3. Repeat steps 1 and 2 for each color that you want to change.
4. When you finish defining colors for the new palette, click on the Add
button. The Add a Palette dialog box appears.
5. Enter the name of the new color palette in the Add a palette dialog box,
and click OK to return to the Palette dialog box. The name of the new
color palette now appears in the Palettes field.
v To delete a color palette:
1. Click on the down-arrow button at the right side of the Palettes field to
see a list of defined palettes.
2. Select the name of the color palette you want to delete from this list. If
the deleted color palette is the palette in effect when you first opened
the Palette dialog box, the colors in that deleted palette remain in effect
until you explicitly select another color palette.
Click on OK to close the Palette dialog box and apply your changes to the
Editor.
“Chapter 5. Customizing Editor Appearance and Function” on
page 25
Using Profiles to Modify Editor Behavior
A number of profiles are loaded each time you start the Editor or open a file
into it. These profiles contain various commands and parameter settings that
control how the Editor looks and behaves.
You can directly modify load profiles supplied with the Editor to your own
personal preferences, but your modifications may be lost if you later reinstall
the software. To avoid losing your load profile modifications, we recommend
that you do the following:
Chapter 5. Customizing Editor Appearance and Function
29
1. Do not directly modify the standard load profiles that come with the
Editor.
2. Instead, create your own load profiles using an lxu filename extension
according to the following naming conventions:
profinit.lxu
User profile that runs when the Editor is first initiated.
profsys.lxu
User profile that runs each time a new file is loaded into the
Editor.
xxx.lxu
User-defined language profile that runs each time a file of type xxx
is loaded into the Editor. For example, if your personalized load
profile is to apply to .cpp files, your personalized load macro will
be called cpp.lxu.
Note: When you load the Editor with file type xxx, the Editor
loads the xxx.lxu user load profile immediately after the xxx.lxl
standard load profile.
Note: Personalized load profiles can be stored in the macros directory, but
we recommend that you store them in your own directory.
Creating a Personalized Profile
This example shows you how you can create and customize your personal
profile in, for example, the profinit.lxu file.
Perform the following steps:
a. Create a new file in the Editor with the following lines. The first line of
the profile must be a comment, as shown. Do not forget the quotation
marks around each command line.
/* profinit.lxu */
'set blockdefaulttype rectangle'
'set toolbar.my_button HELP 'Add 5 lines to end of file' 5 mult ;bottom ;add 5'
'set actionbar.xQueries.Class 5 query class'
'set actionbar.xQueries.Fxonts\tCtrl+Z 5 query fonts'
'set action.c-Z query fonts'
b. Save the file in the macros directory with a name of profinit.lxu and
quit the Editor. Your new Editor customizations take effect the next
time you start the Editor.
c. To cancel your customizations, edit the profinit.lxu file to remove the
unwanted Editor commands, or erase the file completely.
30
LPEX Editor User’s Guide
Storing a Personalized Profile
Personalized profiles should be stored in your own directory. This helps
ensure that your profiles are not lost if you later reinstall the Editor. It also
simplifies profile management when the Editor is used in a network
environment.
To store your profiles in your own directory, do the following:
a. Create a directory in which to store your personal profiles, for
example:
mkdir d:\my_prof
mkdir /u/my_user_id/my_prof
b. Create your personalized profiles and store them in this directory.
Add the new directory to the LPATH environment variable in
c.
your config.sys file. If this environment variable does not already exist,
create it. For example:
set LPATH=d:\my_prof;%LPATH%;
Add the new directory to the LPATH environment variable in your
environment. If this environment variable does not already exist, create
it. For example:
export LPATH=/u/my_user_id/my_prof:$LPATH
d.
Reboot your system.
“Chapter 5. Customizing Editor Appearance and Function” on
page 25
“Writing Macros for the Editor” on page 36
“Changing Editor Load Profiles”
Changing Editor Load Profiles
You can select the load profiles applied to your file. The Editor can use both
system and user profiles to customize Editor functions. In addition,
programming language profiles can also be specified so that parsing functions
are available to highlight the tokens appropriate to a given programming
language.
To change profiles in the Editor proceed as follows:
1. Select Options from the menubar in the Editor window.
2. Select Profiles to display selections.
Chapter 5. Customizing Editor Appearance and Function
31
3. Select Change Profile. The Change Profile dialog box appears.
4. Select any combination of:
System
Apply the system load profile (profsys.lxu) to the file.
User
Apply the user preferences load profile (profile.lx) to the file.
Language profile
Apply a language profile to the file. If this check box is selected, a
list of available language profiles is enabled. Scroll through the list
and select one of the listed profiles.
5. When you are satisfied with your selections, click OK. To cancel all
changes, click Cancel.
“Chapter 5. Customizing Editor Appearance and Function” on
page 25
“Chapter 6. Macros and Profiles” on page 35
“Using Profiles to Modify Editor Behavior” on page 29
Using Alternate Editor Personalities
You can configure the editor to adopt the keyboard and command
personalities of many popular editors.
Most editor personalities differ only in the keys and commands used to
perform various editor tasks. Some editor personalities supported by the
editor, listed below, also add a prefix information and command area at the
start of each line.
Editor
Personality
Profile Name
ISPF
ispfprf.lx
SEU
seuprf.lx
XEDIT
xediprf.lx
The Editor recognizes prefix commands used by these editor personalities.
Depending on which profile you are using, you can enter SEU, XEDIT, or ISPF
commands when the prefix area is active. You can also create your own
commands by binding any editor macro or command to your own line
commands.
The prefix area appears on the left side of the Editor window, and may
display line numbers and/or the date. Line numbers are maintained by the
32
LPEX Editor User’s Guide
Editor. Refer to related readings below for more information on using prefix
area commands for specific editor personalities.
“Chapter 6. Macros and Profiles” on page 35
“ISPF Editor Personality” on page 372
“SEU Editor Personality” on page 374
“XEDIT Editor Personality” on page 376
Chapter 5. Customizing Editor Appearance and Function
33
34
LPEX Editor User’s Guide
Chapter 6. Macros and Profiles
Much of the Editor’s flexibility come from profiles, which are text files
containing Editor commands. A profile is a specialized form of an Editor
macro file. Some of the profiles supplied with the Editor provide specific
editing features and run automatically at specific times. You can also define
your own profiles and macros and run them at any time you want.
The standard Editor profiles are kept in the macros directory. You can edit
these profiles directly, but if you change them incorrectly the behavior of the
Editor may be affected. Instead, if you need to modify the behavior of the
Editor, do so by defining new profiles. See Using Profiles to Modify Editor
Behavior for more information.
The following types of profiles are provided with the Editor:
xxx.lxs
xxx.lxl
profile.lx
This profile, if it exists, runs whenever a file with filename typexxxis
saved, including autosaves.
The Editor comes with predefined save macros for many
programming languages. For example, the cpp.lxs profile runs
whenever a C++ file with a cpp source type is saved. You can also
use the same profile naming convention to create your own save
profiles for files of other source types.
This profile, if it exists, runs whenever a file with filename typexxxis
loaded or opened for editing.
The Editor comes with predefined load macros for many
programming languages. For example, the cpp.lxl profile runs
whenever a C++ file with a cpp source type is loaded. You can also
use the same profile naming convention to create your own load
profiles for files of other source types.
This is a profile in which you can save your own customization
commands. It is the last standard profile that is run before a file is
opened, and its commands override the commands used in previous
profiles.
“Using Profiles to Modify Editor Behavior” on page 29
“Writing Macros for the Editor” on page 36
© Copyright IBM Corp. 1995, 1998
35
Writing Macros for the Editor
You may want to write an editor macro to customize aspects of the Editor
window, and to automate lengthy or frequently used sequences of commands.
Macros are written using a combination of REXX commands and Editor
commands and parameters. Macros used by the Editor, along with other
example macros, can be found in the macros directory. You can use these
system macros as a guide when creating your own macros, as follows:
1. Decide on a name for the macro, according to its purpose:
v If the macro will be run when a specific event occurs, such as when the
Editor window is started, or when a file is saved or loaded, use the
naming conventions described in Macros and Profiles, and Using
Profiles to Modify Editor Behavior.
2.
3.
4.
5.
Note: A profile is a special type of macro.
v If you are creating an ordinary macro that will be run using the Editor
macro command, name the macro filename.lx, where filename can be any
name except profile.
Create a new text file.
Place the commands you want to issue in the text file. The first line of the
macro must start with a comment. Comments begin with /* and end with
the */ symbols. Editor commands within the macro must be enclosed in
single or double quotation marks. If you need to extract information from
the Editor, use the extract command.
Save the file.
Ensure that the file is in a directory that is on your LPATH.
Note: Unless you issue a sshow command, the Editor does not refresh
information displayed in the Editor window until after a macro finishes
running.
See the repeats sample macro for a detailed example of how to create a
macro.
“Chapter 6. Macros and Profiles” on page 35
“Using Profiles to Modify Editor Behavior” on page 29
“repeats sample macro” on page 45
Specifying Conditions in Editor Macros
Conditions in macros are based on true or false comparisons. Depending on
the type of macro instruction specifying a condition, if a specified condition is
36
LPEX Editor User’s Guide
true, an action is either taken or continues. If a specified condition is false, an
action is either not taken or stops. You can also specify an action to take if a
condition is false.
The simplest comparison compares two terms against each other. For example:
a = b - true if the value of a is equal to the value of b
a < b - true is the value of a is less than the value of b
a > b - true is the value of a is greater than the value of b
Terms in a comparison can include numeric or string constants, numeric or
string variables, or REXX functions that return numeric or string values.
Comparisons must, however, be of terms of like type. String values cannot be
compared with numeric values.
Conditions can also be based on a combination of comparisons. Each
comparison is enclosed within parenthesis, and the logical operators OR (|)
and AND (&) are used to combine comparisons.
Use the OR logical operator for conditions that should be taken if any one or
more of the specified comparisons is true. For example:
(a = b) | (c = d)
- true if one or more of the following are true:
- value of a is equal to value of b
- value of c is equal to value of d
(a = b) | (e < f) | (g > h) - true if any one or more of the following are true:
- value of a is equal to value of b
- value of e is less than value of f
- value of g is greater than value of h
Use the AND logical operator for conditions that should be taken if all of the
specified comparisons is true. For example:
(a = b) & (c = d)
- true if both of the following are true:
- value of a is equal to value of b
- value of c is equal to value of d
(a = b) & (e < f) & (g > h) - true if all of the following are true:
- value of a is equal to value of b
- value of e is less than value of f
- value of g is greater than value of h
“Chapter 6. Macros and Profiles” on page 35
“Using Profiles to Modify Editor Behavior” on page 29
“Writing Macros for the Editor” on page 36
“Using Constants and Variables in Editor Macros” on page 38
“Using REXX Functions in Editor Macros” on page 42
“repeats sample macro” on page 45
Chapter 6. Macros and Profiles
37
Specifying Arithmetic Expressions in Editor Macros
You can perform basic arithmetic operations between variables in an Editor
macro. Basic operators available to you are:
+
*
/
%
//
addition
subtraction
multiplication
division
division, returning only the whole number part of the result
whole number division, returning only the remainder part of the result
An arithmetic expression performs operations with two or more terms. Terms
in an arithmetic expression can include any combination of numeric constants,
variables, and REXX functions. The result of the arithmetic expression must be
assigned to a variable.
Some simple arithmetic expressions are:
a
b
c
d
e
=
=
=
=
=
10
11
10
11
11
+ 12
/ 2
* abs(-10)
% 2
// 2
-
a
b
c
d
e
is
is
is
is
is
assigned
assigned
assigned
assigned
assigned
a
a
a
a
a
value
value
value
value
value
of
of
of
of
of
22
5.5
100
5
1
More complex arithmetic expressions can mix several arithmetic operators in
the same expression. In such expressions, the normal rules of arithmetic
precedence apply, with arithmetic expressions inside parentheses evaluated
first, and multiplication and division operations performed before addition
and subtraction operations. For example:
a = 8 + 12 / 4
b = (8 + 12) / 4
- a is assigned a value of 11
- b is assigned a value of 5
“Chapter 6. Macros and Profiles” on page 35
“Using Profiles to Modify Editor Behavior” on page 29
“Writing Macros for the Editor” on page 36
“Using Constants and Variables in Editor Macros”
“Using REXX Functions in Editor Macros” on page 42
“repeats sample macro” on page 45
Using Constants and Variables in Editor Macros
Variables let you associate data with a unique name. With Editor macros, you
can display, compare, do arithmetic, or many other functions with the value
stored in the variable name.
38
LPEX Editor User’s Guide
The first character of a variable name must be one of:
v an alphabetic character (case ignored)
v !
v ?
v _ (underscore)
Other characters in the variable name can be any of the characters listed
above, plus the digits 0 to 9.
You can assign a value to a variable. This value can be a constant value, the
value of another variable, the result of an arithmetic or logical expression, or
the result of a REXX function. String constants must be enclosed in single or
double quotes. Numeric constants, names of other variables, and REXX
function names do not require quotes.
In the examples below, the variable name appears to the left of the = sign, and
the constant, expression, or function value being assigned to the variable
appears to the right of the =sign.
a = 10
- a is assigned a value of 10
b = 10.5
- b is assigned a value of 10.5
result1 = 1 + 1
- result1 is assigned a value of 1 + 1, or 2
result2 = result1 + 20 - result2 is assigned the result of the
arithmetic expression result1 + 20,
where result1 is a numeric variable.
his_name = 'Adrian'
- his_name is assigned the character string Adrian
her_name = 'Sandra'
- her_name is assigned the character string Sandra
evens = 2 4 6 8
- evens is assigned a list of values 2 4 6 8
type = datatype(data) - type is assigned the value returned by the datatype
function; if function input variable data is:
- numeric, the returned value is NUM
- a character string, the returned value is CHAR
Variables are not explicitly typed. For example, a variable might be assigned a
numeric value in one part of the macro, but later be assigned a character
string value.
“Chapter 6. Macros and Profiles” on page 35
“Using Profiles to Modify Editor Behavior” on page 29
“Writing Macros for the Editor” on page 36
“Specifying Arithmetic Expressions in Editor Macros” on page 38
“Using REXX Functions in Editor Macros” on page 42
“repeats sample macro” on page 45
Chapter 6. Macros and Profiles
39
Using the IF Statement in Editor Macros
You can use the REXX IF statement to control instruction flow within your
macro. You can specify an action or actions to take if a specified condition is
true, and you can also specify actions to take if that condition is not true.
The basic forms of the IF statement are shown below:
IF condition_true THEN
action
IF condition_true THEN
action1
ELSE
action2
In the most basic form, an action is performed only when the IF condition is
satisfied. The ELSE clause lets you also specify an action to take when the
condition is not satisfied.
If you want to perform several actions as a result of an IF decision, you need
to enclose those actions within a DO-END structure, as shown below.
IF condition_true THEN
DO
action1
action2
action3
END
IF condition_true THEN
DO
action1
action2
action3
END
ELSE
DO
action4
action5
action6
END
The condition can be specified using any combination of REXX variable and
constant terms, REXX functions, and logical and comparison operators.
“Chapter 6. Macros and Profiles” on page 35
“Using Profiles to Modify Editor Behavior” on page 29
“Writing Macros for the Editor” on page 36
“Specifying Conditions in Editor Macros” on page 36
“Using Constants and Variables in Editor Macros” on page 38
“Using REXX Functions in Editor Macros” on page 42
“repeats sample macro” on page 45
40
LPEX Editor User’s Guide
Using Loops in Editor Macros
The various forms of the REXX DO statement lets you set up loops to
perform repetitive tasks until a specified condition occurs.
The basic forms of the DO command are shown below:
do num loop
- loop num times
do var = num_1 to num_2 loop - set the value of var to num_1 and loop,
incrementing the value of var by 1 each
time through the loop until the value of
var is greater than num_2, then leave
the loop.
do while condition_true
- enter the loop only if condition_true is
satisfied, and continue looping for as long
as condition_true is satisfied.
do until condition_true
- always enter the loop once, and continue
looping until condition_true is satisfied.
do forever
- loop until exit is forced by the leave or
return commands.
You can use numeric constants, numeric variables, or functions that return
numeric values in place of num, num_1, and num_2 above. Loop control
conditions can be specified using any combination of REXX variable and
constant terms, REXX functions, and logical and comparison operators.
The DO loop starts with the DO statement, and ends with the END
statement. Macro statements of any kind can appear inside the loop, including
other loops. For example:
do reps = 5 to 10
statement 1
statement 2
num = 0
do while num < 3
statement a
statement b
num = num + 1
end
statement 4
end
You can force an early exit from any kind of DO loop by using the leave or
return commands.
Chapter 6. Macros and Profiles
41
“Chapter 6. Macros and Profiles” on page 35
“Using Profiles to Modify Editor Behavior” on page 29
“Writing Macros for the Editor” on page 36
“Specifying Conditions in Editor Macros” on page 36
“Using Constants and Variables in Editor Macros” on page 38
“Using REXX Functions in Editor Macros”
“repeats sample macro” on page 45
Using REXX Functions in Editor Macros
REXX functions can perform many useful operations in Editor macros. A
REXX function can appear in arithmetic or comparison expressions, and the
results returned by a function can also be assigned to a variable.
Only a few of the most useful REXX functions are briefly described here. For
a complete list of REXX functions, refer to any REXX language and
programming reference.
REXX Function
Name
abs
Arguments and Description
(num)
center
Returns the absolute value of num.
(str, num)
copies
Returns a string of length num characters, with the string str
centered in the returned string. If the length of str is greater than
num, characters are truncated off each end of str, starting from the
right end.
(str, num)
Returns num copies of the string str.
42
LPEX Editor User’s Guide
date
(opts)
If no option is specified, returns the current date in dd/mon/yyyy
format. Some values for opt are:
days
Return the number of days so far this year, in form ddd
with no leading zeros.
european
Return the date in European dd/mm/yy ormat.
month Returns only the full English spelling of the current month
of the year.
ordered
Returns the date in yy/mm/ddformat.
sorted
Returns the date in yyyymmdd format.
usa
Returns the date in mm/dd/yyformat.
weekday
Returns only the full English spelling of the current day of
the week.
datatype
delstr
(var)
Evaluates the type of data invar. If numeric, function returns NUM.
If a character or string, function returns CHAR.
(str, num_1,num_2)
Deletes characters from the stringstr, starting at character num_1 in
the string, and continuing for num_2 characters. If num_2 is not
specified, characters are deleted to the end of the string.
delword
The function returns the remaining characters in the string. If num
_1 is larger than the length ofstr, the complete string is returned
unchanged.
(str, num_1, num_2 )
Deletes words from the string str, starting at word num _1 in the
string, and continuing for num_2 words. If num_2 is not specified,
words are deleted to the end of the string.
insert
The function returns the remaining words in the string. If num_1 is
greater than the number of words in str, the complete string is
returned unchanged.
(new_str, str, num_1, num_2, char)
Inserts the string new_ str into another string str, starting after
character position num_1. If a value is specified for num_2, the string
being inserted is padded to that number of characters. The default
padding character is a blank unless otherwise specified by char.
Chapter 6. Macros and Profiles
43
length
(str)
substr
Returns the number of characters instr.
(str, num_1,num_2)
subword
time
Returns a substring from the stringstr, starting at character num_1,
for a length of num_2 characters. If num_2 is not specified, the rest
of the string is returned.
(str, num_1,num_2 )
Returns a substring from the stringstr, starting at word num_1, for a
length of num_2 words. If num _2 is not specified, the rest of the
string is returned.
(opts)
If no option is specified, returns the current time in 24-hour clock
hh/mm/ss format. Some values for opts are:
civil
Returns the time in 12-hour clock format, showing hours
and minutes followed by am or pm, for example, 12:10am.
hours
Returns the number of hours since midnight, with no
leading zeros.
minutes
Returns the number of minutes since midnight, with no
leading zeros.
seconds
Returns the number of seconds since midnight, with no
leading zeros.
trunc
(num_1, num_2)
word
Returns the value of num_1 truncated (or expanded) to num_2
decimal places. If num_2 is not specified, 0 is assumed as its value.
(str, num)
wordindex
Returns the num’th word from string str. If num is greater than the
number of words instr, the null string is returned.
(str, num)
wordlength
Returns the character position of the first letter of the num’th word
in string str, or 0 if num is greater than the number of characters in
str.
(str, num)
words
Returns the length of the num’th word in string str, or 0 if num is
greater than the number of words in str.
(str,num)
Returns the number of words in the string str.
44
LPEX Editor User’s Guide
“Chapter 6. Macros and Profiles” on page 35
“Using Profiles to Modify Editor Behavior” on page 29
“Writing Macros for the Editor” on page 36
“repeats sample macro”
repeats sample macro
The sample macro shown below contains a variety of REXX commands and
Editor commands and parameters commonly found in user-defined macros.
Editor commands, parameters, and their options are enclosed in quote marks.
Following the sample macro are selected lines and a brief description of what
those lines do.
This section provides only a minimal guide to macro programming for the
Editor. Refer to a REXX language and programming reference for more
information on REXX programming. Refer to the commands and parameters
summaries for more information on how to use commands and parameters to
modify Editor function.
/* This macro repeats a command a given number of times */
/* Two dialogs are issued - the first collects the number */
/* the second the command to repeat */
/* Note: If number not entered, macro ends and a message is issued.*/
/* Note: Only valid editor commands are accepted in second dialog. */
'set lineread.title Repeat a Command'
'set lineread.prompt Enter the number of times to repeat:'
'lineread 255'
'extract lastkey'
if lastkey = 'ENTER' then do
'extract lastline'
end
if datatype(lastline) = NUM
/* check that a number was entered */
then do
numrep = lastline
end
else do
'msg You must enter a valid number'
return
end
/* get the second piece of information
*/
'set lineread.title Repeat a Command'
'set lineread.prompt Enter the command to repeat:'
'lineread 255'
'extract lastkey'
if lastkey = 'ENTER' then do
'extract lastline'
Chapter 6. Macros and Profiles
45
end
cmd_rep = lastline
/* substitute the values entered and run repeat command */
'repeat' numrep cmd_rep
“Chapter 6. Macros and Profiles” on page 35
“Using Profiles to Modify Editor Behavior” on page 29
“Writing Macros for the Editor” on page 36
“Specifying Conditions in Editor Macros” on page 36
“Specifying Arithmetic Expressions in Editor Macros” on page 38
“Using Constants and Variables in Editor Macros” on page 38
“Using the IF Statement in Editor Macros” on page 40
“Using Loops in Editor Macros” on page 41
“Using REXX Functions in Editor Macros” on page 42
“Commands Summary” on page 55
“Parameters Summary” on page 143
/* This macro repeats a command a given number of times */
The first line of any macro must be a comment. Comments may appear on
any part of a line, but must be preceded with /* and followed by */.
’set lineread.title Repeat a Command’
The lineread parameter with the title option assigns a title to the first
user-input window. The window itself will not appear until created by the
lineread command.
“lineread Parameter” on page 258
’set lineread.prompt Enter the number of times to repeat:’
The lineread parameter with the prompt option assigns a prompt to the first
user-input window. The window itself will not appear until created by the
lineread command.
For more information about this parameter, see lineread Parameter in the
Editor Reference.
“lineread Parameter” on page 258
46
LPEX Editor User’s Guide
’lineread 255’
The lineread command gets input from the user. In the sample macro, this
input will be a number for the command repetition factor, which cannot be
more than 255 digits in size.
The lineread command creates a dialog box with an entry field and Save,
Cancel, and Help push-buttons.
You leave the dialog box by pressing the Enter or Esc keys, or by clicking on
the Save or Cancel push-buttons. The method used to leave this dialog box is
stored to the lastkey parameter.
v If you select the Enter key or Save push-button to leave this dialog box, the
current value in the entry field is stored to the lastline parameter.
v If you select the Esc key or Cancel push-button to leave this dialog box, the
initial value of the entry field is stored to the lastline parameter.
In this example, no initial value is specified.
“lineread Parameter” on page 258
’extract lastkey’
The extract command is used in this statement to retrieve, or extract, the
value stored in the lastkey parameter. The extracted value is stored in a REXX
variable, which by default has the same name as the parameter being
extracted. The value stored in the REXX variable can then be examined to see
which key or push-button was used to leave the dialog box.
If the user presses the Enter key or the Save push-button to leave the dialog
box, the value of the lastkey parameter (and REXX variable) will be ENTER.
If the user presses the Esc key or the Cancel push-button to leave the dialog
box, the value of the lastkey parameter (and REXX variable) will be ESC.
“extract Command” on page 80
“lastkey Parameter” on page 251
if lastkey = ’ENTER’ then do
This line tests the value of the lastkey REXX variable to see how the user chose
to leave the user-input window. A value of ENTER implies that a value was
Chapter 6. Macros and Profiles
47
entered in the text input field, and if so, the macro will go on to extract the
information entered in the user-input window.
“Using the IF Statement in Editor Macros” on page 40
’extract lastline’
The extract command is used in this statement to retrieve, or extract, the
value stored in the lastline parameter. The extracted value is stored in a REXX
variable which by default has the same name as the parameter being
extracted. The value stored in this REXX variable can then be used later on in
the macro.
“extract Command” on page 80
“lastline Parameter” on page 253
if datatype(lastline) = NUM
This line uses the datatype REXX function to test the value of the lastline
REXX variable. If lastline contains a numeric value, the user has entered a
valid repetition factor and the macro continues. If not, an error message is
displayed and the macro ends.
“Using the IF Statement in Editor Macros” on page 40
“Using REXX Functions in Editor Macros” on page 42
numrep = lastline
This line assign the value of variable lastline to the variable numrep for use
later in the macro. This value represents the repetition factor that will be
applied to the Editor command that will later be prompted for.
The value of the lastline variable is stored to another name because the
lastline parameter will be overwritten later in the macro, and a subsequent
extract on that parameter would overwrite the value in the lastline variable
used in the macro. It also stores the value under a more meaningful name.
“Using Constants and Variables in Editor Macros” on page 38
48
LPEX Editor User’s Guide
’MSG You must enter a valid number’
The msg command is used to display an error message on the Editor message
line area.
“msg Command” on page 108
return
The REXX return command quits the macro and returns control to the Editor.
cmd_rep = lastline
This line assign the value of variable lastline to the variable cmd_rep for use
later in the macro. This value represents the command that will be repeated.
“Using Constants and Variables in Editor Macros” on page 38
’repeat’ numrep cmd_rep
This line uses the Editor repeat command to repeat the command input by
the user by the repetition factor also input by the user.
Quote marks surround only the repeat command, and not the arguments to
that command. The numrep and cmd_rep variables on this line yield the values
stored in them as arguments to the repeatcommand. Had the two variables
been enclosed inside the quotation marks, the variable names themselves, and
not the values they contain, would be supplied to the repeat command.
The Editor repeat command offers you one way to repeat a single command
for a known number of times. You can also use various forms of the REXX
DO command to cause several commands to loop, and to include additional
macro processing inside the loop itself. See related readings below for more
information.
“Using Loops in Editor Macros” on page 41
“repeat Command” on page 123
Chapter 6. Macros and Profiles
49
50
LPEX Editor User’s Guide
Chapter 7. External Editor Commands
External commands are created as shared (
) or dynamic link (
)
libraries whose names start with a prefix specific to the version of LPEX
installed (usually l4) and have a filename extension of dll. For example, an
external command called scanl4scan.dll
Your external command is run directly as a procedure call from within the
Editor. Consider the following:
1. You cannot use the C exit function to quit from your external command.
The return statement in lxmain() returns you to the Editor.
2. The command runs on the Editor’s stack. The stack is usually quite large,
however, you should avoid storing too much information in it.
3. One copy of the external command is loaded. If you make a recursive call,
the same procedure is called and any items you use will refer to the same
storage location. Write your programs to allow for this reentrance.
“Writing External Command Source Code”
“External Subroutines Summary” on page 357
“Program Entry and Exit Conditions” on page 52
“Sample External Command: proto” on page 53
“linked Parameter” on page 259
“unlink Command” on page 142
Writing External Command Source Code
The source code is written as a standard C program, using the Editor access
calls described in the lpexapi.h file. The following is an example of a typical
minimal external function:
/*
*–––––––––––––––––––––––––––––––––––-*
* DISCLAIMER OF WARRANTIES:
*
* The following enclosed code is sample code created by IBM
* Corporation. This sample code is not part of any standard IBM
* product and is provided to you solely for the purpose of assisting
* you in the development of your applications. The code is provided
* 'AS IS', without warranty of any kind. IBM shall not be liable
* for any damages arising out of your use of the sample code, even
* if they have been advised of the possibility of such damages.
*
*–––––––––––––––––––––––––––––––––––-*
© Copyright IBM Corp. 1995, 1998
*
*
*
*
*
*
*
*
*
*
*
51
*
*/
/****************************************/
/* LXMIN2.C - A minimal LPEX external */
/*
command in C or C++.
*/
/****************************************/
#include 'lpexapi.h'
/* include function definitions */
int lxmain(uchr *parm)
/* lxmain() is the command entry point */
{
return 0;
/* do nothing */
}
Note that the program entry point is always the lxmain() function. You cannot
use the main() function.
“External Subroutines Summary” on page 357
“Program Entry and Exit Conditions”
“Sample External Command: proto” on page 53
Application Programming Interface Overview
You can use the application program interface (API) to customize and extend
Editor functions by adding new commands, including parsers.
“External Subroutines Summary” on page 357
“Program Entry and Exit Conditions”
“Sample External Command: proto” on page 53
Program Entry and Exit Conditions
Entry Conditions
External commands receive control at a routine called lxmain(). Define this in
your program as:
int lxmain(char* parm)
The argument is a pointer to the command parameter string.
The return value is the return code sent back to the Editor. The values -1 to
-10 are reserved for use by the Editor; you must not return these from your
external commands. All other return values are allowed.
52
LPEX Editor User’s Guide
Exit Conditions
An external command can have an exit clean up routine. Define this in your
program as:
int lxexit (char* parm)
This optional subroutine can call other Editor functions (such as lxcmd('find
up asis needle')). It should release any Editor storage acquired using lxalloc()
or other storage acquired using malloc(), and it should terminate any other
processes that have been linked to earlier by the command.
“External Subroutines Summary” on page 357
“Sample External Command: proto”
Sample External Command: proto
Inserts statements into a file.
Scope: File
Syntax
Description
The proto command provides a simple mechanism for inserting statements
into programs. For example, you could use proto to insert simple logic
structures such as IF, DO, or WHILE, or calls to other applications.
If you assign the mechanism to a key, pressing that key when the cursor is
placed on any keyword, such as if, expands the keyword into a prototype
pattern.
The external command proto is assigned to the Ctrl+R key by the C tokenizer
(parser). The global variables are set up in c.lxl. When C or C++ files are open
in the Editor, you can use the Global Variables selection in the Options
pull-down menu to query and amend the variables.
Note: You can find the source code for the proto command is in the file
proto.c, located in the extras directory.
Chapter 7. External Editor Commands
53
Parameter
Name
Can be any prefix used to set up the global variables; for example proto.c.
Example
To insert an if statement:
1. Open a file containing a C or C++ program.
2. Type the keyword if.
3. Press Ctrl+R. The keyword is replaced by:
if () {
}
and the cursor is positioned between the parenthesis.
For further details on proto and how it works, read the source code that is
provided as lxproto.c in the extras directory.
“Application Programming Interface Overview” on page 52
“Chapter 7. External Editor Commands” on page 51
“External Subroutines Summary” on page 357
“Sample External Command: proto” on page 53
54
LPEX Editor User’s Guide
Chapter 8. References
Commands Summary
The Editor window is fully programmable through the use of an extensive
Editor command set. You can use commands to customize the Editor window,
search for or change text in your document, or perform many other functions.
Select a command from the list below to display complete reference
information for that command.
Command Name
Description
“= Command” on page 58
Re-runs the most-recently run Editor
command.
Adds one or more blank lines.
Produces a tone on the speaker.
Shows all lines or those selected by a
command.
Moves the cursor to the beginning of
the current line.
Manipulates a block of text.
Moves the current position to the
bottom of the file.
Substitutes one string for another.
Takes a checkpoint.
Provides clipboard functions for the
Editor.
Examines two documents for
differences in their content.
Deletes one or more lines.
Expands tabs to blanks.
Invokes an Editor dialog.
Duplicates the current line.
Moves cursor position to the end of
the current line.
Compresses blanks to tabs.
Closes the Editor.
Obtains the value of Editor parameters
when REXX is active.
Closes all file views of the file, saving
the changes.
Find a specific string or line.
“add Command” on page 59
“alarm Command” on page 59
“all Command” on page 60
“begin Command” on page 62
“block Command” on page 62
“bottom Command” on page 67
“change Command” on page 67
“check Command” on page 70
“clip Command” on page 70
“compare Command” on page 71
“delete Command” on page 73
“detab Command” on page 74
“dialog Command” on page 75
“dup Command” on page 76
“end Command” on page 78
“entab Command” on page 78
“exit Command” on page 79
“extract Command” on page 80
“file Command” on page 81
“find Command” on page 82
© Copyright IBM Corp. 1995, 1998
55
Command Name
“focus Command” on page 85
“get Command” on page 85
“godoc Command” on page 86
“goring Command” on page 89
“goview Command” on page 90
“help Command” on page 92
“insert Command” on page 93
“keyread Command” on page 94
“lineread Command” on page 94
“load Command” on page 95
“lx Command” on page 96
“lxc Command” on page 98
“lxi Command” on page 99
“lxn Command” on page 100
“lxr Command” on page 101
“macro Command” on page 102
“macrodrop Command” on page 103
“macroload Command” on page 104
“mark Command” on page 105
“msg Command” on page 108
“mult Command” on page 109
“next Command” on page 110
“openclose Command” on page 111
“prefixprocess Command” on page 112
“prefixrenumber Command” on page 112
56
LPEX Editor User’s Guide
Description
Moves the current position to the focus
line.
Gets a file and inserts it after the
current line.
Go to or create a named document.
Move to or create a new ring in the
Editor window.
Displays or creates the specified file
view.
Returns help information on a
requested command or parameter.
Inserts a text string after the current
line.
Waits for a key to be pressed.
Produces a dialog that reads a string of
characters.
This command reads a specified file
(no lines wider than 2500 characters)
into an empty Editor window as a
simple list of elements.
Loads or creates the named file.
Issues command as though from the
command line.
Issues command as though invoked
interactively.
Issues an Editor command without
searching for a macro.
Issues one or more resolved
commands.
Searches the LPATH for a macro file,
then processes it.
Removes the named macro from
internal storage
Preloads an Editor macro into internal
storage.
Sets up or finds a position mark.
Displays a specified message.
Issues a series of commands.
Moves the current position to next
object (level, class or word).
Adds or deletes a blank line.
Executes all commands found in the
prefix entry fields.
Reorders the numeric part of the prefix
data into unique ascending numbers.
Command Name
“preserve Command” on page 113
“prev Command” on page 114
“primitive Command” on page 115
“print Command” on page 116
“qquit Command” on page 118
“query Command” on page 119
“quit Command” on page 120
“quitview Command” on page 121
“record Command” on page 121
“repeat Command” on page 123
“reset Command” on page 124
“restore Command” on page 125
“save Command” on page 125
“saveall Command” on page 127
“scroll Command” on page 128
“set Command” on page 129
“setoldlines Command” on page 130
“showfont Command” on page 130
“sort Command” on page 131
“splitjoin Command” on page 133
“sshow Command” on page 134
“start Command” on page 135
“submit Command” on page 136
“substitute Command” on page 137
“top Command” on page 138
“trigger Command” on page 139
“undo Command” on page 140
Description
Saves current settings to be restored
later.
Moves current position to previous
object (line, level, class or word).
Performs a keyboard or other simple
function from a macro.
Prints the current document.
Quits from current file view without
saving changes.
Queries one or more parameters.
Quits current file view if no changes
have been made.
Quits current file view.
Records keystrokes to a macro file.
Repeats a command a specified
number of times.
Resets selected Editor settings to their
initial value.
Restores file status.
Saves the contents of the current
editing window into a file.
Invokes an Editor command or macro
after saving user-specifiable set of
modified files.
Scrolls a specified number of lines or
columns of the file.
Specifies the value for an Editor
parameter.
Sets the oldline value for each line to
its current line number.
Displays the content of the character
set.
Sorts lines of text.
Splits a line or joins two lines.
Refreshes a file view.
Invokes an operating system command
to run in a separate process.
Invokes an Editor macro to run on a
secondary thread, thereby allowing the
user to continue interacting with the
Editor.
Causes symbol substitution.
Moves the cursor position to the top of
the file.
Enables live parsing of pending lines.
Undo one or more sets of file changes.
Chapter 8. References
57
Command Name
“unlink Command” on page 142
Description
Unlinks a previously linked external
command.
“Chapter 3. Editor Commands and Parameters” on page 21
“Parameters Summary” on page 143
= Command
Repeats the most-recently run Editor command.
Scope: Global
Syntax
Parameters
None.
Description
The = command re-runs the most-recently run Editor command.
Example
To add five new lines after the current line, type:
add 5
Bring up the Open window by selecting the Open... choice from the File
pull-down menu, then close it. To bring up the Open window again, issue the
= Editor command, as shown below:
=
API Return Codes
None.
58
LPEX Editor User’s Guide
add Command
Adds one or more blank lines.
Scope: File
Syntax
Parameter
Number
The number of blank lines to add. The default is 1; it must be a positive
integer.
Description
The add command adds one or more lines following the current line (or
sequence of flowed lines). Each new line consists of a single blank on a new
line.
To add a line at the top of the file (before the first line), move to the first
character in the file and then use the splitjoin command to create a new
blank line.
Example
To add five new lines after the current line, type:
add 5
API Return Codes
-1 The number specified was either outside the valid range or not a whole number.
Issue the command again using a valid number.
-5 You cannot make changes to the file because the readonly parameter is set to on.
“splitjoin Command” on page 133
alarm Command
Produces a tone on the speaker.
Scope: Global
Chapter 8. References
59
Syntax
Parameters
Tone
Duration
Frequency in hertz in the range 50 to 20000. The default is 440. Tone can
also be set using the beeptone parameter.
Duration in hundredths of a second in the range 0 to 1000. The default
is 20. Duration can also be set using the beeplength parameter.
Description
The alarm command sounds a tone on the speaker, if sound has not been
turned off using a system command or the set beep off command. Use the set
alarm on command to produce the sound when the screen is next refreshed.
Note: If the system beep has been turned off using an system command, the
beep on parameter cannot override it and the alarm will remain off.
Example
To change the alarm, type:
alarm 100 75
API Return Code
-1 A parameter issued with the command was not valid. Issue the command again
with valid numeric values for Duration and Tone.
“alarm Parameter” on page 163
“beep Parameter” on page 175
“beeptone Parameter” on page 176
“beeplength Parameter” on page 176
all Command
Shows all lines or only those selected by a command.
Scope: View
Syntax
60
LPEX Editor User’s Guide
Parameter
Command
Any valid Editor command, including required and optional parameters.
Description
If a command is not provided, all lines are displayed.
If a command is provided, only selected lines in the current file are displayed.
Selection occurs as follows, starting with the first line in the current file:
1. The command is applied against the contents of the current line.
2. If the current line does not change as a result of running the command,
that line is added to the displayed lines, and processing moves to the next
line in the file.
3. If running the command causes the current line to change, the new current
line is displayed, and processing continues with the line following the new
current line.
4. Processing stops when the end of the file is reached.
Depending on the command specified, the contents of the file may or may not
change. Using commands such as add or delete will result in changes to the
file.
Using other commands, such as the find command, may result in only a
subset of lines in the file being displayed, but will not change the original
contents of the file. For example, issuing the command:
all find asisa_non-existent_word
results in no lines being displayed. All lines of the file can be redisplayed by
issuing the all command without specifying a command.
Examples
1. To display only those lines containing string, type:
all find any string
2. To display all lines, type:
all
Chapter 8. References
61
API Return Code
-3 Specify less than 29 ClassNames. The all command itself occupies one class
name, so even though the maximum number of class names is 30, you must
specify less than 29 class names.
“exclude Parameter” on page 210
“include Parameter” on page 244
begin Command
Moves the cursor to the beginning of the current line.
Scope: View
Syntax
Description
The begin command moves the cursor to the beginning of the current line.
Example
To move the current position to the beginning of the current line, type:
begin
API Return Codes
None.
“end Command” on page 78
block Command
Manipulates a block of text.
Scope: File
Syntax
62
LPEX Editor User’s Guide
Parameters
If no parameters are supplied, a block mark is done. Only one block can be
marked at a time.
copy
move
before
after
clear
mark
Copies the current block. The block definition moves to the copied
block, and the current position is moved to be the start of the new
(copied) block.
If a character string is being copied, the characters are copied before
the current position. If a list of lines is being copied, the list is
copied after the current line. If a rectangular block is being copied,
the remainder of each line at and following the current position is
moved to the right to make room for the block.
Deletes the block from its original position and places it into its new
position.
The block is placed immediately before the current position.
The block is placed immediately after the current position.
Clears any currently set block. Use the clear parameter to cancel a
block after the copy, fill, lower, move, shift, and upper parameters
have been used.
Marks using the selection types set by the blockdefaulttype
parameter.
Chapter 8. References
63
mark character
mark stream
Sets the beginning or end of a character block. On the first call, a
single character is marked. On a second call, the block is extended
to all characters between the initial and the current positions. On
further calls, the block is extended if the current position is before
or after the block; or, if the current position is inside the block,
reduced to include characters between the original start and current
position.
Sets the beginning or end of a stream block. It is similar to a
character block except for the following differences:
v It has a scope of view.
v The selection is coupled with the cursor. If the cursor is moved
the block selection will disappear.
v The delete and backspace keys will cause a selection to be
deleted.
mark element
mark group
mark rectangle
set character
set element
set group
set rectangle
set stream
mark word
set word
64
LPEX Editor User’s Guide
v A stream block can be replaced by text entered from the
keyboard, played-back by the keystroke recorder, or pasted from
the clipboard.
Sets the beginning or end of a line block. On the first call, the
current line is marked. On a second call, the block is extended to
include the new current line. On further calls, the block is extended
if the current line is outside the block; or, if the current line is inside
the block, is reduced to include lines between the original start and
current position.
Marks the current subgroup of lines. The block is set up as for mark
element, except that if the first mark is on a structure line, that
mark sets a block that extends from the beginning of that line to the
end of the next structure line at the same or lower level.
Sets the beginning or end of a rectangular block. On the first call,
the current character is marked. On a second call, the block is
extended to all characters in the rectangle between the current
position and the previous one. On further calls, the block is
extended or reduced. The presence of Tab characters will distort a
rectangular block. Using this style of block with text containing tabs
may produce unexpected results.
Performs the same operations as their respective mark functions
with this exception: if the cursor is on the first or last character in
the block on the third or subsequent calls, the whole block is cleared
(unmarked).
Marks the current word. If a block is already set it is cleared first,
then the whole word under the cursor is selected. If the cursor is
not located at an alphanumeric character, a forward scan is done. If
a word is not found before the end of the current element, a
backward scan is carried out. If a word is still not found by the time
start of the current element is reached an error code is returned. For
all block operations, a word block is treated the same as either a
character block or a stream block, depending on the setting of the
blockdefaulttype parameter.
fill Character
Fills the current block with the Character. Character can be a blank or
any other single keyboard character, specified in any of the
following forms:
nnn
A decimal-based ASCII character code, where n is a digit of
value 0 to 9, inclusive. For example, character code 065 =
A.
xnn or xnnn
A hexadecimal-based ASCII character code, where nis a
digit of value 0 to 9, inclusive, or an alphabetic character of
value A to F or a to f, inclusive. For example, character
code x41 = A.
single character
Any single keyboard character.
find
find end
lower
upper
overlay
shift left Number
shift right
Number
delete
The fill character also fills a line block up to the end of the text line.
Moves the current position to the start of the current block, which
may be in another file.
Moves the current position to the end of the current block, which
may be in another file.
Converts the block to lowercase.
Converts the block to uppercase.
The current rectangular block is placed over the text at the current
position. If you clear the block, the contents of the rectangle block
are pasted at the current position.
Moves the current block a specified number of characters to the left
or right. When the block is shifted to the right, it is padded with the
pad character and no data is lost. When shifted to the left, the
block’s initial characters are removed. The shift parameter cannot be
used with the character or word parameters. When applied to a
rectangular block, shift moves the characters within the rectangle to
the left or right, but does not move the block itself.
Deletes the block. If the current position is within the block, it is set
to the first character after the block.
Examples
1. To clear a marked block, type:
block clear
2. To mark a rectangle, place the cursor at one corner of the rectangle and
type:
block mark rectangle
Then move the cursor to the opposite corner of the rectangle and type the
same command again.
3. To copy the current block to a specific position, mark the block, place the
cursor where you want a copy of the block to be placed, and type:
Chapter 8. References
65
block copy
4. To place a copy of the current block below the existing one and then clear
the block, type:
block copy after clear
5. To move the current line block two characters to the right, type :
block shift right 2
6. To overwrite the current block with plus ( + ) signs, type:
block fill +
7. To find the start of the current block, type:
block find
Use block find end to find the end of the current block.
8. To move the current block to a specific position, mark the block, place the
cursor where you want the block to be moved, and type:
block move
The block is deleted from its original position and placed in the new
position.
API Return Codes
-1 The parameter issued with the command was not valid. Check the command’s
syntax requirements and then issue the command again using a valid parameter.
-2 A block was not set or marked before you tried a block move, block copy, block
shift, block upper, block lower, block overlay, or block find command. Mark or
set a block before performing one of these block operations.
-3 You cannot move a line, character, or rectangular block into itself. Move the
cursor outside the block and try again.
-5 You cannot make changes to the file because the readonly parameter is set to on.
-6 Copying, moving, shifting the block, or converting the block to overlay would
make the line too long. The block operation was canceled. See if there is a way to
decrease the size of the block or the line that is being appended.
“blockdoc Parameter” on page 178
“blockend Parameter” on page 179
“blocklength Parameter” on page 180
“blockstart Parameter” on page 181
“blocktype Parameter” on page 182
“blockdefaulttype Parameter” on page 177
“blockview Parameter” on page 183
66
LPEX Editor User’s Guide
bottom Command
Moves the current position to the bottom of the file.
Scope: View
Syntax
Description
The bottom command moves the current position to the last character of the
last line of the file.
Example
To move to the bottom of the file, type:
bottom
API Return Code
-9 This command takes no parameters.
“top Command” on page 138
change Command
Substitutes one string for another.
Scope: File
Syntax
Chapter 8. References
67
Parameters
visible
any
asis
Delimiter
String1/String2
Changes are restricted to visible lines.
Find String regardless of case.
Find String exactly as typed.
Strings are separated by any single non-blank character not used
elsewhere in the parameter string. For example, change
'String1'String2 uses double quotes as a delimiter. Because z is not
part of the string to be changed, you could also have specified the
command with change zString1 zString2. Spaces placed between
the delimiter and string are considered part of the string.
String1 is the string to be searched for, and String2 is the string
which replaces String1. A change is made only when an exact match
is found, including alphabetic case and spaces. If no other
parameters are used, only the current line or marked block is
searched.
If String1 is null, String2 is inserted at the beginning of each line. If
String2 is null, each occurrence of String1 is deleted. To indicate
null, use the delimiter followed by the next delimiter (for example,
'').
An Editor command, including multiple commands. This is used to
define the range of lines over which any changes are to be applied.
The range extends from the current position to the line that becomes
the current line when the command is executed. This parameter can
also be a positive integer that gives the number of lines over which
the changes can be made.
The maximum number of changes allowed in any line. If omitted,
the default is any number of changes; but if String1 is null, then the
default becomes one. If the Command parameter is omitted, you
need to ensure that there are two delimiters before the Count.
The Editor prompts for each change to be confirmed.
Command
Count
?
Description
The change command searches for String1 and, if found, replaces it with
String2. This command searches forward only.
By default, the change command is applied only to the current line or, if a
block is marked, then only to the marked block. If the Command or Count
parameters are used, the change command continues to make changes beyond
the current line or marked block if required by these parameters.
Examples
1. To replace every occurrence of the 6-character string colour with the
5-character string color in the current line or marked block, type:
change 'colour'color
68
LPEX Editor User’s Guide
In this example, ' is the delimiter.
2. To replace every occurrence of the 6-character string colourwith the
5-character string color, from the current position to the end of the file,
type:
change 'colour'color'bottom
3. To replace every occurrence of the 6-character string colourwith the
5-character string color, until the Editor finds the word finish, type:
change 'colour'color'find asis finish'?
The Editor searches for the word colour and changes it to color until it finds
the word finish. Because of the ?, the Program Editor asks for each change
to be confirmed.
4. To replace every occurrence of the 6-character string colourwith the
5-character string color, in the next five lines, type:
change 'colour'color'5
The integer 5 in the Command position gives the number of lines over
which the changes can be made.
5. To replace up to five occurrences of the 6-character string colour with the
5-character string color, in the current line, type:
change 'colour'color''5
The integer 5 in the Count position gives the maximum number of changes
allowed in the current line. The two quotation marks in the Command
parameter position are required to place the integer in the Count position.
API Return Codes
-1 The marked block in which you want to search is not in the current file. Click on
the file containing the block to make it current and then retry the command.
-2 The file contains no lines; no operations can be performed.
-3 The change command received a negative return code from the command
specified by the Command parameter.
-4 The Count parameter was not a valid positive integer. Correct the Count and
issue the command again.
-5 You cannot make changes to the file because the readonly parameter is set to on.
-7 The change command required at least two parameters and you have specified
only one. Check to see that a null string is preceded by a delimiter.
“readonly Parameter” on page 305
Chapter 8. References
69
check Command
Takes a checkpoint.
Scope: File
Syntax
Parameters
clear
Delete all sets of changes.
Description
The check command records a checkpoint. A checkpoint is a set of changes
which can be reversed by the undo command. The first time check is called it
starts the recording of changes. The check command can be called explicitly at
any time or automatically if the autocheck parameter is set to on.
Example
To delete all checkpoint records, type:
check clear
API Return Codes
-1 The parameter issued with the command was not valid.
“autocheck Parameter” on page 165
“undo Command” on page 140
clip Command
Provides clipboard functions for the Editor window.
Scope: View
Syntax
70
LPEX Editor User’s Guide
Parameters
copy
Copies the current marked block into the clipboard (leaving the original
in the file).
Moves the current marked block into the clipboard (removing it from in
the file).
Clears the clipboard.
Copies the current clipboard contents into the file at the cursor position
(provided the clipboard contents are available in standard text format).
Display a message indicating whether the clipboard is empty or contains
text.
cut
empty
paste
query
Description
The clip command provides standard clipboard functions (copy, cut, and
paste) for all block types.
Examples
1. To copy the marked block, type:
clip copy
2. To paste the clipboard contents into a file, type:
clip paste
API Return Codes
-8
-5
1
2
4
Out of memory.
Attempting to cut or paste in read-only file.
Command parameter is not valid.
No block is marked for cut or copy.
Clipboard is empty, or content is not in text format.
“block Command” on page 62
compare Command
Examines two documents for differences in their content.
Scope: Global
Chapter 8. References
71
Syntax
Parameters
DOCNUM n A document specified by Editor document number n.
filename
The name of a file including, if required, the directory path of that file. If
filename is enclosed with ' ', the file name and directory path can include
blanks if permitted by the file system.
path
A directory path without a file name. If path is enclosed with ' ', the
directory path can include blanks if permitted by the file system.
Description
The compare command examines two documents for differences in their
content. Each document is placed in a new file view, and these new file views
are placed side-by-side inside an Editor compare window. Between the two
file views, a comparison bar highlights both similar and different sections of
the two documents. Options for the compare command can be set from the
Compare pull-down menu that appears in the menu bar of the Editor
compare window.
If the compare command is issued without any file names or document
numbers, there must be exactly two documents open in the Editor. The
currently-active document appears in the file view on the left side of the
Editor compare window.
If you specify only one file name or document number in the compare
command, an Editor compare window opens with the currently-active
document in the file view on left side of the window, and the specified
document in the file view on the right side of the window.
If comparing two files that have the same name but reside in different
directories, you can identify the second document by specifying only its
directory location.
File names specified in the compare command that do not already exist will
be created.
A document cannot be compared to itself.
72
LPEX Editor User’s Guide
Examples
1. To compare two documents if those two document are the only documents
opened in the Editor, type:
compare
2. To compare the current document and the config.sys file on your D:\ drive,
type:
compare d:\config.sys
3. To compare document numbers 4 and 8 that are already opened in the
Editor, type:
compare DOCNUM 4 DOCNUM 8
4. To compare the files config.sys and config.old, type:
compare config.sys config.old
5. To compare the file config.sys and document number 4 that is already
opened in the Editor, type:
compare config.sys DOCNUM 4
6. To compare the files d:\config.sys and c:\backups\config. sys, type:
compare d:\config.sys c:\backups
7. To compare the file c:\backups\config.sys with the current document that is
called config.sys, type:
compare c:\backups
API Return Codes
-4
-6
-7
-8
-11
-12
-13
Document number specified is not in valid range of 1 - 9999.
Document number specified is not open in the Editor.
No current document to compare.
Out of memory in compare.
Cannot compare document to itself.
Document failed to load.
Number of open documents is not two.
delete Command
Deletes one or more lines.
Scope: File
Syntax
Chapter 8. References
73
Parameter
Number
The number of lines to be removed. Must be positive. The default is one.
Description
The delete command removes the current line or the current line and a
number of following lines from the file. The line that follows the deleted lines,
becomes the current one. If there are no following lines, the previous line
becomes the current line.
If a parser is set, the new current line (if any) is added to the pending list.
If any deleted line contains the beginning or end of a block, the block clear
command is called before the delete is done.
Example
To delete the next five lines from a file, type:
delete 5
The sixth line becomes the current one.
API Return Codes
-1 The number specified was not a positive integer. Issue the command again using
a valid positive number.
-5 You cannot make changes to the file because the readonly parameter is set to on.
“block Command” on page 62
detab Command
Expands tabs to blanks.
Scope: File
Syntax
Parameters
74
LPEX Editor User’s Guide
None.
Description
The detab command expands tabs to blanks according to the current tab
settings.
Example
To expand tabs to blanks:
detab
API Return Codes
None.
“entab Command” on page 78
“tabs Parameter” on page 337
dialog Command
Invokes an Editor dialog.
Scope: Global
Syntax
Parameters
Name
?
The name of the dialog window to invoke.
List all dialog windows available in the Editor.
1. Issue the command dialog ?
2. View the Macro log file to see the output of the dialog command.
The Editor window will show the basic dialog windows listed below.
Also shown for each dialog window is the standard pulldown menu
path used to open that dialog through the Editor window user
interface.
Description
Chapter 8. References
75
The dialog command opens the specified Editor dialog window.
Window Name
Pull Down Menu Path to Window
new
open
getfile
saveas
print
findchange
element
date
findmark
markname
filter
filterdate
commandline
compare
action
options
fonts
colors
tokens
globals
changeprof
customize
rings
logo
File -> New...
File -> Open...
File -> Get...
File -> Save as...
File -> Print...
Edit -> Find and replace...
Edit -> Locate -> Line...
no menu equivalent
Edit -> Locate -> Mark...
Edit -> Name a mark...
View -> Filter...
no menu equivalent
Actions -> Issue edit command...
Actions -> Compare...
no menu equivalent
Options -> Editor parameters...
Options -> Font...
Options -> Color palette...
Options -> Token attributes...
Global variables...
Options -> Change profile...
Options -> Key behavior -> Customize...
Windows -> Ring Manager
Product Information
Example
To invoke the Open dialog window, issue the following Editor command:
dialog open
API Return Code
-2 The Name specified was not a valid dialog name. Issue the command again using
a valid dialog name.
dup Command
Duplicates the current line.
Scope: Line
76
LPEX Editor User’s Guide
Syntax
Parameter
Number
The number of times the current line is duplicated. It must be zero or a
positive integer value. The default is 1.
Description
The dup command duplicates the current line, copying all information
including content, fonts, and structure.
The new line is placed after the current line, and the first character of the new
line becomes the current position. If more than one new line is created, the
first character of the last of the new lines becomes the current position. If no
new lines are created, the current position is not moved.
If the line being duplicated is the last in a list of lines forming the current
block, the block is extended to include the duplicated line.
By default, the line is duplicated once. A repetition count can be specified if
desired.
Example
To copy the current line five times, type:
dup 5
API Return Codes
-1 The number specified was either outside the valid range or not a whole number.
Issue the command again using a valid number.
-5 You cannot make changes to the file because the readonly parameter is set to on.
-8 Insufficient storage to continue.
“block Command” on page 62
Chapter 8. References
77
end Command
Moves cursor position to the end of the current line.
Scope: View
Syntax
Description
The end command moves the cursor position to the end of the current line.
The current position is set to one character beyond the end of the chosen line.
Example
To move the cursor to the end of the current line, type:
end
API Return Codes
None.
“begin Command” on page 62
entab Command
Compresses blanks to tabs.
Scope: File
Syntax
Description
The entab command compresses sequences of blanks to tab characters
according to current tab selections.
78
LPEX Editor User’s Guide
Example
To compress blanks to tabs:
entab
API Return Codes
None.
“detab Command” on page 74
“tabs Parameter” on page 337
exit Command
Closes documents (views) in the Editor.
Scope: Global
Syntax
Parameter
prompt
A window appears asking you to confirm your intent to close the Editor.
Description
The exit command closes all file views, files, and external commands, then
ends the Editor session. For every file containing unsaved changes, a message
appears asking you to save or discard changes.
Example
To end your Editor session, type:
exit
API Return Codes
1 The exit command was cancelled by user request.
Chapter 8. References
79
“qquit Command” on page 118
extract Command
Obtains the value of Editor parameters when REXX is active.
Scope: File
Syntax
Parameter
Name
Variable
The name of an Editor parameter that can be queried.
The name of a REXX variable. The value of the parameter specified by
Name is stored in this variable. If not specified, the parameter name is
used as the variable.
Description
In an Editor macro program, you use the extract command to extract the
value of an Editor parameter into a REXX variable. This variable can then be
operated on or used by program logic structures in macro program.
Note: The extract command can only be issued as part of an Editor macro,
and will not extract the value of a parameter if issued from the Editor
command line. You can issue the query command from the command line to
see the value of a parameter.
Example
To query the doclist parameter and store its value to a REXX variable of the
same name, type:
extract doclist
API Return Codes
-1 Invalid item found.
-2 REXX not available to set variables.
80
LPEX Editor User’s Guide
“Parameters Summary” on page 143
file Command
Closes all file views of the file, saving the changes.
Scope: File
Syntax
Parameters
Drive-Directory-Filename
/asshown or /as
/nofilelist or /nfl
The drive, directory, and filename to which the file is saved.
This option lets you save a different view of the file. The
data is saved exactly as it is displayed at the time the
command is issued.
The file saved is not shown in the recently-accessed file list
in the File pull-down menu in the Editor window.
Description
The file command ends the editing of the current file by saving it to a file and
then quits from the file. If the save fails, the file is not closed. If a Filename is
not specified, the name is derived from the current file name.
Examples
1. To save a file view of a file called testdoc1.doc to another file name in a
different directory and then quit, type:
file \example\newtest1.doc
2. To save and close a file that has three file views open, type:
file newtest1.doc
All changes made to all file views are saved to the file name.
3. To save a file as it appears in the view and then close the view, type:
file /asshown
All changes made to the file in the view are saved to the current file name
when the Editor is closed. Changes made to other views, if not copied to
this view, are not saved.
Chapter 8. References
81
API Return Codes
1 The filename already exists. The Editor asks if you want to overwrite the existing
file with this file.
2 The file was saved successfully with some lines truncated.
-1 The filename is not valid.
-2 A filename must be specified for an untitled document.
-3 The file is empty.
-6 The Editor encountered an error when the file was being saved.
-7 The file was not saved because the nosave parameter is set to on. To save the
file, set the nosave parameter to off and then use either the file or save
command to save the file.
-9 The file was open in another Editor window.
“preserve Command” on page 113
“qquit Command” on page 118
“quit Command” on page 120
“restore Command” on page 125
“save Command” on page 125
“nosave Parameter” on page 277
find Command
Find a specific string or line.
Scope: View
Syntax
82
LPEX Editor User’s Guide
Parameters
up
down
visible
mark
columns num1 num2
block
alldocs
nowrap
checkcurrent
nosave
emphasis
asis TextString
any TextString
match TextString
match asis TextString
element Number
prefixentry
prefixentry TextString
prefixtext TextString
prefixtext to TextString
prefixnumber Number
next
previous
oldline Number
Searches upwards in the document. Must precede any, asis,
or element.
Searches downwards in the document. Must precede any,
asis, or element.
Restricts the search to visible lines. For a line to be visible,
its class must be included in the list specified by the
include parameter or excluded from the list specified by
the exclude parameter. If visible is not specified, the Editor
searches all lines and places the cursor at the closest visible
point to the string when found. If used, visible must be
specified first.
Marks the text as a character block, or marks the line as a
line block. The found text will be marked with either a
character block or stream block, depending on the setting of
the defaultblockselection parameter.
Restricts the search to a columnar area including the
columns specified by num1 and num2, and the area between
them.
Searches are restricted to the currently-selected block of
text.
Searches all documents currently open in the Editor.
Searches will stop when the bottom of the file is reached.
Begins searching at the current cursor position.
The current find operation is not saved into the lastfind
parameter.
Found text is emphasized in the view.
Searches for the text string using the exact form of
characters specified.
Searches for the text string regardless of case.
Treats TextString as a regular expression search pattern. If
asis is specified, the search pattern is case sensitive.
Searches for the line number specified.
Finds the next prefix entry. If TextString is specified, go to
the next prefix entry that matches TextString.
Finds and goes to the next prefix text entry that matches
TextString.
Searches for the line that has the largest prefix number that
is not greater than Number.
Finds the next occurrence in the find history.
Finds the previous occurrence in the find history.
Search for the line that has been set with an old-line
number of Number.
Note: The length of the entire find parameter string is limited to 250
characters.
Chapter 8. References
83
Description
The find command searches the current file view for the specified string or
line number and then moves the current position to the string or line. If the
string or line is not in the window, the window scrolls to display it. The
search checks the entire file.
If no parameters are specified, find repeats the last find parameter that was
processed. The last find parameter string is saved by the preserve command,
and can be retrieved or changed using the lastfind parameter.
Examples
1. To find the text Goto, type:
find visible any goto
Goto is searched for regardless of case.
2. To find the text lxcmd in the exact form of characters specified, type:
find asis lxcmd
The text lxcmd in any other case form (for example, LXCMD or Lxcmd), is
ignored.
3. To find the text fontstyle and to start the search backward, type:
find up asis fontstyle
API Return Codes
-1 A parameter issued with the command was not valid. Check
the command’s syntax requirements and then issue the
command again using a valid parameter.
-2 The file contains no lines; no operations can be performed.
-3
-8 Insufficient storage to continue.
1 TextString or Number was not found. Check to see if the
TextString or Number was typed correctly.
2 The TextString specified for the find command occurs only once
in this file.
3 The text string or line number was found, but the Editor had to
wrap from the top to bottom or bottom to top to find it.
4 The prefix number was requested, but the file has no prefix
numbers.
5 The prefix number was requested, but the prefix numbers are
not ordered.
7 When using the change all parameter, a string was found at a
wrap point.
noPrefixEntryFound There are no prefix entries in the document.
84
LPEX Editor User’s Guide
“blockdefaulttype Parameter” on page 177
“find Parameter” on page 216
“lastfind Parameter” on page 250
“oldline Parameter” on page 278
“preserve Command” on page 113
“setoldlines Command” on page 130
focus Command
Moves the current position to the focus line.
Scope: View
Syntax
Description
The focus command scrolls the file up or down to move the current position
(the line containing the cursor) to the focus line. The focus line was set using
the focus.row parameter. If a focus line was not set, the focus command
moves the current position to the center row of the Editor window.
Example
The focus row is set to row 5 and the cursor is now on row 23. To scroll the
file so that row 23 is moved to the focus row, type:
focus
API Return Code
-9 Too many parameters.
“focus Parameter” on page 220
get Command
Gets a file and inserts it after the current line.
Scope: File
Chapter 8. References
85
Syntax
Parameter
Filename
Name of the file to be inserted.
Description
The get command gets a named file and places it after the current line in the
current file.
Example
To incorporate the file nextopt.doc into the current file, type:
get nextopt.doc
API Return Codes
-1
-2
-4
-6
The file does not exist.
No filename was specified.
The Editor encountered an error while reading the file.
While reading the file, the Editor encountered a line with length greater than that
allowed by the current setting of the textlimit parameter.
-7 You cannot make changes to the file because the readonly parameter is on.
-8 Insufficient storage to continue.
“readonly Parameter” on page 305
“textlimit Parameter” on page 338
godoc Command
Go to or create a named document (file) in an Editor window.
Scope: Global
Syntax
86
LPEX Editor User’s Guide
Parameters
name
find
DocumentName
docnum
newring
nonewring
next
Switch to the named document. If it is not open, create it.
Switch to the named document. If it is not open in the Editor, do
not create it.
To switch to an open document, you must use the document file
name as it is displayed in the title bar and as is returned by the
query name command. If you do not specify a path name when
creating a new document file, the file is placed in the current
directory when it is saved.
Switch to the document specified by DocumentNumber. If the
document is not open, do not create it. DocumentNumber must be the
number returned by the query docnum command.
The document, if created, is opened into a new ring in the Editor
window. If newring split is specified, an Editor window is split to
accommodate the new ring and document. Otherwise, a new Editor
window is opened.
The document, if created, is opened as a member of the current
ring.
Shows the next document in the sequence.
Description
The godoc command switches to the specified document. If used with no
parameters, it switches to the next open document, beginning with the most
recently used document.
When you specify a parameter and document file name, the Editor ignores
case when making comparisons, though it stores a new name exactly as
typed.
If you create a new document without specifying one of the nonewring or
newring parameters, the new document is placed in a new or existing ring
according to the value of the ring parameter.
The godoc command searches only documents already opened in an Editor
window. If the specified document exists on the disk but is not opened in the
Chapter 8. References
87
Editor, godoc ignores it and creates a new document with the specified file
name. When you save this new document, you will overwrite the existing file
on the disk.
Note: The godoc command does not load any profiles when creating a new
document.
Examples
1. To create a document called rester.c, type:
godoc name rester.c
The document is created. If saved, it is placed in the current directory.
2. To switch to a document with document number of 71, type:
godoc docnum 71
The document must already be open for docnum to display it. If it is not
open, the document file is not created.
3. To switch to a document called \lpex\samples\tester.doc, type:
godoc find \lpex\samples\tester.doc
If the document is not found, it is not created.
4. To create a new document in a new ring, type:
godoc newring name mynewdoc
API Return Codes
-1
-2
-3
-4
You typed a parameter that is not valid.
DocumentNumber must be in the range 1 to 9999.
There was an attempt to move to a new document during trigger processing.
Exceeds the maximum number of views in a ring.
“doclist Parameter” on page 202
“docnum Parameter” on page 202
“lx Command” on page 96
“name Parameter” on page 276
“quit Command” on page 120
“ring Parameter” on page 315
“windowshow Parameter” on page 352
88
LPEX Editor User’s Guide
goring Command
Move to or create a new ring in an Editor window.
Scope: Global
Syntax
Parameter
next
prev
next split
prev split
new
split
ringnumNumber
Move to the next ring.
Move to the previous ring.
Move to the next split file view within an Editor window.
Move to the previous split file view within an Editor window.
Create a new ring with the current file view within an Editor
window.
Create a new ring with the current file view. An Editor window is
split to contain the new ring.
Move to the ring number specified by Number. Number must be a
positive integer value greater than 0.
Description
Use the goring command to move to or create new rings in the current
editing session.
Specifying the goring command without parameters moves you to the
previous ring.
Specifying the new parameter has no effect on a file view that is already the
only member of its ring.
Examples
1. To move the current file view into a new ring, type:
goring new
2. To move to ring number 6, assuming it exists, type:
Chapter 8. References
89
goring ringnum 6
API Return Codes
-1 Invalid command parameter given. Issue the command again using a valid
parameter.
-2 Invalid ring number given. Issue the command again using a ring number value
in the valid range.
1 The ring number specified does not exist.
3 You are already in the ring specified.
4 The file view is already the only member of the ring.
5 You specified a next split or prev split parameter, but no other split file view
exists to move to.
goview Command
Displays or creates the specified view of a named file in an Editor window.
Scope: Global
Syntax
Parameters
newring
nonewring
name
90
LPEX Editor User’s Guide
The file view, if created, is opened in a new ring in an
Editor window.
If newring split is specified, the file view is split in an
Editor window to accommodate the new ring. Otherwise,
the new ring is opened in a new Editor window.
The file view, if created, becomes a member of the current
ring.
Searches all open file views for a named view. If it is not
found, it will be created.
find
ViewName
viewnumViewNumber
inring
next inring
next
Searches all open file views for a named view. If it is not
found, it will not be created.
The file view name that is returned by the query viewname
command.
Searches all open file views for a file view with the
specified number. If the view is not found, it is not created.
Shows the previous file view in the current ring. If the
current view is the first view in the ring, the previous file
view will be the last view in the current ring.
Shows the next file view in the current ring. If the current
view is the last file view in the ring, the next file view
shown will be the first view in the current ring.
Shows the next file view. If the current view is the last view
in a given ring, the next file view shown will be the first
view in the next ring.
Description
The goview command with no parameters switches to the next file view. The
parameters allow specific file views to be called.
When you specify a parameter and a file view name, the Editor ignores case
when making comparisons, though a new name is created exactly as typed.
If you create a new file view without specifying one of the nonewring or
newring parameters, the new file view is placed in a new or existing ring
according to the value of the ring parameter.
Examples
1. To search for a file view called myview, type:
goview name myview
If the file view myview is not found, it is created.
2. To switch to a file view with a number of 45, type:
goview viewnum 45
3. To switch to a file view called functions, type:
goview find functions
If the file view functions is not found, it is not created.
4. To create a file view in a new ring that will split an Editor window, type:
goview newring split name mysplitview
Chapter 8. References
91
API Return Codes
-1 A parameter issued with the command was not valid. Check the command’s
syntax requirements and then issue the command again using a valid parameter.
-2 ViewNumber must be in the valid range.
-4 Exceeds maximum number of views in a ring.
-8 Insufficient storage to continue.
“quitview Command” on page 121
“ring Parameter” on page 315
“viewlist Parameter” on page 347
“viewname Parameter” on page 348
“viewnum Parameter” on page 349
help Command
Returns help information on a requested command or parameter.
Scope: Global
Syntax
help [requested_item]
Parameter
requested_item
The Editor command or parameter for which you want help.
Description
The help command returns help information specific to the requested
command or parameter.
Issuing the help command without a specific request returns general help
information.
Example
To display help for the add command, type:
help add
API Return Codes
None.
92
LPEX Editor User’s Guide
insert Command
Inserts a text string after the current line.
Scope: File
Syntax
Parameter
TextString
The text string that forms the content of the line. It can be blank.
Description
The insert command inserts a new line made up of TextString after the current
line. The new line becomes the current line and inherits the current font,
formatting, and class settings. The new line merges with the following line if
a following line is available.
Note: Leading blanks in front of the text string are included in the new line
but trailing blanks are ignored.
Example
To insert a new line of text, This is a new line of text., after the current line,
type:
insert This is a new line of text.
If the current line is followed by another line (and not by a break), the
inserted line is merged with the following line.
API Return Code
-5 You cannot make changes to the file because the readonly parameter is set to on.
“add Command” on page 59
“element Parameter” on page 206
“readonly Parameter” on page 305
Chapter 8. References
93
keyread Command
Waits for a key to be pressed.
Scope: Global
Syntax
Description
The keyread command waits for a key to be pressed. The value can then be
queried using query lastkey. Note that any key strokes corresponding to
operating system functions will not be detected.
Example
To wait for a key to be pressed, type:
keyread
API Return Codes
None.
“lastkey Parameter” on page 251
lineread Command
Produces a dialog that reads a string of characters.
Scope: Global
Syntax
Parameters
Length
94
LPEX Editor User’s Guide
Maximum number of characters to be input, including the initial text.
The length can be wider than the physical screen.
TextString
Initial text to appear inside the text entry box.
Description
The lineread command requests a line of input from the user. A dialog is
displayed with a text entry box and three pushbuttons: OK, Cancel, and
Help. The text entry box can display an optional TextString as a suggested
input value which a user can accept or replace as required.
The button used to leave the dialog can be retrieved using the lastkey
parameter. The text typed in the box, including the initial text, can be
retrieved using the lastline parameter. If Cancel is used to leave the dialog,
the lastline parameter contains the initial text.
Note: Although a macro can request a line of input, it cannot process the
response. This command may be more useful in an external program where
processing can take place.
Example
To obtain a filename from a user using a dialog, type:
lineread 40 Enter the filename:
A dialog is displayed with a text entry box for user response that contains an
initial value of Enter the filename: .
API Return Code
-1 Length must be a positive integer.
“lastkey Parameter” on page 251
“lastline Parameter” on page 253
load Command
This command reads a specified file (no lines wider than 2500 characters) into
an empty Editor as a simple list of elements.
Scope: Global
Syntax
Chapter 8. References
95
Parameter
Filename
The name of the file. Drive and path may be specified.
Description
Once the file has been read, a number of customizing macros are called,
providing they are listed in the PROFILES setting. All macros are passed the
filename and extension.
v xxx.lxl sets up the parser (which in turn sets class, structure and formatting
information as appropriate).
v profile.lx may be used for personal customization of the Editor.
Note: If the doctype parameter is not set, then the file will not be parsed
when loaded.
Example
To load the file called myfile.txt, type:
load myfile.txt
API Return Codes
-1
-2
-3
-6
-7
Document is not empty
No filename given
Invalid filename
Error reading file
File too wide (only a fixed buffer is available)
“doctype Parameter” on page 203
lx Command
Loads or creates the named file in an Editor window.
Syntax
96
LPEX Editor User’s Guide
Parameters
Filename
/asis
/as
/doctype DocType
/dt DocType
/newring
/nr
/nofilelist
/nfl
/nonewring
/nnr
/nopro
/np
/prefixformat format col
/fp format col
Name of a file to be edited. You can use a wild-card (*)
character to specify a range of file names that fit a given
pattern.
Note: If you want to open an untitled document with any
of the options shown below, you must specify '' for
Filename.
Disable the use of xxx.lxs (save macro) and xxx.lxl (load
macro and parser).
Set the file type (doctype) to DocType. DocType can be up to
8 characters in length.
Files are opened into a new ring. If split is specified, the
new ring is created by splitting the current Editor window.
If all is specified, the new ring is opened in a new Editor
window.
Files are opened but not shown in the recently-accessed file
list in the File pull-down menu.
Files are opened in the current ring.
Disable the use of profile.lx .
Set the display format and starting column of the prefix. If
not specified, the default value of col is 1.
Description
If no filename is specified, the lx command opens a new, untitled, document.
If a filename is specified, all currently open files are searched. If the file is not
found, the Editor looks for the file in the current directory then in the
directories specified by LPATH. If the file is found, it is loaded. Otherwise, a
new file with the given filename is created.
Chapter 8. References
97
If you create a new document without specifing one of the nonewring or
newring parameters, the new document is placed in a new or existing ring
according to the value of the ring parameter.
Examples
1. To load a file named buslet, and set its doctype to .c, type:
lx buslet /dt c
2. To create an untitled file and set its doctype to .c, type:
lx '' /dt c
3. To load all files with a filename extension of cpp into separate rings, each
with its own Editor window, type:
lx *.cpp /nr all
API Return Codes
-1
-2
-3
-6
-7
The file name is too long.
Wild cards (*,?) are not supported by the Editor.
The file is in use elsewhere.
An error occurred while reading the file.
The file is too wide.
“godoc Command” on page 86
“prefixformat Parameter” on page 300
“recentmenushow Parameter” on page 308
“ring Parameter” on page 315
“windowshow Parameter” on page 352
lxc Command
The lxc command processes a command in a macro or external command in
the same way as one originating from the command line in the Editor.
Syntax
Parameter
Command
Description
98
LPEX Editor User’s Guide
The command to be issued. If more than one command is issued, use
the mult command.
The lxc command processes a command in a macro or external command in
the same way as one originating from the command line. In particular, the
special command = (which means repeat the last command) is understood.
The command is added to the history so it can be retrieved or reissued with
the = command.
Note: The lxc command adds the command to the buffer, and then calls the
lxi command.
Example
To process the command string add 10 ;cursorpos 3, type the following into
routine or macro:
lxc mult ;add 10 ;cursorpos 3
This command is added to the command history, and the lxi command is
called.
API Return Codes
-1 The commands in the Command parameter were not valid Editor commands.
Make sure all commands are valid and if more than one command is issued,
ensure that you have used the mult command.
-8 Insufficient storage to continue.
For other codes returned by called routines or macros, see the relevant routine
or macro.
“lxi Command”
“lxr Command” on page 101
lxi Command
The lxi command processes the command in a macro, external command, or
command line as an interactive command and hence applies synonym
resolution.
Syntax
Chapter 8. References
99
Parameter
Command
Name of the command to be issued.
Description
The lxi command processes the command in a macro, external command, or
command line as an interactive command and hence applies synonym
resolution. The lxi command adds 1 to the changes count if one or more lines
are altered during the running of the command.
The data checked against the list of synonyms can be in two forms:
v If the first character is alphanumeric, all characters up to, but not including,
the first nonalphanumeric character are processed
v If the first character is nonalphanumeric, all the characters up to, but not
including, the first alphanumeric character are processed.
Note: Use the lxr command if you want to call specific commands so as to
avoid them being processed by the synonym processor.
Example
To process a command string as an interactive command, type:
set synonym.delete 3 delete
lxi del 4
API Return Codes
-1 The commands in theCommand parameter were not valid Editor commands.
Make sure all commands are valid, and if more than one command is issued,
make sure you have used the mult command.
-8 Insufficient storage to continue.
For other codes returned by called routines or macros, see the relevant routine
or macro.
“lxr Command” on page 101
“synonym Parameter” on page 334
lxn Command
Issues an Editor command without searching for a macro in an Editor
window.
Syntax
100
LPEX Editor User’s Guide
Parameter
Command
Name of the Editor command to be issued.
Description
The lxn command issues an Editor supplied command from within a macro,
external command or command line without a macro search, so that the
command string is processed in the simplest possible way.
Example
To process an Editor command delete, type:
lxn delete 5
API Return Codes
-8 Insufficient storage to continue.
-1 The commands in the Commandparameter were not valid Editor commands.
Make sure all commands are valid and if more than one command is issued,
make sure you have used the mult command.
For other codes returned by called routines or macros, see the relevant routine
or macro.
“lxr Command”
“lxi Command” on page 99
lxr Command
Issues one or more resolved commands in an Editor window.
Syntax
Parameter
Command
Name of the command to be issued.
Chapter 8. References
101
Description
The lxr command processes the command as a possible macro or Editor
command. It is processed as follows:
1. As a command only if the impset parameter is on.
2. If not found, the Editor adds lx to the front and looks for an external
command on the LPATH. If one is found, the Editor passes control to this.
3. If not found and if impmacro is on, the Editor tries to process the
command as a macro.
This routine receives all commands issued from Editor macros. In all cases, if
live parsing is in effect, trigger is called after the command is invoked to
ensure that any changed data is in the correct form. All parsers must be
invoked using this command.
Example
To process a command without applying synonym resolution, type:
lxr add 10
API Return Codes
-1 The commands in the Commandparameter were not valid Editor commands.
Make sure all commands are valid, and if more than one command is issued,
make sure you have used the mult command.
-8 Insufficient storage to continue.
“trigger Command” on page 139
macro Command
Searches the LPATH for a macro file, then processes it.
Syntax
Parameters
Filename
102
LPEX Editor User’s Guide
Name of the macro to invoke. If the macro is not in the current directory
or in a directory listed in the LPATH, then specify a full path name. If
no extension is supplied then .lx is added to the name.
Parameter
The parameter string to be passed to the macro.
Description
The macro command searches for a file and invokes it as a macro. It invokes
simple macros (files containing only comments and Editor commands ) by
passing each line of the file to the Editor for processing. When MACRO is set
to BUILTIN, the Parameter string is not processed. You can view the MACRO
type using the environment command.
Example
To invoke a macro called newkeys, type:
macro newkeys
The Editor searches for a file called newkeys.lx and processes each line of the
file as either a command or a comment.
API Return Codes
-1 The file specified as a macro was not found. Check that the file name is correct
and is preceded by the correct path name. Use the Open dialog or relevant
commands to try to locate the file to make sure it exists.
-3 No Filename was specified. Issue the command again with a valid file name.
Specify a path name if necessary.
-4 The Editor expects the first line of the macro file to be a comment ( and starting
with /*), but it is not. First make sure that you have called the correct file. If the
file is correct, edit the file to include a comment on the first line.
“Chapter 6. Macros and Profiles” on page 35
“Writing Macros for the Editor” on page 36
macrodrop Command
Removes a macro from internal storage.
Scope: Global
Syntax
Chapter 8. References
103
Option
MacroName
The name of the macro to remove.
Description
The macrodrop command removes the named macro from internal storage.
Any path specified is not used. The extension must be appended if it is not
.lxl .
Example
To remove the test macro, type:
macrodrop test
API Return Code
-1 The Editor cannot find the file.
“macroload Command”
macroload Command
Preloads an Editor macro into internal storage.
Scope: Global
Syntax
Options
Path
MacroName
The path to be used instead of LPATH.
The name of the macro to preload.
Description
The macroload command preloads an Editor macro into internal storage.
Preloading macros provides faster invocation of the macro, but the macro will
not run faster. If a path is specified, the selected path is used to find the file,
104
LPEX Editor User’s Guide
otherwise the LPATH is used. If the macro was previously preloaded, the
preloaded macro is replaced by the macro in the file. The profile.lx macro
should be preloaded.
Example
To load the test macro, type:
macroload test
API Return Codes
1 Not enough storage to load the macro.
-1 The Editor cannot find the macro file.
-4 The file is not an Editor macro file or is larger than 64KB (where KB equals 1024
bytes) .
“macrodrop Command” on page 103
mark Command
Sets up or finds a position mark.
Scope: File
Syntax
Parameters
Name
A name identifying a named mark. The name is truncated if longer than
32 characters. The setting and comparison of this name is not case
sensitive.
Chapter 8. References
105
Id
set
An id number identifying an unnamed mark.
Assign the mark Name or Id to the specified position. If no position is
specified, the current position is used.
If Name is already in use, it is reassigned to the current position.
Specify Id only if that id already exists and you want to move a mark
associated with a specific id number. Otherwise, issue the following
command to create a new mark:
mark set #
find
clear
StartLine
StartColumn
EndLine
EndColumn
include
The Editor will assign the next available id number to the new mark.
You can get the id of the new mark by querying the markid parameter.
Set the current cursor position to the position recorded by the mark set
Name or mark set #Idcommands. The mark specified must exist in the
current file.
Cancel the specified mark.
The starting line of the mark. This value must be an integer.
The starting column of the mark. This value must be an integer.
The ending line of the mark. This value must be an integer .
The ending column of the mark. This value must be an integer.
Display lines associated with the specified mark as follows:
on
Hide from display lines that are not associated with the mark.
off
Do not hide from display lines that are not associated with the
mark.
inverse Toggle between on and off.
exclude
Do not display lines associated with the markNameas follows:
on
Hide from display lines that are associated with the mark.
off
Do not hide from display lines that are associated with the
mark.
inverse Toggle between on and off.
setfont
Display the specified mark in the character size and font specified by
Font. If Font is not specified, the mark displays in the default editing
window font. Font can be any valid font name as described in the help
for the font parameter.
Description
Marks function like a bookmark. Use the mark command to position new
marks or relocate existing marks. Once set, you can use the mark command to
quickly find marked locations in your document.
106
LPEX Editor User’s Guide
You can also use the mark command to highlight your marked locations, or to
include or exclude marked locations from view.
When including or excluding marked areas for display, lines are displayed
according to the following rules of precedence:
1. If the showcurrent parameter is set to on, the line is displayed.
2. If the line has in it an excluded mark or class, it is not displayed.
3. If the line does not belong to an included class, it is not displayed.
4. If the line is set as a show line by the show parameter, and the shows
parameter is set to off, it is not displayed.
5. If there are one or more included marks, and the line does not include one
of those marks, it is not displayed. Marks are not saved when the file is
closed.
Examples
1. To mark a position in a file with the name undoref, type:
mark set undoref
The mark’s name is undoref.
2. To move the cursor to the mark undoref, type:
mark find undoref
3. To mark a position in a file with an unnamed mark, type:
mark set #
You can query the markid parameter to get the id number of the new
mark.
4. To move the cursor to the mark with id 276, type:
mark find #276
5. To highlight the mark with id 276 using a font with name M ,type:
mark setfont #276 M
6. If font M does not yet exist, you can create it using the font parameter. For
example, to use a red foreground on yellow background to highlight your
mark, type the following commands:
set font M red/yellow
mark setfont #276 M
7. To clear highlighting for the mark with id 276, type:
mark setfont #276
8. To display only lines associated with the mark area1, type:
mark include area1 on
9. To exclude from display lines associated with the mark area1, type:
mark exclude area1 on
Chapter 8. References
107
API Return Codes
-1 The file is empty.
-2 No name specified.
-3 A parameter issued with the command was not valid. Check the command
syntax requirements and then issue the command again using a valid parameter.
-8 Insufficient storage to continue.
1 Mark not found. The specified name is unknown.
2 The specified name was already in use. It is now overridden.
3 The mark refers to a line that has been deleted.
“font Parameter” on page 222
“mark Parameter” on page 261
“markexclude Parameter” on page 264
“markfont Parameter” on page 265
“markid Parameter” on page 266
“markinclude Parameter” on page 267
“markrange Parameter” on page 268
“show Parameter” on page 322
“shows Parameter” on page 324
msg Command
Displays a specified message.
Scope: Global
Syntax
Parameter
TextString
The optional message to be displayed.
Description
The msg command displays the TextString in the information area (in an
Editor window) and logs it in the Editor macro log (but only if the messages
parameter is set to on). The blank space after the msg command is significant.
Example
To display the message, 'No parameter used with this command ', type:
108
LPEX Editor User’s Guide
msg No parameter used with this command
API Return Code
None.
“messages Parameter” on page 274
mult Command
Issues a series of commands.
Scope: Global
Syntax
Parameter
Delimiter Command
Series of commands to be issued in sequence separated by a
space and a delimiter.
Description
The mult command issues a series of commands, as delimited by the first
non-blank character of the parameter string. Processing stops if a negative
return code is returned by one of the commands or if no files are available.
Each command is issued as a call to the lxi command.
Example
To display the list of assigned keys in the message window, and turn both the
set actions and set readonly parameters to on, type:
mult ;query actionlist ;set actions on ;set readonly on
The ; (semi-colon) symbol is the delimiter.
API Return Code
-1 The commands specified in the command string were not valid Editor
commands. Check to make sure all commands are valid.
Chapter 8. References
109
“lxi Command” on page 99
next Command
Moves the current position to next object (level, class or word).
Scope: View
Syntax
Parameters
visible
element
above
below
class ClassName
level Level
same
word
Restrict moves to objects that are currently visible. (See the include
and exclude parameters on making lines visible in the current view.)
If visible is not specified, the Editor sets the current position on an
object that is not displayed. Then it adjusts the current position to a
visible line unless the showcurrent parameter is on. This must be
the first parameter specified if used.
Move to the next structural line. This is the default value.
Move to the next line at a higher level. If none is found, the current
position remains unchanged.
Move to the next line at level below current. If none is found, the
current position moves to the next structural line at a higher level.
Move to the next line of the specified Class.
Move to the next line at the specified Level. Level must be numeric
and positive.
Move to the next line at the same level (or above) or, if none is
found, to the next line at a lower level.
Move to the start of the next word.
Description
The next command moves the current position to the next level, element, or
word, depending upon the parameters used.
110
LPEX Editor User’s Guide
The same, above, and below parameters operate within the local display
group. They move to the next line at the relevant level that has structural
information, that is, formatting flags before, after, or absolute. Any line at
level zero is also considered structural.
The class, level, and word parameters operate regardless of display groups.
Examples
1. To move the current position to the next visible class COMMENT, type:
next visible class comment
2. To move the current position to the next visible line at a higher level, type:
next visible above
3. To move the current position to the next line (visible or non-visible ) at a
lower level, type:
next below
API Return Code
-1 A parameter issued with the command is not valid. Check the command syntax
requirements and then issue it again with a valid parameter.
“prev Command” on page 114
openclose Command
Adds or deletes a blank line.
Scope: File
Syntax
Description
If current line is blank, the openclose command deletes it and sets the current
position to the first non-blank of the following line. If the current line is not
blank, openclose adds a new line consisting of a single blank, and sets the
current position to line. If the current line has flow set, only a single blank is
used for the content of the new line.
Example
Chapter 8. References
111
To add a new line after a line, place the cursor anywhere within the line and
type:
openclose
API Return Codes
-5 You cannot make changes to the file because the readonly parameter is set to on.
-8 Insufficient storage to continue.
“add Command” on page 59
“delete Command” on page 73
prefixprocess Command
Executes all commands found in the prefix entry fields.
Scope: View
Syntax
Description
The prefixprocess command executes the commands in the prefix entry fields.
If the command in the prefix area is not defined, the text is left in the prefix
entry field until it is explicitly reset with the prefixentry parameter.
API Return Codes
None
“actionprefix Parameter” on page 161
“prefixentry Parameter” on page 299
“find Command” on page 82
prefixrenumber Command
Reorders the numeric part of the prefix data into unique ascending numbers.
Scope: File
112
LPEX Editor User’s Guide
Syntax
Options
Increment
Start
Specifies the increment to use when renumbering the prefix numbers. If
this value is not specified, the increment will be 100.
Specifies the value for the prefix number of the first line in the file. If
this value is not specified, the starting value will be Increment.
Description
The prefix numbers for the current file will be renumbered starting from Start
and incrementing by Increment.
API Return Codes
-1 The specified options will cause the prefix numbers to grow larger than the size
specified by the prefixformat parameter.
-2 This command requires that there be a numeric part to the prefix data.
-8 Insufficient storage to continue.
“prefixformat Parameter” on page 300
preserve Command
Saves current settings to be restored later in the Editor window.
Scope: File
Syntax
Description
The preserve command saves the current values of selected Editor settings.
These settings are listed and described in the reset command.
Editor settings can later be returned to the saved values by using the restore
Chapter 8. References
113
Example
To save the current settings, type:
preserve
You can then change some of the values temporarily and restore the preserved
set afterwards using the restore command.
API Return Code
-9 Too many parameters were specified.
“restore Command” on page 125
“reset Command” on page 124
prev Command
Moves current position to previous object (line, level, class or word).
Scope: View
Syntax
Parameters
visible
element
above
114
LPEX Editor User’s Guide
Restrict moves to objects that are currently visible. (See the include
and exclude parameters on making lines visible in the current view.)
If visible is not specified and the Editor sets the current position on
an object that is not visible, the current position is subsequently
adjusted to a visible line unless the showcurrent parameter is set to
on. If used, this must be the first parameter specified.
Moves to the previous structural line. This is the default value.
Moves to the previous line at a higher level. If none is found, the
current position remains unchanged.
below
class ClassName
level Level
same
word
Moves to the previous line at a level below that of the current line.
If none is found, the current position moves to the previous
structural line at a higher level.
Moves to the previous line of the specified ClassName.
Moves to the previous line at the specified level.
Moves to the previous line at the same level (or above) or, if none is
found, to the previous line at a lower level.
Moves to the start of the previous word.
Description
The prev command moves the current position to the previous element, level,
class or word, depending on which parameter is specified.
The same, above, and below command parameters operate within the local
display group (displayed text in a view). Any line at the relevant level that
has structural information, that is, formatting flags before, after, or absolute is
considered structural. Any line at level zero is also considered structural.
The class, level, and word command parameters operate without regard to
display groups.
Example
To move the current position to the previous visible class COMMENT, type:
prev visible class comment
API Return Code
-1 The ClassName was not a valid class type. Use the query classes command to see
which ClassNames are currently defined, or use the set class command to define a
new class. Issue the command again using a valid ClassName.
“next Command” on page 110
primitive Command
Performs a keyboard or other simple function from a macro.
Scope: Global
Syntax
Chapter 8. References
115
Parameters
Use the name of any primitive function as a parameter to this command.
Description
The primitive command provides a way of invoking a keyboard function on
data from a macro. You can perform functions such as moving the cursor to
the beginning and end of lines, and inserting or deleting characters.
Examples
To cause the Enter key to parse the data even when the cursor does not move
off the current line, type:
set action.enter ;trigger ;primitive newline
The ; (semicolon) symbol is a synonym for the mult command.
API Return Codes
-1 A mandatory parameter is missing from the command. Issue the command again
with the correct parameters.
-1 The Function was not valid. Select a valid Function from the list provided with
the command description and issue the command again.
“Primitive Functions Summary” on page 355
print Command
Prints the current document.
Scope: Global
Syntax
116
LPEX Editor User’s Guide
Parameter
prompt
printer x
driver y
fontsize size
visible
selected
tokenized
linenumbers
startmargin col
copies n
Displays the Print dialog box in which you can specify print
options.
Print using printer x. If enclosed in ' ', x can include spaces in the
printer name.
Print using the y printer driver. If enclosed in ' ', y can include
spaces in the printer driver name.
Print the document using a printer font of size point size.
If specified without the off option, print only document lines that
are visible in the Editor window.
If specified without the off option, print only document lines that
are selected.
If specified without the off option, print document text using token
attributes. Results will depend on the capabilities of your printer.
If specified without the off option, add document line numbers at
the start of each line printed.
The number of columns (col ) left as blank space at the beginning of
each line, where a column is the average width of a character in the
chosen print font.
Print n copies of the document.
Description
The print command lets you specify how and which text is printed.
Print options, once chosen, remain in effect for the current Editor window
until explicitly changed using either the print command or the Print options
window. An option not explicitly set with the print command uses, if one
Chapter 8. References
117
exists, a value acquired from a previous print operation. If no value exists
from a previous print operation, a value is applied from the following default
print options:
printer
driver
fontsize
visible
tokenized
linenumbers
startmargin
copies
Most recently-used in the previous Editor window.
Most recently-used in the previous Editor window.
Most recently-used in the previous Editor window.
off
off
off
0 (zero)
1 (one)
Print options can be initialized for an editing session even if no document is
open.
Example
A sample print command:
print printer ibm4201p driver ibm42xx.ibm fontsize 8 visible off tokenized
The printer and driver options are set to specify an IBM Proprinter as the
target printer. The document is printed using 8 point character size, all lines
are printed, and token attribute highlights are sent to the printer.
API Return Codes
-8
-4
-1
1
2
3
Not enough resources to print.
Incorrect parameter specified for print command.
Unable to start PrinterHandler.
Printing cancelled by user.
No printer selected.
No document present to print.
qquit Command
Quits from the current file view in an Editor window without saving changes.
Scope: File
Syntax
118
LPEX Editor User’s Guide
Description
The qquit command quits the current file without saving changes.
Example
To quit the current file, including all views (documents) opened in the Editor
window, type:
qquit
API Return Codes
-3 Attempted to leave file while trigger processing.
-9 Parameter passed where none required.
“quit Command” on page 120
query Command
Queries one or more parameters.
Syntax
Description
The query command displays the values of specified attributes just above the
command line. If the value of an item is null or just blanks, one of the
messages <null>, <blank>, or <blanks> is displayed for the value.
Parameters
A list of the settings to be queried, separated by blanks. See the appropriate
parameters for valid settings.
Example
To display the values of some autosave parameters, type:
query autonext autotime idletime autochanges autocount
Chapter 8. References
119
API Return Code
-1 The parameter is not valid. First check its spelling then check this list to see if
the parameter is supposed to be queried.
“extract Command” on page 80
“Parameters Summary” on page 143
quit Command
Quits the current file view in the Editor window if no changes have been
made.
Scope: File
Syntax
Description
The quit command quits the current file (if no changes have been made) by
calling qquit. If changes have been made, you are asked to confirm the
request to quit.
Example
To quit the current file in the Editor window (if no changes have been made),
type:
quit
API Return Codes
-6 The Editor discovered an error while writing the file to the disk or while
renaming a temporary file.
-7 The file was not exited because the nosave parameter is on. To exit the file, set
the nosave parameter off and use the quit command again.
-9 Too many parameters were issued with the command.
“qquit Command” on page 118
120
LPEX Editor User’s Guide
quitview Command
Quits the current file view.
Scope: View
Syntax
Parameters
quit
If specified, closes the last view of a given file.
Description
The quitview command quits the current file view and makes the next view
the current view. If the current view is the only view, that view is closed only
if you issue the quitview command with the quit option.
Example
To quit the current view, type:
quitview
API Return Codes
-2 Incorrect argument supplied to the quitview command. If supplied, argument
must be quit.
-4 This is the only file view and therefore cannot be closed with the quitview
command. You can close it using the qquit or quit, or by using the quitview
command with the quit option, for example, quitview quit.
-9 More than one argument supplied to the quitview command.
“qquit Command” on page 118
“quit Command” on page 120
record Command
Records keystrokes to a macro file.
Scope: Global
Chapter 8. References
121
Syntax
Parameters
on
off
inverse
play
continue
Start or restart recording.
Stop recording.
Toggles between on and off.
Play back recording.
Continue recording.
Description
The record command records keystrokes to a macro file that can be played
back at a later time. Playback is within the context of the current
insert/replace mode.
Keystrokes are recorded to the record.lx macro file in the directory pointed to
by the TMP environment variable.
Subsequent recordings will overwrite the record.lx file. If you want to save the
recording for later use, you should save this file under a different name,
keeping the lx file name extension, to the macros directory. You can use the
macro command to play back this saved macro at a later time.
Example
To start recording, type:
record on
API Return Codes
-20
-21
-22
-23
-24
-25
122
The recorder was not recording.
There is no recording to play back.
The recorder is already recording.
There is no existing recording to continue recording with.
An invalid option was specified.
The recording contains nothing to play back.
LPEX Editor User’s Guide
“macro Command” on page 102
repeat Command
Repeats a command a specified number of times.
Scope: Global
Syntax
Parameters
Number
Command
The number of times the command is to be repeated. It is a non-zero
positive integer.
The command sequence to be repeated. The mult command can be used
as the Command to be performed.
Description
The repeat command runs any Editor command repeatedly until either the
given number of runs is complete, or an API return code occurs.
Note: The command is processed by the lxi command, so you can use
synonyms of the command and its parameters.
Example
To repeat the command next class comment five times or until a nonzero
return code occurs, type:
repeat 5 next class comment
The current position moves to the fifth COMMENT type line.
API Return Code
-1 A parameter issued with the command was not valid. Check the command
syntax requirements and then issue the command again using a valid parameter.
Chapter 8. References
123
Return codes are also issued by the repeated command.
“lxi Command” on page 99
reset Command
Resets selected Editor settings to their initial value.
Scope: Global
Syntax
Description
The reset command resets selected Editor settings that were saved by the
preserve command to their initial (default) values. The settings affected are:
Command
exclude
expandtabs
formatter
impmacro
impset
include
overhang
protect
showcurrent
shows
wrap
Default Setting
none
on
off
off
on
all
1
none
off
on
off
API Return Code
-9 Parameter passed where none required.
“preserve Command” on page 113
“restore Command” on page 125
124
LPEX Editor User’s Guide
restore Command
Restores file status.
Scope: File
Syntax
Description
The restore command sets selected Editor settings to the value they had when
the preserve command was last issued. Editor settings that can be preserved
and restored are listed under the reset command.
Example
Use the preserve command to save the current state of the view. Change the
settings to perform a task using the macro, then use restore to restore the
settings to the way they were at the time of the preserve command.
API Return Codes
-2 A preserve command must be issued before you may issue a restore command.
-9 Parameter passed where none required.
“reset Command” on page 124
“preserve Command” on page 113
save Command
Saves the contents of the current Editor window into a file.
Scope: File
Syntax
Chapter 8. References
125
Parameters
Drive-Directory-Filename
/asshown or /as
/nofilelist or /nfl
The drive, directory, and filename to which the file is saved.
This option lets you save a different view of the file. The
data is saved exactly as it is displayed at the time the
command is issued.
The file saved is not shown in the recently-accessed file list
in the File pull-down menu in the Editor window.
Description
The save command saves the contents of the current Editor window into a
file. If no file name is specified, then the file is saved under the current file
name. If a save macro for the current doctype exists in one of the directories
specified in LPATH, then the save command runs the save macro before
writing the file to disk. The save macro is not called if the asshown option is
specified.
Note: The Editor window will be renamed to the specified filename.
Examples
1. To save a file to a new file name, type:
save newname.c
2. To save a file as it is displayed to a new file name, type:
save newname.c /as
API Return Codes
1 The filename already exists. The Editor asks if you want to overwrite the existing
file with this file.
2 The file was saved successfully with some lines truncated.
-1 The filename is not valid.
-2 A filename must be specified for an untitled document.
-3 The file is empty.
-6 The Editor encountered an error when the file was being saved.
-7 The file was not saved because the nosave parameter is set to on. To save the
file, set the nosave parameter to off and then use either the file or save command
to save the file.
-9 The file was open in another Editor window.
126
LPEX Editor User’s Guide
“preserve Command” on page 113
“restore Command” on page 125
“trigger Command” on page 139
“changes Parameter” on page 184
“content Parameter” on page 191
“recentmenushow Parameter” on page 308
“noblanks Parameter” on page 277
saveall Command
Invokes an Editor command or macro after saving a set of modified files.
Scope: Global
Syntax
Options
prompt
EditorMacro
Displays the Save before action secondary dialog box to allow the user
to select the modified files to be saved.
Any Editor command or macro. This variable is optional.
Description
The saveall command, issued without options, saves all modified, named
files. Using options, you can save selected files, and you can specify a macro
to be run after the file save operation.
A progress indicator will be displayed during the save operation. The file
being saved will be shown in the status field, and you can interrupt the save
operation by clicking on the Stop push-button.
Documents not yet named are not saved by the saveall command.
Example
To prompt the user to save any modified files before invoking the build. lx
macro, type:
saveall prompt macro build b
Chapter 8. References
127
API Return Codes
-1 System resource error. Save operation aborted.
1 The save operation has been cancelled or stopped.
“save Command” on page 125
scroll Command
Scrolls a specified number of lines or columns of the file.
Scope: View
Syntax
Parameters
up
down
left
right
screen
Number
Scroll up the file.
Scroll down the file (default direction).
Scroll the file to the left.
Scroll the file to the right.
Scroll the number of lines in the Editor window minus Number (or
scrolls one line, whichever is greater).
Scroll the specified number of lines (or if screen is used, subtract Number
from screen count). The default is 1.
Description
The scroll command lets you move up or down lines and left or right across
columns in your file.
When scrolling vertically, the current position moves to the character and line
vertically above or below the original position. After scrolling, the cursor
usually remains on the same row in the window.
When scrolling horizontally, the cursor maintains its position in the window
and the data is scrolled sideways.
Examples
128
LPEX Editor User’s Guide
1. To scroll down one line, type:
scroll
2. To scroll down ten lines, type:
scroll down 10
3. To scroll up eight lines, type:
scroll up 8
API Return Code
-1 A parameter issued with the command was not valid. Check the command’s
syntax requirements and then issue the command again using a valid parameter.
set Command
Specifies the value for an Editor parameter.
Syntax
Description
Use the set ommand to set certain Editor parameters to different values. These
parameter settings can be used to modify various Editor operating
characteristics, such as action key assignments, menu contents, text
formatting, and more.
The value of many of these same Editor parameters values can also be
queried using the query command.
Parameters
Parameter
Any parameter that can be set. See the Parameters Summary for a list of
parameters and their effect on Editor function. Some parameters are
query-only, and cannot be used with the set command.
API Return Codes
-1 Invalid item.
-2 The parameter is not valid. First check its spelling then check this list to see if
the parameter is supposed to be set.
-3 Too many words, or parameter string is too long.
-5 You cannot make changes to the file because the readonly parameter is set.
Chapter 8. References
129
“query Command” on page 119
“Parameters Summary” on page 143
setoldlines Command
Sets the old line value for each line to its current line number.
Scope: File
Syntax
None
Description
The setoldlines command sets the old line value for each line equal to the
current line number of that line.
Examples
To assign an old line value to each line in a document, type:
setoldlines
API Return Codes
None.
“find Command” on page 82
“linenumber Parameter” on page 257
“oldline Parameter” on page 278
showfont Command
Displays the content of the character set.
Scope: View
Syntax
130
LPEX Editor User’s Guide
Parameters
font
off
Displays the character set for this font. This is the default value.
Removes the showfont display.
Description
The showfont command invokes the external command lcshwfnt.dll, which
displays the entire character set for the given font on a series of overlay lines
and in their own typeface.
If no parameters are specified with this command, the character set is
displayed in font 1.
Example
To display the entire character set for the given font, type:
showfont
API Return Codes
-2 Invalid font name.
1 Font was not set.
sort Command
Sorts lines of text.
Scope: File
Syntax
Chapter 8. References
131
Parameters
Number
Sort from the current line up to, but not including, line Number in the
file
Sort the next Number lines, starting with the current line
Sort all lines in a block of selected text
Sort all lines from the current line to the end of the file, including the
last line in the file
Sort from the current line up to, but not including, the line containing
the named mark mark.
Sort from the current line up to, but not including, the line containing
the next occurence of the string expression specified in string.
Sort by ascending string value. This is the default if a sort ordering type
is not specified.
Sort by descending string value
Sort by ascending numeric value
Sort by descending numeric value
Sort by ascending string value, ignoring character case
Sort by descending string value, ignoring character case
A pair of column numbers defining a sort field within each line. Column
numbers are always absolute column numbers. Up to 100 pairs of
column numbers can be defined as part of a sort command line
invocation, with highest sort priority given to the first column number
pairs appearing in the command line invocation. If no column number
pairs are specified, the entire line is considered to be the sort field.
+Number
BLOCK
*
Mmark
'string'
A
D
AN
DN
AI
DI
col1 col2
Description
The sort command provides a method of sorting information in specific areas
of a file. Options associated with the sort command let you define sort fields
for data in specific locations on each line, and apply the sort operation to
specific sets of lines.
Examples
1. To sort from the current line up to but not including line 25 of the file,
type:
sort 25
2. To sort 25 lines in descending string order, starting from the current line,
type:
sort +25 D
3. To sort a block of selected text in ascending case-insensitive string order,
based on the contents of columns 10 to 15 of each line in that block, type:
sort BLOCK AI 10 15
4. To sort from the current line up to and including the last line in the file, in
ascending numeric order, based on sequence numbers in columns 73 to 80,
type:
132
LPEX Editor User’s Guide
sort * AN 73 80
5. To sort from the current line up to but not including the line with a named
mark called Limit, in ascending order, based first on the contents of
columns 10 to 15, and then the contents of columns 5 to 6, type:
sort Mlimit A 10 15 5 6
6. To sort from the current line up to but not including the line containing
the next instance of the string arbitrary, in ascending order, type:
sort 'arbitrary' A
API Return Codes
-1
-2
-6
-8
String or mark not found
Invalid parameter argument supplied
Bad block defined
Out of memory
“blockdefaulttype Parameter” on page 177
splitjoin Command
Splits a line or joins two lines.
Scope: File
Syntax
Parameters
split
join
Splits the current line into two lines.
Joins two lines together.
Description
The splitjoin command either splits a line or joins two lines together. If the
split option is specified, or if no option is specified and there is a non-blank
character under or to the right of the cursor, the current line is split into two
lines. The current position remains at the end of the first line.
Chapter 8. References
133
The join option joins any following line to the end of the current line. A join is
also carried out if no option is specified and there are only blank characters to
the right of the current position.
There are some exceptions. The splitjoin command ignores show lines and
treats a sequence of flowed lines as continuous text. If the cursor is beyond
the end of the line, splitjoin first pads the line with the pad character,
regardless of whether a split or join is to be done.
Example
To split a line, place the cursor at the place where you want the current line to
end and type:
splitjoin split
API Return Codes
-1 A parameter issued with the command was not valid. Check the command’s
syntax requirements and then issue the command again using a valid parameter.
-5 You cannot make changes to the file because the readonly parameter is set to on.
“pad Parameter” on page 283
“show Parameter” on page 322
sshow Command
Refreshes a file view.
Scope: View
Syntax
Description
The sshow command refreshes the contents of the file view. Used in a macro,
sshow synchronizes the display with the commands issued by the macro.
Example
To display the effects of the first five commands in a macro, type as the sixth
command:
134
LPEX Editor User’s Guide
sshow
API Return Code
-9 Parameter passed where none required.
“macro Command” on page 102
start Command
Invokes an operating system command to run in a separate process.
Scope: File
Syntax
Options
Command
Any command that can be invoked from an operating system command
line.
Description
The start command executes the supplied command as a foreground
application in a separate session. To execute the supplied command in the
same session, use the REXX address command from an Editor macro.
The following substitution variables are supported:
%FILENAME%
%PROFILE%
%MARKEDTEXT%
Fully-qualified file name
Profile name
Selected text (on the first line of a text selection)
Example
To invoke a new program:
start visualage for java %filename% /l %profile%
API Return Codes
-1 System error is encountered during the invocation of the specified command.
Chapter 8. References
135
-2 The %MARKEDTEXT% parameter is specified but there is no text selected in the
current file.
“submit Command”
submit Command
Invokes an Editor macro to run on a secondary thread, thereby allowing the
user to continue interacting with the Editor.
Scope: File
Syntax
Options
read
write
none
stop
synch
Description
EditorMacro
The Editor macro will read the Editor’s content without updating the
text.
The Editor macro will update the text in the edit window. This is the
default option.
No lock is applied.
The Editor macro will honor a Stop pushbutton in the progress
indicator.
If selected, the submit command will not lock up the main thread while
waiting for the macro to complete.
The description text to be displayed in the progress indicator.
Certain Editor macros supplied with the product for language-sensitive
editing support.
Description
The submit command places the specified access lock on the Editor before
invoking the supplied command on a secondary thread. A progress indicator
is displayed with the optional description text. The command string is
displayed as the description by default.
Notes:
136
LPEX Editor User’s Guide
1. Multiple concurrent read accesses are allowed; however, only one write
access is allowed at any one time.
2. When an Editor window is locked for write access, read access requests
will be queued up. When an edit window is locked for read access, write
access requests are rejected.
3. Only certain IBM-supplied (default) Editor macros, which observe the
proper protocol for concurrent execution, can be invoked with the submit
command.
Example
To invoke the CL tokenizer to perform a total parse:
submit read stop 'Parsing file' evflcl all
API Return Codes
-1 There is not enough system resource to invoke the command to run in a
secondary thread.
-2 The ending quote for the description text is missing.
“start Command” on page 135
substitute Command
Causes symbol substitution.
Scope: File
Syntax
Parameter
all
Scans the whole file for symbol substitution. The scanning is done from
right to left.
Description
The substitute command causes symbol substitution on demand, instead of
automatically as it would if the autosymbols parameter was set to on. If the
all option is not specified, only the current line is scanned.
Chapter 8. References
137
Example
To set substitution on demand for all lines, type:
substitute all
API Return Codes
1 There are no symbols to convert to special characters in the file. If you think
there are symbols within the file, check that the symbols have been spelled
correctly and that they are defined with the set symbol command.
2 There are no symbols to convert to special characters in the line. If you think
there are symbols within the line, check that the symbols have been spelled
correctly and that they are defined with the set symbol command.
-2 A parameter issued with the command was not valid. Check the command’s
syntax requirements and then issue the command again using a valid parameter.
“autosymbols parameter” on page 171
“symbol Parameter” on page 332
“symbollist Parameter” on page 334
top Command
Moves the cursor position to the top of the file.
Scope: View
Syntax
Description
The top command moves the cursor position for the current view to the first
character of the first line in the file
Example
To move the cursor to the top of the file, type:
top
API Return Code
-9 Parameter passed where none required.
138
LPEX Editor User’s Guide
“bottom Command” on page 67
trigger Command
Enables live parsing of pending lines.
Scope: File
Syntax
Description
The trigger command causes live parsing of pending lines. This command
calls the live parser, which is specified by the set parser command, for each
line on the pending list. This list contains those lines whose content has
changed since the last live parsing (or since the set parser command was
issued).
Lines changed by the parser are not added to the list of changed lines, so you
do not have to turn off the parser during trigger processing.
During live parsing, the current line and position are saved. They are restored
when all the changed lines have been processed. To change the current
position use the set trigpos command.
Lines can also be added to (or deleted from) the pending list with the set
pending command. If autoparse is on, then pending lines are parsed
automatically.
Example
To start live parsing type:
trigger
API Return Code
-9 Too many parameters were issued with the command.
Chapter 8. References
139
“parser Parameter” on page 285
“pending Parameter” on page 286
“trigpos Parameter” on page 344
undo Command
Undo one or more sets of file changes.
Scope: File
Syntax
Parameter
Number
A positive or negative integer value. If not specified, the default is 1.
Description
The undo command lets you restore the document to a previous state by
undoing or redoing (undoing an undo) sets of changes (generations) to a
document. These sets of changes are recorded using the check command, or
more usually, the autocheck parameter, provided the recording parameter is
set to on.
Depending on the value specified for Number, the undo command handles
changes to a document as follows:
No value
specified
Positive integer
Undo the last change to document, and decrement the value of the
changes parameter by 1.
Undo the most recent number of changes specified by Number, and
decrement the value stored in the changes parameter by the value
of Number.
Negative integer Redo the most recent number of undos specified by Number, and
increment the value stored in the changes parameter by the value of
Number.
You can perform any combination or number of undo and redo operations
until a change is made to the document. Once you have made that change,
the undo operation becomes a single undoable change, regardless of the
number of undo and redo operations just performed.
140
LPEX Editor User’s Guide
Examples
The examples refer to the following states of a file:
line1
line2
line3
line4
line5
State E
Most
recent
version
line1
line2
line3
line4
line1
line2
line3
line1
line2
line1
State D
State C
State B
State A
Oldest
version
The file starts in state A and is progressively changed to state B, then C, then
D, then E. A checkpoint is taken between each state.
1. To revert to state B, one state at a time, type the following command three
times:
undo
The first undo changes the file to state D, the second undo to state C and
the third undo to state B. If there are no more changes to undo, the
following message is displayed:
No recorded changes available for UNDO
2. To revert 3 states directly from, for example, state E, type:
undo 3
State B becomes the current state.
3. Now if you type:
undo -2
The last two undos are undone, and the document returns to state D.
API Return Codes
-1 Parameter specified is not a number.
-5 You cannot make changes to the file because the readonly parameter is set to on.
“autocheck Parameter” on page 165
“changes Parameter” on page 184
“check Command” on page 70
“recording Parameter” on page 312
Chapter 8. References
141
unlink Command
Unlinks a previously linked external command
Scope: Global
Syntax
Parameter
Command
The command to be unlinked.
Description
The unlink command unlinks a previously linked external command. External
commands are loaded the first time they are invoked. Once invoked, an
external command remains linked until it is removed with an unlink
command or the Editor is terminated. If the external command contains an
lxexit subroutine call, this will be invoked to allow the command to terminate
any other processes and release the Editor storage.
If you make changes to an external command that has already been run in the
current editing session, you must first unlink that external command before
running the new version. The query linked command lists the commands
currently linked.
Note: This command cannot be used in API calls.
Example
To unlink the command match, type:
unlink match
API Return Code
-1 Command not found.
-2 No command name specified.
“linked Parameter” on page 259
142
LPEX Editor User’s Guide
Parameters Summary
The Editor window is fully programmable through the use of an extensive
Editor command and parameter set. You can use commands and parameters
to customize the Editor window, search for or change text in your document,
or perform many other functions.
Select a parameter from the list below to display complete reference
information for that parameter.
Parameter Name
Description
“accelerator Parameter” on page 151
Sets the accelerator for a given menu
item
Attaches an action to a logical key.
Modifies the contents of the Editor
window menu-bar and pull-down
menus.
Returns the id of a menu-bar
pull-down item. (Query only)
Lists user-defined pull-down menus.
(Query only)
Lists the logical keys to which
commands have been assigned. (Query
only)
Attaches a prefix action to a logical
key.
Used to get a list of all prefix
commands defined for the current
document. (Query only)
Enables action keys.
Sounds the alarm on next screen
refresh.
Sets the number of changes since last
save or autosave.
Enables automatic checkpointing.
Sets the number of changes required
before autosave.
Sets the name for the autosave file.
Gives the time in seconds before next
autosave. (Query only)
Resumes parsing.
Maintains the prefix data while a file is
being edited.
Causes symbol substitution to occur
automatically.
“action Parameter” on page 152
“actionbar parameter” on page 156
“actionbarid parameter” on page 158
“actionbarlist parameter” on page 159
“actionlist Parameter” on page 160
“actionprefix Parameter” on page 161
“actionprefixlist Parameter” on page 162
“actions Parameter” on page 162
“alarm Parameter” on page 163
“autochanges Parameter” on page 164
“autocheck Parameter” on page 165
“autocount Parameter” on page 166
“autoname Parameter” on page 167
“autonext Parameter” on page 168
“autoparse Parameter” on page 169
“autoprefix Parameter” on page 170
“autosymbols parameter” on page 171
Chapter 8. References
143
Parameter Name
“autotime Parameter” on page 172
“background Parameter” on page 173
“basefont Parameter” on page 174
“beep Parameter” on page 175
“beeplength Parameter” on page 176
“beeptone Parameter” on page 176
“blockdefaulttype Parameter” on page 177
“blockdoc Parameter” on page 178
“blockend Parameter” on page 179
“blocklength Parameter” on page 180
“blockshow Parameter” on page 180
“blockstart Parameter” on page 181
“blocktype Parameter” on page 182
“blockview Parameter” on page 183
“browse Parameter” on page 183
“changes Parameter” on page 184
“class Parameter” on page 185
“classes Parameter” on page 186
“color Parameter” on page 187
“commandcheck Parameter” on page 189
“commandline Parameter” on page 189
“content Parameter” on page 191
“creating Parameter” on page 192
“cursorcol Parameter” on page 192
144
LPEX Editor User’s Guide
Description
Sets the time in minutes before the
next autosave.
Sets the background character.
Sets the default font for a line (Query
only)
Sets the alarm.
Sets the duration for the alarm.
Sets the frequency for the alarm.
Changes the block type favoured by
the block selection commands.
Gives the number of the file that
contains the marked block. (Query
only)
Gives end position of block. (Query
only)
Gives the number of characters or lines
in a block. (Query only)
Sets the way a block is shown on the
screen.
Gives the start position of a block.
(Query only)
Gives the type of block currently set.
(Query only)
Gives the number of the view that
contains the marked block. (Query
only)
Prevents overwriting or changing of a
file.
Sets the number of changes made to
the file.
Sets the class to which the current line
belongs.
Sets the number and names of classes
for the current file.
Sets RGB color values for the Editor.
Associates a command with the issuing
of a command with the Issue edit
command
Displays an Editor command entry
area at the bottom of the Editor
window.
Sets the data content of a line.
Associates a command with the
creation of a line.
Sets the window column containing
the cursor.
Parameter Name
“cursorpos Parameter” on page 193
“cursorrow Parameter” on page 194
“default Parameter” on page 195
“deleting Parameter” on page 197
“directory Parameter” on page 198
“dirty Parameter” on page 198
“dispdepth Parameter” on page 199
“dispwidth Parameter” on page 200
“doccontent Parameter” on page 201
“doclist Parameter” on page 202
“docnum Parameter” on page 202
“doctype Parameter” on page 203
“documents Parameter” on page 204
“docvar Parameter” on page 204
“docvarlist Parameter” on page 205
“drive Parameter” on page 206
“element Parameter” on page 206
“elementchangeexit Parameter” on page 207
“elements Parameter” on page 208
“emphasis Parameter” on page 209
“environment Parameter” on page 210
“exclude Parameter” on page 210
Description
Sets the column in a line containing
the cursor.
Sets the window row containing the
cursor.
Sets a default value for a parameter.
Associates a command with the
deletion of a line.
Changes the directory used by the
Editor processes.
Gives the setting of the dirty flag.
(Query only)
Sets the depth of the Editor window.
Sets the width of the Editor window.
Stores the result of the last text import
operation in the file
Lists current file numbers. (Query
only)
Gives the unique number identifying a
file. (Query only)
Sets the file type; used for xxx.lxs save
macro
Gives the number of files currently
open. (Query only)
Sets the value of a variable global to all
file views of the current document
Lists names of variables global to all
file views of the current document.
(Query only)
Sets the drive used by the Editor
processes.
Gives the number of current line.
(Query only)
Specifies an Editor command to be
performed whenever the current
element changes.
Gives the number of lines in the
current file. (Query only)
Creates an emphasis box, starting from
the current cursor position and
surrounding the number of characters
given by the parameter value.
Obtains information about the system
environment. (Query only)
Sets the classes to exclude from the
display.
Chapter 8. References
145
Parameter Name
“expandtabs Parameter” on page 211
“filedialog Parameter” on page 212
“fill Parameter” on page 214
“filter Parameter” on page 215
“find Parameter” on page 216
“findhistory Parameter” on page 218
“flow Parameter” on page 219
“focus Parameter” on page 220
“font Parameter” on page 222
“fontlist Parameter” on page 225
“fonts Parameter” on page 226
“fontsize Parameter” on page 227
“format Parameter” on page 228
“formatter Parameter” on page 231
“formwidth Parameter” on page 233
“fullparse Parameter” on page 234
“global Parameter” on page 235
“globallist Parameter” on page 236
“group Parameter” on page 236
“help Parameter” on page 238
“hex Parameter” on page 239
“highlight Parameter” on page 239
“horizscroll Parameter” on page 240
“hoverhelp Parameter” on page 241
146
LPEX Editor User’s Guide
Description
Expands tab characters to spaces for
display purposes.
Sets the default settings used by the
Open, Get and Save As dialogs.
Sets the fill character.
Sets options for the filter operation.
Specifies default options for both the
find command and the Editor - find
and replace window.
Sets the number of search occurrences
to remember.
Controls the automatic flowing of
elements (Query only)
Sets the focus lines for the Editor.
Sets the attributes for a given font.
Lists the symbolic fonts that are
currently set (Query only)
Sets the character font for the current
line.
Sets the character size for the current
line.
Specifies format controls for the
current element.
Enables line wrapping.
Sets the formatting width of the
current document.
Defines the parser to be used for a full
parse.
Sets the value of a variable global to all
documents in the Editor.
Lists names of variables global to all
documents in the Editor. (Query only)
Specifies the conditions by which a
menu item will be enabled or
disabled (Query only)
Specifies the help information
associated with a user-defined menu
item (Query only)
Returns the hexadecimal ASCII code of
the character at the current cursor
position. (Query only)
Sets the classes to be highlighted.
Sets the increment for the horizontal
scroll.
Enable or disable hoverhelp for the
toolbar buttons.
Parameter Name
“idletime Parameter” on page 242
“impmacro Parameter” on page 243
“impset Parameter” on page 243
“include Parameter” on page 244
“indent Parameter” on page 245
“inserting Parameter” on page 246
“key Parameter” on page 247
“keylist Parameter” on page 250
“lastfind Parameter” on page 250
“lastkey Parameter” on page 251
“lastline Parameter” on page 253
“length Parameter” on page 254
“level Parameter” on page 255
“limiterror Parameter” on page 255
“linebreak Parameter” on page 256
“linenumber Parameter” on page 257
“lineread Parameter” on page 258
“lines Parameter” on page 259
“linked Parameter” on page 259
“list Parameter” on page 260
“loadedmacros Parameter” on page 261
“mark Parameter” on page 261
“markdeleteexit Parameter” on page 262
“markdirtyexit Parameter” on page 263
Description
Sets the idle seconds required before
autosave.
Processes unknown commands as
macros.
Processes unknown commands as set
query
Specifies the list of classes for which
member lines are to be displayed in a
file view.
Sets the indent factor.
Sets the cursor to either insert or
replace mode.
Maps a logical key to a physical key.
Lists current remapped keys. (Query
only)
Sets the default parameter string for
the find command.
Displays the last key obtained by
keyread or lineread. (Query only)
Displays the last line obtained by the
lineread parameter. (Query only)
Displays the length of the current line.
(Query only)
Specifies the level of the current
element. (Query only)
Specifies how a text length limit error
is handled.
Sets the mode for ending lines in a file.
Gives the line number of the current
line. (Query only)
Sets the title or prompt for the next
lineread.
Returns the number of non-show lines
in the file. (Query only)
Lists external commands linked to the
Editor. (Query only)
Lists details about items such as files,
keys, and views. (Query only)
Lists the preloaded REXX macros.
(Query only)
Returns position of specified mark
within a line. (Query only)
Defines the mark removal exit routine
for the current file.
Defines the mark changed exit routine
for the current file.
Chapter 8. References
147
Parameter Name
“markexclude Parameter” on page 264
“markfont Parameter” on page 265
“markid Parameter” on page 266
“markinclude Parameter” on page 267
“marklist Parameter” on page 268
“markrange Parameter” on page 268
“menuactive Parameter” on page 269
“menucheck Parameter” on page 272
“messageline Parameter” on page 273
“messages Parameter” on page 274
“modes Parameter” on page 275
“name Parameter” on page 276
“noblanks Parameter” on page 277
“nosave Parameter” on page 277
“oldline Parameter” on page 278
“overfont Parameter” on page 279
“overhang Parameter” on page 280
“overlay Parameter” on page 282
“pad Parameter” on page 283
“parent Parameter” on page 284
“parser Parameter” on page 285
“pending Parameter” on page 286
“popupinit Parameter” on page 287
“popuplink Parameter” on page 289
“popupmenu Parameter” on page 290
“popupmenuid Parameter” on page 293
“popupmenulist Parameter” on page 294
148
LPEX Editor User’s Guide
Description
Gives the exclude setting of a mark.
(Query only)
Gives the font setting of a mark.
(Query only)
Gives the id value of a mark. (Query
only)
Gives the include setting of a mark.
(Query only)
Displays a list of mark names set in
the current file. (Query only)
Returns starting and ending positions
of the specified mark. (Query only)
Enables or disables a menu-bar item,
pull-down menu choice, or pop-up
menu item.
Sets or unsets the checkmark for a
menu choice.
Controls the display of messages.
Enables the display of messages.
Displays the character modes for the
current line. (Query only)
Sets the file name of a file view.
Saves the file without trailing blanks.
Enables save to be on.
Set the OLDLINE value for the current
line.
Defines the font for overlay lines.
Sets the overhang for formatting
flowed lines.
Sets the overlay text for the Editor
window.
Sets the pad character.
Sets the parent window for the Editor
window.
Defines command for live parsing.
Sets line pending live parsing.
Specifies a callback routine to be called
when the pop-up menu is raised.
Add menu items already defined on
the menu bar to the pop-up menu.
Sets the contents of the pop-up menu
and associated pull-down menu items.
Queries the menu id of a pop-up menu
item. (Query only)
Lists user-defined pop-up menus.
(Query only)
Parameter Name
“position Parameter” on page 295
“prefix Parameter” on page 295
“prefixdefaulttext Parameter” on page 296
“prefixdisplayformat Parameter” on page 297
“prefixentry Parameter” on page 299
“prefixformat Parameter” on page 300
“prefixprotect Parameter” on page 301
“prefixshow Parameter” on page 302
“profiles Parameter” on page 303
“protect Parameter” on page 304
“rawtext Parameter” on page 305
“readonly Parameter” on page 305
“recall Parameter” on page 306
“recentfilecmd Parameter” on page 307
“recentmenushow Parameter” on page 308
“recentpathshow Parameter” on page 310
“recentsize Parameter” on page 311
“recording Parameter” on page 312
“resolve Parameter” on page 313
“rexx Parameter” on page 314
“ring Parameter” on page 315
“ringlist Parameter” on page 315
Description
Sets the cursor position in the line.
Specifies the value of the prefix data
associated with the current line
Sets the text to be used for the text
part of the prefix data when lines are
inserted or changed and the autoprefix
parameter is on.
Specifies a format string used to
display the prefix area.
Sets the text in the prefix entry field of
the current line.
Defines the size and type of prefix data
for the current file.
Enables or disables text entry in a
displayed prefix data area.
Controls the display of the prefix area
in the current edit view.
Sets the profiles to be used.
Sets the classes to protect from
overtyping.
Displays the data content of a line
without symbol substitution. (Query
only)
Protects view from changes.
Sets command recall options.
Specifies the Editor command
processed when a file name is selected
from the recently-accessed file list.
Specifies how the recently-accessed file
list is displayed.
Enables or disables the display of
complete file paths in the
recently-accessed file list.
Specifies how many file names are
maintained in the recently-accessed file
list.
Enables recording of changes made to
a document.
Displays a message describing the
command to be run. (Query only)
Enables the use of REXX.
Set the default ring assignment mode
for new views.
Queries ring numbers active in the
Editor. (Query only)
Chapter 8. References
149
Parameter Name
“ringnum Parameter” on page 316
“rings Parameter” on page 317
“ringselector Parameter” on page 318
“ruler Parameter” on page 319
“rulertext Parameter” on page 320
“screen Parameter” on page 320
“seconds Parameter” on page 321
“show Parameter” on page 322
“showcurrent Parameter” on page 323
“shows Parameter” on page 324
“sidescroll Parameter” on page 325
“space Parameter” on page 326
“spill Parameter” on page 327
“split Parameter” on page 328
“statusline Parameter” on page 329
“submenuinit Parameter” on page 330
“symbol Parameter” on page 332
“symbollist Parameter” on page 334
“synonym Parameter” on page 334
“synonymlist Parameter” on page 335
“tabcursorpos Parameter” on page 336
“tabs Parameter” on page 337
“textlimit Parameter” on page 338
“timeout Parameter” on page 339
“toolbar Parameter” on page 340
150
LPEX Editor User’s Guide
Description
Specifies the ring number to which to
move the current view.
Queries the number of rings active in
the Editor. (Query only)
Sets the display state of the ring
selector.
Controls the display of the format line
in the edit window.
Specifies the content of the format line.
Gives the number of rows and
columns and pels in the screen. (Query
only)
Gives the number of elapsed seconds
since the start of the Editor session.
(Query only)
Turns a line into a show line.
Enables display of the current line.
Enables display of show lines.
Sets the offset of the leftmost visible
column.
Sets the space character.
Sets the formatting width for elements
to spill over to a new line.
Sets the default orientation of
split-window borders in the Editor
window only.
Controls the display of the status line.
Specifies a callback routine to be called
when a specified menu-bar item or
sub-item is selected.
Assigns a special character to a
symbol.
Returns list of current symbols. (Query
only)
Sets the value of a synonym.
Lists current synonyms. (Query only)
Sets the column, allowing for
expanded tab characters, in a line
containing the cursor.
Sets tab positions.
Sets the byte limit on the size of lines.
Number of minutes before the Editor
closes down after the last Editor
window is closed.
Creates new tool-bar items.
Parameter Name
“toolbarlist Parameter” on page 342
“toolshow Parameter” on page 342
“toolview Parameter” on page 343
“trigpos Parameter” on page 344
“unprotect Parameter” on page 345
“version Parameter” on page 346
“view Parameter” on page 347
“viewlist Parameter” on page 347
“viewname Parameter” on page 348
“viewnum Parameter” on page 349
“window Parameter” on page 350
“windowid Parameter” on page 350
“windowpos Parameter” on page 351
“windowshow Parameter” on page 352
“wordchars Parameter” on page 353
“wrap Parameter” on page 354
Description
Lists items in the toolbar menu. (Query
only)
Displays or hides the tool-bar.
Determines whether text, graphics, or
both are displayed on a tool-bar
button.
Sets the position used after trigger
processing.
Unprotects a line with listed classes.
Identifies the Editor version. (Query
only)
Displays the name of a specific view.
(Query only)
Lists current view numbers. (Query
only)
Sets the name of the current view.
Displays the number identifying the
view. (Query only)
Changes the visibility of the current
Editor window.
Displays a unique number which
identifies a window to the operating
system. (Query only)
Sets the position and size of a view
(window).
Sets the prerequisites for displaying a
window.
Defines the valid characters for an
Editor word.
Enables or disables wrapping of
elements for the display.
“Chapter 3. Editor Commands and Parameters” on page 21
“Commands Summary” on page 55
accelerator Parameter
Allows the setting and querying of a shortcut key associated with a menu
item.
Scope: File
Syntax
query accelerator
Chapter 8. References
151
set accelerator.Name Key
Options
Name
Either the name for a defined Editor menu item, or a numeric value for
a user-added item. The numeric value can be obtained using the query
actionbarid command.
A key name. Any of the key name formats valid for the action
parameter are valid.
Key
Description
The accelerator parameter associates a function key with a menu item. This
attribute can also be set for menu items you have created with the set
actionbar command.
Example
To set the accelerator for the Save menu item to F2, type:
set accelerator.lp_save F2
For a list of predefined Editor names, see the “menuactive Parameter” on
page 269.
API Return Code
-2 Invalid parameter.
“action Parameter”
“menuactive Parameter” on page 269
action Parameter
Assigns a command to a logical key.
Scope: File
Syntax
query action.[prefix.]KeyName
set action.[prefix.]KeyName [Command]
152
LPEX Editor User’s Guide
Options
Command
prefix
KeyName
Command which may include the mult command. If Command is
omitted, the key is set to its default action, which is to return its own
value.
If this option is specified, the key is active only when the cursor is in the
prefix area.
Your operating system may reserve certain function keys or key
combinations, such as F1, for special purposes. With these exceptions,
permitted values for KeyName are:
nnn
A decimal-based ASCII character code, where n is a digit of
value 0 to 9, inclusive. For example, character code 065 = A.
xnnor xnnn
A hexadecimal-based ASCII character code, where nis a digit of
value 0 to 9, inclusive, or an alphabetic character of value A to
F or a to f, inclusive. For example, character code x41 = A.
any letter key
An alphabetic character of value A to Z or a to z, inclusive.
c-a to c-z
Ctrl+letter keys.
c-0 to c-9
Ctrl+number keys. (The number keys on the numeric keypad
are excluded.)
a-a to a-z
Alt+letter keys
a-0 to a-9
Alt+number keys. (The number keys on the numeric keypad
are excluded.)
f1 to f12
Function keys
s-f1 to s-f12
Shift+Function keys
c-f1 to c-f12
Ctrl+Function keys
a-f1 to a-f12
Alt+Function keys
Chapter 8. References
153
buttonNdouble
A double click on button N (N= 1, 2, or 3; although only 1 and
2 will be usable on a two-button mouse.)
buttonNdown
A single click on button N
buttonNdrag
Drag mouse with button N down
a named key
The following key names can be used, either alone or in
combination with the Alt or Ctrl keys:
v Backspace
v Tab
v Backtab
v Enter
v Esc
v PadEnter
The following key names can be used, either alone or in
combination with the Alt, Ctrl, or Shift keys:
v PgUp
v PgDn
v End
v Home
v Left
v Right
v Up
v Down
v Ins
v Del
Description
The action parameter assigns a command to a logical key for the current file
only. When the assigned key is pressed, the command is carried out, provided
the actions parameter is on. A multiple command can be attached to a key
using the mult command.
This parameter can be used to override previously defined accelerators. If the
accelerator was advertised on a menu, it would now be incorrect. To change
the accelerators displayed for a menu item, use the set actionbar command.
154
LPEX Editor User’s Guide
Note: The case of the key assigned to an action is ignored when used in
combination with the Alt or Ctrl keys.
Examples
1. To assign the addition of eight lines to a key sequence (Alt+8), type:
set action.a-8 add 8
Pressing Alt+8 now adds eight lines to the file.
2. To make the F7 key move the text up by the number of lines that can be
displayed in the window, type:
set action.f7 scroll screen up
3. To enable a key sequence (Ctrl+w) to process multiple commands
sequentially, for example, to mark a word and then delete it, type:
set action.c-w ;block set clear word ;block delete
The first ; is a synonym for the mult command. Actions assigned to a key
work much like commands typed on the command line; synonyms are
processed; macros and external commands can be used.
4. To force a macro to be processed in preference to a built-in command,
type:
set action.a-m macro block
If the word macro is omitted, the Alt+m key issues the built-in block
command. Adding the word macro ensures that the Editor searches
instead for a macro named block.lx.
5. To assign a function to the action of dragging the mouse while a button is
pressed, type:
set action.button1drag ;primitive setcursor ;block mark character
This dynamically marks the block. The first command, primitive setcursor,
makes the Editor move the cursor to the position of the mouse pointer.
The second command makes the Editor extend (or shrink) the current
block to include the character at the cursor position.
API Return Codes
-1 The number specified was not a positive integer. Issue the command again using
a valid positive number.
-2 The option specified with the parameter was not valid. Check the syntax
requirements for the parameter and try the set or query command again.
Chapter 8. References
155
“actionlist Parameter” on page 160
“accelerator Parameter” on page 151
“actions Parameter” on page 162
“prefixshow Parameter” on page 302
actionbar parameter
Sets the contents of the Editor menu-bar and associated pull-down menu
items.
Scope: File
Syntax
set actionbar.{Item|BITMAP_resdll_id}[.{Subitem|BITMAP_resdll_id}][...]
[OrdinalNumber] [Command]
query actionbar.{Item|BITMAP_resdll_id}[.{Subitem|BITMAP_resdll_id}][...]
Options
Item
Name of the menu item to be included on the menu-bar.
You can also use the following special characters or strings:
_
Use the underscore to include a blank in the name.
x
Creates a mnemonic for the menu item. The mnemonic is
the character that follows the x.
\t
Defines an accelerator for the menu item.
separator
Places a horizontal separator line in the pull-down or
cascaded menu.
Subitem
BITMAP
resdll
id
OrdinalNumber
Command
Description
156
LPEX Editor User’s Guide
Name of the selection item to be added to the Item pull-down menu.
You can also use the special characters described in Item.
Specifies that the menu or sub-menu item is a bitmap.
The resource dll containing the new item’s bitmap.
The id for the bitmap contained in the resdll resource dll.
The position at which the menu item is inserted, starting at zero.
Separators are included in the count.
The action or actions to perform when Subitem is selected.
The actionbar parameter is used to add menu choices to the Editor menu-bar
and its associated pull-down menus. You can create completely new
pull-down menu sets, or you can add to the contents of existing pull-down
menus.
Use text or icons to represent menu choices. If you use icons, the icons must
be contained in a DLL file located in a directory path included in the PATH
environment variable.
If Item, Subitem, or BITMAP does not already exist in the specified menu-bar
or sub-menu, it is created.
If Item, Subitem, or BITMAP is an existing item, the following happens:
v If a command is specified, the previous command is replaced with the
newly-specified command.
v If an item contains a pull-down or cascaded menu, you cannot change the
contents of that item to a command. Similarly, if an item contains a
command, you cannot change the contents of that item to a pull-down or
cascaded menu. You must first delete the item, then recreate it specifying
the new menu item contents.
v If no command is specified, the item and any commands or subitems
attached to it are deleted.
Examples
1. To create a Example menu-bar item, which creates a sound when selected,
type:
set actionbar.Example alarm
2. To create a Example menu-bar item with a subitem called Sound, which
creates a sound when selected, and mnemonics for both items, type:
set actionbar.Exxample.xSound alarm
The mnemonic for Example is x, and the mnemonic for Sound is s.
Note: You cannot define menu items with the same name within a given
menu set. Though Examples 1 and 2 appear to set up menu-bar items with
the same base name, the mnemonic differentiates them. You could
continue to set up more menu-bar items with the same base name as long
as a different mnemonic was used for each item.
3. To add an accelerator to the Sound subitem defined in the above example,
type:
set actionbar.Exxample.xSound\tAlt+S alarm
The accelerator for Sound is Alt+S.
Chapter 8. References
157
4. You can use a bitmap in place of a text label for your menu item or
subitem. Bitmaps must be defined in a DLL file located in a directory path
included in your PATH environment variable. The following example uses
the bitmap with resource id 2, found in the evfwrc21.dll file included with
the Editor. To add this bitmap to the pull-down menu defined in Example
2, type:
set actionbar.Exxample.BITMAP_evfwrc21_2 alarm
You can also use a bitmap as a menu item on the menu-bar.
5. You can define subitems to subitems. For example, the following example
adds a subitem called Add to the pull-down menu defined in Example 2.
Selecting the Add pull-down menu item raises a cascaded menu, with
menu items that add one, two, or three lines to your document.
set actionbar.Exxample.xAdd.One_line add 1
set actionbar.Exxample.xAdd.Two_lines add 2
set actionbar.Exxample.xAdd.Three_lines add 3
6. To place a separator between the first two items created in the previous
example, use:
set actionbar.Exxample.xAdd.separator 1
7. To set the accelerator for the Save menu item to F2, type:
set accelerator.lp_save F2
For a list of predefined Editor names, see the “menuactive Parameter” on
page 269.
API Return Codes
-1 The option specified for Item was not valid. Type the option exactly as it appears
in the menu, including uppercase and lowercase letters.
-2 The item, subitem, or bitmap name contains invalid characters, or you tried to
define a new menu item without specifying a command.
“action Parameter” on page 152
“actionbarid parameter”
“actionbarlist parameter” on page 159
“popupmenu Parameter” on page 290
“submenuinit Parameter” on page 330
actionbarid parameter
Returns the menu id of a menu-bar pull-down.
Scope: File
158
LPEX Editor User’s Guide
Syntax
query actionbarid.{Item[.Subitem][.Subitem][...] | BITMAP_resdll_id}
Options
Item
Subitem
BITMAP
resdll
id
The name of a menu item on the menu-bar.
The name of a sub-menu item attached to Item.
Specifies that the menu or sub-menu item is a bitmap.
The resource dll containing the item’s bitmap.
The id for the bitmap contained in the resdll resource dll.
Description
The actionbarid parameter queries the id of a menu or menu selection created
with the actionbar parameter. The item and subitem names specified must be
the same as those used to create the menu-bar. If the item specified is not set,
a value of <NULL> is returned.
Example
To query the id of the sound sub-menu item attached to the mine pull-down
menu, type:
query actionbarid.mine.sound
API Return Code
-1 You cannot issue the set command for this parameter.
“action Parameter” on page 152
“actionbar parameter” on page 156
“actionbarlist parameter”
actionbarlist parameter
Lists user-defined pull-down menus.
Scope: File
Syntax
query actionbarlist
Options
None.
Chapter 8. References
159
Description
The actionbarlist parameter lists the names of all user-defined menus on the
menu bar for the current file.
Examples
To list all user-defined menus for the current file, type:
query actionbarlist
API Return Code
-1 This parameter cannot be set.
“actionbar parameter” on page 156
“actionbarid parameter” on page 158
actionlist Parameter
Lists the logical keys to which commands have been assigned.
Scope: File
Syntax
query actionlist
Description
The actionlist parameter lists the keys to which commands have been
assigned by the set action parameter.
Note: For a list of the logical keys and the commands assigned to each key,
use the list parameter. This parameter cannot be used in an API call.
Example
To list the keys that have commands assigned to them, type:
query actionlist
API Return Code
-1 You cannot issue the set command with this parameter.
160
LPEX Editor User’s Guide
“action Parameter” on page 152
“list Parameter” on page 260
actionprefix Parameter
Assigns a prefix command to a character sequence.
Scope: File
Syntax
query actionprefix.prefixcommand
set actionprefix.prefixcommand [Command]
Options
prefixcommand
Command
Prefix command to be defined. This can be any non-numeric
character sequence. Character case is not significant.
Any Editor command, and its associated parameters, if any.
If Command is omitted, prefixcommand becomes undefined. The text
will be left in the prefix area until it is explicitly reset with the
prefixentry parameter.
Description
The actionprefix parameter assigns a prefix command to a character sequence
for the current file only. When the assigned sequence is entered in the prefix
area, the command is carried out, provided that the actions parameter is set
to on.
Multiple commands can be attached to an actionprefix character sequence by
using the mult command.
Use the actionprefixlist parameter to see a list of prefix commands already
defined for the current editing session.
Example
To define a prefix command ’D’ that will delete the current line, type:
set actionprefix.D delete
Entering D into the prefix area will delete the current line.
Return Codes
Chapter 8. References
161
None.
“actionprefixlist Parameter”
“prefixentry Parameter” on page 299
actionprefixlist Parameter
Used to get a list of all prefix commands defined for the current document.
Scope: File
Syntax
query actionprefixlist
Options
None.
Description
This parameter displays a list of all prefix commands defined for the current
document. Output can be viewed in the macro log.
Example
To see a list of prefix commands defined for the current document, type:
query actionprefixlist
API Return Code
-1 The actionprefixlist parameter accepts no options.
“actionprefix Parameter” on page 161
actions Parameter
Enables shortcut keys.
Scope: Global
Syntax
query actions
162
LPEX Editor User’s Guide
set actions { on | off | inverse }
Options
on
off
inverse
A key enters its assigned value. This is the default value.
A key enters its own value.
Toggles between on and off.
Description
The actions on parameter causes any action assigned to a specific key to be
carried out when that key is pressed. If actions is off, the key returns its own
value, as if it had not been remapped.
Example
To make keys carry out the actions that have been assigned to them, type:
set actions on
API Return Code
-2 The option you specified was not on, off, or inverse.
“action Parameter” on page 152
“key Parameter” on page 247
alarm Parameter
Sounds the alarm on the next screen refresh.
Scope: Global
Syntax
query alarm
set alarm { on | off | inverse }
Options
on
off
inverse
Sounds the alarm after the next refresh.
Does not sound the alarm after the next refresh. This is the default
value.
Toggles between on and off.
Description
Chapter 8. References
163
The alarm on parameter sounds an alarm when the screen is next refreshed
(for example, when the current macro ends, or after a sshow command). The
alarm parameter is then automatically set to off after the screen has been
refreshed. The alarm sounds only if the beep parameter is set to on.
Examples
1. To see the state of the alarm parameter, type:
query alarm
2. To turn the refresh alarm on, type:
set alarm on
API Return Code
-2 The option you specified was not on, off, or inverse.
“alarm Command” on page 59
“beep Parameter” on page 175
“beeptone Parameter” on page 176
“beeplength Parameter” on page 176
autochanges Parameter
Counts the number of changes since the last autosave.
Scope: File
Syntax
query autochanges
set autochanges [Number]
Option
Number
Number of changes between autosaves. The default is zero.
Description
The autochanges parameter gives a count of changes since the last autosave.
The query autochanges command lists the number of changes made to the
file since the last save or autosave (or since the file was loaded, if no previous
save or autosave was made).
The autochanges parameter can be set explicitly to either a higher count to
force an autosave or to a lower count to postpone an autosave.
164
LPEX Editor User’s Guide
An autosave is made when the value of autochanges equals or exceeds the
value set by the autocount parameter or when the time elapsed since the last
autosave equals the value set by the autotime parameter.
Examples
1. If autocount is 15, to force autosaves after only five changes, type:
set autochanges 10
After five changes, autochanges is increased to 15, equal to autocount,
thus forcing an autosave.
2. To list the number of changes that have been made since the last autosave,
type:
query autochanges
API Return Code
-2 The number specified was not a positive integer.
“autocount Parameter” on page 166
“autotime Parameter” on page 172
“changes Parameter” on page 184
“idletime Parameter” on page 242
autocheck Parameter
Enables automatic checkpointing.
Scope: File
Syntax
query autocheck
set autocheck { on | off | inverse }
Options
on
off
inverse
Takes checkpoints automatically. This is the default value.
Does not take checkpoints automatically.
Toggles between on and off.
Description
The autocheck on parameter automatically takes checkpoints at various
points; for example, whenever the cursor moves to a new line or when
Chapter 8. References
165
another file becomes current. Each checkpoint records a state of the file. You
can return to any of these states with the undo command.
When autocheck is off, you are responsible for taking manual checkpoints.
You can take manual checkpoints using the check command, or the Set
checkpoint selection from the Edit pull-down menu.
Example
To set up automatic checkpointing, type:
set autocheck on
API Return Code
-2 The option you specified was not on, off, or inverse.
“check Command” on page 70
“undo Command” on page 140
autocount Parameter
Sets the number of changes before the next autosave.
Scope: File
Syntax
query autocount
set autocount [Number]
Option
Number
Number of changes required before an autosave. The default is 50 and
the maximum is 32767.
Description
The autocount parameter sets the number of changes you can make before the
file is automatically saved. The file is automatically saved, using the
autoname, if the number of changes since the last save or autosave (or since
the file was loaded, if no previous autosave) equals or exceeds the autocount
value and no key has been pressed for idletime seconds. You can use query
autochanges to determine the number of changes since the last save or
autosave.
166
LPEX Editor User’s Guide
Note: Setting autocount to 0 may prevent changes from triggering an
autosave of the file. However, an autosave is made anyway if the time since
the last autosave (or load) equals the value set by the autotime parameter,
and at least one change has been made since that save or autosave.
Example
To set a file to save automatically after 20 changes are made, type:
set autocount 20
API Return Code
-2 The number specified was either outside the valid range or not a whole number.
Issue the command again using a valid number.
“autochanges Parameter” on page 164
“autoname Parameter”
“idletime Parameter” on page 242
autoname Parameter
Sets the name for the autosave file.
Scope: File
Syntax
query autoname
set autoname Drive-Directory-Filename
Option
Drive-Directory-Filename
The drive, directory, and filename of the autosave file,
including a relevant extension.
Description
The autoname parameter sets the name under which a file is saved
automatically if the conditions set by the autocount or autotime parameters
are met.
The default autoname is the 8 character hexadecimal equivalent of the
window handle under which the file was first opened. This method is used to
minimize the possibility of a duplicate id when using the Editor in a network
environment. You can change this name, but should do it before the first
autosave.
Chapter 8. References
167
Note: Any changes you made to your file will be autosaved to the file
specified by the autoname parameter. The original file is not updated if you
quit without saving the file, and the autosaved file is not saved to disk if you
exit the Editor normally.
Example
To name the autosave file, type:
set autoname \place2\markup.c
The autosave filename is changed to markup.c and is placed in the \place2
directory of the current drive.
API Return Code
-2 The Drive-Directory-Filename was not valid.
“autocount Parameter” on page 166
“autotime Parameter” on page 172
autonext Parameter
Gives the time in seconds before next autosave.
Scope: File
Syntax
query autonext
Description
The autonext parameter gives the time in seconds before the next autosave
occurs. When the autotime parameter is set to zero, autonext is also zero
because no autosave is scheduled.
Example
To view the seconds before the next autosave occurs, type:
query autonext
API Return Code
-1 You cannot issue set for this parameter.
168
LPEX Editor User’s Guide
“autotime Parameter” on page 172
autoparse Parameter
Resumes or suspends live parsing.
Scope: File
Syntax
query autoparse
set autoparse { on | off | inverse }
Options
on
off
inverse
Activates the parser for the current file. This is the default value.
Suspends the parser for the current file.
Toggles between on and off.
Description
The autoparse parameter resumes or suspends live parsing, When autoparse
is off, any pending changed lines are processed before parsing is suspended.
The Editor remembers the name of the parser, and continues adding lines to
the pending list, but does not invoke the parser until autoparse is set on
again.
The set parser command defines a live parser, and makes it active by turning
autoparse on. If the parser returns an error during live parsing, autoparse is
turned off automatically.
Example
To allow new commands to suspend a live parser temporarily while making
changes to a file, type:
set autoparse off
API Return Code
-2 The option you specified was not on, off, or inverse.
“parser Parameter” on page 285
“pending Parameter” on page 286
Chapter 8. References
169
autoprefix Parameter
Indicate that the prefix data should be automatically maintained.
Scope: File
Syntax
query autoprefix
set autoprefix { on | off | inverse }
Options
on
Indicates that prefix data should be automatically maintained. This
parameter should be set to on after the file has been loaded.
off
inverse
The numeric part of the prefix data will be maintained as ascending
sequence numbers while the file is edited. For lines that are inserted or
changed, the text part of the prefix data will be replaced by the text in
the prefixdefaulttext parameter.
Indicates that prefix data should not be automatically maintained. When
a new line is inserted, the numeric part of the prefix data will be zero
and the text part will be blank. This prefix data may be changed by
setting the prefix parameter.
Toggles between on and off.
Description
The autoprefix parameter indicates whether the prefix data should be
automatically maintained while the file is being edited. The autoprefix
parameter setting affects only the prefix data, and has no effect on the display
prefix.
Example
To indicate that the prefix data should be automatically maintained, use the
following command:
set autoprefix on
API Return Code
-2 The numeric part of the prefix data must be in ascending order before the
autoprefix command can be set to on. First reorder the prefix data by using the
prefix parameter or the prefixrenumber command, then issue this command
again.
170
LPEX Editor User’s Guide
“prefixformat Parameter” on page 300
“prefixdefaulttext Parameter” on page 296
“prefix Parameter” on page 295
autosymbols parameter
Causes symbol substitution to occur automatically.
Scope: File
Syntax
set autosymbols on | off
query autosymbols
Options
on
off
Symbols are automatically substituted.
Symbols are not automatically substituted.
Description
The autosymbols parameter controls how symbols defined by the symbol
parameter are substituted.
If set to on, symbols are substituted for their defined characters when you
leave the line the symbol is entered on. If set to off, symbols must be
substituted by explicit request with the substitute command.
Example
To turn off automatic substitution of symbols, type:
set autosymbols off
API Return Codes
-2 Incorrect option specified for parameter.
“substitute Command” on page 137
“symbol Parameter” on page 332
“symbollist Parameter” on page 334
Chapter 8. References
171
autotime Parameter
Sets time in minutes before autosave.
Scope: File
Syntax
query autotime
set autotime [Minutes]
Option
Minutes
The time in minutes required between autosaves. The inital value is 5,
with the range between 1 and 1439. If no value is specified it defaults to
0.
Description
The autotime parameter sets the minutes between autosaves. The file is saved
when autotime minutes have passed, if at least one change has been made
since the last save or autosave and no key has been pressed for idletime
seconds. The file is saved using its autoname.
Note: An autosave is made before the time limit has been reached if the
idletime condition is met and the number of changes since the last save or
autosave reaches the value set for autocount.
Example
To set the time before the next autosave to 5 minutes, type:
set autotime 5
API Return Code
-2 The number specified was either outside the valid range or not a whole number.
Issue the command again using a valid number.
“autochanges Parameter” on page 164
“autocount Parameter” on page 166
“autoname Parameter” on page 167
“idletime Parameter” on page 242
172
LPEX Editor User’s Guide
background Parameter
Sets background character.
Scope: View
Syntax
query background
set background Char
Option
Char
Can be a blank or any other single keyboard character, where Char can
be specified in any of the following forms:
nnn
A decimal-based ASCII character code, where n is a digit of
value 0 to 9, inclusive. For example, character code 065 = A.
xnn or xnnn
A hexadecimal-based ASCII character code, where nis a digit of
value 0 to 9, inclusive, or an alphabetic character of value A to
F or a to f, inclusive. For example, character code x41 = A.
any letter key
Any single keyboard character.
Description
The background parameter sets the background character which is used to fill
the area above the first and below the last line of data in the data area. Use
the set font.background command to select the color and typeface of the
background character. Issuing a query background command returns the
numeric value of the background character.
Example
To set the background character to a dash, type:
set background -
API Return Code
-2 The Char option was not, or did not represent, a single character. Check that it
conforms to the syntax requirements and type the command again.
“font Parameter” on page 222
Chapter 8. References
173
basefont Parameter
Sets the default font for the current line.
Scope: Line
Syntax
set basefont Char
query basefont
Option
Char
An predefined font character, where Char can be specified in any of the
following forms:
nnn
A decimal-based ASCII character code, where n is a digit of
value 0 to 9, inclusive. For example, character code 065 = A.
xnn or xnnn
A hexadecimal-based ASCII character code, where n is a digit of
value 0 to 9, inclusive, or an alphabetic character of value A to
F or a to f, inclusive. For example, character code x41 = A.
any letter key
An alphabetic character of value A to Z or a to z, inclusive.
Description
The basefont parameter specifies the default font for the current line.
Example
To see the default font for a line, type:
query basefont
API Return Code
-2 The Char option was not, or did not represent, a single character. Check that it
conforms to the syntax requirements and type the command again.
“font Parameter” on page 222
174
LPEX Editor User’s Guide
beep Parameter
Turns the alarm on or off.
Scope: Global
Syntax
query beep
set beep { on | off | inverse }
Options
on
off
inverse
Activates the alarm.
Turns the alarm off. This is the default value.
Toggles between on and off.
Description
The beep on parameter turns the alarm beep on. When beep is set to on, any
message displayed on the screen is accompanied by a beep. When beep is off,
the alarm command is disabled.
If the system beep has been turned off using a system command, the beep on
parameter cannot override it and the alarm will remain off.
The value of the beep parameter is saved between Editor sessions.
Example
To turn the beep on, type:
set beep on
API Return Code
-2 The option you specified was not on, off, or inverse.
“alarm Parameter” on page 163
“beeptone Parameter” on page 176
“beeplength Parameter” on page 176
“alarm Command” on page 59
Chapter 8. References
175
beeplength Parameter
Sets the default duration of the alarm.
Scope: Global
Syntax
query beeplength
set beeplength [Duration]
Option
Duration
Duration of the alarm in hundredths of a second. The default value is 20
and the range is between 0 and 1000.
Description
The beeplength parameter sets the default duration of the beep produced by
the alarm command.
Example
To set the duration of the alarm beep to 300 hundredths of a second, type:
set beeplength 300
API Return Code
-2 The number specified was either outside the valid range or not a whole number.
Issue the command again using a valid number.
“alarm Parameter” on page 163
“beep Parameter” on page 175
“beeptone Parameter”
“alarm Command” on page 59
beeptone Parameter
Sets the default tone of the alarm.
Scope: Global
Syntax
query beeptone
set beeptone [Tone]
176
LPEX Editor User’s Guide
Option
Tone
The tone of the alarm in hertz. The default value is 440 and the range is
between 50 and 10000.
Description
The beeptone parameter sets the default frequency of the sound produced by
the alarm command. If beeptone is not set, the default frequency is 440 hertz.
Example
To set the tone of the alarm to 550 hertz, type:
set beeptone 550
API Return Code
-2 The number specified was either outside the valid range or not a whole number.
Issue the command again using a valid number.
“alarm Parameter” on page 163
“beep Parameter” on page 175
“beeplength Parameter” on page 176
“alarm Command” on page 59
blockdefaulttype Parameter
Changes the block type favoured by the block selection commands.
Scope: Global
Syntax
query blockdefaulttype
set blockdefaulttype [stream|character|element|rectangle]
Options
stream
character
element
rectangle
Set the default
is assumed.
Set the default
Set the default
Set the default
block type to stream. If no block type is specified, stream
block type to character.
block type to element.
block type to rectangle.
Description
Chapter 8. References
177
The blockdefaulttype parameter is used to change the block type favoured by
the block selection commands and primitives when no block type is explicitly
specified. The setting of the parameter will affect the block mark and block
set commands, as well as selection primitives.
The value of the blockdefaulttype parameter is saved between Editor
sessions.
Note: Some types of block selection require the mode to be set to character or
stream. For these commands, if the blockdefaulttype parameter is not set to
either character or stream, then stream will be used.
Example
To set the default block type to character, type:
set blockdefaulttype character
API Return Codes
None.
“block Command” on page 62
“blocktype Parameter” on page 182
blockdoc Parameter
Gives the number of the file that contains the marked block.
Scope: Global
Syntax
query blockdoc
Description
The blockdoc parameter gives the file number (the number of the file in the
sequence of open files) of the file containing the current block, or zero, if there
is no current block.
Example
To display the file number of the file containing the current block, type:
query blockdoc
178
LPEX Editor User’s Guide
API Return Codes
None.
“block Command” on page 62
“docnum Parameter” on page 202
blockend Parameter
Gives end position of block.
Scope: Global
Syntax
query blockend
Description
The blockend parameter gives the end position of the current block. If no
block is set, or if a line block is set, zero is returned. The value returned
depends on the type of block set:
Block Type
Value Returned
Line
Returns zero. You may want to use the blocktype parameter to
determine if a line block was set.
Returns the position of the last marked character in the last line in the
last block.
Returns the position of the last marked character in each marked line.
Character
Rectangular
Example
To display the end position of the current block, type:
query blockend
API Return Codes
None.
“blockstart Parameter” on page 181
“blocktype Parameter” on page 182
Chapter 8. References
179
blocklength Parameter
Gives the number of characters or lines in a block.
Scope: Global
Syntax
query blocklength
Description
The blocklength parameter returns the length of the current block. The length
is given in characters if blockstart is nonzero; otherwise, it is given in lines.
Zero is returned if no block is marked.
Example
To display the number of lines or characters in the current block, type:
query blocklength
API Return Codes
None.
“blockstart Parameter” on page 181
“length Parameter” on page 254
blockshow Parameter
Defines the appearance of a block on the screen.
Scope: Global
Syntax
query blockshow
set blockshow { font | invert }
Options
font
inverse
Description
180
LPEX Editor User’s Guide
Displays the marked block using white text on a gray background.
Displays the marked block using an XOR of the normal color(s) of the
text in the marked block.
The blockshow parameter sets the layout of a marked block. Default value for
the blockshow parameter is inverse.
The query blockshow command displays the current option.
The value of the blockshow parameter is saved between Editor sessions.
Example
To set the marked block to display in XOR, type:
set blockshow INVERT
API Return Code
-2 The parameter issued with the command was not valid. Check the command’s
syntax requirements and issue the command again using a valid parameter.
“block Command” on page 62
“blockend Parameter” on page 179
“blocktype Parameter” on page 182
blockstart Parameter
Gives the start position of a block.
Scope: Global
Syntax
query blockstart
Description
The blockstart parameter gives the start position of the currently set block.
Zero is returned if no block is set or if a line block is set. The value returned
depends on the type of block set:
Block Type
Value Returned
Line
Character
Rectangular
Returns zero.
Returns the position of the first character in the first line of the block
Returns the position of the first marked character for each marked line.
Example
To display the start position of the block, type:
Chapter 8. References
181
query blockstart
API Return Codes
None.
“block Command” on page 62
“blockend Parameter” on page 179
“blocktype Parameter”
blocktype Parameter
Gives the type of block currently set.
Scope: Global
Syntax
query blocktype
Description
The blocktype parameter gives the type of block that is currently set by
returning one of the following values:
Return Value
Meaning of Value
STREAM
CHARACTER
ELEMENT
RECTANGLE
UNSET
A stream block is set.
A character block is set.
A line block is set.
A rectangular block is set.
No block is set.
Example
To determine the type of block set, type:
query blocktype
API Return Codes
None.
“block Command” on page 62
182
LPEX Editor User’s Guide
blockview Parameter
Gives the number of the file view that contains the marked block.
Scope: Global
Syntax
query blockview
Description
The blockview parameter can be used with the blockdoc parameter to
determine which file view of which document contains the block selection.
Because the stream block type has a scope of file view, only when there is a
stream selection will query blockview return a number. If there is no block
selection or the block selection is not of type stream, then query blockview
will return zero.
Example
To query, in which file view does a marked blocked exist, type:
query blockview
API Return Codes
None.
“block Command” on page 62
“blockdoc Parameter” on page 178
“blocktype Parameter” on page 182
browse Parameter
Prevents overwriting or changing of a file.
Scope: View
Syntax
query browse
set browse { on | off | inverse }
Chapter 8. References
183
Options
on
off
inverse
Typed changes are not permitted.
Typed changes are permitted. This is the default value.
Toggles between on and off.
Description
The file can still be altered by action keys, commands from the command
menu or a macro. A beep warns that browse is on if typing is attempted.
Note: You get the beep tone only if the beep parameter is set to on.
Example
To protect a file from typed changes, type:
set browse on
API Return Code
-2 The option you specified was not on, off, or inverse.
“nosave Parameter” on page 277
“readonly Parameter” on page 305
changes Parameter
Sets the number of changes made to the file.
Scope: File
Syntax
query changes
set changes [Number]
Option
Number
The new count of changes made to the file until the next save. The
default is zero.
Description
The changes parameter counts the number of changes made to the file until it
is saved.
184
LPEX Editor User’s Guide
The changes count is increased by one every time a command that changes
the file is issued or a line or part line is altered by overtyping. A macro that
makes many alterations counts as just one change.
The changes count is also affected by the undo command. Each set of changes
undone by an undo operation decrements the count by one, and each set of
changes redone by a redo operations increases the count by one. If you
perform undo operations to a document past a file save point, the count
decrements until it reaches zero, after which it starts incrementing. The
opposite occurs if you are redoing changes to a document.
When the file is saved, Number is set to zero.
Setting the changes parameter explicitly also adds Number to the value of the
autochanges parameter. This means that the changes parameter can be used
to force an autosave operation. Changing the autochanges parameter does not
change the changes parameter.
Examples
1. To display the number of changes made, type:
query changes
2. To force an autosave if autocount is 15 and autochanges is zero, type:
set changes 15
API Return Codes
-2 The number specified was either outside the valid range or not a whole number.
Issue the command again using a valid number.
“autochanges Parameter” on page 164
“autocount Parameter” on page 166
“undo Command” on page 140
class Parameter
Sets the class to which the current line belongs.
Scope: Line
Syntax
query class
set class ClassName [ClassName] [...]
Chapter 8. References
185
Option
ClassName
A string of one or more classes separated by blanks. All classes in the
list must have been already defined with the set classes parameter.
Description
The class parameter sets the classes to which the current line belongs (for
example, FUNCTION and COMMENT in C++).
Examples
1. To discover which class the current line belongs to, type:
query class
2. To set the current line in C++ to the COMMENTS class, type:
set class comments
API Return Codes
1 The specified ClassName was not a valid class type. Use the query classes
command to see which class names are currently defined, or use the set class
command to define a new class. Issue the command again using one or more
valid ClassNames.
-2 At least one ClassName option must be present. Issue the set class command
again specifying a valid ClassName.
-5 You cannot make changes to the file because the readonly parameter is set to on.
“classes Parameter”
classes Parameter
Sets the number and names of classes for the current file.
Scope: File
Syntax
query classes
set classes ClassName [ClassName] [...]
Option
ClassName
Description
186
LPEX Editor User’s Guide
Up to 30 words, each naming a class. Each word in the list of classes is
used to name the next class in sequence, always counting from left to
right.
The classes parameter sets the number and names of classes for the current
file. At least one class must always be present. The default class is DATA. The
set classes command can be used repeatedly to rename the current classes,
but once a given number of classes has been set, the number of classes cannot
be reduced.
Examples
1. To set up three new classes, type:
set classes TEXT GRAPHICS WASTE
If this is the first set classes parameter, it has the effect of increasing the
number of classes available from one to three, and renaming the first
(DATA) to TEXT.
2. To discover the number and names of classes for a file, type:
query classes
API Return Codes
-2 At least one ClassName option must be present. Issue the command again
specifying a valid ClassName.
-3 Too many classes are specified. Specify less than 30 ClassNames.
“class Parameter” on page 185
color Parameter
Sets and queries RGB color values for the Editor.
Scope: Global
Syntax
set color.n [R nn] [G nn] [B nn]
query color.n
Options
n
nn
An Editor color number, from 1 to 16.
A color intensity value. Permitted values are 0 to 255 inclusive, where 0
is lowest intensity of color, and 255 is highest intensity of color.
Description
The Editor supports a set of sixteen colors. You can use the color parameter to
change these colors. Changes to colors are saved between editing sessions.
Chapter 8. References
187
Colors are defined by a mix of Red, Green, and Blue (RGB) color components.
The color parameter lets you set the RGB mix of a given Editor color number
to create your own colors.
Not all RGB color components need be defined when changing RGB color
values. If an RGB color component is not specified when setting the color
parameter, the current value for that color component is not changed. If,
however, no color components at all are specified, the specified Editor color
returns to its default value.
The default values of colors provided with the Editor are shown below:
Color #
1
2
3
4
5
6
7
8
9
10
11
12
13
14
15
16
Default Value
black
blue
green
cyan
red
pink
brown
light gray
gray
bright blue
bright green
bright cyan
bright red
bright pink
yellow
white
R
0
0
0
0
128
170
128
192
128
0
0
0
255
255
255
255
G
0
0
128
128
0
0
128
192
128
0
255
255
0
0
255
255
B
0
170
0
128
0
170
0
192
128
255
0
255
0
255
0
255
Examples
1. To change color 1 to khaki green, type:
set color.1 R 150 G 160 B 110
2. To darken the gray used in color 9, and give it a slight reddish hue, type:
set color.9 G 75 B 75
3. To change color 16 back to its default color values, type:
set color.16
4. To query the RGB color values for color 4, type:
query color.4
API Return Codes
-2 Parameter options specified are out of valid range.
“font Parameter” on page 222
188
LPEX Editor User’s Guide
commandcheck Parameter
Runs a specified command whenever an Editor command is issued from the
Editor command line or Issue edit command window.
Scope: Global
Syntax
query commandcheck
set commandcheck Command
Options
Command
A macro or an external Editor command.
Description
The commandcheck command causes a specified command to be run
whenever an Editor command is issued from the Editor command line or
Issue edit command window.
Example
To run sample1.lx whenever an Editor command is issued, type:
set commandcheck sample1
API Return Codes
None.
commandline Parameter
Displays an Editor command input area at the bottom of the Editor window.
Scope: View
Syntax
set commandline { on | off | inverse | default }
query commandline
Option
on
off
Display the Editor command input area.
Do not display the Editor command input area.
Chapter 8. References
189
inverse
Toggle the value of the commandline parameter between default and
off.
Command input area display is controlled by the value of the default
parameter.
default
Description
The Editor command input area appears and remains at the bottom of the
Editor when the commandline parameter is set to on. Pressing the ESC key
toggles cursor focus between the command input area and the editing pane.
The Editor command input area (commandline) functions similarly to the
Issue Edit Command dialog box. An Editor command typed into the
command input area is run when the Enter key is pressed. Cursor focus then
returns to the Editor.
The input area also incorporates a pull-down selection list (arrow key to the
right of the commandline) of recently entered Editor commands. Entries in
this list can be selected and run. The number of entries stored in this list is
determined by the value of the recall parameter.
Setting the commandline parameter to off removes the Editor command input
area from the Editor. Editor commands can still be entered by using the Issue
edit command window, available from the Actions pull-down menu or by
pressing the ESC key.
If the value of the commandline parameter is default, the command input
area display is controlled by the value of the default parameter.
Example
1. To display the Editor command input area, type:
set commandline on
2. To display the value of the commandline parameter, type:
query commandline
If this query returns default, type the following:
query default.commandline
3. To control command input area display with the value defined by the
default parameter, type:
set commandline default
API Return Codes
-1 Invalid parameter value specified.
190
LPEX Editor User’s Guide
“default Parameter” on page 195
“recall Parameter” on page 306
content Parameter
Changes the data content of a line.
Scope: Line
Syntax
query content
set content [String]
Option
String
Any string to form the new content of the line. The default is null.
Description
The content parameter changes the content of the current line. The fonts
parameter is reset to the default font for the current line repeated to the same
length as the new content, and the position parameter in the line to set to
one.
Examples
1. To query the content of a character string, type:
query content
2. To replace the contents of the current line with This is a replacement
statement, type:
set content This is a replacement statement
The current line is deleted and replaced with the specified text string.
API Return Codes
-8
-6
-5
10
Insufficient memory.
Text limit exceeded, operation cancelled.
You cannot make changes to the file because the readonly parameter is set to on.
The text length limit is exceeded in the line. The update to the line has been
accepted as is.
11 The text length limit is exceeded in the line. The content of the line has been
truncated.
Chapter 8. References
191
“fonts Parameter” on page 226
“position Parameter” on page 295
creating Parameter
Associates a command with the creation of a line.
Scope: Line
Syntax
set creating Command
query creating
Option
Command
An external command, macro, or internal command.
Description
The creating parameter associates Command with the creation of a line.
Example
To associate the test macro with the current line, type:
set creating test
API Return Codes
None.
cursorcol Parameter
Moves the cursor to the specified column within the Editor.
Scope: View
Syntax
query cursorcol
set cursorcol ColumnNumber
192
LPEX Editor User’s Guide
Option
ColumnNumber
The window column where the cursor is to be positioned.
Description
The cursorcol parameter moves the cursor to the specified column within the
Editor. The columns that form the prefix area are assigned negative numbers.
If the window width is less than the specified ColumnNumber, a message is
displayed and the cursor remains in its current position. The cursor will not
be moved beyond the rightmost column on the Editor.
Example
To set the cursor to column 34, type:
set cursorcol 34
If the window width is less than 34 columns, a message is displayed and the
cursor remains in its current position.
API Return Codes
-2 The number specified was either outside the valid range or not a whole number.
Issue the command again using a valid number.
“cursorpos Parameter”
“cursorrow Parameter” on page 194
cursorpos Parameter
Moves the cursor to the specified column within the line.
Scope: View
Syntax
query cursorpos
set cursorpos ColumnNumber
Option
ColumnNumber
The column where the cursor is to be positioned.
Description
Chapter 8. References
193
The cursorpos parameter moves the cursor to the specified column within the
line, regardless of the window size. The columns that form the prefix area are
assigned negative numbers. If the new position is beyond what is currently
displayed, the file view will scroll right or left to display it.
Note: A Tab character is counted as a single column in the line.
Example
To set the cursor to column 34, type:
set cursorpos 34
If column number 34 is not currently displayed, the file view is scrolled to
display the new cursor position.
API Return Codes
-2 The number specified was either outside the valid range or not an integer. Issue
the command again using a valid number.
“cursorpos Parameter” on page 193
“cursorrow Parameter”
“tabcursorpos Parameter” on page 336
cursorrow Parameter
Sets the row containing the cursor within the Editor.
Scope: View
Syntax
query cursorrow
set cursorrow RowNumber
Option
RowNumber
The row number where the cursor is to be positioned. It must not be
beyond the bottommost row.
Description
The cursorrow parameter sets the row containing the cursor within the Editor.
The topmost row of the window is row 1. The Editor adjusts the value if
necessary so that the cursor position is within the text entry portion of the
194
LPEX Editor User’s Guide
screen. If the RowNumber is set to a row in a nontext entry area, the Editor
places the cursor on the closest available row and adjusts the RowNumber to
reflect the change.
Example
To set the cursor to a new row, type:
set cursorrow 17
API Return Codes
-2 The RowNumber specified was larger than the number of rows in the window.
Specify a number smaller than the number of rows in the window.
“cursorcol Parameter” on page 192
“cursorpos Parameter” on page 193
“tabcursorpos Parameter” on page 336
default Parameter
Sets a default value for a parameter in the Editor window.
Scope: Global
Syntax
set default.{Parameter Options}
query default.Parameter
Option
Parameter
Options
The name of a parameter for which a default value can be assigned.
Options assigned as default to Parameter.
Description
Use the default parameter to assign a default value for the parameters listed
below:
v commandline
v fontsize
v hoverhelp (Editor window only)
v messageline
v prefixshow
v ringselector (Editor window only)
Chapter 8. References
195
v
v
v
v
v
ruler
split
statusline
toolshow (Editor window only)
toolview (Editor window only)
v wrap
When the parameters listed above are set with the default option, the Editor
attributes they normally control are instead controlled by the values stored in
the default parameter. When a default parameter value is changed, file views
and documents using the parameter specified by the default parameter option
Name are updated accordingly. Changing the value of a default parameter
option does not change the value of the parameter for which default values
are set.
You can assign any valid option for a parameter as a default value, except the
default option.
The default parameter by itself has no scope. Instead, its scope is determined
by the parameter name specified as an option to the default parameter.
Default settings assigned by the default parameter are saved between editing
sessions.
Examples
1. To set the default value of the toolview parameter so both text and
graphics show in the tool-bar buttons when the toolview parameter is set
with the default option, type:
set default.toolview both
2. To set the default value of the fontsize parameter so the 11 point System
VIO font is used when the fontsize parameter is set with the default
option, type:
set default.fontsize 11 System VIO
3. To change the default value of the hoverhelp parameter from its current
value of off to a new value of on, when the hoverhelp parameter is set
with the default option, type one of the following:
set default.hoverhelp on
set default.hoverhelp inverse
API Return Codes
-2 An invalid parameter option was specified.
196
LPEX Editor User’s Guide
“commandline Parameter” on page 189
“fontsize Parameter” on page 227
“hoverhelp Parameter” on page 241
“messageline Parameter” on page 273
“prefixshow Parameter” on page 302
“ringselector Parameter” on page 318
“ruler Parameter” on page 319
“split Parameter” on page 328
“statusline Parameter” on page 329
“toolshow Parameter” on page 342
“toolview Parameter” on page 343
“wrap Parameter” on page 354
deleting Parameter
Associates a command with the deletion of a line.
Scope: File
Syntax
query deleting
set deleting Command
Option
Command
An external command or macro to be associated with the line.
Description
The deleting parameter defines a command to be run when its associated line
is deleted.
Example
To set sample1.lx to be run when a line is deleted, type:
set deleting sample1
API Return Codes
None.
Chapter 8. References
197
directory Parameter
Changes the directory used by Editor processes.
Scope: Global
Syntax
query directory
set directory [path]
Option
path
The directory you to want to use for Editor processes.
Description
The Editor locks the directory in which it was started. This means that it is
not possible to remove that directory as long as the current instance of the
Editor is active. The directory parameter gives you the option of changing that
directory.
Example
To determine which directory is locked by the Editor, type:
query directory
API Return Code
-2 Unsuccessful. Most likely an invalid drive letter or directory name.
“drive Parameter” on page 206
dirty Parameter
Gives the setting of the dirty flag.
Scope: File
Syntax
query dirty
Options
None.
198
LPEX Editor User’s Guide
Description
The dirty flag is set on if there is an uncompleted change in the document.
A change to a document is complete when an undoable unit is closed, either
explicitly by use of the check command, or automatically if the autocheck
parameter has a value of on.
To find out if a file has unsaved changes, you must query both the changes
and dirty parameters.
Example
To get the setting of the dirty flag, type:
query dirty
API Return Codes
None.
“changes Parameter” on page 184
“check Command” on page 70
dispdepth Parameter
Sets the depth of the Editor window.
Scope: View
Syntax
query dispdepth
set disdepth Number
Option
Number
The Editor depth.
Description
The dispdepth parameter queries the depth of the Editor window.
Examples
1. To query the depth of the Editor, type:
query dispdepth
Chapter 8. References
199
2. To set the depth of the Editor to 20, type:
set disdepth 20
API Return Codes
-2 The number specified was either outside the valid range or not a whole number.
Issue the command again using a valid number.
“windowpos Parameter” on page 351
“dispwidth Parameter”
dispwidth Parameter
Queries the width of the Editor window.
Scope: View
Syntax
query dispwidth
set dispwidth Number
Option
Number
The file view width. The width must be greater than 19.
Description
The dispwidth parameter queries the width of the Editor window. The file
view scrolls sideways when the cursor reaches the window frames if
dispwidth is less than the longest line the formatter produces.
Examples
1. To query the width of the view, type:
query dispwidth
2. To set the width of the view to 20, type:
set dispwidth 20
API Return Codes
-2 The number specified was either outside the valid range or not a whole number.
Issue the command again using a valid number.
200
LPEX Editor User’s Guide
“dispdepth Parameter” on page 199
doccontent Parameter
Stores the result of the last text import operation in the file.
Scope: File
Syntax
query doccontent
set doccontent {docOK|docUpdateCancelled|docTruncated|docLimitExceeded}
Options
docOK
docLimitExceeded
docTruncated
docUpdateCancelled
No recorded warnings or errors for updates to this file.
The text length limit was exceeded in a line. The update to the
line has been accepted as is.
The text length limit was exceeded in a line. The content of the
line has been truncated.
The text length limit was exceeded in a line. The update to the
line has been cancelled.
Description
The doccontent parameter stores the most severe error or warning result of
text import operations. It should be set to docOK prior to a file update (such
as loading a file), and verified after the operation. If the text length limit is
exceeded during an import operation, the edit line is kept or truncated as
specified by the limiterror parameter.
The initial default value for this parameter is docOK. The least severe is the
warning docLimitExceeded, and the most severe is the error
docUpdateCancelled.
Example
To clear the file update indication prior to an import:
set doccontent docOK
API Return Codes
-2
The option specified with the parameter was not valid. Check the syntax
requirements for the parameter and try the set command again.
Chapter 8. References
201
“textlimit Parameter” on page 338
“limiterror Parameter” on page 255
doclist Parameter
Lists current file numbers.
Scope: Global
Syntax
query doclist
Description
The doclist parameter returns a list of the numbers of all files currently open.
Example
To obtain a list of file numbers, type:
query doclist
API Return Codes
None.
“docnum Parameter”
docnum Parameter
Gives the unique number identifying a file.
Scope: File
Syntax
query docnum
Description
The docnum parameter gives a number that uniquely identifies the current
file among those that are open. It is the same number used to make up the
default autoname name.
202
LPEX Editor User’s Guide
Example
To obtain the current file number, type:
query docnum
API Return Codes
None.
“autoname Parameter” on page 167
doctype Parameter
Sets file type.
Scope: File
Syntax
query doctype
set doctype ExtensionName
Option
ExtensionName
The extension given to the filename when it is saved. Blanks are
allowed.
Description
The doctype parameter sets or returns the filename extension that is used
when the current file is saved. A file with no extension is given a doctype of
LPEX when it is created.
Examples
1. To find out the file type, type:
query doctype
2. To call a COBOL macro when a file is saved or autosaved, type:
set doctype cbl
API Return Codes
-2
The ExtensionName specified for the set doctype command contains more than 8
characters. Select a doctype of 8 characters or less.
Chapter 8. References
203
“save Command” on page 125
documents Parameter
Gives the number of files currently open.
Scope: Global
Syntax
query documents
Description
The documents parameter gives the number of files currently open.
Example
To find out the numbers of files that are open, type:
query documents
API Return Codes
None.
“doclist Parameter” on page 202
“docnum Parameter” on page 202
docvar Parameter
Assigns a value to a variable that is global to all file views of the current
document.
Scope: File
Syntax
query docvar.Name
set docvar.Name Value
Options
Name
204
LPEX Editor User’s Guide
User-defined name for the global variable
Value
Value assigned to the global variable.
Description
The docvar parameter assigns a value to a variable global to all file views of
the current document. Such global variables remain until all file views of the
document are closed. They may be set or queried from any file view of the
document in which they are defined.
Examples
1. To display the value of a global variable called x, type:
query docvar.x
2. To assign the value company name to a global variable calledx, type:
set docvar.x company name
API Return Code
-1 The option specified with the parameter was not valid. Check the syntax
requirements for the parameter and try the set or query command again.
“docvarlist Parameter”
“global Parameter” on page 235
“globallist Parameter” on page 236
docvarlist Parameter
Lists names of variables global to all file views of the current document.
Scope: File
Syntax
query docvarlist
Description
The docvarlist parameter lists global variables set for the current document.
Example
To list the names of global variables set for the current document, type:
query docvarlist
API Return Codes
Chapter 8. References
205
None.
“docvar Parameter” on page 204
“global Parameter” on page 235
“globallist Parameter” on page 236
drive Parameter
Changes the drive used by Editor processes.
Scope: Global
Syntax
query drive
set drive [drive-name]
Option
drive-name
The letter of the disk drive you want to use for Editor processes.
Description
The Editor locks the directory in which it was started. This means that it is
not possible to remove that directory as long as the current instance of the
Editor is active. The drive and directory parameters together give you the
option of changing that directory.
Example
To determine which drive is being used by the Editor, type:
query drive
API Return Code
-2 Unsuccessful. Most likely an invalid drive letter.
“directory Parameter” on page 198
element Parameter
Gives the number of the current line.
Scope: Line
206
LPEX Editor User’s Guide
Syntax
query element
Description
The element parameter returns the number of the current line counted from
the top of the file. An empty file returns 1.
Example
To find the number of a line, place the cursor on it and type:
query element
If the cursor is on the fourth line, element returns 4.
API Return Codes
None.
“elements Parameter” on page 208
elementchangeexit Parameter
Specifies an Editor command to be performed whenever the current element
changes.
Scope: File
Syntax
query elementchangeexit
set elementchangeexit [Command]
Options
Command
Any valid Editor command.
Description
The elementchangeexit parameter defines an Editor command to be
performed when the current element changes.
You can clear the value of the elementchangeexit parameter by setting the
parameter without specifying a Command.
Chapter 8. References
207
Example
1. To sound an alarm when the current element changes, type:
set elementchangeexit alarm
2. To clear the value of the elementchangeexit parameter, type:
set elementchangeexit
3. To issue a series of commands when the current element changes, use the
mult command. For example:
set elementchangeexit mult ;alarm ;query prefix
API Return Codes
None.
“mult Command” on page 109
elements Parameter
Gives the number of lines in the current file.
Scope: File
Syntax
query elements
Description
The elements parameter gives the number of lines in the current file.
Example
To obtain the number of lines in the current file, type:
query elements
API Return Codes
None.
“element Parameter” on page 206
208
LPEX Editor User’s Guide
emphasis Parameter
Specifies the current length of the emphasis box.
Scope: Global
Syntax
query emphasis
set emphasis length
Option
length
The length, in characters, of the emphasis box. This value can be any
whole number value, including zero.
Description
The emphasis parameter sets an emphasis box around text starting at the
current cursor position. The length of the emphasis box is set by the length
attribute. Positive values for length will place the emphasis box around text
following the cursor, and negative values will place the emphasis box before
the cursor. The emphasis box remains displayed until the cursor is moved or
the emphasis length is set to 0.
Regardless of length specified, the emphasis box will not wrap onto following
or preceding lines of text.
Performing a query on the current emphasis box will return the length of the
box in characters.
Examples
1. To create an emphasis box 4 characters in length, type:
set emphasis 4
2. To find the length of this emphasis box, type:
query emphasis
API Return Code
-2 The value specified for length was outside the valid range.
Chapter 8. References
209
environment Parameter
Obtains information about the system environment.
Scope: Global
Syntax
query environment
Description
The environment parameter displays a string of information about the current
system environment.
Example
To display information about the system environment, type:
query environment
API Return Code
None.
“query Command” on page 119
exclude Parameter
Specifies the classes to be excluded from a view.
Scope: View
Syntax
query exclude
set exclude ClassName [ClassName] [ ... ]
Options
ClassName
Name of classes to be excluded from the view, separated by blanks.
Description
The exclude parameter removes from the display, lines belonging to the
specified classes. To be displayed, a line must belong to a class listed in set
210
LPEX Editor User’s Guide
include, and must not belong to any class listed in set exclude. If no
ClassName is specified, no classes are excluded.
You can override the effect of the include and exclude parameters for the
current line only, using the showcurrent parameter.
Examples
1. To exclude the COMMENT class in a source file, type:
set exclude comment
2. To exclude CODE and COMMENT, type:
set exclude code comment
API Return Codes
-2 The specified ClassName was not a valid class type. Use the query classes
command to see which ClassName is currently defined, or use the set class
command to define a new class. Issue the command again using a valid
ClassName.
“class Parameter” on page 185
“include Parameter” on page 244
“showcurrent Parameter” on page 323
expandtabs Parameter
Expands tab characters found in a file to spaces for viewing purposes.
Scope: View
Syntax
query expandtabs
set expandtabs { on | off | inverse }
Options
on
off
inverse
Tab characters found in a file will be expanded to spaces for viewing
purposes.
Tab characters are displayed as is.
Toggles the value of the parameter between on and off.
Description
Chapter 8. References
211
The expandtabs parameter controls how tabs are displayed in the Editor. If
the expandtabs parameter is set to on, tab characters in the file will be
expanded to spaces, according to the value of the tabs parameter, for viewing
purposes only.
Tab characters in a file are not changed by the expandtabs parameter. If,
however, the file is saved with the asshown option, tab characters are
expanded to spaces in the saved file.
The expandtabs parameter is affected by the preserve, reset, and restore
commands.
Example
To expand tab characters to spaces in the current file view, type:
set expandtabs on
API Return Codes
-2 Invalid parameter argument given.
“preserve Command” on page 113
“reset Command” on page 124
“restore Command” on page 125
“save Command” on page 125
“tabcursorpos Parameter” on page 336
“tabs Parameter” on page 337
filedialog Parameter
Default drive, directory, and file mask for the Open, Get and Save As dialogs.
Scope: Global
Syntax
212
LPEX Editor User’s Guide
Options
drive
Changes the default drive used by the Open, Get and Save As dialogs.
DriveLetter
Any local or remote drive that your system recognizes.
directory
Changes the default directory used by the Open, Get and Save As
dialogs.
Path
filemask
A path name for any directory on the defined drive.
Changes the default filemask used by the Open, Get and Save As
dialogs.
Mask
A file name that may include the global filename characters *
and ?. No files are masked unless they are specified.
Description
The filedialog parameter allows you to specify the default drive, directory
and filemask used by the Open, Get and Save As dialogs. No validation
checks are done when the parameter is set.
Examples
1. To specify G as the default drive used by the file dialogs (Open, Get and
Save As dialogs), type:
set filedialog.drive g
2. To specify \coolstuf\lpex as the default directory used by file dialogs,
type:
set filedialog.directory \coolstuf\lpex
3. To have the file dialogs display only c files by default, type:
set filedialog.filemask *.c
4. To have the file dialogs display files that differ from the filename
goodlpex.txt only in the seventh character, type:
set filedialog.filemask goodlp?x.txt
5. To determine the currect default filemask used by the file dialogs, type:
query filedialog.filemask
API Return Codes
None.
Chapter 8. References
213
fill Parameter
Specifies the fill character.
Scope: View
Syntax
query fill
set fill Char
Option
Char
Any single printable character, including the space character, or blank.
The fill character can be specified in the following ways:
nnn
A decimal-based ASCII character code, where n is a digit of
value 0 to 9, inclusive. For example, character code 065 = A.
xnn or xnnn
A hexadecimal-based ASCII character code, where n is a digit of
value 0 to 9, inclusive, or an alphabetic character of value A to
F or a to f, inclusive. For example, character code x41 = A.
single character
Any single printable character entered from the keyboard.
Description
The fill character is used to represent spaces displayed as a result of
formatting instructions from parameters such as format, indent, level, or
wrap. The fill character can be used to emphasize indentation or overhang.
The fill character is for display only and is not saved when the file is saved.
Use the set font.fill command to select the color and typeface used for the fill
character. The default fill character is a period.
Example
To specify a plus sign for the fill character, type:
set fill +
API Return Codes
-2 The Char option was not, or did not represent, a single character.
214
LPEX Editor User’s Guide
“font Parameter” on page 222
“indent Parameter” on page 245
“level Parameter” on page 255
“overhang Parameter” on page 280
“wrap Parameter” on page 354
filter Parameter
Sets options for the filter operation.
Scope: Global
Syntax
query filter.{historysize|case|match}
set filter.{historysize|case|match} Value
Options
historysize
The number of filter strings or character pattern expressions saved for
future recall in the Filter window.
Value
case
Must be an integer value between 0 and 25 inclusive.
Permitted values for Value are:
on
String or character pattern matching takes character case into
account.
off
String or character pattern matching ignores character case.
inverse Toggle between values of on and off.
match
Permitted values Value are:
on
The string in the Include all lines with this string field is
treated as regular expression character pattern matching string.
off
The string in the Include all lines with this string field is
treated as a literal string.
inverse Toggle between values of on and off.
Description
Chapter 8. References
215
The filter parameter lets you set the default options. Changes to filter options
are saved between Editor sessions.
Examples
1. To make the filter operation character case-sensitive, type:
set filter.case on
2. To treat the entry in the Include all lines with this string field as a
regular expression pattern, type:
set filter.match on
3. To change the maximum number of entries in the saved string and
character pattern list to 10, type:
set filter.historysize 10
4. To query the maximum number of entries in the saved string and
character pattern list, type:
query filter.historysize
API Return Codes
-1 No parameter sub-item was specified. Enter one of historysize, case, or match as
a parameter sub-item.
-2 An invalid setting was assigned to a parameter sub-item. Enter one of
historysize, case, or match as a parameter sub-item, followed by a valid value
for the sub-item.
find Parameter
Specifies default options for both the find command and the Editor - Find
and Replace dialog box.
Scope: View
Syntax
query find.{cancel|case|columnnums|columns|findstring|
forward|history|historysize|mark|match|
prompt|replacestring|scope|wrap}
query findoptions
set find.{cancel|case|columns|forward|history|mark|
match|prompt|wrap} {on|off}
set find.{columnnums Number1 Number2}
set find.{findstring String}
set find.{historysize Number}
set find.{replacestring String}
set find.{scope all|current|selection}
216
LPEX Editor User’s Guide
Options
cancel
case
columnnums
columns
findoptions
findstring
forward
history
historysize
mark
match
prompt
replacestring
scope
Set to on to cancel the Find and Replace dialog box after a
successful find operation.
Set to on to make find operations character case sensitive.
Specify left and right column positions using integer values between
1 and 2499, inclusive. If the columns parameter is set on, find
operations search only text between and including these columns.
Set to on to restrict find operations to the columns specified by the
find.columnnums parameter.
Display the present value of all find parameter options set to on.
Also, display the value of the find.scope parameter.
Set the string or match pattern to find. If you set a search pattern,
that pattern must adhere to the rules of regular expression, and the
match option must be set on.
Set to on to search forward from the cursor location. If set to off, the
find operation will search backward from the cursor position.
Set to on to save the current find string or match pattern in the
find-history log. The maximum number of entries in this log is set
by the historysize option.
Set the maximum find-history log size, using an integer value
between 1 and 25, inclusive.
Set to on to mark found text or match patterns.
Set to on to specify that the find operation treat the search item as a
match pattern conforming to the rules of regular expression, and not
as a text string.
Set to on to set the Replace, then Find radio button as a default in
the Editor - Find and Replace dialog box.
Set the new string to replace the found string.
Set the scope of the find operation. Valid values are:
all
Search the entire document.
current Search only the current element.
selection
Search only selected text.
wrap
Set to on if you want the find operation to search the entire
document, regardless of the position of the cursor at the time the
search is started. Otherwise, the find operation will stop when it
reaches the beginning or end of the file, depending on your chosen
search direction.
This option has no effect if the forward option is set to off.
Description
The find parameter sets options used by the find command. Options are
saved between editing sessions.
Chapter 8. References
217
When the find command is run with a specified search string, that search
string becomes the new value of the find.findstring parameter.
Examples
1. To set the search string to lost, type:
set find.findstring lost
2. To restrict find operations to between columns 10 and 25, type:
set find.columnnums 10 25
set find.columns on
The first line only defines the column boundaries. The second line
instructs the Editor to restrict find operations to bounds set by the
find.columnnums parameter.
3. To redefine the maximum number of find operations stored in the history
log to six entries, type:
set find.historysize 6
API Return Code
-2 Invalid option specified.
“find Command” on page 82
findhistory Parameter
Sets the number of find occurrences to track.
Scope: File
Syntax
query findhistory
set findhistory Number
Option
Number
The number of find occurrences to remember, to a maximum of 24.
Description
The findhistory parameter limits the number of find occurrences to remember.
By default, a history of up to 10 occurrences is retained. If findhistory is zero,
no record of found occurrences is retained. When the value of findhistory is
changed, the find previous/next point is reset to the last entry.
218
LPEX Editor User’s Guide
Note: If no number is specified, then 0 is assumed.
Example
To set the find occurrence number to 0, type:
set findhistory 0
API Return Code
-2 The number specified is outside the valid range.
“find Command” on page 82
flow Parameter
Controls the automatic flowing of elements.
Scope: View
Syntax
query flow
set flow [LevelNumber]
Option
LevelNumber
The level at which elements are to be flowed. The default is 100.
Description
The flow parameter causes elements of a level number equal to or greater
than the LevelNumber to flow together in the document window. This gives a
formatted appearance to the document.
Note: You must set the formatter parameter to on for the flow parameter to
have an effect on displayed text.
Examples
The lines below have not been flowed together.
line 1111111111 1111
line 22222222222222
line 33333333333333
line 44444444444444
line 55555555555555
(level
(level
(level
(level
(level
1)
2)
3)
4)
5)
Chapter 8. References
219
To flow together elements at or below the third level, type:
set flow 4
The elements of level 4 and 5 are flowed together on to the previous level, as
shown below:
line 1111111111 1111
line 22222222222222
line 33333333333333line 44444444444444line 55555555555555
Note: You must set the formatter parameter to on for the flow parameter to
have an effect on displayed text.
API Return Code
-12 This command requires an open document. First open a document then issue the
command.
-2 The number specified was outside the valid range or was not a whole number.
Issue the command again using a valid number.
“fill Parameter” on page 214
“formatter Parameter” on page 231
“indent Parameter” on page 245
“overhang Parameter” on page 280
focus Parameter
Specifies the focus lines of the file view.
Scope: View
Syntax
query focus.{bottom|next|top|row}
set focus.{bottom|next|top|row [RowNumber]}
Options
bottom
220
LPEX Editor User’s Guide
Set the line in the display area that triggers upward scrolling of the file.
It is the lowest line on which you can place the cursor. The default value
is -3.
next
Focus line for next file view. Temporarily overrides the standard
focus.row and margin triggering. Margin triggering refers to the
automatic scrolling that occurs when the cursor is positioned above
focus.top or below focus.bottom. For the next display only, the current
position is displayed on the focus.next row. The default value for
focus.next is 0.
The focus.next parameter describes an absolute line on the physical
screen, rather than a line within the editing window. You can use it to
position files within windows. The focus command can be used to set
focus.next equivalent to focus.row, thus moving the current position to
the focus line of the file view.
Set the line in the display area that triggers downward scrolling of the
file. It is the highest line on which you can place the cursor. The default
value is 3.
Sets the line in the display area that is used by the focus command as
the default.
top
row
If RowNumber is not specified, or if it is zero, the focus row defaults to
the line in the center of the window. A positive number counts from the
top of the file view downward, a negative number counts from the
bottom of the file view upward.
Description
The focus parameter sets a line in the file view as the focus line. (The focus
line is the line to which the current position moves when you issue the focus
command.) You specify the focus line using set focus.row. If a number is not
specified, the RowNumber defaults to the middle row of the file view.
The focus area is the area of the view where you can place the cursor to scroll
the file. It is specified using set focus.bottom and set focus.top to specify the
bottom and top focus lines respectively. When you place the cursor on either
the top focus line or the bottom focus line, the contents of the window are
scrolled up or down. (The cursor remains on the focus line.)
To override the focus line for one display only, use the set focus.next
command. This specifies the actual line in the view on which to position the
current position the next time the file is displayed in this file view.
Examples
1. To set the fifth row from the bottom as the row that triggers downward
scrolling, type:
set focus.bottom -5
2. To position a file in a window so that the eighth line above the current
position is the first line in the display, type:
set focus.next 8
Chapter 8. References
221
The focus line is set to eight only until the cursor is moved again
3. To set the fifth row from the top as the row that triggers upward scrolling,
type:
set focus.top 5
4. To define line 2 as the focus line to be used by the focus command as a
default, type:
set focus.row 2
5. To remove lines that cause scrolling, type:
set focus.bottom
set focus.top
By not specifying the RowNumber, you can set the focus line to either the
very bottom, or the very top of the window.
API Return Code
-2 The RowNumber specified was larger than the number of rows in the file view. To
find out the number of rows in the window, use the query dispdepth command.
“focus Command” on page 85
font Parameter
Sets attributes of a font.
Scope: View
Syntax
query font.FontName
set font.FontName[bold] [italic] [ underline] [reverse]
[Foreground] [/Background] ['Description']
222
LPEX Editor User’s Guide
Options
FontName
The name of the font to be set. This can be one of the following:
Letter
An uppercase letter, where Letter can be represented by:
nn
A decimal-based ASCII character code, where nn is a
numeric value between 65 and 90, inclusive. For
example, character code 65 = A.
xnn or xnnn
A hexadecimal-based ASCII character code, where n is
a digit of value 0 to 9, inclusive, or an alphabetic
character of value A to F or a to f, inclusive. Valid
hexadecimal values for nn range from 41 to 5A,
inclusive. For example, character code x41 = A.
keypress An alphabetic keyboard keypress of value A to Z,
inclusive.
background
Background character font.
block
Marked block font.
bold
Displays the text in bold font.
context Context lines font.
fill
Fill character font.
highlight
Highlighting font.
italic
Display the text in italic font.
overlay Overlay lines font.
prefixentry
Prefix entry font.
prefixtext
Text part of prefix data.
prefixnumber
Numeric part of prefix data.
space
Space area font.
symbol Displayed symbols font.
underline
Underline the text.
bold
Displays the selected font in bold face.
Chapter 8. References
223
italic
underline
reverse
Foreground
/Background
Description
Displays the selected font in italic face.
Displays the selected font as underlined characters.
Displays the foreground color as the background, and the background
color as the foreground.
The foreground color. Specify either the color number or its
corresponding default color name, which can be any one of:
Color #
Default Value
1
black
2
blue
3
green
4
cyan
5
red
6
pink
7
brown
8
light gray
9
gray
10
bright blue
11
bright green
12
bright cyan
13
bright red
14
bright pink
15
yellow
16
white
The background color, which can be any color number or name from the
list above. You must include the / in the command string.
Description of the token type associated with the font character. It is
displayed in the Fonts/colors secondary window.
Description
The font parameter sets the attributes (color and typeface) for fonts. There are
two types of font: symbolic and special.
Symbolic fonts are specified with a single character, either alphabetic,
numeric, or special, and can be used to set font strings to highlight parts of a
file. For example, the C parser uses font C
Special fonts perform predefined functions. They are:
background
block
context
fill
highlight
overlay
224
LPEX Editor User’s Guide
Sets the attributes of the background character.
Sets the attributes of a marked block.
Sets the attributes of the protected file lines displayed to provide context
(if the context parameter is on).
Sets the attributes of the fill character (the area between the left edge of
the file and the beginning of the text in a formatted file.)
Sets the attributes of those lines whose classes match one of those in the
highlighted class list.
Sets the default font of overlay lines.
space
Sets the font of the space area (the area between the end of an line and
the right edge of the file.)
Sets the attributes of the symbols displayed, when the symbols
parameter is on.
symbol
The fonts set for each of these types takes effect within the current file view.
That means that the colors and typeface for marking blocks (block), for
example, can be displayed in different colors in different file views.
Examples
1. To change the background color of font A to blue, type:
set font.A /blue
2. To reverse the colors of a marked block from red on black to black on red,
type:
set font.block reverse
3. To set the font for overlay lines, type either of the following lines:
set font.overlay yellow/red
set font.overlay 15/5
4. To query the font effect and colors used for overlay lines, type :
query font.overlay
API Return Codes
-2 The FontName specified for the set font command was not found. Check the
spelling and form of the FontName in the command string. You can also use the
query fontlist command to list the current FontNames.
-1 The FontName specified was not valid. Check the syntax requirements for the
parameter and issue the parameter again.
“background Parameter” on page 173
“color Parameter” on page 187
“fill Parameter” on page 214
“fontlist Parameter”
“highlight Parameter” on page 239
“overlay Parameter” on page 282
“space Parameter” on page 326
“block Command” on page 62
fontlist Parameter
Lists the symbolic fonts that are currently set.
Scope: View
Chapter 8. References
225
Syntax
query fontlist
Description
The fontlist command displays a string containing the symbolic font
characters that are currently set, separated by blanks. Symbolic fonts are
defined in font Parameter. Use the query font command to find the
characteristics of a specific font.
Note: This parameter cannot be used in API calls.
Example
To list the symbolic font characters, type:
query fontlist
API Return Codes
None.
“font Parameter” on page 222
fonts Parameter
Sets the character fonts for the current line.
Scope: Line
Syntax
query fonts
set fonts String
Option
String
The font string.
Description
The fonts parameter sets the fonts for individual characters in the current line.
You must supply a string of characters that has the same length as the current
content of the line. Each character in String refers to a currently defined font
and sets the font of the corresponding character in the line.
226
LPEX Editor User’s Guide
Note: If a parser is loaded, all the fonts are specified by the parser. The set
fonts command has no effect.
Example
The current line is:
#include <stdio.h>
To set the angled brackets and the hash (#) sign of the current line to font A
and the remaining characters to font B, type:
set fonts abbbbbbb_abbbbbbba
The underscore symbol denotes a space in the line.
API Return Code
-2 The length of the font string does not match that of the line.
“fontlist Parameter” on page 225
fontsize Parameter
Sets the size of the characters for the Editor window.
Scope: View
Syntax
query fontsize
set fontsize [N [Facename]] | [ default ]
Option
N
The point size used to display characters in the Editor.Nmust be an integer
value greater than 0.
Facename
The desired face name. If no face name is specified, the first font
found that meets the size criterion is used.
default
Font display is controlled by the value of the default parameter.
Description
The fontsize parameter sets the size of the characters for the Editor. The size
of the file view remains the same and the file is redrawn with the top line as
Chapter 8. References
227
the top of the new file view. If any typeface has been defined, the Editor sets
the corresponding face for the new size.
If the value of the fontsize parameter is default, font and font size are
controlled by the value of the default parameter.
Examples
1. To change the size of the characters in the Editor view to 8 point size,
type:
set fontsize 8
2. To change the size of the characters in the Editor view to 10 point size,
and the font to System VIO, type:
set fontsize 10 System VIO
3. To change the size of the characters in the Editor view to that specified by
the default parameter, type:
set fontsize default
4. To query the size and font of the characters in the Editor view, type:
query fontsize
If this query returns DEFAULT, type the following:
query default.fontsize
API Return Code
-2 The value specifed for fontsize is not valid.
“default Parameter” on page 195
format Parameter
Specifies the format controls for the current element.
Scope: Element
Syntax
query format
set format [absolute Level|before Number] [after Number]
[break|nobreak] [final|nofinal] [flow|noflow]
[postspace|nopostspace] [prespace|noprespace]
[solid|nosolid] [spill|nospill]
228
LPEX Editor User’s Guide
Options
absolute Level
after Number
before Number
break
final
flow
postspace
prespace
solid
spill
Set the Level of the current and subsequent elements. Level must not
be negative.
Change the level of subsequent elements by Number relative to the
current element. Number can be positive (higher level ) or negative
(lower level).
Change the level of the current and subsequent elements by Number
relative to the previous element. Number can be positive (lower
level) or negative (higher level). Both before and after values can be
specified for the same element.
Always start this element on a new line, even if format flow is set,
or the element would otherwise be flowed because of the setting of
the flow parameter.
Always start the next element on a new line, even if it has format
flow set, or the element would otherwise be flowed because of the
setting of flow parameter.
Wrap this element to follow the preceding element unless break or
final is set on the previous line.
Include a blank line after this element, and always start the next
element on a new line.
Include a blank line before this element, and always start this
element on a new line.
Indicates that the element is solid. The formatter must not split the
element at blanks (or elsewhere) except when there is no other way
to format the element.
Indicates that the element can be spilled. That is, the element can be
formatted at the spill width rather than at the formwidth.
Description
The format parameter sets or replaces the formatting controls for the current
element. Formatting controls are used to enhance the displayed document.
The last option specified has the highest priority.
Note: The formatter parameter must be set to on to display the formatting
controls.
Important! This parameter is intended for use by programmers writing
structured parsers. Formatting controls are not checked until they are used.
Inconsistencies may lead to unexpected results.
Examples
The following examples refer to these elements:
Chapter 8. References
229
start
start
start
start
start
line
line
line
line
line
1––––––––––-end
2––––––––––-end
3––––––––––-end
4––––––––––-end
5––––––––––-end
line
line
line
line
line
1
2
3
4
5
1. To ensure that line 3 always starts on a new line, place the cursor on line 3
and type:
set format break
2. Suppose you have already used the format parameter to ensure line 3
always starts on a new line. To ensure that line 3 always starts on a new
line and that it can be spilled, type:
set format break spill
Simply typing format spill would have deleted the previous break option,
so break had to be repeated in the latest command.
3. To reverse a previously issued set format break setting for line 3, place the
cursor on line 3 and type:
set format nobreak
4. To indicate that line 3 can be spilled, if it were extended, type:
set format spill
5. To set the level of lines 3, 4, and 5 to level 4, place the cursor on line 3 and
type:
set format absolute 4
Lines 3, 4, and 5 are indented by the number of spaces appropriate for
level 4 elements (if indent is set to a value other than zero). This is shown
below:
start line 1––––––––––-end line 1
start line 2––––––––––-end line 2
start line 3––––––––––-end line 3
start line 4––––––––––-end line 4
start line 5––––––––––-end line 5
6. To set the level of line 3 to three levels lower than level 2, but two levels
higher than subsequent elements, place the cursor on line 3 and type:
set format after 2 before 3
The before option sets line 3, 4, and 5 to level 3 and the after option sets
lines 4 and 5 to two levels lower that the level set for line 3. This is shown
in the following:
start line 1––––––––––-end line 1
start line 2––––––––––-end line 2
start line 3––––––––––-end line 3
start line 4––––––––––-end line 4
start line 5––––––––––-end line 5
230
LPEX Editor User’s Guide
Note: Indentation spaces will be represented by a fill character. The default fill
character is a period, but you can define your own fill character by using the
fill parameter. In the examples above, the fill character is defined to be a
blank.
API Return Codes
-2 The current element is a header element in the document and cannot be changed.
-12 This command requires an open document. First open a document then issue the
command.
-2 The option specified with the parameter was not valid. Check the syntax
requirements for the parameter and try the set command again.
-5 You cannot make changes to the document because the readonly parameter is set
to on.
“fill Parameter” on page 214
“formwidth Parameter” on page 233
“indent Parameter” on page 245
“level Parameter” on page 255
“readonly Parameter” on page 305
“spill Parameter” on page 327
“wrap Parameter” on page 354
formatter Parameter
Turns formatting instructions on or off.
Scope: Global
Syntax
query formatter
set formatter { on | off | inverse }
Options
on
off
inverse
Sets line formatting on.
Sets line formatting off.
Toggles between on and off.
Description
The formatter on parameter formats documents and uses information
supplied by commands and parameters, such as indent, format, and wrap to
format displayed text.
Chapter 8. References
231
Formatted text can be saved as displayed by using the save command with
the /asshown option.
When the formatter parameter is set to off, each element is displayed
unformatted on a separate line.
The default setting for the formatter parameter is off.
The formatter parameter setting can also be changed by the Wrap setting
choice, found in the View pull-down menu. Selecting the Wrap setting sets
both the formatter and wrap parameters to on, and the formwidth parameter
to 0. Deselecting this choice sets the formatter and wrap parameters to off.
The formwidth parameter is not changed, and retains its value of 0.
Conversely, setting both the formatter and wrap parameters to on, and the
formwidth parameter to 0, will select the Wrap setting choice.
Example
The following is an example of a document with wrap on, formwidth=30,
and formatter set to off:
At that very moment, Jack knew he was on a very hot lap: in
fact he was about to set a new lap record and in the process win
his class and the overall Solo 1 championship - here comes the flag!
To format the document, type:
set formatter on
The document appears like this with formatter on:
Just then her head struck
..against the roof of the
..hall: in
fact she was now more than
..nine feet high, and she at
..once took
up the little golden key and
..hurried off to the garden
..door.
Note: Indentation spaces will be represented by a fill character. The default fill
character is a period, as shown in the example above. You can define your
own fill character using the fill parameter.
API Return Code
-2 An invalid parameter option was specified.
232
LPEX Editor User’s Guide
“fill Parameter” on page 214
“flow Parameter” on page 219
“format Parameter” on page 228
“formwidth Parameter”
“indent Parameter” on page 245
“overhang Parameter” on page 280
“wrap Parameter” on page 354
formwidth Parameter
Sets the formatting width of the document.
Scope: View
Syntax
query formwidth
set formwidth LineLength
Options
LineLength
The maximum displayed length of a line in the Editor. This value must
be either 0 or an integer 0 between 20 and 2499 inclusive. The default
value for LineLength is 72.
Description
The formwidth parameter sets the length of the longest line that the formatter
displays, when the wrap parameter is on. If wrap is off, long lines are not
wrapped.
If the value of the formwidth parameter is 0, the maximum line length is
determined by the width of the editing window.
If wrap is off when a document is saved, each element is saved as a single
record up to a maximum length of 2499 characters.
The formwidth parameter setting can also be changed by setting the Wrap
setting choice, found in the View pull-down menu. Selecting the Wrap setting
sets both the formatter and wrap parameters to on, and the formwidth
parameter to 0. Deselecting this choice sets the formatter and wrap
parameters to off. The formwidth parameter is not changed, and retains its
value of 0.
Chapter 8. References
233
Conversely, setting both the formatter and wrap parameters to on, and the
formwidth parameter to 0, will select the Wrap setting choice.
Note: You must set the formatter parameter to on for the formwidth
parameter to have an effect on displayed text.
Examples
To set the longest line to 500 characters, type:
set formwidth 500
API Return Code
None.
“dispdepth Parameter” on page 199
“formatter Parameter” on page 231
“wrap Parameter” on page 354
fullparse Parameter
Defines the parser to use to parse the full file.
Scope: Global
Syntax
set fullparse ParserName ParserOption
query fullparse
Options
ParserName The name of the parser to use.
ParserOption The option to specify for the parser.
Description
The fullparse parameter defines the parser to use for a full parse, as opposed
to an incremental parse.
Example
To use the REXX parser, type:
set fullparse prrexx all
234
LPEX Editor User’s Guide
API Return Codes
None.
“parser Parameter” on page 285
“trigger Command” on page 139
global Parameter
Assigns a value to a global variable to all documents in the Editor window.
Scope: Global
Syntax
query global.Name
set global.Name Value
Options
Name
Value
User-defined name for the global variable.
Value assigned to the global variable.
Description
The global parameter assigns a value to a global variable to all documents in
the Editor. Global variables remain until the Editor session is terminated. They
may be set or queried from any file.
Note: The external command, proto, compares the current word with a list of
global variables. If the keyword is in the list, proto substitutes the value of the
variable. For more on using the proto command to insert values for variables,
see the related readings below.
Examples
1. To display the value of a global variable called x, type:
query global.x
2. To assign the value company name to a global variable called x, type:
set global.x company name
API Return Code
-1 The option specified with the parameter was not valid. Check the syntax
requirements for the parameter and try the set or query command again.
Chapter 8. References
235
“Chapter 7. External Editor Commands” on page 51
“docvar Parameter” on page 204
“docvarlist Parameter” on page 205
“globallist Parameter”
“Sample External Command: proto” on page 53
globallist Parameter
Lists names of variables global to all documents in the Editor window.
Scope: Global
Syntax
query globallist
Description
The globallist parameter lists variables global to all documents in the Editor.
Example
To list the global variables, type:
query globallist
API Return Codes
None.
“docvar Parameter” on page 204
“docvarlist Parameter” on page 205
“global Parameter” on page 235
group Parameter
Specifies the conditions under which a menu item will be enabled or disabled.
Scope: File
Syntax
set group.[MenuItemId] [GroupName] [GroupName] [...]
236
LPEX Editor User’s Guide
Options
MenuItemId
GroupName
The numeric menu item id that can be obtained by the query
actionbarid command. If zero or no value is specified, the id for the
last-defined menu item is used.
The name of the group to which the MenuItemId is added. Unrecognized
group names are ignored. One or more of the following groups can be
specified:
BLOCK
CHANGED
ClassName
CLIPBOARD DOCNONEMPTY MARKSET
MOREDOCS MOREVIEWS
SAVEABLE
WRITEABLE
Description
The group parameter specifies the group(s) to which a menu item belongs.
The conditions for each associated group must be satisfied before a menu item
is enabled.
For example, the Paste operation belongs to the CLIPBOARD and
WRITEABLE groups. It will be enabled only when there is text in the
clipboard and the file is not readonly.
The following table lists the states required for each group to be active or
inactive:
Group Name
BLOCK
CHANGED
ClassName
CLIPBOARD
DOCNONEMPTY
MARKSET
MOREDOCS
MOREVIEWS
SAVEABLE
WRITEABLE
Active - Members are
Selectable
Block is set
Change has been made
Other classes are included in
the current view
Clipboard contains text
File contains text
Mark is set
More than one file is open
More than one view is open
File can be saved
Changes to file permitted
Inactive - Members are not
Selectable
Block is not set
No changes have been made
Only a specified class is
included in the current view
Clipboard is empty
File is empty
No mark is set
Only one file is open
Only one view is open
File cannot be saved
Changes to file not permitted
Examples
1. To specify the last defined menu item to be enabled when text is selected,
type:
set group.block
Chapter 8. References
237
2. To specify the last defined menu item to be enabled when text in the
COMMENTS class is visible, type:
set group.comments
API Return Code
-3 The specified menu item id does not correspond to any user-defined action.
“classes Parameter” on page 186
help Parameter
Specifies the help information associated with a user-defined menu item.
Scope: File
Syntax
set help.[MenuItemId] {HelpId | HelpCommand}
Options
MenuItemId
HelpId
HelpCommand
The numeric menu item identifier that can be obtained by the query
actionbarid command. If 0 or no ID value is given, the ID for the
last-defined menu item is used.
Specifies the help resource id to be associated with the menu item.
Specifies the command line entry to display help for the menu item.
Description
The help parameter associates information for providing online help for a
user-defined action. This information can be in the form of a help panel ID or
any operating system command-line entry for bringing up the help.
Example
To associate a section in a book with the last-defined menu item:
set help. view lpxcref block
API Return Codes
-2 Help information is not provided.
-3 The specified menu item ID does not correspond to any user-defined action.
238
LPEX Editor User’s Guide
hex Parameter
Returns the hexadecimal ASCII code of the character at the current cursor
position.
Scope: View
Syntax
query hex
Description
The hex parameter returns the hexadecimal ASCII code of the character at the
current cursor position. If the cursor is beyond the end of the line, a value of
0 is returned.
Example
To see the hexadecimal ASCII value of the character at the current cursor
position, type:
query hex
API Return Codes
None.
highlight Parameter
Selects the classes to highlight on the display.
Scope: View
Syntax
query highlight
set highlight [ClassName] [ClassName] [...]
Option
ClassName
Name of the class to be highlighted, separated by blanks.
Description
The highlight parameter defines the classes to be highlighted. Any line that
has a class specified has its contents displayed using font.highlight. You can
Chapter 8. References
239
identify classes that are not visually distinguishable by their fonts. The
highlight parameter is especially useful for error conditions.
Note: The font used for marking blocks (font.block) overrides the font used
for highlighting (set highlight).
Example
To define the classes to be highlighted, type:
set highlight comment
The COMMENT class is displayed using fonts set by font.highlight.
API Return Code
-2 The specified ClassName was not a valid class type. Use the query classes
command to see which ClassName is currently defined, or use the set class
command to define a new class. Issue the command again using a valid
ClassName.
“class Parameter” on page 185
“classes Parameter” on page 186
“font Parameter” on page 222
horizscroll Parameter
Sets the number of columns to scroll.
Scope: View
Syntax
query horizscroll
set horizscroll Number
Option
Number
The number of columns to scroll. This value must be an integer between
1 and 30.
Description
The horizscroll parameter sets the number of columns to scroll when the
horizontal scrollbar scroll buttons are pressed.
Example
240
LPEX Editor User’s Guide
To set the horizontal scrollbar to move by three columns when the scroll
buttons are pressed, type:
set horizscroll 3
API Return Code
-2 Number is not in the valid range (1-30).
hoverhelp Parameter
Enables or disables hover-help for toolbar buttons.
Scope: View
Syntax
set hoverhelp { on | off | inverse | default }
query hoverhelp
Options
on
off
inverse
default
Enable hover-help.
Disable hover-help.
Toggles the value of the hoverhelp
Hover-help display is controlled by the value of the default
Description
The value of the hoverhelp determines if hover-help is displayed when the
cursor pauses over a toolbar button.
Example
1. To enable hover-help, type:
set hoverhelp on
2. To control hover-help display with the value defined by the default
parameter, type:
set hoverhelp default
3. To display the value of the hoverhelp parameter, type:
query hoverhelp
If this query returns DEFAULT, type the following:
query default.hoverhelp
Chapter 8. References
241
API Return Codes
-2 Invalid option specified for the parameter.
“default Parameter” on page 195
“toolbar Parameter” on page 340
“toolview Parameter” on page 343
idletime Parameter
Sets number of idle seconds required before autosave.
Scope: File
Syntax
query idletime
set idletime Seconds
Option
Seconds
Delay time for a pending autosave, in seconds. Must be greater than
zero. The default is 2 seconds.
Description
The idletime parameter sets the number of seconds during which no data is
typed before an autosave occurs. Any pending autosave is delayed until the
keyboard has been idle for idletime seconds.
Example
To set idletime to 3 seconds, type:
set idletime 3
API Return Codes
-2 The number specified was either outside the valid range or not a whole number.
Issue the command again using a valid number.
-2 The Seconds option must be greater than zero. Use a number of one or more.
242
LPEX Editor User’s Guide
impmacro Parameter
Processes unknown commands as macros.
Scope: View
Syntax
query impmacro
set impmacro { on | off | inverse }
Options
on
off
inverse
Process unknown commands as macros. This is the default value.
Do not process unknown commands as macros.
Toggle between on and off.
Description
The impmacro on parameter makes the Editor process unknown commands
as macros. This occurs only after the Editor has established that the unknown
command is not one of its own commands, a set or query parameter, or an
external Editor command.
Example
To process unknown commands as macros, type:
set impmacro on
API Return Code
-2 The option you specified was not on, off, or inverse.
“impset Parameter”
“lxr Command” on page 101
“macro Command” on page 102
impset Parameter
Processes unknown text strings as set or query commands.
Scope: View
Syntax
query impset
Chapter 8. References
243
set impset { on | off | inverse }
Options
on
off
inverse
Process unknown text strings as set or query commands. This is the
default value.
Do not process unknown text strings as set or query commands.
Toggle between on and off.
Description
The impset parameter makes the Editor process unknown text strings as set
or query commands. Single words are tried as a query command; multiple
words are tried as a set command. If impset is set to off, you must use the
full set command (set impset on) to turn it on.
Example
To process unknown commands as set or query commands, type:
set impset on
With impset on, beep would be processed as query beep, and beep on would
be processed as set beep on.
API Return Code
-2 The option you specified was not on, off, or inverse.
“impmacro Parameter” on page 243
“lxr Command” on page 101
include Parameter
Specifies the list of classes for which member lines are to be displayed in a file
view.
Scope: View
Syntax
query include
set include [ClassName] [ClassName] [...]
244
LPEX Editor User’s Guide
Option
ClassName
Name of a class to be included in the file when it is displayed. A list of
class names is separated by blanks.
Description
The include parameter specifies the list of classes for which member lines are
to be displayed in the current file view. If the list is empty, all classes are
displayed. The list of classes can be overridden by the exclude parameter.
To display all classes in the file view, the set include and set exclude
commands without any class list are issued.
You can use the set showcurrent command to override the exclude setting for
a line as long as that line is visible in the file view.
Examples
1. To list classes to be included in the file when it is displayed, type:
query include
2. To define the classes to be included in the file when it is displayed, type:
set include error comment
The ERROR and COMMENT classes are displayed.
API Return Code
-2 The specified ClassName was not a valid class type. Use the query classes
command to see which ClassName is currently defined, or use the set class
command to define a new class. Issue the command again using valid ClassName.
“exclude Parameter” on page 210
“showcurrent Parameter” on page 323
indent Parameter
Sets the indent factor.
Scope: View
Syntax
query indent
set indent [Number]
Chapter 8. References
245
Option
Number
The number of character positions used for indentation. The range is
integer values between 0 and 5 inclusive; the default value is 2.
Description
The indent parameter specifies the number of character positions by which
each level is indented when the document is displayed. The number of
indented spaces is the product of the level, which is set by the format
parameter in conjunction with the value of Number.
Note: The indent parameter has no effect on displayed text unless the
formatter parameter is set to on.
Examples
To set the indent to three character positions, type:
set indent 3
The actual indent of each element shown in the window varies with the level
of the element. For example, an element of level 1 is indented three character
positions. A level 2 element is indented six character positions, and a level 0
element has no indent at all.
API Return Code
-2 The specified Number is not in the valid range of values.
“fill Parameter” on page 214
“format Parameter” on page 228
“formatter Parameter” on page 231
inserting Parameter
Sets the cursor to insert or replace.
Scope: View
Syntax
query inserting
set inserting { on | off | inverse }
246
LPEX Editor User’s Guide
Options
on
off
inverse
Characters are inserted. This is the default.
Characters are replaced.
Toggle between on and off.
Description
The inserting parameter sets the cursor to insert (inserting on) or replace
(inserting off). This lets a macro or command force insertion or replacement
of characters at the cursor.
Example
To set the cursor to insert mode, type:
set inserting on
API Return Code
-2 The option you specified was not on, off, or inverse.
“insert Command” on page 93
key Parameter
Maps a physical key to a logical key.
Scope: Global
Syntax
query key.PhysicalKeyName
set key.PhysicalKeyName LogicalKeyName
Options
PhysicalKeyName
The name of the key that is pressed.
Chapter 8. References
247
LogicalKeyName
Your operating system may reserve certain function keys or key
combinations, such as F1, for special purposes. With these
exceptions, permitted values for LogicalKeyName are:
nnn
A decimal-based ASCII character code, where n is a digit of
value 0 to 9, inclusive. For example, character code 065 =
A.
xnn or xnnn
A hexadecimal-based ASCII character code, where n is a
digit of value 0 to 9, inclusive, or an alphabetic character of
value A to F or a to f, inclusive. For example, character
code x41 = A.
any letter key
An alphabetic character of value A to Z or a to z, inclusive.
c-a to c-z
Ctrl+letter keys.
c-0 to c-9
Ctrl+number keys. (The number keys on the numeric
keypad are excluded.)
a-a to a-z
Alt+letter keys
a-0 to a-9
Alt+number keys. (The number keys on the numeric
keypad are excluded.)
f1 to f12
Function keys
s-f1 to s-f12
Shift+Function keys
c-f1 to c-f12
Ctrl+Function keys
a-f1 to a-f12
Alt+Function keys
buttonNdouble
A double click on button N (N = 1, 2, or 3; although only 1
and 2 will be usable on a two-button mouse.)
buttonNdown
A single click on button N
buttonNdrag
Drag mouse with button N down
248
LPEX Editor User’s Guide
a named key
The following key names can be used, either alone or in
combination with the Alt or Ctrl keys:
v Backspace
v Tab
v Backtab
v Enter
v Esc
v PadEnter
The following key names can be used, either alone or in
combination with the Alt, Ctrl, or Shift keys:
v PgUp
v PgDn
v End
v Home
v Left
v Right
v Up
v Down
v Ins
v Del
Description
The key parameter provides a simple way of remapping the keyboard.
Pressing the key identified by PhysicalKeyName has the same effect as pressing
the LogicalKeyname key.
Example
To assign the function of the home key to Ctrl+F4, type:
set key.c-f4 home
API Return Code
-2 The Editor could not find the specified PhysicalKeyName.
“action Parameter” on page 152
“keylist Parameter” on page 250
Chapter 8. References
249
keylist Parameter
Lists current remapped keys.
Scope: Global
Syntax
query keylist
Description
The keylist parameter lists all the key names that have been remapped using
the set key command.
Note: This parameter cannot be used in API calls.
Example
To list all key names that have been remapped, type:
query keylist
API Return Codes
None.
“key Parameter” on page 247
lastfind Parameter
Sets the default parameter for the find command.
Scope: Global
Syntax
query lastfind
set lastfind [visible] [up] {asis TextString|
any TextString| element Num | line Num}
Options
visible
up
250
LPEX Editor User’s Guide
Restrict search to lines that are currently displayed. Must be the first
parameter specified.
Search upwards. If used, this parameter must precede the any, asis,
element, or line options.
asis TextString
any TextString
element Num
line Num
Search for a text string using the exact case of characters specified.
Search for a text string regardless of case.
Search for the specified line number.
Note: The length of the entire lastfind parameter string is limited to a total of
250 characters.
Description
The lastfind parameter determines the search that takes place if the find
command is issued without parameters. If lastfind is not set explicitly, it takes
its values from the most recently issued find command.
Example
To set a default find string of Help, type:
set lastfind any Help
Help is searched for regardless of case if a find command is used without
parameters.
API Return Codes
-1 The length of the lastfind command string exceeds 250 characters. Limit the
length of the entire string, which includes fixed parameters such as asis and any,
to 250 characters.
-1 The number specified was either outside the valid range or not a whole number.
Issue the command again using a valid number.
“find Command” on page 82
lastkey Parameter
Displays the name of the most recent key obtained by the keyread or lineread
commands.
Scope: Global
Syntax
query lastkey
Description
Chapter 8. References
251
The lastkey parameter displays the name of the key read by the most recent
keyread command, or the key used to terminate the most recent lineread
command, whichever occurred last.
If the lineread dialog is used, pressing its OK and Cancel buttons return the
values as Enter and Escape, respectively.
The possible names returned by this command are:
nnn
xnn
xnnn
any key
c-a to c-z
c-0 to c-9
a-a to a-z
a-0 to a-9
f1 to f12
s-f1 to s-f12
c-f1 to c-f12
a-f1 to a-f12
a named key
A decimal-based ASCII character code, where n is a digit of value 0
to 9 inclusive. For example, character code 065 = A.
A hexadecimal-based ASCII character code, where n is a digit of
value value 0 to 9 inclusive, or an alphabetic character of value A to
F or a to f, inclusive. For example, character code x041 = A.
Any keyboard character.
Ctrl+letter keys
Ctrl+number keys. (The number keys on the numeric keypad are
excluded.)
Alt+letter keys
Alt+number keys. (The number keys on the numeric keypad are
excluded.)
Function keys
Shift+Function keys
Ctrl+Function keys
Alt+Function keys
The following key names, either alone or in combination with the
Alt or Ctrl keys:
v Backspace
v Tab
v Backtab
v Enter
v Esc
v PadEnter
252
LPEX Editor User’s Guide
The following key names, either alone or in combination with the
Alt, Ctrl, or Shift keys:
v PgUp
v PgDn
v End
v Home
v Left
v Right
v Up
v Down
v Ins
v Del
<null>
If either of the keyread or lineread commands were not previously
called.
Example
To return the last key obtained by keyread, type:
query lastkey
API Return Code
-1 You cannot issue the set command for this parameter.
“keyread Command” on page 94
“lineread Command” on page 94
lastline Parameter
Displays the last line obtained by lineread.
Scope: Global
Syntax
query lastline
Description
The lastline parameter displays the line of data read by the most recent
lineread command. The key that terminated the lineread can be obtained by
Chapter 8. References
253
using query lastkey. The string <Null> is returned if lineread was not
accepted a line with no data typed in it.
Example
To return the last line obtained by lineread, type:
query lastline
API Return Code
-1 You cannot issue the set command for this parameter.
“lastkey Parameter” on page 251
“lineread Command” on page 94
length Parameter
Displays the length of the current line.
Scope: Line
Syntax
query length
Description
The length parameter displays the number of characters in the current line.
Note that you can have a zero length line, such as a blank line.
Example
To obtain the number of characters in the current line, type:
query length
API Return Codes
None.
“blocklength Parameter” on page 180
254
LPEX Editor User’s Guide
level Parameter
Specifies the level of the current element.
Scope: Element
Syntax
query level
Description
The level parameter displays the structural level of the current element and is
set by the format parameter. It can be negative if relative (before and after)
settings are used such that the indent is less than the current level.
Examples
To obtain the level of the current element, type:
query level
API Return Code
-12 This command requires an open document. First open a document then issue the
command.
“format Parameter” on page 228
limiterror Parameter
Specifies how a text length limit exceeded error condition during an import
operation is to be handled.
Scope: File
Syntax
query limiterror
set limiterror { cancel | truncate | ignore }
Options
cancel
Cancels change to the offending edit line. This is the initial option.
Chapter 8. References
255
truncate
ignore
Truncates the text in the offending edit line to fit within the current text
length limit. Note that additional characters before the text length limit
may have to be removed to avoid splitting a DBCS character and to
balance SO/SI characters on each edit line.
Accepts all the text in the offending edit line.
Description
The limiterror parameter specifies the action to be taken when the text length
limit is exceeded during the update of an edit line in the current file. The
default action is to cancel the update. If specific recover action is required for
certain editing operations, this parameter must first be set accordingly before
the operation and reset after its completion.
Example
To ignore the text length limit violations during an import operation, type:
set limiterror ignore
API Return Code
-2 The option specified with the parameter was not valid.
“doccontent Parameter” on page 201
linebreak Parameter
Defines line break modes.
Scope: File
Syntax
set linebreak Type
query linebreak
256
LPEX Editor User’s Guide
Option
Type
The type of line break. The type must be one of the following:
DOS
Both CR and LF are required. Default for OS/2 and Windows.
CRLF
Both CR and LF are required. This option is the same as DOS.
UNIX
Only LF is required. Default for AIX.
LF
Only LF is required. This option is the same as UNIX.
Description
The linebreak parameter defines the line break modes. This is used to
determine how lines are to be defined. The default mode is DOS, which
requires that both CR and LF are present and are adjacent in that order.
End-of-file is determined by the sequence CR-LF-EOF or hex 0D0A1A.
Example
To change the line modes, type:
set linebreak crlf
API Return Code
-2 Invalid option specified.
linenumber Parameter
Gives the line number of the current line.
Scope: Line
Syntax
query linenumber
Options
None.
Description
The linenumber parameter returns the line number of the current line.
Example
Chapter 8. References
257
To get the line number of the current line, type:
query linenumber
API Return Codes
None.
“oldline Parameter” on page 278
“setoldlines Command” on page 130
lineread Parameter
Sets a title or prompt for the next lineread command.
Scope: Global
Syntax
query lineread.{title | prompt}
set lineread.{title | prompt}Text
Options
title
prompt
Text
The text for the secondary window’s title bar.
The text used for the entry field label.
The text to use for the appropriate area of the lineread window.
Description
The lineread parameter sets the title line or prompt line for the next lineread
command.
Examples
1. To set the title of the lineread window as Editor lineread window, type:
set lineread.title Editor lineread window
2. To set the prompt of the lineread window as Sample, type:
set lineread.prompt Sample
API Return Code
-2 Invalid option.
“lineread Command” on page 94
258
LPEX Editor User’s Guide
lines Parameter
Gives the number of non-show lines in the current file.
Scope: File
Syntax
query lines
Description
The lines parameter gives the number of non-show lines in the current file.
Example
To obtain the number of non-show lines in the current file, type:
query lines
API Return Codes
None.
“element Parameter” on page 206
“show Parameter” on page 322
linked Parameter
Lists external commands linked to the Editor.
Scope: Global
Syntax
query linked
Description
The linked parameter lists names of any external commands linked to the
Editor. Once invoked, an external command remains linked until it is removed
with an unlink command or the Editor is terminated. The string <Null> is
returned if no commands are linked.
Example
To list the external commands linked with the Editor, type:
Chapter 8. References
259
query linked
API Return Code
-1 You cannot issue the set command for this parameter.
“unlink Command” on page 142
list Parameter
Lists details about items such as files, keys, and file views.
Scope: Global
Syntax
query list.{action|actionbar|doc|face|font|global|
key|mark|symbol|synonym|view}
Options
action
actionbar
doc
face
font
global
key
mark
symbol
synonym
view
Lists the logical keys that have been assigned to action keys using the
set action command.
Lists pulldown menus and the choices assigned to them.
Lists the names and numbers of the opened files.
Lists current user-defined font names.
Lists current symbolic fonts and their values.
Lists currently set global variables.
Lists physical keys that have been remapped and the logical keys to
which they have been assigned.
Lists the current set marks and their position.
Lists the current symbols and their values.
Lists the current synonyms and their values.
Lists the viewnames of the current file.
Description
The list parameter gives information about current actions, files, fonts, keys,
marks, symbols, synonyms, or views.
Note: This parameter cannot be used with API calls.
Example
To list current symbolic fonts, type:
query list.font
260
LPEX Editor User’s Guide
API Return Codes
None.
“action Parameter” on page 152
“key Parameter” on page 247
“mark Parameter”
“symbol Parameter” on page 332
“synonym Parameter” on page 334
“view Parameter” on page 347
loadedmacros Parameter
Lists the preloaded REXX macros.
Scope: Global
Syntax
query loadedmacros
Description
The loadedmacros parameter lists the names of REXX macros that have been
preloaded into REXX storage.
Example
To list the preloaded REXX macros, type:
query loadedmacros
API Return Codes
None.
mark Parameter
Returns position of specified mark within a line.
Scope: File
Syntax
query mark.[Name|#Id]
Chapter 8. References
261
Option
Name
The name of a mark. This name is truncated if longer than 32 characters.
The search for this name is case insensitive.
The id number of an unnamed mark.
Id
Description
The mark parameter gives the position of a specified mark within a line. The
number returned is positive if the mark is in the current line; negative if it is
set but is not on the current line; or zero if the mark is not in the file.
Example
To get the position of a mark called undoref, type:
query mark.undoref
API Return Codes
None.
“mark Command” on page 105
“markid Parameter” on page 266
“marklist Parameter” on page 268
“markrange Parameter” on page 268
markdeleteexit Parameter
Defines the mark removal exit routine to be used with the current file.
Scope: File
Syntax
query markdeleteexit
set markdeleteexit Command [Parameters]
Options
Command
Parameters
Description
262
LPEX Editor User’s Guide
A native Editor command to be invoked when all the text associated
with a mark has been removed.
The parameters required by the command.
The markdeleteexit parameter sets the command to be invoked when a mark
is removed as text is deleted from the edit data. When the command specified
by set markdeleteexit is invoked, the mark’s name is concatenated to the
command parameters.
Example
To specify errlist as the mark removal handling routine:
set markdeleteexit errlist
API Return Code
-8 Insufficient storage to continue.
“mark Command” on page 105
markdirtyexit Parameter
Defines the mark changed exit routine to be used with the current file.
Scope: File
Syntax
query markdirtyexit
set markdirtyexit Command [Parameters]
Options
Command
Parameters
A native Editor command to be invoked the first time the text associated
with a mark is changed.
The parameters required by the command.
Description
The markdirtyexit parameter sets the command to be invoked when the text
associated with a mark is changed. Note that the routine is only invoked the
first time the mark is changed. When the command specified by set
markdirtyexit is invoked, the mark’s name is concatenated to the command
parameters.
Example
To specify errlist as the mark changed handling routine:
set markdirtyexit errlist
Chapter 8. References
263
API Return Code
-8 Insufficient storage to continue.
“mark Command” on page 105
markexclude Parameter
Gives the exclude setting of a mark.
Scope: View
Syntax
query markexclude.[Name|#Id]
Options
Name
Id
The name of a named mark to query.
The id number of an unnamed mark to query.
Description
If the specified mark is excluded, the markexclude parameter will return a
value of on. Otherwise, it returns a value of off.
A mark can be specified by its name if it is a named mark, or by its id
number. If Name or Id is not specified, the last mark created is queried.
Example
1. To get the exclude setting of the named mark mark1, type:
query markexclude.mark1
2. To get the exclude setting of the unnamed mark with id number 765, type:
query markexclude.#765
3. To get the exclude setting of the mark most recently created, type:
query markexclude.
API Return Codes
264
LPEX Editor User’s Guide
None.
“mark Command” on page 105
“mark Parameter” on page 261
“markid Parameter” on page 266
“markinclude Parameter” on page 267
markfont Parameter
Gives the font setting of a mark.
Scope: View
Syntax
query markfont.[Name|#Id]
Options
Name
Id
The name of a named mark to query.
The id number of an unnamed mark to query.
Description
This parameter returns the font setting associated with the specified mark.
A mark can be specified by its name if it is a named mark, or by its id
number. If Name or Id is not specified, the last mark created is queried.
Example
1. To get the font setting of the named mark mark1, type:
query markfont.mark1
2. To get the font setting of the unnamed mark with id number 765, type:
query markfont.#765
3. To get the font setting of the mark most recently created, type:
query markfont.
API Return Codes
Chapter 8. References
265
None.
“mark Command” on page 105
“mark Parameter” on page 261
“markid Parameter”
markid Parameter
Gives the id value of a mark.
Scope: View
Syntax
query markid.[Name|#Id]
Options
Name
Id
The name of a named mark to query.
The id number of an unnamed mark to query.
Description
The markid parameter returns the id number of a mark.
A mark can be specified by its name if it is a named mark, or by its id
number. If Name or Id is not specified, the last mark created is queried.
Examples
1. To get the id number of the named mark mark1, type:
query markid.mark1
2. To get the id number of the unnamed mark with id number 765, type:
query markid.#765
3. To get the id number of the mark most recently created, type:
query markid.
API Return Codes
266
LPEX Editor User’s Guide
None.
“mark Command” on page 105
“mark Parameter” on page 261
“markrange Parameter” on page 268
markinclude Parameter
Gives the include setting of a mark.
Scope: View
Syntax
query markinclude.[Name|#Id]
Options
Name
Id
The name of a named mark to query.
The id number of an unnamed mark to query.
Description
If the specified mark is included, the markinclude parameter will return a
value of on. Otherwise, it returns a value of off.
A mark can be specified by its name if it is a named mark, or by its id
number. If Name or Id is not specified, the last mark created is queried.
Example
1. To get the include setting of the named mark mark1, type:
query markinclude.mark1
2. To get the include setting of the unnamed mark with id number 765, type:
query markinclude.#765
3. To get the include setting of the mark most recently created, type:
query markinclude.
API Return Codes
Chapter 8. References
267
None.
“mark Command” on page 105
“mark Parameter” on page 261
“markexclude Parameter” on page 264
“markid Parameter” on page 266
marklist Parameter
Displays a list of mark names set in the current file.
Scope: File
Syntax
query marklist
Description
The marklist parameter gives you a list of mark names defined in the current
file.
Note: This parameter cannot be used in API calls.
Example
To list mark names, type:
query marklist
API Return Codes
None.
“mark Command” on page 105
“mark Parameter” on page 261
markrange Parameter
Returns starting and ending positions of the specified mark.
Scope: File
Syntax
268
LPEX Editor User’s Guide
query markrange.[Name|#Id]
Option
Name
The name of a mark. This name is truncated if longer than 32 characters.
The search for this name is case insensitive.
The id number of an unnamed mark.
Id
Description
The markrange parameter gives the range location of the specified mark. The
four numbers returned are the starting line, starting column, ending line, and
ending column.
Examples
1. To get the text range location of a mark called undoref, type:
query markrange.undoref
2. To get the text range location of a mark with id of 567, type:
query markrange.#567
API Return Codes
None.
“mark Command” on page 105
“mark Parameter” on page 261
menuactive Parameter
Enables or disables a menu bar item, pull-down menu choice, or pop-up
menu item in the Editor window.
Scope: View
Syntax
set menuactive.Name{ on | off | inverse }
query menuactive.Name
Options
Name
on
Either the predefined Editor window name for an Editor-defined menu
item, or a numeric value for a user-added item. The numeric value can
be obtained by querying the actionbarid parameter.
Enables the menu bar item or menu choice.
Chapter 8. References
269
off
inverse
Disables the menu bar item or menu choice.
Toggle between on and off.
Description
The menuactive parameter enables or disables menu bar items or sub-menus.
The action is performed on the window for the current file view. Disabling an
item does not disable any accelerator key; this must be done using an
appropriate set action command. Similarly, enabling an item does not activate
the accelerator key.
The following list defines the names of the predefined Editor items and the
English content of each item:
Menu ID
270
LP_SYSMENU
LP_FILE
LP_NEW
Description
or Name
System menu
File
New...
LP_OPENEDIT
LP_NEWVIEW
LP_GET
LP_SAVE
Open...
Open new view
Get...
Save
LP_SAVEAS
LP_SAVEALL
LP_CLOSEVIEW
LP_CLOSERING
Save as...
Save all
Close view
Close ring
LP_PRINT
Print...
LP_COLLAPSE
LP_CLOSE
Minimize all
Exit
LP_EDIT
LP_UNDO
LP_REDO
LP_CLIPCUT
LP_CLIPCOPY
LP_CLIPPASTE
Edit
Undo
Redo
Cut
Copy
Paste
LP_FINDCHANGE
LP_FINDNEXT
Find...
Find next
LP_FINDPREV
Find up
LPEX Editor User’s Guide
Menu ID
Description
or Name
LP_TOOLBAR_HELP
Hover help
LP_TOOLBAR_STYLE
Style
LP_TOOLBAR_BOTH
Graphic and
text
LP_TOOLBAR_GRAPHIC Graphic only
LP_TOOLBAR_TEXT
Text Only
LP_RING
Ring
LP_RINGSINGLE
Single
window
LP_RINGNEW
New ring
LP_RINGEXPLODE
All new rings
LP_RINGSPLIT
Split ring
LP_RINGCONFIGURE
Configure
rings...
LP_RINGDEFAULT
Default to
ring
LP_RINGSELECTOR
Ring selector
LP_SPLIT
Split
orientation
LP_VERTICAL
Vertical
LP_HORIZONTAL
Horizontal
LP_WRAP
Wrap
LP_VIEWSPLIT
Split window
LP_ACTIONS
Actions
LP_ISSUECMD
Issue edit
command...
LP_COMPARE
Compare...
LP_RECORD
Keystroke
recorder
LP_RECSTART
Start/Restart
Menu ID
Menu ID
LP_FINDSEL
LP_SELALL
LP_DESELALL
Description
or Name
Find selection
Select all
Deselect all
LP_BLOCK
Block
LP_RECRENAME
LP_MARKLINE
Mark line
LP_RECDELETE
LP_MARKCHAR
LP_MARKRECT
Mark character
Mark rectangle
LP_OPTIONS
LP_PARAMETERS
LP_UNMARK
LP_COPY
Unmark
Copy
LP_FONTS
LP_COLORS
LP_OVERLAY
Overlay
LP_TOKENS
LP_MOVE
Move
LP_GLOBALS
LP_DELETE
LP_UPPER
Delete
Uppercase
LP_PROFS
LP_CHANGEPROFS
LP_LOWER
LP_LOCATE
LP_NEXTERROR
LP_LINE
LP_START
LP_END
LP_JUMP
LP_QUICKMARK
LP_FINDMARK
Lowercase
Locate
Next error
Line...
Start of block
End of block
Previous location
Quick mark
Mark...
LP_ACTIVEPROFS
LP_KEYS
LP_LPEXKEYS
LP_EPMKEYS
LP_SEUKEYS
LP_XEDITKEYS
LP_ISPFKEYS
LP_CUSTOMIZE
LP_SAVEKEYS
LP_SETQUICK
LP_NAMEMARK
LP_VIEW
LP_FILTER
LP_FILTERDATE
Set quick mark
Name a mark...
View
Filter...
Filter date...
LP_WINDOWS
LP_MACROLOG
LP_DOCLIST
LP_NEXTINRING
LP_PREVINRING
LP_SHOWALL
LP_FORMATLINE
Show all
Format line
LP_NEXTRING
LP_PREVRING
LP_MSGLINE
LP_STATUSLINE
LP_TOOLBAR
Message line
Status line
Tool bar
LP_HELP
LP_HOWDOI
LP_ABOUT
LP_RECHALT
LP_RECPLAY
LP_RECCONT
Description
or Name
Halt
Playback
Continue
recording
Rename
macro...
Delete all
macro lines
Options
Editor
parameters...
Font...
Color
Palette...
Token
attributes...
Global
variables...
Profiles
Change
profiles...
All active
Key behavior
LPEX
EPM
SEU
XEDIT
ISPF
Customize...
Save key
behavior
Windows
Macro log
File list
Next in ring
Previous in
ring
Next ring
Previous in
ring
Help
How do I...
Product
information
Chapter 8. References
271
Menu ID
Description
or Name
LP_TOOLBAR_SHOW Show
Menu ID
Description
or Name
Note: Based on the state of the Editor, some built-in menu items are
automatically enabled or disabled. They are not affected by the value of the
menuactive parameter setting.
Example
To suspend the Keystoke recorder choices in the Actions menu, type:
set menuactive.LP_RECORD off
API Return Code
-2 The option specified with the parameter was not valid.
“menucheck Parameter”
menucheck Parameter
Sets or unsets the check mark for a cascaded, pull-down, or pop-up menu
choice in the Editor window.
Scope: View
Syntax
set menucheck.Name{ on | off | inverse }
query menucheck.Name
Options
Name
on
off
inverse
Either the predefined Editor window name for an Editor-defined menu
item, or a numeric value for a user-added item. The numeric value can
be obtained by querying the actionbarid parameter.
Check the menu item.
Uncheck the menu item.
Toggle between on and off.
Description
The menucheck parameter enables you to display a checkmark next to
cascaded, pull-down, or pop-up menu items.
272
LPEX Editor User’s Guide
Note: Based on the state of the Editor window, some built-in menu items are
automatically checked or unchecked. They are not affected by the value of the
menucheck parameter setting.
Example
To change the setting of user-defined menu item 8181 from on to off, type:
set menucheck.8181 inverse
API Return Code
-2 The option specified with the parameter was not valid.
“menuactive Parameter” on page 269
messageline Parameter
Controls the display of the last generated message.
Scope: File
Syntax
set messageline { dynamic | on | off | inverse | default }
query messageline
Options
dynamic
on
off
inverse
default
Display the last message in the data area overlaying the first text line
until the next function is performed.
Display the last message in a special area at the bottom of the window.
Do not display the last message anywhere.
Toggle between on and off, or set dynamic off.
Message display is controlled by the value of the default parameter.
Description
The messageline parameter controls the displaying of the last message. This
control is used in addition to the messages parameter.
If the value of the messageline parameter is default, message display is
controlled by the value of the default parameter.
Chapter 8. References
273
Note: The width for the messageline parameter is fixed, so you cannot use
the scroll bar to display any text which is not in view. You must open the
Macro Log to view the text.
Examples
1. To set the messageline off, type:
set messageline off
2. To control message line display with the value defined by the default
parameter, type:
set messageline default
3. To query the value of the messageline parameter, type:
query messageline
If this query returns DEFAULT, type the following:
query default.messageline
API Return Code
-2 The option specified with the parameter was not valid.
“default Parameter” on page 195
messages Parameter
Enables the display of messages.
Scope: Global
Syntax
query messages
set messages { on | off | inverse }
Options
on
off
inverse
Messages are displayed in the information area and are logged in the
Editor window macro log.
All messages are suppressed.
Toggle between on and off.
Description
Messages are displayed in the information area when the messages parameter
is set to on.
274
LPEX Editor User’s Guide
The value of the messages parameter is saved between Editor sessions.
Examples
1. To display and log messages as they are generated, type:
set messages on
2. To suppress display and logging of messages, type:
set messages off
API Return Code
-2 The option you specified was not on, off, or inverse.
“Writing Macros for the Editor” on page 36
“msg Command” on page 108
modes Parameter
Displays the character modes for the current line.
Scope: File
Syntax
query modes
Description
The modes parameter queries the character modes for the current line. The
string returned specifies whether the characters are SBCS or DBCS. A
character value of 0 is returned for SBCS. For DBCS, a character value of 1 or
2 is returned depending on the position of the double byte character.
Example
To query the modes of a string of characters, type:
query modes
API Return Code
-1 You cannot issue the set command for this parameter.
Chapter 8. References
275
name Parameter
Sets the file name of a file.
Scope: File
Syntax
query name
set name Filename
Option
Filename
The new name and path of the file in one of the following formats,
depending on your operating system:
Directory/Filename
Directory\Filename
Description
The name parameter changes the filename of the current file. If the filename
does not already exist, a new file will be created.
The Editor accepts a name with any syntax, but a file without a valid file
name cannot be saved by a simple save or file command.
Example
To change the name and directory of a file, type:
set name \lpex\newfile.c
When the file is reloaded, the C parser is used because the .c extension is
specified in the new file name.
API Return Codes
1
-1
-6
-7
276
The filename already exists.
The filename is not valid.
The Editor encountered an error when the file was being saved.
The file was not saved because the nosave parameter is set to on. To save the
file, set the nosave parameter to off, and then use either the file or save
command to save the file.
LPEX Editor User’s Guide
“save Command” on page 125
noblanks Parameter
Controls the formatting of trailing blanks.
Scope: File
Syntax
query noblanks
set noblanks { on | off | inverse }
Options
on
off
inverse
Remove trailing blanks.
Do not remove trailing blanks.
Toggle between on and off.
Description
The noblanks parameter, when set on, removes trailing blanks when an
unformatted file is saved using the save command.
Example
To remove all trailing blanks, type:
set noblanks on
API Return Codes
-2 The option specified is not valid.
nosave Parameter
Prevents the file from being saved.
Scope: File
Syntax
query nosave
set nosave { on | off | inverse }
Chapter 8. References
277
Options
on
off
inverse
Prevent file from being saved or autosaved.
Do not suppress save or autosave. File can be saved if it is not in the
read-only mode. This is the default value.
Toggle between on and off.
Description
The nosave parameter prevents a file from being autosaved or saved by the
save command. Setting the nosave parameter does not prevent other Editor
instances from changing the file.
Example
To prevent a file from being saved, type:
set nosave on
API Return Code
-2
The option specified is not valid.
“save Command” on page 125
“readonly Parameter” on page 305
oldline Parameter
Sets or queries the old line value for the current line.
Scope: Line
Syntax
set oldline Linenumber
query oldline
Options
Linenumber
A number to be used as the old line value for the current line.
Description
You can associate an old line value with each line in a document. You can
then later locate that line using the oldline option of the find command.
278
LPEX Editor User’s Guide
Unless specifically set, the old line value for a line defaults to zero. Use the
setoldlines command or the oldline parameter to assign an old line value to a
line or set of lines.
Examples
1. To assign an old line value of 81 to the current line, type:
set oldline 81
2. To query the old line value of the current line, type:
query oldline
API Return Codes
-2
The option specified is not valid.
“find Command” on page 82
“linenumber Parameter” on page 257
“setoldlines Command” on page 130
overfont Parameter
Sets font overlay lines.
Scope: View
Syntax
query overfont.n
set overfont.n [String]
Options
n
String
The line on the screen for which the fonts are to be set. A positive value
is counted from the top of the view, while a negative value is counted
from the bottom of the view. The value and sign used must be the same
as in a previous set overlay command.
A numeric string in which each digit identifies a font. Digits 1 through 9
can be used.
Description
The overfont.n parameter sets the fonts explicitly for the overlay that appears
on line n of the view. The Stringparameter is a numeric string in which each
digit sets the font for the corresponding position on the window. These digits
(1 through 9) refer to fonts previously defined by the set font.n command.
When the set overfont command is issued, the current definition of these
Chapter 8. References
279
fonts is saved and the definition is used when the overlay line is built on the
screen. These fonts can be reset with the set font.x command without affecting
the appearance of the overlay line, unless another set overfont command is
issued.
Programs can set up overlay lines using the nine fonts without interference
from other programs setting up overlay lines at different times. The set font.x
command only modifies the color attributes specified. All attributes should be
fully specified when you set the numeric fonts for use in an overlay line,
because the appearance of the font depends set font.x commands. If String is
omitted, the font set by font overlay is used. If String is shorter than the
overlay lines, font overlay is used for the remaining positions.
Example
To set the fonts for the overlay that appears on the fifth line of the view, type:
set overfont.5 eeeeeeeeeeeeeeee
API Return Codes
-2 Option is not valid.
“overlay Parameter” on page 282
“font Parameter” on page 222
overhang Parameter
Specifies overhang for flowed lines.
Scope: View
Syntax
query overhang
set overhang [Number]
Option
Number
Description
280
LPEX Editor User’s Guide
The value, positive or negative, by which indent is multiplied to
determine direction (right or left) and the number of characters to indent
lines. The default value is 1.
The value of the overhang parameter determines the indentation of flowed
lines in a paragraph of text. A paragraph is any length of text ended by a
hard carriage return.
A paragraph can be wrapped (flowed) over multiple lines. The overhang
parameter sets the indentation of the second and subsequent lines of a
paragraph.
Multiply the values of the overhang and indent parameters together to
calculate the offset for the start columns of flowed lines. This offset is
measured in character positions from the start column of first line in the
paragraph. A positive offset value starts flowed lines to the right of the start
column of the first line. A negative offset value starts flowed lines to the left
of the start column of the first line. The overhang parameter has no effect on
the start column of the first line in a paragraph.
Notes:
1. You must set the formatter parameter to on for the overhang parameter to
have an effect on displayed text.
2. The Editor will accept, but not use, indent or overhangparameter values
that cause less than 14 characters to be displayed on a wrapped line.
Examples
For the following examples, place the cursor on the first line of a paragraph
before typing the following commands in the Issue edit command window.
1. Set an initial formatting style for the document by typing these Editor
commands:
set
set
set
set
formatter on
wrap on
formwidth 60
format absolute 4
2. If the indent parameter is set to 2, then to set an indentation of 6
characters to the right of the first element, type this Editor command:
set overhang 3
The second and subsequent lines are indented 4 characters to the right as
shown below:
Rather than holding data passively while it is
being edited, the Editor recognizes the
different elements of a program or document.
3. If the indent parameter is set to 2, then to set an indentation of 6
characters to the left of the first element, type:
set overhang -3
Chapter 8. References
281
The second and subsequent lines are indented 4 characters to the left as
shown below:
Rather than holding data passively while it is
being edited, the Editor recognizes the different
elements of a program or document.
API Return Codes
-2 The number specified was either outside the valid range or not a whole number.
Issue the command again using a valid number.
“flow Parameter” on page 219
“format Parameter” on page 228
“indent Parameter” on page 245
“wrap Parameter” on page 354
overlay Parameter
Sets text for overlay line.
Scope: View
Syntax
query overlay.RowNumber
set overlay.RowNumber [TextString]
Options
RowNumber
TextString
Line where the overlay appears. A positive value is counted from the
top of the view; a negative value is counted from the bottom. Because
the size of the window can change dynamically, you should use negative
values when attempting to set overlays at or near the bottom of the
view.
Text to appear on the overlay.
Description
The set overlay parameter places a TextString on a specified row in the
window. The overlay remains in the fixed position on the window even if the
file is scrolled. The string appears in the font set by set font.overlay. An
overlay is deleted using set overlay.RowNumber with no text. RowNumber
must have the same value and sign used when the overlay was first specified.
Example
1. To place a warning note on row 3 of the window, type:
282
LPEX Editor User’s Guide
set overlay.3 WARNING: nosave is on
The text WARNING: nosave is on stays on row 3 of the window even if
the file is scrolled.
2. To delete the overlay on row 3 of the window, type:
set overlay.3
3. To place a warning note on the fourth row from the bottom, type:
set overlay.-4 WARNING: nosave is on
API Return Code
-2 The RowNumber specified was not numeric.
“font Parameter” on page 222
pad Parameter
Defines the pad character.
Scope: View
Syntax
query pad
set pad Character
Option
Character
Any single printable character, including the space character, or blank.
The pad character can be specified in the following ways:
nnn
A decimal-based ASCII character code, where n is a digit of
value 0 to 9, inclusive. For example, character code 065 = A.
xnn or xnnn
A hexadecimal-based ASCII character code, where nis a digit of
value 0 to 9, inclusive, or an alphabetic character of value A to
F or a to f, inclusive. For example, character code x41 = A.
any keyboard character
Any single printable character entered from the keyboard.
Description
Chapter 8. References
283
The pad parameter defines the pad character that is used to extend or fill lines
as required. Do not use the Tab character for a pad character, as it is not
processed as a single character.
The default fill character is a blank.
The pad character is for display only, and is not saved with the file.
Example
To set the pad character to a dash ( - ), type:
set pad -
API Return Code
-2 The Character option was not, or did not represent, a single character.
“font Parameter” on page 222
“splitjoin Command” on page 133
parent Parameter
Sets the parent window for the Editor window.
Scope: Global
Syntax
query parent
set parent Id
Option
Id
The handle of the Editor window to make the parent. A value of 0 sets
the desktop as the parent.
Description
The parent parameter changes the parent of the Editor window to the Id. The
current positioning is maintained at the same relative position to the new
parent.
Example
To assign the desktop as parent window, type:
284
LPEX Editor User’s Guide
set parent 0
API Return Codes
None.
parser Parameter
Defines the live parser to be used.
Scope: File
Syntax
query parser
set parser Command [Parameters]
Options
Command
Parameters
A native Editor command to be invoked by trigger.
The parameters required by the command.
Description
The parser parameter sets the command to be invoked by the trigger
command to process changed lines. If a parser has been specified using set
parser, the trigger command is invoked automatically to process the lines on
the pending list. As each is processed, the parser command specified by set
parser is invoked with the pending line temporarily set to the current line.
A call to set parser processes any pending changed lines before the new
parser is selected or switched off.
The parser command must be a native command invoked with the argument
string specified on the set parser command. If the parser itself is a macro or
external command the native command must be lxr. Use the set parser
command without a command name or arguments to turn off automatic
parsing of changed lines.
Use the set autoparse off command to suspend automatic parsing without
canceling any parser.
Example
To specify a prrexx parser, type:
set parser prrexx
Chapter 8. References
285
API Return Codes
None.
“lxr Command” on page 101
“trigger Command” on page 139
“autoparse Parameter” on page 169
pending Parameter
Adds a line to a pending list being processed by a parser.
Scope: Line
Syntax
query pending
set pending { off | change | delete | both }
Options
off
change
delete
both
Drops current line from the pending list. This is the default value.
Line is added to the pending list following a change to the content of
the line.
Line is added to the pending list following the deletion of another line.
Line is added to the pending list following a change in the content of
the line and the deletion of another line.
Description
The pending parameter adds or drops the current line from the pending list
of lines waiting to be processed by the parser. Lines are added to the pending
list if a parser has been specified by the set parser command and the text
content of the lines is changed. A line is also automatically added to the list if
the parser has been specified and the line becomes the current line after
another line is deleted.
Lines can be changed by commands such as insert or set content, or by
overtyping. If a line is changed by overtyping, it is added to the list when the
cursor is moved off the line.
The query pending command indicates whether the current line is on the
pending list because of changes.
Examples
286
LPEX Editor User’s Guide
1. To see if the current line is on the pending list, type:
query pending
2. To drop the current line from the pending list, type:
set pending off
3. To add a line to the list following a change to the content of the line, type:
set pending change
API Return Codes
-2 The option specified with the parameter was not valid. Check the syntax
requirements for the parameter and try the set
-5 You cannot make changes to the file because the readonly parameter is set to on.
“autoparse Parameter” on page 169
“parser Parameter” on page 285
“trigger Command” on page 139
popupinit Parameter
Specifies a command or callback routine to be run when the pop-up menu is
raised in the Editor window.
Scope: Document
Syntax
set popupinit [drop] Command
query popupinit
Options
Command
drop
A command or callback routine to run when the pop-up menu is
requested, along with any parameters required.
Remove the specified callback routine from the callback list.
Description
You can use the popupinit parameter to specify a command or callback
routine to be run between the time you request the pop-up menu and the
time it appears. The callback routine can use any of the Editor commands,
including the set and query commands, to work with items of interest. A
typical callback routine might modify the contents of the pop-up menu,
depending on the state of the document being edited when the pop-up menu
is requested.
Chapter 8. References
287
The pop-up menu can have multiple callback routines, which are called in
LIFO order. If one of the callback routines returns a non-zero value, no further
callbacks will be called.
A callback routine can be removed from the callback list by using the drop
argument with the popupinit parameter. If a callback routine is not explicitly
dropped, it remains active until the document is closed.
Examples
1. To display the message Pop-up menu raised! each time you request the
pop-up menu, type:
set popupinit msg Pop-up menu raised!
2. To stop displaying the message Pop-up menu raised! each time you request
the pop-up menu, type:
set popupinit drop msg Pop-up menu raised!
3. To see all callback routines in the callback list, type:
query popupinit
4. The more complex example shown below looks for blank lines at the
beginning of a document, and if present, displays a menu choice on the
pop-up menu that will remove those blank lines.
The primary callback routine used to create the menu choice is shown
below:
/* Macro file 'del_empt.lx'
/* Enable a pop-up menu item if empty lines are found at the top of a file
'mark set predel'
/* Save the cursor position for later use
'top'
/* Move cursor to first line in the file
'extract content'
/* Get contents of first line
/*
A pair of Editor commands will be run if the pop-up menu item is
/*
selected - 1. run the macro called delempty.lx
/*
- 2. remove the menu item from the pop-up menu when done
/*
These commands are assigned to a variable for easier reading in
/*
the next section where the pop-up menu item is actually created.
run_cmd = 'mult ;macro delempty ;set popupmenu.Delete_leading_empty_lines'
/* Check line and add pop-up if first line is empty
if (content = '') then do
/* line is empty */
/* Create a pop-up menu item that runs commands to first delete empty
/* leading lines, and then removes itself from the pop-up menu.
'set popupmenu.Delete_leading_empty_lines 'run_cmd
end
'mark find predel' /* Restore original
cursor position if still existing
'mark clear predel' /* Clear the mark saving the original cursor position
exit 0
This callback routine calls another macro file called delempty.lx that
actutally removes the leading empty lines from the file.
288
LPEX Editor User’s Guide
*/
*/
*/
*/
*/
*/
*/
*/
*/
*/
*/
*/
*/
*/
*/
/* Macro file 'delempty.lx'
/* Find and remove leading empty lines
'mark set predel'
/* Save the cursor position for later use
'top'
/* move cursor to first line in file
'extract content'
/* get contents of first line
do while (content='')
/* loop while empty lines found
'block mark element'
/* highlight empty lines
'next element'
/* move cursor to next line
'extract content'
/* get contents of next line
end
'block delete'
/* delete marked block
'mark find predel' /* Restore cursor position if still existing
'mark clear predel' /* Clear mark saving the cursor position
exit 0
*/
*/
*/
*/
*/
*/
*/
*/
*/
*/
*/
*/
a. To run the callback routine called del_empt.lx each time you request the
pop-up menu, type:
set popupinit del_empt.lx
b. To remove the callback routine called del_empt.lx from the pop-up
menu callback list, type:
set popupinit drop del_empt.lx
API Return Code
None.
“popuplink Parameter”
“popupmenu Parameter” on page 290
“popupmenuid Parameter” on page 293
“popupmenulist Parameter” on page 294
popuplink Parameter
Add menu items already defined on the menu bar to the pop-up menu in the
Editor window.
Scope: File
Syntax
set popuplink.Id[Item][.SubItem][...] [Ordinal]
Options
Id
Item
Either the predefined Editor name for an Editor-defined pop-up menu
item, or a numeric value for a user-added item. The numeric value can
be obtained by querying the popupmenuid parameter.
Pop-up menu item to which the new menu item should be linked.
Chapter 8. References
289
SubItem
Ordinal
Pop-up sub-menu item to which the new menu item should be linked.
Integer value of zero or greater, defining the position in which the new
item is placed in the specified pop-up menu or sub -menu.
Description
The popuplink parameter lets you link, to the pop-up menu, items already
defined in the menu bar and its sub-menus. You can place a linked menu item
on the main pop-up menu, or in any pop-up sub-menu.
If the menu or sub-menu location specified does not exist, it is created.
If no menu or sub-menu is specified, the linked menu item is placed on the
main pop-up menu.
Example
To add the Open new view choice from the File pull-down menu to the third
position in the pop-up menu (in the Editor window), type:
set popuplink.LP_NEWVIEW 2
API Return Code
-1 Incorrect parameter specified.
“popupinit Parameter” on page 287
“popupmenu Parameter”
“popupmenuid Parameter” on page 293
“popupmenulist Parameter” on page 294
popupmenu Parameter
Sets the contents of the pop-up menu and associated pull-down menu items
in the Editor window.
Scope: File
Syntax
set popupmenu.{Item|BITMAP_resdll_id}[.{Subitem|BITMAP_resdll_id}]
[...] [OrdinalNumber] [Command]
query popupmenu.{Item|BITMAP_resdll_id}[.{Subitem|BITMAP_resdll_id}][...]
290
LPEX Editor User’s Guide
Options
Item
Subitem
BITMAP
OrdinalNumber
Command
Name of the menu item to be included on the pop-up menu.
Name of the selection item to be added to the Item pull-down menu.
Specifies that the pop-up or pull-down menu item is a bitmap. If
this is chosen, you must also specify:
resdll
The resource dll containing the new item’s bitmap.
id
The id for the bitmap contained in the resdll resource dll.
The position at which the menu item is inserted, starting at zero.
Separators are included in the count.
The action or actions to perform when Subitem is selected.
Description
The popupmenu parameter is used to add menu choices to the Editor
window pop-up menu and its associated pull-down menus. You can create
completely new pull-down menu sets, or you can add to the contents of
existing pull-down menus.
Use text or icons to represent menu choices.
v If you use icons, the icons must be contained in a DLL file located in a
directory path included in the PATH environment variable.
v If you use text, you can also use the following special characters in the
name:
– The underscore character ( _ ) represents a blank in the menu name.
– The tilde (x) before a letter in the name creates a mnemonic for the menu
item.
– \t defines an accelerator for the menu item.
If Item, Subitem, or BITMAP is not an existing item, it is created.
If Item, Subitem, or BITMAP is an existing item, the following happens:
If a command is specified, the previous command is replaced with the
newly-specified command.
If an item contains a pull-down or cascaded menu, you cannot change the
contents of that item to a command. Similarly, if an item contains a command,
you cannot change the contents of that item to a pull-down or cascaded
menu. You must first delete the item, then recreate it specifying the new menu
item contents.
Chapter 8. References
291
If no command is specified, the item and any commands or sub-menu items
attached to it are deleted.
Examples
1. To create a Example pop-up menu item, which creates a sound when
selected, type:
set popupmenu.Example alarm
2. To create a Example pop-up menu item with a sub-menu item called
Sound, which creates a sound when selected, and mnemonics for both
items, type:
set popupmenu.Exxample.xSound alarm
The mnemonic for Example is x, and the mnemonic for Sound is s.
Note: You cannot define menu items with the same name within a given
menu set. Though Examples 1 and 2 appear to set up menu-bar items with
the same base name, the mnemonic differentiates them. You could
continue to set up more menu-bar items with the same base name as long
as a different mnemonic was used for each item.
3. To add an accelerator to the Sound sub-menu item defined in the above
example, type:
set popupmenu.Exxample.xSound\tAlt+S alarm
The accelerator for Sound is Alt+S.
4. You can use a bitmap in place of a text label for your menu item or
sub-menu item. Bitmaps must be defined in a DLL file located in a
directory path included in your PATHenvironment variable. The following
example uses the bitmap with resource id 2, found in the evfwrc21.dll file
included with the Editor. To add this bitmap to the pop-up menu defined
in Example 2, type:
set popupmenu.Exxample.BITMAP_evfwrc21_2 alarm
You can also use a bitmap as a menu item in the pop-up menu.
5. You can define sub-menu items to sub-menu items. For example, the
following example adds a sub-menu item called Add to the pop-up menu
defined in Example 2. Selecting the Add pop-up menu item raises a
cascaded menu, with menu items that add one, two, or three lines to your
document.
set popupmenu.Exxample.xAdd.One_line add 1
set popupmenu.Exxample.xAdd.Two_lines add 2
set popupmenu.Exxample.xAdd.Three_lines add 3
292
LPEX Editor User’s Guide
API Return Code
-1 The option specified for Item was not valid. Type the option exactly as it appears
in the menu, including uppercase and lowercase letters.
-2 The item, sub-menu item, or bitmap name contains invalid characters, or you
tried to define a new menu item without specifying a command.
“popupinit Parameter” on page 287
“popuplink Parameter” on page 289
“popupmenuid Parameter”
“popupmenulist Parameter” on page 294
popupmenuid Parameter
Queries the menu id of a pop-up menu item in the Editor window.
Scope: File
Syntax
query popupmenuid.{Item|BITMAP_resdll_id}[.Subitem|BITMAP_resdll_id] [...]
Options
Item
Subitem
BITMAP
The name of a pop-up menu item.
A sub-menu item attached to the Item pop-up menu.
Specifies that the menu or sub-menu item is a bitmap. If this is chosen,
you must also specify:
resdll
The resource dll containing the new item’s bitmap.
id
The id for the bitmap contained in the resdll resource dll.
Description
The popupmenuid parameter queries the id of a pop-up menu or submenu
selection. The names or ids of the pop-up menu item and sub-menu items
must be the same as originally used used to create the item. If the item is not
found, a value of <NULL> is returned.
Example
To query the id of the sound sub-menu item attached to the mine pop-up
menu, type:
query popupmenuid.mine.sound
Chapter 8. References
293
API Return Codes
-1 You cannot issue the set command for this parameter.
“menuactive Parameter” on page 269
“menucheck Parameter” on page 272
“popupinit Parameter” on page 287
“popuplink Parameter” on page 289
“popupmenu Parameter” on page 290
“menucheck Parameter” on page 272
“popupmenulist Parameter”
popupmenulist Parameter
Lists user-defined pop-up menus in the Editor window.
Scope: File
Syntax
query popupmenulist
Description
The popupmenulist parameter lists the names of all user-defined pop-up
menu items for the current file.
Example
To list all user-defined pop-up menu items for the current file, type:
query popupmenulist
API Return Code
-1 You cannot issue the set command for this parameter.
“popupinit Parameter” on page 287
“popuplink Parameter” on page 289
“popupmenu Parameter” on page 290
“popupmenuid Parameter” on page 293
294
LPEX Editor User’s Guide
position Parameter
Sets cursor position in a line.
Scope: View
Syntax
query position
set positionNumber
Option
Number
A positive integer up to the length of the content of the line + 1.
Description
The position parameter moves the current position within the character
content of the current line. The value of Number must be positive and can be
set no farther than one space to the right of the last character of the line.
Note: A tab character is counted as a single column in the line.
Example
To set the current position to the first column of the current line, type:
set position 1
API Return Codes
-2 The Number specified was either outside the valid range or not a whole number.
Issue the command again using a valid number.
“length Parameter” on page 254
prefix Parameter
Specifies the value of the prefix data associated with the current line.
Scope: Line
Syntax
query prefix
set prefixText
Chapter 8. References
295
Option
Text
The prefix data. This parameter is interpreted according to the format
specified by the prefixformat parameter.
Description
The prefix parameter changes the prefix data of the current line.
Example
To set the prefix of the current line to 012400920912, type:
set prefix 012400920912
API Return Codes
-1 Parameter is read-only. The prefix parameter cannot be changed when autoprefix
is set to on.
-3 Prefix does not match format.
-8 Insufficient storage to continue.
“prefixdefaulttext Parameter”
“prefixdisplayformat Parameter” on page 297
“prefixformat Parameter” on page 300
prefixdefaulttext Parameter
Sets the text that is to be used to set the text part of the prefix data when lines
are inserted or changed and the autoprefix parameter is set to on.
Scope: File
Syntax
query prefixdefaultext
set prefixdefaulttext Text
296
LPEX Editor User’s Guide
Options
Text
The text part of the prefix data, subject to the following rules:
v If the autoprefix parameter is set to on, Text is used to set the prefix
data for lines that are inserted or changed.
v If the Text is shorter than the text part of prefix data, then it will be
truncated.
v If it is longer than the text part of the prefix data, it will be padded
with blanks.
v No attempt to maintain the integrity of DBCS data will be made
during padding or truncation.
Description
The prefixdefaulttext parameter sets the text that is to be used to set the text
part of the prefix data for lines that are inserted or changed while the prefix
data is being automatically maintained.
Example
If the text portion of the prefix data is the date of the last change made to the
line and the current date is Jan. 1, 1993, the following command could be
used:
set prefixdefaulttext 930101
API Return Codes
-8 Insufficient storage to continue.
“prefixformat Parameter” on page 300
“autoprefix Parameter” on page 170
“prefix Parameter” on page 295
prefixdisplayformat Parameter
Specifies a format string that is used to display the prefix area.
Scope: View
Syntax
query prefixdisplayformat
set prefixdisplayformat Format
Chapter 8. References
297
Options
Format
This string describes how the prefix data will be displayed, subject to
the following rules:
v The length of the string is equal to the number of characters that you
wish to have displayed.
v ’X’ characters found in the format string will be replaced by the text
part of the prefix area.
v ’9’ characters found in the format string will be replaced by the
numeric part of the prefix area.
v All other characters in the format string will be displayed without
substitution.
v If you wish to include a ’9’ or an ’X’ as part of the displayed prefix, it
must be preceded by a ’\’ character.
v If the numeric part of the prefix data overflows its space in the format
string, it will be truncated on the left.
v If the numeric part of the prefix data does not fill its space in the
format string, it will be padded with leading zeros.
v If there are more ’X’ characters than text data, the remaining ’X’
characters will be padded with blanks.
v If there is more text data than ’X’ characters, the unused characters
will not be displayed.
Description
The prefixdisplayformat parameter controls how the prefix data will be
displayed in the left margin of an edit view. The prefix data is divided into
two parts, a text part and a numeric part. This division is defined by the
prefixformat parameter. The format string will determine how these two parts
are displayed in relation to one another.
Note that the prefixshow parameter must be used to control whether the
prefix data is actually displayed. If there is no prefix data, or there is no
numeric part to the prefix data, the line number will be displayed in the
numeric part of the prefixdisplayformat format string.
If the text part of the prefix data contains DBCS data, no attempt to maintain
the integrity of DBCS characters will be made during display formatting.
Example
If the prefixformat parameter is set to 999999XXXXXX, and the numeric part
consists of a 6-digit number and the text part consists of a 6-digit date. To
display the prefix data area as a 6-digit sequence number followed by the
date, the following command could be used.
298
LPEX Editor User’s Guide
set prefixdisplayformat '999999 XX/XX/XX'
API Return Codes
-8 Insufficient storage to continue.
“prefixformat Parameter” on page 300
“prefixshow Parameter” on page 302
prefixentry Parameter
Used to query or set the text in the prefix entry field of the current line.
Scope: Element
Syntax
query prefixentry
set prefixentry [Text]
Options
Text
Specifies the text that is to be displayed in the prefix entry field.
Description
The character(s) specified in the Text option are placed in the prefix area for
the current line.
If Text is not specified, the prefix area is filled with either the current prefix
number, or if there is no numeric part to the prefix data, with the line number.
If the size of Text is larger than the prefix entry entry field, it will be truncated
on the right.
Example
To query the text in the prefix entry field, type:
query prefixentry
API Return Code
-8 Not enough resources available.
Chapter 8. References
299
“prefixdisplayformat Parameter” on page 297
“actionprefix Parameter” on page 161
prefixformat Parameter
Defines the size and type of prefix data that will be maintained with the
current file.
Scope: File
Syntax
query prefixformat
set prefixformat Format [col]
Options
Format
This parameter is a string that describes how the prefix parameter is
interpreted. This string must be entirely made up of ’9 ’ and ’X’
characters.
v The ’9’ characters represent the positions that will contain the numeric
part of the prefix data.
v The ’X’ characters represent the positions that will contain the text
part of the prefix data. The size of the prefix data is determined by
the size of Format.
The starting column at which the prefix data is displayed on a line. If
not specified, the value of col is 1.
col
Description
The prefixformat parameter defines the size, format, and location of the prefix
data that will be maintained with the current file. This parameter must be set
before the prefix is set for any line in the current file. After the prefix
parameter has been set for a line in the file, the prefixformat parameter
becomes a read-only parameter and can only be queried. If the prefixformat
parameter is never set, then it will have a null string default value. In this
case, the only valid value for set prefix is an empty string.
Example
1. To define the prefix data as an AS/400 sequence number with a 6-digit
sequence number followed by a 6-digit date, the following command
could be used:
set prefixformat 999999XXXXXX
300
LPEX Editor User’s Guide
2. To define the prefix data as a 8-digit MVS sequence number appearing in
columns 73 to 80 of a line, enter:
set prefixformat 99999999 73
API Return Codes
-1 Parameter is read-only. After the prefix parameter is set, this parameter can no
longer be changed.
-2 Invalid argument specified.
-3 The Format string is not valid.
-8 Insufficient storage to continue.
“prefix Parameter” on page 295
“autoprefix Parameter” on page 170
“prefixdefaulttext Parameter” on page 296
prefixprotect Parameter
Enable or disable text entry in the displayed prefix area.
Scope: View
Syntax
query prefixprotect
set prefixprotect { on | off | inverse }
Option
on
off
inverse
Disable text entry in the displayed prefix area.
Enable text entry in the displayed prefix area.
Toggles between on and off.
Description
The prefixprotect parameter controls whether text can be entered in the
displayed prefix area.
The Editor reads this parameter only when the prefixshow parameter is used
to enable the display of text or numbers in the prefix area.
Example
To disable text entry in the displayed prefix area, type:
set prefixprotect on
Chapter 8. References
301
API Return Codes
-2 Invalid parameter argument.
“prefix Parameter” on page 295
“prefixshow Parameter”
prefixshow Parameter
Displays the prefix data in the left margin of the current view.
Scope: View
Syntax
query prefixshow
set prefixshow {[text|numbers] on|off|inverse} | {default}
Option
on
off
inverse
default
Displays the prefix data.
Hides the prefix data.
Toggles between on and off.
Prefix data display is controlled by the value of the default
Description
The prefixshow parameter controls whether the prefix data is displayed. The
prefix data is stored in the prefix parameter associated with each line.
If the value of the prefixshow parameter is default, prefix data display is
controlled by the value of the default parameter.
Examples
1. To remove prefix data from the current Editor, type:
set prefixshow off
2. To control prefix data display with the value defined by the default
parameter, type:
set prefixshow default
3. To display the value of the prefixshow parameter, type:
query prefixshow
If this query returns DEFAULT, type the following:
query default.prefixshow
302
LPEX Editor User’s Guide
API Return Codes
-2 Invalid or missing parameter argument.
“default Parameter” on page 195
“prefix Parameter” on page 295
“prefixprotect Parameter” on page 301
profiles Parameter
Specifies profiles to be used by the Editor.
Scope: File
Syntax
query profiles
set profiles [load] [user] [save]
Options
load
If present when a file is loaded, the extension-dependent load macro
profile is called after the file is loaded. The name of the load macro is
the same as the doctype setting, which is usually the same as the file
extension. The load macro’s extension is .lxl . This macro is used for
extension-dependent settings, and especially for invoking the initial
parser for the file.
If the user profile (profile.lx) exists, it is called after the file is loaded and
after the system profile and the load macro have been called.
If the save macro exists when save is called, it is called to set the
formatting defaults. The name of the save macro is the same as the
doctype setting, and has an extension of.lxs .
user
save
Description
The profiles parameter sets the profiles that are used (if available) by the
Editor when you are loading and saving files. By default, all four parameters
are used.
Examples
1. To load only the user profile when a file is loaded, type:
set profiles user
2. To see which profiles have been used when you are loading or saving a
file, type:
query profiles
Chapter 8. References
303
API Return Codes
-2 The option specified with the parameter was not valid.
“save Command” on page 125
protect Parameter
Sets classes to be protected on display.
Scope: View
Syntax
query protect
set protect [ClassName] [ClassName] [...]
Option
ClassName
List of valid classes to be protected, separated by blanks. The maximum
number of classes is 30.
Description
The protect parameter ensures that classes specified are protected against
overtyped changes (even if browse is off). Changes by other means, such as
macros, are still allowed.
Example
To protect lines containing CODE and BRACE classes from being overtyped,
type:
set protect code brace
API Return Codes
-2 The ClassName was not a valid class type. Use the query classes command to see
which ClassNames are currently defined, or use the set class command to define a
new class. Issue the command again using valid ClassNames.
“browse Parameter” on page 183
304
LPEX Editor User’s Guide
rawtext Parameter
Displays the data content of a line without symbol substitution.
Scope: File
Syntax
query rawtext
Option
None.
Description
The rawtext parameter returns the content of the character string of the
current line. Regardless of the setting of symbols any substitution characters
are restored to the original symbol string. Using the form instead of content
guarantees that if the text is replaced by a set content command, the symbol
variables are retained.
Example
To return the content of the character string for the current line, type:
query rawtext
API Return Codes
None.
readonly Parameter
Protects view from changes.
Scope: View
Syntax
query readonly
set readonly { on | off | inverse }
Options
on
off
Changes are not permitted.
Changes are permitted. This is the default value.
Chapter 8. References
305
inverse
Toggles between on and off.
Description
The readonly parameter prevents changes from being made directly to a view.
An attempt to change a line sounds an alarm when the beep is enabled.
Example
To protect a view from changes, type:
set readonly on
API Return Code
-2 The option you specified was not on, off, or inverse.
“browse Parameter” on page 183
“nosave Parameter” on page 277
“protect Parameter” on page 304
recall Parameter
Sets command recall options.
Scope: Global
Syntax
query recall
set recall Number [commandline] [pulldown] [actionkey]
Options
Number
commandline
pulldown
actionkey
Size of the recall buffer. The default value is 12, the valid range is 1
to 1000, inclusive.
Commands issued through the command line are recallable.
Commands issued through menus are recallable.
Commands issued by pressing action keys are recallable.
Description
The recall parameter sets the size of the command-recall buffer. The Editor
maintains a buffer of recently typed commands that can be recalled.
306
LPEX Editor User’s Guide
The recall command also determines which commands are saved in the buffer.
By default only those issued through the command line are saved, but you
can also specify the commands issued by choosing menu selections or by
pressing keys to which actions have been assigned.
If an identical command already exists in the buffer, only one copy is retained.
Example
To resize the buffer and save only those commands issued through the menus,
type:
set recall 20 pulldown
API Return Codes
-2 The number specified was either outside the valid range, not a positive integer,
or not a whole number. Issue the command again using a valid number.
recentfilecmd Parameter
Specifies the Editor command processed when a file name is selected from the
recently-accessed file list in the Editor window.
Scope: File
Syntax
query recentfilecmd
set recentfilecmd [Command]
Options
Command
Any Editor command.
Description
Each file name entry in the recently-accessed file list has an associated open
command associated with it. The recentfilecmd parameter can query and
change this command.
If the current document is not in the recently-accessed file list, setting the
recentfilecmd parameter adds the current file name and new Command to the
recently-accessed file list. recently-accessed file list.
If Command is left blank, the name of the current file is removed from the
recently-entered file list.
Chapter 8. References
307
The command associated with a file name in the recently-accessed file list is
saved between Editor window sessions. However, the command is applied
only if the file is opened by selecting its entry on the recently-accessed file list.
This list is displayed only if the recentmenushow and recentsize parameters
are set accordingly. Opening the file in another way replaces the command in
the recently-accessed file list with a default file open command assigned by
the Editor.
No checking is performed on the validity of Command.
Example
1. To query the current value of the recentfilecmd parameter, type:
query recentfilecmd
2. To change the command used to open the file my_file.txt to include an asis
option, type:
set recentfilecmd lx my_file.txt /asis
3. A sequence of commands can be specified. For example, to change the
command used to open the file my_file.txt to include an asis option and
sound an alert on loading, type:
set recentfilecmd mult ;lx my_file.txt /asis ;alarm ;alarm
API Return Codes
None.
“recentmenushow Parameter”
“recentpathshow Parameter” on page 310
“recentsize Parameter” on page 311
recentmenushow Parameter
Specifies how the recently-accessed file list is displayed in the Editor window.
Scope: View
Syntax
query recentmenushow
set recentmenushow { BOTTOM | TOP | OFF }
Options
BOTTOM
308
LPEX Editor User’s Guide
The recently-accessed file list is displayed, and appears at the bottom of
the File pull-down menu.
TOP
The recently-accessed file list is displayed, and appears at the top of the
File pull-down menu.
The recently-accessed file list is not displayed.
OFF
Description
The Editor window can display a list of the recently-accessed files. If the
recentmenushow parameter has a value other than off, and the recentsize
parameter has a value other than 0, a list of recently-accessed file names is
displayed in the File pull-down menu. Files can be opened by double-clicking
on the file names displayed in the recently-accessed file list.
If you open or save a file whose name already appears in the
recently-accessed file list, the name of that file is moved to the top of the list.
If the file name is not already in the recently-accessed file list, the name of
that file is added to the top of the list, and all other entries move down one
position.
If adding a file name to the recently-accessed file list causes the number of
files in that list to exceed the value of recentsize parameter, the file name at
the bottom of the list is removed from the list.
The recently-accessed file list is saved each time you work within an Editor
window.
Additions to the recently-accessed file list can be suppressed by specifying the
/NFL or /NOFILELIST options when using the lx and save commands in the
Editor window to open and save files.
Example
To display the recently-accessed file list at the top of the File pull-down menu,
type:
set recentmenushow TOP
API Return Codes
-2 Invalid or missing value for parameter
“recentfilecmd Parameter” on page 307
“recentpathshow Parameter” on page 310
“recentsize Parameter” on page 311
Chapter 8. References
309
recentpathshow Parameter
Enables or disables the display of complete file paths in the recently-accessed
file list in the Editor window.
Scope: View
Syntax
query recentpathshow
set recentpathshow { ON | OFF }
Options
ON
OFF
Show the directory path of each file in the recently-accessed file list.
Do not show the directory path of each file in the recently-accessed file
list.
Description
The Editor window can display a list of the recently-accessed files. If the
recentmenushow parameter has a value other than off, and the recentsize
parameter has a value other than 0, a list of recently-accessed file names is
displayed in the File menu.
If the recentpathshow parameter is set to on, each entry in the
recently-accessed file list displays both the name and directory path of that
file. If set to off, only the file names are displayed.
Example
1. To display the both file names and directory paths in the recently-accessed
file list, type:
set recentpathshow ON
2. To query the current value of the recentpathshow parameter, type:
query recentpathshow
API Return Codes
-2 Invalid or missing parameter value
“recentfilecmd Parameter” on page 307
“recentpathshow Parameter”
“recentsize Parameter” on page 311
310
LPEX Editor User’s Guide
recentsize Parameter
Specifies how many file names are maintained in the recently-accessed file list.
Scope: Global
Syntax
query recentsize
set recentsize [Number]
Options
Number
The number of file names maintained in the recently-accessed file list.
Number must be an integer with value of 0 to 10 inclusive. If a value is
not specified, Number defaults to 0.
Description
The Editor window can display a list of the recently-accessed files. If the
recentmenushow parameter has a value other than off, and the recentsize
parameter has a value other than 0, a list of recently-accessed file names is
displayed in the File pull-down menu. Files can be opened by double-clicking
on the file names displayed in the recently-accessed file list. The value of the
recentsize parameter determines the maximum number of file names
displayed in this list.
If you open or save a file whose name already appears in the
recently-accessed file list, the name of that file is moved to the top of the list.
If the file name is not already in the recently-accessed file list, the name of
that file is added to the top of the list, and all other entries move down one
position.
If adding a file name to the recently-accessed file list causes the number of
files in that list to exceed the value of Number, the file name at the bottom of
the list is removed from the list.
Example
1. To set the maximum number of entries in the recently-accessed file list to
10, type:
set recentsize 10
2. To query the current value of the recentsize parameter, type:
query recentsize
Chapter 8. References
311
API Return Codes
-2 Invalid value specified forNumber.
“lx Command” on page 96
“recentfilecmd Parameter” on page 307
“recentmenushow Parameter” on page 308
“recentpathshow Parameter” on page 310
“save Command” on page 125
recording Parameter
Enables recording of changes made to a document.
Scope: Global
Syntax
set recording { on | off | inverse }
query recording
Options
on
off
inverse
Enable recording of changes made to a document.
Disable recording of changes made to a document.
Toggles between on and off.
Description
If the recording parameter is set to on, the Editor records changes made to a
document. These recorded changes can later be used by the undo command
to undo or redo those changes.
If the recording parameter is set to off, you will not be able to undo or redo
changes to your document.
Examples
1. To enable recording of changes, type:
set recording on
2. To obtain the value of the recording parameter, type:
query recording
API Return Codes
312
LPEX Editor User’s Guide
None.
“undo Command” on page 140
resolve Parameter
Displays a message describing the command to be run.
Scope: Global
Syntax
query resolve.Name
Option
Name
This can be an Editor macro, synonym or native command. If it is a
command that contains a period (.), such as font., doc., or mark., the
period must be included in the Name.
Description
The resolve parameter displays a message describing the command that
would be executed if Name was issued as a command. The message returned
is one of the following:
synonym
native
query
?
Command
Command
Command
Command
is
is
is
is
a synonym. The value of the synonym is also displayed.
an Editor command.
a query parameter.
either unknown or an Editor macro.
Example
To display a message describing the substitute command, type:
query resolve.substitute
The message resolve.substitute native is displayed in the message line.
API Return Codes
Chapter 8. References
313
None.
“query Command” on page 119
“set Command” on page 129
“synonym Parameter” on page 334
rexx Parameter
Enables the use of REXX (if present).
Scope: Global
Syntax
query rexx
set rexx { on | off | inverse }
Options
on
off
inverse
Enables REXX for macros if the REXX interpreter is present.
Disables the use of REXX.
Toggles between on and off.
Description
The rexx parameter enables the use of REXX for macros if the REXX
interpreter is present and is set on. If REXX is off, the Editor uses the built-in
macro processor, which is faster but has no support for variables and
conditional processing.
Example
To use the built-in macro processor, turn off the REXX interpreter with the
following:
set rexx off
API Return Codes
None.
314
LPEX Editor User’s Guide
ring Parameter
Sets the default ring assignment mode for new views.
Scope: Global
Syntax
set ring { on | off }
query ring
Options
on
off
A new view becomes a member of the current ring.
A new view is placed into a new ring.
Description
Unless specifically overridden by a command parameter, the ring parameter
determines whether a new view is placed in its own ring, or becomes a
member of an existing ring.
The value of the ring parameter is saved between Editor sessions.
Example
To set the default ring assignment mode so that new views default into a new
ring, type:
set ring off
API Return Codes
-2 An invalid option was specified.
“godoc Command” on page 86
“goview Command” on page 90
“lx Command” on page 96
ringlist Parameter
Queries ring numbers active in the Editor.
Scope: Global
Syntax
Chapter 8. References
315
query ringlist
Options
None
Description
The ringlist parameter is a query-only parameter. It returns a list of all ring
numbers that are active in the Editor.
Example
To see a list of active ring numbers, type:
query ringlist
API Return Codes
None.
“goring Command” on page 89
“goview Command” on page 90
“ringnum Parameter”
ringnum Parameter
Sets the ring to which the current document is moved.
Scope: Global
Syntax
query ringnum
set ringnum Number
Options
Number
The number of the ring to which the current document is moved.
Description
To move the current document to another ring, set the ring parameter to the
Number of the new ring.
Examples
316
LPEX Editor User’s Guide
1. To move the current document to ring 2, type:
set ringnum 2
2. To discover the ring number for which the current document is a member,
type:
query ringnum
API Return Codes
-2 An invalid ring number was specified.
“goring Command” on page 89
“goview Command” on page 90
rings Parameter
Queries the number of rings active in the Editor.
Scope: Global
Syntax
query rings
Options
None.
Description
The rings parameter displays how many rings are active in the Editor.
Example
query rings
API Return Codes
None.
“goring Command” on page 89
“goview Command” on page 90
“ringnum Parameter” on page 316
Chapter 8. References
317
ringselector Parameter
Sets the display state of the ring selector.
Scope: Global
Syntax
query ringselector
set ringselector { on | off | inverse | default }
Options
on
off
inverse
default
The ring selector is displayed.
The ring selector is not displayed.
Toggles between on and off.
Ring selector display is controlled by the value of the default parameter.
Description
The ringselector parameter determines if the ring selector is displayed. The
ring selector lets you select a given view in a ring without having to cycle
through other views in that ring.
Examples
1. To display the ring selector, type:
set ringselector on
2. To control ring selector display with the value defined by the default
parameter, type:
set ringselector default
3. To display the value of the ringselector parameter, type:
query ringselector
If this query returns DEFAULT, type the following:
query default.ringselector
API Return Codes
-2 An invalid option was specified.
“default Parameter” on page 195
“goring Command” on page 89
318
LPEX Editor User’s Guide
ruler Parameter
Controls the display of a ruler at the top of the Editor.
Scope: View
Syntax
query ruler
set ruler { on | off | inverse | default }
Options
on
off
Displays the ruler at the top of the current Editor.
Removes the ruler from the top of the Editor, if any. This is the initial
display mode.
Toggles between on and off.
Ruler display is controlled by the value of the default parameter.
inverse
default
Description
The ruler parameter controls the display of a ruler in an edit view. The
content of the ruler is specified with the rulertext parameter. The scrolling and
highlighting of the cursor location are handled by the Editor. The ruler does
not wrap when wrap is set on.
If the value of the ruler parameter is default, ruler display is controlled by the
value of the default parameter.
Examples
1. To display a ruler at the top of the current Editor, type:
set ruler on
2. To control ruler display with the value defined by the default parameter,
type:
set ruler default
3. To display the value of the ruler parameter, type:
query ruler
If this query returns DEFAULT, type the following:
query default.ruler
API Return Codes
-2 The option you specified was not on, off, or inverse.
Chapter 8. References
319
“default Parameter” on page 195
“rulertext Parameter”
rulertext Parameter
Specifies the content of the ruler.
Scope: View
Syntax
query rulertext
set rulertext [Text]
Options
Text
The text for labelling the ruler control. The initial default value indicates
the following label:
––+––1––+––2––+––3––+––4––+––5––+––6...
Description
The rulertext parameter specifies the text to be used to label the ruler control.
If you issue the command query rulertext while it is set to the default text,
null will be returned. The actual display of the ruler is controlled by the ruler
parameter.
Example
To specify the ruler for the Extension specification in RPG, type:
set rulertext
....E....FromfileTofile++Name++N/rN/tbLenFDSArrnamLenFDSComments+++++++++**
API Return Codes
None.
“ruler Parameter” on page 319
screen Parameter
Gives the number of rows and columns and picture elements (pels) in the
screen.
320
LPEX Editor User’s Guide
Scope: Global
Syntax
query screen
Description
The screen parameter returns the number of rows and columns and picture
elements (pels) in the screen. It also returns the character size in pels.
Example
To obtain the number of rows and columns and pels in the screen, type:
query screen
API Return Codes
None.
“cursorcol Parameter” on page 192
“cursorpos Parameter” on page 193
“cursorrow Parameter” on page 194
“dispwidth Parameter” on page 200
“dispdepth Parameter” on page 199
seconds Parameter
Gives the number of elapsed seconds since the start of the Editor session.
Scope: Global
Syntax
query seconds
Description
The length of time that has elapsed since the start of the Editor session. The
unit is in seconds.
Example
To give the number of elapsed seconds since the start of the Editor, type:
query seconds
Chapter 8. References
321
API Return Codes
None.
“autotime Parameter” on page 172
show Parameter
Changes a line to a show line.
Scope: Line
Syntax
query show
set show { on | off | inverse }
Options
on
off
inverse
Indicate show lines.
Do not indicate show lines. This is the default value.
Toggle between on and off.
Description
The show on parameter changes a line to a show line (one that is displayed
only to improve the presentation of the file while editing). Show lines are
automatically excluded when files are saved to a file.
To exclude show lines from the display use the set shows off command.
Setting the show parameter to on or off increments the change count which
can be undone with the undo command.
Example
To set the show status of a line to on, type:
set show on
API Return Codes
-5 You cannot make changes to the file because the readonly parameter is set to on.
-2 The option you specified was not on, off, or inverse.
322
LPEX Editor User’s Guide
“shows Parameter” on page 324
showcurrent Parameter
Forces a temporary display of the current line.
Scope: View
Syntax
query showcurrent
set showcurrent { on | off | inverse }
Options
on
off
inverse
Display excluded line temporarily to allow the current position to be set
on it.
Only visible lines are made current. Excluded lines are not displayed.
Toggle between on and off.
Description
The showcurrent on parameter allows the current line to remain visible even
if it subsequently becomes an excluded line. Once the cursor is moved, the
line, if in an excluded class, is no longer visible and cannot be re-selected.
The showcurrent off parameter moves the cursor from the line, if it is an
excluded line, and places the cursor on the next visible line.
Example
All classes of this fragment from a C file are displayed:
/* This is a comment */
void f1 ( char, char, int *, int, int );
char f2 ( int );
#include <stdio.h>
main(int argc, char **argv, char **envp)
{
char b;
int a, c;
f1( b, b, &c, a, a );
strcpy ( b, f2(a) );
}
void f1 ( char b, char c, int* a, int y, int z )
{
int i;
i = *a;
Chapter 8. References
323
}
char f2 ( int b )
{
return ('b');
}
The cursor is on the line int i;. If showcurrent is on, and then you selected
Functions from the View menu (to exclude all but functions), the following is
displayed:
main(int argc, char **argv, char **envp)
void f1 ( char b, char c, int* a, int y, int z )
int i;
char f2 ( int b )
The current position remains displayed, even though it is now an excluded
line, until you move the cursor. If showcurrent is off and you select Functions
from the View pull-down menu, then only the functions are displayed but the
current position moves to the next visible line.
API Return Codes
-2 The option you specified was not on, off, or inverse.
“exclude Parameter” on page 210
“include Parameter” on page 244
shows Parameter
Displays show lines.
Scope: View
Syntax
query shows
set shows { on | off | inverse }
Options
on
off
inverse
Description
324
LPEX Editor User’s Guide
Display all show lines. This is the default value.
Do not display show lines.
Toggle between on and off.
The shows parameter controls whether the show elements are displayed in
the Editor window. Show elements can be set using the show parameter, but
are visible only when the shows parameter is set to on.
Example
To display all show lines, type:
set shows on
API Return Code
-2 The option you specified was not on, off, or inverse.
“show Parameter” on page 322
sidescroll Parameter
Offsets leftmost visible column.
Scope: View
Syntax
query sidescroll
set sidescroll ColumnNumber
Option
ColumnNumber
The offset in columns. The default is zero.
Description
The sidescroll parameter gives the number of columns that the Editor scrolls
horizontally to keep the current position visible.
Because sidescroll does not change the current position, and the Editor
ensures that the current position is always visible, there may be some
adjustment in the amount of scrolling that actually takes place.
Example
To offset the sidescroll by five columns, type:
set sidescroll 5
Chapter 8. References
325
API Return Codes
-2 The number specified was either outside the valid range or not a whole number.
Issue the command again using a valid number.
“scroll Command” on page 128
space Parameter
Sets character used to highlight formatting spaces.
Scope: View
Syntax
query space
set space [Character]
Option
Character
Any character, specified in the forms below:
nnn
A decimal-based ASCII character code, where n is a digit of
value 0 to 9, inclusive. For example, character code 065 = A.
xnn or xnnn
A hexadecimal-based ASCII character code, where nis a digit of
value 0 to 9, inclusive, or an alphabetic character of value A to
F or a to f, inclusive. For example, character code x41 = A.
any key Any keyboard character.
The default character is a blank.
Description
The space parameter defines the character that occupies the areas in the
window into which nothing has been typed.
Example
To fill blank areas with dashes, type:
set space -
API Return Codes
-2 The option specified with the parameter was not valid.
326
LPEX Editor User’s Guide
“background Parameter” on page 173
“fill Parameter” on page 214
spill Parameter
Sets the formatting width for elements to spill over to a new line.
Scope: View
Syntax
query spill
set spill Width
Option
Width
The width in characters at which a new line begins for an element that
spills over. Valid values are integers between 20 and 2500 inclusive. The
default value is 72.
Description
The spill parameter sets the width at which spillover elements are formatted.
If an element, whose format includes the spill option, is longer than the spill
width, the line ends at a blank and a new line is started. If spill is larger than
formwidth, it has no effect. The wrap parameter must be set to on for spill to
take effect.
Examples
Suppose you have a text file that contains some elements you want to spill at
a length less than formwidth (set at 72 characters). For each of these elements,
use the format parameter to assign the format spill option. Then, to set the
width of these elements to 60 characters, type:
set formwidth 72
set spill 60
API Return Code
-12 This command requires an open document. First open a document, then issue
the command.
-2 The number specified was either outside the valid range, not a positive integer,
or not a whole number. Issue the command again using a valid number.
Chapter 8. References
327
“format Parameter” on page 228
“formwidth Parameter” on page 233
split Parameter
Sets the default border orientation between multiple editing views in the
Editor window.
Scope: Global
Syntax
query split
set split { horizontal | vertical | default }
Options
horizontal
vertical
default
The borders between multiple editing views run horizontally.
The borders between multiple editing views run vertically.
Split window border orientation is controlled by the value of the default
parameter.
Description
The Editor window lets you have multiple windows. The split parameter
does not actually split the window into multiple views. Instead, it determines
the default orientation of borders between editing views.
If the value of the ruler parameter is default, split view border orientation is
controlled by the value of the default parameter.
Examples
1. To set the default border orientation between multiple editing views to
vertical, type:
set split vertical
2. To control split window border orientation with the value defined by the
default parameter, type:
set split default
3. To display the value of the split parameter, type:
query split
If this query returns DEFAULT, type the following:
query default.split
328
LPEX Editor User’s Guide
API Return Codes
-2 An invalid option was specified.
“default Parameter” on page 195
“godoc Command” on page 86
“goring Command” on page 89
“goview Command” on page 90
“lx Command” on page 96
statusline Parameter
Controls the display of the statusline.
Scope: File
Syntax
query statusline
set statusline { on | off | inverse default }
Option
on
off
inverse
default
Display the status in an area at the top of the window. If the statusline
parameter is not set on, the space is not reserved for the window.
Do not display the statusline anywhere.
Toggle between on and off.
Status line display is controlled by the value of the default parameter.
Description
The statusline parameter controls the display of the file or view status. The
status shows the insert/replace mode and the cursor position within the file,
the number of changes since the last update, and whether or not browse
mode is on.
If the value of the statusline parameter is default, status line display is
controlled by the value of the default parameter.
Note: The width for the statusline parameter is fixed, so you cannot use the
scroll bar to display any text which is not in view. You must open the Macro
Log to view the text.
Examples
1. To display the file status, type:
Chapter 8. References
329
set statusline on
2. To control status line display with the value defined by the default
parameter, type:
set statusline default
3. To query the value of the statusline parameter, type:
query statusline
If this query returns DEFAULT, type the following:
query default.statusline
API Return Codes
-2 The option is not valid.
“default Parameter” on page 195
submenuinit Parameter
Specifies a command that is run when the specified menu-bar item or
sub-item is selected.
Scope: Document
Syntax
set submenuinit.Menu_id [drop] Command
query submenuinit.Menu_id
Options
Menu_id
Command
drop
The id of an existing menu-bar item or sub-item. For predefined Editor
window items, this is the predefined Editor window name as described
in “menuactive Parameter” on page 269. For user-defined items, this id
can be obtained by querying the actionbarid parameter.
A command that is run when the specified menu-bar item or sub-item is
selected.
Remove the specified command from the callback list of the specified
menu-bar item or sub-item.
Description
You can use the submenuinit parameter to specify a callback routine or
command, to be run between the time you request a menu-bar item or
sub-item, and the time it appears. The callback routine can use any of the
Editor window commands, including the set and query commands, to work
330
LPEX Editor User’s Guide
with items of interest. A typical callback routine might modify the contents of
a sub-menu, depending on the state of the document being edited when the
sub-menu is requested.
A menu item or sub-item can have multiple callback routines, which are
called in LIFO order. If one of the callback routines returns a non-zero value,
no further callbacks will be called.
A callback routine can be removed from the callback list by using the drop
argument with the submenuinit parameter. If a callback routine is not
explicitly dropped, it remains active until the document is closed.
Examples
1. To display the message Options menu item selected! each time you select an
item from the Options pull-down menu, type:
set submenuinit.LP_OPTIONS msg Options menu item selected!
2. To stop displaying the message Options menu item selected! each time you
select an item from the Optionspull-down menu, type:
set submenuinit.LP_OPTIONS drop msg Options menu item selected!
3. To see all callback routines in the callback list for the Options menu-bar
item, type:
query submenuinit.LP_OPTIONS
4. The more complex example shown below looks for blank lines at the
beginning of a document, and if present, displays a menu choice on the
My_tools pull-down menu that will remove those blank lines.
The example assumes that the My tools menu-bar item has been created
with the following command:
set actionbar.My_tools.Query_version query version
and that the id attached to this menu item, as returned by querying the
actionbarid parameter, is 6008.
The primary callback routine used to create the menu choice in the My
tools pull-down menu is shown below:
/* Macro file 'del_emp.lx'
*/
/* Enable pull-down menu item if empty lines found at the top of a file */
'mark set predel'
/* Save cursor position for later use */
'top'
/* Move cursor to first line in file
*/
'extract content'
/* Get contents of first line
*/
/*
A pair of Editor commands is run if the pull-down menu item is
*/
/*
selected - 1. run the macro called delemp.lx
*/
/*
- 2. remove menu item from the pull-down menu when done
*/
/*
These commands are assigned to a variable for easier reading in
*/
/*
the next section where a pull-down menu item is actually created. */
run_cmd = 'mult ;macro delemp ;set actionbar.My_tools.Delete_leading_empty'
/* Check line and add pull-down menu item if first line is empty
*/
Chapter 8. References
331
if (content = '') then do
/* line is empty */
/* Create pull-down menu item that runs commands to delete empty
/* leading lines, then remove itself from the pull-down menu.
'set popupmenu.Delete_leading_empty 'run_cmd
end
'mark find predel' /* Restore original cursor position if still exists
'mark clear predel' /* Clear mark saving the original cursor position
exit 0
This callback routine calls another macro called delemp.lxthat actually
removes the leading empty lines from the file.
/* Macro file 'delemp.lx'
/* Find and remove leading empty lines
'mark set predel'
/* Save the cursor position for later use
'top'
/* move cursor to first line in file
'extract content'
/* get contents of first line
do while (content='')
/* loop while empty lines found
'block mark element'
/* highlight empty lines
'next element'
/* move cursor to next line
'extract content'
/* get contents of next line
end
'block delete'
/* delete marked block
'mark find predel' /* Restore cursor position if still existing
'mark clear predel' /* Clear mark saving the cursor position
exit 0
*/
*/
*/
*/
*/
*/
*/
*/
*/
*/
*/
*/
a. To run the callback routine called del_emp.lx each time you select the
My tools pull-down menu, type:
set submenuinit.6008 del_emp.lx
b. To remove the callback routine called del_emp.lxfrom the My tools
pull-down menu, type:
set submenuinit.6008 drop del_emp.lx
API Return Code
None.
“menuactive Parameter” on page 269
“menucheck Parameter” on page 272
symbol Parameter
Assign a special character to a symbol.
Scope: File
Syntax
332
LPEX Editor User’s Guide
*/
*/
*/
*/
set symbol.SymbolString [Character] [FontName]
Options
SymbolString The string that you type; it can be up to 25 characters.
Character
The special character to be produced, entered in any of the forms below:
nnn
A decimal-based ASCII character code, where n is a digit of
value 0 to 9, inclusive. For example, character code 065 = A.
xnn or xnnn
A hexadecimal-based ASCII character code, where nis a digit of
value 0 to 9, inclusive, or an alphabetic character of value A to
F or a to f, inclusive. For example, character code x41 = A.
any key Any keyboard character.
FontName
The font specified for the special character.
Description
The symbol parameter assigns a special character to a symbol. When
SymbolString is typed in the file, it is replaced by the Character assigned to it
(providing a live parser is processing symbols). If FontName is not specified,
the default font for the line is used.
Example
To specify that typing !beta in the file enters the lowercase Greek beta
character (B), in font !, type:
set symbol.!beta xe1 !
or
set symbol.!beta 225 !
!beta is the symbol and xe1 or 225 represents the special character (B).
API Return Codes
-2 FontName must be a single character. Check the syntax requirements for the
parameter and issue to parameter again.
-2 The special character specified in the set symbol command was not in the range
1 to 255. Enter a valid value and re-issue the command.
“autosymbols parameter” on page 171
“substitute Command” on page 137
“symbollist Parameter” on page 334
Chapter 8. References
333
symbollist Parameter
Returns list of current symbols.
Scope: File
Syntax
query symbollist
Description
The symbollist parameter gives an unordered list of all the symbols set for
the current file.
Example
To list all the symbols set for the current file, type:
query symbollist
API Return Codes
None.
“symbol Parameter” on page 332
synonym Parameter
Sets up a synonym.
Scope: File
Syntax
query synonym.Name
set synonym.Name [Length] Value
Options
Name
Length
Value
Description
334
LPEX Editor User’s Guide
The synonym you are creating. Must be composed either of just
alphanumerics or just special characters.
Can be up to 25 characters long.
The command to be issued when Name is typed.
The synonym parameter sets up a synonym for a command. When used at
the start of an interactive command, the synonym is replaced by the Value of
the synonym before the command is processed by lxi. The mult command can
be used to set a single synonym for a string of commands.
If Length is used, the name can be abbreviated to the given length and still be
recognized. A synonym name can be no more than 25 characters. There is no
restriction on its value.
When a command is processed for synonyms by lxi, the first character
determines the kind of synonym. There are two types:
v Alphanumeric synonyms consist of alphabetics and digits. Characters up to
the first nonalphanumeric character are compared with the synonym table.
v Special synonyms consist of characters that are neither alphabetic nor digits.
Characters up to the first alphanumeric character are used.
Users should note that an Editor command issued from a REXX macro will
not have synonym resolution applied unless the command is prefixed with lxc
or lxi.
Examples
1. To issue the command block mark if any of blockmark, blockmar,
blockma, or blockm are used, type:
set synonym.blockmark 6
block mark
2. To issue the command find up any if either - or -/ is used, type:
set synonym.-/ 1 find up any
API Return Codes
-2 The Length parameter must be a positive number greater than 1 and less than 25.
Issue the set synonym command again with a valid Length.
“mult Command” on page 109
“synonymlist Parameter”
“lxc Command” on page 98
“lxi Command” on page 99
synonymlist Parameter
Lists current synonyms.
Scope: File
Chapter 8. References
335
Syntax
query synonymlist
Description
The synonymlist parameter lists synonyms set for the current file.
Example
To list all synonyms for the current file, type:
query synonymlist
API Return Codes
None.
“synonym Parameter” on page 334
tabcursorpos Parameter
Moves the cursor to the specified column within the line, allowing for tab
characters expanded to spaces.
Scope: View
Syntax
query tabcursorpos
set tabcursorpos ColumnNumber
Option
ColumnNumber
The column where the cursor is to be positioned.
Description
The tabcursorpos parameter moves the cursor to the specified column within
the line, regardless of the window size. The columns that form the prefix area
are assigned negative numbers. If the new position is beyond what is
currently displayed, the window will scroll right or left to display it.
Note: If the expandtabs parameter is set to on, each space used to expand the
tab character in the Editor window is counted as a column.
Example
336
LPEX Editor User’s Guide
To set the cursor to column 34, type:
set tabcursorpos 34
If column number 34 is not currently displayed, the window is scrolled to
display the new cursor position.
API Return Codes
-2 The number specified was either outside the valid range or not an integer. Issue
the command again using a valid number.
“cursorcol Parameter” on page 192
“cursorpos Parameter” on page 193
“cursorrow Parameter” on page 194
“expandtabs Parameter” on page 211
tabs Parameter
Sets tab positions.
Scope: File
Syntax
query tabs
set tabs [Position] [Position] [...] [every Interval]
Options
Position
every Interval
Explicit positions for up to a maximum of 50 tab settings. These
positions must be sequential.
Sets tabs at fixed intervals. The default is 8.
Description
The tabs parameter sets tab postions for the file. When the Tab key is pressed,
the cursor moves to the next tab position. When the Backtab key is pressed,
the cursor moves to the previous tab position.
You can set tabs at a number of explicit positions and at fixed intervals.
Examples
1. To set tabs at positions 8, 12, 16, 26, 36 . . . type:
set tabs 8 12 16 every 10
2. To set tabs at positions 10, 20, 30, 40, 50 . . . type:
Chapter 8. References
337
set tabs every 10
API Return Codes
-2 You have specified more than 50 Positions for the set tabs command. Issue the
command again with fewer Positions.
-2 The Interval set for the every option is not a whole, positive number. Issue the set
tabs command again with a valid Interval.
-2 The Positions set are not sequential. Issue the set tabs command with the Positions
listed in ascending order.
-2 One or more of the specified Positions is too large.
“check Command” on page 70
“detab Command” on page 74
“entab Command” on page 78
textlimit Parameter
Sets the byte limit on the size of lines.
Scope: File
Syntax
query textlimit
set textlimit Number
Option
Number
The maximum size in bytes of any line. The initial value is 2499.
Description
The textlimit parameter limits the number of bytes of text that can be typed
on an edit line. Note that the text length limit value does not include the
prefix data and the CRLF characters.
If the text length limit is exceeded during an import operation, the text may
be truncated or the operation cancelled, as specified by the limiterror
parameter.
Example
To set the text length limit to 80, type:
set textlimit 80
338
LPEX Editor User’s Guide
API Return Codes
-2 The number specified was either outside the valid range or not a whole number.
Issue the command again using a valid number.
2 The new text limit has been set, but one or more lines in the current file exceed
the size specified.
“limiterror Parameter” on page 255
timeout Parameter
Number of minutes before the Editor window closes down after the last
Editor window is closed.
Scope: Global
Syntax
query timeout
set timeout [Minutes]
Option
Minutes
The number of minutes the Editor window will wait before closing, after
the last view was closed. Any integer between -1 and 32767 is
considered valid. (32767 minutes is a bit more than 22 days.)
Description
An Editor window session does not necessarily end after the last Editor
window is closed. The timeout parameter allows the user the option of
having the Editor shut down automatically, some period of time after the last
window is closed. The default is 5 minutes. If set to -1, the Editor window
will never timeout. If set to 0, the Editor will shut down immediately after the
last window is closed.
Example
To have the Editor close automatically after the last window is closed, type:
set timeout 0
API Return Code
-2 Number is out of range.
Chapter 8. References
339
toolbar Parameter
Sets the contents of the tool-bar menu.
Scope: File
Syntax
query toolbar.Name
set toolbar.Name[BITMAP resddl_id] [ HELP HelpText] [OrdinalNumber] [Command]
Options
Name
BITMAP
HELP
OrdinalNumber
Command
Name for the item to be included on the new tool-bar menu. This
name is also used as the text label on the new tool-bar menu item.
To include a blank in the name, use the underscore character (_).
Specifies that the new tool-bar item is a bitmap. If used, you must
also specify:
resdll
The resource dll containing the new item’s bitmap.
id
The id for the bitmap contained in the resdll resource dll.
Optional hover-help text specified by HelpText, enclosed in quotes.
When you pause the mouse cursor over your tool-bar item, this text
will appear in a bubble near the mouse cursor.
The position at which the tool-bar item is inserted, starting at zero.
If the number is greater than the first available position, or if no
number is specified, the first available position is used.
The action or actions to perform when the tool-bar item is selected.
Description
The toolbar parameter sets the tool-bar menu by adding or removing
user-defined items from the tool-bar. It can also remove default Editor
window tool-bar items.
If only the name of an existing tool-bar item is given when setting the toolbar
parameter, that item is deleted from the tool-bar menu.
When specifying the name of user-defined tool-bar items, Name is
case-sensitive. You must enter the tool-bar item text name exactly as it
appears. Where a space appears, substitute the underscore character ( _ ).
Default Editor window tool-bar items must be referred to by their reserved
names, as listed below:
Tool-bar Item
New
340
LPEX Editor User’s Guide
Reserved Name for Item
LP_NEW
Open
Save
Print...
Undo
Redo
Cut
Copy
Paste
Select all
Deselect all
Find
Compare
Start recording
Stop recording
Playback recording
Fonts
Colors
Ring manager
Next in ring
Previous in ring
Next ring
Previous ring
Help index
General help
Using help
LP_OPENEDIT
LP_SAVE
LP_PRINT
LP_UNDO
LP_REDO
LP_CLIPCUT
LP_CLIPCOPY
LP_CLIPPASTE
LP_SELALL
LP_DESELALL
LP_FINDCHANGE
LP_COMPARE
LP_RECSTART
LP_RECHALT
LP_RECPLAY
LP_FONTS
LP_TOKENS
LP_RINGCONFIGURE
LP_NEXTINRING
LP_PREVINRING
LP_NEXTRING
LP_PREVRING
LP_HELPINDEX
LP_GENERALHELP
LP_USINGHELP
Examples
1. To remove the New tool-bar button from the tool-bar, type:
set toolbar.LP_NEW
2. To create a new text item on the tool-bar called Open, that when selected
displays the open dialog, type:
set toolbar.Open dialog open
3. To create this same item with help, and appearing after the second item
already on the tool-bar, type:
set toolbar.Open HELP 'display the open dialog' 2 dialog open
4. You can use a bitmap icon in place of a text label for your tool-bar item.
Bitmaps must be defined in a DLL file located in a directory path included
in your PATH environment variable. The following example uses the
bitmap with resource id 2, found in the evfwrc21.dll file included with the
Editor.
To create an iconic tool-bar item with the same function as Example 1,
type:
set toolbar.Open BITMAP evfwrc21_2 dialog open
Chapter 8. References
341
API Return Code
-1 The option specified for the bitmap was not valid.
“toolbarlist Parameter”
“toolshow Parameter”
toolbarlist Parameter
Lists items in the toolbar menu.
Scope: File
Syntax
query toolbarlist
Description
The toolbarlist parameter lists the names of all items in the toolbar menu the
current file.
Example
To list all the items in the toolbar for the current file, type:
query toolbarlist
API Return Code
-1 You cannot issue the set command for this parameter.
“toolbar Parameter” on page 340
toolshow Parameter
Sets the display mode of the tool-bar.
Scope: Global
Syntax
query toolshow
set toolshow { on | off | inverse | default }
342
LPEX Editor User’s Guide
Options
on
off
inverse
default
Display the tool-bar.
Do not display the tool-bar.
Toggles between on and off.
Display the tool-bar according to the value of the default parameter.
Description
The value of the toolshow parameter determines if the tool-bar is displayed.
If the value of the toolshow parameter is default, tool-bar display is
controlled by the value of the default parameter.
Examples
1. To display the tool-bar, type:
set toolshow on
2. To control tool-bar display with the value defined by the default
parameter, type:
set toolshow default
3. To display the value of the toolshow parameter, type:
query toolshow
If this query returns DEFAULT, type the following:
query default.toolshow
API Return Codes
-2 Invalid option specified for the parameter.
“default Parameter” on page 195
“toolbar Parameter” on page 340
“toolview Parameter”
toolview Parameter
Sets the display mode of the tool-bar.
Scope: View
Syntax
query toolview
set toolview { both | graphic | text | default }
Chapter 8. References
343
Options
both
bitmap
text
default
Display
Display
Display
Display
tool-bar
tool-bar
tool-bar
tool-bar
items
items
items
items
as buttons containing both text and graphics.
as buttons containing only graphics.
as buttons containing only text.
according to the value of the default parameter.
Description
The toolview parameter determines how tool-bar buttons are displayed in the
Editor window.
If the value of the toolview parameter is default, tool-bar button text and
graphics display is controlled by the value of the default parameter.
Examples
1. To display both text and graphics in the tool-bar buttons, type:
set toolview both
2. To control tool-bar display with the value defined by the default
parameter, type:
set toolview default
3. To display the value of the toolview parameter, type:
query toolview
If this query returns DEFAULT, type the following:
query default.toolview
API Return Codes
-2 Invalid option specified for the parameter.
“default Parameter” on page 195
“toolbar Parameter” on page 340
“toolshow Parameter” on page 342
trigpos Parameter
Specifies the current position after the live parsing of pending lines has been
processed.
Scope: View
Syntax
344
LPEX Editor User’s Guide
query trigpos
set trigpos Number
Option
Number
The new current position.
Description
The trigpos parameter sets the current position to be the specified character
position in the current line after trigger processing is complete. If trigpos is
not set, the current position is saved before trigger processing and restored
afterward.
The query trigpos command returns a number that indicates the saved
current position.
v If the position is unknown, a zero is returned.
v If the position is in the current line, a positive number is returned.
v If the position is known but is not on the current line, a negative number is
returned.
Example
To set the next current position to the seventh character of the line after the
trigger processing is complete type:
set trigpos 7
API Return Codes
-2 The option specified with the parameter was not valid.
“trigger Command” on page 139
unprotect Parameter
Sets classes to be unprotected on the display.
Scope: File
Syntax
query unprotect
set unprotect ClassList
Chapter 8. References
345
Option
ClassList
The list of classes to unprotect from modifications.
Description
The unprotect parameter releases lines specified in the class list from
protection against modifications. This parameter is normally used to negate
the effect of the protect parameter.
Example
To unprotect comments, type:
set unprotect comment
API Return Codes
-2 The option is not valid.
“protect Parameter” on page 304
version Parameter
Identifies the Editor version.
Scope: Global
Syntax
query version
Description
The version parameter displays the version of the Editor being used. This is
in the form Editor VxRyMz, where V is version, R is release and M
modification level.
Example
To display the Editor version information, type:
query version
API Return Codes
346
LPEX Editor User’s Guide
None.
“environment Parameter” on page 210
view Parameter
Displays the name of a specific view.
Scope: View
Syntax
query view.ViewNumber
Option
ViewNumber
The number of the view, as returned from the viewnum or viewlist
parameters. It must be a positive integer.
Description
The view parameter displays the name of the specified view. ViewNumber
contains the value that is returned from the viewnum or viewlist parameters.
Example
To display the name of view 7, type:
query view.7
API Return Codes
None.
“goview Command” on page 90
“viewlist Parameter”
“viewnum Parameter” on page 349
viewlist Parameter
Lists all current view numbers.
Scope: File
Syntax
Chapter 8. References
347
query viewlist
Description
The viewlist parameter lists numbers of all views currently open. The
numbers are separated by blanks.
Note: This parameter cannot be used in an API call.
Example
To display a list of view numbers, type:
query viewlist
API Return Codes
None.
“view Parameter” on page 347
“viewnum Parameter” on page 349
viewname Parameter
Sets the name of the current view.
Scope: View
Syntax
query viewname
set viewname Name
Option
Name
The name to be given to the specific view.
Description
The viewname parameter sets a name for each view when it is created. The
initial view is called <null>. If no name is specified, viewname is set to the
view number. To move to a view with a particular name, use the goview
command.
Example
348
LPEX Editor User’s Guide
To give the current view the name newview, type:
set viewname newview
API Return Codes
-3 The name for the view was too long.
“viewlist Parameter” on page 347
“viewnum Parameter”
“view Parameter” on page 347
“goview Command” on page 90
viewnum Parameter
Displays the number identifying the view.
Scope: View
Syntax
query viewnum
Description
The viewnum parameter displays the number of the current view. The first
view has a viewnum of 1, and each successive view that is created has a
viewnum one larger than the one before it.
Example
To get the view number of the current view, type:
query viewnum
API Return Codes
None.
“view Parameter” on page 347
“viewlist Parameter” on page 347
“viewname Parameter” on page 348
Chapter 8. References
349
window Parameter
Sets the mode of the Editor window.
Scope: File
Syntax
query window
set window { hidden | min | max | visible | activated }
Options
hidden
min
max
visible
activated
The view (window) is hidden. It is restored to normal before hiding.
The view is minimized. If it is hidden, it is displayed before minimizing.
The view is maximized. If it is hidden, it is displayed before
maximizing.
The view is restored and displayed. The focus is not necessarily set on
the view.
The view is displayed and the focus is set to it.
Description
The view parameter controls whether the current file is visible, hidden,
minimized, maximized, or activated.
Example
To hide the current view (window), type:
set window hidden
API Return Codes
-2 The option is not valid.
“windowid Parameter”
windowid Parameter
Displays a unique number which identifies a file view or window or to the
operating system.
Scope: View
Syntax
350
LPEX Editor User’s Guide
query windowid
Description
The windowid parameter returns the unique number assigned by the
operating system as the handle of the window. This number can be used to
send or post messages to that window. This is necessary for operation in a
modeless dialog.
Example
To return the window handle, type:
query windowid
API Return Codes
None.
“window Parameter” on page 350
windowpos Parameter
Positions and resizes a file view in the Editor window.
Scope: View
Syntax
query windowpos
set windowpos X Y [CX CY]
Options
XY
CX CY
Coordinates determining the position of the lower left corner.
Coordinates determining the size of the file view.
Description
The windowpos parameter positions and resizes the file view. The parameters
are given in pels. X and Y set the position of the lower left corner, while CX
and CY set the width and depth. If X & Y are set to -1 the view can be resized
without changing its location. If CX and CY are omitted or set to zero, the
view is not resized. Setting both CX and CY to -1 iconifies the view (X and Y
are ignored).
Chapter 8. References
351
There are a multitude of factors that govern exactly where on the screen a file
view may be placed. When you ask the Editor to place the view at a certain
location, it will do it’s best to satisfy all the constraints and position the view
as close to the location you specified as possible. You might want to issue
query windowpos after each set windowpos to determine the exact location
of the view.
Some part of the file view must be visible on the desktop (whose size can be
obtained by query screen).
Example
1. To set the position for the file view, type:
set windowpos 23 34
The lower left corner of the view is placed at 23 pels across and 34 pels
from the top. Because CX and CY are omitted, the view cannot be resized.
2. To set the position and size of the of the file view, type:
set windowpos 4 512 1011 252
The lower left corner of the view is placed at 4 pels across and 512 pels
from the top. The frame of the view is 1011 pels wide and 252 pels deep.
API Return Codes
-2 The coordinates placed the entire view outside the desktop. Issue the command
again using position and size coordinates that place the view within the desktop.
“screen Parameter” on page 320
windowshow Parameter
Sets the prerequisites for displaying a Editor window.
Scope: Global
Syntax
query windowshow
set windowshow { create | load | parse | user }
Options
create
352
LPEX Editor User’s Guide
Display the view (window) as soon as it is created with the godoc or lx
commands.
load
When opening a new file with the lx command, the window is not
displayed until the file has been loaded.
When opening a new file with the lx command, the window is not
displayed until the load profile has been run.
The window is not automatically displayed. The set window visible
command must be invoked to display the window.
parse
user
Description
The windowshow parameter controls when a window is displayed. The effect
this parameter has is dependent on whether a window is created using the
godoc or lx commands. If windowshow is not set to create, then any window
created by the godoc command will not be automatically displayed. You will
need to issue the set window visible command to display the window.
The default setting for the windowshow parameter is parse.
Example
To display a window only after the load profile is run, type:
set windowshow parse
API Return Codes
-1 You must specify an option.
“godoc Command” on page 86
“lx Command” on page 96
wordchars Parameter
Defines the characters that are considered part of a word in the Editor
window.
Scope: File
Syntax
query wordchars
set wordchars Characters
Option
Characters
The characters to define as possible word characters.
Chapter 8. References
353
Description
The wordchars parameter determines valid word characters. The default word
characters are the national language alphabetic and numeric characters.
This parameter sets the valid word characters to the list provided.
The character list is restricted to the single-byte character set, because the
Editor concept of a word does not apply to the double-byte character set (for
example KANJI).
Example
To set the valid word characters to a, b, and c, type:
set wordchars abc
API Return Codes
None.
wrap Parameter
Wraps elements for the display.
Scope: Element
Syntax
query wrap
set wrap { on | off | inverse | default }
Options
on
off
inverse
default
Wraps the elements.
Does not wrap elements. This is the default value.
Toggles between on and off.
Display wrap is controlled by the value of the default parameter.
Description
The wrap on parameter ensures that elements wrap from one line to the next
if the formatted line is longer than the formwidth. The wrap parameter must
be set to on to spill elements at either the formwidth or spill lengths. If the
spill parameter is set to on, it wraps at the lower of the two lengths.
354
LPEX Editor User’s Guide
The wrap parameter setting can also be changed by the Wrap setting choice,
found in the View pull-down menu. Selecting the Wrap setting sets both the
formatter and wrap parameters to on, and the formwidth parameter to 0.
Deselecting this choice sets the formatter and wrap parameters to off. The
formwidth parameter is not changed, and retains its value of 0.
Conversely, setting both the formatter and wrap parameters to on, and the
formwidth parameter to 0, will select the Wrap setting choice in the
pull-down menu for the View menu bar choice.
If the value of the wrap parameter is default, display wrap is controlled by
the value of the default parameter.
Examples
1. To set the wrap parameter on, type:
set wrap on
2. To control display wrap with the value defined by the default parameter,
type:
set wrap default
3. To display the value of the wrap parameter, type:
query wrap
If this query returns DEFAULT, type the following:
query default.wrap
API Return Codes
-12 This command requires an open document. First open a document then issue the
command.
-2 The option you specified was not on, off, or inverse.
“default Parameter” on page 195
“formatter Parameter” on page 231
“formwidth Parameter” on page 233
“spill Parameter” on page 327
Primitive Functions Summary
The primitive functions shown below are used by the primitive command to
simulate key-press actions in macros and profiles.
Chapter 8. References
355
Primitive Name
Action
beginelement
Move the cursor to the beginning of the
current element.
Move the cursor to the beginning of the
current line.
Put the character x at the cursor position.
Move the cursor down one line.
Move the cursor left one column.
Move the cursor right one column.
Move the cursor up one line.
Delete the character at the cursor position.
Delete the word at the cursor position.
Move the cursor to the end of the current
element.
Move the cursor to the end of the current
line.
Insert character x at the cursor position.
Move the cursor to the position of last
change.
Move the cursor to the start of the next
line.
Move the cursor to the next tab position.
Take no action.
Move the cursor to the preceding tab
position.
Replace the character at the cursor
position with character x.
Move the cursor and all characters to the
right to the left one column, deleting the
character on the left.
Select/deselect the next line.
Select/deselect text to the mouse position.
Select/deselect text to the end of the line.
Select/deselect text to the end of the file.
Select/deselect text to the start of the file.
Select/deselect text to the start of the line.
Select/deselect text one character position
to the left.
Select/deselect text down one page.
Select/deselect text left one page.
Select/deselect text right one page.
Select/deselect text up one page.
Select/deselect text one character position
to the right.
Select/deselect text up one line.
beginline
char x
cursordown
cursorleft
cursorright
cursorup
deletechar
deleteword
endelement
endline
insertchar x
jump
newline
nexttab
null
previoustab
replacechar x
rubout
selectdown
selectdrag
selectend
selectfileend
selectfilehome
selecthome
selectleft
selectpagedown
selectpageleft
selectpageright
selectpageup
selectright
selectup
356
LPEX Editor User’s Guide
Primitive Name
selectword
Action
Select/deselect the word at the cursor
position.
selectworddown
Select/deselect text one line down and
move to a word boundary.
selectwordleft
Select/deselect one word to the left.
selectwordright
Select/deselect one word to the right.
selectwordup
Select/deselect text one line up and move
to a word boundary.
setcursor
Move the cursor to the mouse pointer
position.
setpointer
Move the mouse pointer to the cursor
position.
togglecommand
Display the Issue edit command dialog.
toggleinsert
Toggle between insert and replace modes.
toggleprefix
Toggle the cursor between the prefix area
and the data area.
topline
Set the current line to the top line in the
display.
truncate
Delete text to the end of the line.
wordleft
Move the cursor to the next word on the
left.
wordright
Move the cursor to the next word on the
right.
Note: For char, insertchar and replacechar, x can be either any single character, or a
character’s ASCII code (expressed as three decimal digits or two hexadecimal digits
preceded by x) if the resulting decimal value is greater than 0 and less than 256. You
can also specify a string enclosed in single or double quotation marks to allow several
characters to be inserted or replaced in one operation.
“primitive Command” on page 115
External Subroutines Summary
You can use the following library of external subroutines to access Editor
functions:
“lxcmd() Subroutine” on
page 358
“lxcall() Subroutine” on
page 359
“lxquery() Subroutine” on
page 360
Invokes an Editor command
Invokes an Editor command with a separate parameter
string
Gets information about Editor data items and settings
Chapter 8. References
357
Several special-purpose subroutines provide fast access to Editor functions.
These are especially useful when working with parsers.
“lxnext() Subroutine” on
page 361
“lxprev() Subroutine” on
page 362
“lxqtext() Subroutine” on
page 363
“lxstext() Subroutine” on
page 363
“lxqfont() Subroutine” on
page 364
“lxsfont() Subroutine” on
page 365
“lxqclass() Subroutine” on
page 366
“lxsclass() Subroutine” on
page 367
“lxalloc() Subroutine” on
page 368
“lxfree() Subroutine” on
page 369
Moves the current position to the next line
Move the current position to the previous line
Gets the content of the current line
Sets the content of the current line
Gets the fonts of the current line
Sets the fonts of the current line
Gets the class of the current line
Sets the class of the current line
Allocates storage
Frees storage allocated using the lxalloc()
“Chapter 7. External Editor Commands” on page 51
“Program Entry and Exit Conditions” on page 52
“Sample External Command: proto” on page 53
lxcmd() Subroutine
Issues an Editor command and any parameters from a C program.
Library:
lpexapi.h
Include File: lpexapi.h
C Syntax
int lxcmd(unsigned char *Command);
Parameter
Command
Description
358
LPEX Editor User’s Guide
A single string containing the command and any parameters to be
issued.
The lxcmd subroutine provides a way of issuing an Editor command from a C
program. It is passed one parameter, which is a string containing the
command (with any parameters) to be issued.
Examples
1. To issue the insert command, type:
lxcmd ('insert this is a new element');
2. To issue the find command, type:
lxcmd ('find up asis needle');
3. To issue the next command, type:
lxcmd ('next word');
Return Value
The return value is the return code from the Editor.
“Chapter 7. External Editor Commands” on page 51
“lxcall() Subroutine”
lxcall() Subroutine
Calls an Editor command with a separate parameter string.
Library:
lpexapi.h
Include File: lpexapi.h
C Syntax
int lxcall(unsigned char *Command, unsigned char * ParameterString);
Parameters
Command
ParameterString
The command name
The parameters for the command
Description
The lxcall subroutine provides a way of issuing an Editor command from a C
program. It passes two parameters: the first parameter is the command name,
and the second is the parameter string for the command.
Examples
1. To issue the insert command, type:
lxcall('insert', 'this is a new element');
Chapter 8. References
359
2. To issue the find command, type:
lxcall('find', 'up asis line');
3. To issue the next command, type:
lxcall('next', 'word');
Return Value
The return value is the return code from the Editor.
“Chapter 7. External Editor Commands” on page 51
“lxcmd() Subroutine” on page 358
lxquery() Subroutine
Queries an Editor parameter value.
Library:
lpexapi.h
Include File: lpexapi.h
C Syntax
int lxquery(unsigned char*Item, unsigned char *Buffer) ;
Parameters
Item
Buffer
The item to be queried.
Set this to a variable long enough to hold the return string. The
MAXQUERY constant in lpexapi.h is set to the longest possible return
string.
Description
The lxquery subroutine retrieves the response to the query command. The
result returned by lxquery is the same as the response to the query command.
For example:
lxquery('nosave', commandline)
returns the value of the commandline parameter.
There are three exceptions:
The lxquery subroutine does not indicate an empty string as <null>, a single
blank as <blank>, or multiple blanks as <blanks>. It returns the empty string,
blank, or blanks as appropriate.
360
LPEX Editor User’s Guide
Note: Unlike the query command, only a single item may be queried at a
time with this subroutine. It cannot be used with the list parameter.
Example
To find out how many changes there are in a file, type:
char *changes;
changes = malloc(MAXQUERY);
lxquery('CHANGES', changes);
To set the number of changes back to the original number, type:
lxcall('SET', changes);
Return Value
The return value is the return code from the Editor.
“Chapter 7. External Editor Commands” on page 51
“query Command” on page 119
lxnext() Subroutine
Issues the next command.
Library:
lpexapi.h
Include File: lpexapi.h
C Syntax
int lxnext();
Description
The lxnext subroutine provides a faster way of issuing the next command
from a C program. It has the same effect as calling:
lxcmd('next')
Example
To move to the next line, type:
int rc;
rc = lxnext();
Return Value
Chapter 8. References
361
lxnext gives a return code of 1 if it is already on the last line. It returns a code
of 0 if successful.
“Chapter 7. External Editor Commands” on page 51
“lxcmd() Subroutine” on page 358
“lxprev() Subroutine”
“next Command” on page 110
lxprev() Subroutine
Issues the prev command.
Library:
lpexapi.h
Include File: lpexapi.h
C Syntax
int lxprev();
Description
The lxprev subroutine provides a faster way of issuing the prev command
from a C program. It has the same effect as calling:
lxcmd('prev')
Example
To move to the previous line, type:
int rc;
rc = lxprev();
Return Value
lxprev gives a return code of 1 if it is already on the first line. It returns a
code of 0 if successful.
“Chapter 7. External Editor Commands” on page 51
“lxcmd() Subroutine” on page 358
“lxnext() Subroutine” on page 361
“next Command” on page 110
362
LPEX Editor User’s Guide
lxqtext() Subroutine
Issues the query content command.
Library:
lpexapi.h
Include File: lpexapi.h
C Syntax
int lxqtext(unsigned char *Buffer);
Parameter
Buffer
A variable long enough to hold the return value. The MAXQUERY
constant in lpexapi.h is set to the longest possible return string.
Description
The lxqtext subroutine provides a faster way of issuing the query content
command from a C program. It has the same effect as calling:
lxquery('content',buff1);
Buffer = buff1 + 8;
/* to skip over the word 'content ' */
Example
To find the content of the current line and put it into a variable called
element_content_buffer:
char *element_content_buffer;
element_content_buffer = malloc (MAXQUERY);
lxqtext (element_content_buffer);
Return Value
The return value is the return code from the Editor.
“Chapter 7. External Editor Commands” on page 51
“lxquery() Subroutine” on page 360
“lxstext() Subroutine”
“content Parameter” on page 191
lxstext() Subroutine
Issues the set content command.
Library:
lpexapi.h
Include File: lpexapi.h
Chapter 8. References
363
C Syntax
int lxstext(unsigned char *Buffer);
Parameter
Buffer
A variable long enough to hold the value.
Description
The lxstext subroutine provides a faster way of issuing the set content
command from a C language program. It has the same effect as calling:
sprintf(buffer1, 'set content %s',buffer);
lxcmd(buffer1);
Example
To set the content of the current line to deposit amount, type:
lxstext ('deposit amount')
Return Value
The return value is the return code from the Editor.
“Chapter 7. External Editor Commands” on page 51
“lxcmd() Subroutine” on page 358
“lxqtext() Subroutine” on page 363
“content Parameter” on page 191
lxqfont() Subroutine
Issues the query fonts command.
Library:
lpexapi.h
Include File: lpexapi.h
C Syntax
int lxqfont(unsigned char *Buffer);
Parameter
Buffer
Description
364
LPEX Editor User’s Guide
A variable long enough to hold the return value. The MAXQUERY
constant in lpexapi.h is set to the longest possible return string.
The lxqfont subroutine provides a faster way of issuing the query fonts
command from a C program. It has the same effect as calling:
lxquery('fonts',buff1);
buffer = buff1 + 6;
/* to skip over the word 'fonts ' */
Example
To find the font string set for the current line and put it into a variable called
font_string, type:
char *font_string;
font_string = malloc (MAXQUERY);
lxqfont(font_string);
Return Value
The return value is the return code from the Editor.
“Chapter 7. External Editor Commands” on page 51
“lxquery() Subroutine” on page 360
“lxsfont() Subroutine”
“fonts Parameter” on page 226
lxsfont() Subroutine
Issues the set fonts command.
Library:
lpexapi.h
Include File: lpexapi.h
C Syntax
int lxsfont(unsigned char *Buffer);
Parameter
Buffer
A variable long enough to hold the value.
Description
The lxsfont subroutine provides a faster way of issuing the set fonts
command from a C program. It has the same effect as calling:
sprintf(buff1, 'set fonts %s',buffer);
lxcmd(buff1);
Example
Chapter 8. References
365
To set the fonts of the current line, type:
lxsfont('ABBBBBA');
Return Value
The return value is the return code from the Editor.
“Chapter 7. External Editor Commands” on page 51
“lxcmd() Subroutine” on page 358
“lxqfont() Subroutine” on page 364
“fonts Parameter” on page 226
lxqclass() Subroutine
Issues the query class command.
Library:
lpexapi.h
Include File: lpexapi.h
C Syntax
int lxqclass(long * ClassList);
Parameter
ClassList
Pointer to a long integer in which the data will be returned.
For each class set for the current line, one bit in the ClassList will be
turned on. The order of the bits is the same as the order that the classes
were specified in the CLASSES command, starting with the
highest-order bit. (That is, the first class specified in the CLASSES
command is represented by the bit 0x80000000.)
Description
The lxqclass subroutine provides a fast way of finding out about line classes,
avoiding the need to do string operations that involve adding or deleting
words. See the classes parameter for more information.
Examples
Before the examples below will work you must enter the command:
set classes DATA COMMENT CODE.
1. If a file has three classes, defined as follows:
366
LPEX Editor User’s Guide
#define DATA
0x80000000
#define COMMENT 0x40000000
#define CODE
0x20000000
A line belonging to both the DATA and CODE classes would return the
value 0xA0000000.
2. To see if an line contains both DATA and CODE (using the same
definitions as in the previous example), type:
int classlist;
lxqclass(&classlist);
if ((classlist & DATA) && (classlist & CODE))
printf('Element belongs to both DATA and CODE classes \n');
Return Value
The return value is the return code from the Editor.
“Chapter 7. External Editor Commands” on page 51
“lxsclass() Subroutine”
“lxalloc() Subroutine” on page 368
lxsclass() Subroutine
Issues the set class command.
Library:
lpexapi.h
Include File: lpexapi.h
C Syntax
int lxsclass(long ClassList);
Parameter
ClassList
A long integer, the bits of which represent the classes that are to be set
for the current line.
Each bit represents a possible class. The order of the bits is the same as
the order that the classes were specified in the CLASSES command,
starting with the highest-order bit. (That is, the first class specified in
CLASSES command is represented by the bit 0x80000000.)
Description
The lxsclass subroutine provides a fast way of setting line classes, avoiding
the need to do string operations that involve adding or deleting words.
Chapter 8. References
367
Example
To set a line as belonging to both the DATA and CODE classes, type:
#define DATA
0x80000000
#define COMMENT 0x40000000
#define CODE
0x20000000
lxsclass(DATA|CODE);
Return Value
The return value is the return code from the Editor.
“Chapter 7. External Editor Commands” on page 51
“lxqclass() Subroutine” on page 366
“classes Parameter” on page 186
lxalloc() Subroutine
Gets storage.
Library:
lpexapi.h
Include File: lpexapi.h
C Syntax
char *lxalloc(int Size);
Parameter
Size
The amount of storage to be allocated in bytes.
Description
The lxalloc() subroutine is used to get storage.
Example
To allocate 1000 bytes of memory, type:
char *p;
p = lxalloc(1000);
Return Value
368
LPEX Editor User’s Guide
The return value is the return code from the Editor.
“Chapter 7. External Editor Commands” on page 51
“lxfree() Subroutine”
lxfree() Subroutine
Frees storage obtained by lxalloc().
Library:
lpexapi.h
Include File: lpexapi.h
C Syntax
void lxfree(unsigned char *Pointer);
Parameter
Pointer
A valid address for the memory block.
Description
The lxfree subroutine is used to free any storage allocated by lxalloc().
Example
To allocate 1000 bytes of memory and then free them, type:
char *p;
p=lxalloc(1000);
if(!p) {
printf('out of memory');
exit (2);
}..
.
.
lxfree(p)
Return Value
There is no return value.
“Chapter 7. External Editor Commands” on page 51
“lxalloc() Subroutine” on page 368
Chapter 8. References
369
Regular Expression Syntax and Usage
A regular expression consists of a combination of ordinary and special
characters, and bracket expressions. Together, these elements can be used to
specify a search expression with flexibility and power far greater than that
afforded by a simple text search.
Regular Expression Character Set
You can use any single-byte character in your regular expression, subject to
the rules listed below:
v An ordinary character is any single-byte character that is not a special
character. An ordinary character matches itself. A simple regular expression
could consist of a string of ordinary characters, which would be treated as a
literal-text search item.
v A special character is any of the following:
.
[
\
*
|
$
(
+
?
{
|
v A special character, preceded by a backslash (\), matches itself.
v A period (.) not preceded by a backslash (\) matches any single character.
v Characters are case-sensitive only if you select the Case-sensitive check box
in the Editor - Find and Replace window.
Bracket Expressions
A bracket expression can contain one or more expressions that match
characters, collating symbols, equivalence or character classes, or ranges of
characters. Bracket expressions are case-sensitive only if you select the
Case-sensitive check-box in the Editor - Find and Replace window.
The basic forms of a bracket expression are:
Expression
[string]
[|string]
[symbol1-symbol2]
Description
Matches any of the characters specified in string. For
example, [set] matches the next instance of characters s, e,
or t.
Does not match any of the characters specified in string.
Matches all collating elements that fall between the two
specified collating symbols, inclusive. The symbols must be
different, with symbol2 higher in the collating sequence than
symbol1. For example, [d-f] will match the next instance of
characters d, e, or f.
Note: If you want to match a hyphen (-), the hyphen must
appear as either the first or last character in the string.
370
LPEX Editor User’s Guide
Note: You can use a right bracket (]) as an ordinary character in a bracket
expression only if you specify it as the first character following the left bracket
([) or caret (|) symbols.
Regular Expression Syntax
You can combine characters, special characters, and bracket expressions to
form regular expressions that match multiple characters and character
patterns. Basic syntax elements for regular expressions are described below.
Expression Syntax
(expr)
expr*
Description
Matches expr. Place a simple expression in parentheses if you
want to apply a +, |, or * operator or { } pattern repetition
expression to it.
Matches zero or more occurrences of the pattern specified by
expr.
For example, in the phrase:
at the cabana
[abc]* matches any single character in your file, as well as all
complete sequences of letters including only the letters a, b, or
c, as in the character sequence caba.
expr{n}
Subsequent find operations start from the character immediately
following the first character of the found string. For example, in
the phrase above, after a find operation finds caba, subsequent
find operations would find aba, ba, and a,
Matches exactly n occurrence(s) of the pattern specified by expr.
For example, in the phrase:
at the cabana
[cab]{2} matches only the sequences ca, ab, and ba in the word
cabana.
expr{n,}
[cab]{3} would match the sequences cab and aba in the word
cabana.
Matches at least n occurrences of the pattern specified by expr.
For example, in the phrase:
at the cabana
[cab]{3,} matches only the sequences caba and aba in the word
cabana, but not ca, ab, or ba.
Chapter 8. References
371
expr{n1,n2}
Matches between n1 and n2 occurrence(s) of the pattern
specified by expr and occurrences between n1 and n2.
For example, in the phrase:
at the cabana
|expr
expr$
|expr$
expr?
expr+
expr1 | expr2
[cab]{2,3} matches only the sequences cab, aba, and ba in the
word cabana, but not c, a, b, or caba.
Matches the pattern specified by expr only if it occurs at the
very start of a line.
Matches the pattern specified by expr only if it occurs at the
very end of a line.
Matches the pattern specified by expr only if it comprises the
entire line.
Matches zero or more occurrences of the pattern specified by
expr.
Matches one or more occurrences of the pattern specified by
expr.
Matches the pattern specified by either expr1 or expr2. For
example, s|o matches both characters s and o.
Operator Orders of Precedence
Regular expression elements are processed in a specific order. The order of
precedence is described below. Element categories with higher precedence
appear closer to the top of the list. Within each category, higher precedence is
to the left.
Operators
\special
[
()
* + ? {n}
{n,} {n1,n2}
|$
|
Category or Description
Special characters preceded by a backslash
Bracket expressions
Grouping of expressions
Pattern repetition
Anchoring of pattern to start or end of line
Alternate match patterns
“Finding Text” on page 12
“Finding and Replacing Text” on page 13
Alternate Editor Personalities
ISPF Editor Personality
The following is a list of the ISPF prefix area commands that you can use in
the Editor window.
372
LPEX Editor User’s Guide
Select the ISPF editor personality by selecting Options->Key behavior in the
Editor window.
To process ISPF commands, type the commands you want to use over the
sequence numbers in the prefix area, hold down the Alt key, and then press
Enter.
A
B
C
CC
D
Dn
DD
F
Fn
I
In
L
Ln
LC
M
MM
O
OO
R
Rn
RR
RR n
S
UC
X
Xn
XX
>
>n
>>
>> n
<
<n
<<
Move or copy lines after this line.
Move or copy lines before this line.
Copy this line to the specified target.
Copy the block of lines between the two CC commands.
Delete this line.
Delete this and the following n-1 lines.
Delete all lines between the two DD commands.
Show the first line in an exclude block.
Show the first n lines in an exclude block.
Insert a blank line after the current line.
Insert n blank lines after the current line.
Show the last line in an exclude block.
Show the last n lines in an exclude block.
Convert the current line to lowercase.
Move a line to the specified target.
Move all lines between the two MM commands to a specified target.
Overlay this line with the lines defined by the move, copy, or copy retain
commands.
Overlay all the lines between the two OO commands with the lines defined
by the move, copy, or copy retain commands.
Duplicate the current line immediately before the next line.
Duplicate the current line n times immediately before the next line.
Duplicate the lines between the two RR commands.
Duplicate the lines between the two RR commands n times.
Show all of the significant lines in an exclude group.
Convert the current line to uppercase.
Exclude this line from the display.
Exclude this line and the next n-1 lines from the display.
Exclude all the lines between the two XX commands from the display.
Shift the data in this line one character position to the right.
Shift the data in this line n character positions to the right.
Shift the data between the two >> commands one character position to the
right.
Shift the data between the two >> commands n character positions to the
right.
Shift the data in this line one character position to the left.
Shift the data in this line n character positions to the left
Shift the data between the two << commands one character position to the
left.
Chapter 8. References
373
<< n
)
)n
))
)) n
(
(n
((
(( n
Shift the data between the two << commands n character positions to the
left.
Shift the data in this line one character position to the right. Any data that
appeared in the last column will be removed.
Shift the data in this line n character positions to the right. Any data in the
last n columns will be removed.
Shift the data between the two )) commands one character position to the
right. Any data that appeared in the last column will be removed.
Shift the data between the two )) commands ncharacter positions to the
right. Any data in the last n columns will be removed.
Shift the data in this line one character position to the left. Any data that
appeared in the first column will be removed.
Shift the data in this line n character positions to the left. Any data in the
first n columns will be removed. jack mac.
Shift the data between the two (( commands one character position to the
left. Any data in the first column will be removed.
Shift the data between the two (( commands ncharacter positions to the left.
Any data in the first n columns will be removed.
“Using Alternate Editor Personalities” on page 32
“SEU Editor Personality”
“XEDIT Editor Personality” on page 376
SEU Editor Personality
The following is a list of the SEU prefix area commands that you can use in
the Editor window.
Select the SEU editor personality by selecting Options->Key behavior in the
Editor window.
To process SEU commands, type the commands you want to use over the
sequence numbers in the prefix area, hold down the Alt key, and then press
Enter.
+
+n
-n
n
A
An
B
Bn
374
Roll the member forward one line.
Roll the member forward n lines.
Roll the member backward one line.
Roll the member backward n lines.
Type a sequence number to position the line identified by that value as the
first line on the display.
Move or copy lines after this line.
Move or copy lines after this line and repeat these lines n times.
Move or copy lines before this line.
Move or copy lines before this line and repeat these lines n times.
LPEX Editor User’s Guide
C
Cn
CC
CR
CR n
CCR
D
Dn
DD
F
F?
I
In
IP
IS
IS n
L
Ln
LL
LL n
LT
LT n
LLT
LLT n
M
Mn
MM
O
On
OO
P
Copy this line to the specified target.
Copy this and the following n-1 lines to the specified target.
Copy the block of lines between the two CC commands.
Copy this line to multiple specified targets.
Copy this and the following n-1 to multiple specified targets.
Copy the block of lines between the two CCR commands to multiple
specified targets.
Delete this line.
Delete this and the following n-1 lines.
Delete all lines between the two DD commands.
When editing RPG, display a format line.
When editing RPG, Show the Select Format display. From this display
choose the format to use.
Insert a blank line after the current line.
Insert n blank lines after the current line.
When editing RPG, Insert a blank line and display the line in a prompt.
Insert a line after this line and initialize it to the data saved as the skeleton
line.
Insert n lines after this line and initialize them to the data saved as the
skeleton line.
Shift the data in this line one character position to the left.
Shift the data in this line n character positions to the left. If there is any data
in the first n columns, the line will only shift up to the start of the data.
Shift the data between the two LL commands one character position to the
left. If there is any data in the first column, the lines will shift only up to the
start of the data.
Shift the data between the two LL commands n character positions to the
left. If there is any data in the first n columns, the lines will only shift to the
start of the data.
Shift the data in this line one character position to the left. Any data that
appeared in the first column will be removed.
Shift the data in this line n character positions to the left. Any data in the
first n columns will be removed.
Shift the data between the two LLT commands one character position to the
left. Any data in the first column will be removed.
Shift the data between the two LLT commands n character positions to the
left. Any data in the first n columns will be lost.
Move a line to the specified target.
Move this line and the following n-1 lines to a specified target.
Move all lines between the two MM commands to a specified target.
Overlay this line with the lines defined by the move, copy, or copy retain
commands.
Overlay this line and the following n-1 lines with the lines defined by the
move, copy, or copy retain commands.
Overlay all the lines between the two OO commands with the lines defined
by the move, copy, or copy retain commands.
Display this line in a prompt.
Chapter 8. References
375
R
Rn
RR
RR n
RT
RT n
RRT
RRT n
RP
RP n
RRP
RRP n
S
SF
SF n
SL
SL n
W
Wn
X
Xn
XX
Shift the data in this line one character position to the right. If there is any
data in the last column, the line will only shift up to the end of the data.
Shift the data in this line n character positions to the right. If there is any
data in the last n columns, the line will only shift up to the end of the data.
Shift the data between the two RR commands one character position to the
right.
Shift the data between the two RR commands n character positions to the
right. If there is any data in the last n columns, the lines will only shift to
the end of the data.
Shift the data in this line one character position to the right. Any data that
appeared in the last column will be removed.
Shift the data in this line n character positions to the right. Any data in the
last n columns will be lost.
Shift the data between the two RRT commands one character position to the
right.
Shift the data between the two RRT commands n character positions to the
right. Any data in the last n columns will be lost.
Repeat this line once before the next line.
Repeat this line n times before the next line.
Repeat all lines between the two RRP commands.
Repeat all lines between the two RRP commands n times.
Define this line as a skeleton line.
Show the first line of the exclude group.
Show the first n lines of the exclude group.
Show the last line of the exclude group.
Show the last n lines of the exclude group.
Display the member beginning in column 1.
Display the member beginning in column n.
Exclude this line from the display.
Exclude this line and the next n-1 lines from the display.
Exclude all the lines between the two XX commands from the display.
“Using Alternate Editor Personalities” on page 32
“ISPF Editor Personality” on page 372
“XEDIT Editor Personality”
XEDIT Editor Personality
The following is a list of the XEDIT prefix area commands that you can use in
theEditor window.
Select the XEDIT editor personality by selecting Options->Key behavior in
the Editor window.
376
LPEX Editor User’s Guide
To process XEDIT commands, type the commands you want to use over the
sequence numbers in the prefix area, hold down the Alt key, and then press
Enter.
A
An
C
CC
D
Dn
DD
F
I
In
M
MM
P
S
S*
Sn
S+ n
S- n
X
Xn
X*
XX
>
>n
>>
>> n
<
<n
<<
<< n
)
)n
))
)) n
Add a blank line after the current line.
Move or copy lines after this line and repeat these lines n times.
Copy this line to the specified target.
Copy the block of lines between the two CC commands.
Delete this line.
Delete this and the following n-1 lines.
Delete all lines between the two DD commands.
Copy or move one or more lines to after the current line.
Insert a blank line after the current line.
Insert n blank lines after the current line.
Move a line to the specified target.
Move all lines between the two MM commands to a specified target.
Copy or move one or more lines to before the current line.
Show all the hidden lines in an exclude group.
Show all the hidden lines in an exclude group.
Show the first n lines in an exclude group.
Show the first n lines in an exclude group.
Show the last n lines in an exclude group.
Exclude this line from the display.
Exclude this line and the next n-1 lines from the display.
Exclude the lines from the current line to the end of the file from the display.
Exclude all the lines between the two XX commands from the display.
Shift the data in this line one character position to the right.
Shift the data in this line n character positions to the right.
Shift the data between the two >> commands one character position to the
right.
Shift the data between the two >> commands n character positions to the
right.
Shift the data in this line one character position to the left.
Shift the data in this line n character positions to the left
Shift the data between the two << commands one character position to the
left.
Shift the data between the two << commands n character positions to the
left.
Shift the data in this line one character position to the right. Any data that
appeared in the last column will be removed.
Shift the data in this line n character positions to the right. Any data in the
last n columns will be removed.
Shift the data between the two )) commands one character position to the
right. Any data that appeared in the last column will be removed.
Shift the data between the two )) commands n character positions to the
right. Any data in the last n columns will be removed.
Chapter 8. References
377
(
(n
((
(( n
'
'n
''
/
Shift the data in this line one character position to the left. Any data that
appeared in the first column will be removed.
Shift the data in this line n character positions to the left. Any data in the
first n columns will be removed.
Shift the data between the two (( commands one character position to the
left. Any data in the first column will be removed.
Shift the data between the two (( commands ncharacter positions to the left.
Any data in the first n columns will be removed.
Copy this line immediately below itself.
Copy this line immediately below itself it n times.
Copy the lines between the two '' commands immediately below itself.
Move the current line to the top of the edit window.
“Using Alternate Editor Personalities” on page 32
“ISPF Editor Personality” on page 372
“SEU Editor Personality” on page 374
Keys Help
Editor Shortcut Keys
This section lists keys used to perform and manage Editor window
operations. The first table identifies shortcut keys used in the Editor window.
Caution: The keys help defines only the default Editor key behaviors, and
may be incorrect if applied to other Editor personalities or customized key
behaviors.
Where two key names are joined by a plus sign (+), hold down the first key
and press the second, or hold down the first two and press the third.
The following Editor shortcut keys work when the cursor is in the editing
space.
F7
F8
F9
Esc
Arrows
Spacebar
PgDn
PgUp
378
LPEX Editor User’s Guide
Outdents text in the selected element or rectangular block.
Indents text in the selected element or rectangular block.
Switch to the Command shell window; which gives you access to
the command line prompt. Note: The cursor must be located within
the working area of the Editor.
Moves the cursor to the command line.
Move within text in the working area of the Editor.
Select a check box, list item, or push button.
Scroll down one screen in the contents of a file view.
Scroll up one screen in the contents of a file view.
Scroll left one screen in the contents of a file view.
Scroll right one screen in the contents of a file view.
Process prefix area commands.
Move line with cursor to top focus line of current file view.
Move cursor to top of file.
Move cursor to bottom of file
Move cursor to last position.
Move cursor to end of line.
Move cursor to start of next word.
Move cursor to beginning of word or previous word.
Copy selected text to clipboard.
Cut selected text to the clipboard.
Paste text from the clipboard.
Select a line of text, or extend selected text by additional lines for
copying, moving, or deleting (and deselect any text selected from
any other file view).
Ctrl+T
Select word/token
Alt+U
Unmark text selected with Alt+L (applies to any file view opened).
Alt+B
Select a block of text.
Alt+R
Select a rectangular block of text.
Alt+K
Convert selected text to uppercase.
Alt+I
Convert selected text to lowercase.
Alt+C
Copy selected text to the current cursor position.
Alt+M
Move selected text to the current cursor position.
Alt+Z
Overlay block.
Alt+D
Delete block of text (if in the current file view).
Ctrl+Shift+Home Select all text to start of file.
Ctrl+Shift+End Select all text to end of file.
Ctrl+Y
Duplicate line.
Enter
Split the line at the current cursor position, or insert a new line
when at the end of the current line.
Ctrl+Enter
Create new line without splitting current line and move cursor to
new line.
Alt+S
Split current line at cursor.
Alt+J
Join next line to current line.
Ctrl+Delete
Delete to end of line.
Ctrl+Backspace Delete entire line.
Backspace
Delete the character to the left of the cursor.
Delete
Delete the character to the right of the cursor.
Ctrl+Z
Undo the last editing change.
Ctrl+Shift+Z
Redo the last undo operation.
Ctrl+K
Set checkpoint.
Ctrl+Q
Set quick mark.
Alt+Q
Find quick mark.
Ctrl+U
Find the previous occurrence of a selected text string.
Ctrl+N
Find the next occurrence of a selected text string.
Ctrl+PgUp
Ctrl+PgDn
Alt+Enter
Alt+T
Ctrl+Home
Ctrl+End
Ctrl+J
End
Ctrl+Right
Ctrl+Left
Ctrl+C
Ctrl+X
Ctrl+V
Alt+L
Chapter 8. References
379
Alt+N
Ctrl+O
Ctrl+S
Ctrl+I
Ctrl+L
Ctrl+A
Find the next error.
Open a file for editing.
Save a file.
Display the Filter window. (Include all lines with this string)
Locate line by line or sequence number.
Include all lines of the file into the current file view.
The Editor window shortcut keys function the following way when you are
working within a dialog box:
Home
End
Ctrl+Left
Ctrl+Right
Tab
Shift+Tab
Move
Move
Move
Move
Move
Move
to
to
to
to
to
to
the
the
the
the
the
the
beginning of a field.
end of a field.
beginning of a field.
end of a field.
next entry field or check box.
previous entry field or check box.
Miscellaneous Editor shortcut keys:
Esc
F10 or Alt
Home
End
Arrows
Alt+Underlined
letter
F3
Ctrl+F
Alt+Right
Alt+Left
Ctrl+Alt+Right
Ctrl+Alt+Left
Ctrl+L
Ctrl+M
Ctrl+R
Cancel a menu or the system menu.
Go to/or from the menu bar.
Go to the first choice in a menu.
Go to the last choice in a menu.
Move between the menu bar and menu choices.
Select the associated item on menu bar or menu.
Close a program window.
Find a text string with the Editor - find and replace dialog box.
Go to next file in ring.
Go to previous file in ring.
Go to next ring.
Go to previous ring.
Locate line by line or sequence number. If used when the Line
Number dialog box is in focus, focus will be switched back to the
Editor.
Match brackets for C language.
Prototype expansion (template insertion).
“Keys for Text Selection and Actions” on page 381“Keys for Text
Selection and Actions” on page 381
380
LPEX Editor User’s Guide
Keys for Text Selection and Actions
Keys and actions you use to select text differ depending on the following :
v If token highlighting is on, you can select tokens; otherwise, you can select
character strings (words) delimited by white space or the end-of-line (EOL)
character.
v If you have already selected a token, some actions will deselect it and select
another one. Other actions will expand or contract the selection.
v If your keyboard is in Replace mode, the cursor is placed on a character
(and that character is selected by a block). In Replace mode, selection
actions may include the character where the cursor is located, as well as a
selected field which can be a character, a word, or a token.
The following keys will help you select text in the Editor. Where two or more
key names are joined by a plus sign (+), hold down the first key and press the
second, or hold down the first two and press the third.
Single click, mouse
button 1
Click with mouse
button 1 and drag
Double click, mouse
button 1
Shift+Single Click,
mouse button 1
Ctrl+Double click,
mouse button 1
Alt+Double click,
mouse button 1
Ctrl+Left
Ctrl+Right
Shift+Ctrl+PgUp
Shift+Ctrl+PgDn
Shift+Right
Shift+Left
Shift+Ctrl+End
Shift+Down
Shift+Up
Shift+Ctrl+Right
Shift+Ctrl+Down
Shift+End
Shift+Home
Shift+Ctrl+Left
Shift+Ctrl+Up
Shift+Ctrl+Home
Move cursor.
Select new text.
Select current word.
Expand or contract the currently-selected item to the mouse
cursor position.
Select current line.
Start rectangular block selection, then drag to mark remainder of
rectangle.
Move cursor to start of current or previous token.
Move cursor to start of next token.
Extend selection one screen page to the left.
Extend selection one screen page to the right.
Select or deselect following character.
Select or deselect previous character.
Select or deselect to bottom of file in the working area.
Select or deselect to column beneath current cursor position.
Select or deselect to column above current cursor position.
Select or deselect to start of next token.
Select or deselect to end of token or word beneath
Select or deselect to end of line.
Select or deselect to start of line.
Select or deselect to start of previous token.
Select or deselect to start of token above current cursor position.
Select or deselect to top of file.
Chapter 8. References
381
“Editor Shortcut Keys” on page 378
382
LPEX Editor User’s Guide
IBMR
Part Number: CT8WFIE
SC09-2795-00
CT8WFIE
Printed in the United States of America
on recycled paper containing 10%
recovered post-consumer fiber.