1
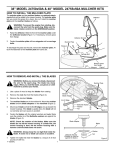
30 Day Satisfaction Guarantee
Bullet Tools™ is confident that you will be absolutely pleased with the purchase of our product. If, for any reason, you
are not completely satisfied with your tool, we will refund your purchase price at any time within 30 days of your
original purchase (receipt required). If you want to return your product under our 30-day no risk trial offer (valid only
for purchases made in the US), please contact us at 1-800-406-8998 or 208-772-0175 for return instructions.
BULLETPROOF WARRANTY GOLD (5 Year)
Bullet Tools™ warrants only to the original purchaser of this product, when purchased from an authorized reseller or
distributor, that this product will be free from defects in material and workmanship under normal use and service for
five (5) years from initial purchase. This warranty includes all parts except the blade and cosmetic appearance (chips,
dings, scratches) caused by normal use and wear. This warranty does not cover any damage due to accident, misuse,
abuse or negligence. Further, it is valid only if the product is used with the cut products specified in the cut guide. Please
refer to the User Guide for details or call Bullet Tools™ technical support. In order to recover under this limited warranty,
the purchaser must make claim to Bullet Tools™ within 60 days of occurrence and must present acceptable proof of
original ownership (such as original receipt, warranty card registration, on-line registration, or other documentation
Bullet Tools™ deems acceptable) for the product. Bullet Tools™, at its option, shall repair or replace the defective unit
covered by this warranty. To obtain warranty service, please contact Bullet Tools™ at 1-800-406-8998 or 1-208-7720175, for pre-authorization and further instructions.
USER GUIDE
Read Before Use!
SHUT -N- CUT
Bullet Tools™ disclaims all warranties, express or implied, including all warranties of merchantability and/or fitness for a
particular purpose. Additional rights may be available under the laws of your state or province. Any and all warranties,
written or implied, are void with any alterations to the product. Note: Bullet Tools™ shall not be liable for any special,
incidental or consequential damages, including but not limited to lost revenue, lost profits, rental or replacement
equipment, downtime, damage to property and third-party claims, arising out of any theory of recovery, including
warranty, contract, statutory or tort.
1901-26-01
SAFETY
1) SHARP BLADE - This machine uses a razor sharp blade.
Keep hands, feet, and other appendages away at all times.
2) Wear Kevlar™ or cut-resistant leather gloves when operating or servicing the blade.
3) This machine has several pinch points. Do not adjust or collapse machine when fingers
are in the way.
4) To avoid tipping and/or rocking, only operate on a level, stable, flat surface.
5) Wear safety goggles and all other OSHA recommended safety gear when cutting.
www.BulletTools.com • 208-772-0175
PRT-INS-1901 RevB.02.13 ©2013 Bullet Tools
SET UP
INSTRUCTIONS FOR USE
WELCOME! YOUR MAGNUM SHUT-N-CUT COMES READY TO ASSEMBLE.*
*You will need a #3 Phillips head screwdriver
and a 7/16” (11mm) socket or wrench.
Please Review and Verify Parts Included in Box:
1. Clamp Assembly
2. Base
3.Knife Kit
4. Hardware Kit
1
1
Item B
• Pull back on the red-capped Lock Lever to unlock the Clamp
Arm. Pivot the Clamp Arm to the full‑open position.
1
• Set insulation on the lower Clamp Bar so that the cutting slot
is in-line with the desired cut.
2
Item A
3
2
HARDWARE KIT:
4
Item A. (4) 1/4”-20 x 1-1/2” PH Phillips Screws
A.
Item B. (4) 1/4”-20 Nuts
B.
Insert knife
in slot
• Close the Clamp Arm to compress the product, pressing
down until the Lock Lever engages.
• Insert the EZ Insulation Knife (included) into the cutting
slot on the Clamp Arm.
• Cut through the insulation product with a sawing motion,
drawing the blade toward you.
ASSEMBLY
STEP 1: With Deck upside down, insert four Item A
screws through the four holes in the Deck. Turn Deck
back over and set on a level surface.
Screws
Turn Over
Deck
Clamp Pressure Adjustment
1) Remove the wingnuts.
2) Move the spring-rest pins to the desired setting.
For very low pressure, remove the pins completely.
3) Replace the wingnuts.
STEP 2: Align the Clamp Assembly
and secure to Deck using the four
screws and four Item B nuts. Do
not over tighten. Cut zip tie after
mounting.
wingnut
wingnut
2