1
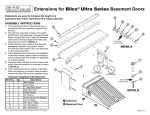
Ultra Series Basement Door Components and Hardware
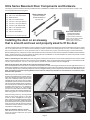
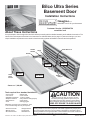
The majority of the door hardware is factory installed for ease of installation. In addition to the major components shown on page 1, the
door is supplied with the following parts:
Hardware Package Contents
(11) #12 x 1-1/2” hex head screws
(14) Plastic anchors
(5) #10 x 2-1/2” deck screws
Motion Damper Kit
(2) Motion Dampers
(4) Ball stud fasteners
(4) Lock nuts
(2) 1/2” O.D. X 1/8” nylon spacers
(11) 1/2” O.D. X 1/4” nylon spacers
(18) 1/4-20 x 1” pan head screws
(3) #10 x 1-1/2” flat head screws
(2) #10 x 1” drive screws
(13) 7/8” O.D. steel washers
Side Panel Insert Kit*
(2) Solid panel inserts
(2) Clear panel inserts
* Extra fasteners are included in package
* Louver side panel inserts with
insect screen are factory installed.
Inserts can be changed by
following Step 5 of instructions.
Installing the door on an areaway
that is smooth and level and properly sized to fit the door
The Bilco basement door will shed water in normal conditions only when installed and caulked in accordance with these instructions. If there
are no rain gutters above door, a diverter must be installed to prevent roof water from flowing directly onto door. If the foundation areaway
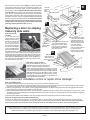
that you are installing the door on is not smooth and level, or does not fit the door properly, see bottom of page 3 of these instructions.
Before installing the door, verify that you have all the parts shown above and that you have the tools required for installation that are listed on
page 1 of these instructions. If you are replacing an existing door, Mix a small batch of concrete and patch any holes in the present concrete
caused by the anchors that held the old door in place.
STEP 1: Assembling the door frame. Remove side panels, header panel and sill from carton. Stand up side pieces and connect header
panel to each side piece with #10 x 1”drive screws as shown in Figure 1. Next, connect the aluminum door sill piece to each side piece with
1/4-20 x 1”pan head screws, 1/2” O.D. X 1/8” nylon spacers, and 7/8” O.D. steel washers as shown in Figure 2.
STEP 2: Anchoring the door frame to the house and areaway foundation
Move assembled door frame into place on foundation areaway. Make sure that vertical edge of side pieces are flush against the house. For
replacement applications, siding may need to be removed and replaced to position door frame properly. Place a level against side piece and
check plumb. Square door by measuring diagonals as shown in Figure 3, shifting frame as required until measurements A and B are equal.
Note: The Distance across the opening (between anchor holes in side pieces) should be no less than 53-1/2" on center for proper
basement door operation.
Mark all anchor hole locations on foundation
areaway and wall with pencil or marker. Remove
frame from areaway and drill all anchor holes
using 5/16” carbide tip masonry bit as shown
in Figure 4. Once all anchor holes are drilled,
insert plastic anchors into all anchor holes flush
with concrete and reposition frame on areaway.
Anchor side pieces to areaway foundation and
foundation wall using #12 x 1-1/2” slotted hex
head screws, 1/2” O.D. X 1/4” nylon spacers,
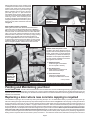
and 7/8” O.D. steel washers as shown in Figure 5 on next page. Anchor Sill to areaway foundation using (3) #10 x 1-1/2” flat head screws.
Finish anchoring frame by securing header
panel to house using (4) #10 x 2-1/2” deck
screws as shown in Figure 6 on next page.
Note: Indents are provided in header panel to
show proper screw location. Make sure header
panel is level before securing. When the frame
is fully anchored, caulk all around the exterior
of the frame where it meets the masonry with
polyurethane caulk (opaque).
A
B
STEP 3: Install Door Panels on Frame
Note: Because of the size of the doors, it may
require two people to attach the door panels
to the door frame.
Page 2
1
2
3
4