1
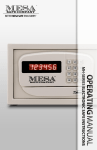
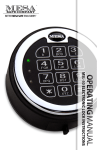
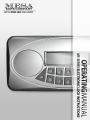
CATEGORY
PAGE
CHECK LIST
1
QUICK START
2
WRONG CODE ALARM
2
EMERGENCY KEY
2
TIME TO CHANGE YOUR BATTERIES
3
USER CODES
3
EMERGENCY KEY
3
LOCKING THE SAFE
3
THE DETENT
3
CHANGING YOUR CODE
4
RESET BUTTON
4
CONCEALING YOUR CODE
4
TAMPER ALARM
4
SETTING THE DATE & TIME
5
VIEW OPEN DOOR RECORDS
5
CAUTION FIRE SAFE STORAGE
5
IMPORTANT INFO ON SAFE USAGE
6
HOW TO ORDER KEYS
6
MESA SAFE LIMITED 1 YEAR WARRANTY
7
MF-SERIES ELECTRONIC LOCK INSTRUCTIONS | PG.1
CHECK LIST
Before proceeding, make sure all items below are included.
If any items are missing, contact M ESA S AFE C OMPANY Customer Care :
800.490.5624 [Monday thru Friday 7AM - 4PM/PST ]
m 2 Emergency Keys [Do not store the emergency keys inside your safe]
o 1 Anchor Bolt
n 4AA Batteries
R 1 External Power Pack
PG.2 | MF-SERIES ELECTRONIC LOCK INSTRUCTIONS
QUICK START
Before proceeding, make sure all items below are included.
If any items are missing, contact M ESA S AFE C OMPANY Customer Care :
800.490.5624 [Monday thru Friday 7AM - 4PM/PST ]
1 Insert 4AA Batteries [included] into the External Power Pack [included]
2 Plug the External Power Pack into the External Power Jack. See figure A
3 Allow the lock to power up: [[ ALREADY ]] will appear
4 Enter: #1234# or #123456#
5 You will hear a “Click” to indicate that the safe is unlocked.
6 Turn the handle clockwise within 5 seconds of unlocking to open the door
7 Insert 4AA Batteries in the battery compartment
8 To lock your safe, close the door & turn the handle
9
back to the locked position
Make sure your safe is locked & secure before walking away!
If you accidently enter a wrong number, press
Valid code : LCD will display [[ OPEN ]]
Invalid code : LCD will display [[ Error ]]
* to delete it
WRONG CODE ALARM
Enter 3 wrong codes & it will trigger the Wrong Code Alarm
To turn the alarm off immediately, you must enter a valid code.
Example : 1234#
If a valid code is not entered the alarm will turn off 1 minute after the
last wrong code entered
EMERGENCY KEY
IMPORTANT : Do not store the emergency keys inside the safe!
If the batteries die or you lose your code, use the emergency key
[2 keys included]
1 Insert a pin or similar item into the Access Hole:
2
3
4
5
Located on the bottom edge of keypad
Gently push the pin up to release the emergency key cover
The emergency cover will losen so you can remove it
Insert the emergency key & turn it counter-clockwise
Turn the handle to open the door
WARNING : Do not force the emergency key cover back in place.
If the cover does not re-attach easily it may be upside down.
If you happen to misplace your emergency keys or need to order extra keys,
see backside of manual for details
MF-SERIES ELECTRONIC LOCK INSTRUCTIONS | PG.3
TIME TO CHANGE YOUR BATTERIES
If
If
If
If
the battery level indicator on the display only reveals 1 bar
you enter your code & the LCD screen display [[ Lo-BATTE ]]
you enter your code & [[ OPEN ]] displays but the safe does not unlock
the keypad has no sign of life
IMPORTANT : If the batteries die or are too low to unlock your safe, use
your External Power Pack or Emergency Key to open the safe & change
your batteries.
USER CODES
This safe is equipped with 2 User Codes
User 1 Code is factory set to : 1234#
User 2 Code is factory set to : 123456#
IMPORTANT : Because the codes are factory set, we highly recommened
changing both codes to your own uique codes!
When viewing Open Door Records, [[ PASS1 ]] will display for User 1 &
[[ PASS2 ]] will display for User 2
EMERGENCY KEY
1 Enter #. The display will turn amber & [[ - - - - - - - - ]] will display
2 Enter a valid code & #. You will hear a ‘Click’, the display will turn blue &
[[ OPEN ]] will display
Example : 1234#
Valid Code: LCD will display [[ OPEN ]]
Invalid Code: LCD will display [[ Error ]]
LOCKING THE SAFE
1 If the handle/locking bolts are still in the unlocked position, close
2
the door & turn the handle back to the locked position
If the door is open & the handle/locking bolts are in the locked position,
follow steps 1-3 under Unlocking the Safe; close the door & turn the
handle back to the locked position
THE DETENT
The detent prevents the door from being closed with the locking bolts in
the locked position, avoiding any damage to the locking bolts
When you unlock your safe & open the door, the locking bolts are held in
the unlocked position by the safe’s detent.
To release the locing bolts, push the detent rod in & turn the handle to the
locked position
PG.4 | MF-SERIES ELECTRONIC LOCK INSTRUCTIONS
CHANGING YOUR CODE
NOTE : Always perform this operation with the door opened!
Test your new code out several times before closing the door & locking
the safe
1 Enter #. The display will turn amber & [[ - - - - - - - - ]] will display
2 Enter a valid code & #. You will hear a ‘Click’, the display will turn blue &
[[ OPEN ]] will display
3 While the display is still blue, enter , [[ - - - - - - - - ]] will display
4 Enter your new code [1-8 digits] & #, [[ INTO ]] will display
5 Your new code has now been set
*
Example : #1234# #4321# [Code was 1234 & is now 4321]
If you accidently enter a wrong number, press to delete it
*
*
RESET BUTTON
The Reset Button is used to reset both User Codes back to their factory
settings [User 1: 1234# / User 2: 123456#]
1 Locate the red button on the back panel of the safe door
2 Press the red button. The display will turn amber & [[ CLEAR ]] will appear
3 Both user codes have now been reset to factory settings
Test the codes to make sure they have been reset back to the factory
settings before closing the door & locking the safe
CONCEALING YOUR CODE
If you do not want your code to show on the LCD screen, press # then
then your code & #
Example : # #1234#:
LCD screen will display [[ oooo - - - - ]] instead of [[ 1234 - - - - ]]
You will have to do this every time you want your code concealed
*
*
TAMPER ALARM
You may set a Tamper Alarm that will sound if the safe is hit/attacked
Enter 0, [[ BELL ON ]] will display. The Tamper Alarm is now set.
If the Tamper Alarm is triggerd, enter a valid code to turn off the alarm
If wrong codes are being entered, the alarm will turn off 1 minute after
the last wrong code entered
Once the alarm has been triggered or a valid code has been entered to
unlock the safe, you will have to reset the Tamper Alarm
MF-SERIES ELECTRONIC LOCK INSTRUCTIONS | PG.5
SETTING THE DATE & TIME
The date format on the display is year / month / date
The time format is Military time
The week is the Day of the Week; 1 represents Monday, 2 Tuesday, et al.
You will have 6 seconds to make an entry between fields or the operation
will be completed
1 Enter *. The display will turn amber & the Year field will blink
Enter 0 or 8 to change the Year. Enter 0 to descend, 8 to ascend.
2 Enter #. Display is still amber & the Month field will blink
Enter 0 or 8 to change the Month
3 Enter #. Display is still amber & the Date field will blink
Enter 0 or 8 to change the Date
4 Enter #. Display is still amber & the Hour field will blink
Enter 0 or 8 to change the Hour
5 Enter #. Display is still amber & the Minute field will blink
Enter 0 or 8 to change the Minute
6 Enter #. Display is still amber & the Week field will blink
Enter 0 or 8 to change the Day of the Week
VIEW OPEN DOOR RECORDS
This function allows you to view the date & time the safe was accessed
& which user accessed the safe
[[ PASS1 ]] is User 1, [[ PASS2 ]] is User 2
You can view the last 14 valid entries, starting with the most recent entry
1 Enter #. The display will turn amber & [[ - - - - - - - - ]] will display
2 Enter a valid code & #. You will hear a ‘Click’, the display will turn blue
& [[ OPEN ]] will display
3 As soon as [[ OPEN ]] disappears but the display is still blue, enter 0
4 The display will first show the date then the time the safe was accessed
5
followed by the user [[ PASS1 ]] or [[ PASS2 ]]
To view the next opening record, Enter 0 while [[ PASS1 ]] or [[ PASS2 ]]
is displayed
CAUTION FIRE SAFE CONTENT STORAGE
A fire safe contains insulation material, which may cause humidity to be
present when closed for extended periods of time. It is recommened that
the safe is opened on a regular basis & interior allowed to air out. It is also
recommended that safe contents sensitive to moisture be kept in a sealed
containter [i.e.; zip-lock bags, etc.]
PG.6 | MF-SERIES ELECTRONIC LOCK INSTRUCTIONS
IMPORTANT INFORMATION ON SAFE USAGE
Hold on to your Proof of Purchase [receipt/invoice].
You will need this to order keys or use the Warranty Service
Do not open your safe if it is lying on its side, back or top.
Only open your safe when it is in the upright position
Do not slam the door. Extreme shock can damage the lock or jam the
bolt work system
Do not shut the door with the locking bolts in the locked position.
This may damage the locking bolts & create problems unlocking &
locking the safe
Do not stack contents of the safe so that the door must be forced shut.
Bolt works may jam as a result
Keep liquids away from the keypad. Liquids can damage the keypad
The safe door is removeable. To remove door, unlock the safe, open the door
& lift the door up. Do not lose the hinge pins - they may slide out of the
hinge when removing the door. If they happen to slide out, you can easily
insert them back into the hinge.
If you experience a difference in the feel of the operation, inconsistency
or difficulty opening or operating the safe, DO NOT LOCK THE SAFE.
Immediately contact our Professional Tech Assistants at M ESA S AFE
C OMPANY Customer Care : 800.490.5624 [Monday thru Friday 7AM - 4PM/PST ]
HOW TO ORDER KEYS
1 Contact Mesa Safe’s Sales Department for availability & prices :
2
800.490.5624
You will need to provide your Proof of Purchase [receipt/invoice]. If you
can’t provide a Proof of Purchase, please send a notarized document
stating that you are the owner of the safe [must send the original notartized
document by mail, copies will NOT be accepted]
2 Make sure these items are on your notarized document: Name, Safe
Number, Key Number [stamped on the key lock], Mailing Address
MF-SERIES ELECTRONIC LOCK INSTRUCTIONS | PG.7
MESA SAFE COMPANY LIMITED 1 YEAR WARRANTY
Mesa Safe Company will gurarantee your Mesa Safe free from defects for a
period of one year from original purchase date on maufacture defects only.
This warranty is non-transferable and only applies to original owner with
proof of purchase from an authorized dealer.
Mesa Safe Company will not, under any circumstances, be liable to the initial
consumer for any incidental, consequential, special, exemplary, or punitived
damages arising out of the purchase or use of any Mesa Safe Company
product(s). Mesa Safe Company’s liability for any breach of this warranty shall
be limited exclusively to repair or replacement of the defective product(s),
as described above or a refund of the product(s). In no event shall Mesa Safe
Company’s obligation under this warranty exceed the price of the original
product(s). Under no circumstances will Mesa Safe Company be held liable for
contents stored inside the Safe(s).
This warranty is limited to the terms stated herin. All expressed and implied
warranties including the warranties of merchantability and fitness for a
particular purpose are excluded, except as stated above. Mesa Safe Company
disclaims all liabilities for incidental or consequential damages resulting from
the use of this product, or arising out of any breach of this warranty. Some
states do not allow the exclusion or limitation of incidental or consequential
damages, so the above limitation may not apply to you. This warranty gives
you specific legal rights, and you may have other rights as well, which will
vary from state to state.