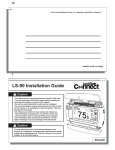
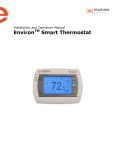
1
Communicating Thermostat TheLS-90 has 2 RTM-1 radio ports. These allow your
thermostat to communicate with other systems. Depending on
your area Power Company, programs may be available to
connect your thermostat to power grid status information. This
can make it easy for you to moderate your energy use at peak
hours and use power when it is less expensive.
The RTM-1 ports also allow you to connect yourLS-90 to your
home WiFi network. This can give you access to your home’s
HVAC system even when you are away. It can also give you
access to web based efficient energy management sites that
can help you save money and protect the environment.
RTM-1 port
Customer support:877-254-5625 or www.LockStateConnect.com
PG
20
PG
1
LS-90 Operation Guide
The LS-90 programmable communicating
thermostat operates via a high-quality, easyto-use touch screen. To program or adjust
your LS-90, simply touch your finger or the
stylus firmly to the screen. The screen will
automatically light up and you will hear a
“beep.” The screen will respond differently to
different types of touches, so you may want
to experiment with both your finger and with
the stylus, which is included with the LS-90,
to see what works best for you.
top cover
Wire
terminals
Power Grid
status
indicators
Reset
button
SAVE
ENERGY
Save
Energy
button
pg16
Statement of use: 100% Compatible with all popular
residential HVAC systems; 24VAC single, two, three stage
conventional heating systems (gas/oil/electric), heat pumps
(single and two stage compression) and single or two stage
auxilliary heat (electric or fossil), zoned forced air and
zoned hot water (2 or 3 wire), millivolt systems (with 24VAC
adapter), one or two stage cooling, and hybrid systems.
Home
button
NORMAL
$0.05 KW
H
12:30
5/25 WpEm
D
FAN
o
F
HVAC
STATUS
Power S
77
o
TEMP
HUMI D
23%
tatus N
HEAT
.05/kW
h
ormal $
Control
bar
TARGET
MENU
Power
Button
controls the
LS-90 Mode
pg17
Menu
button
HVAC
Status
indicator
pg17
bottom
cover
+/- Temp
adjust
buttons
Touch screen
ENGLISH
PG
CONTROL SCREENS
Before you operate the LS-90 please get familiar with these basic control screens. All the LS-90
functions are accessed through these screens. HOME pg2, MENU pg3, and MANUAL pg4. The
LS-90 touch screen technology allows you to select (by touching) an item and change it using the +/buttons on the control bar. All user inputs use this method. If you want to change it, touch it.
HOME Screen
The HOME screen is displayed when
the unit is operating. Touching the green
HOME icon
on the control bar will
always return you to this screen.
To set a Mode:
Power button on the control
Press the
bar. Touch the desired mode from the
choices displayed at the bottom COOL,
HEAT, AUTO or OFF.
Radio
Touch HOME when done.
icon
Set the time by touching the hour or
minute and the +/- buttons to change.
Your LS-90 is now controlling your HVAC.
Power
Company
info area
Fan icon
access fan
controls
Time
Touch this
to set time
pg16
NORMAL
$0.05 KWA
FAN
12:30pm
5/25 WED
o
F
HOME
TARGET
o
77
TEMP
HUMID
23%
OFF
Power Status Normal $.05/kWh
Message
Current Room
area
Temperature
Touch this or the +/- buttons
to temporarily modify
target temp setting
Day
Touch this
to set day
Increase
temp
POWER
button
mode
control
pg17
MENU
Decrease
temp
Thermostat Mode
indicator
2
MENU Screen
The MENU screen is the gateway to many functions of the LS-90. It is
displayed when you press the purple MENU button on the control bar to the right side of the screen.
Note page numbers for further info about each function.
Program
Use this to set a daily
time/temp schedule
(displayed in HEAT or
COOL modes only)
pg6-7
Comfort setting
Use this to select
efficiency or comfort
pg8
Humidity control
Use this to select MIN
and Max humidity
pg10
Consumables
UV Bulb, Filter,
and Humidifier pad
remindersTimer set
pg11
PROGRAM
12:30p WED 72
.
Information access
Use this to access info screens
from network connections
pg14
COMFORT
NETWORK
HUMIDIFY
INFORMATION
CONSUMABLES
CALIBRATE
HVACSET-UP
F˚/C˚
Lock Control
HVAC SET-UP
pg14
Use this to set
your LS-90 to control
your HVAC system
(displayed in OFF only)
pg12-13
Network control
Use this to configure network
connections
pg14
Calibration control
Use this to calibrate your LCD
display match to another device
pg15
Set F - C
Touch this to set
temperature display
pg9
o
o
Chirp set
Touch this to turn the
audible chirp on or off
pg9
PG
3
PG
4
MANUAL Screen The Manual Screen control screen is where you can make
temporary changes to your LS-90’s operation. The LS-90 has 6 manual override commands. These
are accessed by pressing the +/- buttons
AUX heat
FRESH AIR
or touching the current temperature on the
for HEAT Pumps
for HEAT or COOL
HOME screen.
EMER HEAT
IMPORTANT: The Mode
must be in
HEAT or COOL to access the manual
Current Target
screen.
Temporary OVERRIDE • Press the + / - buttons to select your
desired temporary Target Temperature.
• Press HOME to return to operation.
FRESH AIR
HEAT
o
F
Temperature
use the +/- buttons
to temporarily modify
target temp setting
HOLD
The TEMPORARY icon will display
Holds current
indicating you have modified the Target
temp indefinitely
Temperature for the current Time Slot only. until you remove
HOLD
HOLIDAY
PROGRAM
set-up
holiday
PROGRAM
VACATION
Activates
HOLIDAY
program
Vacation
preset temp
HOLD This will hold the target temperature you set indefinitely, until you turn it off. Take care using the HOLD
function. To set a hold, touch HOLD to initiate a hold temperature. You can use the +/- buttons to select
your hold temperature. The HOLD icon will display on the HOME screen indicating you have changed the
Target Temperature. The system will HOLD this temperature until you return to this screen and de-select
HOLD, by touching it. (HOLD is also canceled when you set the mode to OFF).
HOLIDAY PROGRAM - This is a single program that repeats day after day until you turn it off. It
supersedes the weekly program. To modify it touch PROGRAM on the MANUAL screen. It uses the
Calendar method for programming (see pg7 ).
VACATION - This function will hold a pre-set temperature until you turn it off. The preset is saved for
next time.
FRESH AIR - If you have a fresh air baffle connected to the EX terminal, the LS-90 will use this
outside air source as the 1st stage of heating or cooling. Useful in desert climates where outside air
temp can change very quickly or just to freshen indoor air quality.
EMER HEAT - This is available if you have a HEAT PUMP with auxiliary heat. When you select this
your HEAT PUMP is disabled and auxiliary heat is your sole source of heat. This manual override
setting stays active until you turn it off. (This command is not displayed if you do not have a heat
pump). Remember auxiliary heat is more expensive than the heat pump.
Auto Run the pre-set program
The LS-90 comes pre-programmed with an Energy-Star approved program. This program is
recommended by the EPA for energy efficiency. We strongly recommend that you Auto-Run this
program for one week, and see if it works for you. If it does not fit your needs you can always input a
custom program.
TM
and select HEAT or COOL with the mode
• To Auto-Run the Energy-StarTM program, press
selection. Set the time and Day and Press HOME. The unit is now running the Energy-StarTM
program.
PG
5
PG
MENU Functions
INTERVIEW SCREEN
Scroll control
PROGRAM
The LS-90 is designed for
fast and easy programming with a simple, onscreen interview
. Just answer the
questions and the LS-90 takes care of the
rest. A calendar option is also available
for fine-tuning. HEAT and Cool are
programmed separately.
Programming Using the Interview
Method (Fastest and Easiest ):
Interview
1. Make sure the LS-90 is in either HEAT or
Scroll control
Calendar
COOL using the MODE button .
2. Press MENU on the control bar and then touch PROGRAM in the upper left of the screen. The
PROGRAM BY INTERVIEW screen will come up.
3. Read each question and fill-in your answers by touching the answer in brackets <78o> to highlight
and using the +/- buttons to adjust. (Press and hold +/- buttons for faster scrolling)
4. Touch
(the scroll down) arrow in the lower right corner of the screen to go to the next set of
questions and continue answering. Use
(scroll up) to go back to a previous question.
5. Once the interview is complete, press HOME to return to the Home screen.
If you want to change entries just go back to step 1 and modify your answers.
6
The LS-90 will generate a simple program for you. It will assume you are home on the weekend and
just apply your wake-up and evening temp choices. Your LS-90 is now programmed and ready to go.
No additional updates are needed. If you would like to fine-tune the LS-90 programming, including
adding or deleting time periods, or reviewing your schedule, please refer to the instructions that follow
regarding programming using the Calendar method.
CALENDAR SCREEN
Calendar Programming Method You can use the Calendar screen to review
your current LS-90 schedule, or to make
changes after programming in Interview
mode. To create a whole new program:
(With the LS-90 in HEAT or COOL mode)
1. Press MENU and then touch PROGRAM
in the upper left of the screen.
2. Touch the CALENDAR icon
on the
left side of the screen. A schedule of times
slots with temperatures for today will appear
on the screen.
3. Select a time period or temperature by
touching it, and use the +/- buttons to adjust
up or down. (Press and hold down +/buttons for faster scrolling.)
HEAT
Calendar
MTW
Interview
I
A/B selector
- use this
to make
and save
an alternate
program
DAY advance
to next day
<Monday>
7:00am 75oF
9:00am 55oF
11:55am 75oF
2:55pm 85oF
AB
COPY>
delete
touch here to
create a new
time slot
copy these
time/temps to
the next day
PG
7
PG
PROGRAM
cont.
4. You can ADD additional time slots (up to seven in a day) by touching a blank line, and then
adjusting the time and temperature with the +/- buttons. To DELETE a time slot, highlight and then
touch the TRASH CAN icon in the lower left of the screen .
5. Touch the left < or right > arrows next to the day of the week to go to the next or previous day and
continue programming.
To COPY one day’s programming to the next day, touch COPY> on the bottom right of the screen.
The information for the current day will be copied to the next day and will appear on the screen.
6. Press HOME to return to the Home screen.
A/B program - The LS-90 can hold 2 complete weekly programs in memory. Prog A is the default. The
interview program is stored in prog A. To switch to the B program touch the A/B icon.
COMFORT
The Comfort Settings on the LS-90 allow you to maintain consistent comfort with
the highest levels of temperature control precision, accuracy and energy efficiency.
HVAC CYCLING: This feature allows you to set the desired variance in temperature between the
LS-90 setting and the room temperature required before the heating or cooling system will turn on—
from 0.5° to 2.0° F (.25° to 1° C). For example, if HVAC CYCLING is set to 2.0° F and the LS-90 is
set to 70°F, the heat cycle will not start until the room temperature drops to 68°. Similarly, the cooling
system will not kick-in until the room temperature increases to 72°F. The HVAC shuts off at the target.
8
To set/adjust HVAC CYCLING:
1. Press Menu and then touch “COMFORT.”
2. Touch the temp offset setting.
3. Use the +/- buttons to raise or lower the variance setting—from 0.5° to 2.0° F.
4. Press HOME to return to the Home screen.
2ND STAGE ON AT : This feature allows you to adjust the settings that control second stage heating
and cooling depending upon the climate you live in. This can be modified for maximum efficiency or
comfort. It is displayed if you have configured a multistage system in HVAC SET-UP.
To set/adjust 2ND STAGE ON AT:
1. Press Menu and then touch COMFORT
2. Touch and highlight the user setting (next to 2ND STAGE ON AT ).
3. Use the +/- buttons to raise or lower the setting—from 2.0° to 4.5°F (1° to 2.5° C).
4.Press HOME to return to the Home screen.
Chirp set - Touch this to turn the audible chirp sound on or off.
F/C Set - Touch this to switch the temperature display scale from oF to oC .
PG
9
PG
HUMIDITY
The LS-90 has a humidistat to control an
external humidifier for humidifying by the H terminal.
HUMIDITY
10
touch toggles thru
OFF, W/ heat,
.
ALWAYS
12:30pm 77
HUMIDIFR MIN --%
HUMIDIFR - To set a minimum humidity level (with a
humidifier installed in the HVAC) from the HOME screen:
DE-HUMID
1. Press MENU, then touch the HUMIDITY
BY A/C MAX --%
2. Toggle HUMIDIFR from <OFF> to <W/HEAT>.
3. Touch MIN --% and use the +/- buttons to set the desired EXTERNL MAX 99%
minimum humidity level.
DE-HUMID
4. The LS-90 can be toggled <ALWAYS> run the humidifier
when the humidistat calls for humidity (fan also runs) or can
be set to run only when the humidistat is calling for humidity
and the heat is also running <W/ HEAT>.
WED
<W/ HEAT>
<OFF>
touch toggles thru
OFF, ALWAYS
HST+TST
DE-HUMID BY A/C - The LS-90’s humidistat can also control the Air Conditioner for de-humidifying. To
set a maximum humidity level (using the air conditioner):
1. Press MENU, then touch the HUMIDITY, then view DE-HUMID by A/C.
2. Touch MAX --% and use the +/- buttons to set the desired maximum humidity level.
(You cannot change MAX humid % until you set it to ALWAYS or HST+TST)
3. The LS-90 can be toggled to <ALWAYS> run the air conditioner when the humidistat calls to dehumidify or can be set to run the air conditioner only when the humidistat calls to de-humidify AND the
thermostat is also calling for COOL <HTS+TST> (HST=humidistat, TST=thermostat).
EXTERNAL DE-HUMID - The LS-90’s humidistat can also control an external de-humidifier, if you
have a dehumidifier unit installed in your HVAC system. Connect it to the DH terminal.
To set a maximum humidity level:
1. Press MENU, then touch the HUMIDITY.
2. Touch MAX --% and use the +/- buttons to set the desired maximum humidity level.
3. Press HOME to return to the HOME screen.
CONSUMABLES Consumables are parts of your HVAC system that get used up; like filters and
UV bulbs. The LS-90 keeps track of system run times and can be programmed to remind you when
consumables, such as air filters, humidifier pads and UV bulbs, should be checked and/or changed.
(HUM PAD = Run time of humidifier, AIR FILTER = Run time of HEAT+COOL, UV BULB = Real time)
To set/adjust CHECK CONSUMABLES ALERTS:
1.Press Menu and touch CONSUMABLES, and select a CHECK ALERT to set.
2.Touch the number of weeks in the CHECK ALERT column for
o
CONSUMABLES 1 2 : 3 0 p W E D 7 5
that item, and use the +/- buttons to raise or lower the setting.
- Alerts may be scheduled from 0 to 99 weeks.
CHECK RUN
3. Repeat for each item included in your system.
ALERT TIME
- If your system does not include a listed item, leave the
00wks 00wks
HUM PAD
CHECK ALERT at 00wks.
4.Press HOME to return to the Home screen.
When the Run Time for a given item reaches the limit you have
set, the LS-90 will show you a reminder in the message area of
the Home screen.
AIR FILTER
00wks 00wks
UV BULB
00wks 00wks
PG
11
PG
HVACSET-UP HVAC SET-UP allows you to configure the LS-90 to
control your HVAC system. The LS-90 will control most residential systems.
Take care to correctly set-up the LS-90. Incorrect set-up can result in
damage to your HVAC system.
HVAC SET-UP 12:30pm WED 77
HEAT or COOL STAGES
[1]
NORMAL
[1]
HEAT PUMP
[NONE]
AUXILIARY
AUX ELECT or GAS-OIL
FAN CTRL TSTAT
BACK>
IMPORTANT: Make sure the LS-90 is powered up and is in the OFF
the Power button and select OFF.)
mode before set-up. (To turn your thermostat OFF, press
Heating and cooling systems must be configured separately.
SET-UP for NORMAL systems (not a heat pump):
1. Press the purple MENU button on the control bar and then touch HVAC SET-UP.
2. Touch to highlight HEAT in the upper left corner of the display.
3. Touch to highlight NORMAL.
4. Select the appropriate number of stages for your heating system (from 1 to 3) by touching the
number of STAGES to highlight, and using the +/- buttons to increase or decrease.
5. Touch the appropriate FAN CONTROL setting. Select HVAC if your heating system controls
the fan (appropriate for most gas, oil, propane and similar furnaces). Select TSTAT if you want the
thermostat to control the fan (for most electric heating systems).
6. Go on to configure COOL or press HOME to return to the Home screen.
SET-UP for NORMAL A/C cooling systems:
1. Press MENU and then touch HVAC SET-UP.
2. Touch and highlight COOL in the upper left corner of the display.
.
12
3. Select the number of stages of compression for your cooling system (1 or 2) by touching the
number of STAGES and using +/- buttons to change.
NOTE: If your system does not have A/C select NONE as your number of stages and you won’t be
bothered with on-screen cooling messages
4. Touch to select the appropriate FAN CONTROL setting HVAC or TSTAT.
NOTE: Most cooling systems require that the thermostat TSTAT control the fan.
5. Press HOME to return to the Home screen.
SET-UP for HEAT PUMP systems (up to 3 Stages):
1. Press MENU and then touch HVAC SET-UP.
2. Touch HEAT in the upper left corner of the display.
3. Touch HEAT PUMP.
4. Select the number of stages of compression for your heat pump system (1 or 2) by touching the
number of STAGES, and using the +/- buttons to increase or decrease.
NOTE: Most heat pump systems have one stage of compression.
5. If you have AUXILIARY heat, touch the number of AUX stages (default is [NONE] ) use the +/buttons to select the number of AUX stages (1-2 stages) in your system.
6. (If you have AUX) Select the type of auxiliary heat that you have - Electric or Gas-Oil.
NOTE: Most heat pump systems have electric heat strips for auxiliary heat.
7. Fan Control is by the LS-90 (tstat) for heat pumps.
8. Press HOME button to return to the Home screen. NOTE: For heat pump system your cooling is
already configured, the heat pump unit provides both heating and cooling.
PG
13
PG
NETWORK
Refer to your NETWORK system manual.
INFORMATION Displays info and interactive screens from a network source. Refer to your
NETWORK system manual.
LOCK
The LS-90 has 2 lock features. These control the users ability to change the
temperature and other settings of the LS-90.
LOCK
12:30pm WED 74
To lock and/or control the ability to change the LS-90:
LOCK OFF
LOCK icon in the lower right of
1. Press MENU and then touch
the screen.
PARTIAL Range +/- 4F
2. Select the desired LOCK feature by touching the function:
PARTIAL: Limits the user to temporary override the LS-90 target
temp. The override is limited to ±9oF (±5oC). To change this range
FULL
touch “RANGE +/-“ and using the +/- buttons to adjust up and down.
FULL: No changes can be made.
3. Press HOME to return to the Home screen.
Once LOCKED the LS-90 will respond to a limited set of manual commands. To UNLOCK :
1. Press MENU, touch and hold the LOCK icon for 10 seconds.
2. Touch LOCK OFF
3. Press HOME to return to the Home screen.
.
14
Calibrate controls
CALIBRATE
Your thermostat was accurately calibrated at the
factory to ±1° F of actual ambient temperature.
You do have the option, however, to change the
display temperature to match that of a previous
thermostat, or to match another thermostat
already in your home, from ±1 - 9°F (±1-5°C).
CALIBRATE
DELTA
FACTOR
-2
1 2 : 3 0 pm 7 7 W ED
o
F
ACTUAL
TEMP
DISPLAYED TEMP
7 7.
<CONTRAST 5> BACK>
MENU
To change your Thermostat Calibration:
1. Press MENU and then touch CALIBRATE
2. Use the + / - buttons to adjust the displayed
temperature up or down, as desired.
3. The DELTA FACTOR that appears on the screen will also automatically increase or decrease for
each 1° F (or 0.5° C) adjustment. The large display will show the modified temperature reading that
will be displayed on the HOME screen and used as the new room temp.
4. Press HOME to return to the Home screen .
LCD Screen CONTRAST can be adjusted.
To change LCD Screen CONTRAST
From the CALIBRATE screen:
1.Select CONTRAST and adjust by touching the on-screen < and > controls for best viewing.
2.Press HOME to return to the Home screen.
PG
15
PG
Save Energy Button
SAVE
ENERGY
FAN
The “Save Energy” feature on the LS-90 provides a simple, easycontrol
to-use way to help you manage your energy use. SAVE ENERGY
NORMAL
$0.05 KW
automatically adjusts your target temperature up [in COOL] or
A
12:30pm
5/25 WED
down [in HEAT] by a saved value degrees (four degrees is the
o
77
F
default).
23
-To use Save Energy, simply press Save Energy button in the
Power
Status
HEAT MENU
Normal
$
.05/kWh
upper left corner of the unit
- The screen will now read “Save Energy Δ 4°and the Target
Temperature will adjust by that offset. Use the +/- buttons to change
HVAC
the offset. Range 2°-9°F [1°-5°C]
STATUS
- To return to normal operation, press the “Save Energy” button
again, and the TARGET TEMP will return to the programmed temperature.
SAVE
ENERGY
FAN
TARGET
o
TEMP
HUMID
%
HVAC
STATUS
FAN control
To view the fan status, touch the FAN icon located at the top center of the HOME screen.
AUTO: The fan control is normally set to AUTO mode, meaning that the fan operates automatically,
only when the HVAC system is also running.
CIRC: The CIRC function allows your fan to automatically circulate air for
up to nine minutes per hour for better indoor air quality and efficiency.
FRESH: If your HVAC system has a fresh air baffle, touch FRESH to use
fresh air with HVAC. This works with AUTO or ON. The fresh air baffle must
be connected to the EX terminal on the LS-90.
AUTO
CIRC 5
FRESH
ON
16
ON: To manually turn ON the fan, touch the FAN icon and then touch ON.
The FAN icon will begin turning and the fan will run continuously until switched to AUTO. Fan ON
function is available in OFF mode to allow simple ventilating.
POWER BUTTON and MODE selection
The power button brings up your mode selection options: COOL HEAT AUTO OFF
COOL - This will operate the cooling portion of your HVAC system until it is turned off.
HEAT - This will operate the heating portion of your HVAC system until it is turned off.
AUTO - The LS-90 TRUE AUTO mode switches automatically between heat and cool throughout
the year. Unlike other manufacturers, the LS-90 TRUE AUTO has no temperature or time limitations
(Patent pending), just program your desired HEAT and COOL temps and select the AUTO mode. The LS-90
will switch from HEAT to COOL as needed.
OFF- This takes your HVAC system “off-line” and it will not control HVAC functions. In this mode your
house may experience extreme heat or cold.
The HVAC STATUS indicator shows what HVAC function is active. It glows orange when the HEAT
HVAC function is active, blue when the COOL function is active, and green when the fan is
STATUS active. These indicators can combine, where orange-green indicates HEAT-FAN and
BLUE-GREEN indicates COOL-FAN.
RESET button - The RESET button re-boots the LS-90 processor. It does not effect the user
programs that have been stored in permanent memory.
PG
17
PG
NETWORK
The NETWORK button allows you to identify the network you are connected with
and further manage your settings. You can connect your LS-90 to an AMI network for In Home
Display of electric meter data or connect to a Home Automation network for HA functionality with
remote access to your HVAC system and home conditions.
To Insert a RTM-1 radio module:
1. Power off the LS-90
2. Insert the the radio module in either slot on the back of the LS-90.
3. Power up LS-90.
NOTE: DO NOT HOT SWAP RTM-1 modules this can damage the
thermostat or radio modules.
To MATE to a network:
1. Select MENU, then NETWORK.
2. Make sure the network is ON.
3. Select the Radio Icon for the radio you want to mate
with the network.
4. Touch Mate. Initiate the mate procedure on the
network device side. Wait for radios to sync.
5. The LS-90 will display the netname (network name) it
is connected to under “network”.
18
INFORMATION This MENU function displays information and interactive screens from a network
source. The network can display interactive information screens, poll users, and display electrical
rate and usage information from your utility or enabled power meter.
Home automation systems can also utilize the
INFORMATION function for interactive and
informative messages. They can display text and
alpha numeric information on energy use, HVAC
status, and other network connectivity.
These messages are generated by another network
source and displayed on the LS-90. Consult your
AMI or Home Automation network documentation for
further information.
sample INFORMATION screen
PG
19