1
MODEL 765HFL
Page PLAN THE INSTALLATION
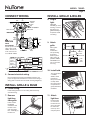
insulation
(Can be placed
around and over
housing.)
hole for optional screw mounting (4)
* screw (2)
ROOF
CAP *
nail (4)
bottom edge of framing
2. Mount housing.
housing
* Purchase
4-in.
ROUND
DUCT *
separately
4-in. ROUND
ELBOW(S) *
Extend hanger bars to the width of the framing. Hold fan
in place with the hanger bar tabs wrapping around the
bottom edge of the framing.
Nail fan to framing or fasten with screws (not provided)
through holes near nails.
* To ensure a noise-free mount: Secure hanger bars
together with screws or use a pliers to crimp mounting
channels tightly around hanger bars.
WALL
CAP *
The unit will operate most quietly and efficiently when located
where the shortest possible duct run and minimum number of
elbows will be needed.
Use a roof cap or wall cap that has a built-in damper to reduce
backdrafts.
Plan to supply the unit with proper line voltage and appropriate
power cable.
3. Attach
damper
/ duct
connector to
housing.
INSTALLATION
tab
hanger
bars
channel
channel
hanger
bars
1. Insert hanger bars.
Four (4) sliding hanger bars are provided to allow for
accurate positioning of housing anywhere between
framing. They can be used on all types of framing (I-joist,
standard joist, and truss construction) and span up to 24”.
Slide hanger bars into channels on housing. Make sure
hanger bar tabs face “up” as shown.
Snap damper /
duct connector
onto housing.
Make sure
connector is flush
with top of housing
and damper flap
falls closed.
4. Install 4inch round
ductwork.
Connect 4-inch
round ductwork
to damper / duct
connector. Run
ductwork to a roof
cap or wall cap.
Tape all ductwork
connections to
make them secure
and air tight.