1
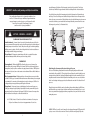
Marking downspout for diverter installation
After insuring the urn is level and in its final installation
location, place a level on top of the urn and make a pencil
mark on the downspout 5-1/2” below the bottom
of the level. Using a tape measure, make a second
mark 1” below the first one.
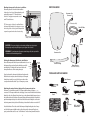
PARTS INCLUDED
Stoneware Urn
Connector
Level
6’ Hose (assembled)
TIP: Place a scrap piece of plywood or cardboard between
the house and the downspout before cutting to protect your
home’s siding. For the second cut, place the downspout and
scrap wood on ground or work surface for easier cutting.
Shut-Off Valve
Remove lower bracket. Connection may vary. A slotted
or Phillips screwdriver or a socket wrench may be needed.
CAUTION: Always wear safety glasses when cutting or drilling to prevent eye injuries.
Downspout edges may be sharp. Wear gloves to protect against cuts or scratches.
WARNING: If your downspouts and/or gutters contain heating cables, there is potential for electrocution or fire hazard during installation.
Discard
1” Piece
Using a hacksaw, cut the downspout at the first pencil mark you made.
After the first cut is complete, remove the bottom piece of downspout
from the house to make the second cut. Make your second cut on the
second pencil mark and discard the 1” piece of downspout you cut out.
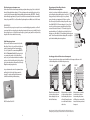
Attaching the water diverter tubing to the downspout and urn
The diverter is to be installed on standard 2”x3” downspout with the narrow end facing up — or —
on oversized 3”x4” downspout with the wide end facing up. Be sure to install the diverter with the diverter
tubing holes on the side of diverter facing the urn. Once you have determined which downspout size you
have and thus which end of the diverter faces upward (keeping the diverter tubing holes facing the urn),
push diverter tubing into the top hole on the diverter. Moisten the outside of tubing for easier insertion
into diverter grommet. Insert just the end of the tubing so it extends into the diverter no more than 1/4”.
Next, slide the diverter UP onto the cut end of the downspout leading from the gutter above. You may
need to flex the downspout slightly in order to get the diverter onto the downspout. Wear gloves to
protect your hands from scratches or cuts. Push the diverter 2” onto the downspout until it contacts the
6
Screwdriver
Screws
Cutting the downspout for diverter installation
Remove the downspout bracket below your installation marks to loosen First
Cut
the downspout from your house (keep bracket handy as you will be
Second
reinstalling later). This will provide some clearance between the
Cut
downspout and house to allow for cutting downspout.
Tape Measure
Stoneware Urn
Diverter Tubing
Water Diverter
(with 2 Black Grommets)
TOOLS AND SUPPLIES NEEDED
Tape Measure
Screwdriver
Pencil
Hacksaw
Safety Glasses
Gloves
Wood Board
3
Level
Drill - with 3/4”
Diameter Bit