1
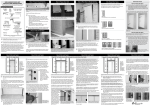
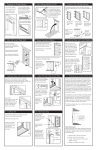
Step 5 : Shim and Fasten Step 5 : Shim and Fasten Step 6 : Install Dead Bolt and Strike Plates Step 5C : For door with sidelites XO B C E D F F D E D A Note: Units intended for installation in high velocity windstorm regions may require additional points of attachment. See local retailer for installation sheet supplement. A Install the dead bolt strike plate at the correct location, per the manufacturer installation detail (Figures 26 and 27). For units with only one non-operable panel attached on the latch side of the door : The second set of supplied screws are installed through the thin (rabbet) section of the jamb using the vacant hinge screw holes (Figure 21). Typically long security screws are used to install the dead bolt strike plate (Step 6). For units with only one non-operable panel attached on the hinge side of the door : The second set of supplied 2-1/2" screws are installed through the thin (rabbet) section of the jamb under the weatherstripping through the shim and into the stud approximately 8" from the top and bottom of the jamb (Figure 22). Shim just above and below the dead bolt hole and drive the supplied 2-1/2" installation screws through the dead bolt strike plate (Step 6). 3 When shims are properly installed, the frame should not move or twist at all when the screws are tightened and counter-sunk, thus maintaining the 1/8" gap. If there is any movement, loosen the screws and shim tighter to maintain the 1/8" gap, then re-tighten screws. Step 8 : Caulk Doorway Step 9A : Adjust Sill Some door units are supplied with adjustable sills, and these may be raised or lowered to form a tight seal with the fixed sweep on the bottom of the door. This adjustment requires a screwdriver with appropriate screw bit. To increase the height of the sill cap, turn screws evenly along the rail. Refer to the “Steps to test threshold seal”. (Figure 33). Caulk all four exterior corners and all around the brick or siding in the following sequence: caulk the sill on both latch and hinge sides from the edge of thesill crown along the edge where the sill and jamb or brickmould meet (Figure 29) Calfeutrer le bord avant du seuil, là où le seuil et le sous-plancher se rejoignent (Figure 30) Figure 33 : Raise or lower the sill by adjusting the sill screws. Some sills may have covers over the adjusting screws. These covers must be removed prior to making any adjustments. Figure 26 : Screws fasten the latch plate to the door slab. Figure 20 : Install shims in the correct location and in the correct sequence. Step 9B : Adjust Sweep Stand on the inside of the door and center the door in the opening. Shim tightly at the bottom corners of the door unit (Points A in Figure 20). This will keep the door centered and the frame tight against the sill. Shim the top of the frame, behind the latch-side jamb (Point B in Figure 20). Install shims until there is a consistent 1/8" gap between the top of the operating door slab and the frame header. Shim at the top of the frame, behind the hinge-side jamb (Point C in Figure 20) to hold the door tight in its position relative to the frame. The door should operate freely with nothing but the shims holding it in place. CAUTION : Do not open door panel greater than 30-degrees until 2-1/2" screws have been installed. (Points B, C, D, E & F in Figure 20). 3 From the outside and with the door closed, ensure that the frame is in a straight vertical plane (not twisted). To do this, check that the weatherstripping on the latch side is evenly compressed along the entire height of the door slab, without any pinching or gaps (Figures 8 and 9). Once there is an even 1/8" gap across the top of the door slab and the weatherstripping is evenly compressed along the height of the door slab, proceed with the installation. Shim at points D, E and F on the perimeter of the frame (Figure 20), until there is an even 1/8" gap on both sides of the operating door slab. Figures 29 and 30 : Caulk the sill crown and the front of the sill. Figure 21 and 22 : The second set of supplied screws is installed in the vacant hinge holes or under the weatherstripping. Figure 27 : Screws should connect the dead bolt plate to the stud. Proceed to Step 6. Steps to test threshold seal 1. Close door on a piece of paper placed over the threshold. 2. Pull paper between the sweep of the door and the threshold. 3. If the threshold is properly adjusted, you should feel some tension, but if the paper tears, the door’s seal is too tight. If there is no tension on the paper, the door’s seal is too loose. To properly adjust the threshold seal if it is too tight. caulk the perimeter where the exterior trim meets the brick or siding trim (Figure 32) If the door is center-hinged or has a sidelite, caulk around the mullions where the mullions contact the sill and header. Factory-Finished Door System Because the inside of the jamb is not accessible, a 3/8" hole must be drilled through the factory-finished exterior jamb, 1/4" deep at all points where the door system is shimmed (three on each exterior side of a nonoperable panel, Figure 23). Drive the supplied 2-1/2" installation screws, through the drilled hole in the exterior thick (stop) section of the jamb, through the shims and into the studs (Figure 24). Use the supplied caps to cover the holes in the exterior jamb (Figure 25). Drive the supplied 2-1/2" installation screws, three on each exterior jamb of a fixed panel, through the exterior (stop) section part of the jamb, through the shims and into the studs. Note: If the door is factory-finished use the “Factory-Finished Door System” information for fastening through exterior jambs. For units with two non-operable panels: Typically long security screws are used to install the dead bolt strike plate (Step 6). caulk the top corners where the header and jambs meet, starting at the weatherstripping and working to the face of the brick mould (Figure 31) Step 7 : Insulate Score shims with a utility knife and snap the shims along the score. Trim any excess with the utility knife. Insulate around the top and sides of the door unit in the cavity between the jamb and the wall studs with fiberglass blanket insulation (Figure 28). Install the interior and/or exterior trim around the door. Figure 34 : U-channel sweeps are adjusted to form a tight seal with the sill. Figure 28 : Insulate between the jambs and the wall studs all around the door. Figure 23 : Pre-finished systems must have holes drilled before screws are installed. Figures 24 and 25 : Drill holes through the exterior jamb on factory-finished doors to install screws and plugs. Step 11: Corner Seal (Foam Pad) Installation Critical Point : The use of expandable type foam is not recommended as it may cause the door jambs to warp; this may leave the door inoperable or push the brickmould away from the jamb. Figures 31 and 32 : Caulk the jambs and the exterior trim. Some door units are supplied with a U-channel adjustable sweep and these may be raised or lowered to form a tight seal with the fixed sill. To adjust the sweep, loosen the screws that hold the sweep in place and lower the sweep far enough to create an airtight seal with the sill. Once the sweep is positioned properly, tighten the screws by hand, taking care not to over-tighten (Figure 34). Trouble Shoothing 1. Add a bead of caulk at both ends of sill cap where the cap meets the jambs. 2. On door lock-side of cap, affix latch seal vertically to jamb on top of caulk where jamb and cap meet. Push seal into caulk. 3. On door hinge-side of cap, affix hinge pad horizontally to jamb on top of caulk where jamb and cap meet. Push seal into caulk. For double doors: Test the threshold seal for the active and passive doors. Once threshold seal is properly adjusted, affix latch seal vertically so bottom of seal is resting where cap and both doors meet. Remember to install hinge pads on both jambs. 1. Adjust rail by turning screws evenly a 1/2 turn. 2. Repeat seal test. If paper does not slide beneath door with a feeling of tension, repeat Step. Re-test seal. 3. Continue testing threshold until it is properly adjusted. To properly adjust the threshold seal if it is too loose. Step 12 : Instructions to touch up factory finished wood jambs / brickmold / mullions / quarter round (WARNING: Do not increase height by more then 1/4") 1. Adjust rail by turning screws evenly a 1/2 turn. 2. Repeat seal test. If paper does not slide beneath door with a feeling of tension, repeat Step. Re-test seal. 3. Continue testing threshold until it is properly adjusted. Your factory finished prehung unit comes with a color matched wax pencil and marker. Follow these instructions to touch up nail holes, cracks and other damages after installation of factory finished jambs, brickmold, mullions and quarter round. If it becomes apparent that there is some trouble with the operation of the unit, the first thing to check is the installation of the unit into the rough opening. Check to insure that 1⁄8" gap across the top edge of door panel and frame holds true for the entire width of the door opening AND that weatherstripping is evenly compressed the entire height of the door opening. Secondly, check that the two jambs are correctly aligned with each other and that incorrect nailing on shims have not twisted the jambs. Check all Critical Points to confirm that unit was installed correctly in proper rough opening. Wax Pencils / Fill Stick : 1. Work into the nail hole, crack or other blemishes 2. Wipe off excess with cloth as needed. Step 10 : Install the Latch and Dead Bolt Stain Marker : CAUTION : Contains mineral spirits which are harmful if swallowed. Read manufacturer’s directions in full. 1. Shake marker well. Remove cap and depress tip gently a few times on scrap paper or wood to start stain flowing. Warranty Warranties are available for most products. Please check with your dealer or distributor for current warranty terms and conditions. 2. Apply stain to wood. 3. Wipe excess with cloth as needed. 4. Replace cap tightly and store pen lying flat. NOTE : Read manufacturer’s first aid and warning information prior to starting. The finish on your Masonite AvantGuard exterior door is very durable and tolerant of exposure to many common household materials. If it becomes necessary to clean the door surfaces, please use a mild detergent, warm water and a clean cloth. Figure 35 : The latch and dead bolt are installed per the hardware manufacturer installation detail. the beautiful door Masonite® and “Masonite. The Beautiful Door.®” are trademarks of Masonite International Corporation. Please check with your Masonite dealer or distributor for current warranty terms and conditions. 4/10 Printed in the USA ©2010 by Masonite International Corporation HMD10501 www.masonite.com 72460 Rev. B 04/10