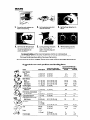
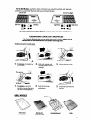
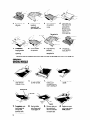
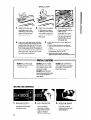
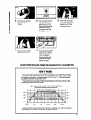
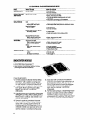
1
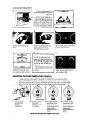
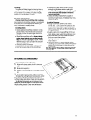
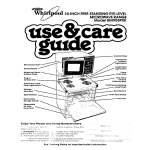
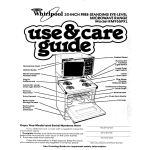
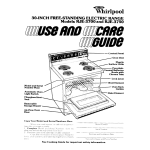
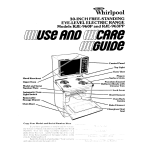
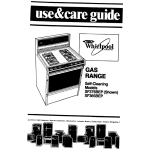
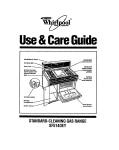
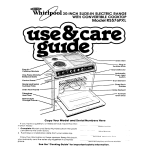
Whirlpool
304Ncti SET-N ELECTRIC RIANGE
WITH CONVERTIBLE COOKTOP
Model RS676PXL
One-Piece
Chrome
Reflector
Bowls
Control
Panel
Broil Element
Model and Serial
Number Plate
Oven
Front Frame
Bake Element
M-Flow
ven Door
If you have a question,
mation ready:
Copy
Your Model
or need
service,
and Serial Numbers
Here
have this inforModel
1. Complete
Model and Serial Numbers (from the plate
just behind the oven door].
2. Purchase or installation
date from your sales slip.
Copy this Information
in these spaces.
your warranty and the sales slip together
place.
See the “Cooking
Serial
Purchase
Keep this book,
in a handy
Service
Guide”for
important
safety
Company
Number
Number
Installation
and
information.
Dole
Phone
Number
Your responsibflhs..
.
Proper installation
and safe use of the range are your personal
responsibilities.
Read this “Use and Care Guide” and the “Cooking
Guide”carefully
for important
use and safety information.
Installation
You mud be sure your range
Is...
installed and leveled in a cabinet and on a floor that will hold
the weight;
l
l
installed in a well-ventilated
area protected
from the
weather:
l
properly
connected
to the
correct electric supply and
groundtng.
(See “Installation
Instructions.“)
Proper use
You mud be sure your range
l
sedol ily for jobs expected
of home ranges;
us
Is,a..
.
l
used only bv
operate
it properly;
property
matntalned.
Contents
..........................
Responsibilities
..............................
Installation
..............................
ProperUse
................................
Safety..
Using Your Range .........................
Setting the Clock ......................
Using the Minute Timer .................
The Oven Controls .....................
....................
Baking or Roasting
Adjusting the Oven Temperature
Control
...............................
Broiling
Using the Automatic
MEALTIMER’ Clock
The Oven Light ..........................
The Oven Vent ...........................
....................
Surface Unit Controls
Cooktop Module Controls ...............
............
Changing
Cooktop
Modules
Surface Units ..........................
Grill
Optidnal’cri’db;k’Mdb’ule
: 1: 1: : 1: 1: 1: 1:
....
Optional Black Smoothtop
Module
.............
Using the Cooktop Modules
Optional Griddle Module ..............
..........................
Grill Module
....................
Optional Rotisserie
..........
Optional Smoothtop
Module
Optional
Cutting Board ................
Cleaning
and Caring for Your Range ......
Control Panel and Knobs ................
Surface Units and Reflector Bowls ........
Using the Self-Cleaning
Cycle ...........
.............
Cleaning
Cooktop Modules
Cleaning
Chart .........................
If You Need Service or Help ...............
1. Before You Call for Service ............
..................
2. If You Need Service
................
3. If You Have a Problem
Page
2
2
2
3
4
4
2
6
6
7
8
9
9
IO
10
11
11
12
13
13
13
14
15
16
17
18
188
19
;:
23
23
24
24
*Tmk
3
Manual Oven
Light Switch
/
Using your range
/
Adjustable
Temperature
Oven
Control
Clean
I
Left Cooktop
8
CLEAN
\
Oven Signal Light
Module
Right Cooktop
Module
B
Q
LEFT
Surface Unit
Signal Light
Oven Selector
MODULE
RIGHT
MODULE
Lock
8
LOCK
Slgnal Llghtr
SETTING THE CLOCK
1.
Push In Minute Timer Knob and turn
clockwlse
until clock digits show the right
time of day.
2.
let the Minute Timer Knob pop out. Turn
counterclockwise
until the Minute Timer
dial is on OFF. If you push in on the knob, you
will change the time of day
USING THE MINUTE
1.
4
Wlthout pushlng It in, turn the Minute Timer
Knob until the setting showing in the
window is longer than the one you want.
TIMER
2.
Turn the knob back so the setting
want shows in the window.
you
3.
When the set time is up, a buzzer
will sound.
4.
Turn the dial to OFF to stop the buzzing
Surtace Unit
Control Knob
/
Surface Unit/
Cooktop
Module
Indicator
Minute
Timer
Stop Time Knob
\
\
/
Start Time Knob
THE OVEN CONTROLS
The oven is controlled
by two knobs: the Oven Selector
ture Control. Both must be on a setting for the oven to heof.
and the Oven Tempera-
With the Oven Selector on
BROIL, only the top element
heats. (Broiling, pg. 7 ).
With the Oven Selector on
BAKE, the bottom element
does most of the work. The
top element heats, but does
not turn red. [Baking, pg. 6 1.
With the Oven Selector on
TIMED BAKE, the MEALTIMER’
Clock can be used to turn the
oven on and off automatically. (MEALTIMER Clock, pg.
8 1.
Use the Oven Temperature
Control to set baking or roasting temperature
when the
Oven Selector is on BAKE or
TIMED BAKE.
When both the Oven Selector and Temperature
Control
are on BROIL, the broil element heats all the time. The
Oven Temperature
Control
can be set on a temperature
for slower broiling (see Broiling, page 7 ).
5
Lilt rack at front and pull out.
Set the Oven Selector
BAKE.
Put the rack(s) where you
want them before turning on
the oven.
Rack(s) should be placed
so food can be centered
in
the oven. Always leave at
least 1’ 2 to 2 inches (4-5 Cm)
between the sides of the pan
and the oven walls and pans.
For more information,
see the
“Cooking
Guide.”
Set the Oven Temperature
Control to the baking
temperature
you want.
on
Let the oven preheat until the
Signal Light goes off
6
During baking, the elements
will turn on and off to help
keep the oven temperature
at the setting. The Signal Light
will turn on and off with the
elements.
The top element helps heat
during baking, but does not
turn red.
Put food in the oven. Oven
rock walls ond door will be hot
ADJUSTING
When baking is done, turn
both knobs to OFF.
THE OVEN TEMPERATURE CONTROL
Does your new oven seem to be hotter or colder than your old oven at the
same settings? The temperature
setting in your old oven may have changed
gradually
over the years. The accurate
setting of your new oven can seem differneeds adjusting,
follow these steps:
ent. If you think the oven temperature
Locking Screw
1.
Pull the Oven
Temperature
Control
straight off
2. Loosen the lock-
3.
ing screw;
NOTICE position
of notches.
Tlghten
the locking
screw.
To lower the temperature, move
black part of
knob closer to LO.
Each notch
equals about IO’F
(5°C).
Replace
the knob.
4.
To raise the temperature, move
black part of
knob closer to HI.
Each notch
equals about 10°F
(5°C).
BROILING
1.
Place the rack where
want it for broiling.
you
2.
Put the broiler pan and
food on the rack.
3.
Set the Oven Selector
BROIL.
4.
Set the Oven Temperoture
Control on BROIL (or on a
lower temperature
for
slower broiling).
5.
During broiling, the oven
door must be partly
open. A built-in stop will
hold it there.
6.
When broiling is done,
turn both knobs to OFF.
on
For slower brolllng, set the Oven Temperature
Control on a temperature
instead of BROIL. The broil element will then turn on and off instead of staying on.
The lower the temperature
setting, the slower the broiling.
The Oven Selector must be on BROIL and the door partly open for all brolllng temperatures.
Suggested
oven-rack
Food
Beef Steaks
Rare
Medium
Well done
Beef Steaks
Rare
Medium
Well Done
Hamburgers
Lamb Chops
Medium
Ham slice, precooked
or tendered
Canadian
Bacon
Pork Rib or Loin Chop
Well done
\ Chicken
Fish
Liver
Frankfurters
positions
and broiling
times
Approxlmate
Temperature
1st side
Minutes set to BROIL
2nd side
Description
inches (cm) from top
of food to Broil Element
I ” (2.5 cm)
I" (2.5 cm)
I" (2.5 cm]
3” (8 cm)
3” [ 8 cm)
3" (8 cm]
7-9
9-l 1
II-13
3-5
4-7
5-7
I W' (4 cm)
1 l/2" (4 cm)
1 l/2” (4 cm]
l/2”
[ 1 cm)
4"-5" (I O-l 3 cm]
4"-5"(10-13
cm)
4"-5"(10-13
cm)
3" (8 cm)
13-15
17-19
19-21
6-8
6-8
B-IO
14-16
4-5
l”(2.5 cm]
l/2”-1”
[I -2.5 cm)
1/2”(1 cm]
3" (8 cm)
6-8
4-5
3" (8 cm]
3" (8 cm]
6-8
6
4-5
4
3/4”-1
”
(2-2.5 cm)
2-3 lb.
(l-l .5 kg)
cut in half
whole
fillets
1/2”-3/4”
(l-2 cm)
4”-5” (1 O-l 3 cm)
15
10
7"-9"(lB-23
3" [ 8 cm)
3" [ 8 cm)
25-30
II-16
7-8
IO-12
9-14
5-7
3
6-7
3
4-5
3" (8 cm)
4"-5"(10-13
cm]
cm)
7
USING THE AUTOMAIIC
MEALTIMER”
CLOCK
The Automatic
MEALTIMER Clock is designed
to turn the oven on and off at times
you set...even when you are not around. IMPORTANT: Follow these steps In order.
To start and stop baking
1.
automatically:
Put the racks where you
want them and place the
food in the oven.
2. Set the Oven Selector
4.
Make sure the clock is set
to the right time of day.
5.
Push in and turn the Start
Time Knob clockwlre
to the time you want baking to start.
7.
After baking is done, turn
both knobs to OFF.
8.
To stop the oven before
the preset time, turn both
knobs to OFF.
To stop baklng
1.
2.
3.
4.
on
3.
TIMED BAKE.
6.
Set the Oven Temperature
Control on the baking
temperature
you want.
Push in and turn the Stop
Trme Knob clockwlse
to the time you want the
oven to shut off.
automatlcally:
Put the racks where you want them and
place the food in the oven.
Set the Oven Selector on TIMED BAKE.
Set the Oven Temperature
Control on the
baking temperature
you want.
Make sure the clock is set to the right time
of day.
5.
Push in and turn the Stop Time Knob clockwise to the time you want the oven to shut
Off.
6.
After baking is done, turn both knobs to
OFF.
7. To stop the oven before the preset time,
turn both knobs to OFF.
SPECIAL CAUlION:
Use foods that will not go bad or spoil
while waiting for cooking
to start. Avoid
using dishes with milk or eggs, cream
soups, cooked
meats or fish, or any item
with baking powder or yeast.
Smoked or frozen meats may be used;
so can vegetables.
fruits and casseroletype foods. Vegetables
can be cooked
in
8
a covered
baking dish with about a halfcup (118 ml) of water for 1 to 1% hours.
Any food that has to wait for cooking
to
start should be very cold or frozen before
it is put in the oven. MOST UNFROZEN
FOODS SHOULD NEVER STAND MORE THAN
TWO HOURS BEFORE COOKING STARTS.
*Tmk
If the steps for using the Automatic
MEALTIMER- Clock are not followed
in
order, the electric oven door lock may be
turned on. The door will then either:
l not open;
l not close
all the way (the oven light stays
on).
If the Door Won’t Open:
Make sure the Clock and Start and
Stop Times are set to the right time of
day.
2. Turn the Oven Selector to CLEAN.
3. Push in and turn the Stop Time Knob
past the right time of day.
4. Walt 30 seconds.
5. Turn the Oven Selector to OFF; the door
will be unlocked
within 10 seconds,
1.
If the Door Won’t Close:
1. Make sure the Clock and Start and
Stop Times are set to the right time of
day; open the oven door.
2. Turn the Oven Selector to CLEAN.
3. Push in and turn the Stop Time Knob
past the right time of day.
4. Push the automatic
oven light switch in
and hold it in for 10 seconds.
5. Let the oven light switch go and turn the
Oven Selector to OFF.
6. Push in the automatic oven light switch
and hold it for another 10 seconds.
7. Close the oven door.
THE OVEN LIGHT
The oven light will come on when you open the oven door or when you push
the Oven Light switch. Close the oven door or push the switch again to turn off the light.
To replace
1.
the light bulb:
Turn off the electric
at the main power
power
supply.
4. Replace the bulb with a
40-watt appliance
bulb
available
from most grocery, variety and
hardware stores.
2. Remove the bulb cover by
pulling out on the wire
holder and moving it to the
side.
5. Replace the bulb cover
and snap the wire holder
in place. The bulb must
have thls cover when the
oven Is belng used.
3. Remove the light bulb from
its socket.
6.
Turn electrical
power back
on at main power supply.
THE-VENT
When the oven is on, hot air and moisture
escape through a vent behind the cooktop. The
for air circulation
in the oven.
the vent. Poor baking can result.
9
SURFACE UNIT CONTROLS
m--L--
I I.-
LWIIIIWI
k\
-L
KrlOD:
j
must
be pushed In bi efore
lurnlng them to Q setting. They can be set
anywhere
between
HI
and OFF.
;i
The slgnal light will
glow when a surface
unlt Is on. Be sure
the light Is off when
you are not cooklng.
Turn to setting
Until you get used to the settlngs,
Use HI to start
foods cooking
or
to brlng liquids
to o boll. Surface
unit will not turn
red if good contact is made with
boffom of pan.
use the followlng
as a gulde.
Ml0
u;o
r;o
&
Use MED-HI to
hold a rapid boil
or to fry chicken
or pancakes.
Use MED for
gravy, puddings
and icings or to
cook large
amounts of
vegetables.
Use LO to keep
food warm until
ready to serve.
Use MED-LO to
keep food
cooking after
starting it on a
higher setting.
Set the heat
higher or lower
within the LO
band lo keep
food at the
temperature
you
wont
COOKTOP MODULE CONTROLS
The following Optlonal
Accessories
Parts Distributor:
Griddle
Rotisserie
Grill
Cutting Board
are available
your Whirlpool
Dealer
modules. For the Optlonal
control to use:
on the Left
Grlddle
Grlddle
Islo
Push In and turn the
Surface Unit Control
the settlng you want
(see page 13 for
suggestlons).
or
Cooktop 2-6” Surface Units
Cooktop l-6” & l-8” Surface Units
Black Smoothtop
Use Surface Unit Controls to turn on cooktop
surface unit indicators
with boxes show which
Grlddle
through
to
The Right or Left Module Slgnal Llght will
glow to show which
module Is on.
only,
on the Right
For the Grill Module, use front or buck controls as you would for surface
controls if you want both the front and buck of the grill to heat.
Grill on Left
units. Use both
Grill on the Rlaht
Left Front
Rlght Rear
The Optlonal
Black
Smoothtop
Module
works the some as Surface
Unit Modules
CHANGING COOKIOP MODULES
The Cooktop Modules will work on either side of the cooktop. Make
controls are OFF and modules are cool before removlng
them.
sure all
SURFACE UNIT MODULES
1.
To remove,
the handle.
1.
To replace,
use both
hands to line up the terminal with the receptacle.
lift slightly
by
2.
With both hands, pull
module toward you to
unplug it.
3.
Lift out and set aside.
2.
Plug terminal
receptacle.
3.
Lower the front with the
handle.
into
Terminal
\
Frame
Grease
and
Well
Basket
Ceramic
wlth
Rocks
Heating
Element
Grllls
1. To remove,
lift
2.
off grills.
Lift front end of
heating
element and
pull toward you.
3.
Lift out basket
of ceramic
rocks.
4.
Lift slightly at
the back and
remove the
grease well,
being careful
not to spill
fat drippings.
4.
Place grills
over heating
element.
Receptacle
1.
To replace,
lower grease
well into
opening.
All parts
2.
Put in basket
of ceramic
rocks.
must be cleaned
after each
3.
Plug heating
element
terminal into
receptacle.
use to avoid
fat spollage
and odors.
See page
OPTIONAL
GRIDDLE MODULE
1.
To remove, lift
and remove
griddle cover.
2.
Lift front slightly
by the handle.
3.
With both
hands, pull
griddle toward
you to unplug it.
4.
Lift out and set
aside.
2.
Push griddle
into place until
its plugged
in.
3.
Slide so tabs on
the griddle fit
into the notches
on each side.
4.
Replace cover
only over clean,
cool griddle.
Receptacle
1.
12
To replace,
use
both hands to
line up the
terminal with
the receptacle.
22.
OPTIONAL BLACK SMOOTHTOP
MODULE
-
1.
To remove, lift
slightly by the
handle.
2.
With both
hands, pull
module toward
you to unplug it.
3.
Lift out and set
aside.
1.
To replace,
use
both hands to
line up the terminal with the
receptacle.
2.
Push smoothtop
into place until
it’s plugged
in.
3.
Lower smoothtopinto
place
USING THE COOKIOP MODULES
OPTIONAL GRIDDLE
1.
Before using the griddle for the first time:
Wash, rinse and dry griddle.
l
Use warm sudsy water.
l DO NOT immerse
griddle.
l DO NOT use metal
scouring pads or abrasive
2.
Lightly wipe with cooking oil to season. You
don’t have to grease the griddle every time
you use it. However, oil or butter adds flavoring
1.
Lift and remove
griddle cover.
DO NOT
replace until
griddle is cool.
2.
Preheat for a
few minutes
(until butter
melts or beads
of water dance
on the griddle).
Approxlmate
3.
Grlddle
cleansers.
They will damage
Add food. Use
only nylon or
plastic utensils.
Metal can
scratch the nonstrck finish.
Module
4.
griddle.
TURN OFF the
griddle when
cooking
is
finished.
Leaving it ON
will damage
the griddle.
Settlngr
Bacon . . . . . . . . . . . . . . . . . . . . . . . . . . . . . . . . . . . . . . . . . . . . . . . . . . . . . . . . . . . . . . . HI
Grllled Sandwiches..
. ..... .
... ... ... ... .. .
. . . . . . HI
Pancakes
. . . . . . . . . . . . . . . . . . . . . . . . . . . . . . . . . . . . . . . . . . . . . . . . . . . . . . . . . . . HI
Hamburgers....................................................
MED-HI
Eggs...............................................................
MED
13
A range hood (Whirlpool Model No’sRGH8330
or RGH8336) should
help get rid of smoke while using the Grill Module.
Approxlmate
Preheat
Grill Module
grill for five minutes
Cooklng
Times
at suggested
setting.
Approxlmate
Cooklng
l’lme
Side 1 Side 2 COmmenh
Temperature
Setting(s)
140°F(600C)
16O”F(71 “C]
1 70°F(76C)
Hi
Hi
Hi
To test steak for
9 Min. doneness. cut
8 Min.
11 Min. 12 Min. near center
12 Min. 13 Min. with sharp
knife
14O”F(6O”C)
16O”F(71”C)
17O”F(76”C)
Hi
Hi
Hi
10 Min.
7 Min.
13 Min. 13 Min.
16 Min. 16 Min.
14O”F(6O”C)
160°F(71”C)
1 70°F(76”C)
Hi
Hi
Hi
8 Min. IO Min.
9 Min. 12 Min.
10 Min. 13 Min.
2%” Ibs. (1 kg)l20”(44C)
120”(44”C)
1 lb. (.5 kg]
2 Ibs. (1 kg)
120”(44”C)
Hi
Hi
Hi
15 Min. 15 Min. When fish
4 Min.
4 Min. flakes easily it
5 Min.
5 Min. is done. Cook
all fish on
aluminum foil.
%“(I.9 cm)
17O”F(76”C)
21/z Ibs. (1 kg) 17O”F(76”C)
Hi
Hi
1 lb. (.5 kg)
150°F(59”C)
Hi
6 Min.
170”F(76”C)
Hi
8 Min,, 12 Min.
6 Min. Total
150”(59”C)
Hi
8 Min. Total
1 lh” (3.8cm)
11/2”(3.8cm)
1 lh” (3.8cm)
fully cooked
be used to
Turn every
15 Min. 12 Min. few minutes
10 Min. 10 Min.
7 Min.
Turn frequently
18 Min. Total
45 Min. Total
1 50°F(59”C)
Hi
Cob wrapped
French Bread,
Hints
and
30 Min. Total
2 loaves
1 JO”F(54”C)
Hi
10 Min. Total
Tips:
Foods cooked on the grill can spatter. It is
important to clean all parts after each use.
See page 22.
2. The ceramic
rocks will darken with use.
3. The heating element for the grill cleans
itself. Do not immerse.
14
1.
Wrap tightly
4. Take grill apart to clean and to remove
and store.
5. Most utensils safe for use on an outdoor
grill can be used with your Grill Module.
OPTIONAL
ROTISSERIE
Rem Support
I I
The Rotisserie has 4 parts. It is
used with the Grill Module.
1.
Remove the
grills from the
Grill Module.
2.
Insert rear support tabs into
slots at rear
of the Grill
Module.
3.
Slide forward to
lock. Tilt top to
level.
4.
n”Q
II
Insert front sup
port tabs into
slots at front of
the Grill
Module.
LowsPosItIon
6.
Put motor socket and pins through holes
in Rear Support at the high or low position.
5.
Slide back to
lock. Tilt top
to level.
1.
Put one fork on the spit pointing away from
the handle.
Push spit through meat so the weight is
balanced
around the center.
Put the second fork on the spit pointing
toward the meat.
Push both forks into the meat and tighten
the thumbscrews.
2.
3.
4.
5.
6.
7.
Push the pointed end of the spit all the way
into the motor socket.
Put the handle end of the spit into the high
or low slot (to match the motor socket position] of the Front Support.
Plug in the Rotisserie motor and turn on the
Grill Module. See page 16 for suggested
cooking times.
15
Approxlmate
Food
rotlsserle
cooklng
tlmes:
Internal
Temperature
Welght
140°F
(60°C)
140°F
(60°C)
3% Ibs. Hi
(I.5 kg1
3’/4 Ibs. Hi
(1.5 kg1
High
5 Ibs.
Hi
High
Control
Setting(s)
Spit
Posltlon
Time
Comments
1 hr.
55 min.
2 hr.
Meat with an
outer layer of fat
may take longer
to cook.
Beef
Rolled rib
(rare)
Rolled rump
High
Pork
Rolled
loin roast
Spareribs
Canadian
bacon
170°F
(76°C)
170°F
(76°C)
160°F
(71 “C)
(2 kg1
3 hrs.
15 min.
50 min.
ll/4” Ibs.
1 kg1
2 Ibs.
(1 kg)
Hi
High
Hi
High
1 hr.
IO min.
175°F
[ 79°C)
5 Ibs.
Hi
High
2 hr.
30 min.
190-F
(88°C)
190°F
(88C)
A90°F
(88°C)
190°F
(88C)
2’1.1Ibs.
(1 kg1
61/d Ibs.
(2.5 kg)
3% Ibs.
[I .5 kg)
2-1 lb.
(1 kg1
hens
Hi
High
Hi
High
Hi
High
Hi
High
1 hr.
45 min.
2 hr.
45 min.
2 hrs.
15 min.
2 hrs.
lamb
Rolled
leg
(2 kg)
Pouttry
Chicken
Turkey
Duck
Cornish
hen
Truss poultry
tightly. Run spit in
at the base of the
tail and
diagonally
through the
cavity to the fork
of the wishbone.
If
wing tips brown
too rapidly, cover
them with foil.
NOTE:
l Use the high spit position
for anything
over two inches (5 cm] in diameter.
l Turkeys bigger
than 8 to 10 pounds should not be put on the rotisserie. Roast
them in the oven.
THE OPTIONAL
SMOOTHTOP
MODULE
Cooking on the optional
black smoothtop
is
o/most the same as cooking on surface elements.
There are three differences
you should know about:
1. The cookware
you use.
2. What to expect.
3. The care and cleaning.
Cookware...
For best results, proper
cookware
must be used.
Bottoms must be perfectly
flat, with NO
ridges, rims, patterns, dents, roughness or
scratches.
-Pans with uneven bottoms cause poor
cooking
results and may damage
the
smoothtop.
-Nicks and scratches on a pan can damage the smoothtop.
16
l
l
l
Bottoms must be clean. Heating a soiled pan
can leave a stain on the smoothtop.
Sliding aluminum
pans or foil, and copper
pans, on the smoothtop can leave a mark. The
marks made by aluminum
can be removed If
they are not heated.
See page 22 for cleaning and care suggestions.
Cooklng...
The glass will take longer to heat up than a
regular surface unit. It will also take longer
to cool down. Turn off the unit a few minutes
before you are finished cookrng.
l
l
The Care and Cleaning...
Always clean the smoothtop
after cooking.
Use a special smoothtop
cleaner/conditioner
available
from your appliance
dealer, grocery, hardware
or variety stores.
Avoldlng
stalns
l Use a special
smoothtop
cleanericonditioner every time you use the Smoothtop
Module. Follow the package
directions
carefully.
l Wipe
the smoothtop with a clean, damp
paper towel before you use the smoothtop. (Do not use a sponge or cloth. A little
leftover soap or soil can stain the smoothtop when heated.)
l
Use only clean cookware.
l Avoid
spillovers. Use pans with tall sides.
l Don’t let covers
drip on the smoothtop.
OPTIONAL
Wipe up any spill when the unit is cool
enough not to steam when a wet cloth
touches it. The longer you cook wlth a splllover on the unit, the harder It will be to
remove that spill.
Clean off metal marks (from copper or
aluminum)
right away. If heated, they may
never come off
Avoiding
Damage
Rough cookware,
jewelry, salt, sand,
knives, etc....can scratch the surface. Use
only smooth cookware;
wipe the surface
before using. DO NOT use the smoothtop
as
a cutting board.
l
Sugary spills can cause pitting on the surface. Wipe a spill when the surface is cool.
l
Pans that aren’t flat can cause hot spots
that can crack the surface.
l
Spilling ice-cold
water on a hot surface
may crack it.
l
Dropping
heavy or hard objects on the
cooktop can crack it. Be careful with heavy
skillets. Don’t store jars or cans above the
smoothtop.
See the special “Smoothtop
Cleanlng
Chart”
on page 22.
l
CUTTING BOARD
Before using the Cutting Board...
Wipe with damp sudsy cloth to remove
dust.
2. Rinse and wipe dry.
3. Season it by coating with colorless minera
oil.
4. Let oil stand a few hours; wipe off excess.
To keep the Cutting Board looking new, sand
the surface with fine sandpaper
to remove
cutting marks and stains. Clean and re-season.
To sterilize the board, use a mixture of one
teaspoon
chlorine bleach to one quart water.
Wipe cutting board. Clean and re-season.
1.
t7
Cleaning and caring
for your range
CONTROL
PANEL
AND KNOBS
SURFACE UNITS AND
REFLECTOR BOWLS
REMOVING
1.
Be sure surface
units are OFF and COOL.
\
‘;\
I
-
\
*es
\
1.
2.
3.
First make sure knobs
pull knob rtralght off.
are set on OFF then
2.
Lift the edge of the unit opposite the recep
tacle just enough to clearthe
reflector bowl.
3.
Pull the surface
receptacle.
4.
Lift out the reflector
Use warm soapy water and a soft cloth to
wipe the panel. Rinse and wipe dry.
Wash knobs in warm
well and dry.
soapy
water.
unit straight
away
from the
bowl.
Rinse
REPLACING
1.
Be sure surface
unit controls
are OFF.
Bowl
1
Opening
2
I
h
4.
18
Push the knobs straight
they point to OFF.
back
Receptacle
on. Make sure
2.
Line up opening
in the reflector
the surface unit receptacle.
bowl
with
Terminal
3.
Hold the surface unit as level as possible
with the terminal
just started
into the
receptacle.
4.
While pushing the surface unit terminal into
the receptacle,
lift a little on the edge of
the unit nearest the receptacle.
5.
When the terminal
is pushed into the receptacle
as far as it will go, the surface unit
will fit into the reflector bowl.
Reflector bowls reflect heat back to the
utensils on the surface units. They also help
catch spills. When they are kept clean, they
reflect heat better and look new longer
If a reflector bowl gets discolored,
some
of the utensils used may not be flat enough.
Or some may be too large for the surface
unit. In either case, some of the heat that is
meant to go into or around a utensil goes
down and heats the reflector bowl. This extra heat can discolor it.
USING THE SELF-CLEANING
CYCLE
The self-cleaning
cycle uses very hlgh heat to burn awcy soil. Before
you start, make sure you understand
exactly how to use the cycle
safely.
BEFORE YOU START
1.
Clean areas that may not be cleaned
during the cycle. Use hot water and detergent or a soapy steel-wool pad on...
l the frame
around the oven
l the inside
of the door, especially
the part
outside the oven seal.
DO NOT try to clean the flberglass
seal. DO
NOT move It or bend It.
2.
Remove any pots or pans you may have
stored in the oven. They can’t stand the
help reduce
Clean
ny loose soil or grease. This will
smoke during the cleaning
Door
19
SPECIAL TIPS
1.
Keep the kitchen well
ventilated
during the
cleaning
cycle to help
get rid of normal heat
odors and smoke.
4.
Oven racks lose their shine, discolor
and become
harder to slide on their
guides when they are left in the oven
during the cleaning
cycle. To make
them slide easier, polish the edges of
the racks and rack guides with a soapy
steel-wool pad, rinse well, and wipe
on a thin coat of salad oil.
2.
Clean the oven before
it gets heavily soiled.
Cleaning
a very soiled
oven takes longer and
results in more smoke
than usual.
5.
3.
If the cleaning
cycle
doesn’t get the oven as
clean as you
expected,
the cycle
may not have been set
long enough. Set the
cleaning
time longer
for heavier soil.
To stop the cleaning
cycle after it has
started:
l Turn the Stop Trme Knob clockwise
until the hand points to the right time
of day.
l
Turn the Oven Selector and Oven
Temperature
Control to OFF.
l
When the oven cools, you can
open the door. Wait until the oven is cool.
SPECIAL CAlllIONS
DO NOT touch the range
during the cleaning
cycle
...it can burn you.
DO NOT use foil or other
liners in the oven. During
the cleaning
cycle, they
can burn or melt.
DO NOT use commercial
oven cleaners in your oven.
Damage to the porcelain
finish may occur.
DO NOT block the vent
during the cleaning
cycle.
Air must move freely for
best results.
SETTING THE CONTROLS
1.
20
Make sure the clock
and start and stop
time dials all have the
right time of day.
2.
Push in the Stop Time
Knob and turn the
hand clockwise
about two or three
hours. (Two hours for
light soil; three or
more for heavier soil.]
3.
Set the Oven Selector
to CLEAN. The Clean
Light will come on
and the door will lock
automatically.
6.
4.
Set the Oven Temperature Control to
CLEAN.
5.
The Lock Light comes
on when the oven
gets above normal
baking temperatures.
The door can’t be
unlocked when the
Lock Light is on.
7.
Turn the Oven Temperature Control to OFF.
8.
Affer the oven Is cool,
wipe off any residue
or ash with a damp
cloth.Ifneeded,
touch up spots with
cleanser or soapy
steel-wool pad.
When the Lock Light
goes off, turn the Oven
Selector to OFF. This
unlocks the door.
DO NOT TOUCH THE RANGE DURING THE CLEANING CYCLE. IT CAN BURN YOU.
HOW IT WORKS
During the self-cleaning
cycle, the oven gets much hotter than it does
for baking
or broiling...approximately
870” F (46&C).
This heat breaks
up grease
and soil, and burns it off.
The graph shows approximate
temperatures
and times during a selfcleaning
cycle set for two hours.
SELF-CLEANING
CYCLE -TWO
(Approximate
Temperatures
HOUR SETTING
and Tlmes)
1000
F
538
c
800
F
427
C
600
F
316 c
400
F
204
200
F
START
C
93 c
% hr.
1 hr.
1% hrs.
2 hrs.
2% hrs
Notice that the heating stops when the two-hour setting is up, but that it takes a
while longer for the oven to cool down enough to unlock.
CLEANING COOKTOP MODULES
PART
WHAT TO USE
HOW TO CLEAN
SURFACE UNITS
Do not clean
l
l
GRIDDLE MODULE
AND COVER
Warm soapy
water
l
l
l
l
GRILL MODULE
Grill
Warm soapy water or
soapy steel wool pad
Heating Element
Do not clean
l
l
l
l
Basket with Ceramic
Hot soapy water
CUTTING
BOARD
l
Grease Well and Frame
Warm soaov water and
plastic scouring
pad
SUDDOrtS
and SDlt
Worm soapy water and
plastic scouring pad
Motor
Soft cloth; warm soapy
water.
Sott cloth;
warm
To season
or sterlllre
water
SMOOTHTOP
l
l
soapy
or harsh
It needed.
Wash, rinse and dry well.
Use soapy steel wool pads
for stubborn
areas.
Soil burns off.
Do not Immerse.
l
l
Clean often.
Soak and swlsh In hot, soapy
water.
Wash, rinse and dry well.
Clean otten.
. Wash, rinse and dry well.
l Clean
after each use.
Do not Immerse.
Unplug before cleanlng.
0 Wloe clean often.
l Wipe clean
otter each use.
l Do not soak.
l See oaae
17.
l
l
MODULE
Avoid Staining l See page 17.
Use cleaner/conditioner
often
package
directions
carefully.
l
Follow
If you do get a stain:
1. A mildly abrasive
cleanser like Bar Keepers Friend ’ with a plastic scouring pad
will help remove stains that aren’t burned
on. Use cleaner/conditioner
afterwards.
2. A soapy steel wool pad will help with stubborn spots. Make sure the pad is very
soapy. Use cleaner/conditioner
afterwards.
3. A moist sponge and automatic
dishwasher
detergent
can help. (Wear rubber gloves.)
Rinse and dry carefully. Use cleaner/conditioner afterwards.
4. Spread a paste of powdered
cleanser
and water over the stain. Keep the paste
damp with a damp paper towel for 30
to 45 minutes. This can soften the soil so a
cleanser or steel wool pad can remove it.
Use the cleaner/
conditioner
afterwards,
22
pads
Rocks
l
ROTISSERIE
Sol1 burns off.
Do not Immerse.
Do not immerse grlddle.
Wash, rlnse and dry well.
Do not use metal scouring
cleansers
Use plastic scouring
pad
Soak stain with a mixture of household
ammonia
and water (1 part ammonia
to 4
parts water) for 30 to 60 minutes. Use a
damp paper towel to cover Use cleanser
and plastic, nylon or soapy steel wool
pad. Use the cleanser/conditioner
afterwards.
For thick soil buildups, a single-edge
razor
blade in a holder can be used. Carefully
scrape off most of the soil as you would
scrape paint off a window. Then use one of
the cleaning
methods mentioned
above.
CLEANING CHART
PART
Outslde
of range
WHAT TO USE
HOW TO CLEAN
Soft cloth, warm soapy water
Nylon or plastic scouring
pad for
stubborn
spots
9 Wipe off regularly
when range Is cool.
Do not allow food contalnlng
acids (such as
vlnegar, tomato, lemon Juice or milk) to remaln
on surface. Acids will remove the glossy flnlsh.
l Do not use abraslve
or harsh cleansers.
l Spatters
or spills will burn off.
In water.
l Do not Immerse
l Wash, rlnse and dry well.
l Do not soak.
l Wash wlth other
cooklng
utensils.
l Do not place
In SelfCleanIng
Oven.
l Wash wlth other
cooklna
utensils.
l Do not place
In Self-Clganlng
Oven.
l Wash, rinse and dry wlth soft cloth.
l leave
In oven durlng SelfCleanIng
cycle.
l Wash, rlnse and dry. Use soapy
steel wool pads
for stubborn
areas:
l Make
certain oven Is cool. Wash, rlnse and dry
well wlth soft cloth.
l Follow
dlrectlons
provlded
with cleaner.
cycle to
9 Clean before usln SelfCleanIng
prevent burn-on o ? solI.
l Follow
dlrectlons
glven on page 19,“Uslng the
SelfCleanIng
Cycle.”
Surface
unlts
No cleaning
Control
knobs
Warm, sudsy water
Chrome reflector
bowls
Porcelain-enamel
broiler pan and grid
Control panel
Oven racks
Oven door
SelfCleanIng
Oven’
l
- reaulred
and bristle
brush
Automatic
dlshwasher
or warm,
soapy water or plastic scrubbing
pad
Warm, soaov water or soaov. . steel
wool pads’ .
Warm, soapy water
SelfCleanIng
Oven cycle
Warm, soapy water or soapy steel
wool padsWarm, soapy water or plastic
scrubbing
pad
Commercial
glass cleaner
For areas outslde SelfCleanIng
area
use warm, soapy water or soapy steel
wool pads
l Do not use oommerclal
Do not use toil to line the bottom ot your Self-Cleaning
Oven.
oven cleaners.
If you need service or help, we
suggest you follow these three steps:
1
l
BEFORE YOU
FOR SERVICE*:
If your range does not seem to be operating properly,
check
the following
before
calling
for service.
If nothing
operates:
9 Is the range
l
correctly
wired to a live circuit
with proper voltage?
(See lnstallatlon
Instructlons.)
Have you checked
the main fuse or circuitbreaker box?
If the oven will not operate:
Is the Oven Selector turned to a setting
[BAKE or BROIL, but not TIMED BAKE]?
l
Is the Oven Temperature
Control turned
temperature
setting?
l
to a
If surface units or cook-fop modules will not
operate:
l
Have you checked
the main fuse or circuitbreaker box?
l Are surface
units or cooktop modules
plugged
in all the way?
l Do the control
knobs turn?
If surface unlt control knob or knobs will not
turn:
l
Did you push in before trying to turn?
If the SelfCleanIng
cycle will not operate:
l Are the Oven
Selector and the Oven Temperature
Control
set to “CLEAN?”
l
Does the Start Time Dial show the correct
time of day?
l
Is the Stop lime Dial set ahead to the time
you want the cleaning
cycle to stop?
If cooklng resulfs aren’t what you expect:
l
Is the range level?
l
Are you using pans recommended
in the
Cooklng Gulde?
l
If baking, have you allowed
1% to 2 inches
(4-5 cm] on all sides of the pans for air
circulation?
l
Does the oven temperature
seem too low or
too high? [See page 6, “Resetting the
Oven Temperature
Control.“]
l Have
you preheated
the oven as the recipe
calls for?
l Are the pans the size called
for in the
recipe?
l Are you following
a tested recipe from a
reliable source?
l
Do the cooking utensils have smooth, flat
bottoms?
. Do the cooking utensils fit the surface unit
being used?
See the Cooklng Guide for more information
on cooking problems and how to solve them.
23
2
l
IF YOU NEED SERVICE*:
If your WHIRLPOOL” appliance
ever needs
service anywhere
in the United States, help is
just a phone
call away...to
your nearest
Whirlpool
franchised
TECH-CARE@ service
representative.
SYMBOL
iiF
OUALITY
StRVlCt
Whirlpool
maintains
a nationwide
network
of franchised
TECH-CARE service companies
to fulfill your warranty
and provide after-warranty service and maintenance
to keep your
WHIRLPOOL appliance
in peak condition.
You’ll find your nearest TECH-CARE service
company
listed in your local telephone
book
Yellow
Pages
under
APPLIANCES - HOUSEHOLD - MAJOR -SERVICE AND REPAIR. Should
you not find a listlng,
dial the Whlrtpool
COOL-LINE@ service assistance
toll-free telephone nymber:
Contlnental
U.S. . . . . Dlal(800)
253-1301
In Mlchlgan
. . . . . . . . . Dlal(800)
632-2243
Alaska and Hawall
. Dlal(800)
253-1121
If you move...To make sure that your appliance is correctly
installed
and to insure its
continued
satisfactory
operation,
please telephone your nearest TECH-CARE service company for installation
or to get the name of a
qualified
installer.
(Installation
cost will, of
course, be paid by you.)
Helpful hlnts...You can help your TECH-CARE
service representative
give you faster service
if you include the model and serial number of
your appliance
when requesting service. Also,
retain your sales slip and warranty
to verify
your warranty status.
Remember...Your
LTE~~-C~RE service
rep
resentative
is specially
trained in the expert
repairing
and servicing
of your WHIRLPOOL
appliances.
He can help you maintain
the
quality
originally
built into your WHIRLPOOL
appliance.
So why not take the time, now, to
look up his telephone
number and jot it down
in the space provided
on the cover.
3
l
IF YOU HAVE A PROBLEM*:
Call Whirlpool Corporation
in Benton Harbor
at the COOL-LINE service
assistance
telephone number [see step 2) or write:
Mr. Guy Turner, Vice President
Whirlpool Corporation
Administrative
Center
2000 U.S. 33 North
Benton Harbor, Michigan
49022
*If you must call or write, please provide: your
name, address, telephone
number, type of appliance,
brand, model, serial number, date of
purchase, the dealer’s name, and a complete
description
of the problem.
This information
is
needed
in order to better respond to your request for assistance.
FSP is a regislered
trademark
of Whirlpool
Corporation
for
quality
parts. look for this
FSP
symbol of quality whenever
8 you need a replacement
part
for your Whirlpool
appliance.
FSP replacement
parts
will fit right and work right. because
they are
made lo the same exacting
specifications
used lo burld every new Whirlpool
appliance.
0
TKirlpool
Home
Part No. 1324116/868966
Appliances
Benlon Harbor, Michigan. Automatic Washers, Clothes Dryers,
Freezers, Relrigeralor-Freezers.
Ice Makers, Dishwashers,
Built-in Ovens and Surface Units, Ranges. Microwave Ovens,
Compactors, Room Air Conditioners, Dehumidifiers,
Central
Heating and Air Conditioning Systems.
Quality. Our way of life.
Printed
in U.S.A.