1
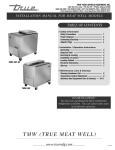
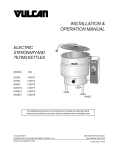
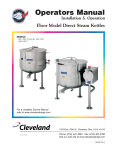
INSTALLATION &
OPERATION MANUAL
DIRECT STEAM
COUNTERTOP
TILTING KETTLES
MODELS
K6DTT
ML-136070
K12DTT
ML-136071
For additional information on Vulcan-Hart or to locate an authorized parts and
service provider in your area, visit our website at www.vulcanequipment.com
VULCAN-HART
DIVISION OF ITW FOOD EQUIPMENT GROUP, LLC
WWW.VULCANEQUIPMENT.COM
3600 NORTH POINT BLVD.
BALTIMORE, MD 21222
FORM 37480 (02-11)
DIRECT STEAM COUNTERTOP TILTING KETTLES
IMPORTANT FOR YOUR SAFETY
THIS MANUAL HAS BEEN PREPARED FOR PERSONNEL QUALIFIED TO
INSTALL STEAM EQUIPMENT, WHO SHOULD PERFORM THE INITIAL
FIELD START-UP AND ADJUSTMENTS OF THE EQUIPMENT COVERED
BY THIS MANUAL.
Improper installation, adjustment,
alteration, service or maintenance can cause
property damage, injury or death. Read the
INSTALLATION, OPERATING AND MAINTENANCE
Instructions thoroughly before installing or servicing
this equipment.
—2—
DIRECT STEAM COUNTERTOP TILTING KETTLES
TABLE OF CONTENTS
INSTALLATION, OPERATION AND MAINTENANCE OF
K6DTT AND K12DTT DIRECT STEAM TILTING KETTLES ......................................................... 4
GENERAL ................................................................................................................................... 4
UNPACKING ............................................................................................................................... 5
INSTALLATION CODES AND STANDARDS ........................................................................... 5
LOCATION .................................................................................................................................. 5
INSTALLATION ................................................................................................................................. 5
INSTALLING K6DTT ON COUNTER OR STAND .................................................................... 5
INSTALLING K12DTT ON TABLE OR STAND ......................................................................... 6
PLUMBING CONNECTIONS ..................................................................................................... 6
Steam Supply Connection ................................................................................................... 6
Drain Connection ................................................................................................................. 6
OPERATION .................................................................................................................................... 7
DIRECT STEAM ......................................................................................................................... 7
CLEANING ........................................................................................................................................ 7
STAINLESS STEEL EQUIPMENT CARE AND CLEANING ..................................................... 7
Enemies of Stainless Steel ................................................................................................. 8
Recommended cleaners for specific situations ................................................................ 9
Review .................................................................................................................................. 9
MAINTENANCE ................................................................................................................................ 9
TROUBLESHOOTING .................................................................................................................. 10
SERVICE AND PARTS INFORMATION ...................................................................................... 12
—3—
DIRECT STEAM COUNTERTOP TILTING KETTLES
INSTALLATION, OPERATION AND MAINTENANCE OF
K6DTT AND K12DTT DIRECT STEAM TILTING KETTLES
SAVE THESE INSTRUCTIONS FOR FUTURE USE
GENERAL
Vulcan countertop tilting kettles are produced
with quality workmanship and material. Proper
installation, usage and maintenance will result
in many years of satisfactory performance. It
is suggested that you thoroughly read this
entire manual and carefully follow all of the
instructions provided.
These kettles must be connected to a plumbing
source according to applicble specifications
and codes. These units are built to comply
with applicable manufacturing standards and
approvals. Approval agencies include UL, NSF,
ASME and NB.
It is the responsibility of the owner/installer to
comply with these codes.
The Direct Steam Kettles are available in both
6- and 12-gallon capacity models.
Fig. 1 K6DTT Direct Steam Tilting Kettle
TABLE 1. MODEL CHART
Model
Number
Gallons
Quarts
Liters
K6DTT
6
24
23
K12DTT
12
48
45
Fig. 2 K12DTT Direct Steam Tilting Kettle
—4—
DIRECT STEAM COUNTERTOP TILTING KETTLES
INSTALLATION
MINIMUM CLEARANCE
Before installing, verify that the direct steam
supply required for the equipment covered by
this manual agrees with the specifications on
the machine data plate, located on the back of
the unit. If the direct steam supply does not
agree with the equipment requirements, do
not proceed with the installation. Contact your
dealer or Vulcan-Hart immediately.
TABLE 2. MINIMUM CLEARANCE
REQUIREMENTS
UNPACKING
This kettle was inspected before leaving the
factory. The transportation company assumes
full responsibility for safe delivery upon
acceptance of the shipment.
Capacity in
Gallons
Clearance in
Inches (Back)
6
5.25
12
6.5
INSTALLING K6DTT ON COUNTER
OR STAND
Immediately after unpacking, check for
possible shipping damage. If kettle damage is
found, save the packaging material and
contract the carrier within 15 days of delivery.
Vulcan kettles must be permanently
mounted on a suitable, level counter or
stand. Place unit in a drained location.
INSTALLATION CODES AND
STANDARDS
In the United States, Vulcan kettles must be
installed in accordance with:
1
State and local codes
2
NFPA Standard NFPA-96, Vapor Removal
from Cooking Equipment, latest edition,
available from the National Fire Protection
Association, Batterymarch Park, Quincy,
MA 02269
In Canada, Vulcan kettles must be installed in
accordance with local codes.
Fig. 3 Mounting Hole Location
LOCATION
1. Position the kettle on the counter with
sufficient rear clearance from the wall to
allow the kettle to tilt completely without
obstruction according to the Minimum
Clearance Requirement Chart, Table 2.
Allow space for plumbing.
The K6DTT and K12DTT countertop tilting
kettles must be positioned on a firm stand or
countertop and secured in place.
—5—
DIRECT STEAM COUNTERTOP TILTING KETTLES
PLUMBING CONNECTIONS
2. On countertop, drill two 1" holes on 8 1/2"
centers for the two kettle leg stanchions.
Plumbing connections must comply with
applicable sanitary, safety and plumbing
codes.
3. Remove the mounting locknuts and
washers [1/2" NPT (NPSL) nuts] from the
bottom of the legs.
Steam Supply Connection
4. Prepare a clean, dry surface according to
package directions on a high grade NSF
listed sealant.
TABLE 3. STEAM TABLE
Fast Boil
12 minutes
5. Apply sealant to the flared edge of the
stanchions.
6. Insert the threaded portion of the
stanchions through the holes. Install
washers and lock nuts and tighten.
7. Wipe off excess sealant.
Medium Boil
20 minutes
Stock Boil
30 minutes
Time to boil
lbs/hr
kg/hr
lbs/hr
kg/hr
lbs/hr
kg/hr
12 gallons
78
36
43
20
29
13
MODEL
TRUE WORKING CAPACITY
4OZ. SERVINGS
K12DTT
12 gallons, 48 quarts
45 liters
384
1. Install a steam shut off valve in the steam
supply line, preferably near the kettle for
ease of maintenance.
INSTALLING K12DTT ON
TABLE OR STAND
2. Install a pressure reducing valve (if supply
pressure is more than 50 PSI), pressure
relief valve, and strainer.
3. Install steam traps in the line to eliminate water
in the incoming steam line. Mount in a drip leg
on the supply line, not directly in the supply line.
4. Install steam line pressure gauge to
determine actual pressure to kettle.
5. Connect the steam supply line (1/2" pipe size) to
the steam inlet fitting on the right leg (stanchion).
Drain Connection
1. Install a steam steam strainer and trap in the
condensate line (left side) near the kettle and
run a condensate return line to the drain.
Figure 4: K12DTT mounting hole location
2. Install a check valve and gate shut off valve
near the kettle if the condensate line will be
going to the boiler.
1. Drill four 7/16" holes in table or stand top as
shown in Figure 4.
Relief
Valve
50 PSI
2. Drill two 1" holes in table or stand top as
shown in Figure 4.
Pressure Pressure
Gauge Reducing
Valve
Union
Shutoff
Valve
Strainer
TO
KETTLE
STEAM
IN
3. Install /8" anchor couplings in the 1" holes.
3
STEAM
IN
TO DRAIN
STEAM LINE PLUMBING
4. Set kettle on table or stand top, align holes,
and attach using four 5/16" - 18 hex head
screws and lock washers.
Steam Trap
on Drip Leg
Strainer
FROM
KETTLE
5. Using flexible steel or copper tubing,
connect steam and condensate lines under
the kettle.
Steam
Trap
Check
Valve
TO DRAIN OR BOILER
CONDENSATE RETURN
CONDENSATE RETURN PLUMBING
Figure 5: K6DTT Plumbing
—6—
DIRECT STEAM COUNTERTOP TILTING KETTLES
OPERATION
The kettle and its parts are
hot. Use care when operating, cleaning or
servicing the kettle.
1. Fill kettle with product to the desired level.
NOTE: Food products with milk or egg base
should be placed into a cold kettle before
cooking. Avoid sudden contact of these
food products with a hot kettle surface
because they will stick to the surface.
3. The water or food should boil in 3 to 4
minutes per gallon. If it does not, then
check incoming pressure to determine
that it is adequate to operate the kettle.
Refer to table for steam supply.
2. Slowly turn the steam control valve to the
full open position.
4. Regulate the steam control valve according
to the type of food being prepared.
CLEANING
3. Add mild detergent and scrub the kettle
interior with a nylon brush.
Disconnect
electrical power to the
machine and follow Lockout/
Tagout procedures before
cleaning.
4. Thoroughly rinse the interior and dry with a
soft cloth.
5. Rinse the exterior and dry with a soft cloth.
NOTE: Do not hose down under any
condition. Failure to comply will void
the warranty.
STAINLESS STEEL EQUIPMENT
CARE AND CLEANING
Contrary to popular belief, stainless steels
ARE susceptible to rusting.
The kettle interior and exterior should be
washed after each use when a different food
is to be cooked next or when cooking is
completed for the day.
Corrosion on metals is everywhere. It is
recognized quickly on iron and steel as
unsightly yellow/orange rust. Such metals are
called “active” because they actively corrode
in a natural environment when their atoms
combine with oxygen to form rust.
1. Add water to the kettle for cleaning and to
prevent residue from drying and sticking to
the inside of the kettle.
2. Loosen stuck-on food by allowing it to
soak at a low temperature setting.
Stainless steels are passive metals because
they contain other metals, like chromium, nickel
and manganese that stabilize the atoms. 400
series stainless steels are called ferritic, contain
chromium, and are magnetic; 300 series
stainless steels are called austenitic, contain
chromium and nickel; and 200 series stainless,
also austenitic, contains manganese, nitrogen
and carbon. Austenitic types of stainless are not
magnetic, and generally provide greater
resistance to corrosion than ferritic types.
Never use harsh or corrosive cleaning
chemicals.
Never scrape the inside of the kettle with
abrasive cleansers metal tools or steel
scouring pads, which will scratch the surface,
spoil the appearance and make it more difficult
to thoroughly clean.
—7—
DIRECT STEAM COUNTERTOP TILTING KETTLES
With 12-30 percent chromium, an invisible
passive film covers the steel’s surface acting as
a shield against corrosion. As long as the film is
intact and not broken or contaminated, the metal
is passive and stainless. If the passive film of
stainless steel has been broken, equipment
starts to corrode. At its end, it rusts.
lines are present, always scrub in a motion
parallel to the lines. When the grain cannot
be seen, play it safe and use a soft cloth or
plastic scouring pad.
3. Use alkaline, alkaline chlorinated or
non-chloride-containing cleaners.
While many traditional cleaners are loaded
with chlorides, the industry is providing an
ever-increasing choice of non-chloride
cleaners. If you are not sure of chloride
content in the cleaner used, contact your
cleaner supplier. If your present cleaner
contains chlorides, ask your supplier if
they have an alternative. Avoid cleaners
containing quaternary salts; it also can
attack stainless steel and cause pitting
and rusting.
Enemies of Stainless Steel
There are three basic things which can break
down stainless steel’s passivity layer and
allow corrosion to occur.
1. Mechanical abrasion
2. Deposits and water
3. Chlorides
Mechanical abrasion means those things that
will scratch a steel surface. Steel pads, wire
brushes and scrapers are prime examples.
4. Treat your water.
Though this is not always practical,
softening hard water can do much to
reduce deposits. There are certain filters
that can be installed to remove distasteful
and corrosive elements. To insure proper
water treatment, call a treatment specialist.
Water comes out of the faucet in varying degrees
of hardness. Depending on what part of the
country you live in, you may have hard or soft
water. Hard water may leave spots, and when
heated leave deposits behind that if left to sit, will
break down the passive layer and rust stainless
steel. Other deposits from food preparation and
service must be properly removed.
5. Keep your food equipment clean.
Use alkaline, alkaline chlorinated or nonchloride cleaners at recommended
strength. Clean frequently to avoid buildup of hard, stubborn stains. If you boil
water in stainless steel equipment,
remember the single most likely cause of
damage is chlorides in the water. Heating
cleaners that contain chlorides has a
similar effect.
Chlorides are found nearly everywhere. They
are in water, food and table salt. One of the
worst chloride perpetrators can come from
household and industrial cleaners.
So what does all this mean? Don’t
Despair! Here are a few steps that can help
prevent stainless steel rust.
6. Rinse, rinse, rinse.
If chlorinated cleaners are used, rinse and
wipe equipment and supplies, and dry
immediately. The sooner you wipe off
standing water, especially when it contains
cleaning agents, the better. After wiping
equipment down, allow it to air dry; oxygen
helps maintain the stainless steel’s
passivity film.
1. Use the proper tools.
When cleaning stainless steel products,
use non-abrasive tools. Soft cloths and
plastic scouring pads will not harm steel’s
passive layer. Stainless steel pads also
can be used, but the scrubbing motion
must be in the direction of the
manufacturer’s polishing marks.
7. Never use hydrochloric acid (muriatic
acid) on stainless steel.
2. Clean with the polish lines
8. Regularly restore/passivate stainless
steel.
Some stainless steel comes with visible
polishing lines or “grain.” When visible
—8—
DIRECT STEAM COUNTERTOP TILTING KETTLES
Recommended cleaners for specific situations
JOB
CLEANING AGENT
COMMENTS
Routine cleaning
Soap, ammonia,
detergent, Medallion
Apply with cloth or sponge
Fingerprints & smears
Arcal 20, Lac-O-Nu Ecoshine
Provides barrier film
Stubborn stains &
discoloration
Cameo, Talc, Zud,
First Impression
Rub in direction of polish lines
Grease & fatty acids,
blood, burnt-on-foods
Easy-off, De-Grease It Oven Aid
Excellent removal on all
finishes
Grease & oil
Any good commercial detergent
Apply with sponge or cloth
Restoration/Passivation
Benefit, Super Sheen
Review
1. Stainless steels rust when passivity (filmshield) breaks down as a result of scrapes,
scratches, deposits and chlorides.
5. Soften your water. Use filters and softeners
whenever possible.
Stainless steel rust starts with pits and
cracks.
6. Wipe off cleaning agent(s) and standing
water as soon as possible. Prolonged
contact causes eventual problems.
3. Use the proper tools. Do not use steel
pads, wire brushes or scrapers to clean
stainless steel.
To learn more about chloride-stress corrosion
and how to prevent it, contact the equipment
manufacturer or cleaning materials supplier.
4. Use non-chlorinated cleaners at
recommended concentrations. Use only
chloride- free cleaners.
Developed by Packer Engineering, Naperville, Ill., an
independent testing laboratory.
Provided courtesy of NAFEM.
2
MAINTENANCE
Clean the line strainers before and after the
kettle on an annual basis, or more often as
required.
Strainer maintenance is not covered under
warranty.
—9—
DIRECT STEAM COUNTERTOP TILTING KETTLES
TROUBLESHOOTING
K6DTT & K12DTT: Direct Steam Countertop Kettle Troubleshooting
SYMPTOMS
Kettle not heating
POSSIBLE CAUSES/REMEDY
No steam supply/Turn on building supply valve to kettle.
Boiler or steamer supplying kettle not on/Turn on unit.
Building steam not turned on/Call building maintenance.
Steam control valve closed/Open control valve to allow steam to enter
kettle jacket.
No condensate return flow, closed loop system/Condensate return valve
is not open.
Steam supply strainer dirty/Clean strainer.
Steam not flowing/Steam supply line blockage. Call Service.
Condensate line blockage/Clean strainer. Call Service.
Steam trap not operating or clogged/Call Service.
Full of condensate water/Add steam trap to building steam supply line.
Building condensate return pump not working/Call Service.
Slow cooking time or
fails to boil
Inadequate steam flow/Control valve not fully open to desired setting.
Supply pressure is low/Contact building maintenance. Call Service.
Steam supply line undersized/Contact plumber or building maintenance.
Kettle(s) exceed steam supply capabilities/Refer to sequential start up
instructions in Installation & Operation manual.
Pressure relief valve on steam supply leaking/Call Service.
Line strainer clogged/Clean line strainer.
Steam trap malfunction/Contact building maintenance or call Service.
Trunnion seals leaking
Dirty steam/Install steam strainer before kettle(s).
Trunnion legs not mounted securely to table or table too flimsy to
support kettle/Tighten trunnion leg mounting nuts/Reinforce table
mounting surface.
Valve leaking steam
Valve packing needs tightening/Using a 20 mm wrench turn valve
packing nut, closest to the knob, 1/8 turn at a time till leak stops, or call
an authorized servicer.
— 10 —
DIRECT STEAM COUNTERTOP TILTING KETTLES
K6DTT & K12DTT: Direct Steam Countertop Kettle Troubleshooting (continued)
SYMPTOMS
POSSIBLE CAUSES/REMEDY
Kettle stays hot after
steam control valve
is fully closed
Valve seal has failed/Replace valve/Call an authorized servicer to repair.
Kettle making
cracking sound when
started up from cold
Water in jacket turning to steam/None, this does not harm the unit.
Open steam control valve slowly/gradually during initial heat-up.
Dirty supply steam/Replace valve, install steam strainer,
call authorized servicer.
Note: When heating issues occur with direct steam kettles, building
maintenance should be notified first before calling a service company.
Service calls due to building steam supply issues are not covered
under warranty.
— 11 —
DIRECT STEAM COUNTERTOP TILTING KETTLES
SERVICE AND PARTS INFORMATION
To obtain service and parts information concerning this model, contact the Vulcan-Hart Service
Agency in your area (refer to our website, www.vulcanequipment.com for a complete listing of
Authorized Service and Parts depots).
When calling for service, the following information must be available: model number, serial number,
manufacture date (MD) and steam pressure.
(02-11)
— 12 —
PRINTED IN U.S.A.