1
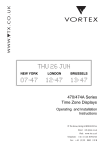
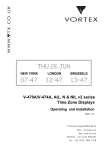
V-400A Series Multifunction Clocks and Calendar Clocks Operating and Installation Instructions 75 The Grove, Ealing LONDON W5 5LL Email: info @vtx.co.uk Web: www.vtx.co.uk Telephone: +44 (0)20 8579 2743 Fax: +44 (0)20 8840 0018 Contents Introduction Operating Modes 1 Installation 3 Power Supply Connection 3 External Signal Connection 3 Manual Time Synchronisation 3 Optional Internal Interfaces 3 Guarantee 3 Time and Date Setting 4 Function Programming 6 Programmable Options 7 Special Display Modes 10 EBU/SMPTE Code Formats 11 Serial ASCII Data Formats 12 Up/Down Stopwatch Operation with 402A Stopwatch Controller Introduction 13 Programmable options 14 402A Stopwatch Controller Function Programming 15 402A Stopwatch Controller Operating Modes 16 Simple Stopwatch Operation with 496A Stopwatch Controller 18 Optional Internal Interfaces Installation 20 Interface Function Options 21 Special Operating Modes Temperature Display 22 Local Master Clock Mode 22 Radio Time Code Synchronisation 23 Mounting Details 400A.02 Series DIN Cased Panel Mounting Clocks 24 Ceiling Suspended Cases 25 Flush Mounting Cases 26 Surface Mounting Cases 27 External Interface Connections Program Record Sheet 28 Inside rear cover Issue 2.2 Introduction - 1 Operating Modes The 400A family of electronic digital clocks and calendar clocks allows a wide range of user programmable operating modes as detailed below. To program the required functions please refer to the Function Programming instructions starting on page 6. For a full description of the various program function selection options please refer to pages 7 to 9. • automatic or manual control of display brightness - program function 1. • 12 or 24 hour display selection - program function 2. • Stand-alone operation - program function 3, selection 1 - or synchronisation from : ∼ Uni-polar or alternate polarity signals, 6 - 24v, at a one second, half minute or one minute repetition rate - program function 3, selections 2 to 7. ∼ W482 time code signals with selection of one of fifteen different time zones - program function 3, selection 8. ∼ MSF or DCF radio time code signals when used in conjunction with a 484 series radio time code receiver. The displayed time may be either CET when synchronised to DCF signals, BST when synchronised to MSF signals or UTC (GMT) when synchronised to either DCF or MSF signals program function 3, selections 9 to 12. Please refer to page 23 of this manual for further information. ∼ IRIG-B or afnor NF S 87- 500 time code signals - requires optional 404.I internal interface for modulated sine wave signals or 404.4 internal interface for RS485 level logic signals - program function 3, selections 13 & 14. ∼ EBU or SMPTE signal in either of two date formats - requires optional 404.E internal interface - program function 3, selections 15 & 16. ∼ W482 time code from a 400A series clock used as a local master to synchronise up to 10 other 400A series clocks acting as slaves and located within 200 metres. The 400A clock used as a local master requires the internal 404.M interface option. The clock used as the local master may derive its time keeping from its internal crystal or be synchronised to radio time code signals. Please refer to page 22 of this manual for further information. ∼ RS232 or RS485 serial ascii data in one of three message formats - program function 3, selections 18 to 20; at 1200, 2400, 4800, or 9600 baud - program function 10 - with seven or eight data bits - program function 11 - and odd or even parity- program function 12. Serial ascii synchronisation requires either the optional internal 404.2 (RS232) or 404.4 (RS485) interface. Refer to page 12 for details of serial formats. ∼ GPS satellite time signals displayed either as UTC or as local time with up to ±13 hours offset program function 6, from UTC with pre-programmable seasonal time-change offset corrections requires 488GPS antenna and receiver/interface - program function 3, selection 23. • The display can be programmed to blank or stop in the event of synchronising code failure or to continue to count, using the internal high stability quartz crystal timebase, from the last valid signal received -program function 4. • Time only clocks (401A, 420A and 490A models) can be programmed for use as a stopwatch, when used with a 496A control panel, to count time in hours, minutes and seconds or minutes, seconds and 1/100th seconds (hours and minutes or minutes and seconds for model 420A) - program function 7, selection 1 or 2. Please refer to pages 18 & 19 of this manual for further information. • The 401A, 420A and 490A models can be programmed for use with a type 402A control panel to give the ability to switch between time-of-day and stopwatch time. The time-of-day count may be stand-alone or synchronised to remote impulse or code master clocks or radio time code signals. The stopwatch time can be programmed to count down from a user pre-programmed time value, stopping at or counting through zero, or to count up from zero. Five user selectable count-hold-reset modes are available for different timing applications - program function 7, selection 3 . Please refer to pages 13 to 17 of this manual for further information. Issue 2.2 1 Introduction - 2 • All models may be programmed to provide one of seven serial RS232 ascii data output messages when used in stand-alone or radio-synchronised modes - program function 9. The output messages may be either every second, after receipt of an ascii `T’ or `t’ - program function 7, selection 4) or on a voltage free switch closure - program function 7, selection 5. The output messages may be at 1200, 2400, 4800, or 9600 baud - program function 10 - , with seven or eight data bits - program function 11 - and odd or even parity - program function 12. Requires optional internal 404.2 (RS232) interface. Please refer to pages 12 and 20 - 21 of this manual for further information. • All models may be programmed to provide an alternating time/temperature display - program function 7, selections 6 or 7 - with user selection of the time interval between display changes program function 13 . The display temperature may be adjusted to correct errors due to sensor location and calibration. - requires optional temperature sensor. Please refer to page 22 of this manual for further information. • All models may be programmed for automatic seasonal time changes in accordance with European, UK or US change-over patterns - program function 14 . Manual selection of the appropriate change-over month and Sunday (first, second, third, fourth or last in month) is normally once-only. • The 450A, 451A, 452A, 453A, 454A and 460A calendar clocks may be programmed for four alternate date displays to show: • ∼ Julian date (the day of year) in place of day-of-week display - program function 15, selection 2 ∼ Week number in place of day-of-week display - program function 15, selection 3 The first Monday in each year is taken as the start of week 1. ∼ Numeric day-month-year display - program function 15, selection 4 ∼ Numeric month-day-year display - program function 15, selection 5 The date display of calendar clocks may be programmed to display one, two, or three languages program functions 16 to 19 - from those listed below. If two or three languages are selected the display changes at a user-selectable rate - program function 13. ∼ Catallonian - selection CA ∼ Czech - selection CR ∼ German - selection D ∼ Danish - selection DK ∼ Spanish - selection E ∼ French - selection F ∼ Galician - selection GA ∼ English - selection GB ∼ Hungarian - selection H ∼ Croat - selection HR ∼ Italian - selection I ∼ Norwegian - selection N ∼ Dutch - selection NL ∼ Portuguese - selection P ∼ Polish - selection PL ∼ Russian - selection RU ∼ Swedish - selection S ∼ Finnish - selection SF ∼ Slovak - selection SK ∼ Slovenian - selection SL ∼ Welsh - selection W Installation 400A series clocks are available with cases suitable for surface wall mounting, flush mounting in a panel with rear access, flush mounting in a wall box and single or double sided ceiling suspension. The surface wall mounting case is supplied with special mounting brackets to enable the angle of the front face of the clock to Issue 2.2 2 Introduction - 3 be varied to reduce or eliminate unwanted reflections. Please refer to pages 24 to 28 for further mounting information. Power Supply Connection 400A series clocks may be supplied for 230v ac, 110/120v ac, 12v dc, 24v dc or 48v dc. The clock must be connected to the appropriate supply after first verifying the correct voltage by reference to the supply voltage label fixed to or printed on the rear panel of the clock. A connection to the earth line must be made to ensure safe operation and ensure compliance with EMC regulations. To ensure conformance with EN60950: (A) For installations where the 400A clock is to be permanently connected into the mains power circuit, a readily accessible disconnect device should be incorporated in the fixed wiring. (B) For installations where the 400A clock is to be plugged into the mains power circuit, a socketed outlet should be installed near the equipment and should be easily accessible. All installation work should be performed in accordance with the Sixteenth Edition of the IEE Wiring Regulations. An internal automatically re-charging battery will, when fully charged, maintain the internal time count for a period normally in excess of 60 hours if the mains supply is interrupted. The power supply is fitted with an internal 100mA fuse (450A, 490A.05 etc = 160mA fuse). In case of fault the fuse should only be replaced by a suitably qualified engineer after disconnection from the mains power supply and correction of the fault condition. External Signal Connection A six way terminal block is located on the rear panel of the clock to enable the connection of external signals. Details of the connections for various signal configurations are shown on page 28. The mains power supply must be disconnected when making connections to external signals. Manual Time Synchronisation The 400A clock or calendar clock should be set to time of day, when used in stand-alone mode, prior to the connection of a synchronising impulse signal or in the absence of the required synchronising code or radio signal, by means of the three time setting switches located on the rear of the clock. The locations of these switches are illustrated on pages 24 and 28 and the setting sequence is detailed on pages 4 and 5. 401A, 420A and 490A series clocks which normally display time only may also be set to date in order to enable automatic pre-programmed seasonal time-changes and to provide date information for serial ascii data outputs if an optional internal serial interface module is fitted. Optional Internal Interfaces A range of optional internal interfaces allow connection of the clock to a variety of signals and external equipment. The appropriate interfaces are normally factory fitted in accordance with order specification. If it is necessary to fit a new internal interface in order to change the specification of the clock the work must be carried out by a suitably qualified engineer in accordance with the instructions on page 20. Guarantee The 400A series clocks are fully guaranteed, on a return to works basis, against failure due to faulty parts or workmanship for one year from date of purchase. In the event of failure, either within or outside the warranty period, please pack the unit with care and return it to our factory for examination and repair. Issue 2.2 3 Time and Date Setting - 1 B C Enter setting mode and step to next stage A C Zero seconds or increment other unit values A B Return to normal operation at any stage A B C C display of seconds flashes on/off seconds count set to zero A B C C display of minutes flashes on/off minutes count increments A B C C display of hours flashes on/off hours count increments Display for 401 & 420 A B C C display of months flashes on/off months count increments month A B C C display of day-of-month flashes on/off day-of-month count increments day-of-month Issue 2.2 4 Time and Date Setting - 2 B C Enter setting mode and step to next stage A C Zero seconds or increment other unit values A B Return to normal operation at any stage A B C C display of year flashes on/off years count increments A B C C forward month value changes - value may be 3, 4, 9, or 10 display of month in which seasonal forward change occurs - display flashes on/off A B C C display of Sunday in changeover month on which forward change occurs Sunday value changes value may be 1(st), 2(nd), 3(rd), 4(th) or L (last) A B C C display of month in which seasonal backward change occurs - display flashes on/off backward month value changes - value may be 3, 4, 9, & 10 A B C C display of Sunday in changeover month on which backward change occurs Sunday value changes value may be 1(st), 2(nd), 3(rd), 4(th) or L (last) Return to normal operation Issue 2.2 5 Function Programming B Enter programming mode after three seconds B step to next programming stage C A A Change program function option B C Return to normal operation at any stage A B C Program function No. Program function option flashes on/off Program function No. Program option selection flashes on/off Program function option changes B C A B Return to normal operation Note: • Following the display of the last appropriate program option selection the version number of the software will be shown i.e. U 40 = software version 4.0. • A table is provided on the inside rear cover of this manual for recording the user selected program settings. It is recommended that the installed settings are recorded in this sheet in case of incorrect or unauthorized adjustment of the program settings. • If all three switches are pressed together a display test will be performed. Issue 2.2 6 Programmable Options - 1 Prog. No. Function Selection Options 1 Display brightness A 7 Comments = Automatic = brightest manual setting ~ 1 = dimmest manual setting 2 Hour display mode 12 24 = 12 hour display = 24 hour display 3 Synchronisation mode 1 2 3 4 5 6 7 8 = Stand-alone operation = one second uni-polar impulse = one second alternate polarity impulse = half minute uni-polar impulse = half minute alternate polarity impulse = one minute uni-polar impulse = one minute alternate polarity impulse = W482 time code 9 10 11 12 13 = MSF time code - BST display = MSF time code - UTC(GMT) display = DCF time code - CET display = DCF time code - UTC display = IRIG-B time code 14 15 17 18 19 20 21 22 23 = afnor NF S 87- 500 time code = EBU/SMPTE time code - refer to page 11 = Leitch (TM) format = EBU/SMPTE time code - refer to page 11 = Slave to local 400A master = RS232/RS485 serial ascii format (1) = RS232/RS485 serial ascii format (2) = RS232/RS485 serial ascii format (6) = H310 serial time code = Mobaline® time code = GPS time code 1 = blank if code fails 1 = display last message for - 2 = setable to time and date, continue to count with colons flashing when not synchronised 16 4 Run mode Uses internal crystal 6-24v 6-24v 6-24v 6-24v 6-24v 6-24v Code from 482 or 4850 series master clock requires appropriate 484 series radio time code receiver requires 404.I interface, - set year manually. requires 404.I interface requires 404.E interface requires 404.E interface requires 404.2 (RS232) or 404.4 (RS485) interface refer to 488GPS manual -for further information W482, H310, Mobaline & GPS synchronisation only. EBU, IRIG and serial ASCII codes only. Issue 2.2 7 Programmable Options - 2 Prog. No. Function Selection Options Comments 5 Time zone 1 = Zone number Only available when synchronised to W482 time code from 482 or 4850 series master clock = Local time difference from UTC in hours Only required when synchronised to 488GPS system ~ F 6 GPS time offset +13 ~ -13 7 External controller mode 0 1 2 3 4 5 C ° 8 9 10 Temperature adjustment mode Serial Output format Baud rate = no external controller = 496A stopwatch controller with HH:MM:SS display (HH:MM with 420A) = 496A stopwatch controller with MM:SS:1/100 sec display (MM:SS with 420A series) = 402A up/down stopwatch controller with time/stopwatch display selection = Serial ascii code on demand triggered by ascii ‘T’ or ‘t’ input = Serial ascii code on demand triggered by voltage free switch closure = Alternate time/temperature display °C = Continuous temperature display °C Only with 401A,420A or 490A series clocks Requires 404.2 interface Requires 404.2 interface Requires 406 temperature sensor = Temperature sensor adjustment to correct for sensor calibration and mounting errors Only required when 406 temperature sensor connected 0 = No serial output - setting for ‘ Local Master’ mode. 1 2 3 4 5 6 7 = Seconds to years + status = Years to seconds = Years to seconds + status = Years to seconds +1/100 sec = Years to seconds +1/100 sec + status = Hours, minutes, seconds = Hours, minutes, seconds + 1/100 sec Requires 404.M interface for ‘Local Master’ mode. Selections 9.1 to 9.7 require 404.2 RS232 interface module. External controller mode must be set to 0,6 or 7 for ‘Local Master’ mode or 0,4,5,6, or 7 for serial outputs. 12 24 48 96 = 1200 = 2400 = 4800 = 9600 Only required when synchronised to serial ascii code or serial ascii output required +5° ~ - 5° baud baud baud baud Issue 2.2 8 Programmable Options - 3 Prog. No. Function Selection Options 11 Bit length 7 8 = 7 data bits = 8 data bits 12 Parity O E = odd parity = even parity 13 Hold time 1 15 = delay in seconds between changes in languages or between time and temperature display ~ Comments 14 Seasonal time change-over mode — GB EU US = no change-over mode set = British change-over pattern = European change-over pattern = American change-over pattern forwards 1:00 - 2:00 2:00 - 3:00 2:00 - 3:00 15 Special display modes 1 = Standard display 2 ~ 5 = Modes 2 - 5 available on 450A, 452A, 453A and 454A calendar clocks See page 10 for illustration of special display modes. 2 ~ 6 = Modes 2 - 6 available on 490A.02 and 490A.05 clocks 7 ~ 8 = Modes 7, 8 available on 401A and 420A clocks 16 Number of languages display 1 2 3 = one language = two languages = three languages 17 19 First, second and third language selections CA CR D DK E F GA GB H HR = Catallonian = Czech = German = Danish = Spanish = French = Galicain = English = Hungarian = Croat backwards 2:00 - 1:00 3:00 - 2:00 2:00 - 1:00 Alternating date and time display on 401A & 420A. 7 = day-of-month, month 8 = month, day-of-month Only required for calendar clocks I N NL P PL RU S SF SK SL W = Italian = Norwegian = Dutch = Portuguese = Polish = Russian = Swedish = Finnish = Slovak = Slovenian = Welsh Issue 2.2 9 Special Display Formats Special Display Modes for 450A, 452A, 453A and 454A Calendar Clocks Special Display Modes for 490A.02 and 490A.05 Clocks Display mode 1 day-of-week day-of-month month Display mode 2 day-of-year day-of-month month Display mode 3 week-number day-of-month month Display mode 4 day-of-month month year Display mode 5 month day-of-month year Display mode 6 Issue 2.2 10 EBU/SMPTE Code Formats 400A series clocks may be programmed to synchronise to EBU/SMPTE time code signals when the optional 404.E interface is fitted. Calendar clocks may be synchronised to one of two date formats. Format 1 (*) is desgined to work with other manufacturers' displays - eg Leitch (TM) whereas Format 2 (**) displays time/date on a video signal in an understandable order. Both formts work with V-401A/V-420A/V-490A Time Displays (ie no date) Application 401, 420 & 490 Clocks Calendar Clocks V-400A Clock program setting Prog. 3, Opt. 15 Prog. 3, Opt. 16 Prog. 3, Opt 15 * Master Clock program settings Prog. 17, Opt. ‘0’ Prog. 18, Opt. ‘0’ Not applicable 414 Timer only Prog. 17, Opt. ‘1’ Prog. 18, Opt. ‘0’ Bits Prog. 3, Opt 16 ** Prog. 17, Opt. ‘1’ Prog. 18, Opt. ‘1’ Data Bit Content 0-3 Frame No. units Frame No. units Frame No. units Frame No. units 4-7 Unused bits Unused bits Unused bits Status bits 8-9 Frame No. tens Frame No. tens Frame No. tens Frame No. tens 10 - 11 Unused bits Unused bits Unused bits Unused bits Days Units Unused bits 12 - 15 16 - 19 Seconds units Seconds units Seconds units Seconds units 20 - 23 Unused bits Unused bits Months units Years units 24 - 26 Seconds tens Seconds tens Seconds tens Seconds tens 27 Unused bits Unused bits Unused bit Unused bit 28 - 29 Days tens Years tens 30 Months tens 31 Unused bit 32 - 35 Minutes units Minutes units Minutes units Minutes units 36 - 39 Unused bits Unused bits Unused bits Months units 40 - 42 Minutes tens Minutes tens Minutes tens Minutes tens 43 Unused bits Unused bits Unused bit Unused bit 44 - 45 Years units Months tens 46 - 47 Unused bits Unused bits 48 - 51 Hours units Hours units Hours units Hours units 52 - 55 Unused bits Unused bits Unused bits Days units 56 - 57 Hours tens Hours tens Hours tens Hours tens 58 - 59 Unused bits 414 Control bits Unused bits Unused bits Unused bits Years tens Days tens 60 - 62 63 64 - 79 Unused bits Sync word Sync word Sync word Sync word Issue 2.2 11 Serial ASCII Data Formats 400A Series clocks and calendar clocks, when fitted with a 404.2 (RS232) or 404.4 (RS485) optional internal interface module, are capable of synchronisation to one of three serial ASCII data message formats and will transmit messages in seven formats. The clock may be programmed to receive or transmit messages at 1200, 2400, 4800 or 9600 baud - program function 10 -, seven or eight data bits - program function 11 - and odd or even parity - program function 12. When programmed to transmit serial messages - by selecting options 1 to 7 of program function 9 - the clock will transmit a new message at every second edge. If the clock is programmed to transmit in one of the two `on-demand’ modes - program function 7 , selections 4 or 5 - the message will only be transmitted following the receipt of an ASCII `T’ or `t’ - program function 7, selection 4 - or the closure of an external voltage free switch contact - program function 7, selection 5. Output Format 1 (Input synchronisation - program function 3, selection 18) STX Su St Mu Mt Hu Ht Du Dt Mtu Mtt Yu Yt Stt ETX Output Format 2 (Input synchronisation - program function 3, selection 19) T Yt Yu : Mtt Mtu : Dt Du : 0 W : Ht Hu : Mt Mh : St Su CR LF Output Format 3 T Yt Yu : Mtt Mtu : Dt Du : 0 W : Ht Hu : Mt Mh : St Su `_’ St CR LF Output Format 4 T Yt Yu : Mtt Mtu : Dt Du : 0 W : Ht Hu : Mt Mh : St Su . Sht Shu CR LF Output Format 5 T Yt Yu : Mtt Mtu : Dt Du : 0 W : Ht Hu : Mt Mh : St Su . Sht Shu `_‘ St CR LF Output Format 6 (Input synchronisation - program function 3, selection 20) * Ht Hu Mt Mu St Su CR LF Output Format 7 * Ht Hu Mt Mu St Su Sht Shu CR LF `t’ = tens, `u’ = units value Byte STX ETX Stt T CR LF : . `_` * Description start transmission end transmission status - see table start transmission carriage return line feed colon point space start character ASCII value Byte 02H 03H Sh S M H W D Mt Y 0 54H 0DH 0AH 3AH 2EH 20H 2AH Description 1 /100 seconds seconds minutes hours day-of-week day-of-month month year zero ASCII value 30 - 39H 30 - 39H 30 - 39H 30 - 39H 31 - 37H 30 - 39H 30 - 39H 30 - 39H 30H Status Byte - ASCII value 30H - 3FH Bit 0 Bit 1 Bit 2 Bit 3 0 = MSF 0 = Winter time 0 = not synchronised 0 = no early warning bit 1 = DCF 1 = Summer time 1 = synchronised 1 = early warning bit Issue 2.2 12 402A Stopwatch Controller - 1 The 402A Stopwatch Control unit enables a 401A,420A or 490A series clock to be used both as a multifunction stopwatch and a time-of-day clock with the display freely switchable between time-of-day and stopwatch time. The time-of-day count may be synchronised to a wide variety of external time codes, impulses and time signals. Four switches control the stopwatch count, display selection and function programming of the control unit. The operation of these switches is illustrated on the following pages. The stopwatch function can be programmed to count: • Up from zero - program function SA, selection 1. • Down from a pre-programmed start-time to stop at zero - program function SA, selection 2. • To count down and then up through zero - program function SA, selection 3. In this mode a minus sign will appear in the left hand character position when the count is minus and the most significant digit is zero. • To continuously count down to zero with automatic re-start from a pre-programmed start time program function SA, selection 4. The stopwatch can be programmed to operate: • In a simple start-stop mode - program function SB, selection 1. • With one of four programmed spilt actions to enable the time intervals between sequential events to be timed incrementally or accumulatively. Please refer to pages 14 and 17 for further information. program function SB, selections 2 to 5. The stopwatch display can be programmed to show: • Minutes, seconds and one hundredth seconds (minutes and seconds for 420A series clocks) program function SC, selection 1. • Hours, minutes and seconds (hours and minutes for 420A series clocks) - program function SC, selection 2. • Minutes, seconds and one hundredth seconds (minutes and seconds for 420A series clocks) unless the hours count is one or more in which case the display automatically switches to show hours, minutes and seconds (minutes and seconds for 420A series clocks) - program function SC, selection 3. The countdown start time can be programmed in hours, minutes and seconds (hours and minutes for 420A clocks). The programmed time is held in non-volatile EEPROM and is automatically recalled whenever the stopwatch is in a countdown mode and the `RESET’ switch is pressed or automatically when count option - 4 - is selected. An optional internal interface module (404.R) provides a normally open voltage-free relay contact pair, rated at 24v 1A dc and programmable from one to three seconds contact closure duration in steps of 0.1 seconds, which starts when the countdown reaches zero - program function SD, selections 0 (no contact closure) to 30 (3 seconds closure). The 402A Stopwatch Control unit can also be used to remotely set the clock to time and date. The 402A controller unit is connected to the 401A, 420A or 490A clock by means of the three metre long three core cable provided. The interconnecting cable may be extended to ten metres length using a screened cable. Please refer to page 24 and 28 for details of the connections to the clock. Issue 2.2 13 402A Stopwatch Controller -2 Prog. No. Function Selection Options SA Select count direction 1 = Up from zero 2 = Down from a pre-programmed start-time to stop at zero 3 = Down from a pre-programmed start-time and then up through zero. 4 = Continuously count down to zero with automatic restart from a pre-programmed start time 1 = Single start - stop -start -stop count action. = First action starts count, subsequent actions update display to new incremental split time. = First action starts count, subsequent actions alternately freeze the display to show incremental split times and rejoin the running time. = First action starts count, subsequent actions update display to new accumulative split time. = First action starts count, subsequent actions alternately freeze the display to show accumulative split times and rejoin the running time. SB Select STARTHOLD-STOP switch action 2 3 4 5 SC Select display resolution 1 2 3 SD Set period of relay contact closure at end of count-down 0 1 ~ 30 Comments Reset switch sets count to zero. Reset switch sets count to pre-programmed countdown start time. Minus sign displayed during countdown when most significant digit = 0. Refer to page 17 for illustrations of count actions. = Minutes seconds and 1/100 seconds (minutes and seconds for 420A series) = Hours, minutes and seconds (hours and minutes for 420A series) = Minutes seconds and 1/100 seconds (minutes and seconds for 420A series) unless the hours count is one or more when the display will show hours, minutes and seconds. (hours and minutes for 420A series) = No relay contact closure = 0.1 seconds contact closure Requires 404.R relay output option = 3.0 seconds contact closure Issue 2.2 14 402A Stopwatch Controller - 3 Switch Control Unit Details 54.0 27.0 12.0 3 core cable to clock 44.0 22.0 22.0 START - HOLD - STOP RESET 102.0 88.0 72.0 C Panel cut-out SW 402A M3 clearance hole Control switch functions in normal operating mode C Time-of-day display selected SW Stopwatch display selected START - HOLD - STOP Refer to page 16 for further information on stopwatch start, stop and display hold functions and programming Stopwatch start, hold or stop function selected RESET or Stopwatch time count stopped and reset to zero C SW Stopwatch time count stopped and set to pre-programmed countdown start time value Refer to the following page for further information on stopwatch function, countdown start time and time-of-day programming First display of stopwatch function, countdown start time and time-of-day programming Issue 2.2 15 402A Stopwatch Controller - 4 Control switch functions in programming and time-setting mode Enter Programming Mode C SW First display of stopwatch function, countdown start time and time-of-day programming Set clock to time-of-day C RESET Time-of-day time setting display selected with seconds flashing on/off START - HOLD - STOP Time setting display indexed to minutes by use of START-HOLD-STOP switch Seconds set to zero by the use of the RESET switch Refer to pages 4 and 5 for further information on time and date setting. Use the START-STOP-HOLD switch in place of switch A and the RESET switch in place of switch B. Press switch C or switch SW to end timesetting mode. Program count-down start time SW RESET Increment countdown start time seconds value using RESET switch Countdown start time display selected with seconds display flashing on/off START - HOLD - STOP Press switch C or switch SW to end countdown start time programming Countdown start time display indexed to minutes by use of START-HOLD-STOP switch Program stopwatch count, display hold, display resolution and alarm time modes START - HOLD - STOP Count direction program display selected with option selection display flashing on/off RESET Increment count mode selection using RESET switch START - HOLD - STOP Press switch C or switch SW to end programming mode. Display indexed to count hold mode selection by use of START-HOLD-STOP switch Issue 2.2 16 402A Stopwatch Controller - 5 Stopwatch Count/Hold function options Count start/stop and display hold function selection Stopwatch timer and display at zero (or pre-programmed down count start time) START - HOLD - STOP Stopwatch timer starts with display following counter 1:04 START - HOLD - STOP Timer stops, display shows accumulated time Display freezes to show ’SPLIT’ time, timer restarts at zero or pre-set Display freezes to show ’SPLIT’ time, timer restarts at zero or pre-set 4:30 Timer starts, display follows timer count Display updates to show new ’SPLIT’ time, timer restarts at zero or pre-set Display updates and continues to follow timer count Display updates to show new ’SPLIT’ time, timer continues to count Display updates and continues to follow timer count 5:13 Display continues to follow timer count Display shows last ’SPLIT’ time, timer continues to count Display continues to follow timer count Display shows last ’SPLIT’ time, timer continues to count Display continues to follow timer count Timer stops, display shows accumulated time Display updates to show new ’SPLIT’ time, timer restarts at zero or pre-set Display freezes to show new ’SPLIT’ time, timer restarts at zero or pre-set Display updates to show new ’SPLIT’ time, timer continues to count Display freezes to show new ’SPLIT’ time, timer continues to count 2:10 Display freezes Display freezes to show to show ’SPLIT’ time, timer ’SPLIT’ time, timer continues to count continues to count START - HOLD - STOP START - HOLD - STOP RESET Stopwatch timer is stopped and reset to zero (or pre-programmed down-count start time) Issue 2.2 17 496A Stopwatch Controller - 1 Switch Control Unit Details 54.0 27.0 12.0 3 core cable to clock 44.0 22.0 22.0 START - STOP HOLD - RESET 102.0 88.0 72.0 Panel cut-out 496A M3 clearance hole The 496A Stopwatch Controller unit enables a 401A, 420A or 490A series clock to be used as a stopwatch. The clock may be programmed to display either : • Hours, minutes and seconds (hours and minutes for 420A series clocks) - program function 7, selection 1. • Minutes, seconds and 1/100 th seconds (minutes and seconds for 420A series clocks) - program function 7, selection 2. Two switches control the stopwatch count, display hold and reset operations. The different methods of operation of these switches are illustrated on the following page. When a minutes, seconds and 1/100 th second display is selected and the display is following the running time the 1/100 th second character is blanked as it is impossible to read. When the display is held or stopped the 1 /100 th second character appears. The 496A Stopwatch controller is connected to the 401A, 420A or 490A clock by means of the three metre long, four core cable provided. The interconnecting cable may be extended to ten metres length using a screen cable. Please refer to pages 24 and 28 for details of connections to the clock. Issue 2.2 18 496A Stopwatch Controller - 2 Stopwatch Count/Hold function options Using START - STOP - RESET action Using START - HOLD - STOP action Selection No. Program No. Selection No. Stopwatch timer and display at zero Stopwatch timer and display at zero START - STOP START - STOP Min. 1:04 Sec. Sec. 1/100. Timer starts 1/100 sec display blanks during count START - STOP Min. 1:04 Sec. Sec. 1/100. Timer starts 1/100 sec display blanks during count HOLD - RESET Min. 2.10 Sec. Sec. Timer stops 1/100. 2.10 START - STOP Min. Sec. Sec. 1/100. Display shows ’SPLIT’ time. Timer continues to count. Colons flash on/off to indicate hold mode. HOLD-RESET Min. 4.30 Sec. Sec. Timer starts 1/100. Min. 4.30 Sec. Sec. Display updates to running timer count 1/100. HOLD-RESET Min. 5.13 Sec. Sec. Display continues to follow timer count 1/100. 5.13 START - STOP Min. Sec. Sec. 1/100. Display shows ’SPLIT’ time. Timer continues to count. Colons flash on/off to indicate hold mode. START - STOP Min. Sec. Sec. Timer stops 1/100. HOLD - RESET Min. Sec. Sec. 1/100. Timer count stops Colons illuminated continuously Display shows previous ’SPLIT’ time HOLD - RESET Min. Sec. Sec. 1/100. Display & timer reset to zero Note: The count must be stopped to enable reset to zero to be actioned. Min. Sec. Sec. 1/100. Display updates to show the time at which the START - STOP switch was pressed A further HOLD-RESET action will reset the timer count and display to zero. Issue 2.2 19 Internal Interface Installation The 400A series of clocks and calendar clocks may be programmed to synchronise to and to output a wide variety of signals. In a number of applications, as detailed throughout this manual, an optional internal interface module must be added in order to convert the external signals into the logic levels required by the 400A series clock or to generate the appropriate output signal levels. The required interface module will normally, if specified at time of order, be factory installed during the testing procedure prior to dispatch. If it is necessary to subsequently install an interface module in a 400A series clock the following steps must be taken. • Ensure that any power supply to the clock is completely disconnected. • Place the clock on a conductive, grounded, work-surface ensuring that the case body is protected to avoid damage to the finish of the case and the front display filter. • Unscrew the cross-head self-tapping screws which hold the rear panel to the clock case body. A ‘Pozidrive’ type screwdriver should be used and the screws saved for re-assembly. • Locate and remove the battery connection jumper - J4 - which is located above the end of the right-hand battery. To avoid loss retain the jumper on one pin of the J4 header. • By reference to the drawing below, locate the ten pin vertical header - J5 - and remove the standard jumper connecting pins 2 and 3. • The optional interface module must be installed with the ten way female socket mating with header - J5. The body of the female socket must be towards the square processor chip and on the side of the interface module away from the transformer and batteries. The side of the module carrying surface mounted components must be towards the batteries and transformer. • Ensure that the module socket is correctly aligned with the - J5 - header pins. • Ensure that the flat, 20 way, interconnecting cable assembly between the display printed circuit board and the power/logic printed circuit board is correctly in place with the cable mounted socket securely seated on the shrouded board mounted plug - J6. • Replace the J4 jumper to re-connect the battery. • Carefully replace the back cover of the clock ensuring that no strain is placed on the interconnecting cables. All of the original retaining screws must be replaced to ensure electrical and mechanical safety and EMC screening. If any screws have been misplaced they may be replaced with No. 4 x 3/8” self tapping countersunk screws. Jumper required for standard operation - remove to fit interface option module program memory J5 processor J4 J6 J4 - Remove jumper to disconnect battery J4 P95/01A Typical module installed J5 - Interface module connector Issue 2.2 20 4 4 4 4 Impulse None 2 -7 4 8 8 4 8 8 8 8 W482 Time Code None 8 4 8 8 4 8 8 8 8 MSF & DCF Radio Time Code None 9 - 12 4 4 8 4 4 4 4 4 IRIG-B & afnor Nf S 87-500 Code 404.I 13 -14 8 8 8 8 8 8 8 8 EBU/SMPTE Time Code 404.E 15 - 16 8 8 8 8 8 8 8 8 400A Local Slave Mode None 17 4 8 8 4 8 8 8 8 RS232 Serial Ascii 404.2 18 - 20 8 8 8 8 8 8 8 8 RS485 Serial Ascii 404.4 18 - 20 8 8 8 8 8 8 8 8 H310 Time Code None 21 4 8 8 4 8 8 8 8 Mobaline Time Code None 22 4 8 8 4 8 8 8 8 GPS code from 488GPS System None 23 4 8 8 4 8 8 8 8 10 slave clocks 4 400A Master Output to Control up to Serial Ascii Output on RS232/485 trigger 4 Serial Ascii Output on Switch Closure Serial Ascii Output every second 4 496A Stopwatch Controller 4 402A with switch closure at 00:00.0 1 402A Stopwatch Controller None Program 3 Selection Option Stand-alone Internal Interface Module required Alternate Time & Temperature Display Internal Interface Function Options Synchronisation Mode System configurations indicated by 4 are available. Configurations indicated by 8 are not available. Serial RS232 or RS485 outputs require an internal 404.2 (RS232) or 484.4(RS485) module. 400A Master Clock output operation requires an internal 404.M module. Issue 2.2 21 Special Operating Modes Temperature Display Two temperature display modes are available. The temperature may be displayed continuously or alternately exchanged with the hours and minutes time display. When the alternate time/temperature display mode is selected the period between display changes may be adjusted by the user. An external type 406 Temperature Sensor module is required to allow temperatures in the range -17°C to +50°C to be displayed. The 406 module is normally supplied with a three core, 5m connecting cable which may be user extended up to a maximum of 100m. The connection of the module to the 400A series clock is illustrated on page 28 of this manual. The 406 module is housed in a two part, clip together, ventilated case measuring 70mm x 70mm x 25mm deep. The module may be mounted on a suitable vertical surface, either by the use of two strips of double sided tape or by mechanical fixing via two screws through the marked positions in the detachable base plate of the unit. The module must be mounted in a position where it is not subject to direct rain or other water spray. Please refer to pages 4 - 9 of this manual for programming information. Important note: The clock should be programmed to the required temperature display function with the temperature sensor disconnected. The temperature sensor must be connected to the clock after the required display mode has been programmed. To program a 400A series clock to display temperature information program function 7 should be set to selection `C’ to display alternating time and temperature or selection ‘°’ to display the temperature only. The temperature sensor is factory calibrated to +/- 1°C. However any temperature display system is subject to errors caused by installation location related environmental conditions. The correct temperature should be established by reference to an accurate shielded thermometer. Program function 8 allows the displayed temperature to be corrected to compensate for errors, when program function 8 is selected the display flashes on/off showing the adjusted temperature. The displayed value may be adjusted, up or down by up to 5 degrees, to the required corrected value by use of the `B’ setting switch. The correction factor is permanently stored in non-volatile memory. Program function 13 allows the `hold time’ between display changes to be set in the range 1 to 15 seconds. Note that the alternating cycle is always returned to show time information at the start of each new minute. Local Master Clock Mode The local master clock mode enables any 400A series clock, when fitted with an internal 404.M interface module, to control up to ten 400A clocks operating as slaves with a maximum cable length of 200m. A 400A clock will only operate as a `local master’ clock if, in addition to having a 404.M module installed, it is maintaining its timekeeping from the internal high stability crystal (stand-alone synchronisation mode) or it is synchronised to MSF or DCF radio time code via a 484 series receiver. Any 400A clock will operate as a `local slave’ as the interface circuit is present as standard. The master clock should be programmed, by reference to pages 4 - 9 of this manual, as follows: • Program function 3 - Synchronisation mode - selection 1, 9, 10, 11 or 12 as appropriate • Program function 7 - External Controller mode - selection 0 • Program function 9 - Serial Output mode - selection 0 Each slave clock should be programmed as follows: • Program 3 - Synchronisation mode - selection 17 The slave clocks should be connected in parallel to the master clock, by reference to the connection diagrams shown on page 28 of this manual, using a single twisted pair cable. The interconnecting cable may be unscreened in the majority of installations but should be screened in the presence of high levels (1Vm) of radio frequency emissions or when the interconnecting cable runs are adjacent to machinery or equipment likely to produce significant levels of electrical noise. If screened cable is used the screen should be grounded at the 400A local master clock end only. Issue 2.2 22 Radio Time Code Synchronisation The 400A series clocks will, when connected to an appropriate 484 series radio receiver and programmed for radio time code synchronisation, automatically synchronise to the radio time code information transmitted from radio station DCF located at Mainflingen near Frankfurt or from MSF at Rugby. The clock may display BST - program function 3, selection 9 - (MSF synchronised), CET - program function 3, selection 11 - (DCF synchronised) or UTC (GMT) from either MSF - selection 10 - or DCF - selection 12. The DCF signal is transmitted at 77.5KHz and is derived from an atomic clock at the Physics Institute of Brunswick. The MSF signal is transmitted at 60KHz and is referenced to the Caesium Beam Oscillator at the National Physical Laboratory. The type 484.02 (MSF) and 484.03 (DCF) time signal receivers are housed in a compact weather-proof case and are connected to the clock or master clock by a single cable pair. In many locations the receiver will operate within the building. In difficult reception areas, where an external mounting point is required, the receiver unit may be located up to 200 metres from the clock. The type 484.06 (MSF) and 484.07 (DCF) time signal receivers are low cost units for internal use only. Installation The 484 series radio time code receiver should be mounted: • At least 2 metres from the 400A series clock. • At the greatest practical distance from: Other electrical equipment including computers, fluorescent lights and signs, metal girders and reinforced concrete walls. Any other sources of electrical noise. • Preferably on the outside of the building (484.02 and 484.03 only) as high as possible. The case is weatherproof to IP65 but it is preferable to provide some protection from direct rain. • With the cable entry on the lower face of the case (484.02 and 484.03). The 484 series receiver may be connected to the 400A series clock directly by means of the cable provided or, at a greater distance, by means of a suitable extension cable. At distances of up to 10 metres unscreened two core cable may be used. At greater distances, or in areas of high electrical noise, a two core screened cable must be used with the screen grounded at one end only. The maximum recommended distance between the receiver and master clock is 200 metres. Alignment The 484.02 and 484.03 radio receivers have dual ferrite antenna which normally permit location regardless of orientation to the transmitter. The receiver is mounted by means of the four fixing holes in the rear surface which are accessed after removing the front cover. The four mounting holes are located outside of the central sealed compartment. The 484.06 and 484.07 receivers have a single antenna element and are supplied with an adjustable mounting bracket to enable orientation with the longest face of the receiver at 90° to the direction of the transmitter. The front cover of the 484.02 and 484.03 receivers may be removed to enable an indicator LED to be viewed. The indicator LED for the 484.06 and 484.07 receiver is located in the front face of the unit. The alignment of the receiver is correct when the LED flashes on/off once per second. Signal Reception Under normal circumstances the DCF signal provides reliable operation at distances of up to 1500km. MSF signals are normally usable up to 1000km. Greater operating ranges are possible at night. The received and decoded signal provides an operating accuracy of better than +/- 20ms and provides completely automatic seasonal time changes. In best conditions the 400A series clock will take three minutes to synchronise with the transmitted time code from either DCF or MSF. When the 400A series clock is `locked’ to the transmitted signal, the colon between the hours and minutes characters is illuminated continuously. During periods of signal failure or signal corruption the clock will maintain timekeeping using its internal high stability quartz crystal oscillator and the colons will flash on/off every second. It should be noted that MSF is off the air for maintenance purposes from 10:00 to 14:00 on the first Tuesday of each month and usually for up to two weeks during the summer months for annual maintenance. The MSF transmission status can be checked by telephoning 020 8943 6493. Issue 2.2 23 Mounting Details - 400A.02 Series Panel Mounng Clocks Fit three supplied clamps into case slots Panel 6 way plug for external system connections (supplied) Side View Mains or low voltage power supply connection 145 144 132 WARNING ISOLATE MAINS BEFORE REMOVING COVER 72 Refer to page 28 for details of external system connections 58 230 VOLTS AC Rear View Front View 401.02 A B C Time, Date & Program Setting Switches A B C Front View 420.02 Issue 2.2 24 Mounting Details - Ceiling Suspended Cases mounting rose & upper tube supplied by customer 20mm tube 50mm square connecting section mains & data cable suspended ceiling 20mm support tube painted to BS0055/RAl9010 single or double sided clock Case style .SS. - ’X’ = 58 Case style .DS. - ’X’ = 120 ’X’ Issue 2.2 25 Mounting Details - Flush Mounting Cases Flush Fitting Panel Case 3 Flush Fitting Case with Mounting Box 55 80 6 ’X’ + 6 ’X’ 6 22 - maximum panel thickness ’X’ = Standard surface mounting case body height Spring loaded mounting spigot Steel mounting box Issue 2.2 26 Mounting Details - Surface Mounting Cases 16 3 Model Case Size LxHxD Fixing Centres 401A.05 420A.05 420A.06 450A.05 451A.05 452A.05 453A.05 454A.05 460A.05 490A.05 305 x 90 x 58 240 x 90 x 58 240 x 90 x 58 550 x 90 x 58 550 x 90 x 58 480 x 180 x 58 480 x 180 x 58 300 x 300 x 58 460 x 90 x 58 300 x 300 x 58 195 130 130 440 440 370 370 190 350 190 6 o o Issue 2.2 27 External Interface Connections External Interface Connector Supply Voltage Label 230 VOLTS AC A B C WARNING ISOLATE MAINS BEFORE REMOVING COVER Time, Date & Program Setting Switches 110 or 230V AC Power Supply Connection Cable Brown - Live Blue - Neutral Green & Yellow - Earth Red 12, 24 or 48V DC Power Supply Connection Cable 484 Series DCF or MSF Radio Time Code Receiver +12, 24 or 48V dc Blue - 0V dc Green - Earth EBU/SMPTE Time Code Green or uncovered Connector polarity is not critical Red or clear Requires 404.E internal interface 496A Stopwatch Controller 402A Up/Down Stopwatch Controller Red RS232 Serial ASCII Black Ground Yellow TX data Blue Requires 404.2 internal interface Red RS485 Serial ASCII RX data Blue 406 Temperature Sensor Green Data - A Requires 404.4 internal interface Alternate Polarity 12-24v impulses* W482 Time Code* H310 Time Code* ’Local Slave’ Mode* Uni-polar 12-24v impulses ’A’ = common, ’B’ = pulse ML time code IRIG-B Time Code Afnor NF S 87-500 Time Code Data -B Local Master Operation * = Connector polarity is not critical ’A’ ’B’ Green Requires 404.M internal interface For control up to ten off 400 series ’Local Slave Clocks’ RS232 ’switch trigger’ Connector polarity is not critical Red Red Green Requires 404.I internal interface Issue 2.2 28 Program Option Record Sheet Program No. Function 1 Display brightness 2 Hour display mode 3 Synchronisation mode 4 Run mode 5 Time zone 6 GPS time offset 7 External controller mode 8 Temperature adjustment 9 Serial output format 10 Baud rate 11 Bit length 12 Parity 13 Display Hold Time 14 Seasonal time change-over mode 15 Special display mode 16 Number of languages 17 First language selection 18 Second language selection 19 Third language selection SA 402 Stopwatch Controller count direction SB 402 Stopwatch Controller hold mode SC 402 Stopwatch Controller display mode SD 402 Stopwatch Controller alarm time Clock Type Issue 2.2 Date Serial No. Vortex Communications Ltd 75 The Grove, Ealing LONDON W5 5LL Email: Web: Telephone: Fax: info @vtx.co.uk www.vtx.co.uk +44 (0)20 8579 2743 +44 (0)20 8840 0018 Issue 2.2