1
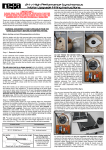
PROFESSIONAL DIRECT DRIVE TURNTABLE
OWNER'S MANUAL
VESTAX CORPORATION
1-18-16 Wakabayashi, Setagaya-ku, Tokyo 154-0023 Japan
Phone : 03-3412-7011 Fax : 03-3412-7013
E-mail : [email protected]
www.vestax.com
VESTAX Europe Ltd.
Unit 5, Riverwey Industrial Park
Alton, Hampshire GU 34 2QL, England.
Phone : (0)1420-83000 Fax : (0)1420-80040
www.vestax.co.uk
CONGRATULATION
Thank you for purchasing the Vestax PDX-2300MkII/MkII Pro, Professional
Direct Drive Turntable. Please read this owner's manual carefully, so that
you will fully understand all of the special features and enjoy the full use
of this product.
CAUTION
RISK OF ELECTRIC SHOCK DO NOT OPEN
CAUTION : TO REDUCE THE RlSK OF ELECTRlC SHOCK
DO NOT REMOVE COVER (OR BACK)
NO USER-SERVICEABLE PARTS INSIDE
REFER SERVlCING TO QUALIFIED SERVlCE PERSONNEL
The lightning flash with arrowhead, symbol within an equilateral triangle, is
intended to alert the user to the presence of uninsulated "dangerous voltage"
within the product's enclosure that may be of sufficient magnitude to constitute a
risk of electric shock to persons.
The exclamation point within an equilateral triangle is intended to alert the user to
the presence of important operating and maintenance (servicing) instructions in
the literature accompanying the appliance.
TO REDUCE THE RISK OF FIRE OR ELECTRlC SHOCK, DO NOT
EXPOSE THIS APPLIANCE TO RAIN OR MOISTURE.
CAUTION : TO PREVENT ELECTRIC SHOCK, MATCH BLADE OF PLUG TO
WIDE SLOT, FULLY INSERT
ATTENTION : POUR EVITER LES CHOCS ELECTRIQUES, INTRODUIRE LA
LAME LA PLUS LARGE DE LA FICHE DANS LA BORNE
CORRESPONDANTE DE LA PRISE ET POUSSER JUSQU' AU
FOND
1
IMPORTANT SAFEGUARDS
READ BEFORE OPERATING EQUIPMENT
This product was designed and manufactured to meet strict quality
and safety standards. There are, however, some installation and
operation precautions which you should be particularly aware of.
1. Read instructions-All the safety and operating instructions 13. Protective Attachment Plug-The appliance is equipped with an
attachment plug having overload protection. This is a safety
should be read before the appliance is operated.
feature. See Instruction Manual for replacement or resetting of
protective device. If replacement of the plug is required, be
2. Retain instructions-The safety and operating instructions
sure the service technician has used a replacement plug
should be retained for future reference.
specified by the manufacturer that has the same overload
3. Heed Warnings-All warnings on the appliance and in the
protection as the original plug.
operating instructions should be adhered to.
14. Lightning-For added protection for this product during lightning
4. Follow Instructions-All operating and use instructions should
storm, or when it is left unattended and unused for long
be followed.
periods of time, unplug it from the wall outlet. This will prevent
damage to the product due to lightning and power-line surges.
5. Cleaning-Unplug this product from the wall outlet before
cleaning. Do not use liquid cleaners or aerosol cleaners. Use a 15. Overloading-Do not overload wall outlets and extension cords
damp cloth for cleaning.
as this can result in a risk of fire or electric shock.
6. Attachments-Do not use attachments not recommended by 16. Object and Liquid Entry-Never push objects of any kind into
the product manufacturer as they may cause hazards.
this product through openings as they may touch dangerous
voltage points or short-out parts that could result in a fire or
7. Water and Moisture-Do not use this product near water-for
electric shock. Never spill liquid of any kind on the product.
example, near a bath tub, wash bowl, kitchen sink, or laundry
tub, in a wet basement, or near a swimming pool, and the like. 17. Servicing-Do not attempt to service product yourself as
opening or removing covers may expose you to dangerous
8. Accessories-Do not place this product on an unstable cart,
voltage or other hazards. Refer all servicing to qualified
stand, tripod, or table. The product may fall, causing serious
personnel.
injury to a child or adult, and serious damage to the appliance. 18. Damage Requiring Service-Unplug this product from the wall
Use only with a cart,. stand, tripod, bracket, or table
outlet and refer servicing to qualified service personnel under
recommended by the manufacturer, or sold with product. Any
the following conditions:
mounting of the appliance should follow the manufacturer's
a. When the power-supply cord or plug is damage.
instructions, and should use a mounting accessory
b. If liquid has been spilled or objects have fallen into the
recommended by the manufacturer.
product.
c. If the product has been exposed to rain or water.
9. Ventilation-Slots and openings in the cabinet are provided for
d. If the product dose not operate normally by following
ventilation and to ensure reliable operation of the product and
the operating instructions. Adjust only those controls
to protect it from overheating, and these openings must not be
that are covered by the operating instructions as an
blocked or covered. The openings should never be blocked by
improper adjustment of other, controls may result in
placing the product on a bed, sofa, rug, or other similar
damage and will often require extensive work by a
surface. This product should never be placed near or over a
qualified technician to restore the product to its normal
radiator or heat register. This product should not be placed in
operation.
a built-in installation such as a bookcase or rack unless proper
e. If the product has been dropped or cabinet has been
ventilation is provided or the manufacturer's instructions have
damaged.
been adhered to.
f. When the product exhibits a distinct change in
performance-this indicates need for service.
10. Power sources-This product should be operated only from the
type of power source indicated on the marking label. If you are 19. Replacement Parts-When replacement parts are required, be
not sure of the type of power supply to your home, consult
sure the service technician has used replacement parts
your appliance dealer or local power company.
specified by the manufacturer or have the same
characteristics as the original parts. Unauthorized
11. Grounding or Polarization-This product is equipped with a
substitutions may result in fire, electric shock or other hazards.
polarized alternating-current line plug (a plug having one blade
wider than the other). This plug will fit into the power outlet 20. Safety Check-Upon completion of any service or repairs to
only one way. This is safety feature. If you are unable to insert
product, ask the service technician to perform safety checks to
the plug fully into the outlet, try reversing the plug. If this
determine that the product is in proper operating condition.
should still fail to fit, contact your electrician to replace your
obsolete outlet. Do not defeat the safety purpose of the 21. Carts and Stands-The appliance should be used only with a
polarized plug.
cart stand that is recommended by manufacturer.
12. Power-Cord Protection-Power supply cords should be routed 22. An appliance and cart combination
so that they are not likely to be walked on or pinched by items
should be moved with care. Quick
placed upon or against them, paying particular attention to
stops, excessive force, and uneven
cords at plugs, convenience receptacles, and the point where
surfaces may cause the appliance and
they exit from the appliance.
cart combination to overturn.
2
FEATURES
• Advanced analogue turntable.
• Enhanced pitch control. Fast and accurate beat matching adjustment with a 100mm +/-10% fine pitch fader. Ultra pitch control with
a +/-50% control fader. Combined the total amount you can adjust the pitch by is a huge +/-60%pitch. Furthermore, with the pitch
bend joystick, you can quickly push or pull the pitch for smooth mixes or dynamic effects.
• Digital Pitch Display. A large display, showing the current pitch setting, allows you to accurately set the pitch or when needed to,
make adjustments perfectly.
• Strong DC motor with 2.7kg torque allowing for super high-speed start times.
• Adjustable start and break speeds (within 1/4 RPM).
• A.S.T.S - anti skipping tone arm system - the most reliable and strongest tone arm system available for professional turntables of
this kind. This system when combined with Tracking Hold (TH) technology can reduce skipping and needle vibration by up to 90%.
• Adjustable tone arm height and weight.
• Start and brake speeds can be adjusted and pre-set for improved performance.
• Reverse play is possible with the quick easy one touch reverse play button.
• The futuristic body design of the PDX-2000 and PDX-2300 is made of a super high density moulded plastic that provides not only
the best possible acoustic sounds but also reduces feedback.
PDX-2300MkII Pro
• In addition to the above-mentioned feature, the dynamic balance tone arm system is adopted.
By improving the trace performance of tone arm, playback sound quality becomes better and it makes playback possible even if the
disk have some curvature.
NOTES
• Ensure that the power to any mixer or amplifier that the turntable is connected to is turned OFF before attaching or detaching the
head shell. Failing to do so may damage your mixer, amplifier or speakers.
• Whilst the platter is detached DO NOT TURN ON THE TURNTABLE.
• When you have finished using the turntable please ensure that the tone arm is secured with the tone arm clamp. If the unit is not to
be used for an extended period it is also sensible to ensure that the stylus tip is protected. Most conventional cartridges come with
an attached stylus protector.
• Dust, dirt and other surface grime should be removed from the unit, the stylus tip and any records to be played on the unit. Take
care so as to avoid damage. We suggest using a dry soft cloth.
• Please take care when transporting this unit, or packing for storage. It is best to use the original packaging materials provided in
either case. Should this not be possible, then please take care to wrap the platter and the unit separately, and to ensure that the entire
unit is kept in a dry place out of direct sunlight. Before wrapping please remove the stylus and to avoid damage to the tone arm,
please set the tone arm in the tone arm clamp and apply a reasonable amount of tape to ensure that it does not move.
• To avoid feedback or hum, locate the speakers and the turntable is a suitable position. Feedback is often caused by the vibration of
speakers, which in turn affects sensitive cartridges, producing a poor sound. If such occurs, relocate the turntable or speakers so as
to be as far apart from each other as possible. Hum is often caused by nearby appliances that use a transformer or thermostat.
Relocating the units again as far away as possible to the source will help with this problem. Hum may also be produced if the
grounding wire is not securely fasted to the mixer or amplifier.
3
PARTS
Front
Turntable Platter(Option 2 )
Spare Cartridge Stand
Center Spindle
Tone-Arm Height Fixed Screw
Balance Weight(Option 5 )
PDX-2300MkII
Dynamic Needle
Pressure
Adjustment Knob
Power Switch
EP Adapter Holder
Tone-Arm
Height Gauge
Tone Arm
Arm Rest
Slip Mat(Option 3 )
Headshell
(Option 4 )
START/STOP Button
Speed Select Button
PDX-2300MkII Pro
Fine Pitch Fader
Detachable Stylus Illumination Jack
START/BRAKE Controller
Reverse Switch
Ultra Pitch Fader
Pitch Bend Joystick
Rear
Remote-control Jack
PDX-2300MkII
PDX-2300MkII Pro
SERIAL NO.
R
L
OUTPUT
REMOTE
Output Jack
AC Cord
Ground Terminal
BEFORE USE
Parts and accessories
Before use, please check that you have all parts.
q Main unit
w Platter
e Split mat
r Head shell
t Balance weight
• Accessories accompanying this booklet.
y Shell weight
u RCA cable
i GND cable
o EP adopter
!0 Platter screws
!1 Screw driver for platter screws
!2 Owner's manual
!3 Stylus Light
4
ASSEMBLY AND SET-UP
Turntable Assembly
q Place the platter on the center spindle. The platter will adjust
itself to best fit over the spindle.
w Adjust the positioning of the platter so that the screw holes line
up perfectly.
e Screw and tighten accordingly.
r Place the slip mat on the platter.
*** Care should be taken to avoid dropping either/both, the
platter or the cabinet.
DRIVER
e
r
w
q
• If the player is operated without fixing the screws, the
platter may not rotate properly.
• Do not plug in to a power outlet until this unit is fully
assembled and adjusted.
Installing the balance Weight
q From the backend of the tone arm (towards the rear panel)
place the balance weight onto the shaft and turn counter
clockwise. (Refer to the illustration)
PDX-2300MkII
PDX-2300MkII Pro
Slip mat
q Place the slip mat on the platter. Then place a record on top of
the slip mat. The slip mat is essentially used to give you better
control over the spinning of your record. That is, with the slip
mat in place you are able to stop, pull or push the record
without affecting the rotation of the platter.
Top : Record disc side (Printed side)
Bottom : Slip surface side
(The slip mat included with this unit may
differ from illustrations in this user guide or
in other publications.)
5
Cartridge Installation
q Make sure that you follow the instructions included with your
cartridge.
w Connect the lead wires to the respective terminals. Industry
standard cartridges come with color-coded wires. Make sure
that you match these colors correctly.
NUT
SHELL
LEAD WIRE
(OPTION r)
SHELL WEIGHT
TERMINAL
(OPTION y)
If using a light weight cartridge, we suggest the use of
the shell weight enclosed.
(ACCESSORY)
CARTRIDGE
(ACCESSORY)
STYLUS
(ACCESSORY)
SCREWS
(ACCESSORY)
e The overhang of your cartridge needs to be adjusted to best
suit the A.S.T.S tone arm. For best tracking and stylus pressure
a distance of 50mm (as shown) should be set.
50mm
To avoid premature damage to the stylus take care to
avoid touching it during any adjustment(s).
r Insert the head shell into the front part of the tone arm. Turn
the looking ring in the direction shown below until the head
shell is firmly fixed in place.
6
INSTALLATION AND CONNECTION
Power Connection
Player Installation
Plug in the unit to a power outlet.
• Do not expose this unit to direct sunlight, or install in an area
that is typically humid and/or damp.
• Place this unit on a stable, horizontal service in order to limit
vibration and poor tracing/action of the tone arm.
• Locate this unit at a suitable distance from any speakers so as
to avoid feedback.
• Interference may result from close proximity of an AM/FM
tuner.
This unit has been manufactured to strict quality and
safety standards. PLEASE ENSURE that you use
the correct power supply as shown on the rear panel
of this device. FAILURE to do so many result in shock
and/or serious damage to this unit and/or users.
Connecting Phono terminal
With the RCA cable (accessory 7) and the GND cable (accessory
8), connect the output terminals and the GND terminal on the
PDX-2300MkII/MkIIPro rear panel, and the phono input
terminals to the respective terminals on your amplifier/mixer.
Ensure that the GND (ground) terminal is firmly
connected to a mixer or amplifier. If the GND terminal
is not correctly connected HUM may persist.
Example
PDX-2300MkII / MkII Pro
PDX-2300MkII / MkII Pro
PDX-2300MkII / MkII Pro
REAR PANEL
RCA JACK WHITE(L)
RCA JACK RED(R)
SERIAL NO.
R
L
OUTPUT
SERIAL NO.
R
REMOTE
L
OUTPUT
REMOTE
GND TERMINAL
R/RED
R/RED
L/WHITE
L/WHITE
CABLE
Connection
RCA CABLE(WHITE/L)
R/RED
R/RED
L/WHITE
L/WHITE
RCA CABLE(RED/R)
GND CABLE(BLACK)
DJ MIXER PCV180
CABLE
Connection
AMP/AUDIO MIXER
PHONO L Channel
PHONO R Channel
GND TRMINAL
7
ADJUSTMENT ( S )
Adjustment of Overhang
As shown in the illustration, overhang indicates the distance from
the stylus tip to the center of the turntable spindle when the stylus
tip falls on the extension of a straight line from the pivot of the
tonearm to the center of the spindle. If this adjustment is not
correct, the stylus will not track the grooves properly.
q Loosen the two cartridge mounting screws.
w Position the tonearm over the center spindle.
e Slide the cartridge until the stylus tip is at specified distance
from the center of spindle. (see illustration)
r Once proper distance is obtained, tighten the cartridge
mounting screws.
ToneArm Center
Center Spindle
m
m
15
Stylus Tip
Center
Spindle
Be careful not to touch your finger to the stylus tip during the
adjustment.
15mm
Disk
Adjustment of Horizontal Zero Balance
q Carefully release the tone arm from the tone arm clamp.
w Turn the balance weight clockwise or anti-clockwise until
balanced horizontally.
The balance weight and cartridge are
balanced, the tone-arm is held horizontal.
When adjusting the horizontal balance, take care not to
touch the stylus.
The balance weight setting is too heavy.
The balance weight setting is too light.
In case of PDX-2300MkII Pro, adjust the Dynamic
Needle Pressure Adjustment Knob in the position of 0.
e Return the tone arm to resting position.
8
Adjustment of Stylus Puressure
q Hold the balance weight with one hand as shown in the
drawing, and rotate only counter ring to bring the numeral "0"
of the ring into alignment with the center line on the tone-arm
rear shaft.
Balance Weight
Rotate
this part
If the balance weight is moved, readjust the horizontal
balance again.
Counter Ring
w Turn the balance weight to present the reading on the gauge to
the designed stylus force of your cartridge.
As counter ring moves in step with the balance weight, proper
stylus pressure can selected by reading the graduated ring
directly.
Balance Weight
Rotate
this part
If you put too much pressure on the stylus, it can
cause the stylus to jump during scratch play and will
shorten the stylus's life.
Counter Ring
Dynamic Needle Pressure
Adjustment Knob
q Loosen the dynamic needle pressure adjustment knob and pull
it to the position with appropriate needle pressure, the tighten
the knob.
Loose
Close
Dynamic Needle
Pressure
Adjustment Knob
Tone arm height adjustment
A Tone arm height adjustment may be necessary for some
cartridge types. The height can be adjusted up to 9mm by rotating
the arm height adjustment screw.
Cartridge height 16mm
Cartridge height 25mm
Be sure to tighten the arm height adjustment screw
well. The stylus may jump/skip if the height setting is not
secured.
Arm Height Adjustment Screw
9
OPERATION
q Place a record on the slip mat.
w Switch on the unit using the Power on/off switch located on
the rear panel.
e Remove the stylus protector if applicable.
r Start the platter spinning with the START/STOP button.
t Position the tone arm over the record and gently lower to begin
playback.
y Set the playing speed to either 33 1/3 or 45 RPM.
When turned on this unit is set to play at 33 1/3 RPM.
To adjust to a 45RPM speed setting, press the 45
RPM button. This unit does not use a cue lever
system for speed setting(s).
u Move the tone arm to the resting position and secure using the
tone arm clamp.
i Push the START/STOP button to stop the platter from
spinning.
o Turn the unit off.
Remote Control
The START/STOP functions of the PDX-2300MkII can be controlled
externally with equipment such as a foot switch peddle. An input
jack is provided for this remote control on the rear panel of this unit.
If the power switch is turned off without pressing the
START/STOP button, the electric brake will not
function.
Playing EP records
Fit the EP adapter over the center spindle and follow the same
playing instructions as written above.
Stylus light (Detachable mini light)
A detachable stylus light is available for this unit.
10
Advanced Pitch Control Features
The PDX-2300MkII/MkIIPro features advanced digital pitch
control features. Through three different controls you are able to
adjust the playing pitch by up to +/-60%.
q PITCH BEND & ULTRA SHIFT
Using the pitch bend joystick will allow you to quickly pull or
push the playing pitch of this unit. To pull means to slow
down, push means to speed up. Pushing the joystick towards
the tone arm will result in you being able to pull (minus) the
playing pitch. Pushing the joystick in the opposite direction
will result in you being able to push (positive) the playing
pitch. It is possible to set the increment of pitch adjustment or
the pitch span to 1,2,3, & 6%. The basic pitch span setting is
2%. To change the pitch span setting press the joystick down.
Pushing the joystick down once will set the span to 3%, twice
6%, three times 1% and a fourth time will set it back to 2%.
You can also ultra shift the pitch by +/-50% by pushing the
joystick left or right. A movement to the left will speed up the
pitch momentarily whilst a push to the right will slow down
the pitch momentarily. This momentary ultra shift is always set
to +/-50%.
When the power is turned on, pitch bend is set at
±2%.
Display
Every time the stick controller is pressed, the display changes as shown below.
Currently set
amount
Amount to
be set
( Initial setting )
w FINE PITCH CONTROL
The PDX-2300MkII/MkIIPro has two pitch control faders.
The larger, 100mm fader control is for fine pitch adjustment.
With the fine pitch fader you are able to make accurate
adjustments up to +/-10%.
e ULTRA PITCH FADER
Using the ultra pitch fader will allow you to make dramatic
and accurate pitch adjustments up to +/-50%.
11
Start Speed
You can adjust the starting speed of the platter by adjusting the
SPEED ADJUSTMENT 'START' dial. A clockwise rotation
slows down the starting speed whilst an anti clockwise rotation
will speed it up. At its maximum setting after pressing the
START button, the PDX-2300MkII/MkIIPro has an amazingly
quick start up (to full speed) of around 0.5 seconds.
Brake Speed
As well as being able to change the start speed, you can alter
the speed at which the platter brakes or slows down. A
clockwise rotation of this dial gives a slow brake speed whilst
an anti clockwise rotation produces the fastest brake speed
possible. Again, the powerful motor (and therefore platter
speed) of the PDX-2300MkII/MkIIPro is far beyond that of its
closest competitor.
Reverse Play
When pushed, this button will instantly reverse the playing
direction of the platter. In reverse mode, an indicator LED will
be on. When the unit is first turned on, the platter is set to spin
in the normal forward direction.
12
SPECIFICATION
TURNTABLE
MOTOR
DIRECT DRIVE
STARTING UP TIME
0.5sec (33 1/3rpm) 70°
STARTING TORQUE
2.7kg・cm
BRAKING SYSTEM
ELECTRONIC BRAKE
RMBLE (S/N RATIO)
78dB (IEC 98 WTD)
SPEED
"33 1/3rpm, 45rpm"
FINE PITCH
± 10% (100mm FADER)
ULTRA PITCH
± 50% (45mm FADER)
PITCH BEND
± 1,2,3,6 %( Front ⇔ Rear )
± 50 %( Right ⇔ Left )
ARM
WOW & FLUTTER
0.07% W.R.M.S.
TYPE
ANTI SKIPPING TONE-ARM SYSTEM
DYNAMIC BALANCE J type TONE-ARM
BALANCE
TRACING HOLD BALANCE
TONE-ARM HEIGHT
ADJUSTMENT RANGE 9MM (MAXIMUM)
STYLUS PRESSURE
ADJUSTMENT RANGE 0 ∼ 7.0g
LIGHT (OPTIONAL)
DETOUCHABLE MINI LIGHT DC12Volt 20mA
REMOTE
MOMENTARY START (MINI JACK)
DIMENSION
(W) 454mm × (H) 162mm × (D) 365mm
WEIGHT
9.5kg
POWER
US
: AC120V 10W
EC, UK : AC230V 10W
12AZ851010