1
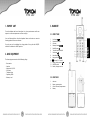
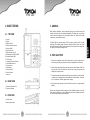
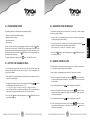
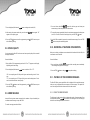
Mira 200
CORDLESS TELEPHONE
WITH BUILT-IN DIGITAL ANSWERING MACHINE
Operating Guide
Mira 200
Dear Customer,
Congratulations on having bought the TOPCOM
Mira 200 cordless telephone.
The Mira 200 is a quality product which offers you a
whole range of possibilities and is easy to operate.
This operating guide gives you a complete view of all
the possible functions.
We advise you to first read this operating guide
thoroughly before using your Mira 200.
Kind regards,
TOPCOM
COPYRIGHT
1996 TOPCOM® N.V.
3
Mira 200
Mira 200
TABLE OF CONTENTS
1. IMPORTANT . . . . . . . . . . . . . . . . . . . . . . . . . . . . . . . . . . . . . . . . . . . . 6
9. OPERATION DIGITAL ANSWERING MACHINE . . . . . . . . . . . . . . . . . . . 19
2. BASE EQUIPMENT . . . . . . . . . . . . . . . . . . . . . . . . . . . . . . . . . . . . . . . 6
9.1. SOME TERMS . . . . . . . . . . . . . . . . . . . . . . . . . . . . . . . . . . . . . . . . . . 19
3. HANDSET . . . . . . . . . . . . . . . . . . . . . . . . . . . . . . . . . . . . . . . . . . . . . . 7
9.2. RECORDING OUTGOING MESSAGE 1 & 2 . . . . . . . . . . . . . . . . . . . . . . 20
3.1. FRONT VIEW . . . . . . . . . . . . . . . . . . . . . . . . . . . . . . . . . . . . . . . . . . . . 7
9.3. SWITCHING THE ANSWERING MACHINE ON/OFF . . . . . . . . . . . . . . . . 21
3.2. REAR VIEW . . . . . . . . . . . . . . . . . . . . . . . . . . . . . . . . . . . . . . . . . . . . . 7
9.4. PROGRAMMING MODE . . . . . . . . . . . . . . . . . . . . . . . . . . . . . . . . . . . 22
4. BASE STATION . . . . . . . . . . . . . . . . . . . . . . . . . . . . . . . . . . . . . . . . . . 8
9.5. SETTING THE NUMBER OF RINGS . . . . . . . . . . . . . . . . . . . . . . . . . . . 22
4.1. TOP VIEW . . . . . . . . . . . . . . . . . . . . . . . . . . . . . . . . . . . . . . . . . . . . . . 8
9.6. RECORDING TIME PER MESSAGE . . . . . . . . . . . . . . . . . . . . . . . . . . . . 23
4.2. REAR VIEW . . . . . . . . . . . . . . . . . . . . . . . . . . . . . . . . . . . . . . . . . . . . . 8
9.7. REMOTE CONTROL CODE . . . . . . . . . . . . . . . . . . . . . . . . . . . . . . . . . 23
4.3. SIDE VIEW . . . . . . . . . . . . . . . . . . . . . . . . . . . . . . . . . . . . . . . . . . . . . . 8
9.8. SPEECH QUALITY . . . . . . . . . . . . . . . . . . . . . . . . . . . . . . . . . . . . . . . 24
5. GENERAL . . . . . . . . . . . . . . . . . . . . . . . . . . . . . . . . . . . . . . . . . . . . . . 9
9.9. MEMO MESSAGES . . . . . . . . . . . . . . . . . . . . . . . . . . . . . . . . . . . . . . . 24
6. INSTALLATION . . . . . . . . . . . . . . . . . . . . . . . . . . . . . . . . . . . . . . . . . 9
9.10. RECORDING A TELEPHONE CONVERSATION . . . . . . . . . . . . . . . . . . 25
7. BATTERY . . . . . . . . . . . . . . . . . . . . . . . . . . . . . . . . . . . . . . . . . . . . . 10
9.11. PLAYBACK OF THE RECORDED MESSAGES . . . . . . . . . . . . . . . . . . . 25
8. OPERATION . . . . . . . . . . . . . . . . . . . . . . . . . . . . . . . . . . . . . . . . . . . 11
9.12. CALL SCREENING . . . . . . . . . . . . . . . . . . . . . . . . . . . . . . . . . . . . . . 27
8.1. OUT OF RANGE WARNING . . . . . . . . . . . . . . . . . . . . . . . . . . . . . . . . . 11
8.2. TONE AND PULSE DIALLING . . . . . . . . . . . . . . . . . . . . . . . . . . . . . . . 11
8.3. MAKING A TELEPHONE CALL . . . . . . . . . . . . . . . . . . . . . . . . . . . . . . 12
8.4. RECEIVING A TELEPHONE CALL . . . . . . . . . . . . . . . . . . . . . . . . . . . . 12
8.5. MUTE FUNCTION . . . . . . . . . . . . . . . . . . . . . . . . . . . . . . . . . . . . . . . 12
9.13. MEMORY FULL
. . . . . . . . . . . . . . . . . . . . . . . . . . . . . . . . . . . . . . . 27
9.14. ERASING ALL MESSAGES . . . . . . . . . . . . . . . . . . . . . . . . . . . . . . . . . 27
9.15. BACKUP BATTERY ALMOST EMPTY. . . . . . . . . . . . . . . . . . . . . . . . . 28
9.16. RESET (RELOADING THE STANDARD SETTINGS) . . . . . . . . . . . . . . . 28
8.6. HANG-UP BUTTON . . . . . . . . . . . . . . . . . . . . . . . . . . . . . . . . . . . . . . 13
10. REMOTE CONTROL . . . . . . . . . . . . . . . . . . . . . . . . . . . . . . . . . . . . . 28
8.7. REDIAL . . . . . . . . . . . . . . . . . . . . . . . . . . . . . . . . . . . . . . . . . . . . . . . 13
11. TROUBLESHOOTING . . . . . . . . . . . . . . . . . . . . . . . . . . . . . . . . . . . . 32
8.8. TRANSMISSION (FLASH) . . . . . . . . . . . . . . . . . . . . . . . . . . . . . . . . . . 13
12. EXPLANATION OF SYMBOLS THAT CAN APPEAR
8.9. TEMPORARY PULSE -> TONE SWITCH . . . . . . . . . . . . . . . . . . . . . . . . 14
8.10. DIALLING MEMORY NUMBERS . . . . . . . . . . . . . . . . . . . . . . . . . . . . . 14
8.11. CALL BARRING . . . . . . . . . . . . . . . . . . . . . . . . . . . . . . . . . . . . . . . . 15
8.12. BABYCALL (EMERGENCY CALL) . . . . . . . . . . . . . . . . . . . . . . . . . . . . 16
ON THE DISPLAY OF THE BASE STATION . . . . . . . . . . . . . . . . . . . . . 34
13. TECHNICAL SPECIFICATIONS . . . . . . . . . . . . . . . . . . . . . . . . . . . . . . 34
14. WARRANTY . . . . . . . . . . . . . . . . . . . . . . . . . . . . . . . . . . . . . . . . . . . 35
8.13. SETTING PAUSE TIME . . . . . . . . . . . . . . . . . . . . . . . . . . . . . . . . . . . 18
8.14. PAGING . . . . . . . . . . . . . . . . . . . . . . . . . . . . . . . . . . . . . . . . . . . . . 18
8.15. SETTING RINGER VOLUME . . . . . . . . . . . . . . . . . . . . . . . . . . . . . . . 19
4
5
Mira 200
Mira 200
1. IMPORT ANT
3. HANDSET
Treat the telephone with care. Never place it in a dusty environment and do not
expose it to extreme temperatures or direct sunlight.
3.1. FRONT VIEW
Use a soft damp cloth to clean the telephone. Never use abrasive or corrosive
cleaning products. Never use solvents.
If you do not use the telephone for a long period of time, place the ON/OFFswitch of the handset in the OFF-position.
2. BASE EQUIPMENT
The base equipment consists of the following things:
-
Base station
Handset
Adaptor Ac 9V/0.7 A
9V battery
Telephone plug
Operating Guide
Warranty card
1.
2.
3.
4.
5.
6.
7.
Line button
Numerical buttons
# button
Memory button
Redial button
Transfer button (flash) R
Set button
8.
9.
10.
11.
12.
13.
Mute button
Hang-up button
button/ P->T switch
Ringer volume switch
ON/OFF-switch
Battery charger contacts
3.2. REAR VIEW
1.
2.
3.
4.
6
Antenna
Battery contact points
Cover of battery compartment
Battery
7
Mira 200
Mira 200
4. BASE STATION
5. GENERAL
4.1. TOP VIEW
With cordless telephones, radio connection replaces the cord connecting the
handset to the base unit of traditional telephones. This allows you to make and
receive calls even when you are away from the base unit. Thanks to this radio
connection, your mobility increases.
1. Speaker
2. Display
3. Battery indicator
4. Radio connection indicator
5. Indicator OGM 2
6. Program indicator
7. Program button; on/off
8. Recording button OGM 2/ERASE
9. Recording button OGM 1
10. STOP button
11. Playback/Fast forward button
12. Rewind/Memo button
13. Paging button
14. Microphone
15. Indicator OGM 1
16. Power indicator
17. Antenna
3
The Mira 200 has a working range of 300 m (range is reduced to 60 m inside
buildings). This working range is however strongly reduced if there are several
obstacles between the base and the handset. If you have gone too far away from
the base, you will hear a warning signal.
4
6. INST ALLA TION
1. Connect the telephone cord to the left socket on the rear of the base (rear of
base facing you) and plug the other end into the telephone line wall socket.
2. Connect the power cable plug to the power socket with indication “AC9V” on
the right side of the rear of the base (rear of base facing you) and plug the
adaptor into a power socket.
3. To avoid messages from being erased during a power failure, put the 9V backup battery in the compartment on the bottom of the base station. If this battery is not placed, ‘LO’ (low) appears on the display.
4.2. REAR VIEW
4. Adjust the antenna located on the left side of the base to a straight upward
position.
1. Connection telephone line
2. Connection adaptor
Remove the transparent plastic protection of the telephone number card on the
base station by pushing it to the left. Write down your own telephone number on
this card and put the plastic protection back.
4.3. SIDE VIEW
1. Volume switch
2. Ringer volume switch
8
9
Mira 200
Mira 200
7. BA TTER Y
·
If the battery in the handset has not been charged for a long period of time,
charge it during an entire night.
Open the cover of the battery compartment on the backside of the handset. Now
place the battery in the handset and put the ON/OFF-switch in the ON-position
(“I”).
·
Do not throw faulty batteries just anywhere, they are small chemical waste
and have to be treated as such.
The battery of the handset has to be charged before telephone calls can be
made. The first time the unit is used, it takes at least 10 hours before the battery
is fully charged.
8. OPERA TION
Put the handset on the connected base station to charge the battery. The battery
indicator lights to indicate that the battery is being charged. After approximately
10 hours the battery is fully charged. Do not put the handset back in the base
station, every time the phone has been used! Put the handset only in its base
when it is indicated that the battery is almost empty. It is better for the battery
to be sufficiently decharged before being recharged.
8.1. OUT OF RANGE WARNING
Obstacles between the handset and the base station will influence the operation
range. When the handset is too far away from the base station, the quality of the
connection will deteriorate and you will hear a warning tone (2 signals). The
communication will be broken automatically if you do not go back into the
operation range within 10 seconds.
Remark:
The battery indicator will light when the handset has been put on the base station for charging. It will not turn off when the battery is fully charged.
If a connection between the handset and the base station is not possible, you
will hear an intermittent warning tone.
When you hear an intermittent tone from the handset or when the low battery
indicator on the LCD display of the handset is blinking, the handset has to be
charged again.
8.2. TONE AND PULSE DIALLING
A fully charged battery allows a conversation of 5 hours. In standby mode the
battery has to be recharged after approximately 30 hours .
Remarks:
The charger contacts of the handset should not come into contact with metal
since this could cause a short-circuit and damage the battery irreparably.
·
·
The charger contacts of the battery on the base station and on the handset
should be cleaned with a soft cloth once a month.
·
If you do not use your unit for a longer period of time, remove the battery
from the handset or put the ON/OFF-switch of the handset in the OFF-position. In this case, do not put the handset in charging position on the base station. It is better for your batteries not to do so.
Standard the Mira 200 has been set to pulse dialling. It is possible that the
dialling system has to be changed to tone dialling (DTMF) before a call can be
made. Your telephone has to be set to the dialling system, which is offered on
your telephone line.
Pulse dialling : if you are connected to an older (mechanic) telephone exchange.
Tone dialling : if you are connected to a modern electronic (DTMF) telephone
exchange.
8.2.1. TEMPORARY PULSE -> TONE (DTMF) SWITCH
10
1. Press the line button
2. Press the set button
and wait for the dial tone.
(“SET” appears on the display).
11
Mira 200
3. Press the numbers “28 ” and the
4. Press the line button
.
button.
8.2.2. BACK TO PULSE DIALLING
1. Press the line button
2. Press the set button
3. Press the numbers “28 ”
4. Press the line button
and wait for the dial tone.
(“SET” appears on the display).
and the # button.
.
8.3. MAKING A TELEPHONE CALL
Make sure the correct dialling system has been set (pulse or tone dialling) by
making an outgoing call. Press the line button
and wait for the dial tone. The
radio connection indicator
on the base station lights when the radio connection has been established. Now dial the desired telephone number.
Press the line button
after ending the telephone conversation, the Mira 200
returns to standby and “ON” appears on the display. In case you want to make
another phone call, press the hang-up button
instead of the line button and
dial the desired telephone number.
Mira 200
button
. The display will start blinking. When you want to continue the telephone conversation, press the mute button
again.
8.6. HANG-UP BUTTON
When you have made a mistake while dialling a telephone number, you can press
the hang-up button
and dial the number again. By pressing the hang-up
button
it is also possible to make several phone calls after each other without disconnecting the radiolink. After pressing the hang-up button
“BREAK”
appears on the display.
8.7. REDIAL
When you have dialled a telephone number but did not receive an answer, you
can call this number again afterwards. The last number dialed is saved. When
you wish to dial the number again, first press the line button
(the last number dialed appears on the display) and then, after hearing the dial tone, press the
redial button
. The number is now automatically redialed.
If you wish to redial the number immediately without breaking the connection
with the base station, first press the hang-up
button and then the redial
button
.
8.4. RECEIVING A TELEPHONE CALL
8.8. TRANSMISSION (FLASH) R
When you are being called, first the base station will ring and after a short period
of time also the handset. Press the line button
. When you hear a beep, you
can start the conversation. Press the line button
again to end the conversation.
With the flash button R - also called flash, recall or R button - you can transfer a
line to another telephone on your telephone exchange. The R button has a flash
function, this means that a short line interruption is being generated.
8.5. MUTE FUNCTION
Consult the operating guide of your telephone exchange for a correct use of this
function.
If you wish to talk to a third person without your correspondent hearing this conversation, you can temporarily turn off the microphone. Simply press the mute
This button is sometimes also used for services offered on your public telephone
line.
12
13
Mira 200
Mira 200
8.10.2. DIALLING A MEMORY NUMBER
8.9. TEMPORARY PULSE -> TONE SWITCH
The Mira 200 has been preset to pulse dialling. It is however possible to switch
temporarily to tone dialling f.i. for telebanking, pager calls, ...
You can use this function by pressing the
button immediately after having
dialed the desired telephone number. Now you can enter the desired numbers in
tone dialling mode.
After pressing the line button
or the hang-up button
automatically returns to pulse dialling.
your Mira 200
8.10. DIALLING MEMORY NUMBERS
The Mira 200 disposes of 10 memory numbers (speed dial numbers). Each
memory place can store a telephone number of maximum 16 digits. You can call
a memory number by pressing the memory button
followed by the number of the memory place where the desired telephone number has been stored
(0-9).
8.10.1. STORING MEMORY NUMBERS
1. Press the line button
and wait for the dial tone.
2. Press the set button
(“SET” appears on the display).
3. Press the memory button
(“PHONE NO-” appears on the display).
4. Choose a memory place by pressing a numerical button (0-9).
5. Enter the telephone number that you wish to store.
6. Press the set button
(“DONE” appears on the display).
7. Press the line button
to stop the radio connection.
1. Press the line button
and wait for the dial tone.
2. Press the memory button
(“SPEED DIAL” appears on the display).
3. Press the number of the memory place, where the telephone number has been
stored (0-9). The telephone number is now automatically dialled.
8.10.3. SEARCHING A MEMORY NUMBER
1. Press the line button
and wait for the dial tone.
2. Press the memory button
(“SPEED DIAL” appears on the display).
3. Press the
button to see the following number or the # button to see the
previous number.
You can dial a memory number while going through the memory numbers by
pressing the redial button
when the desired number appears on the display.
8.10.4. ERASING A MEMORY NUMBER
1.
2.
3.
4.
Press the line button
and wait for the dial tone.
Press the set button
(“SET” appears on the display).
Press the memory button
(“PHONE NO-” appears on the display).
Press the number of the memory place (0-9) of the memory number you wish
to erase.
5. Press the set button
(“DONE” appears on the display).
6. Press the line button
to stop the radio connection.
8.11. CALL BARRING
You can also program a flash or pause in the memory numbers. During the programming of the memory numbers press the R -button for a line interruption or
the redial button
for a pause. In order to set the pause time, see 8.13. Setting
pause time.
The numerical buttons of the Mira 200 can be locked electronically so that outgoing calls are not possible any more.
14
15
Mira 200
Mira 200
8.11.1. ACTIVATE CALL BARRING
8.12.1. ENTERING A BABYCALL NUMBER
1. Press the line button
and wait for the dial tone.
2. Press the set button
(“SET” appears on the display).
3. First press the number “3” and then the
button (first “LOCKED” appears on
1. Press the line button
and wait for the dial tone.
2. Press the set button
(“SET” appears on the display).
3. Enter the code number 3719 (“SET BABYCALL” appears on the display).
4. Enter the desired telephone number.
5. Press the set button
(“DONE” appears on the display).
6. Press the line button
to stop the radio connection.
the display and then, until the electronic lock is deactivated, “ “ is present on
the display).
4. Press the line button
to stop the radio connection.
If you now first press the line button
and then any other button, you will
hear a long warning tone to indicate that the electronic lock of the numerical buttons is activated.
8.12.2. ACTIVATE BABYCALL
Remark:
If the Mira 200 is connected to a house telephone exchange, incoming lines can
still be put through, even when the electronic lock is activated.
1. Press the line button
and wait for the dial tone.
2. Press the set button
(“SET” appears on the display).
3. First press the number “1” and then the
button (“ “ appears on the display together with the programmed babycall number. The babycall function is
now activated and the handset is in standby mode).
8.11.2. DEACTIVATE CALL BARRING
1. First press the line button
on the display).
2. Press the set button
.
and wait for the dial tone (“LOCKED “ appears
3. Press the number “3” and then the # button (“
“UNLOCK” appears on the display).
4. Press the line button
.
“ disappears and now
8.12. BABYCALL (EMERGENCY CALL)
Thanks to the babycall function you can program the Mira 200 so that a preprogrammed telephone number is dialled when pressing any button.
16
The automatic dialling is done when you first press the line button
and then
any button (except the set button
). You hear 2 short warning beeps to indicate that the programmed babycall number is dialled automatically.
Important:
This function can only be activated if a babycall number has been programmed.
8.12.3. DEACTIVATE BABYCALL
1. Press the line button
and wait for the dial tone.
2. Press the set button
(“SET” appears on the display). The babycall number is
not dialled.
3. Press the number “1” and then the # button (“BABY OFF” appears short on the
display and then the handset is in standby mode).
17
Mira 200
8.13. SETTING PAUSE TIME
Mira 200
Remark:
If your Mira 200 is connected to a house telephone exchange, we advise you to
program a pause in the memory numbers after asking access to the external line
(see 8.10.1. Storing memory numbers).
Standard the pause time is set to 3 seconds, but this can be changed in the
following way:
1. Press the line button
and wait for the dial tone.
2. Press the set button
(“SET” appears on the display).
3. Enter the code number:
codenumber 461 = 1 second pause
codenumber 462 = 2 seconds pause
codenumber 463 = 3 seconds pause (standard)
codenumber 464 = 4 seconds pause
4. Press the line button
to stop the radio connection.
If you wish to enter a pause when storing a memory number, press the redial
button
. The pause will last as long as you have programmed it.
8.14. PAGING
This function does not allow you to have a conversation between the base station and the handset. Only the ringer sound can be activated.
8.15. RINGER VOLUME CONTROL
The ringer volume of the handset and the base station can be set by means of a
ringer volume switch. On the right side of the base station you will see a switch
with 3 positions. On the handset a switch with 2 positions is present on the right
side (front of handset facing you).
9. OPERATION DIGITAL ANSWERING
MACHINE
The built-in digital answering machine in the Mira 200 is a very sophisticated device
which offers you a whole range of possibilities. Please read through this operating
guide carefully in order to be able to use the device without any problem.
9.1. SOME TERMS
With this function you can call the handset from the base station and vice versa.
Press the paging button
of the base station. When the radio connection is
established, the handset will emit a ringer sound and “PAGE” appears on the display. Press the line button
to interrupt the ringer sound. If you press the line
button again, the radio connection is broken.
You can also call the base station from the handset. Proceed as follows:
1. Press the line button
and wait for the radio connection to be established
(dial tone).
2. Press the set button
(“SET” appears on the display).
3. Press the number “5”. The base station will ring.
4. Press the line button
.
18
OGM
(outgoing message)
MEMO
(memorandum message)
=
=
An-mode
=
nA-mode
=
This text, which you have recorded, is announced to
the caller during your absence.
Instead of leaving written memo messages for the
members of your household, you can record memo
messages on your Mira 200.
After the playback of outgoing message 1, the caller
has the possibility to leave a message.
After the playback of outgoing message 2, the connection is broken automatically. The caller does not
have the possibility to leave a message.
19
Mira 200
9.2. RECORDING OUTGOING MESSAGE 1 & 2
OUTGOING MESSAGE 1
= this outgoing message is used when the Mira 200 is
set to An-mode (answering and recording)
OUTGOING MESSAGE 2
= this outgoing message is used when the Mira 200 is
set to nA-mode (only answering, no recording)
1. Press and hold the OGM 1
button till you hear a beep. Dictate your outgoing
message at 20 cm distance from the microphone on the base station. The display
shows the recording time.
Example of OGM 1:
“ Hello, Rob and Mary are unable to answer the telephone at this time. After the
beep, please leave your name, telephone number and a short message. We will
return your call as soon as possible.”
2. To stop the recording of the outgoing message, press the STOP
button. The
maximum recording time of the outgoing message is 25 sec., when this time is
reached, the recording will stop automatically without pressing the STOP
button.
After ending the recording, the outgoing message is played automatically. In order
to end the playback faster, press the STOP
button.
3. In order to playback the outgoing message again, press and release the OGM 1
button, ‘An’ now appears on the display.
For the recording of outgoing message 2, you can proceed in the same way as
described above. You do need to use the OGM 2
‘nA’ appears instead of ‘An’.
9.3. SWITCHING THE ANSWERING MACHINE
ON/OFF
The Mira 200 can automatically answer your calls and record messages during your
absence.
When you press and release the
/PROG button, you can switch your Mira 200 from:
An-mode -> nA-mode -> oF (switching off)
In An- or nA-mode the corresponding LED on the base station will light. When the
answering machine is turned off, either of both LEDs will light.
Note:
It is not possible to activate the An- or nA-mode when the corresponding outgoing message has not been recorded.
9.3.1. ANSWERING AND RECORDING CALLS (AN-MODE)
Switch the answering machine to An-mode. Your Mira 200 will now automatically
answer the incoming calls (outgoing message 1) and record possible messages.
The messages that are being recorded can also be heard through the speaker on the
base station. When you are at home and you wish to answer the call, press the line
button of the handset of the Mira 200. The recording of the message is now stopped
automatically.
9.3.2. ONLY ANSWERING CALLS (NA-MODE)
button, on the display now
Example of outgoing message 2:
“Our offices are closed at this moment, please contact us again between 9.00 and
16.00 h.”
20
Mira 200
Switch the answering machine to nA-mode. Your Mira 200 will now only answer the
incoming calls (outgoing message 2). The caller does not have the possibility to leave
a message.
21
Mira 200
Mira 200
9.4. PROGRAMMING MODE
9.6. RECORDING TIME PER MESSAGE
The following settings can be changed in the programming mode.
The maximum recording time has been preset to 2 minutes (d2). In order to change
this setting, proceed as follows:
* Number of rings before automatic answering
* Recording time per message
* Remote control code
* Speech quality
1. Bring the device in programming mode so that the previously programmed
recording time appears on the display.
In order to bring the device in programming mode, press and hold the
/PROG
button until you hear a beep. The PROG-LED on the base station will light and on the
display the previously entered number of rings appear. Each time you want to go to a
following setting, press and release the
/PROG button, the previously entered coordinates appear on the display.
To stop the programming, press the STOP
2. In order to change the recording time, press the playback/fast forward
button. On the display the possible choices appear (d0-d2,d-):
d0= 30 seconds, d1= 1 minute, d2= 2 minutes, d-= no limit.
3. Press the STOP
button to end the programming or the
to the following setting.
/PROG button to pass
button. The PROG-LED turns off.
9.7. REMOTE CONTROL CODE
9.5. SETTING THE NUMBER OF RINGS
You can determine yourself after how many rings your Mira 200 will answer the
incoming calls. Standard this has been set to 2 rings (r2). In order to change this setting, proceed as follows:
1. Bring the Mira 200 in programming mode so that the previously entered number of
rings appear on the display.
2. To change the number of rings, press the playback/fast forward
button. On
the display the possible choices appear (r1-r5, ts):
r1= 1 ring, r2= 2 rings, r3= 3 rings, r4= 4 rings, r5= 5 rings, ts= toll saver
(the call is answered after 2 rings when messages have been recorded and after 4
rings when no messages have been recorded, see 10. Remote control).
3. Press the STOP
button to end the programming or the
to the following setting.
The code number for the remote control consists out of 3 numbers and is preset to
“123”. In order to change this code, proceed as follows:
1. Bring the device in programming mode so that “Cd” appears on the display.
2. In order to change the first number, press the rewind
button. The previously entered number appears on the display. The indication “-” shows that it concerns
the first number.
3. Press the playback/fast forward
button to change the number (0-9).
4. In order to change the second number, press the rewind
button. The previously entered number appears on the display. The indication “=“ shows that it concerns the second number.
/PROG button to pass
5. Press the playback/fast forward
button to change the number (0-9).
6. In order to change the third number, press the rewind
button. The previously entered number appears on the display. The indication “ ” shows that it
concerns the third number.
22
23
Mira 200
7. Press the playback/fast forward
button to change the number (0-9).
8. After setting the remote control code, press the rewind
appears on the display again.
9. Press the STOP
button to end the programming or the
to the following setting.
Mira 200
1. Press and release the MEMO
button. After the beep you can dictate your
memo message in the microphone of the base station.
button again. “Cd”
2. The recording stops automatically when the maximum programmed recording time
(see 9.6.) is reached. To end the recording earlier, press the STOP
button.
/PROG button to pass
3. Your Mira 200 automatically repeats the recorded memo message. Press the STOP
button to stop the automatic playback.
9.8. SPEECH QUALITY
9.10. RECORDING A TELEPHONE CONVERSATION
You can program the Mira 200 so that an even better speech quality of the recorded
messages is obtained.
When you are having a telephone conversation with the handset of the Mira 200, this
conversation can be recorded.
Proceed as follows:
Proceed as follows:
1. Bring the Mira 200 in programming mode until “48” or “72” appears on the display,
depending on the last setting.
1. Press and release the MEMO
button and the recording starts immediately.
The recording time appears on the display.
2. Press the playback/fast forward
2. Press the STOP
button to switch to “48” or “72”.
“48”: for a sampling rate of 4.8 kbps which gives a total recording time of 14 minutes.
“72”: for a sampling rate of 7.2 kbps which gives a total recording time of 9 minutes but with an even better sound quality.
3. Press the STOP
button to end the programming or the
to the following setting.
/PROG button to pass
button or hang up
to stop the recording.
9.11. PLAYBACK OF THE RECORDED MESSAGES
The Mira 200 offers you two possibilities for the playback of the recorded messages:
either you can just playback the new messages or all the messages. The speaker volume can be adjusted with the volume switch on the base station.
9.11.1. ONLY THE NEW MESSAGES
9.9. MEMO MESSAGES
Instead of leaving written memo messages for the members of your household, you
can dictate memo messages on your Mira 200.
The display on the base station blinks to indicate the number of new messages. Press
and release the playback
button to listen to the messages. Your Mira 200 plays
back all the new messages from the first one on.
To record a message proceed as follows:
24
25
Mira 200
Mira 200
In order to obtain the playback at normal speed again, press and hold the
fast forward
button again until you hear a beep.
9.11.2. ALL THE MESSAGES
To listen to all the messages, press and hold the playback
button until you
hear a beep. The number of the message that is being played back appears on the
display.
During the playback of the messages you have the following possibilities:
PAUSE:
Press the STOP
button to interrupt the playback ( “PA” appears on
the display). To continue, press and release the playback
button within 30
seconds.
9.12. CALL SCREENING
When you are at home and the answering machine is activated, you can listen to the
message of the caller (volume adjustable with volume control switch on the base
station).
If you wish to speak to the caller personally, simply take over the call by pressing the
line button
on the handset of the Mira 200. Now the answering machine
automatically stops the recording of the message.
STOP:
To stop the playback, press and hold the STOP
a beep.
button until you hear
ERASING A MESSAGE:
When you press the erase button
message, this message is erased.
When during the recording of messages only 15 seconds of recording time is left, the
caller will hear a beep. This beep is also audible through the speaker of the base station.
during the playback of a
REPEATING A MESSAGE:
In order to repeat a message, press and release the rewind
9.13. MEMORY FULL
button.
As soon as the memory is full, the base station will emit a long continuous beep and
will stop the recording. The caller will also hear this beep. New calls will not be
answered anymore and the display of the base station will show “Fu” (full).
PREVIOUS MESSAGE:
To go back to a previous message, press and hold the rewind
soon as you reach the desired message, release the rewind
to the message.
button. As
9.14. ERASING ALL MESSAGES
button to listen
In order to erase all the recorded messages, press and hold simultaneously the
rewind
NEXT MESSAGE:
Press and release the fast forward
message.
button to listen to the following
PLAYBACK AT DOUBLE SPEED:
Press and hold the fast forward
button during the playback of the
messages until you hear a beep. The playback of the messages is now at
double speed.
26
button and the playback
button until you hear a beep.
Remark:
All recorded messages remain saved unless they are erased explicitely. To avoid that
no more messages can be stored when the memory is full, it is best that you erase
the messages that you do not wish to listen to again. For the specific erasing of a
message, see 9.11. Playback of the recorded messages (erasing message).
27
Mira 200
9.15. BACKUP BATTERY ALMOST EMPTY
The 9V backup battery avoids the memory from being erased in case of a power failure. The display of the base station shows “LO” when the battery is almost empty and
the 9V battery has to be replaced. The battery compartment is situated on the bottom
of the base station.
9.16. RESET
(RELOADING THE STANDARD SETTINGS)
In order to reload the standard settings in the answering machine, proceed as follows:
remove the adaptor plug from the backside of the base station.
Press simultaneously the rewind
button, the playback
button and the
STOP
button and reconnect the plug while you keep the buttons pressed until “rr”
appears on the display of the base station.
Now the standard setting are reloaded in your answering machine and all messages
and outgoing messages are erased.
Mira 200
going message 2, followed by 2 short beeps. Now you have 5 seconds to enter the
first digit of your remote control code. If you wait longer then 5 seconds, the connection is broken automatically.
* When the answering machine is turned off, the line is automatically answered after
15 rings and you will hear 2 short beeps. Now you have 5 seconds to enter the
first digit of your remote control code. If you wait longer then 5 seconds, the connection is broken automatically.
2. According to the mode in which the answering machine is set, enter the 3 digit
remote control code after the beep or after the 2 short beeps.
Remark:
It is very important that you wait after entering each digit until you hear a short confirmation beep. When the digits are entered too fast after each other, a part of the
code is lost. When the 3 digits are correct, you will hear 2 short confirmation beeps.
When you have entered a wrong code, after the last digit you will hear a long beep.
Now enter the correct remote control code.
3. Press the corresponding numbers of the desired function:
10. REMOTE CONTROL
You can operate your Mira 200 through the telephone line from another location. Be
sure to use a telephone, set to tone dialling (DTMF).
If you often use the remote control function, it is best that you set your answering
machine to ‘toll saver’ (see 9.5. Setting the number of rings).
Your call is then answered after 2 rings when new messages have been recorded.
When no new messages have been recorded, a call will only be answered after 4
rings. You can then hang up after 3 rings so that you know for free that no new messages have been recorded.
11 : PLAYBACK OF THE NEW MESSAGES
12 : PLAYBACK OF ALL MESSAGES
During the playback of the messages, you have the following possibilities:
0: PAUSE
Press 0 to interrupt the playback and press 0 again to continue the playback
(if you do not press 0 within 30 seconds in order to continue the playback,
the playback stops).
3: ERASING A MESSAGE
Press 3 to erase the message that is being played.
In order to operate the Mira 200 through the telephone line, proceed as follows:
1. Dial the telephone number to which your answering machine is connected.
* If you call the answering machine when it is set to An-mode, you will hear
outgoing message 1. After the beep you can enter the 3 digit remote control code.
If you call the answering machine when it is set to nA-mode, you will hear out-
28
4: PREVIOUS MESSAGE
Press 4 to go to the previous message.
5: REPEATING A MESSAGE
Press 5 to repeat a message.
29
Mira 200
6: NEXT MESSAGE
Press 6 to listen to the next message.
9: STOP
Press 9 to stop the playback.
17 : ERASING ALL THE MESSAGES
41 : PLAYBACK OF OGM 1 (An-MODE)
Press 9 to stop the playback.
42 : PLAYBACK OF OGM 2 (nA-MODE)
Press 9 to stop the playback.
71 : RECORDING OGM 1
Dial 71 to record OGM 1 (wait for the beep) and press 9 to stop the
recording (after 25 seconds of recording you hear a long beep and the
recording stops automatically).
72 : RECORDING OGM 2
Dial 72 to record OGM 2 (wait for the beep) and press 9 to stop the
recording (after 25 seconds of recording you hear a long beep and the
recording stops automatically).
73 : RECORDING A MEMO MESSAGE
Dial 73 to dictate a memo message (wait for the beep) and press 9 to stop
the recording.
211 : SETTING THE ANSWERING MACHINE TO An-MODE
212 : SETTING THE ANSWERING MACHINE TO nA-MODE
210 : SWITCHING OFF THE ANSWERING MACHINE
8 : ROOM MONITORING
Press 8 to activate the room monitoring (on the display of the base
station “--” appears). Press 9 to stop the room monitoring, or after 2
minutes the room monitoring stops automatically.
9:
STOP
30
Mira 200
Remark:
When you have dictated a message just before entering the remote control code, this
message will not be saved. If you want to leave a message, press 73 (recording a
memo message) during the remote control function and 9 to stop the recording.
Mira 200
THE ANSWERING MACHINE DOES NOT RECORD ANY MESSAGES AND
BREAKS THE CONNECTION AFTER THE OUTGOING MESSAGE
- Has the answering machine been set to nA-mode (answering without possibility
to record)?
Set the answering machine to An-mode (answering with possibility to record).
During the remote control function “rE” (remote) appears on the display of the base
station to inform the possible user of the Mira 200 that the remote control function is
activated.
11. TROUBLESHOOTING
- Does “Fu” appear on the display of the base station?
The memory is full, erase the memory.
THE ANSWERING MACHINE CANNOT BE ACTIVATED
Record OGM 1 and 2.
Did you use the adaptor delivered with this telephone?
THE ANSWERING MACHINE BREAKS THE CONNECTION DURING THE
RECORDING OF A MESSAGE
The maximum recording time is reached, prolong the recording time or do not
set any time limit.
Has the telephone line been connected correctly?
The memory is full, (“Fu” appears on the display), erase the memory.
THE TELEPHONE DOES NOT FUNCTION
Check the power supply of the adaptor.
Did you use the line cord delivered with this telephone?
Is the battery of the handset sufficiently charged?
Is the handset too far away from the base station?
REMOTE CONTROL DOES NOT FUNCTION
Has the remote control code been entered with a telephone set to tone dialling
(DTMF)?
Has the code been entered after the beep?
NO DIAL TONE
Has the telephone cord been connected correctly? If not, connect the Mira 200
with the line cord delivered with this telephone.
Did you wait for the confirmation beep after entering each digit?
Did you hear 2 short beeps after entering the complete code?
Did you enter the correct code?
OUTGOING CALLS ARE NOT POSSIBLE / WRONG DIALLING SYSTEM
Change the dialling system (pulse/tone dialling).
BAD CONNECTION
The handset is too far away from the base station, move closer.
YOU HEAR AN INTERMITTENT BEEP
during the conversation
You are too far away from the base station, if you do not move closer to the base
station within 10 seconds, the line will be broken.
when you try to establish a communication and it is impossible to
obtain the connection:
- in the beginning of a call: wait for the connection to be established.
- during a call: try again.
32
33
Mira 200
12. EXPLANATION OF SYMBOLS THAT
CAN APPEAR ON THE DISPLAY OF
THE BASE STATION
An =
nA =
oF =
PA =
Fu =
Lo =
rr =
re =
-- =
Answering with possibility to record (see 9.3.)
Answering without possibility to record (see 9.3.)
Answering machine is turned off (see 9.3.)
Pause (see 9.11.2.)
Memory is full (see 9.13.)
Backup battery almost empty (see 9.15.)
Reset (reloading the standard settings) (see 9.16.)
The answering machine is being operated from a distance
(see 10.)
Room monitoring (see 10.)
In Programming mode:
r1, r2, r3, r4, r5, ts = Setting the number of rings (see 9.5.)
d0, d1, d2, d= Recording time per message (see 9.6.)
Cd
= Remote control code (see 9.7.)
48, 72
= Setting the speech quality (see 9.8.)
13. TECHNICAL SPECIFICATIONS
Dialling system:
Memory:
Power supply:
Battery operating time:
Dimensions:
Weight:
ANSWERING MACHINE
Recording outgoing messages + messages : full digital
Recording capacity:
14 minutes
Outgoing message 1:
outgoing message for answering with
possibility to record messages (max 25 sec.)
Outgoing message 2:
outgoing message for answering without
possibility to record messages (max 25 sec.)
Messages:
Recording time programmable 30 sec/1 min/2
min/ no limit
Number of rings:
1, 2, 3, 4, 5 or toll saver programmable
Remote control code :
3 digits programmable
Backup battery:
9V
14. WARRANTY
The MIRA 200 has been manufactured and tested to offer you complete satisfaction.
TOPCOM secures this device against material and construction defects for a period of
12 months counting from the date the first user purchased it. The warranty is only
valid if the warranty card has been filled in duely, dated and signed. The warranty
card has to be sent back to TOPCOM within 10 days after the purchase date.
The warranty expires completely if people other than our technical personnel have
repaired or modified the machine, or in case of improper maintenance.
TELEPHONE
Frequency:
Power:
Transmission range:
Mira 200
900 MHz
10 mw
inside buildings - max 60 m
outside - max 300 m
Pulse/tone switch possible
10 memory numbers (speeddial numbers)
Base station: adaptor AC 9 V 700 mA
Handset: NiCd - rechargeable battery: 3,6 V
in standby +/- 30 hours
talk time +/- 5 hours
Base station: +/- 165 x 170 x 50 mm
Handset: +/- 57 x 160 x 30 mm
Base station: +/- 350 g
Handset: +/- 200 g (incl. battery)
34
The batteries and adaptor are not covered by the warranty.
If you find any defects during the warranty, please return the unit in its original packing, together with the warranty card and a photocopy of your purchase invoice, to the
TOPCOM sales department.
Any transport costs will be debited to the purchaser.
35