1
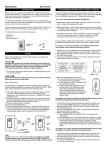
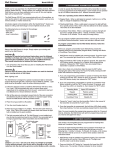
Safety Information INSTALLATION INSTRUCTIONS WIRELESS 3 WAY ON/OFF/DIMMER KIT Model: SK7 Section 1 - Setting up the Wall Switch Receiver Turn off power to the circuit breaker before installing. If you are uncertain or uncomfortable performing this installation, please consult a qualified electrician. This manual should also be kept for future reference. For indoor use only. DO NOT use this product to control loads over the specified maximum rating. For dimming function, the light bulbs must be dimmable. WARNING: Turn off power to the circuit that you plan on installing the Wall Switch to, at the circuit breaker. Failure to turn off power at the circuit breaker can result in electrical shock, causing severe or fatal injury. NOTE: The Wall Switch is designed to operate incandescent light or dimmable compact fluorescent light with a maximum load of 300W at 120VAC. Light bulbs must be dimmable in order to achieve dimming function. The device is approved by the FCC and it complies with Part 15 of the FCC Rules. Its operation is subject to the following two conditions: 1. This device may not cause harmful interference. 2. This device must accept any interference that may cause undesired operation. WARNING: Changes or modifications to this unit not expressly approved by the party responsible of compliance could void the user’s atuhority to operate the equipment. Technical Specifications: Technical Specifications Section 2 - Setting up the Wireless Wall Switch Transmitter 4. Make sure the air gap switch is in the off position and then turn the circuit back on. 5. Place the air gap switch to on position. The two blue LEDs will be on. If the blue LEDs remain off, please check and ensure the light bulb is installed and in good position and that the wires are connected correctly. 6. After the Wall Switch is installed, tap the metal touch plate to turn the lights on and off. NOTE: If you already have an existing 3 Way Switch, disable one switch and replace the other switch with the Wall Switch Receiver. 1. Loosen the screws on the wallplate cover of the Wall Switch receiver and remove it before installing. 2. Install the Wall Switch with the 3 wires, Live, Load and Ground. Use the provided wire nuts (C) to connect these wires respectively to the existing wires from the wall. Neutral wire is not required and cannot be connected to the Wall Switch Receiver. 3. After all the wires are connected, ensure that all of the wire connectors are attached securely and there should be no exposed copper wiring. Secure the Wall Switch with screws. Input Voltage 120V AC, 60Hz Standby Current 0.2mA Minimum Load 10W Maximum Load 300W at 120VAC Red Operating Frequency 318MHz Black Operational Temperature -4°F - 140°F (-20°C - 60°C) Humidity 5% - 95% Range Up to 500 feet in open area ON Position 1. First clean the wall surface where you plan to install the Wireless Wall Switch transmitter. 2. Place the two foam tapes (E) on the back of the Wireless Wall Switch transmitter plate. 3. Peel off the foam tape cover and stick it to the wall surface. Air Gap Switch Load Live NOTE: The Wireless Wall Switch Transmitter comes with a lithium battery already installed. Remove the battery isolator tag from the Wireless Wall Switch transmitter before installing. OFF Position Ground Green INSTALLING WITH DOUBLE SIDED TAPE Blue LEDs Place double-sided foam tape Touch Plate Grey Antenna Congratulations on your purchase of the SkylinkHomeTM Wireless 3 Way On/Off/ Dimmer Kit, model SK7. Simply replace your existing wall switch with the Skylink Wall Switch receiver and mount the Wireless Wall Switch Transmitter anywhere you would like to control your lighting. NOTE: Do not cut the antenna. PACKAGE CONTENTS Package Contents Warranty Section 3 - Operation Section 2 - Setting up (continued) INSTALLING WITH SCREWS ONE YEAR WARRANTY Wall Switch Receiver NOTE: The Wall Mount transmitter comes with a lithium battery already installed. Remove the battery isolator tag from the Wall Mount Transmitter before installing. This product is guaranteed to be free of defects in materials and workmanship for 1 year from the date of purchase. If this product is defective, call 1-800-304-1187 for repair or replacement parts. Guarantee does not include normal wear and tear or batteries. Wireless Wall Switch Transmitter NOTE: Make sure the Air Gap Switch is in the on position before you start. 1. Installing to an Existing Wall Switch A B 1. Loosen the screws on the wallplate cover of the Wireless Wall Switch transmitter and tighten the two included screws (D) on the back plate to the existing wall box. 2. Tighten the two screws on the wallplate to the back plate to secure it. 3. The Wireless Wall Switch transmitter is now ready to be controlled. 1. To turn the light on and off, tap the Wall Switch metal touch plate.. Push Push D Tap the touch plate (On/Off) D C If you have any questions, problems or missing parts, please call Skylink Customer Support: 9:00am - 5:00pm EST, Monday-Friday. 2. 1-800-304-1187 E Part Description 2. Installing on New Wall Surface www.skylinkhome.com P/N : 101Y156 Rev:0 ©2014 SKYLINK GROUP. To dim or brighten the lights, push the Wireless Wall Switch pad to turn on the lights then press and hold the same (upper) pad to dim or brighten the lights. Existing Wall Box (No Anchor) Or e-mail us at [email protected] CUSTOMER SERVICE 17 Sheard Avenue, Brampton, Ontario, Canada L6Y1J3 To turn the light on and off, push the Wireless Wall Switch pad from one position to the other. Quantity A Wall Switch Receiver 1 B Wireless Wall Switch Transmitter 1 C Wire Nuts 3 D Screws and anchors 2 E Double-sided Foam Tape 2 1. Drill two small pilot holes based on the two mounting screw positions and insert the anchors (D) before tightening the back plate with screws (D). 2. Tighten the two screws on the wall plate to the back plate to secure it. 3. The Wireless Wall Switch transmitter is now ready to be controlled. D To dim or brighten the lights, tap the metal touch plate to turn on the lights then press and hold to dim or brighten the lights. Press and hold D Press and hold the touch plate (Dimming) Drill 2 pilot holes & insert anchors PACKAGE CONTENTS Section 4 - Programming PACKAGE CONTENTS Section 5 - Erasing NOTE: Before programming, remove the wall plate on the Wireless Wall Switch transmitter by loosening the screws. PACKAGE CONTENTS On/Off or Dimming Section 6 - Enable/Disable NOTE: All previously programmed devices will be erased. You must re-program the devices you want to keep. NOTE: On/Off Mode turns the light on/off, without dimming and Dimming Mode turns the light on/off or dims/brightens. NOTE: Use a sharp non-conductive object, like a pen or pencil, to press the learn button. WARNING: Non-dimmable load has to always be working under the On/Off Mode. Using non-dimmable load under Dimming Mode may damage the non-dimmable CFL. PACKAGE CONTENTS Section 7 - Flashing Alert Mode NOTE: Use a sharp non-conductive object, like a pen or pencil, to press the learn button. 1. Touch the metal touch plate on the Wall Switch receiver to turn the lights on. The two blue LEDs should go off. 2. Press and hold the learn button for about three seconds until the upper blue LED flashes quickly and then release the learn button. 1. Power off the Wall Switch receiver by sliding the air gap switch into the off position. 2. Press and hold the learn button and slide the air gap switch back into the on position. Air Gap Switch Blue LEDs 3. Press the learn button on your Wireless Wall Switch transmitter. The red LED will be on for 15 seconds. 4. Press the pad (switch) on the Wall Switch Transmitter, the red LED will flash and then go off. The upper blue LED on the Wall Switch Receiver will also turn off. 5. Both wall switches are now programmed. CR 2032 + Red LED Learn Button Blue LEDs Learn Button 3. The blue LEDs will first turn on and then turn off. 4. Release the learn button. 5. All devices have now been successfully erased. NOTE: If the Flashing Alert Mode is activated, the light connected to the Wall Switch receiver will flash for a predetermined time interval and then turn off. NOTE: If the Countdown Timer Mode is activated, the light connected to the Wall Switch receiver will be on for the predetermined time interval and then turn off. NOTE: You must compete the programming sequence within the 15-second interval, otherwise the Wall Switch receiver will quit from programming mode and you will need to start again from step 1. NOTE: You must compete the programming sequence within the 15-second interval, otherwise the Wall Switch receiver will quit from programming mode and you will need to start again from step 1. NOTE: Use a sharp non-conductive object, like a pen or pencil, to press the learn button. NOTE: Use a sharp non-conductive object, like a pen or pencil, to press the learn button. NOTE: The factory default operating mode is on/off. 1. Turn the light on with the programmed transmitter or touch pad. 2. Press and hold the button on the transmitter that is programmed to the Wall Switch receiver for 10 seconds or touch the pad with your finger for 10 seconds. The LED will flash quickly. 3. The light in the room will flash. If it flashes once, it is in On/Off Mode. If it flashes twice, it is in Dimming Mode. 4. Repeating step 2 will toggle the settings between On/Off Mode and Dimming Mode. Touch Plate Learn Button PACKAGE CONTENTS Timer Mode Section 8 - Countdown 1. To program a transmitter to operate in Flashing Alert Mode, hold the learn button on your Wall Switch receiver for about 10 seconds, until the upper blue LED flashes slowly, then release the learn button. 1. To program a transmitter to operate in Countdown Timer Mode, hold the learn button on your Wall Switch receiver for about 20 seconds, until the upper blue LED is on steadily, then release the learn button. 2. Press the learn button on your transmitter. 2. Press the learn button on your transmitter. 3. Once the transmitter is programmed, both blue LEDs will flash quickly and stop flashing. 3. Once the transmitter is programmed, both blue LEDs will flash quickly and stop flashing. 4. The transmitter has been successfully programmed. 4. The transmitter has been successfully programmed. Blue LEDs Blue LEDs Learn Button Pad NOTE: Once you have successfully completed the programming, go to section 9 to setup the timer duration for the transmitter. Section 9 - Setting a Timer Duration NOTE: Once the number of flashes reaches 5, it will stay at this setting. If you would like to go back to other settings, such as 1 minute, release the button and repeat from step 1 to start over. NOTE: Use a sharp non-conductive object, like a pen or pencil, to press the learn button. 1. The connected light must be turned off and the two blue LEDs should be on. 2. Press and hold the learn button for three seconds until the lower blue LED flashes once. The number of flashes indicates the timer duration. Number of Flashes Timer Duration 1 1 min. 2 5 min. 3 15 min. 4 30 min. 5 PACKAGE CONTENTS Troubleshooting Section 10 - Replacing the Battery NOTE: This section is for transmitters that are programmed to Flashing Alert Mode and Countdown Timer Mode. The timer duration for both modes can be set for the following times: 1 minute, 5 minutes, 15 minutes, 30 minutes or 60 minutes. 3. Learn Button 60 min. Continue to hold the learn button until it reaches the desired setting. The status will change every 6 seconds; so holding the learn button for another 6 seconds the number of flashes will change from 1 to 2, 2 to 3 etc. Once a transmitter is programmed for the timer mode, activating this programmed transmitter will turn the lights on for the specified timer duration. To stop timer countdown, press a programmed button for regular mode. NOTE: During a timer countdown if the Wall Switch receiver receives another signal for timer operation, the timer will start again and override the previous timer. This will extend the on period by another timer interval. 1. Problem Remove the wall plate from the Wireless Wall Switch transmitter by loosening the two screws. 2. Remove the existing battery by sliding it out. 3. Insert the new battery, positive side up, by sliding it in and pushing down on the battery to lock it in place. 4. When the battery is installed, the red LED on the transmitter will be on for one second. Slide in 20 32 2 + + Battery (Positive side up) Push Down CR 2032 + PACKAGESnap-On CONTENTS Optional Decorative Cover Solution Wall Switch Receiver`s LEDs and the connected load will not turn on. - Ensure the corresponding wires are connected correctly. Refer to Section 1. - Ensure the wires are side by side and held together when pushing them inside the wire nuts. - Check that the circuit breaker is turned on. My switch has more than 3 wires in the wall box. - If there are white wires (neutral) in the wall box, connect the white wire with a wire nut. Only connect the Load and Live wires from the wall box to the Wall Switch Receiver. The Wall Switch Receiver is getting warm to touch. - This is normal. Ensure the connected load does not exceed the maximum rating. The range of my Wall Switch Receiver is decreasing. - Keep the antenna wire as straight as possible and put it directly into the dry wall or via the hole in the wall box. It takes a long time for the light to turn off when set to Timer Mode. - Ensure the timer duration is set to the desired setting. - Check that there were no other Timer Mode signals being received as that will extend the ON period by another interval. Red LED Can I connect the Wall Switch Receiver with 600W lights? - No. Purchase the Skylink Wall Switch Receiver (WE-001/WE-318) instead of this Wall Switch Receiver. Can I dim the CFL with the Wall Switch Receiver? - Ensure the CFL is dimmable. NOTE: Once you have successfully completed the programming, go to section 9 to setup the timer duration for the transmitter. PACKAGE CONTENTS Accessories Snap a cover into your Skylink Wall Switch! Add up to eight Skylink Wireless Transmitters! Place the Snap-On Cover on the opening of the Wall Switch receiver for a more stylish look. Press or tap the cover, TM-001, to turn lights on/off or dim/brighten. Or carry the Snap-On Remote,TM-318, with you for local control and when you are done snap it back onto the Wall Switch. Snap-On Cover Snap-On Remote Model: TM-001 Model: TM-318 Wireless Wall Switch Motion Sensor Model: TB-318 Model: ID-318 Snap-On Remote Keychain Remote LCD Deluxe Remote Model: TM-318 Model: LK-318 Model: TD-318 Wireless Remote Control TC-Series TC-Series Remotes are available in 1 to 14 buttons. For more information visit www.skylinkhome.com For more information visit www.skylinkhome.com