1
Multiplexer Driver
Developer’s Guide
(Windows XP/2000)
Siemens Cellular Engines
Version:
DocId:
07
Mux_Drv_DevGuide_v07
User’s Guide
s
s
Multiplexer Driver Developer’s Guide
Document Name:
Multiplexer Driver Developer’s Guide
Version:
07
Date:
2006-9-27
DocId:
Mux_Drv_DevGuide_v07
Status
Confidential / Released
General Notes
Product is deemed accepted by recipient and is provided without interface to recipient’s products. The documentation and/or product are provided for testing, evaluation, integration and information purposes. The documentation and/or product are provided on an “as is” basis only and may contain deficiencies or inadequacies. The
documentation and/or product are provided without warranty of any kind, express or implied. To the maximum
extent permitted by applicable law, Siemens further disclaims all warranties, including without limitation any implied warranties of merchantability, completeness, fitness for a particular purpose and non-infringement of thirdparty rights. The entire risk arising out of the use or performance of the product and documentation remains with
recipient. This product is not intended for use in life support appliances, devices or systems where a malfunction
of the product can reasonably be expected to result in personal injury. Applications incorporating the described
product must be designed to be in accordance with the technical specifications provided in these guidelines. Failure to comply with any of the required procedures can result in malfunctions or serious discrepancies in results.
Furthermore, all safety instructions regarding the use of mobile technical systems, including GSM products,
which also apply to cellular phones must be followed. Siemens or its suppliers shall, regardless of any legal theory upon which the claim is based, not be liable for any consequential, incidental, direct, indirect, punitive or other
damages whatsoever (including, without limitation, damages for loss of business profits, business interruption,
loss of business information or data, or other pecuniary loss) arising out the use of or inability to use the documentation and/or product, even if Siemens has been advised of the possibility of such damages. The foregoing
limitations of liability shall not apply in case of mandatory liability, e.g. under the German Product Liability Act, in
case of intent, gross negligence, injury of life, body or health, or breach of a condition which goes to the root of
the contract. However, claims for damages arising from a breach of a condition, which goes to the root of the
contract, shall be limited to the foreseeable damage, which is intrinsic to the contract, unless caused by intent or
gross negligence or based on liability for injury of life, body or health. The above provision does not imply a
change on the burden of proof to the detriment of the recipient. Subject to change without notice at any time. The
interpretation of this general note shall be governed and construed according to German law without reference
to any other substantive law.
Copyright
Transmittal, reproduction, dissemination and/or editing of this document as well as utilization of its contents and
communication thereof to others without express authorization are prohibited. Offenders will be held liable for
payment of damages. All rights created by patent grant or registration of a utility model or design patent are reserved.
Copyright © Siemens AG 2006
Mux_Drv_DevGuide_v07
Confidential / Released
Page 2 of 36
2006-9-27
s
Multiplexer Driver Developer’s Guide
Contents
Contents
0
Document History.................................................................................................................................... 7
1
Introduction.............................................................................................................................................. 9
1.1
Supported Product Versions ......................................................................................................... 10
1.2
Related Documents....................................................................................................................... 11
1.3
Abbreviations................................................................................................................................. 11
2
Architecture............................................................................................................................................ 12
2.1
Hierarchy Chart in the System ...................................................................................................... 12
2.2
Handling of the Physical Serial Port .............................................................................................. 13
2.3
Module Detection .......................................................................................................................... 13
2.4
Handling of Control Lines on Virtual Ports .................................................................................... 14
2.5
Limitation of Virtual Ports .............................................................................................................. 14
2.6
Module Initializing Sequence......................................................................................................... 15
2.7
Module Re-initialization ................................................................................................................. 16
2.8
Power Down .................................................................................................................................. 16
2.8.1
Power Down on PC Suspend ........................................................................................ 16
2.8.2
Power Down after Closing the Last Port........................................................................ 16
2.8.3
Power Down on PC Shutdown ...................................................................................... 17
3
Installation.............................................................................................................................................. 18
3.1
Files Required for WinMux2k Driver Installation ........................................................................... 18
3.2
Installing the WinMux2k Driver...................................................................................................... 18
3.3
Deinstalling the Driver ................................................................................................................... 19
4
Device Settings and Properties............................................................................................................ 20
4.1
Settings on the Serial Multiplexer Properties Page ....................................................................... 20
4.2
Settings Stored in the Windows Registry ...................................................................................... 21
5
Settings for Applications ...................................................................................................................... 25
5.1
Dial-up Network Settings............................................................................................................... 25
5.2
Fax Settings .................................................................................................................................. 25
6
Translate Source Code.......................................................................................................................... 26
6.1
Software Requirements................................................................................................................. 26
6.2
Preparing the Translation .............................................................................................................. 26
6.3
Compiler Flags .............................................................................................................................. 26
7
Additional Source Documentation....................................................................................................... 27
7.1
Interaction of the Different Driver Objects ..................................................................................... 27
7.2
Internal Driver States..................................................................................................................... 28
7.3
Buffer Handling.............................................................................................................................. 29
7.4
Data Transfer ................................................................................................................................ 30
7.4.1
Block Flow Diagram for Data Received by the Module ................................................. 30
7.4.2
Block Flow Diagram for Data Sent to the Module via Virtual Port ................................. 31
7.4.3
SerMuxSend Function ................................................................................................... 32
7.5
The +++-Parser ............................................................................................................................. 34
8
Known Problems ................................................................................................................................... 35
8.1
Booting Operating System ............................................................................................................ 35
Mux_Drv_DevGuide_v07
Confidential / Released
Page 3 of 36
2006-9-27
s
Multiplexer Driver Developer’s Guide
Contents
8.2
8.3
8.4
8.5
8.6
8.7
Shutdown of the Operating System............................................................................................... 35
Standby of the Operating System ................................................................................................. 35
Wake on Ring................................................................................................................................ 35
Special Environments.................................................................................................................... 36
Operation on Virtual USB Port ...................................................................................................... 36
Automatic Shutdown in case of Emergency.................................................................................. 36
Mux_Drv_DevGuide_v07
Confidential / Released
Page 4 of 36
2006-9-27
s
Multiplexer Driver Developer’s Guide
List of Tables
Tables
Table 1:
Table 2:
Table 3:
Table 4:
Table 5:
Table 6:
Table 7:
Physical serial port...................................................................................................................... 13
Virtual serial port with Multiplexer Protocol version 2 ................................................................. 14
Virtual serial port with Multiplexer Protocol version 3 ................................................................. 14
Module initialization of supported modules................................................................................. 15
Required driver files.................................................................................................................... 18
Registry values ........................................................................................................................... 21
Registry values for trace outputs ................................................................................................ 24
Mux_Drv_DevGuide_v07
Confidential / Released
Page 5 of 36
2006-9-27
s
Multiplexer Driver Developer’s Guide
List of Figures
Figures
Figure 1:
Figure 2:
Figure 3:
Figure 4:
Figure 5:
Figure 6:
Figure 7:
Figure 8:
Figure 9:
Figure 10:
Driver architecture .....................................................................................................................
Serial Multiplexer Properties page.............................................................................................
Interaction of the different driver objects....................................................................................
State diagram of the internal driver states .................................................................................
Driver internal buffer handling....................................................................................................
Block flow diagram for data received by the module .................................................................
Block flow diagram for data sent to the module via a virtual port ..............................................
SerMuxSend function ................................................................................................................
Send function from the virtual communication ports..................................................................
State diagram of the +++-parser................................................................................................
Mux_Drv_DevGuide_v07
Confidential / Released
Page 6 of 36
12
20
27
28
29
30
31
32
33
34
2006-9-27
s
Multiplexer Driver Developer’s Guide
0 Document History
0
Document History
Preceding document: "Multiplexer Driver Developer’s Guide", Version 06
New document: "Multiplexer Driver Developer’s Guide" Version 07
Chapter
What is new
1.1
Enhanced list of supported products.
4.2
Table 6: Added optional Registry values supported as of Multiplexer Protocol version 4.
Table 7: Added value 0x0002 0000 Frame information, HDLC.
6.1, 6.2
Updated requirements for Windows environment.
Preceding document: "Multiplexer Driver Developer’s Guide", Version 05
New document: "Multiplexer Driver Developer’s Guide" Version 06
Chapter
What is new
1.1
Enhanced list of supported products.
8.6
Added Chapter Operation on Virtual USB Port.
8.7
Added Chapter Automatic Shutdown in case of Emergency.
Preceding document: "Multiplexer Driver Developer’s Guide", Version 04
New document: "Multiplexer Driver Developer’s Guide" Version 05
Chapter
What is new
1.1
Updated list of supported products.
2.6
Changed description within Table 4 to cover all supported modules. Deleted tables for
particular modules.
3.2
Hints on migration to different modules changed.
4.2
Updated description of the Registry values “ModemInit”, “ClosePort”, “WaitforDSR”
Preceding document: "Multiplexer Driver Developer’s Guide", Version 03
New document: "Multiplexer Driver Developer’s Guide" Version 04
Chapter
What is new
Throughout
manual
In several chapters, added information specific to XC18.
1.1
Updated list of supported products.
2.6
Added note regarding user profile settings
4.1
Added figure and modified description.
Mux_Drv_DevGuide_v07
Confidential / Released
Page 7 of 36
2006-9-27
s
Multiplexer Driver Developer’s Guide
Preceding document: "Multiplexer Driver Developer’s Guide", Version 02
New document: "Multiplexer Driver Developer’s Guide" Version 03
Chapter
What is new
1.1, 1.2
Updated list of supported products and information about version control.
Throughout
manual
Complete revision of all chapters. Added information specific to TC35i and TC45.
Updated Description of Registry values.
Mux_Drv_DevGuide_v07
Confidential / Released
Page 8 of 36
2006-9-27
s
Multiplexer Driver Developer’s Guide
1 Introduction
1
Introduction
The multiplex mode according to the ETSI TS 101 369, GSM 07.10 Multiplexer Protocol enables one physical
serial interface to be partitioned into three virtual channels. This allows you to take advantage of three simultaneous sessions running on one serial interface. For example, you can send or receive data on the first channel,
while the other two channels are free to control the GSM/GPRS engine with AT commands.
In order to properly communicate with the wireless modem, the application needs to support the Multiplexer Protocol and 3 virtual ports must be installed. For this purpose a Windows 2000/XP multiplexer driver WinMux2k can
be provided. The driver offers basic multiplexer functionality and serves as a reference implementation to aid
developers and system integrators in designing, developing and testing customized multiplexer applications. As
such, it has been tested by Siemens using a variety of applications and platforms, but naturally, even the most
extensive test setup can never be adequate to cover all conceivable configurations.
The Siemens AG does not guarantee any support regarding the integration of the driver into a customer’s application. However, the documentation as well as code binaries and source files can be provided and used for further development.
This document describes how to install the Windows 2000/XP multiplexer driver WinMux2k in a Windows 2000/
XP based application.Related Documents
Mux_Drv_DevGuide_v07
Confidential / Released
Page 9 of 36
2006-9-27
s
Multiplexer Driver Developer’s Guide
1.1 Supported Product Versions
1.1
Supported Product Versions
Please note that this User’s Guide covers the three different versions of the Multiplexer Protocol.
The following products support the Siemens Multiplexer Protocol version 2:
•
•
•
TC35, TC35 Terminal and TC37 from Release 03.10
MC35 from Release 03.00
AC35
The following products support the Siemens Multiplexer Protocol version 3:
•
•
•
•
•
•
•
•
•
•
•
•
•
•
•
•
•
•
•
•
AC43
AC45
MC35i
MC35i Terminal
MC39i
MC45
MC46
MC388
MC5x
TC35i
TC35i Terminal
TC45
XC18
XT55
XT56
MC75
TC63
TC65
TC65 Terminal
WinMux2k driver earlier than version 3.000
The following products support the Siemens Multiplexer Protocol version 4:
•
•
•
•
•
AC65
AC75
XT65
XT75
WinMux2k driver as of version 3.000
Where differences occur between the two Multiplexer Protocol versions or between the supported Siemens wireless modules they are particularly noted.
The Multiplexer sources are available on request. In the case you wish to receive the source code of the
MinMux2k driver packed into a zip file containing the complete source files together with corresponding MS
Visual Studio 6.0 project files, see Chapter 6.
Mux_Drv_DevGuide_v07
Confidential / Released
Page 10 of 36
2006-9-27
s
Multiplexer Driver Developer’s Guide
1.2 Related Documents
1.2
Related Documents
[1] 3G TS 27.010, 3rd Generation Partnership Project; Technical Specification Group Terminals; Terminal
Equipment to Mobile Station (TE-MS) multiplexer protocol
[2] Digital Cellular Telecommunications Systems (Phase 2+); Terminal Equipment to Mobile Station (TE-MS)
“Multiplexer Protocol”; ETSI TS 101 369 V7.1.0 (1999-11), GSM 07.10 Version 7.1.0, Release 1998
[3] AT Command Set of your Siemens wireless engine
[4] Hardware Interface Description of your Siemens wireless engine
[5] Multiplexer User’s Guide
[6] MC35 Multiplexer User’s Guide (for MC35 only)
[7] TC3x Multiplexer User’s Guide (for TC35 and TC37 only)
To visit the Siemens Website you can use the following link:
http://www.siemens.com/wm
1.3
Abbreviations
Abbreviation
Description
ACPI
Advanced Configuration and Power Interface
CTS
Clear to Send
DCD
Data Carrier Detect
DDK
Driver Development Kit (Microsoft driver development)
DSR
Data Set Ready
DTR
Data Terminal Ready
ETSI
European Telecommunications Standards Institute
FIFO
First in first out
GPRS
General Packet Radio Service
GSM
Global System of Mobile Communication
MS
Mobile Station
PC
Personal Computer
PDA
Personal Digital Assistant
RI
Ring Indicator
RTS
Request to Send
TE
Terminal Equipment
UART
Universal Asynchronous Receiver Transmitter
Mux_Drv_DevGuide_v07
Confidential / Released
Page 11 of 36
2006-9-27
s
Multiplexer Driver Developer’s Guide
2 Architecture
2
Architecture
2.1
Hierarchy Chart in the System
Sessions running simultaneously
Fax application
data transfers
channel 1
(COM10)
SMS functions
channel 2
(COM 11)
Read battery
status
channel 3
(COM 12)
File object for
virtual COM port
File object for
virtual COM port
Terminal
COM1
direct connection
User
File object for
virtual COM port
File object for
physical COM1
port
Device object
"winmux2k.sys"
Multiplexer Protocol GSM 07.10
one control channel and
data channels
Serial.sys
port COM1
Kernel
Hardware
Phys. serial port
RS-232
connection
Modem
Siemens GSM
engine with
Multiplexer Protocol
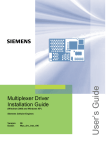
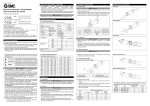
Figure 1: Driver architecture
Mux_Drv_DevGuide_v07
Confidential / Released
Page 12 of 36
2006-9-27
s
Multiplexer Driver Developer’s Guide
2.2 Handling of the Physical Serial Port
Figure 1 shows the driver architecture of winmux2k.sys in the operating system. The device driver winmux2k.sys
emulates virtual serial ports. The lower layer of the WinMux2k driver is the physical serial port driver (serial.sys).
The WinMux2k driver is loaded during system startup. It creates virtual port objects. The physical port is opened,
when the first virtual port is opened by an application.
If the last virtual port is closed the physical port will be released by the WinMux2k driver. This allows applications
to access the module without the WinMux2k driver.
If the WinMux2k driver is opened by at least one application a special device object is attached to the driver stack
of the serial.sys driver. This device object is used to control the power management request. It is detached from
the stack if the last handle is closed.
2.2
Handling of the Physical Serial Port
When the physical port is opened, the WinMux2k driver initializes it. During the initialization the physical port is
set to hardware handshake. This means the RTS and CTS signals on the port side are controlled by the hardware
and the WinMux2k device driver. The DTR signal is set to 1. The port mode is set to 8 bits, 1 stop bit, no parity.
The baud rate can be configured using the winmux2k.inf file or the Serial Multiplexer property page. If fast baud
rates are selected (e.g. 115200 bps) the receive FIFO of the UART should be configured for a size of 8 bytes.
This can be done using the property page of the COM Port in the device manager.
Table 1: Physical serial port
Signal
Description
RTS/CTS
Hardware controlled
DTR
Set to 1
Baud rate
Variable, parameter read from registry
Data bits
8
Parity
No
Stop bits
1
2.3
Module Detection
The module supports an auto-baud mode and constant baud rates. Furthermore, the module can stay in “normal
AT command mode” or in WinMux2k mode. To establish a communication to the module the correct baud rate
and the state of the module must be found. Therefore it is recommended to set the module into auto baud mode.
If the baud rate is programmed to a constant value, the driver has to find the correct baud rate. To do so, the
driver sends an “AT” command to the module, trying different baud rates until the correct one is found. If the module doesn’t answer to the initial “AT” sent at the first baud rate, the driver tries to disable the possibly enabled
multiplexer mode. This is done because the module might still be kept in multiplexer mode due to an earlier failure. If this fails, the driver sends again the initial “AT” command using the next baud rate from the list of supported
baud rates. The driver must wait for a given timeout before the decision can be made that the module does not
answer at any baud rate. The timeout value can be changed in the Windows Registry (see “RequestTimeout”
value in Table 6). It can take some time before the driver finds the correct baud rate or before the driver fails to
call the Open() function. Even if the module is not connected to the serial port or is turned off, the long timeout
period occurs.
If the connection to the module has been established the baud rate set in the Registry is used for further communications.
Closing the last port deactivates the multiplexer mode and causes the module to return to “normal AT command
mode” without multiplexer. Also, autobauding (AT+IPR=0) will be enabled once again. Finally, the AT^SMSO
command will be sent to switch the module off. Only in the case of TC45 and XC18, AT^SMSO will not be sent.
Instead, TC45 and XC18 remain in “normal AT command mode” and can be quickly accessed from the PC debug
environment.
Mux_Drv_DevGuide_v07
Confidential / Released
Page 13 of 36
2006-9-27
Multiplexer Driver Developer’s Guide
2.4 Handling of Control Lines on Virtual Ports
2.4
s
Handling of Control Lines on Virtual Ports
Summary of control line handling.
Table 2: Virtual serial port with Multiplexer Protocol version 2
Signal
Description
RING
Read from hardware port, distributed to the first virtual port
DCD
Read from hardware port, distributed to the first virtual port
DSR
Received with Modem Status Command
DTR
Set by user, sent with Modem Status Command, initialized with 1
CTS
Received with Modem Status Command
RTS
Set by user, sent with Modem Status Command, initialized with 1
Table 3: Virtual serial port with Multiplexer Protocol version 3
Signal
Description
RING
Received with Modem Status Command
DCD
Received with Modem Status Command
DSR
Received with Modem Status Command
DTR
Set by user, sent with Modem Status Command, initialized with 1
CTS
Received with Modem Status Command
RTS
Set by user, Send with Modem Status Command, initialized with 1
2.5
Limitation of Virtual Ports
Flow control can be set to RTS/CTS or DSR/DTR. XON/XOFF flow control is not supported. Hardware flow control on the virtual COM ports is handled internally by the Multiplexer Protocol.
The WinMux2k driver handles neither modem nor serenum IO-control requests.
The WinMux2k driver supports only 8 data bits, no parity, and one stop bit.
The function IOCTL_SERIAL_XOFF_COUNTER is not supported.
The following functions return “success”, but have no effect at all:
•
•
•
•
•
IOCTL_SERIAL_SET_BREAK_ON
IOCTL_SERIAL_SET_BREAK_OFF
IOCTL_SERIAL_SET_XOFF
IOCTL_SERIAL_SET_XON
IOCTL_SERIAL_RESET_DEVICE
Virtual ports accept any baud rate, though the changed setting will be ignored. Calling the function Open() to a
virtual port can take up to 40 seconds. It fails if the module is not connected.
Mux_Drv_DevGuide_v07
Confidential / Released
Page 14 of 36
2006-9-27
s
Multiplexer Driver Developer’s Guide
2.6 Module Initializing Sequence
2.6
Module Initializing Sequence
Due to different requirements of the supported products the initialization sequence varies with the module type.
This means that when you migrate to another module type you are required to uninstall the driver and reinstall it
with the new module. The settings are taken from the winmux2k.inf file.
The tables below list the commands sent to the module during the initialization. As the init string information is
stored in the Windows Registry the corresponding values are also listed. For further details on the Registry see
Section 4.2.
Table 4: Module initialization of supported modules
Command
Response
Function
Associated Registry
value
AT
OK
Detection of connected module.
AT+IPR=115200
OK
“BaudRateString”
Baud rate specified in the Windows
Registry during WinMux2k installation.
The value may be different according to
individual settings.
AT
OK
Check if change of baud rate was successful.
AT&S0\Q3
OK
Sets DSR always on and hardware flow “ModemInit”
control. The settings are read from the
Windows Registry.
AT+ICF=3
“ModemInit”
OK/ERROR Sets interface mode 8N1. This command works only on modules supporting different interface modes (TC35i,
TC63, TC65, MC75, AC75). The settings are read from the Windows Registry.
“ModemInit”
The resulting ERROR on modules without support of the AT+ICF command is
ignored by the WinMux2k driver.
AT+CMUX=0
OK
Switches to multiplexer mode. This
sequence is read from the Windows
Registry. More AT commands can be
sent to the module at this point.
“ModemInit”
Note: The initialization sequence overrides the user profile settings defined with AT&W on channel 1 for the commands AT&S, AT\Qn and AT+ICF. After restart without multiplexer, the user profile will be loaded with all your
individual settings.
Mux_Drv_DevGuide_v07
Confidential / Released
Page 15 of 36
2006-9-27
s
Multiplexer Driver Developer’s Guide
2.7 Module Re-initialization
2.7
Module Re-initialization
If the module is disconnected or powered off during normal operation, the driver detects this and tries to reinitialize the module. Because the module state can be changed while disconnected the multiplexer mode has to be
completely initialized. The driver checks the following situations:
•
•
•
Invalid frames from the module are received.
Timeout occurs during sending frames.
DSR signal goes to zero, can be turned off with Registry value.
If one of these conditions is detected the driver starts the following actions:
•
•
•
•
Try to send an MSC command to the module. If the module answers it is assumed that the module is working
and no re-initialization is required.
Generate an RTS impulse.
Wait for CTS to ensure that the module has been properly started after re-initialization.
Reinitialize the module.
2.8
Power Down
The module switches to Power down mode when the PC enters the suspend mode or shuts down or when the
last virtual port is closed. The following sections describe the behavior of the software in these three cases.
The commands sent to the module are taken from the Registry values „PowerDown” for PC suspend, “ClosePort”
for closing the last virtual port and “ShutDown” for a shut down of the PC. These values are copied from the
“winmux2k.inf file into the Registry during installation of the driver. For further details on the Registry values see
below and Section 4.2.
2.8.1
Power Down on PC Suspend
When the PC enters the suspend mode, the module stays in multiplexer mode. A virtual channel is activated and
used to send the commands from the Registry value “PowerDown” or via the “PowerDownFrame” available from
Multiplexer Protocol version 3 onwards. All pending send requests are stopped.
When the PC wakes up the module gets an RTS impulse and the pending send buffers are re-enabled.
2.8.2
Power Down after Closing the Last Port
When the last virtual port is closed the module switches from multiplexer mode to “normal AT command mode”.
This is accomplished by sending the strings of the Registry value “ClosePort” to the module (AT+IPR=0 and,
depending on the product, AT^SMSO).
If the module is switched off with AT^SMSO, the driver waits for the DSR signal to go low after switch-off. Otherwise reopening a virtual port may fail because the module hasn’t finished its shutdown procedure. This behavior is supported by Multiplexer Protocol version 3 or later and enabled by the Registry value “WaitForDSR” = 1.
Due to different requirements of the supported products the Registry values “ClosePort” and “WaitForDSR” vary
with the module type. By default, all modules except for TC45 and XC18 will be switched to autobauding with
IPR=0 and then turned off by AT^SMSO, with the “WaitForDSR” feature being enabled. TC45 and XC18, however, will only be set to autobauding and not switched off, and therefore the “WaitForDSR” feature is disabled.
As stated in Section 2.3, this default behavior of TC45 and XC18 was implemented for faster access from the
PC debug environment.
Mux_Drv_DevGuide_v07
Confidential / Released
Page 16 of 36
2006-9-27
s
Multiplexer Driver Developer’s Guide
2.8 Power Down
2.8.3
Power Down on PC Shutdown
When the PC is shut down, the multiplexer mode is turned off and the strings from the Registry value “ShutDown”
are sent to the module, if a virtual port is in use.
Note: During shutdown, some PCs may generate an impulse on the lines of the serial interface. In applications
where the DTR line connects to the ignition line (IGT), an impulse received on DTR will immediately cause the
module to be restarted from Power Down mode.
Mux_Drv_DevGuide_v07
Confidential / Released
Page 17 of 36
2006-9-27
s
Multiplexer Driver Developer’s Guide
3 Installation
3
Installation
3.1
Files Required for WinMux2k Driver Installation
Table 5: Required driver files
File
Comment
Wmuxinst.exe
WinMux2k driver installation program
Winmux2k.inf
INF file for the WinMux2k driver. It contains all driver settings and module specific settings stored in the Windows Registry during the installation. See Section 4.2 for further details on the Registry.
Winmux2k.sys
Device driver image
Wmuxprop.dll
Property page for the module, co-installer
3.2
Installing the WinMux2k Driver
Before starting the installation make sure that all files are located in the same folder as the wmuxinst.exe:
•
•
•
winmux2k.inf
winmux2k.sys
wmuxprop.dll
1
Start the program wmuxinst.exe.
2
Ensure that the module is connected to a serial port and turn the module power on.
3
Press the “Scan” button of the application. All Siemens modules found will be listed in a box. If no modem has
been installed yet, the virtual ports can be selected. If it is properly installed, the virtual ports are shown. If at
least one modem is found, the “Install” button becomes active. Pressing this button will cause the selected
modules to be installed.
4
Use the Device Manager to check that the installation was successful.
The virtual ports are available without reboot. The driver instances are visible in the device manager class “Multiport Serial Adapters”. If you wish to uninstall the driver see Section 3.3.
When migrating from TC45 or XC18 to another module type or vice versa we recommend to uninstall the driver
and reinstall it with the new module. This way, you can take advantage of the module specific power down
sequence determined during the driver installation and executed each time after closing the last virtual port (see
Section 2.8.2 and Section 4.2).
Although it is not recommended, it is possible to modify the driver’s factory defaults by editing, prior to the driver
installation, the parameters contained in the winmux2k.inf file. This approach can be used, for example, if you
want to use another default baud rate or if you want to replace the string AT+CFUN=0 with one of the CYCLIC
SLEEP mode settings supported by your module, such as AT+CFUN=5 or 6 or 7 or 8 or 9. See also Section 4.2.
Note: During the installation a pop-up dialog with "Digital Signature Not Found" will appear. Please ignore this
message and continue the installation process. The reason for the message is that the driver has not been registered with Microsoft, but its correct functionality is ensured.
Mux_Drv_DevGuide_v07
Confidential / Released
Page 18 of 36
2006-9-27
s
Multiplexer Driver Developer’s Guide
3.3 Deinstalling the Driver
3.3
Deinstalling the Driver
In order to uninstall the Windows Multiplexer Driver perform the following steps:
Windows 2000
1
Start the Control Panel.
2
Select System.
3
Select the Hardware property sheet.
4
Double click the Device Manager button.
5
Under Multi-port serial adapters right click Serial Multiplexer.
6
Choose Uninstall Driver and answer the confirm dialog with yes to finally uninstall the driver.
Windows XP (new desktop, not the classic desktop)
1
Start the Control Panel.
2
Under Performance and Maintenance select System.
3
Select the Hardware property sheet.
4
Double click the Device Manager button.
5
Under Multi-port serial adapters right click Serial Multiplexer.
6
Choose Uninstall Driver and select Yes from the Confirm File Deletion dialog.
Mux_Drv_DevGuide_v07
Confidential / Released
Page 19 of 36
2006-9-27
s
Multiplexer Driver Developer’s Guide
4 Device Settings and Properties
4
Device Settings and Properties
4.1
Settings on the Serial Multiplexer Properties Page
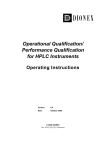
From the Serial Multiplexer Properties page (see Section 3.3 for details where to find the page) select the Port
Settings tab. The baud rate used on the physical serial port can be changed individually.
Figure 2: Serial Multiplexer Properties page
Mux_Drv_DevGuide_v07
Confidential / Released
Page 20 of 36
2006-9-27
s
Multiplexer Driver Developer’s Guide
4.2 Settings Stored in the Windows Registry
4.2
Settings Stored in the Windows Registry
The WinMux2k driver parameters are located in the registry path
HKLM\System\CurrentControlSet\Enum\Root\winmux\000X\Device Parameters.
X is the number of the device instance.
All values listed below will be created during the installation of the WinMux2k driver. The settings are provided
by the winmux2k.inf file. If you want to write your own preferences to the Registry you can edit the inf file before
installing the driver.
Table 6: Registry values
Value
Data (Example)
Properties
BasePort
COM1
The physical serial port that connects the module to the PC.
BaudRate
115200
Baud rate used on the physical port.
BaudRateString
AT+IPR=115200
This string is used to set the module to the given baud rate.
Note: This string must contain the same value as the
BaudRate value.
If you select a higher baud rate be sure it is supported by the
module. For details see [3].
ModemInit
AT
AT&S0
AT\Q3
AT+ICF=3
AT+CMUX=0
This multi-string value contains several AT commands
which are used to switch the module to multiplexer mode.
Possible ERROR codes resulting from unsupported commands are ignored by the WinMux2k initialization sequence.
RequestTimeout
2000
Timeout value used only during the initialization of the module. 2000 is the maximum number of milliseconds the module can take to respond to AT requests.
VirtPort1
COM10
Name of the first virtual port. Each virtual port must have a
unique name. Otherwise the driver will fail to start up.
VirtPort2
COM11
See VirtPort1
VirtPort3
COM12
See VirtPort1
VirtualChannels
3
Number of Virtual Channels visible as COM ports. The
WinMux2k driver supports up to 3 virtual ports. The number
of VirtualChannels must be less or equal to TotalChannels.
TotalChannels
3
If the number of TotalChannels is greater than VirtualChannels and no VirtPortX value for additional channels is
defined, these additional ports are not visible as COM ports.
They can be accessed by the link named
SERMUX_CONTROL_PREFIX defined in sermux_i.h. This
allows to hide virtual ports to the user. Each physical port
can have one hidden port.
WakeUpTime
4000
Timeout during module initialization. The timeout takes
effect only when the driver tries to restart the module from
Power Down or to wake it up from SLEEP mode
AT+CFUN=0. The time is given in milliseconds.
PowerCmdPort
3
This virtual channel is used to send the power down commands to the module. The data state on this channel may be
disturbed during power down and cannot be reconstructed
by the driver.
Mux_Drv_DevGuide_v07
Confidential / Released
Page 21 of 36
2006-9-27
s
Multiplexer Driver Developer’s Guide
4.2 Settings Stored in the Windows Registry
Table 6: Registry values
Value
Data (Example)
Properties
ReinitOnDSR
1
0 Default for XC18
The driver does not try to reconnect to the module if DSR
changes. This feature can be switched off if an application
controls the DSR line with AT&S.
1 Default for all modules except XC18
The driver tries to reconnect to the module if DSR changes.
The driver can detect if the module was disconnected and
reinitializes it before the first data errors occur.
ClosePort
(not applicable to
TC45 and XC18)
AT+IPR=0
AT^SMSO
A multi-string sent to the module if the last port is closed.
ClosePort
(TC45, XC18 only)
AT+IPR=0
A multi-string sent to the module if the last port is closed.
PowerDown
AT+CFUN=0
A multi-string sent to the module if the PC goes to suspend
mode or hibernate state.
The command AT+CFUN=0 has been chosen as factory
default for compatibility with older Siemens products. If you
prefer to use one of the more efficient CYCLIC SLEEP
modes it can be replaced with AT+CFUN=5 or 6 or 7 or 8 or
9. See [3] and [4] to verify the SLEEP mode types supported
by your product. To avoid editing the Windows Registry you
can alter the corresponding parameter in the winmux2k.inf
file and then reinstall the driver.
ShutDown
AT+IPR=0
AT^SMSO
A multi-string sent to the module if the PC is shut down or
rebooted.
Note: Some PCs generate a DTR spike during turn off and
the module wakes up again.
WaitForDSR
1
0 Default for TC45 and XC18
The driver does not wait for the DSR signal to go low when
the module is shut down. Instead, the parameter RecoverTime (see below) is used.
1 Default for all modules except TC45 and XC18
The driver waits for the DSR signal to go low when the module is shut down. In this case the parameter RecoverTime is
not used. If the module is not switched off with the AT commands defined in the parameter ClosePort this parameter
must be set to 0.
RecoverTime
2000
Minimum number of milliseconds between close and the
next open call.
PowerDownFrame
2
From version 3 onwards, the Multiplexer Protocol supports
power saving control with a special multiplex control frame.
This provides the possibility of sending power down commands to the module without accessing any data channel.
If the connected module only supports the Multiplexer Protocol version 2 this value is not used. If the supported Multiplexer Protocol version is 3 or higher, the multiplex power
control is used instead of the values “PowerCmdPort” and
“PowerDown”. In this case this value corresponds to the
power down command of the multiplex power down frame
described in [5]. If the value is greater than 255 there is no
power down frame sent for Multiplexer Protocol 3.
Mux_Drv_DevGuide_v07
Confidential / Released
Page 22 of 36
2006-9-27
s
Multiplexer Driver Developer’s Guide
4.2 Settings Stored in the Windows Registry
Table 6: Registry values
Value
Data (Example)
Properties
Optional values supported as of Multiplexer Protocol version 4, i.e. supported by the WinMux2k driver
version 3.000 or later.
The following optional values can be manually added to the Registry when needed.
MaxMuxVersion
3
This registry value provides the possibility to force the driver
to use a lower multiplex protocol version than the maximum
supported. The multiplex protocol has been improved continuously by adding several features. The multiplex protocol
version is negotiated with the connected module during multiplex startup. It is used to ensure compatibility between different multiplex driver and module generations. The registry
value isn’t mandatory, by default the WinMux driver uses
always the latest protocol implementation with all available
features. If for some reason an older multiplex protocol shall
be used it can be controlled with that registry value. For further information about the multiplex protocol versions refer
to the “Multiplexer User’s Guide”.
HdlcWindowSize
4
Modules with multiplex protocol version 4 and above use a
kind of HDLC framing to secure the data transmission on the
virtual ports and avoid data loss at high transfer rates and
much data traffic. This registry value provides the possibility
to adjust the size of the HDLC window which defines the
maximal number of outstanding HDLC packets. It can be
between 2 and 7.
This Registry value is not mandatory. If it is not added to the
Registry the value 4 will be assumed by default. Please note
that the value is negotiated with the module.
Mux_Drv_DevGuide_v07
Confidential / Released
Page 23 of 36
2006-9-27
s
Multiplexer Driver Developer’s Guide
4.2 Settings Stored in the Windows Registry
The following Registry values in the path
HKLM \System\CurrentControlSet\Services\winmux2k\Parameters are used to configure the TRACE outputs. These values are only valid for the debug version of the device driver.
Table 7: Registry values for trace outputs
Values
Data (Example)
Properties
DebugBaud
57600
Baud rate: used if DebugPort is different from 0.
DebugMask
0x0000003
DebugMask determine, which reports from the device driver
are printed to the DebugPort.
Masks:
0x0000001 Errors
0x0000002 Warnings
0x0000004 Information’s
0x0000008 PnP
0x0000010 Power management
0x0000020 Data control commands
0x0000040 Open/Close/Cleanup
0x0000080 Dispatch Device Control
0x0000100 Dispatch Read/Write
0x0000200 Submit control requests
0x0004000 framed data read/write
0x0008000 frequently traces submit/wrsupport
The mask 0x7 means, that all three traces are on.
The next masks are only for driver checks and represent
internal variables and states of the serial Multiplexer Device
driver.
0x0001 0000 Frame information, send and receive
0x0002 0000 Frame information, HDLC
0x0004 0000 Status information from virtual channels
0x0008 0000 Status information from Multiplexer control
channel
0x0010 0000 Output Names from WinMux2k functions
0x1000 0000 traces how and because a Request completed
0x2000 0000 traces V.24 signals and change of these signals
0x4000 0000 traces, in which state is the parser for scanning
the +++ sequence
0x8000 0000 traces states for scanning a Frame
DebugPort
0x0
0 Output from the driver is redirected to the kernel debugger.
(default value)
1...4: Output is redirected to a COM port
Mux_Drv_DevGuide_v07
Confidential / Released
Page 24 of 36
2006-9-27
s
Multiplexer Driver Developer’s Guide
5 Settings for Applications
5
Settings for Applications
5.1
Dial-up Network Settings
The dial-up network settings must be configured according to the requirements of the network provider. The
WinMux2k driver has no special requirements.
5.2
Fax Settings
There are no special settings for the fax service of the operating systems.
Note: If the fax service is enabled for receiving fax messages, the virtual port is opened all the time. In this case
the driver cannot be disabled or unloaded. To change port settings the PC must be rebooted.
Mux_Drv_DevGuide_v07
Confidential / Released
Page 25 of 36
2006-9-27
s
Multiplexer Driver Developer’s Guide
6 Translate Source Code
6
Translate Source Code
6.1
Software Requirements
The WinMux build environment has been designed to work together with a Microsoft Visual Studio 6.0 SP3 or
higher and the Microsoft Windows XP SP1 DDK. It is possible to use a Windows 2000 DDK as well, but in this
case adaptations to the different build control files might be necessary.
6.2
Preparing the Translation
1
Create the environment variables “WINMUXVSTUDIOROOT” and “WINMUXDDKROOT” containing the path
to the root of your Visual Studio and Windows DDK installation. Alternatively you can edit the file
“driver\dir_env.cmd” and enter the correct paths to the DDK and the VC 6.0 there.
2
Open the workspace sermux in the root directory. Select batch build.
3
The executable files can be found under lib\wdm\[fre|chk] _wxp_x86\i386.
Note: The DDK is a software tool for Windows driver development.
6.3
Compiler Flags
There is only one compiler flag “MUX_MANUAL” for a conditional compile of the driver. With this compiler flag
set the driver can be compiled in a special manual version where opening and closing of the multiplexer can be
controlled via special DeviceIoControl() commands instead of automatic control via the opened virtual channels.
This manual version is used for internal automated module testing and is not relevant for usual driver operation.
Mux_Drv_DevGuide_v07
Confidential / Released
Page 26 of 36
2006-9-27
s
Multiplexer Driver Developer’s Guide
7 Additional Source Documentation
7
Additional Source Documentation
This chapter contains additional flow charts and state diagrams which give more detailed information on the
structure and the content of the sources.
7.1
Interaction of the Different Driver Objects
Object chart of the device driver winmux2k.sys
WDM - Model
ANSI-C
Driver object "winmux2k"
Device object
Device extension
- struct DEVICE
DPOOL request pool
Control Irp for serial driver
SerMux
WinMux object
IRP Complete object
Context
Wait Irp for serial events
SerPort0 object
Port objects DLIST
ChkFrame object
IRP_QUEUE Read queue
*SerMux
PtrSerPort[]
IRP_QUEUE Write queue
SendBuffer
RcvBuffer
Buffer for read and write requests
DLIST Sendqueue
DLIST Rcv queue
PORT_OBJ
(virtual serial port)
CIRCBUF Objects for circular send
and receive buffer
SER_PORT
Parameter for the virtual serial port
Figure 3: Interaction of the different driver objects
Mux_Drv_DevGuide_v07
Confidential / Released
Page 27 of 36
2006-9-27
s
Multiplexer Driver Developer’s Guide
7.2 Internal Driver States
7.2
Internal Driver States
SerMux internal states
STATE_CLOSE_
DOWN
initial state
rcv. a DM-Frame
send a SABM-Frame
STATE_
DISCONNECT
STATE_
DISCONNECT
REQUEST
WrConnectPort()
send aSABM-Frame
rcv. a DM (Disconnect)
Frame
WrConnectPort()
send a SABM-Frame
WrDisconnectPort(),
send a DISC-Frame
STATE_
VERSION_ERROR
this state exists
only for port 0
STATE_
CONNECT
STATE_
CONNECT_
REQUEST
rcv. a TEST-command
with a VERSION Controlbyte
not correct Version
STATE_
VERSION_
REQUEST
this state exists
only for port 0
Versionstring from
MS- and TS-Version are identical
for Ports other than port 0
receive a UA-Frame for the desired port
Figure 4: State diagram of the internal driver states
Mux_Drv_DevGuide_v07
Confidential / Released
Page 28 of 36
2006-9-27
s
Multiplexer Driver Developer’s Guide
7.3 Buffer Handling
7.3
Buffer Handling
SerMux
SerPortN
Mulitplexer Control Port 0
SerPort 0
Channel number
Priority with MaxSequence
Timeouts (Request Timeouts and
Scanning Timeouts)
Statistics
V24 Status from itself and the
Modem
Handshake Status
Current Read and Write Status
Circular Buffer Params
ScanSendRequest
ConfirmCommand
Buffer
Send
Queue
Requests
Circular
buffer
Send
RCV
Queue
Requests
Circular
buffer
RCV
if receive a Control Command
Special control functions:
Circular
buffer
Send
EstablishDLC
ReleaseDLC
CloseDown
SetModemStatus
SendVersionCommand
CommandBuffer
GetFrameBufferPort0()
Timer functions:
WrTimer()
OnTimerSerPort0()
OnTimerSerPort()
Control Timeouts for Send and Receive Queue Requests for
repeating Control Commands and Timeouts for scanning the
Escape Sequence
Send function:
while(GetWriteBuffer) {
SerPort=GetNextSerPort();
SerPort->GetFrame();
SubmitWriteBuffer();
}
SerPort0IndicateFrame()
Frame Assembly and check
state machine Demux
IndicateRead {
ProcessData(); // check frame, crc
SerPortIndicateFrame()
// indicate frame to a SerPort instance
}
WrGetWriteBuffer(void *Buffer,ULONG &Length); void WrIndicateReadBuffer(void *Buffer,ULONG Length);
WrSubmitWriteBuffer(void *Buffer,ULONG
Length);
WrWriteComplete();
WrReturnWriteBuffer();
Write Buffer
Pool
Wrapper
Read Buffer
Pool
Figure 5: Driver internal buffer handling
Mux_Drv_DevGuide_v07
Confidential / Released
Page 29 of 36
2006-9-27
s
Multiplexer Driver Developer’s Guide
7.4 Data Transfer
7.4
7.4.1
Data Transfer
Block Flow Diagram for Data Received by the Module
S e rM u x fu n c tio n s s e q u e n c e , if c h a ra c te rs fro m th e p h y s ic a l D e v ic e
to th e S e rM u x O b je c t a re in d ic a te d
W rIn d ic a te R e a d B u ffe r
yes
re t
a ll b y te s
scanned?
no
P ro c e s s C h a r
no
F ra m e v a lid ?
yes
D e m u x In d ic a te F ra m e
yes
A d d re s s ! = D L C I 0
& & U IH -F ra m e ?
S e rP o rtIn d ic a te F ra m e
o th e r p o rts th a n 0
no
U IH -F ra m e ?
yes
s e a rc h th e n e x t C o n tro l C o m m a n d
in th e
In fo rm a tio n fie ld
no
a ll U IH -C o n tro l
Com m ands scanned?
S e rP o rt0 In d ic a te F ra m e ()
S e rP o rt0 S c a n U IH C onnotro l s e e
sheet 2,
c h e c k a U IH -C o n tro lF ra m e
re tu rn S e n d P o rt
no
U A -F ra m e
or
D M -F ra m e ?
yes
yes
S e rP o rt0 C o n firm R e q u e s t
no
S A BM or
D IS C F ra m e
n o t v a lid
(M a s te r)
S e n d P o rt= =
TRUE?
S e rM u xS e n d (), m u s t
c a ll if re c e iv e a F C -B it= 0 , th e n
s ta rt th e s e n d in g
1
Figure 6: Block flow diagram for data received by the module
Mux_Drv_DevGuide_v07
Confidential / Released
Page 30 of 36
2006-9-27
s
Multiplexer Driver Developer’s Guide
7.4 Data Transfer
7.4.2
Block Flow Diagram for Data Sent to the Module via Virtual Port
Send Request Flow of a virtual Channel with
scanning of Break Signal '+++'
only the schema
WrSendRequest()
ReadIntervalTime=0
TotalTIme=0
ScanFlags=0
PlusNb=0
TimeStamp=ActualTimerTick
DlistInsertHead
SerMuxSend()
end
Figure 7: Block flow diagram for data sent to the module via a virtual port
Mux_Drv_DevGuide_v07
Confidential / Released
Page 31 of 36
2006-9-27
s
Multiplexer Driver Developer’s Guide
7.4 Data Transfer
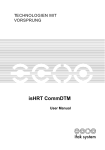
7.4.3
SerMuxSend Function
The figure shows the flow diagram of the SerMuxSend function which sends the data to the module.
SerMuxSend and SerMuxSendPort0 Functions
Locations from where to call the SerMuxSend Functions
Function that calls from SerMux
Wrapper:
W rSendRequest()
SerMuxSend
Send UIH-Frames from
W riteRequests to the
virtuals Ports
Function that calls from ChkFrame:
SerPort0IndicateFrame()
SerPortIndicateFrame()
Function that calls from SerPort0 :
Function that calls from SerMux
W rapper:
W rTimer()
W rW riteComplete()
SerMuxSendPort0
Send Control-Frames to
the Multiplexer Control
Port (Channel 0)
EstablishDLC()
ReleaseDLC()
CloseDown()
SetModemStatus()
SendVersionCommand()
SendUAFrame()
Figure 8: SerMuxSend function
Mux_Drv_DevGuide_v07
Confidential / Released
Page 32 of 36
2006-9-27
s
Multiplexer Driver Developer’s Guide
7.4 Data Transfer
Send function from the virtual Communication Ports
(the SerPort Object)
Function SerMuxSend() only sends UIH-Frames (unnumbered
information) which come in from WriteRequest to the virtual serial
communication port.
Start
WrGetWriteBuffer
no
GetBuffer?
yes
asked all Port two
times and no Frames
sent?
yes
no
Get
WriteBuffer?
GetFrameBufferPort
no
no
yes
Frame ?
yes
WrReturnWriteBuffer
WrSubmitWriteBuffer
ret
Figure 9: Send function from the virtual communication ports
Mux_Drv_DevGuide_v07
Confidential / Released
Page 33 of 36
2006-9-27
s
Multiplexer Driver Developer’s Guide
7.5 The +++-Parser
7.5
The +++-Parser
The following state diagram shows the states of the +++-parser.
Internal states of the ScanRequest Object for scanning each
character in a Send Request for one Port Object
if BreakCount > 0, then send first
the breaks. After check for incoming
Request also check if Break
Count>0 and then '+' characters.
W AIT_CHAR()
Timeout 1s and
rcv. BreakChar '+'
SerMuxSend(), BreakCount=0
If rcv. a SendRequest, then
Flag = SCAN_LATER
rcv. char. unequal '+'
or Timeout 1s
or difference between current and
last Request too big
PLUS
COMPLETE_PLUS
Timeout
W aitResponseTimer
rcv. any character
with time differences over One
second to the last character
or the ScanRequest Timer go to zero
in the Timer
if rcv "++" then
BreakCount +1
if receive the MSC Response
if BreakCount = 3
Send MSC
command with
ESCAPE =1
W AIT_BREAK
1. If the next incoming request
has a TImeout to the last request,
then switch to W AIT_BREAK without
Timerfunction
Request-Flag =SCAN_LATER
2. if the ScanRequest Timer go to zero.
PLUS_TIMEOUT
If rcv. a SendRequest, then
Flag = SCAN_LATER
if Timer go to zero:
if STATE_PLUS then STATE_W AIT_CHAR
if STATE_PLUS_TIMEOUT then STATE_W AIT_BREAK
if Timer go to 0:
if STATE_W AIT_BREAK then STATE_W AIT_CHAR
ScanRequest
->W aitResponse
Timer
ScanRequest
->Timer
Figure 10: State diagram of the +++-parser
Mux_Drv_DevGuide_v07
Confidential / Released
Page 34 of 36
2006-9-27
s
Multiplexer Driver Developer’s Guide
8 Known Problems
8
Known Problems
8.1
Booting Operating System
Windows 2000 and Windows XP toggle the signals of the serial interfaces. As a result, the module will be
switched on, even if the WinMux2 driver is not active. The driver accesses the connected module only when the
virtual ports are accessed.
If the WinMux2k driver is used by accessing one or more of the virtual ports, it switches off the module when the
last virtual port is closed again. Only TC45 and XC18 do not switch off in this case.
8.2
Shutdown of the Operating System
If the supported operating system has been installed in ACPI mode, the power supply will be automatically
switched off. This power down might cause pulses on those signals of the serial interfaces which are responsible
for switching the module on. This may happen, even if it had correctly switched off before by the driver.
If the module has its own power supply it might stay switched on after the shutdown procedure of the computer
has completed.
8.3
Standby of the Operating System
If the operating system has been installed in ACPI mode, it supports improved power management by also sending computer components into suspend mode. The serial WinMux2k driver supports this power management by
switching the module into standby mode, if the driver is in use by accessing one or more of the virtual ports. If
the operating system has been properly configured together with the BIOS, incoming calls or real clock alarms
wake the operating system up again. During this wake up the first characters sent by the module to the operating
system via the serial interface are lost. This is no restriction of the serial WinMux2k driver, but caused by the
operating system.
E.g. in case of an incoming call the first RING event is lost. Usually this causes no problem because the RING
is repeated every few seconds. However, in case of the real clock alarm the module only sends one CALA URC.
As a result, the URC will not be indicated though the alarm will be correctly executed.
Additionally, in some cases when the computer switches to suspend mode, this causes pulses on the serial interface signals which wake up the module again.
8.4
Wake on Ring
If the operating system is in standby mode and the module has not been switched off, incoming calls and real
time clock alarms should wake up the operating system (wake on RING). This feature belongs to the ACPI power
management mechanisms which are not properly implemented on all PC systems. It is independent of the multiplexer driver. When the ring signal toggles on the serial interface like on incoming calls and real time clock
alarms, this should wake up the operating system, if the PC has been properly configured. On some systems not
the RING signal but data transferred to the PC (the “RING” or “CALA” messages from the module) wake up the
operating system.
To avoid loss of data the multiplexer driver switches on the hardware flow control on the module. This means
that the module cannot send data to the PC, if the operating system is in standby mode and therefore the serial
interface is blocked by the hardware flow control. As a consequence the operating system does not wake up, if
the system ignores the RING signal, because the module cannot send the “RING” or “CALA” messages to the
PC.
Mux_Drv_DevGuide_v07
Confidential / Released
Page 35 of 36
2006-9-27
s
Multiplexer Driver Developer’s Guide
8.5 Special Environments
8.5
Special Environments
The driver expects a module connected to the COM port in a way where the ignition signal to start the module is
connected with the DTR signal of the COM port so that the driver is able to switch the module on via the DTR
signal. If the driver is used for modules built into environments where this connection does not exist (e.g. like
laptops with a hard mounted module) it cannot power on the module. In this case the automatic power down of
the module after closing the last virtual channel has to be disabled by replacing the line
HKR,,ClosePort,0x00010000,"AT+IPR=0","AT^SMSO"
with the line
HKR,,ClosePort,0x00010000,"AT+IPR=0"
In the case of TC45 and XC18, there is no need to alter the value “ClosePort” in the Registry.
8.6
Operation on Virtual USB Port
This section applies only to Siemens GSM modules equipped with a USB interface.
To configure the USB interface for use with the WinMux2k driver the virtual COM port assigned to the module’s
USB interface shall be set to max. 115200 bps. To do so, use the Serial Multiplexer Properties page described
in Section 4.1. The setting is only needed to open the virtual multiplex channels on the virtual COM port assigned
to the USB interface. There is no loss of performance because the virtual baud rate on the USB interface has no
influence on the data transfer rate.
8.7
Automatic Shutdown in case of Emergency
Please note that while Multiplex mode is active the automatic shutdown mechanism described in [3] and [4] is
not effective. If fault conditions arise, such as over- and undertemperature or undervoltage (overvoltage shutdown is product dependent) the module shuts down after sending the alert URCs (e.g. “^SBC: undervoltage” or
“^SCTM_A/B: 2/-2”, but is then restarted by the WinMux2k driver.
Therefore, to avoid problems it is strongly recommended to close all virtual ports as soon as alert URCs are sent
by the module. Please refer to [3] and [4] as the “^SBC” and “^SCTM” URCs are product specific.
Mux_Drv_DevGuide_v07
Confidential / Released
Page 36 of 36
2006-9-27