1
WARNING
SHARP ELECTRONIC CASH REGISTER
FCC Regulations state that any unauthorized changes or modifications to this equipment not
expressly approved by the manufacturer could void the user’s authority to operate this equipment.
Note: This equipment has been tested and found to comply with the limits for a Class A digital device,
pursuant to Part 15 of the FCC Rules. These limits are designed to provide reasonable protection
against harmful interference when this equipment is operated in a commercial environment.
This equipment generates, uses, and can radiate radio frequency energy and, if not installed and used
in accordance with the instruction manual, may cause harmful interference to radio communications.
Operation of this equipment in a residential area is likely to cause harmful interference in which case
the user will be required to correct the interference at his own expense.
MODEL
XE-A101
INSTRUCTION MANUAL
CAUTION
The socket-outlet shall be installed near the equipment and shall be easily accessible.
FOR YOUR RECORDS
Please record below the model number and serial number, for easy reference, in case of loss or theft.
These numbers are located on the right side of the unit. Space is provided for further pertinent data.
Printed in Korea
O(TINSE2457BHZZ) 2
Model Number_______________________________________________________
Serial Number_______________________________________________________
Date of Purchase_____________________________________________________
Place of Purchase____________________________________________________
Thank you for purchasing the SHARP Electronic Cash Register Model XE-A101. Please
read this manual carefully before operating your machine. Keep this manual for future
reference. It will help you solve any operational problems that you may encounter.
For assistance call
Handling Cautions
1-800-BE-SHARP
Install the cash register in a location not subject to direct sunlight, unusual temperature
changes, high humidity, or splashing water.
Do not operate the cash register with wet hands. Water can cause internal component failure.
The cash register plugs into any standard wall outlet (120V AC ± 10%). Avoid connecting any
other electrical devices on the same electrical circuit since such connection could cause the
cash register to malfunction.
For Easy Set-up,
See “Getting Started”
When cleaning the cash register, use a dry, soft cloth. Never use volatile liquids, such as
benzine or thinner. Chemicals can discolor or damage the cabinet.
For protection against data loss, please install three new “AA” batteries before using the cash
register. However, never forget you must initialize the cash register before installation of
batteries; otherwise damage to memory contents or malfunctioning of the register will occur. You
can start operating it only after initializing it and then installing batteries.
For complete electrical disconnection, pull out the main plug.
Getting Started
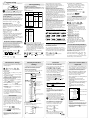
Initializing the Cash Register
For your cash register to operate properly, you must
initialize it before programming for the first time.
Follow this procedure.
1. Remove the register from its packing carton.
2. Set the mode switch to the REG position.
3. Insert the plug into the AC outlet.
IMPORTANT: This operation must be performed
without batteries loaded.
4. The buzzer will sound three times. Now your
cash register has been initialized. The display
l”.
will show "0.00" with “l
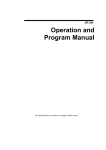
Installing Batteries
Batteries must be installed in the cash register to
prevent data and programmed contents from being
lost from the memory in case of accidental
disconnection of the AC cord or power failure. Please
install three new “AA” batteries before programming
and operating the cash register. Once installed, the
batteries will last approximately one year. When it is
time to replace them, the “l” symbol will appear on
the display to indicate a low battery voltage. If the
symbol appears, you must replace them within two
days.
Install the batteries according to this procedure with
the AC cord connected:
1. Push the printer cover forward and detach it.
2. Open the battery cover next to the paper roll
cradle.
5. Attach the printer cover.
Improper use of batteries could cause
them to burst or leak, which might damage
the interior of the cash register. Please
take the following precautions:
Be sure that the positive (+) and negative
(-) poles of each battery are oriented
properly. .
•Never mix batteries of different types.
•Never mix old batteries and new ones.
•Never leave dead batteries in the battery
compartment.
•Remove the batteries if you plan not to
use the cash register for long periods.
Should a battery leak, clean out the
battery compartment immediately, taking
care not to let the battery fluid come into
direct contact with your skin.
C
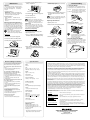
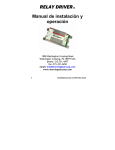
Installing a Paper Roll
Always install the paper roll even when you set the
register for not printing journal or receipt in REG
mode.
1. Push the printer cover forward and detach it.
2. Push the paper roll release lever and install
the paper roll so that the paper unrolls from
the bottom.
3. Insert the paper straight into the paper inlet,
and press the f key. The inserted end
comes out at the printing area.
5. Attach the printer cover.
(For receipt printing, step 4 should be omitted.)
Setting the Time
Set the mode switch to the Z/PGM position and
enter the time in 4 digits (“hhmm” format) using the
#/
SBTL
24 hour system. Press the
key once to continue
programming or twice to exit the program mode.
#/
SBTL
#/
SBTL
Time(2:30 p.m.)
D
•Always enter the time in 4 digits even when
the hour is in the single digit. For example,
enter 0 6 3 0 for 6:30 a.m.
• 6:30 a.m. prints as “6-30” and 6:30 p.m.
prints as “6-30@”.
Setting the Date
In the Z/PGM mode, enter the date in 6 digits using
#/
SBTL
the month-day-year format. Press the
key once
to continue programming or twice to exit the
program mode.
#/
SBTL
#/
SBTL
Date(March 15, 2002)
D
Always enter the date in 6 digits. For
example, enter 0 3 1 5 0 2 for March
15, 2002. If you change the date format in
the Z/PGM mode, follow the newly specified
format when setting the date.
Checking the Time and Date
You can display the time and date to check if they
are correctly set.
1. Set the mode switch in the REG position.
2. Press the
@/TM
key once to display the time.
3. Press the
date.
@/TM
key a second time to display the
When you program the tax status for a department,
tax will be automatically added to sales of items
assigned to the department according to the
programmed tax status for the department. You can
also enter tax manually.
There are two tax programming methods. The tax
rate method uses a straight percentage rate per
dollar. The tax table method requires tax break
information from your state or local tax offices. Use
the method which is acceptable in your state. You
can obtain necessary data for tax programming from
your local tax office.
D
For tax table programming, see "programming"
Tax Rate Programming
The percent rate specified here is used for tax
calculation on taxable subtotals. Set the mode
switch to the Z/PGM position and use the following
sequence to program the tax rate:
9
➝
➝
@/TM
#/
SBTL
➝ Tax number(1-4) ➝
View from rear
3. Insert three new AA batteries.
4. (For journal printing) Insert the top end of
the paper into the slit in the take-up spool
shaft and wind the paper two or three turns.
Then place the take-up spool on the bearing.
View from rear
l”
4. When the batteries are properly installed, “l
on the display will disappear. Close the battery
cover.
Before you can proceed with registration of sales,
you must first program the tax that is levied in
accordance with the law of your state. Your cash
register comes with the ability to program four
different tax rates. In most states, you will only
need to program Tax 1. However, if you live in an
area that has a separate local tax (such as a Parish
tax) or a hospitality tax, your register can be
programmed to calculate these separate taxes.
In order to program the tax to be collected in
accordance with the law of your state, you must
specify the tax rate(s) and minimum taxable
amount(s).
➝R
➝Q➝
where R and Q represent the following.
R: Tax rate (0.0000% to 99.9999%) x 10000
Enter the rate in 6 digits (leading zeros may be
omitted). If the rate is fractional (e.g., 4 3/8%), it
should be converted to its decimal equivalent
(4.375) before entering.
Q: Minimum taxable amount (0.01 to 99.99) x 100
Smallest amount for which tax must be collected. In
some states, sales whose amounts are less than the
minimum taxable amount are not subject to tax. If
amounts $0.01 to $0.10 are not taxed, the value of
Q would be 11 (for $0.11), the lowest of the first
taxable category.
#/
SBTL
@/TM
Tax 1
Programming the Tax Rate
@/TM
@/TM
Tax rate(7.0000%)
Min. taxable
amount($0.11)
Changing Other Settings As Necessary
Your cash register is pre-programmed so that you
can use it with minimum setup. To change the initial
settings, see the appropriate sections.
Initial Settings
Departments 1 to 4:
Taxable 1. Positive (+). Preset price: 0.00
Departments 5 to 8:
Non-taxable. Positive (+). Preset price: 0.00
PLU codes 1-10:
Assigned to dept. 1. Preset price: 0.00
PLU codes 11-80:
Not used
Entries
5
@/TM
Operation Examples
#/
SBTL
3
1
@/TM
and , then , and v. Subsequent entries in the
transaction remain unaffected and will be taxed normally.
TAX2
SHIFT
/PO
3
CHK
When Paid by Cash
Single Item Cash Sale (SICS) Entry
2. Enter the clerk code (1 to 4) and press . (Once
the clerk code is entered, you need not enter the
clerk code at the start of each transaction until the
clerk is changed.)
3 Enter the price for the first item.
4. Press the appropriate department key.
5. Repeat steps 2 and 3 for all the remaining items.
This function is used for the sale of one item to be paid
by cash. It is applicable only to departments
programmed for single-item cash sales or to PLUs
associated with such departments. After the appropriate
department or P key is pressed, the transaction is
complete and the drawer opens. For the programming of
SICS, see the Department Status section in
“Programming.”
#/
SBTL
6. Press
to display the amount due including any
tax (you can omit this step).
7. Enter the amount received from the customer (you
can omit this step if the amount tendered is the
same as the subtotal).
8. Press
, and the change due or deficit is
displayed and the drawer opens.
9. Close the drawer.
5
CLK#
7
1
Clerk code
#/
SBTL
3
Price and dept.
The PLU function allows speedy key entries. When a
PLU code has been assigned to an item and a price for
it has been programmed, entry of the code
automatically calls up the price for the item. Up to 80
PLU codes are programmable. See the PLU
programming section in “Programming”
Tax Calculation
When Paid by a Credit Card
Automatic Tax Calculation
Press CH at the end of the transaction. The amount
tendered cannot be entered.
When the register is programmed with a tax table or tax
rate method and the tax status of a department is
programmed as taxable, the register automatically
computes the tax on any item entered using the
department key for that department or a PLU code
associated with that department.
When Paid by Check
Press
at the end of the transaction. The amount
tendered can be entered like a cash sale and the
change due is displayed.
CHK
When the amount tendered by cash or check is less
than the sales amount including tax, the display shows
a deficit and “o”. To compensate for the deficit, make
an additional amount-tendered entry or make a charge
entry.
Department
You can display the taxable 1 or taxable 2 subtotal by
pressing either tax shift key and then . The subtotal
of taxable 1 or taxable 2 entries is displayed. You
cannot display the subtotal of taxable 3 or 4 items.
#/
SBTL
Tax Shift
You can change the programmed taxable 1 or 2 status
of each department key by pressing one or both of the
two tax shift keys
and . To change the taxable
status, press the appropriate tax shift key just before
the department, P or % key. In case of repetitive
entries, the shifted tax status is used.
TAX1
SHIFT
/RA
Repetitive Department Entries
To enter two or more of the same item, press the
appropriate department key repeatedly.
To enter a sale of two or more of the same item, use
key for multiplication.
Example: Selling five pieces of $1.50 item (department 1)
and three pieces of $3.50 item (department 3)
for check payment.
@/TM
Part Names and Functions
TAX2
SHIFT
/PO
This function is used when the taxable item or items
once entered need to be made non-taxable. Press
or , then s, and v and all entries made so far in
the transaction for items with the specified taxable
status will be made non-taxable.
TAX1
SHIFT
/RA
TAX2
SHIFT
/PO
Keyboard
Symbols and figures appearing on the display:
Department code
PLU code
Mode switch
Drawer
Drawer lock
Mode Switch
The mode switch enables the register to perform a
variety of functions. Mode switch settings are
made by sliding the switch .
VOID
X/F
Z/PGM
You can select the following functions:
87654321
TAX1
SHIFT @/TM
/RA
3
TAX2
SHIFT
/PO
2
CLK#
8
#/
SBTL
CH
7
4
6
%
CA/AT/NS
5
VOID ESC
1
In order to enter the departments 5 to 8,
and then the
5
1
to
8
4
keys.
➝ tax amount ➝
#/
SBTL
Received-on-account entry (X/F mode):
Opening the Drawer
with No Sale
Just press
amount received (up to $799999.99) ➝
amount paid out (up to $799999.99) ➝
and the drawer opens.
Percent Key
2
0
0
,g or k.
In addition, the following appear when appropriate:
• The minus sign (-) can appear in positions 2 to 8.
• The decimal point appears in positions 1 to 3.
• When entry of the secret code is necessary,
“----” appears in positions 1 to 4 .
Press CL and re-enter a correct number.
2. You make an error in key operation:
.)
0
Press CL and operate keys correctly.
3. You make an entry beyond a programmed
entry digit limit:
➝ percentage rate ➝ %
(ex. For 5%, enter
5
0
0
.)
Press CL and check if the entered amount is
correct. If not correct, re-enter a correct number. If
correct, check the setting of the entry digit limit.
4. A subtotal exceeds 79999999 (eight digits):
Entering a Refund
The cash register has no refund key. You must use the
following alternative method to make a refund entry: A
negative department for refund must be programmed in
advance. Check the taxable status of the returned item
is the same as that of the programmed negative
department. If not, use the appropriate tax shift key to
change the taxable status.
Press CL and then press
, g or k to finish
the transaction.
5. The number of an item exceeds 3 digits in
multiplication entry:
Press
➝
CL
and re-enter the correct number.
Error Escape Function
Procedure
unit price of the returned item ➝ negative dept. key
When an error or something uncontrollable occurs
during a transaction entry and you cannot keep the
or g.
Non-add Code Number
Non-add code numbers can be entered and printed on
the journal (or receipt) during the entry of a sale. Nonadd codes can be used for credit numbers, check
numbers, serial numbers, product codes, service charge
codes or any other numbers for reference to specific
customer waiting, press ESC twice (following CL when
in the error state). You can escape the situation and
finalize the transaction as a cash sale at that time.
Transaction entries to that point are registered.
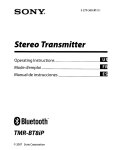
Reading and Resetting
of Sales
X Reports
X/Z Report Sample
This report, when taken in the X/F mode, prints the
accumulated information of sales. Taking an X
report is a good way to do a mid-day check on
daily sales. You can take X reports any number of
times, because they do not affect the cash
register’s memory.
To issue an X report, set the mode switch to the X/F
.
The contents of Z reports are the same as those of
X reports, but issuance of a Z report resets all the
transaction totals to zero. To issue a Z report, set
the mode switch to the Z/PGM position.
If the secret code is programmed, you must
Press
D
enter the secret code and press
this step.
after
.
If the secret code is programmed, you have
to enter the secret code and press
again after this step.
For Z reports with grand total resetting
If you want to reset the grand total(GT)when taking
the Z report, press k instead of
.
Other than resetting the grand total, this report is
the same as the normal Z reports.
If the secret code is programmed, you have
D
to enter the secret code and press k again
after this step.
Flash Reports (displayed but not printed)
Press the following key in the X/F mode:
Department Total
Department key
Sales Total
Cash in Drawer
Reset counter
Reset symbol
("X" is printed in the
case of X reports.)
Grand total
Quantity
Dept. code
Amount
For Z reports without grand total resetting
transaction is finalized by pressing
warning beep. Clear the error state by pressing the CL
key and take the appropriate action.
1. You enter a number of more than 7 digits for
the department price or a number larger than
the 79999999 (8 digits) for other amounts.
Discount for a subtotal:
#/
SBTL
.
When your register goes into an error mode, it will
display the error symbol “e” accompanied with a
Discount for an item:
entry of an item ➝ percentage rate ➝ %
entry of all items➝
TAX2
SHIFT
/PO
When an Error Occurs
The percent key is used to apply a discount or premium
to an item or to a subtotal.
You can manually enter a discount (or premium) rate.
Once the rate is preset for % , you can skip the step of
entering the rate.
(ex. For 20%, enter
TAX1
SHIFT
/RA
Paid-out entry (X/F mode):
(e
e) Error: This symbol appears, accompanied by a
warning beep, when an error is made. If this
occurs during a transaction because of an
o) Subtotal: This symbol appears when
is
(o
pressed and the cash register computes the
subtotal, and also when the amount tendered is
less than the total sale amount.
c) Change: This symbol appears whenever the
(c
change due amount is displayed.
l) Low battery: This symbol appears when the
(l
power of the installed batteries is below a certain
level or you need to replace the batteries with new
ones. (see the “Maintenance” section for
explanation.)
l) No battery: This symbol appears when no
(l
batteries are installed. (see “Maintenance” and
“Getting Started” sections for explanation.)
CHK
#/
SBTL
D
Keyboard Layout
SHIFT
and
Repeat: Indicates the number of times the same
department key is pressed. If an entry is repeated
more than ten times, only the first digit is displayed
(12 displays as “2”).
#/
SBTL
PLU
#/
SBTL
Z Reports
excessive digit entry, simply press CL and re-enter
correctly.
p) Program: This symbol remains on the display
(p
when the cash register is being programmed in the
Z/PGM mode.
f) Finalization: This symbol appears when a
(f
SHIFT
➝ tax amount ➝
Departments/PLU Code: The department code or
PLU code entered appears on the left. For
example, if the key for department 1 is pressed,
“1” would appear in the extreme left position.
Permits transaction entries.
Turns the display off.
Permits you to cancel transaction entries.
Permits printing of sales reports and
displaying of flash reports.
Z/PGM: Permits printing of sales reports, resetting
of sales data and programming.
REG:
OFF:
VOID:
X/F:
#/
SBTL
position and press
Repeat
The received-on-account (RA) entry function is used
for entering the cash received not directly connected
with a sale. The paid-out (PO) entry function is used
for recording the money taken from the drawer for
payment not directly connected with a sale. These
functions are available in the X/F mode.
Manual tax 2 entry:
Display
The XE-A101 is equipped with a front LED (LightEmitting Diode) display that affords easy visibility
during transactions.
Display
Printer cover
D press
and
Tax Delete
Multiplication Entries
OFF
REG
TAX1
SHIFT
/RA
Taxable Subtotal
Mixed Tender Sale
Received-on-Account
and Paid-Out Entries
Manual tax 1 entry:
TAX2
SHIFT
/PO
Amount tendered
Non-add code number entry procedure:
a code number of up to 8 digits ➝ s.
You can apply tax manually when the automatic tax
calculation function cannot be used. Each manual tax
entry (for Tax 1 or Tax 2) can be made only once during
a transaction. After a manual tax entry, you cannot
make any further item entries.
PLU(Price Look Up)
To enter a sale of a PLU item, simply enter its code and
press P.
Price and dept.
#/
SBTL
Manual Tax
1. Set the mode switch to the REG position.
CLK#
transactions. Non-add code numbers can be entered
in the REG or VOID mode.
TAX1
SHIFT
/RA
To make all entries up to that point non-taxable, press
7
3
#/
SBTL
All Depts. counter and
total
Percent counter and
total
Item void counter and
total
Void mode counter
and total
Taxable 1 total
Tax 1 total
Taxable 2 total
Tax 2 total
Taxable 3 total
Tax 3 total
Taxable 4 total
Tax 4 total
Count of transactions
Sales total
Cash sale total
Check sale counter and
total
Charge sale counter and
total
Received-on-account total
Paid-out total
No sale counter
Cash in drawer
CH
Clerk 1 sale total
Clerk 2 sale total
Clerk 3 sale total
Clerk 4 sale total
Programming
Tax Programming
Before you begin programming, set the mode switch to
the Z/PGM position.
OFF
REG
VOID
X/F
Z/PGM
Tax Table Programming
Follow these steps as needed.
If you do not press the
key at the end of each
programming step, you can continue programming without printing the programming report.
D
#/
SBTL
If you are in an area that uses a tax table for tax
calculation, you can program the cash register accordingly.
Tax table programming can be performed for Tax 1 and
Tax 2.
Sample tax table 1 (6%):
Tax
.00
.01
.02
.03
.04
.05
.06
.07
.08
.09
.10
.11
.12
.13
Programming by Departments
Preset Unit Price
The preset unit price function assigns a frequently
purchased item to a department key and enables you to
enter the price simply by pressing the department key.
Specify a price using the following sequence:
Unit Price (Max. 5 digits) ➝ Dept. key (➝
#/
SBTL
)
Department Status
You can specify various status parameters (+/- sign,
single item cash sale function, taxable status and entry
digit limit) for a department key. Use the following
sequence:
ABCDEFG➝
➝ Dept. key (➝
@/TM
#/
SBTL
where A to G represent the following choices.
A: Choice of + or - sign
Enter 0 for + or 1 for -.
B: Choice of single item cash sale (SICS) function
Enter 0 for normal or 1 for single item cash sale.
C, D, E and F: Choice of taxable status
Enter 0000 for non-taxable, 0001 for taxable 1, 0010
for taxable 2, 0100 for taxable 3, 1000 for taxable 4 or
0011 for taxable 1 and 2.
G: Entry digit limit (0 to 7 digits)
Enter 0, 1, 2, 3, 4, 5, 6 or 7
Each PLU is associated to a department and the
programmed contents for the department are
automatically applied. Your cash register is preprogrammed so PLU codes 1-10 are assigned to
department 1 and PLU codes 11-80 are disabled. To set
the price or change the associated department, use the
following sequence:
PLU code ➝
P ➝ Price ➝ Dept. key (➝
Ex.:
6
Price
)
#/
SBTL
2
PLU code
#/
SBTL
To disable a PLU code, use the following sequence:
PLU code ➝
P➝v
(➝
#/
SBTL
You can program miscellaneous settings using the
following sequence:
1
➝
➝ ABCDEFGH ➝
Cyclic I
Cyclic II
Tax
Breakpoint
.00
.01
.02
.03
.04
.06
.09
.10
.11
.12
.14
.17
.01
.11
.26
.47
.68
.89
1.11
1.26
1.47
1.68
1.89
2.11
Example: Programmig Tax 1 as 6% sales tax using
sample tax table 1.
#/
SBTL
0
@/TM
Tax 1
@/TM
0
@/TM
Minimum taxable
amount(Q)
(First breakpoint)
0
0
0
@/TM
Tax rate(R)
Breakpoint
0
Cycle(M)
@/TM
@/TM
Breakpoint
Breakpoint
@/TM
@/TM
Breakpoint
Breakpoint
Breakpoint
(First breakpoint of the next cycle)
@/TM
If tax is not shown for every cent, use the
not shown for .05, .07, .08, .13, .15 and .16.
Likewise, the corresponding breakpoints are not
shown. To complete the table, simply insert the
next highest breakpoint after each missing figure.
Therefore, the breakpoint for .05 would be .89, .07
and .08 would be 1.11, etc.
Use the following sequence for tax programming:
➝
R➝
#/
SBTL
@/TM
➝ 1
➝
M➝
for Tax 1 or
@/TM
➝
Q➝
for Tax 2 ➝
2
@/TM
@/TM
➝
➝ Breakpoint ➝
#/
SBTL
(➝
#/
SBTL
)
where A, B, C, D, E, F, G and H represent the
following choices.
A: Date format
Enter 0 for mmddyy, 1 for ddmmyy or 2 for yymmdd.
B: Time format
Enter 0 for 12 hour system or 1 for 24 hour system.
C: Decimal point setting
Enter 0, 1, 2 or 3 for the decimal point position.
D: Resetting receipt no. when issuing Z report
Enter 0 to not reset or 1 to reset
E: Amount tendered compulsory
Enter 0 for non compulsory or 1 for compulsory.
Checking the Machine
Settings
Programming the Percent key
The % key can be programmed as a discount key or
as a premium key. The taxable status of the % key can
also be programmed though it is pre-programmed as a
non-taxable discount key. Use the following sequence:
ABCDE ➝
@/TM
➝
% (➝
#/
SBTL
)
where A to E represent the following choices
A: Choice of + or - sign
Enter 0 for + or 1 for - .
.
Correction
Correction of Entered Number
pressing
Correction of the Last Entry
You can correct any incorrect entry made during a
transaction if you find it before finalizing the
SICS (1) / Normal (0)
transaction by pressing
3
Miscellaneous settings
Printing format
4
Initial setting: date format "mmddyy", time format
“12 hour system”, decimal point position “2”, not
resetting, amount tendered non compulsory, s
non compulsory, entry digit limit “8” and rounding
off ("00200080")
Tax table(Tax1)
P
P
1
1
5
0
5
1
3
Secret code ➝
➝
The secret code function can be disabled by
entering 0 0 0 0 (or nothing) for the code in
the above sequence.
When entry of secret code is necessary, “----” is
displayed. Each time you enter a number for the
secret code, the corresponding symbol “-”
changes to “_”.
.)
Initial setting: 0.00(%)
Printing Format
You can choose either a journal or receipt format and
specify other options for the printing format. Use the
following sequence:
2
➝
#/
SBTL
➝ ABCDEFG ➝
#/
SBTL
(➝
#/
SBTL
)
A: Printing journal/receipt in the REG mode
Enter 0 for printing or 1 for no printing.
B: Journal or receipt format
Enter 0 for journal format or 1 for receipt format.
(In the receipt format, the paper is fed by a few
lines upon finalization of each transaction. In the
journal format, the paper is wound around the takeup spool.)
C: Printing date
Enter 0 to print or 1 not to print
D: Printing time
Enter 0 to print or 1 not to print
E: Printing consecutive numbers
Enter 0 to print or 1 not to print
F: Printing taxable subtotal
Enter 0 to print or 1 not to print
G: Printing merchandise subtotal with
Enter 0 to print or 1 not to print
Initial setting: printing in the REG mode, journal
format, printing date, time and consecutive number,
and not printing taxable subtotal and merchandise
subtotal ("0000011")
Consecutive Receipt Number
Consecutive receipt number can be printed on every
transaction or receipt and report with the date and
time. Use the following sequence to set the receipt
start number. To start from a specific number, enter
the number less one (e.g. if you want to start from
receipt number 1001, enter 1000).
#/
SBTL
)
When a power failure occurs during printing of
an X (reading) or Z (reading and resetting)
report:
Upon power recovery, the register prints
“############” and resumes printing of the
report.
vP
Percentage tax rate(Tax2)
Minimum taxable amount
Clerk code
Date
Time
Receipt number
This function allows you to reverse the entries
made in an incorrect receipt. The entries are
subtracted from each totalizer and added to a void
totalizer.
To use this function, set the mode switch to the
VOID position and enter the same details that are
on the incorrect receipt. The VOID mode
symbol(VD) is printed at the bottom of the receipt.
If the secret code is programmed, you have
to enter the secret code and press
after
setting the mode switch to the VOID position.
To see the PLU settings, set the mode switch to
the Z/PGM position and press P.
PLU code
Associated department
Unit price
Power failure mark
After power failure
When the printer motor is locked due to a
paper jam:
Printing stops and intermittent beeping starts. First,
unplug the power cord and clear the paper jam.
Then plug in the power cord, feed the roll paper to
Void Operation in the X/F Mode
PLU Settings
Before power failure
D
Received-on-account(RA) and paid-out(PO)
entries can be corrected in the X/F mode.
the proper position and press CL . The register will
then resume printing after printing
“############”.
Void operation for RA(X/F mode)
@/TM
)
Void Mode
Secret Code
A secret code can be specified so that only those
who know the secret code may issue Z reports for
reading and resetting of sales, perform
programming in the Z/PGM mode and void
operation in the VOID mode. The pre-programmed
secret code setting is 0000 (no secret code). Use
the following sequence to enter a secret code (4
digits).
0
When a power failure occurs during printing of
transaction data:
Upon power recovery, the register prints
“############” and resumes printing of the
transaction data.
, g, k, etc.
Taxable status for %
Sign and rate for %
Secret code
TAX2
SHIFT
/PO
0
When a power failure occurs with the register
turned on or during a computation process:
Upon power recovery, the register resumes
operation from the point of failure.
Correction of Earlier Entries
G: Entry digit limit for g, k,
,
and
manual tax
Enter 0, 1, 2, 3, 4, 5, 6, 7 or 8 for the entry digit limit.
H: Rounding
Enter 0 for rounding off, 1 for rounding up or 2
for rounding down
TAX1
SHIFT
/RA
0
#/
SBTL
The following situations may arise during a power
failure or paper jam. (Make sure that batteries are
correctly installed.) As the power is recovered or a
paper jam is removed, the register will resume
normal operation with a next key operation.
immediately after the entry.
CL
Entry digit limit
#/
SBTL
(ex. For 10.00% enter
1
% (➝
In Case of a Power Failure or
Paper Jam
For example, to correct 3 P entry to 4 P after
another correct entry has been made, enter the
following:
F: Choice of
compulsory
Enter 0 for non compulsory or 1 for compulsory.
Percent rate (0.01% to 99.99%) ➝
(For miscellaneous settings, secret code and checking
machine settings, see the columns below. )
If you make a mistake when making a department
entry, PLU entry, repetitive or multiplication entry,
discount or premium entry by % , or manual tax
entry, you can correct this by pressing v.
Taxable status
Dept. code
Sign and unit price
Use the following sequence:
#/
General & Tax Settings
#/
SBTL
Programming the percent rate
Consecutive (receipt) number ➝ @/TM ➝ SBTL (➝
Initial setting: starting from 0001("0000")
When you enter an incorrect number, delete it by
switch to the Z/PGM position and press
Initial setting: - (discount), non-taxable ("10000")
Percent Key Function
To obtain a printout that shows the cash register
settings, set the mode switch to the Z/PGM
position and use the following sequence:
To see the general and tax settings, set the mode
B, C, D and E: Choice of taxable status
Enter 0000 for non-taxable, 0001 for taxable 1,
0010 for taxable 2, 0100 for taxable 3, 1000 for
taxable 4 or 0011 for taxable 1 and 2.
#/
SBTL
)
Miscellaneous Settings
#/
SBTL
Non-cyclic
.10
.12
.16
.18
.16
.16
.22
.12
.16
.18
.16
.16
.22
of the next highest tax amount for each
D breakpoint
missing breakpoint. In sample tax table 2, tax is
8
Associated dept.
.01
.11
.23
.39
.57
.73
.89
1.11
1.23
1.39
1.57
1.73
1.89
2.11
Sample tax table 2:
)
PLU (Price Look-Up) Programming
Breakpoint
Breakpoint
difference
where R, M and Q represent the following:
R: Tax rate (0.0000% to 99.9999%) x 10000
If the rate is fractional, it should be converted to its
decimal equivalent before entering.
M: Cycle (0.01 to 99.99) x 100
In tax table 1, you can see that the breakpoint
differences repeat in cycle. The value of M may be
viewed as the taxable amount which is covered by a
cycle. Thus, it can be determined by adding all of the
breakpoint differences in a cycle or by simply taking the
difference between the first breakpoint of the cycle and
the first breakpoint of the next cycle.
Q: Minimum taxable amount (0.01 to 99.99) x 100
This represents the smallest amount for which tax must
be collected. In some states, sales whose amounts are
less than a specific minimum taxable amount are not
subject to taxation.
Breakpoints (0.01 to 99.99) x 100
The tax amount increases in stages. The value of a
taxable subtotal at which the tax amount changes is
called a breakpoint. The difference between one
breakpoint and the next is called the breakpoint
difference. A group of breakpoint differences is
repeated at regular intervals and each of these intervals
is called a cycle. A maximum of 18 breakpoints (for tax
types 1 and 2), between 0.01 to 99.99, can be
programmed. Intervals between breakpoints must be
less than one dollar.
VOID
* ➝ amount ➝
TAX1
SHIFT
/RA
Void operation for PO(X/F mode)
VOID *
➝ amount ➝
TAX2
SHIFT
/PO
*If the secret code is programmed, you have to
enter the secret code here and press
VOID
before entering the amount and pressing
again
TAX1
SHIFT
/RA
or
TAX2
SHIFT
/PO
.
Maintenance
5. Install three new “AA” batteries into the
battery compartment.
5. Remove the used journal paper roll (if used)
from the take-up spool.
Drawer Handling
Batteries
Locking the Drawer
This cash register provides a low battery symbol
(l) and a no battery symbol (l) which appears on
the far left of the display in one of the following
situations:
Develop the habit of locking the drawer when not
using the register for any extended period of time.
Low battery symbol (l)
• When less than 3 batteries are installed in the
cash register.
• When the voltage of the batteries installed in the
cash register is under the required level.
No battery symbol (l)
• When no batteries are installed in the cash
register.
• When the batteries installed in the cash register
are dead.
When either of these symbols appear, check
batteries. If no batteries are installed, install three
new “AA” batteries at once. If batteries are already
installed, replace them with new ones as soon as
possible. If the AC power cord is disconnected or a
power failure occurs when the batteries are dead
or not installed, all the programmed settings will be
reset to the default settings and any data stored in
memory will be cleared.
D
If the low battery symbol appears while
making a transaction, complete the
transaction before replacing the batteries.
Replacement
1. Be sure the cash register is plugged in.
To lock:
View from rear
l” symbol has disappeared.
6. Check that the “l
6. Install a new paper roll and the take-up spool
according to the instructions in "Getting
Started."
Insert the key into the drawer lock and
turn it 90 degrees counter-clockwise.
To unlock: Insert the key into the drawer lock and
turn it 90 degrees clockwise.
7. Close the battery cover.
8. Replace the printer cover.
C
Improper use of batteries could cause
them to burst or leak, which might damage
the interior of the machine. See the
cautions in the "Getting Started" section.
Paper Roll
When colored dye appears on the edges of the
paper roll, it is time to replace the roll. Use paper
of 2 1/4" (57 mm) in width. To prevent jamming be
sure to use paper specified by SHARP.
C
In the case of receipt printing, steps 3 and
5 should be omitted and the take-up spool
need not be installed in step 6.
Replacing the Ink Roller
1. Open the printer cover.
Removing the Drawer
2. Remove the ink roller by pulling it upward.
To remove the drawer, pull it out and lift it up.
Coin case
Replacement (Journal printing)
1. Set the mode switch to the REG position.
2. Open the printer cover.
3. Press f to advance the paper several lines.
Remove the take-up spool from the bearing.
D
3. Install a new ink roller.
• To prevent burglary, it is a good idea to
empty the drawer after work and leave it
open at the end of the day.
• Coin case is detachable.
2. Set the mode switch to the REG position.
Manually Opening the Drawer
3. Pull the printer cover upward and detach it.
In case of a power failure or if the machine is out of
order, locate the lever at the bottom of the machine
and move it in the direction of the arrow to open
the drawer. The drawer will not open if it is locked
with the drawer lock key.
4. Open the battery cover and remove the old
batteries.
4. After cutting the existing paper, remove the
paper roll. Then remove the remaining paper
by pressing f.
4. Close the printer cover.
Lever
View from rear
Before Calling for Service
If you encounter any of the following problems,
please read below before calling for service.
The display shows symbols that do not make
sense.
• Has the machine been initialized properly as
shown in “Getting Started”?
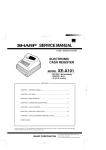
LIIMITED WARRANTY
Specifications
Model:
XE-A101
Size:
Inches: 13.0 (W) x 14.3 (D) x 9.96 (H)
Millimeters: 330 (W) x 363 (D) x 253 (H)
SHARP ELECTRONICS CORPORATION warrants to the first consumer purchaser that this Sharp brand product
(the "Product"), when shipped in its original container, will be free from defective workmanship and materials and
agrees that it will, at its option, either repair the defect or replace the defective Product or part thereof at no charge
to the purchaser for parts or labor for the time period(s) set forth below.
This warranty does not apply to any appearance items of the Product nor to the additional excluded item(s) set
forth below nor to any product the exterior of which has been damaged or defaced, which has been subjected to
misuse, abnormal service or handling or which has been altered or modified in design or construction.
The display will not illuminate while the
machine is turned on. The machine will not
operate when any key is pressed.
Weight:
Approx. 11.0 lbs. (5.0 kg)
In order to enforce the rights under this limited warranty, the purchaser should follow the steps set forth below and
provide proof of purchase to the servicer.
• Is the power supplied to the electrical outlet?
(Plug another electrical device into the outlet for
confirmation.)
• Is the power cord firmly connected to the
electrical outlet?
Power Source:
120V AC±10%, 60Hz
The limited warranty described herein is in addition to whatever implied warranties may be granted to purchasers
by law. ALL IMPLIED WARRANTIES INCLUDING THE WARRANTIES OF MERCHANTABILITY AND FITNESS
FOR USE ARE LIMITED TO THE PERIOD(S) FROM THE DATE OF PURCHASE SET FORTH BELOW. Some
states do not allow limitations on how long an implied warranty lasts, so the above limitation may not apply to you.
The display is illuminated, but the machine will
not accept key entries.
• Is the mode switch properly set to the REG
position?
• Has the machine been initialized properly as
shown in “Getting Started”?
Journal paper will not feed properly in the
printer.
• Is the take-up spool installed properly?
• Is there a paper jam?
• Is the journal format selected in the printing
format programming?
(If the receipt format is selected, the paper is not
wound around the take-up spool.)
Printing is faded or illegible.
• Is the ink roller used up?
• Has the ink roller been installed properly?
Power Consumption:
Stand-by: 4 W, Operating: 12.5 W
Working Temperature:
32 to 104˚F (0 to 40˚C)
Display:
LED (Light-Emitting Diode) numeric display
Printer:
1 station, print wheel selective type
Printing Capacity:
Max. 13 characters
Paper Roll:
Width: 2 1/4" + 1/64" (57.5mm + 0.5mm)
Max. external diameter: 3-5/32" (80mm)
Min. internal diameter: 15/32" (12mm)
Cash Drawer:
4 slots for bills, 5 for coins
Accessories (supplied):
Paper roll: 1 roll
Drawer lock key: 2
Instruction manual (English): 1 copy
Instruction manual (Spanish): 1 copy
Quick Start Guide (English/Spanish): 1 copy
Ink roller: 1 (installed)
Take-up spool: 1
• Specifications and appearance are subject to
change without notice for improvement.
Neither the sales personnel of the seller nor any other person is authorized to make any warranties other than
those described herein or to extend the duration of any warranties beyond the time period described herein on
behalf of Sharp.
The warranties described herein shall be the sole and exclusive warranties granted by Sharp and shall be the sole
and exclusive remedy available to the purchaser. Correction of defects, in the manner and for the period of time
described herein, shall constitute complete fulfillment of all liabilities and responsibilities of Sharp to the purchaser
with respect to the Product and shall constitute full satisfaction of all claims, whether based on contract,
negligence, strict liability or otherwise. In no event shall Sharp be liable, or in any way responsible, for any
damages or defects in the Product which were caused by repairs or attempted repairs performed by anyone other
than an authorizezd servicer. Nor shall Sharp be liable, or in any way responsible, for any incidental or
consequential economic or property damage. Some states do not allow the exclusion or incidental or
consequential damages, so the above exclusion may not apply to you.
THE WARANTY GIVES YOU SPECIFIC LEGAL RIGHTS. YOU MAY ALSO HAVE OTHER RIGHTS WHICH
VARY FROM STATE TO STATE.
Your Product:
XE series Electronic Cash Register
Warranty Period of this Product:
One (1) year for parts and ninety (90) days parts and labor from the date of
purchase.
Additional items excluded from
warranty coverage:
Any consumable items such as paper supplied with the Product.
Where to obtain service:
At a Sharp Authorized Servicer located in the United States. To find the
location of the nearest Sharp Authorized Servicer, call toll free at
1-800-BE-SHARP.
What to do to obtain service:
Ship (prepaid) or carry your Product to a Sharp Authorized Servicer. Be
sure to have proof of purchase available. If you ship or mail the Product, be
sure it is packaged carefully.
TO OBTAIN SUPPLIES, ACCESSORIES OR PRODUCT INFORMATION, CALL 1-800-BE-SHARP.
SHARP ELECTRONICS CORPORATION
Sharp Plaza, Mahwah, New Jersey 07430-2135
1-800-BE-SHARP
http://www.sharp-usa.com