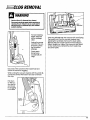
1
III" I
I
II
ilillil I lillll II
lllllii
I
L
I
IllIIH
I
L
I
I
I
II II_II
11 _
I
IIIIIII
III
IIIIII
I
I
IIII
-I
I
III III
i
III
I
I I_II I
i
IIIIIIIIIIIIIIIIIIIIIIIIIIIIIIIII
III
III
! I
III1!
[[I
[ '111[[I
III1[[
I
I
I
I
III
I
I
I
IIIII
I
I
SEARS
Kenmore
_Vacuum Cleaner
OWNER'SMANUAL
READ THIS MANUAL for important safety,
assembly and operating instructions.
C(_ 1ZJP3(_U_-4369584C
EEE ,ONTENTS
WARRANTY .......
: ......................
I
SERVICE .................................
I
IMPORTANT SAFETYINSTRUCTIONS .......
2
PARTSAND FEATURES....................
3
ASSEMBLY........
......................
4-5
ATTACHMENT ASSEMBLY .................
5
VACUUM CARE
Bag Changing
To Vacuum
..............................
How to Select Proper Height for Cleaning
Using Attachments
.......................
Attachment
Use Chart ....................
Vacuum
6
....
Storage ..........................
6
7
7
9-10
Motor Safety Filter Cleaning ...............
Suction Motor Reset ......................
I0
11
Belt Changing'
Brush Changing
and Brush Cleaning
...................
Cleaning
USE
8
i 1-!3
Exterior and Attachments
Ught Bulb Changing
Clog Removal .....
........
......................
........
.............
TROUBLESHOOTING .....................
13
14
15
16
8
Proper assembly and safe use of your vacuom cleaner are your responsibg#ies. Your cleaner is intended only for household use. The cleaner should be stored in a dry, indoor area. Read this Owner's Manual carefully for Iml_ant
use and safety information.
KENMOREVACUUM CLEANER
FULLONE-YEARWARRANTY
When used for private household purposes, if within
one year from the date of purchase, this vacuum
cleaner fails due to a defect in material or workmanship, RETURNIT TO THE NEARESTSEARSSERVICE CENTER/DEPARTMENTIN THE UNITED STATES,and Sears will
repair it free of charge.
If this vacuum cleaner is used for commercial
or
rental purposes, the above warranty
coverage
applies for only 90 days from the date of purchase.
This warranty gives you specific
legal rights, and
you may also have other rights which vary from
state to state.
If you need service or parts, visit your nearest Sears
Service Center or the Service Department located at
most Sears Retail Stores. They will be able to solve
your problem and supply any needed replacement
parts. Any service needed other than described in
this Owner's Manual should be done by a Sears
authorized service representative.
How to Order Repair Parts
When requesting service or ordering
following information available:
parts, have the
I. Model number.
2. Serial number.
3. Description of problem.
4. Part number.
5. Name of part.
SEARS,ROEBUCKAND CO., D/817 WA,
Hoffman Estates, IL.60179
English Speaking:
To Call TollJ:ree For Service:
(I-800-4-REPAIR)
(I-800-473-7247)
To CallToll
Free ForParts:
•(I-800-FON-PART)
(I-800.-366-7278)
Spanbh Speaking:
To Call Toll Free For'service:
(1-800-626-5811)
To Call Toll Free For Parts:
(1-800-659-7084)
EEEE MPORTANTSAFETYINSTRUCTIONS
To reduce the risk of fire, electrical shock, injury to persons or damage
vacuum cleaner, follow basic safety precautions including the following:
Read this manual
before
your vacuum cleaner.
Use your cleaner
manual.
Use only
attachments.
assembling
or using
only as described
in this
with Sears recommended
To reduce the risk of electrical
shock
use outdoors or on wet surfaces.
Disconnect electrical
supply
or cleaning
out brush area.
could
result
in electrical
suddenly starting.
Always turn qJeaner
off before
before
Failure
shock
- Do not
servicing
to do so
or brush
unplugging.
Do not unplug by pulling on cord.
grasp the plug, not the cord.
To unplug,
Do not use with damaged
cord or plug. If
cleaner
is not working
as it should, has been
dropped,
damaged,
left outdoors, or dropped
into water,
return
it to a Sears Service
Center/Department.
Do not pull or carry
hahdle,
close door
around
sharp edges
cleaner
over cord.
heated surfaces.
by cord, use cord as a
on cord,
or pull cord
or corners.
Do not run
Keep cord away
from
Do not leave
cleaner
Unplug from outlet when
servicing.
Do not
attention
children.
allow
to be
is necessary
Do not handle
when
plugged
in.
not in use and before
used as a toy. Close
when used by or near
plug or cleaner
with wet hands.
when using your
Do not put any objects into openings.
Do not use with any opening
blocked;
keep
free of dust, lint, hair and anything
that may
reduce air flow.
Keep hair, loose clothing, fingers, and all parts
of body away
from openings
and moving
parts.
Do not use cleaner without dust bag in place.
Always change
the dust bag after vacuuming
carpet
cleaners
or fresheners,
powders
and
fine dust. These products
clog
the bag,
reduce
airflow
and can cause
the bag to
burst. Failure to change
bag could
cause
permanent
damage
to the cleaner.
Do not use the cleanerto pick up sharp hard
objects,smalltoys,pins,paper,etc.They may
damage the cleanerordustbag.
Do not pick up anything that isburning or
smoking, such as cigarettes,matches, or
hot ashes.
Do not use cleaner to pick up flammable or
combustible liquids
(gasoline,
cleaning fluids,
perfumes, etc.),or use inareas where they
may be present. The fumes from these
substances can create a firehazard or
explosion.
Use extracare when cleaningon stairs.
Do not
put on chairs,
tables,etc.Keep on floor.
You are responsible
for making sure that your
vacuum cleaner is not used by anyone unable
to operate
it properly.
SAliE THESEINSTRUCTIONS
Proper assembly and sate use of your vacuum cleaner are your responsibilities.
Your cleaner is intended only for household use. The cleaner should be stored in a dry, indoor area.
Read this Owner's Manual carefully for important use and safety information.
ANDFEATURES
UPRIGHTVACUUM CLEANER
It is important to know your vacuum cleaner parts
and features to assure its proper and safe use.
Review these before using your cleaner.
COPY YOUR MODEL AND SERIALNUMBERSHERE.
Copy this information from the bottom of
vacuum cleaner into these spaces. Keep
numbers for future reference. If you need
.call with a question, have this information
the
these
service or
ready:
Hose
116.
h
Model Number
.
Serial Number
(Dust Bag Inside)
Quick
Release
Cord Hook
Dust Bag
In U.S. #20-50688
In Canada #20-50680
Hose
Filter (Inside
Dust Cover)
oot,as oalr
Belt
Lower
Cord Hook
Release
l_andle
Screw
l In
#2O-5275
In U.S.
Canada
#20-40096
Dusting
Brush
I
Adjustment
Lever
(On Some Models)
Port
Headlight and Lens
(On Some Models)
Bulb
l In
020-5240
In U.S.
Canada
#20-40600
Serial
Number
Label
ATTACHMENTS
Tool
Warning
Label
Wand-_
f ff
(On Some _ _k
Models)
Button
_ No
Tabs
ResetLabel
(Seepage t I)
Brush
Serial Number
Label
Short
Hose
/.2-4-- Crevice
Tool
3
Y
HANDLEASSEMBLY
Handle
Scn_
Before assembling your vacuum cleaner, be sure you
have all the parts shown on page 3.
ElectricalShock Hazard
Do not plug into electrical supply untilassembly Is
complete. Failureto do so could resultin electrical
shock or injury.
Back Of
I
v-uum°'
I ll
Remove the handle screw located just below the top
edge of the back of the vacuum, (see illustration
above).
Handle
Position the handle so the cord hooks are toward the
back of the cleaner.
Insert the handle
into the opening at
the top of the
vacuum.
Align the handle
screw in the hole in
the handle and the
handle screw hole
in the back of the
vacuum.
Hooks
Handle
Screw
and Hole
In Vacuum
Insert the handle
screw so it passes
through the back of
the vacuum into
the handle.
Begin to tighten the screw with your fingers. It may
be necessary to adjust the handle slightly.
Using a screwdriver,
tighten the screw,
CORD ASSEMBLY
Make sure the quick release upper cord hook is in
the upright position,
Remove the
wire fie from
the power
cord, Wrap
the power.
cord arour_d
the upper
and lower
cord hooks,
DO NOT overlighten. Overtlghteningcould stripthe
screwholes.
DO NOT operate the cleaner withoutthe screw in
place.
-..
TTACHMENT
ASSEMBLY
TO ASSEMBLE
ATTACHMENTS
After the handle has been assembled to
th$ body and the power cord has been
wrapped around the cord hooks, the
attachments can be assembled,
.
The wand can be affached to the
hose by inserting the small end of the
wand into the open end of the hose,
Be sure to align the tabs on the wand with
the "J" slots in the hose, Once the wand is
inserted into the hose it should be twisted to
the right to lock the tabs into the "J" slots,
2. The wand and hose can then be routed in front
of the handle and over the hose support.
3. The wand can then be placed over the end of
the short hose, twisting as you push down,
Brush
Tool
4. The dusting brush can be placed in the holder in
front of the wand with the brush portion up,
5. The crevicetoolcan be slippeddown intothe holder
besidethe wand.
5
VACUUM
6. With your left hand reach down and push the "ONOFF" switch to the right. The cleaner will now staff.
WARNING
personal Injury and Product Damage Hazard
• DO NOT use outlets above counters. Damage to
items in surrounding area could occur.
• Use care in plugging in the vacuum. The vacuum
should be in the OFF position.
Quick Release
i. Turn the top
cord hook down.
2. Pull the cord off
the hook.
To shut the cleaner "OFF" reach down and push the
switch to the left, Raising the handle up will catch the
handle support spring and hold the handle in the
upright position.
3. Once the cord is
removed, lock the
cord into place by
forcing it into the
locking notch on the
body of the cord
hook as shown.
Locking
Notch
4. Plug the cord into
120 volt o_ttlet located near the floor,
NOTE: To reduce the risk
of electric
shock,this
vacuum cleanerhas a polarizedplug,(one blade iswider
than the other).
Thisplugwill
fit
ina polarizedoutlet
onlyone way. Ifthe plug does not fit
fully
inthe outlet,
reversethe plug.Ifitstill
does notfit,
contact a
qualified
electrician
to install
the proper outlet.
Do
notchange the plug inany way.
W TOSELECT
PROPERHEIGHT
FORCLEANING
This cleaner has four heights in which the nozzle can
be set up off the floor for the various surfaces you are
trying to clean.
The height adjust knob is on the nozzle over the light
lens.The settings
are:EX LOW, LOW, MED and HIGH.
To adjust the
height, grasp
the knob and
move it to the
desired setting,
Adjustcleaner
heightsby referringto the chaff
below to match
the type of surface to be
cleaned:
Foot Rest For
Handle Release
Height Adjust Knob
EX LOW: very low pile.
LOW: shortor medium pile.
MED: medium to long pile.
5. Place your foot on the pad at the left rear of the
cleaner and pull back on the handle until it releases
from its upright position,
HIGH: shag carpet,long pile,
plush,scatterrugs.
Place unit in "HIGH" when using attachments to prevent possible floor damage.
EEEEEEEI.!SING
ATTACHMENTS
TO USEATTACHMENTS
'C-AUTION
When usingattachments, be careful not to overextend the hose length when reaching. Tryingto
reach beyond the hose reach could cause the
cleaner to tip over.
•
DO NOTplace hands or feet underneath the unit
when insertingthe hose. Thebrushassembly begins
to revolve rapidly when the vacuum is fumed on and
PersonaIInjuryHazard
isswitchedto a carpet height setting.
Place the cleaner on a flat surface, put the handle in
the upright position and move the height adjustment
to HIGH.
The attachments will fit on the hose or the wand. In
addition the dusting brush will also fit on the crevice
•tool,
ON SOME MODELS:
An extra wand, without tabs, is included. Thisextra
wand can be added to the wand with tabs for extra
reach. Insert wand and twist a quarter of a turn to
secure fit.
If the dusting brush is being used and more distance
is needed the crevice tool can be added to the
wand and the dusting brush can be added to the
crevice tool,
The hose and wand can be pulled off the short hose
by grasping the cuff twi_ting and pulling up.
Dusting Brush
Crevice Tool
Wand
TO STOREATTACHMENTS
Return the hose and wand to its position on the short
hose and the attachments to their holders.
The attachments can be added to the hose ifthe
itemto be cleaned isnotfarfrom the cleaner,The
hose will
expand.
NOTE: When cleaneristurned on the hose will
have a
tendency to collapsedue to suctionof the cleaner,
Ifmore reach isneeded the wand can be attached
to the hose and the attachmentS can be added to
the wand,
TTACHMENT
USECHART
Between
ATTACHMENT
Furniture*
CREVICE TOOL
X
Cushions*
Drapes*
Stairs
Walls
X
X
X
X
X
X
X
/
DUSTING
BRUSH
X
*Alwaysclean
attachments
before using
on fabrics.
EEEEEEVA
CUUM STORAGE
Gather the cord
and wrap it loosely
around the upper
and lower cord
hooks,
Storethe cleaner
ina dry,indoor
area, on the floor
withthe handle
locked inthe
uprightposition.
Electrical Shock and Personal Injury Hazard
Wrappingthe cord too tighffyputs stresson the c_d
and can cause cord damage. A damaged cord is
an electrical shock hazard and could cause
personal Injuryor damage.
Cord
Lower
Cord
Hook
EEEEEWA
CUUM CARE
ALWAYSFOLLOWALL SAFETY
PRECAUTIONSWHEN CLEANING AND
SERVICING THEVACUUM CLEANER.
Elechtcal Shock Or Personal Inlury Hazard
Disconnect electrical supply before servicing or
cleaning the unit.Failureto do so could resultin
elech'icalshock or personol injury from cleaner sudclenlystarling.
8
G CHANGING
WARNING!
Unplug power cord
from electrical outleL
,_
NEVERREUSE
A DUSTBAG Veryfine materials, such
as carpet fresheners,face powder, fine dust,plaster,
soot,etc can clog the bag and cause it to burst
before it is full.Change bag more often when
vacuuming these materials
TO REMOVEBAG:
Dust Cover
Release
Squeeze the dust
cover release and
pull forward on the
top of the dust
cover to remove
the cover.
Check the dirt
tube and the
motor safety filter.
If either is
blocked, check
the Troubleshooting chart.
TO REPLACEBAG:
Lay cover
aside.
_
Dust Bag
Cover
Fold the safety
seal tab on the
new dust bag
away from the
opening that fits
on the dirt tube.
(NOTE: See page
3 for Dust Bag #.)
Unfold the new
dust bag.
Grasp the dust bag
collar and pull gently, carefully removing the dust bag.
Throw away the
used dust bag. Do
not reuse.
Insert the dust bag
onto the bag holder
completely_oy holding the bag collar
and pushing it onto
the dirt tube.
Posltion
the
dustbag
cover so its
positionlng
tab fits
into
the body
positlonlng
slot.
SAFETYFILTER
CLEANINO
DustBag
Cover
Bag Cover
Body
Check the motor filter
frequently
and clean when
di_y.
ElectricalShock Hazard
Do not operate the cleaner withoutthe motor safety
filter.Besure the filterisdry and properly installedto
prevent motorfailure and/or electrical shock.
Close the bag
cover.
You will
hear a
distinct
snap
when cover is
securelyclosed.
Cover
Squeeze the latch
and pullforward
on the top ofthe
dustcover to
remove the cover.
Remove the dust
bag.
Ifthe filter
(locatedinthe bottom of the dustcover
cavity)isdirty,
remove itby R.ulling
forwardout from
under the ribs.
Wash the foam filter
inwarm soapy water,rinseand
drythoroughlyby squeezingthe filter
inyour hand
and letting
itairdry.
Do not wash in the dishwasher.
Do not install damp.
Replace the foam filter by sliding it back into place
under the ribsin the dust cover cavity,
10
SUCTION
MOTORRESET
The suction motor reset will shut the motor off if airflow is sufficiently restricted to cause motor overheating and possible damage to the vacuum cleaner.
Once the reset goes into effect, the vacuum cleaner
will not operate for approximately
10 minutes. At this
time the unit should be unplugged from the electrical outlet and checked for clogging. Follow the
instructions under "CLOG REMOVAL" on page 15.
Even though dust bags may appear to be not full,
there are times when airflow through them may
become severely restricted. This can happen from
picking up fine dust particle materials such as plaster
dust, talc or other powders. These materials can clog
the pores in the bag and close off airflow, causing
the reset button to go into effect. If this condition
exists, the bag must be changed. See "BAG CHANGING" instructions staffing on page 9.
When all airflow passages are clean, the dust bag
• has been checked to be satisfactory, and approximately 10 minutes have passed, use a pencil, ball
point pen tip or similar item to push the reset button
back in. See nstruct ons n the Ilustrat on to the right.
The reset button must be pushed in for the vacuum
cleaner to resume operation.
SUCTIONMOTORRESET
IF SHUT DOWN OCCURS,CHECK
FORFULL BAGOR CLOGGEDHOSE.
(SEEOPERATOR'SMANUAL)
WAIT APPROXIMATELY
10 MINUTES
BEFOREATTEMPTINGRESET.
USE BALLPOINTPENFOR RESET.
Set the unit upright, plug the power cord in and
restart the unit. If it does not restart, wait an additional five minutes. Try again. If it still does not staff, call
Sears for service.
TCHANGING,BRUSHCHANGING
ANDBRUSHCLEANING
ElectricalShock Or PersonalInjuryHazard
Disconnectelectrical supply before servicingor
cleaning the unit.Failureto do so could resultin
electrical shock or personalinjuryfrom cleaner suddenly starting.
Frequently check and remove hair, string and lint
build-up in the brush area. If build-up becomes
excessive, follow the steps below. Should the belt
become loose or should it break, follow the Belt
Removal instructions.
TO REMOVEBELT:
Disconnect electrical supply.
The handle must be pulled down and the cleaner
turned over.
Release the lower plate by pushing the tabs in
toward the center,
11
Grasp the clips at the back and pull forward and up
to remove the lower plate.
Remove any dirt or debris in the belt path area or in
the brush roller area.
Clips
Ro//er
Area
Carefully remove the brush end caps and washers to
check for string and hair build-up.
Brush
End Cap
Personal Injury Hazard
Always unplug the vacuum cleaner before cleaning
the brush area as brush may suddenly restart. Failure
to do so can result in personal injury.
f
TO CLEANBRUSH:
?
CAUTION:
When you remove
the end caps, a
small washer on
each end may
come off. Do not
Iose,.these two
washers.
Remove any string or debris.
Shaft
Agitator
Assembly
Replace the
washers and
end caps. See
exploded view
for correct
assembly,
Carefully lift the right end of the agitator assembly
and then lift the left end. Remove the brush
assembly,
Remove the worn or broken belt from the motor
drive shaft.
PersonalInjuryHazard
Be careful when removingbrushassembly,the belt
tensionis high.Failureto do so could resultin personal injuryfrom brushassembly releasing quickly
and snapping away.
12
Exploded View - BrushAssembly
End
Cap
TOREPLACEBELT:
Press firmly, checking
pletely inserted.
to see that each end is com-
Motor
Drive
Shaft
Be/t
Shaft
Loop the new belt on the motor drive shaft.
(NOTE: See page 3 for Belt #,)
Loop the other end of the belt on the belt groove on
the brush assembly.
Check to see that the belt is centered in the belt
groove and that the brush assembly turns freely.
Reinstall the lower plate by placing the front tabs on
the plate into the slots on the nozzle housing and
pushing the plate to the rear until the back clips snap
into place. Pull the tabs to the outside.
Align the square
extension on each
end cap with the
slots in the frame of
the base.
Base
S/ot
Return the cleaner to the upright position before
plugging into the electrical outlet.
LEANING
EXTERIOR
ANDATTACHMENTS
I. Unplug cord from wall outlet. DO NOT drip water
on cleaner.
DO NOT USEATTACHMENTSIF THEYAREWET.
2. Clean exterior using a clean, soft cloth that has
been dipped in a solution of mild liquid detergent
and water, then wrung dry. Wipe dry after
cleaning.
3. To reduce static electricity and dust build-up, wipe
outer surface of cleaner and attachments.
4. Wash attachments
in warm soapy water, rinse and
air dry. Do not clean in dishwasher.
Attachments used In dlrtyareas (under a
refrigerator)shouldnot be used on other surlaces
untilthey are washed. Theycould leave marks.
IGHTBULBCHANGING
NOTON ALLMODELS
ElectricalShock Or PersonalInjuryHazard
Disconnect electrical supply before servicingor
cleaning the unit. Failureto do socould resultin
electrical shock or personal injuryfrom cleaner
suddenlystarling.
Disconnect
electrical
supply.
The handle must be pulled down and the cleaner
turned over.
Release the lower plate by pushing the tabs in
toward the center.
Bulb Housing
With the bulb housing loose the bulb can be
removed by pushing in and twisting it counterclockwise. The new bulb can be placed in the socket, J_ine
up the post on the bulb with the slots in the socket
and while pushing the bulb ir_to the socket, twist the
bulb clockwise.
(NOTE: See page 3 for Bulb #,)
Replace the lightbulb withthe same or smaller
wattage sizeto prevent damage to surrounding
parts.
Reinsert the bulb housing onto the flange by pushing.
down.
Grasp the clips at the back and pull forward and up
to remove the lower plate.
With the lower plate off the bulb housing can be
pulled off the flange it is mounted to by wiggling the
socket back and forth,
14
Reinstall the lower plate by placing the front tabs on
the plate into the slots on the nozzle housing and
pushing the plate to the rear until the back clips snap
into place, Push the tabs to the outside.
REMOVAL
ElectricalShock Or PersonalInjuryHazard
Disconnectelectrical supply before servicingor
cleaning the unit.Failureto do so could resultin
electrical shock or personal injuryfrom cleaner
suddenlystarting.
For best cleaning
results, keep the
airflow passage
clear.
Unplug the power
cord from the outlet before checking the airflow
passage.
If the clog still exists turn the vacuum OFF and unplug
the power cord. Turn the vacuum cleaner over,
exposing the underside. Remove the lower plate.
Remove the short nozzle hose from the housing by
lifting it straight up. Inspect the hose end and clear it
of any obstructions. Reinstall the short nozzle hose
and lower plate.
Check each
starred area
occasionally for
clogs.
Disconnect the wand from the no771e hose and
check the wand for clogging.
While running the vacuum cleaner with the wand disconnected,
stretch the hose in and out to remove
the clog.
Pull down
on the suction inlet lid
and check
for clogging
in this area,
15
ROUBLESHOOTING
Review this chart to find do-it-yourself solutions for minor performance problems.
Electrical Shock Or Personal Injury Hazard
Disconnect electrical supply before servicing or cleaning the unit. Failure to do so could result
in electrical shock or personal injury from cleaner suddenly starting.
I:]Ul:I
Cleaner won't run.
I. Unplugged at walloutlet.
I.
Plug in firmly, push OnlOff switch
to ON.
2. Trippedcircuit
breaker/blown
fuseat householdservice
panel.
2.
Reset circuit breaker or replace
fuse.
3. On/Off switchnotturnedON,
,3. Push On/Off switch to ON.
4. Suctionmotor resettripped.
4.
Remove clogs and reset, (pages I 1
and 15).
I. Full
orclogged dustbag.
I.
Change bag, (pages 9 and I0).
2. Wrong pileheightsetting,
2. Adjust setting, (page 6).
3. Worn brush.
3.
Replace brush, (pages 1I- 13).
4. Clogged nozzlehose,
4.
Clean nozzle hose, (page 15),
5. Clogged hose orwand.
6. Holeinhose.
5.
Clean hose, (page 15).
6.
Replace hose.
7. Brokenbelt.
7.
Replace belt, (pages 1I-13).
8. Hose notinserted
fully.
9. Crevicetoolleft
on wand.
8.
Inserthose, (page 3).
9.
Remove wand and properly store.
Cleaner picks up
moveable rugs or
pushes too hard.
I. Wrong pileheightsetting.
I.
Adjustsetting.
(page 6).
Light won't work.
I. Burned outlight
bulb,
I. Change light
bulb,(page 14).
Poor job of dirt pick-up.
Dust escapes the
paper bag.
16
I=11=
:1
I.
Check instructions,(pages 9 and 10).
2. Bag torn.
2.
Replace bag.
3. Bag cover improperly
installed.
3.
Check instructions,(pages 9 and 10).
,
Check forproperinstallation
ofbag.
I
I
I
I
I
II
II
I
I
II
I
II
II
[
11 I
I
II
P
I
II
II
I FI
[
I
I
II
II
I
I
!
I
I
I
'm
"
I
•
i
i_
Illl]illJ
I
I
ImlJIJ
]
Ill
I]I II
I
Ilria]
I
I H
!l
I
I
I
II
I
I
I
II
I
I
I I
I
I
III
II
I
I
I
I
I
I
II !
I I
I
I
]
I
|
I Jl
I
I
Ir
I
i
I]
II
I
I
I
I
I
II
]1
I
I
1___
r
IIIlr_L
I ]
I
[]
I
ml
it
I
I
II_lLrq]]]I I
II
I
I
I
I
I
]
Jl
I1
I
I
I
!
I
i
]
r J
I
I
I
I
II
I
I
I
!
illl
I
I
J
J
I
J
I
•
J
i
I
m
i_
I
g
If
i
SEARS
SEARS,ROEBUCKAND CO., HOFFMAN ESTATES,
IL 60179 U.S.A.
PARTNO. C_ I ZJP3_U_O-4369584C
Printed in U.S.A.
_
|
i
g
I