1
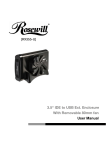
SATA-150 1-Int/1-Ext Port PCI Adapter RC205
User Manual
SATA-150 1-Int/1-Ext Port PCI Adapter RC205
User Manual
This Manual for the Models of 2 Channels SATA HBA:
Model A: Low Profile Serial ATA Internal 2 Ports
Model B: Low Profile External 1 Port + Internal 1 Port
Model C: Low Profile Internal 1 Port + External 1 Port + Bracket Power
Model D: External 2 Ports + Bracket Power
1. Introduction
The Low Profile Serial ATA 2 Channels PCI Host Adapter is a PCI to dual Serial ATA host controller
board which can support Low profile PCI and regular size PCI both. It provides a 32bit, 33/66
MHz PCI interface on the host side and dual, fully compliant Serial ATA ports on the device side
to access SATA storage media such as hard disk drive, ZIP drive, CD-ROM, CD-RW, DVD-ROM.
The board can be used to upgrade your desktop computer to have dual Serial ATA Channels. It
accepts host commands through the PCI bus, processes them and transfers data between the
host and Serial ATA devices. The board should be connected to SATA target device and will take
the data, serialize it and output it for transmission over the SATA interface. The board can control
two independent Serial ATA channels. Each channel has its own Serial ATA bus and will support
one Serial ATA device.
The board supports a 32-bit 33/66 MHz PCI bus revision 2.2 and the Serial ATA Generation 1
transfer rate of 1.5 Gb/s (150 MB/s).
It comes completely with drivers for Windows 98, Windows Millennium, Windows NT 4.0,
Windows 2000 and XP.
1.1. Features
1.1.1. PCI Interface
• Compliant with PCI Specification, revision 2.2.
• Integrated PCI DMA engines.
• 32 bit, 33/66MHz fully compliant PCI host interface.
1.1.2. High Speed Serial ATA Interface
• Dual high speed Serial ATA interface Channels, each supporting
1
SATA-150 1-Int/1-Ext Port PCI Adapter RC205
User Manual
1st generation Serial ATA data rates. (1.5Gb/s)
• Fully compliant with Serial ATA 1.0 specifications.
• Supports Spread Spectrum in receiver.
• Independent 256-byte FIFOs (32 bit * 64 deep) per Serial
ATA channel for host reads and writes.
1.1.3. The Individual features for different Models
1.1.3.1. Model A: Serial ATA Internal 2 Ports
• Supports Independent two Internal Ports.
1.1.3.2. Model B: External 1 Port + Internal 1 Port
• Supports one External Port and one Internal Port.
• One Special Shell SATA connector on External Port to support Mobile
HDD, Mobile CD-ROM, Mobile DVD and Mobile CD-RW.
1.1.3.3. Model C: Internal 1 Port + External 1 Port + Bracket Power
• Independent one Internal SATA Ports.
• One External Port and one Internal Port sharing one SATA Channel.
• One Special Shell SATA connector on External Port to support Mobile
HDD, Mobile CD-ROM, Mobile DVD and Mobile CD-RW.
• One USB-like Connector on board to provide 2A/5V DC
power output for Mobile Storage Devices using.
1.1.3.4. Model D: External 2 Ports + Bracket Power
• Independent two External SATA Ports.
• Two Special Shell SATA connector on External Port to support Mobile
HDD, Mobile CD-ROM, Mobile DVD and Mobile CD-RW.
• One USB-like Connector on board to provide 2A/5V DC
power output for Mobile Storage Devices using.
1.2. Package Contents
• Low Profile Serial ATA 2 Channel PCI Host Adapter
• This Users Manual
• Driver Diskette
• Low Profile Size PCI Bracket ( Not supported on Model D)
2. Software Installation
This section provides the information on how to install the drivers of Low Profile Serial ATA 2 Port
2
SATA-150 1-Int/1-Ext Port PCI Adapter RC205
User Manual
PCI Host Adapter for the operating systems:
New & Existing Windows 98/98 SE
New & Existing Windows ME
New & Existing Windows NT 4.0
New & Existing Windows 2000
New & Existing Windows XP
2.1. Windows 98/98SE Driver Installation
For New Windows 98/98 SE Systems
1. After the Serial ATA PCI Host Adapter and attached drives are configured, follow Microsoft
procedures to install Windows accordingly.
2. Once Windows has been installed, double click My Computer/Control Panel/System, then click
Device Manager.
3. Double click Other Devices then PCI RAID Controller.
4. Click Driver tab, then Update Driver.
5. Insert the Driver diskette and click Next.
6. Select Search for a better driver than the one ...option and click Next.
7. Check Specify a location, uncheck the other boxes, type in A:\ and click Next. Click Next and
then Finish.
8. Remove the Driver diskette and click Yes to restart Windows to complete driver installation.
For Existing Windows 98/98 SE Systems
1. After the Serial ATA PCI Host Adapter and attached drives are configured, boot up Windows.
2. At the Add New Hardware Wizard, click Next.
3. Select Search for the best driver for your device option and then click Next.
4. Insert the Driver diskette, check Specify a location, uncheck the other boxes, type in A:\, and
click Next.
5. Click Next and then Finish respectively.
6. Remove the Driver diskette and restart Windows to complete driver installation.
2.2. Windows ME Driver Installation
For New Windows ME Systems
1. After the Serial ATA PCI Host Adapter and attached drives are configured, follow Microsoft
procedures to install Windows accordingly.
2. Once Windows has been installed, click My Computer, then click Properties. Click Device
3
SATA-150 1-Int/1-Ext Port PCI Adapter RC205
User Manual
Manager tab.
3. Double click Other Devices then PCI RAID Controller.
4. Click Driver tab, then Update Driver.
5. Insert the Driver diskette, check Specify the location of the driver (advanced) and click Next.
6. Select Search for the better driver option, check Specify a location, uncheck Removable
Media, type in A:\, and click Next.
7. Click Next and then Finish.
8. Remove the Driver diskette and click Yes to restart Windows to complete driver installation.
For Existing Windows ME Systems
1. After the Serial ATA PCI Host Adapter and attached drives are configured, boot up Windows.
2. At the Add New Hardware Wizard, check Specify the location of the driver (advanced), and
click Next.
3. Insert the Driver diskette, check Specify a location, uncheck the other boxes, type in A:\, and
click Next.
4. Click Next and then Finish.
5. Remove the Driver diskette and restart Windows to complete driver installation.
Verification of the Proper Installation for Windows 98/98SE/ME
1. Double click My Computer/Control Panel/System. Click Device Manager tab.
2. Double click SCSI Controllers, Silicon Image Sil-3112 Serial ATA Controller should be listed.
3. Highlight Silicon Image Sil-3112 Serial ATA Controller and click Properties. A message This
device is working properly is displayed in the dialog box, the driver has been correctly installed.
If any error message is displayed, remove Silicon Image Sil-3112 Serial ATA Controller and restart
your system.
2.3. Windows NT 4.0 Driver Installation
For New Windows NT 4.0 System
1. After the Serial ATA PCI Host Adapter and attached drives are configured, follow Microsoft
procedures to install Windows accordingly.
2. At the Windows Set-up screen, press F6 to specify and add the driver.
3. Press S, select Other, then press Enter.
4. Insert the Driver diskette and press Enter.
5. Select Silicon Image Sil-3112 Serial ATA Controller Driver and press Enter.
6. Press Enter to continue and follow on-screen instructions to complete Windows NT 4.0
installation.
For Existing Windows NT 4.0 (in old ATA channel) System
1. After the Serial ATA PCI Host Adapter and attached drives are configured, boot up Windows.
4
SATA-150 1-Int/1-Ext Port PCI Adapter RC205
User Manual
Double click My Computer/Control Panel/SCSI Adapters, then click the Drivers tab.
2. Click Add… then Have Disk....
3. Insert the Driver diskette into the floppy drive and type in A:\, then click OK.
4. Highlight Silicon Image Sil-3112 Serial ATA Controller and click OK.
5. Remove the Driver diskette and restart Windows.
Verification of the Proper Installation for Windows NT 4.0
1. Double click My Computer/Control Panel/SCSI Adapters.
2. Highlight Silicon Image Sil-3112 Serial ATA Controller and click Properties. This device is
working properly is displayed in the dialog box, the driver has been correctly installed.
2.4. Windows 2000 Driver Installation
For New Windows 2000 Systems
1. After the Serial ATA PCI Host Adapter and attached drives are configured, follow Microsoft
procedures to install Windows accordingly.
2. At the Windows Set-up screen, press F6 to specify and add the driver.
3. Insert the Driver diskette. Press S, then press Enter.
4. Select Silicon Image Sil-3112 Serial ATA Controller Driver and press Enter.
5. Press Enter to continue and follow on-screen instructions to complete installation.
For Existing Windows 2000 (in old ATA channel) Systems
1. After the Serial ATA PCI Host Adapter and attached drives are configured, boot up Windows.
2. At the Found New Hardware Wizard, click Next.
3. Select Search for a suitable driver for my device (recommended) and click Next.
4. Insert the Driver diskette into the floppy drive, check Specify a location, uncheck the other
boxes, click Next, type in A:\. Click OK and then Next to continue.
5. If the Digital Signature Not Found message appears, click Yes. (Note If prompted for Windows
2000 CD-ROM, insert the CD and click OK. Type in D:\I386, click OK and Finish. (assuming D: is
your CD-ROM drive))
6. Click Finish, remove the Driver diskette and click Yes to restart Windows to complete driver
installation.
2.5. Windows XP Driver Installation
For New Windows XP Systems
1. After the Serial ATA PCI Host Adapter and attached drives are configured, follow Microsoft
procedures to install Windows accordingly.
2. At the Windows Set-up screen, press F6 in order to specify and add the driver.
3. Insert the Driver diskette. Press S then press Enter.
4. Select Silicon Image Sil-3112 Serial ATA Controller Driver and press Enter.
5. Press Enter to continue and follow on-screen instructions to complete Windows XP installation.
Note: When the Software Installation warning pops up, click Yes. And when the Hardware
5
SATA-150 1-Int/1-Ext Port PCI Adapter RC205
User Manual
Installation warning pops up, click Yes again.
For Existing Windows XP (in old ATA channel) Systems
1. After the Serial ATA PCI Host Adapter and attached drives are configured, boot up Windows.
2. At the Found New Hardware Wizard, check Install from a list or specific location (advanced),
then click Next.
3. Insert the Driver diskette. Check Include this location in the search, uncheck the other box,
type in A:\, and click Next.
4. When a warning message pops up, click Continue Anyway, then click Finish.
5. Remove the Driver diskette and restart Windows.
Verification of the Proper Installation for Windows 2000/XP
1. Double click My Computer/Control Panel/System.
2. Click Hardware then click Device Manager.
3. Double click SCSI and RAID Controllers, then double click Silicon Image Sil-3112 Serial ATA
Controller to display driver properties.
4. A message This device is working properly is displayed in the dialog box, the driver has been
correctly installed.
Thank you for purchasing Rosewill Product.
Please register your product at www.rosewill.com for complete warranty information and future
support for your product.
6