Download Ricoh Network Guide User's Manual

Transcript
Network Guide
Getting Started
Connecting and Setting Up
Using a Printer Server
Monitoring and Configuring the Printer
Special Operations under Windows
Appendix
Read this manual carefully before you use this machine and keep it handy for future reference. For safe and correct use, be sure to read the Safety
Information in the "General Settings Guide" before using the machine.
Introduction
This manual contains detailed instructions and notes on the operation and use of this machine. For your
safety and benefit, read this manual carefully before using the machine. Keep this manual in a handy
place for quick reference.
Important
Contents of this manual are subject to change without prior notice. In no event will the company be liable for direct, indirect, special, incidental, or consequential damages as a result of handling or operating the machine.
Software Version Conventions Used in This Manual
•
•
NetWare 3.x means NetWare 3.12 and 3.2.
NetWare 4.x means NetWare 4.1, 4.11, 4.2 and IntranetWare.
Trademarks
Microsoft®, Windows® and Windows NT® are registered trademarks of Microsoft Corporation in the
United States and/or other countries.
Apple, AppleTalk, EtherTalk, Macintosh, Mac OS and TrueType are trademarks of Apple Computer,
Inc, registered in the United States and other countries.
Netscape and Netscape Navigator are registered trademarks of Netscape Communications Corporation.
Novell, NetWare, NDS and NDPS are registered trademarks of Novell, Inc.
PostScript® and Acrobat® are registered trademarks of Adobe Systems, Incorporated.
UNIX is a registered trademark in the United States and other countries, licensed exclusively through
X/Open Company Limited.
Citrix® and MetaFrame® are registered trademarks of Citrix Systems, Inc.
Bluetooth is a registered trademark of Bluetooth-SIG Inc. worldwide.
UPnP is a trademark of the UPnP Implementers Corporation.
Other product names used herein are for identification purposes only and might be trademarks of their
respective companies. We disclaim any and all rights to those marks.
The proper names of the Windows operating systems are as follows:
• The product name of Windows® 95 is Microsoft® Windows 95.
• The product name of Windows® 98 is Microsoft® Windows 98.
• The product name of Windows® Me is Microsoft® Windows Millennium Edition (Windows Me).
• The product names of Windows® 2000 are as follows:
Microsoft® Windows® 2000 Professional
Microsoft® Windows® 2000 Server
Microsoft® Windows® 2000 Advanced Server
• The product names of Windows® XP are as follows:
Microsoft® Windows® XP Home Edition
Microsoft® Windows® XP Professional
• The product names of Windows Server™ 2003 are as follows:
Microsoft® Windows Server™ 2003 Standard Edition
Microsoft® Windows Server™ 2003 Enterprise Edition
Microsoft® Windows Server™ 2003 Web Edition
• The product names of Windows NT® 4.0 are as follows:
Microsoft® Windows NT® Workstation 4.0
Microsoft® Windows NT® Server 4.0
• RSA Data Security, Inc. MD5 Message-Digest Algorithm
Copyright© 1991-2, RSA Data Security, Inc. Created 1991. All rights reserved.
License to copy and use this software is granted provided that it is identified as the “RSA Data Security, Inc. MD5 Message-Digest Algorithm” in all material mentioning or referencing this software
or this function.
License is also granted to make and use derivative works provided that such works are identified
as “derived from the RSA Data Security, Inc. MD5 Message-Digest Algorithm” in all material mentioning or referencing the derived work.
RSA Data Security, Inc. makes no representations concerning either the merchantability of this software or the suitability of this software for any particular purpose. It is provided “as is” without express or implied warranty of any kind.
These notices must be retained in any copies of any part of this documentation and/or software.
TABLE OF CONTENTS
Manuals for This Machine .....................................................................................1
How to Read This Manual .....................................................................................3
1. Getting Started
Functions Available over a Network ....................................................................5
Printer......................................................................................................................... 5
Internet Fax ................................................................................................................ 5
LAN-Fax ..................................................................................................................... 6
IP-Fax......................................................................................................................... 6
E-mail ......................................................................................................................... 6
Scan to Folder............................................................................................................ 6
Network Delivery Scanner.......................................................................................... 7
Network TWAIN Scanner ........................................................................................... 7
Document Server ....................................................................................................... 7
2. Connecting and Setting Up
Confirming the Connection...................................................................................9
Connecting to the Ethernet Interface ......................................................................... 9
Connecting to the IEEE 1394 Interface....................................................................10
Using the IEEE 802.11b (Wireless LAN).................................................................. 11
Setting Up the Machine on a Network................................................................ 14
Printer/LAN-Fax ....................................................................................................... 14
Internet Fax .............................................................................................................. 16
IP-Fax....................................................................................................................... 19
E-mail ....................................................................................................................... 21
Scan to Folder.......................................................................................................... 24
Network Delivery Scanner........................................................................................ 26
Network TWAIN Scanner .........................................................................................28
Document Server .....................................................................................................30
Network Configuration.............................................................................................. 32
Interface Settings .....................................................................................................37
File Transfer ............................................................................................................. 42
LDAP Server Settings..........................................................................................50
Before using this function.........................................................................................50
Program/Change/Delete LDAP Server ....................................................................50
Programming the LDAP Server................................................................................51
i
3. Using a Printer Server
Preparing Printer Server .....................................................................................57
Printing notification via SmartDeviceMonitor for Client ............................................ 57
Using NetWare .....................................................................................................59
Setting Up as a Print Server (NetWare 3.x) .............................................................59
Setting Up as a Print Server (NetWare 4.x, 5/5.1, 6/6.5) ......................................... 60
Using Pure IP in the NetWare 5/5.1 or 6/6.5 Environment.......................................62
Setting Up as a Remote Printer (NetWare 3.x) ........................................................ 64
Setting Up as a Remote Printer (NetWare 4.x, 5/5.1, 6/6.5) ....................................66
4. Monitoring and Configuring the Printer
Using Web Image Monitor...................................................................................69
Displaying Top Page ................................................................................................70
When user authentication is set ............................................................................... 71
About Menu and Mode.............................................................................................72
Access in the Administrator Mode............................................................................ 74
Displaying Web Image Monitor Help........................................................................ 74
Using SmartDeviceMonitor for Admin ...............................................................76
Installing SmartDeviceMonitor for Admin .................................................................77
Changing the Network Interface Board Configuration..............................................77
Locking the Menus on the Machine's Control Panel ................................................ 78
Changing the Paper Type ........................................................................................ 78
Managing User Information......................................................................................79
Configuring the Energy Saver Mode ........................................................................ 81
Setting a Password ..................................................................................................82
Checking the Machine Status .................................................................................. 83
Changing Names and Comments ............................................................................ 83
Load Fax Journal .....................................................................................................84
Viewing and Deleting Spool Print Jobs ....................................................................85
Managing Address Information ................................................................................85
Using SmartDeviceMonitor for Client ................................................................ 86
Monitoring Printers ...................................................................................................86
Checking the Machine Status .................................................................................. 86
When Using IPP with SmartDeviceMonitor for Client ..............................................87
ii
Remote Maintenance by telnet ........................................................................... 88
Using telnet .............................................................................................................. 88
access ......................................................................................................................89
appletalk...................................................................................................................89
autonet .....................................................................................................................90
btconfig.....................................................................................................................90
devicename.............................................................................................................. 90
dhcp .........................................................................................................................91
diprint ....................................................................................................................... 92
dns ...........................................................................................................................92
domainname ............................................................................................................93
help .......................................................................................................................... 94
hostname ................................................................................................................. 94
ifconfig......................................................................................................................95
info ...........................................................................................................................96
ipp ............................................................................................................................96
netware .................................................................................................................... 96
passwd .....................................................................................................................97
prnlog ....................................................................................................................... 97
rendezvous...............................................................................................................98
route .........................................................................................................................99
set ..........................................................................................................................100
show.......................................................................................................................101
slp........................................................................................................................... 101
smb ........................................................................................................................ 102
snmp ......................................................................................................................102
sntp ........................................................................................................................ 105
spoolsw .................................................................................................................. 105
sprint ......................................................................................................................106
status......................................................................................................................106
syslog ..................................................................................................................... 106
upnp .......................................................................................................................106
web.........................................................................................................................107
wiconfig .................................................................................................................. 107
wins ........................................................................................................................ 110
SNMP................................................................................................................... 111
Getting Printer Information over the Network................................................. 112
Current Printer Status ............................................................................................ 112
Printer configuration ............................................................................................... 119
Understanding the Displayed Information ...................................................... 120
Print Job Information ..............................................................................................120
Print Log Information..............................................................................................121
Configuring the Network Interface Board ...............................................................122
Message List ...................................................................................................... 127
System Log Information ......................................................................................... 127
iii
5. Special Operations under Windows
Printing Files Directly from Windows .............................................................. 133
Setup......................................................................................................................133
Using a Host Name Instead of an IP Address........................................................133
Printing Commands................................................................................................134
6. Appendix
When Using Windows Terminal Service/MetaFrame...................................... 137
Operating Environment ..........................................................................................137
Supported Printer Drivers.......................................................................................137
Limitations .............................................................................................................. 137
Using DHCP........................................................................................................ 139
Using AutoNet ........................................................................................................ 140
Precautions ........................................................................................................ 141
Connecting a Dial-Up Router to a Network ............................................................141
NetWare Printing....................................................................................................143
When the optional IEEE 802.11b interface unit Is Installed ...................................144
Information about Installed Applications ........................................................ 145
Samba(Ver 2.2.2-1.1).............................................................................................145
RSA® BSAFE™ ..................................................................................................... 145
Specifications..................................................................................................... 146
INDEX....................................................................................................... 148
iv
Manuals for This Machine
The following manuals describe the operational procedures of this machine. For
particular functions, see the relevant parts of the manual.
Note
❒ Manuals provided are specific to machine type.
❒ Adobe Acrobat Reader is necessary to view the manuals as a PDF file.
❒ Two CD-ROMs are provided:
• CD-ROM 1 “Operating Instructions for Printer/Scanner”
CD-ROM 2 “Scanner Driver & Document Management Utilities”
❖ General Settings Guide
Provides an overview of the machine and describes System Settings (such as
Tray Paper Settings), Document Server functions, and troubleshooting.
Refer to this manual for Address Book procedures such as registering fax
numbers, e-mail addresses, and user codes.
❖ Security Reference
This manual is for administrators of this machine. It describes security functions that the administrators can use to protect data from being tampered, or
prevent the machine from unauthorized use. Also refer to this manual for the
procedures for registering administrators, as well as setting user and administrator authentication.
❖ Network Guide (this manual)
Provides information about configuring and operating the printer in a network environment or using software. This manual covers all models, and
therefore contains functions and settings that may not be available for your
model.
Images, illustrations, functions, and supported operating systems may differ
from those of your model.
❖ Copy Reference
Describes operations, functions, and troubleshooting for the machine’s copier
function.
❖ Facsimile Reference <Basic Features>
Describes operations, functions, and troubleshooting for the machine's facsimile function.
❖ Facsimile Reference <Advanced Features>
Describes advanced facsimile functions such as line settings and procedures
for registering IDs.
❖ Printer Reference
Describes system settings, operations, functions, and troubleshooting for the
machine’s printer function.
1
❖ Scanner Reference (PDF file - CD-ROM1)
Describes operations, functions, and troubleshooting for the machine’s scanner function.
❖ Manuals for DeskTopBinder
DeskTopBinder is a utility included on the CD-ROM labeled “Scanner Driver
& Document Management Utilities”.
• DeskTopBinder Lite Setup Guide (PDF file - CD-ROM2)
Describes installation of, and the operating environment for DeskTopBinder Lite in detail. This guide can be displayed from the [Setup] dialog
box when DeskTopBinder Lite is installed.
• DeskTopBinder Introduction Guide (PDF file - CD-ROM2)
Describes operations of DeskTopBinder Lite and provides an overview of
its functions. This guide is added to the [Start] menu when DeskTopBinder
Lite is installed.
• Auto Document Link Guide (PDF file - CD-ROM2)
Describes operations and functions of Auto Document Link installed with
DeskTopBinder Lite. This guide is added to the [Start] menu when DeskTopBinder Lite is installed.
❖ Other manuals
• PS3 Supplement (PDF file - CD-ROM1)
• UNIX Supplement (available from an authorized dealer, or as a PDF file on
our Web site)
2
How to Read This Manual
Symbols
In this manual, the following symbols are used:
* The statements above are notes for your safety.
Important
If this instruction is not followed, paper might be misfed, originals might be
damaged, or data might be lost. Be sure to read this.
Preparation
This symbol indicates prior knowledge or preparation is required before operation.
Note
This symbol indicates precautions for operation, or actions to take after mal-operation.
Limitation
This symbol indicates numerical limits, functions that cannot be used together,
or conditions in which a particular function cannot be used.
Reference
This symbol indicates a reference.
[
]
Keys that appear on the machine's display panel.
Keys and buttons that appear on the computer's display.
{
}
Keys built into the machine's control panel.
Keys on the computer's keyboard.
3
4
1. Getting Started
Functions Available over a Network
This machine provides printer, LANFax, Internet Fax, and scanner functions over a network. Using the Docum e n t S e r v e r f u n c t i o n , y ou c a n
combine copied documents and print
jobs into a single document. Not only
can you print this document straight
away, but you can also store it so it can
be printed again whenever needed.
Printer
The network interface board is compatible with NetWare * 1 (IPX/SPX,
TCP/IP), Windows NT 4.0 (TCP/IP,
NetBEUI *2 , IPP *3 ), Windows 2000
(TCP/IP, NetBEUI *2 , IPP *3 ), Windows XP, Windows Server 2003
(TCP/IP, IPP *3 ), Windows 95/98/Me
(TCP/IP, NetBEUI *2 , IPP *3 ), UNIX
(TCP/IP), and Mac OS (AppleTalk)
protocols. This allows you to operate
the machine in a network that uses different protocols and operating systems.
*1
*2
*3
If the optional 802.11b interface unit is
installed, you can use only infrastructure mode.
For NetBEUI, use the SmartDeviceMonitor for Client port.
IPP (Internet Printing Protocol) is a
protocol for printing via the Internet.
Internet Fax
This machine converts scanned document images to e-mail format and
transmits the data over the Internet.
Specify the e-mail address instead of
the fax number, and then send the
document.
E-mail can be received on a fax machine that supports Internet Fax, or
on a computer that can receive normal e-mail.
You can also receive e-mails or Internet faxes, and then print or forward
them.
Note
❒ To use this function, optional fax
unit is required.
Reference
For details about what settings to
make, see p.14 “Setting Up the Machine on a Network”.
For details about using this function, see “Using Internet Fax Functions”, Facsimile Reference <Basic
Features>.
Reference
For details about what settings to
make, see p.14 “Setting Up the Machine on a Network”.
For details about using this function, see p.57 “Preparing Printer
Server”, or PostScript 3 Supplement.
5
Getting Started
LAN-Fax
You can fax documents over phone
lines from any computer connected to
the machine via Ethernet, IEEE 1394
(IP over 1394), or wireless LAN.
To send a fax, print from the Windows application you are working
with, select LAN-Fax as the printer,
and then specify the destination.
You can also check the sent image data.
1
Note
❒ To use this function, optional fax
unit is required.
Reference
For details about what settings to
make, see p.14 “Setting Up the Machine on a Network”.
For details about using this function, see "Sending Fax Documents
from Computers", Facsimile Reference <Advanced Features>.
IP-Fax
You can send and receive fax documents through fax machines connected directly to the same network using
the TCP/IP protocol. Specify the IP
address or host name instead of the
fax number and then send the document. If Gatekeeper is used, enter the
alias telephone number to send the
document.
No e-mail server is required, and
transmission between IP-fax machine
is faster than between G3 fax machine.
You can also check the sent image data.
Note
❒ To use this function, optional fax
unit is required.
6
Reference
For details about what settings to
make, see p.14 “Setting Up the Machine on a Network”.
For details about using this function, see “Internet Fax Functions
(by Specifying an IP Address)”,
Facsimile Reference <Basic Features>.
E-mail
Scan file attached to an e-mail can be
sent using the e-mail system through
a LAN or the Internet.
Reference
For details about what settings to
make, see p.14 “Setting Up the Machine on a Network”.
For details about using this function, see "Sending Scan Files by Email", Scanner Reference.
Scan to Folder
You can send scan file directly to
shared folders on computers running
Windows or to FTP servers.
Reference
For details about what settings to
make, see p.14 “Setting Up the Machine on a Network”.
For details about using this function, see “Sending Scan Files by
Scan to Folder”, Scanner Reference.
Functions Available over a Network
Network Delivery Scanner
Document Server
You can use the machine as a delivery
scanner for the ScanRouter delivery
software.
Scan file or document received by fax
can be stored in the delivery server, or
delivered via the network to specified
folders on client computers.
You can store copy, fax, printer, and
scanner documents on the hard disk.
Using DeskTopBinder Lite or a Web
browser, you can browse, print, delete, or copy these documents over a
network.
Reference
For details about what settings to
make, see p.14 “Setting Up the Machine on a Network”.
For details about using this function, see "Delivering Scan Files",
Scanner Reference.
Network TWAIN Scanner
You can use the scanning function of
this machine from a computer connected via a network (Ethernet, IEEE
1394(IP over 1394), or IEEE 802.11b
(wireless LAN)).
You can scan documents the same
way you would if you were using a
scanner connected directly to your
computer.
Reference
For details about what settings to
make, see p.14 “Setting Up the Machine on a Network”.
1
Reference
For details about what settings to
make, see p.14 “Setting Up the Machine on a Network”.
For more information about Document Server operation from the
printer, see "Using the Document
Server", Printer Reference.
For more information about Document Server operation from the
facsimile, see "Using the Document Server", Facsimile Reference
<Advanced Features>.
For more information about Document Server operation from the
scanner, see "Using the Document
Server", Scanner Reference.
For all information about Document Server operation, see "Using
the Document Server", General Settings Guide.
For more information about DeskTopBinder Lite, see the manuals
for DeskTopBinder Lite.
For details about using this function, see "Using the Network
TWAIN Scanner Function", Scanner Reference.
7
Getting Started
1
8
2. Connecting and Setting Up
Confirming the Connection
When the IEEE 1394
interface board (optional)
is installed.
When the
wireless LAN board (optional)
is installed.
ZZZ018S
1. 10BASE-T/100BASE-TX port
Port for connecting the 10BASE-T or
100BASE-TX cable
2. IEEE 1394 ports (optional)
Ports for connecting the IEEE 1394 interface cable
3. Wireless LAN port (optional)
Port for using the wireless LAN
Note
❒ The optional IEEE 1394 interface board
and the IEEE 802.11b interface unit
cannot be installed at the same time.
❒ The position of the port differ depending on the machine type.
Connecting to the Ethernet
Interface
The network interface board supports
10BASE-T or 100BASE-TX connections.
Important
❒ Before making the connection, touch
the metallic part to ground yourself.
A Turn off the main power switch.
Important
❒ Make sure the main power is
off. See “Turning On the Power”, General Settings Guide.
9
Connecting and Setting Up
B Connect the Ethernet interface cable
to the 10BASE-T/100BASE-TX port.
Connecting to the IEEE 1394
Interface
Important
❒ Before making the connection, touch
the metallic part to ground yourself.
2
Note
❒ Use the interface cable supplied with
the optional IEEE 1394 interface board.
ZZZ019S
Note
❒ The position of the port differ
depending on the machine type.
C Turn on the main power switch.
❒ Make sure the interface cable is not
looped.
A Turn off the main power switch.
Important
❒ Make sure the main power is
off. See “Turning On the Power”, General Settings Guide.
B Connect the
IEEE 1394 interface
cable to the IEEE 1394 ports.
ZZZ023S
1. Indicator (green)
Remains green when the machine is
properly connected to the network.
2. Indicator (yellow)
Turns yellow when 100 BASE-TX is
operating. Turns off when 10 BASE-T
is operating.
ZZZ020S
Note
❒ Two interface ports are available
for connecting the IEEE 1394 interface cable. Either is suitable.
❒ If you have an interface cable
with a ferrite core, connect the
end nearest to the ferrite core to
the machine.
❒ The position of the port differ
depending on the machine type.
C Turn on the main power switch.
10
Confirming the Connection
Using the IEEE 802.11b (Wireless LAN)
Setting IEEE 802.11b (Wireless LAN)
2
Note
❒ Select [802.11 Ad hoc] mode when connecting Windows XP as a wireless LAN
client using Windows XP standard driver or utilities, or when not using the
infrastructure mode.
11
Connecting and Setting Up
❖ When using in ad hoc mode/802.11
ad hoc mode
Confirming the Connection
A Make sure the LED of the IEEE
802.11b interface unit is lit.
❖ When using in infrastructure mode
2
1
2
ZZZ024S
1. If the IEEE 802.11b interface unit
1
2
is working, it is lit in orange.
ZZZ024S
tings]/[Network] screen is not set to
[IEEE 802.11b], it does not light, even
if the main power is on.
network, the LED is green when in
ad hoc mode or 802.11 ad hoc mode.
If the LED is blinking, the machine
is searching for devices. The LED
will light after a few seconds.
2. If it is connected properly to the
B Print
1. If [LAN Type] on the [Interface Set-
network, the LED is green when in
infrastructure mode. If the LED is
blinking, the machine is searching
for devices.
12
2. If it is connected properly to the
the configuration page to
verify settings.
Reference
For more information about
printing a configuration page,
see Printer Reference.
Confirming the Connection
Checking the machine's radio wave
status
When using in infrastructure mode,
you can check the machine's radio
wave status using the control panel.
Note
❒ To check the radio wave status,
press [IEEE 802.11b] under [LAN
Type] on the [Network] screen.
2
A Press the {User Tools/Counter/Inquiry}
key.
B Press [System Settings].
C Press [Interface Settings].
D Press [IEEE 802.11b].
E Press [Wireless LAN Signal].
The machine's radio wave status
appears.
F After checking radio wave status,
press [Exit].
G Press the {User Tools/Counter/Inquiry}
key to return to the User Tools /
Counter / Inquiry menu.
13
Connecting and Setting Up
Setting Up the Machine on a Network
This section describes the network settings you can change with User Tools (System Settings). Make settings according to functions you want to use and the interface to be connected.
Important
❒ These settings should be made by the systems administrator, or after consulting with the systems administrator.
2
Reference
For details about settings, see p.37 “Interface Settings”
❖ Viewing the Information Displayed in the List
$ These items must be set to use the function. Be sure to set them before attempting to use the corresponding function.
❍ These items must be set if required.
Printer/LAN-Fax
Interface
Ethernet
Settings
Interface Settings/
Network
See p.37 “Network”.
IP Address
$
Gateway Address
❍
DNS Configuration
❍
DDNS Configuration
❍
Domain Name
❍
WINS Configuration
❍
NW Frame Type
❍
LAN Type
14
*2
$
Ethernet Speed
❍
Effective Protocol *3
$
SMB Computer Name
❍
SMB Work Group
❍
Permit SNMP V3 Communication
❍
Permit SSL / TLS Communication
❍
Host Name
❍
Machine Name
❍
Setting Up the Machine on a Network
Interface
IEEE 1394
(IP over 1394)
Settings
Interface Settings/
IEEE 1394 *1
See p.39 “IEEE 1394”.
Interface Settings/
Network
See p.37 “Network”.
IEEE 802.11b
(wireless LAN)
Interface Settings/
Network
See p.37 “Network”.
Interface Settings/
IEEE 802.11b *2
See p.41 “IEEE
802.11b”.
*1
*2
*3
IP Address
$
IP over 1394
$
WINS Configuration
❍
DDNS Configuration
❍
Host Name
❍
Domain Name
❍
Gateway Address
❍
DNS Configuration
❍
Effective Protocol *3
$
IP Address
$
Gateway Address
❍
DNS Configuration
❍
DDNS Configuration
❍
Domain Name
❍
WINS Configuration
❍
NW Frame Type
❍
LAN Type *2
$
Ethernet Speed
❍
Effective Protocol *3
$
SMB Computer Name
❍
SMB Work Group
❍
Permit SNMP V3 Communication
❍
Permit SSL / TLS Communication
❍
Host Name
❍
Machine Name
❍
Communication Mode
$
SSID Setting
❍
Channel
❍
WEP (Encryption) Setting
❍
Transmission Speed
❍
2
Appears when the optional IEEE 1394 interface board is installed.
Appears when the optional IEEE 802.11b interface unit is installed.
If Ethernet and IEEE 802.11b (wireless LAN) are both connected to the machine, the
selected interface has priority.
Check [Effective] is selected for TCP/IP.
15
Connecting and Setting Up
Internet Fax
Interface
Ethernet
Settings
Interface Settings/
Network
See p.37 “Network”.
2
IP Address
$
Gateway Address
$
DNS Configuration
❍
DDNS Configuration
❍
Domain Name
❍
WINS Configuration
❍
LAN Type
IEEE 1394
(IP over 1394)
Ethernet Speed
❍
Effective Protocol *5
$
Permit SNMP V3 Communication
❍
Permit SSL / TLS Communication
❍
Host Name
❍
$
File Transfer
SMTP Server
See p.42 “File Transfer”.
SMTP Authentication
❍
POP before SMTP
❍
Reception Protocol *4
$
POP3 Setting *6
❍
Administrator's E-mail Address *8
❍
E-mail Communication Port *4
$
Interface Settings/
IEEE 1394 *1
See p.39 “IEEE 1394”.
16
$
*2
*3
*7
E-mail Reception Interval
❍
Max. Reception E-mail Size
❍
E-mail Storage in Server
❍
Program / Change / Delete Email Message
❍
Program / Change / Delete
Subject
❍
E-mail Account *3
$
*4
IP Address
$
IP over 1394
$
DDNS Configuration
❍
WINS Configuration
❍
Host Name
❍
Domain Name
❍
Setting Up the Machine on a Network
Interface
IEEE 1394
(IP over 1394)
Settings
Gateway Address
$
DNS Configuration
❍
Effective Protocol *5
$
File Transfer
SMTP Server *3
$
See p.42 “File Transfer”.
SMTP Authentication
❍
POP before SMTP
❍
Reception Protocol *4
$
POP3 Setting *6
❍
Administrator's E-mail Address *8
❍
E-mail Communication Port *4
$
Interface Settings/
Network
See p.37 “Network”.
IEEE 802.11b
(wireless LAN)
*7
E-mail Reception Interval
❍
Max. Reception E-mail Size
❍
E-mail Storage in Server
❍
Program / Change / Delete Email Message
❍
Program / Change / Delete
Subject
❍
E-mail Account *3
$
*4
IP Address
$
Gateway Address
$
DNS Configuration
❍
WINS Configuration
❍
DDNS Configuration
❍
Domain Name
❍
LAN Type *2
$
Ethernet Speed
❍
Effective Protocol *5
$
Permit SNMP V3 Communication
❍
Permit SSL / TLS Communication
❍
Host Name
❍
Interface Settings/
IEEE
802.11bDocument
Server *2
Communication Mode
$
SSID Setting
❍
Channel
❍
See p.41 “IEEE
802.11b”.
WEP (Encryption) Setting
❍
Transmission Speed
❍
Interface Settings/
Network
See p.37 “Network”.
2
17
Connecting and Setting Up
Interface
IEEE 802.11b
(wireless LAN)
2
*1
*2
*3
*4
*5
*6
*7
*8
18
Settings
File Transfer
SMTP Server *3
$
See p.42 “File Transfer”.
SMTP Authentication
❍
POP before SMTP
❍
Reception Protocol *4
$
POP3 Setting *6
❍
Administrator's E-mail Address *8
❍
E-mail Communication Port *4
$
*7
E-mail Reception Interval
❍
Max. Reception E-mail Size
❍
E-mail Storage in Server
❍
Program / Change / Delete Email Message
❍
Program / Change / Delete
Subject
❍
E-mail Account *3
$
*4
Appears when the optional IEEE 1394 interface board is installed.
Appears when the optional IEEE 802.11b interface unit is installed.
If Ethernet and 802.11b (wireless LAN) are both connected to the machine, the selected interface has priority.
Minimum settings required to use transmission.
Minimum settings required to use reception.
Check[Effective] is selected for TCP/IP.
If you select [On] for [POP before SMTP], select this function also.
If you select [On] for [POP before SMTP], check the port number for [POP3].
If you select [On] for [SMTP Authentication], select this function also.
Setting Up the Machine on a Network
IP-Fax
Interface
Ethernet
Settings
Interface Settings/
Network
See p.37 “Network”.
IP Address
$
Gateway Address
$
DNS Configuration
$
DDNS Configuration
❍
Domain Name
❍
WINS Configuration
❍
LAN Type
IEEE 1394
(IP over 1394)
Interface Settings/
IEEE 1394 *1
See p.39 “IEEE 1394”.
Interface Settings/
Network
See p.37 “Network”.
*2
2
$
Ethernet Speed
❍
Effective Protocol *3
$
Permit SNMP V3 Communication
❍
Permit SSL / TLS Communication
❍
Host Name
❍
IP Address
$
IP over 1394
$
DDNS Configuration
$
WINS Configuration
❍
Host Name
❍
Domain Name
❍
Gateway Address
$
DNS Configuration
❍
Effective Protocol *3
$
19
Connecting and Setting Up
Interface
IEEE 802.11b
(wireless LAN)
Settings
Interface Settings/
Network
See p.37 “Network”.
2
Interface Settings/
IEEE 802.11b *3
See p.41 “IEEE
802.11b”.
*1
*2
*3
20
IP Address
$
Gateway Address
$
DNS Configuration
$
WINS Configuration
❍
DDNS Configuration
❍
Domain Name
❍
LAN Type *2
$
Ethernet Speed
❍
Effective Protocol *3
$
Permit SNMP V3 Communication
❍
Permit SSL / TLS Communication
❍
Host Name
❍
Communication Mode
$
SSID Setting
❍
Channel
❍
WEP (Encryption) Setting
❍
Transmission Speed
❍
Appears when the optional IEEE 1394 interface board is installed.
Appears when the optional IEEE 802.11b interface unit is installed.
If Ethernet and 802.11b (wireless LAN) are both connected to the machine, the selected interface has priority.
Check[Effective] is selected for TCP/IP.
Setting Up the Machine on a Network
E-mail
Interface
Ethernet
Settings
Interface Settings/
Network
See p.37 “Network”.
IP Address
$
Gateway Address
$
DNS Configuration
❍
DDNS Configuration
❍
Domain Name
❍
WINS Configuration
❍
LAN Type
*2
2
$
Ethernet Speed
❍
Effective Protocol *3
$
Permit SNMP V3 Communication
❍
Permit SSL / TLS Communication
❍
Host Name
❍
File Transfer
SMTP Server
$
See p.42 “File Transfer”.
SMTP Authentication
❍
POP before SMTP
❍
POP3 Setting *4
❍
Administrator's E-mail Address
❍
E-mail Communication Port *5
❍
Program / Change / Delete Email Message
❍
Program / Change / Delete
Subject
❍
Scanner Recall Interval Time
❍
Number of Scanner Recalls
❍
21
Connecting and Setting Up
Interface
IEEE 1394
(IP over 1394)
Settings
IP Address
$
IP over 1394
$
DDNS Configuration
❍
WINS Configuration
❍
Host Name
❍
Domain Name
❍
Gateway Address
$
DNS Configuration
❍
Effective Protocol *3
$
File Transfer
SMTP Server
$
See p.42 “File Transfer”.
SMTP Authentication
❍
POP before SMTP
❍
POP3 Setting *4
❍
Administrator's E-mail Address
❍
E-mail Communication Port *5
❍
Program / Change / Delete Email Message
❍
Program / Change / Delete
Subject
❍
Scanner Recall Interval Time
❍
Number of Scanner Recalls
❍
Interface Settings/
IEEE 1394 *1
See p.39 “IEEE 1394”.
2
Interface Settings/
Network
See p.37 “Network”.
22
Setting Up the Machine on a Network
Interface
IEEE 802.11b
(wireless LAN)
Settings
IP Address
$
Gateway Address
$
DNS Configuration
❍
DDNS Configuration
❍
Domain Name
❍
WINS Configuration
❍
LAN Type *2
$
Ethernet Speed
❍
Effective Protocol *3
$
Permit SNMP V3 Communication
❍
Permit SSL / TLS Communication
❍
Host Name
❍
Communication Mode
$
SSID Setting
❍
Channel
❍
WEP (Encryption) Setting
❍
Transmission Speed
❍
File Transfer
SMTP Server
$
See p.42 “File Transfer”.
SMTP Authentication
❍
POP before SMTP
❍
POP3 Setting *4
❍
Administrator's Address
❍
E-mail Communication Port *5
❍
Program / Change / Delete Email Message
❍
Program / Change / Delete
Subject
❍
Scanner Recall Interval Time
❍
Number of Scanner Recalls
❍
Interface Settings/
Network
See p.37 “Network”.
Interface Settings/
IEEE 802.11b *2
See p.41 “IEEE
802.11b”.
*1
*2
*3
*4
*5
2
Appears when the optional IEEE 1394 interface board is installed.
Appears when the optional IEEE 802.11b interface unit is installed.
If Ethernet and 802.11b (wireless LAN) are both connected to the machine, the selected interface has priority.
Check [Effective] is selected for TCP/IP.
If you select [On] for [POP before SMTP], select this function as well.
If you select [On] for [POP before SMTP], check the port number for [POP3].
23
Connecting and Setting Up
Scan to Folder
Interface
Ethernet
Settings
Interface Settings/
Network
See p.37 “Network”.
2
IP Address
$
Gateway Address
$
DNS Configuration
❍
DDNS Configuration
❍
Domain Name
❍
WINS Configuration
❍
LAN Type
File Transfer
See p.42 “File Transfer”.
IEEE 1394
(IP over 1394)
Interface Settings/
IEEE 1394 *1
See p.39 “IEEE 1394”.
Interface Settings
/Network
See p.37 “Network”.
Ethernet Speed
❍
Effective Protocol *3
$
Host Name
❍
Permit SNMP V3 Communication
❍
Permit SSL / TLS Communication
❍
Default User Name / Password
(Send)
❍
Scanner Recall Interval Time
❍
Number of Scanner Recalls
❍
IP Address
$
IP over 1394
$
DDNS Configuration
❍
WINS Configuration
❍
Host Name
❍
Domain Name
❍
Gateway Address
$
DNS Configuration
❍
*3
$
Effective Protocol
File Transfer
See p.42 “File Transfer”.
24
$
*2
Default User Name / Password
(Send)
❍
Scanner Recall Interval Time
❍
Number of Scanner Recalls
❍
Setting Up the Machine on a Network
Interface
IEEE 802.11b
(wireless LAN)
Settings
Interface Settings/
Network
See p.37 “Network”.
Interface Settings/
IEEE 802.11b *2
See p.41 “IEEE
802.11b”.
File Transfer
See p.42 “File Transfer”.
*1
*2
*3
IP Address
$
Gateway Address
$
DNS Configuration
❍
DDNS Configuration
❍
Domain Name
❍
WINS Configuration
❍
LAN Type *2
$
Ethernet Speed
❍
Effective Protocol *3
$
Permit SNMP V3 Communication
❍
Permit SSL / TLS Communication
❍
Host Name
❍
Communication Mode
$
SSID Setting
❍
Channel
❍
WEP (Encryption) Setting
❍
Transmission Speed
❍
Default User Name / Password
(Send)
❍
Scanner Recall Interval Time
❍
Number of Scanner Recalls
❍
2
Appears when the optional IEEE 1394 interface board is installed.
Appears when the optional IEEE 802.11b interface unit is installed.
If Ethernet and IEEE 802.11b (wireless LAN) are both connected to the machine, the
selected interface has priority.
Check [Effective] is selected for TCP/IP.
25
Connecting and Setting Up
Network Delivery Scanner
Interface
Ethernet
Settings
Interface Settings/
Network
See p.37 “Network”.
2
IP Address
$
Gateway Address
❍
DNS Configuration
❍
DDNS Configuration
❍
Domain Name
❍
WINS Configuration
❍
LAN Type
IEEE 1394
(IP over 1394)
Ethernet Speed
❍
Effective Protocol *4
$
Permit SNMP V3 Communication
❍
Permit SSL / TLS Communication
❍
Host Name
❍
❍
File Transfer
Delivery Option
See p.42 “File Transfer”.
Fax RX File Transmission
❍
Scanner Recall Interval Time
❍
Number of Scanner Recalls
❍
IP Address
$
IP over 1394
$
DDNS Configuration
❍
WINS Configuration
❍
Host Name
❍
Domain Name
❍
Gateway Address
❍
DNS Configuration
❍
Effective Protocol *4
$
File Transfer
Delivery Option *3
❍
See p.42 “File Transfer”.
Fax RX File Transmission
❍
Scanner Recall Interval Time
❍
Number of Scanner Recalls
❍
Interface Settings/
IEEE 1394 *1
See p.39 “IEEE 1394”.
Interface Settings/
Network
See p.37 “Network”.
26
$
*2
*3
Setting Up the Machine on a Network
Interface
IEEE 802.11b
(wireless LAN)
Settings
IP Address
$
Gateway Address
❍
DNS Configuration
❍
DDNS Configuration
❍
Domain Name
❍
WINS Configuration
❍
LAN Type *2
$
Ethernet Speed
❍
Effective Protocol *4
$
Permit SNMP V3 Communication
❍
Permit SSL / TLS Communication
❍
Host Name
❍
Communication Mode
$
SSID Setting
❍
Channel
❍
WEP (Encryption) Setting
❍
Transmission Speed
❍
File Transfer
Delivery Option *3
❍
See p.42 “File Transfer”.
Fax RX File Transmission
❍
Scanner Recall Interval Time
❍
Number of Scanner Recalls
❍
Interface Settings/
Network
See p.37 “Network”.
Interface Settings/
IEEE 802.11b *2
See p.41 “IEEE
802.11b”.
*1
*2
*3
*4
2
Appears when the optional IEEE 1394 interface board is installed.
Appears when the optional IEEE 802.11b interface unit is installed.
If Ethernet and IEEE 802.11b (wireless LAN) are both connected to the machine, the
selected interface has priority.
When delivery option is set to [On], make sure the IP address is set.
Check [Effective] is selected for TCP/IP.
27
Connecting and Setting Up
Network TWAIN Scanner
Interface
Ethernet
Settings
Interface Settings/
Network
See p.37 “Network”.
2
IP Address
$
Gateway Address
❍
DNS Configuration
❍
DDNS Configuration
❍
Domain Name
❍
WINS Configuration
❍
LAN Type
IEEE 1394
(IP over 1394)
Interface Settings/
IEEE 1394 *1
See p.39 “IEEE 1394”.
Interface Settings/
Network
See p.37 “Network”.
28
*2
$
Ethernet Speed
❍
Effective Protocol *3
$
Permit SNMP V3 Communication
❍
Permit SSL / TLS Communication
❍
Host Name
❍
IP Address
$
IP over 1394
$
DDNS Configuration
❍
WINS Configuration
❍
Host Name
❍
Domain Name
❍
Gateway Address
❍
DNS Configuration
❍
Effective Protocol *3
$
Setting Up the Machine on a Network
Interface
IEEE 802.11b
(wireless LAN)
Settings
Interface Settings/
Network
See p.37 “Network”.
Interface Settings/
IEEE 802.11b *2
See p.41 “IEEE
802.11b”.
*1
*2
*3
IP Address
$
Gateway Address
❍
DNS Configuration
❍
DDNS Configuration
❍
Domain Name
❍
WINS Configuration
❍
LAN Type *2
$
Ethernet Speed
❍
Effective Protocol *3
$
Permit SNMP V3 Communication
❍
Permit SSL / TLS Communication
❍
Host Name
❍
Communication Mode
$
SSID Setting
❍
Channel
❍
WEP (Encryption) Setting
❍
Transmission Speed
❍
2
Appears when the optional IEEE 1394 interface board is installed.
Appears when the optional IEEE 802.11b interface unit is installed.
If Ethernet and 802.11b (wireless LAN) are both connected to the machine, the selected interface has priority.
Check [Effective] is selected for TCP/IP.
29
Connecting and Setting Up
Document Server
Interface
Ethernet
Settings
Interface Settings/
Network
See p.37 “Network”.
2
IP Address
$
Gateway Address
❍
DNS Configuration
❍
DDNS Configuration
❍
Domain Name
❍
WINS Configuration
❍
LAN Type
IEEE 1394
(IP over 1394)
Interface Settings/
IEEE 1394 *1
See p.39 “IEEE 1394”.
Interface Settings/
Network
See p.37 “Network”.
30
*2
$
Ethernet Speed
❍
Effective Protocol *3
$
Permit SNMP V3 Communication
❍
Permit SSL / TLS Communication
❍
Host Name
❍
IP Address
$
IP over 1394
$
DDNS Configuration
❍
WINS Configuration
❍
Host Name
❍
Domain Name
❍
Gateway Address
❍
DNS Configuration
❍
Effective Protocol *3
$
Setting Up the Machine on a Network
Interface
IEEE 802.11b
(wireless LAN)
Settings
Interface Settings/
Network
See p.37 “Network”.
Interface Settings/
IEEE 802.11b *2
See p.41 “IEEE
802.11b”.
*1
*2
*3
IP Address
$
Gateway Address
❍
DNS Configuration
❍
DDNS Configuration
❍
Domain Name
❍
WINS Configuration
❍
LAN Type *2
$
Ethernet Speed
❍
Effective Protocol *3
$
Permit SNMP V3 Communication
❍
Permit SSL / TLS Communication
❍
Host Name
❍
Communication Mode
$
SSID Setting
❍
Channel
❍
WEP (Encryption) Setting
❍
Transmission Speed
❍
2
Appears when the optional IEEE 1394 interface board is installed.
Appears when the optional IEEE 802.11b interface unit is installed.
If Ethernet and IEEE 802.11b (wireless LAN) are both connected to the machine, the
selected interface has priority.
Check [Effective] is selected for TCP/IP.
31
Connecting and Setting Up
E Change settings by following the
Network Configuration
Any change you make with User
Tools remains in effect even if the
main power switch or operation
switch is turned off, or the {Energy
Saver} or {Clear Modes} key is pressed.
2
Configuring the network using the
control panel
Note
❒ Operations for System Settings are
different from normal operations.
After using User Tools, press the
{User Tools/Counter/Inquiry} key to
exit.
❒ When [User Authentication Management] is set, operations are not possible with the machine unless a
valid user name and password is
entered. For details about user authentication, consult administrator.
A Press the {User Tools/Counter/Inquiry}
key.
Note
❒ The machine will be offline during setting.
B Press [System Settings].
C Press [Interface Settings]
or [File
Transfer].
D Select
the required menu, and
then press the desired key.
32
instructions on the display panel,
and then press [OK].
Note
❒ To cancel changes made to settings and return to theSystem
Settings menu, press [Cancel].
F Press [Exit].
G Press the {User Tools/Counter/Inquiry}
key.
Note
❒ You can also exit by pressing
[Exit] on the User Tools main
menu.
Setting Up the Machine on a Network
Configuring the network using other utilities
As well as using the control panel to make network settings, utilities such as a
Web Image Monitor and SmartDeviceMonitor for Admin can also be used. The
following table shows available settings:
Note
❒ ❍ Indicates machine settings can be changed.
2
❒ - Indicates the setting cannot be changed from that device.
SmartDeWeb Image viceMonMonitor
itor for
Admin
Name on the control panel
Interface
Settings
Network
telnet
❍
❍
❍
IP Address
❍
❍
❍
Sub-net
Mask
❍
❍
❍
Gateway Address
❍
❍
❍
DNS
Configuration
❍
-
❍
VDNS
Server 1
❍
-
❍
VDNS
Server 2
❍
-
❍
VDNS
Server 3
❍
-
❍
DDNS Configuration
❍
-
❍
Domain
Name
Auto-Obtain (DHCP)
❍
-
❍
Specify
V Domain
Name
❍
-
❍
WINS
Configuration
On
VPrimary WINS
Server
❍
-
❍
VSecondary WINS
Server
❍
-
❍
Scope ID
❍
-
❍
❍
-
❍
IP Address Auto-Obtain (DHCP)
Specify
Auto-Obtain (DHCP)
Specify
Off
33
Connecting and Setting Up
SmartDeWeb Image viceMonMonitor
itor for
Admin
Name on the control panel
Interface
Settings
Network
TCP/IP
-
❍ *1
❍
NetWare
❍
❍ *2
❍
SMB
❍
❍
❍
AppleTalk
❍
❍
❍
Auto Select
❍
-
❍
Ethernet II
❍
-
❍
Ethernet 802.2
❍
-
❍
Ethernet 802.3
❍
-
❍
Ethernet SNAP
❍
-
❍
SMB Computer Name
❍
-
❍
SMB Work Group
❍
-
❍
Ethernet Speed
-
-
-
LAN
Type
Ethernet
❍
-
❍
IEEE 802.11b
❍
-
❍
Ping Command
-
-
-
Permit
SNMP V3
Communication
Encryption Only
-
-
❍
Encryption / Clear
Text
-
-
-
Permit
Ciphertext Only
SSL / TLS
Ciphertext Priority
Communication
Ciphertext / Clear
Text
-
-
-
-
-
-
-
-
-
Host Name
❍
❍
❍
Machine Name
❍
-
❍
❍
-
❍
IP Address
❍
-
❍
Sub-net
Mask
❍
-
❍
DDNS Configuration
❍
-
❍
Host Name
❍
-
❍
Effective
Protocol
2
NW
Frame
Type
IEEE 1394 IP Address Auto-Obtain (DHCP)
Specify
34
telnet
Setting Up the Machine on a Network
SmartDeWeb Image viceMonMonitor
itor for
Admin
Name on the control panel
Interface
Settings
Auto-Obtain (DHCP)
❍
-
-
Specify
Domain
Name
❍
-
❍
On
Primary
WINS
Server
❍
-
❍
Secondary WINS
Server
❍
-
❍
Scope ID
❍
-
❍
Off
❍
-
❍
IP over
1394
Active
❍
-
❍
Inactive
❍
-
❍
SCSI
print
(SBP-2)
Active
❍
-
❍
Inactive
❍
-
❍
Bidirectional
SCSI
print
Active
❍
-
❍
Inactive
❍
-
❍
Communication
Mode
802.11 Ad hoc
❍
-
❍
Ad hoc
❍
-
❍
Infrastructure
❍
-
❍
SSID Setting
❍
-
❍
Channel
❍
-
❍
WEP (En- WEP
Active
cryption)
Inactive
Setting
Encryption
❍
-
❍
❍
-
❍
❍
-
❍
Wireless LAN Signal
-
-
-
Transmis- Auto
sion
11Mbps Fixed
Speed
5.5Mbps Fixed
-
-
❍
-
-
❍
-
-
❍
2Mbps Fixed
-
-
❍
1Mbps Fixed
-
-
❍
Return to Defaults
-
-
-
Print List
-
-
-
IEEE 1394 Domain
Name
WINS
Configuration
IEEE
802.11b
telnet
2
35
Connecting and Setting Up
Name on the control panel
File
Transfer
2
*1
*2
36
SmartDeWeb Image viceMonMonitor
itor for
Admin
telnet
Delivery Option
-
-
-
Capture Server IP Address
-
-
-
Fax RX File Transmission
-
-
-
SMTP Server
❍
-
-
SMTP Authentication
❍
-
-
POP before SMTP
❍
-
-
Reception Protocol
❍
-
-
POP3 Setting
❍
-
-
Administrator's E-mail Address
❍
-
-
E-mail Communication Port
❍
-
-
E-mail Reception Interval
❍
-
-
Max. Reception E-mail Size
❍
-
-
E-mail Storage in Server
❍
-
-
Default User Name / Password (Send)
❍
-
-
Program / Change / Delete E-mail Message
-
-
-
Program / Change / Delete Subject
-
-
-
Scanner Recall Interval Time
-
-
-
Number of Scanner Recalls
-
-
-
E-mail Account
-
-
-
Auto Specify Sender Name
-
-
-
You can make the TCP/IP settings if SmartDeviceMonitor for Admin is communicating with the machine using IPX/SPX.
You can make the IPX/SPX settings if SmartDeviceMonitor for Admin is communicating with the machine using TCP/IP.
Setting Up the Machine on a Network
Interface Settings
Network
❖ IP Address
Before using this machine in the
network environment, you must
configure the IP address and subnet mask.
• Auto-Obtain (DHCP)
• Specify
When you select [Specify], enter
the [IP Address]and [Sub-net
Mask] as “xxx.xxx.xxx.xxx”(“x”
indicates a number).
• IP Address: 011.022.033.044
• Sub-net Mask: 000.000.000.000
Note
❒ Default: Auto-Obtain (DHCP)
❒ If you use the interface for Ethernet and IEEE 1394 (IP over
1394) at the same time, settings
must be made carefully. See
p.139 “Using DHCP”.
❒ If you install the optional IEEE
1394 interface board and use the
IEEE 1394 interface, you must
set the address of the domain,
different from the [IP Address] of
[IEEE 1394]. If you intend to set
the address for the same domain, set a different value for
the [Sub-net Mask].
❒ When you select [Specify], be
sure not to set the same [IP Address] as that of another machines on the network.
❒ The physical address (MAC address) also appears.
❖ Gateway Address
A gateway is a connection or interchange point between two networks. Configure the gateway
address for the router or host computer used as a gateway.
• Gateway Address:000.000.000.000
2
Note
❒ Default: 000.000.000.000
❖ DNS Configuration
Make settings for the DNS server.
• Auto-Obtain (DHCP)
• Specify
When you select [Specify], enter
the [DNS Server] IP address as
“xxx.xxx.xxx.xxx”(“x” indicates a number).
• VDNS Server 1:000.000.000.000
• VDNS Server 2:000.000.000.000
• VDNS Server 3:000.000.000.000
Note
❒ Default: Auto-Obtain (DHCP)
❖ DDNS Configuration
You can specify the DDNS settings.
• Active
• Inactive
❖ Domain Name
You can specify the domain name.
• Auto-Obtain (DHCP)
• Specify
• Domain Name
37
Connecting and Setting Up
❖ WINS Configuration
You can specify the WINS server
settings.
• On
If [On] is selected, enter the
[VWINS Server] IP address as
“xxx.xxx.xxx.xxx”(“x” indicates a number).
If DHCP is in use, specify the
[Scope ID].
• Primary WINS Server
• Secondary WINS Server
• Scope ID
• Off
2
Limitation
❒ Enter a [Scope ID] using up to 31
alphanumeric characters.
Note
❒ Default: Off
❖ Effective Protocol
Select the protocol to use in the
network.
• TCP/IP:Effective/Invalid
• NetWare:Effective/Invalid
• SMB:Effective/Invalid
• AppleTalk:Effective/Invalid
Note
❒ Default: TCP/IP: Effective, NetWare: Effective, SMB: Effective,
AppleTalk: Effective
❖ NW Frame Type
Select the frame type when you
use NetWare.
• Auto Select
• Ethernet II
• Ethernet 802.2
• Ethernet 802.3
• Ethernet SNAP
38
Note
❒ Default: Auto Select
❖ SMB Computer Name
Specify the SMB computer name.
❖ SMB Work Group
Specify the SMB work group.
❖ Ethernet Speed
Set the access speed for networks.
Select a speed that matches your
network environment. [Auto Select]
should usually be selected.
• Auto Select
• 100Mbps Full Duplex
• 100Mbps Half Duplex
• 10Mbps Full Duplex
• 10Mbps Half Duplex
Note
❒ Default: Auto Select
❖ LAN Type
When you have installed the optional IEEE 802.11b interface unit,
select interface, IEEE 802.11b
(wireless LAN) or Ethernet.
• Ethernet
• IEEE 802.11b
Note
❒ Default: Ethernet
❒ Appears when the optional IEEE
802.11b interface unit is installed.
❒ If Ethernet and IEEE 802.11b (wireless LAN) are both connected to
the machine, the selected interface
takes precedence.
Setting Up the Machine on a Network
❖ Ping Command
Check the network connection
with ping command using given
IP address.
Note
❒ If you fail to connect to the network, check the following, and
then retry the ping command.
• Check TCP/IP of the printer
is active.
• Check that the machine with
assigned IP address is connected to the network.
• There is a possibility that same
IP address is used for the specified equipment .
❖ Permit SNMP V3 Communication
Set the encrypted communication
of SNMP v3.
• Encryption Only
• Encryption / Clear Text
Note
❒ If you set to [Encryption Only],
you need to set password for
the machine.
❖ Permit SSL / TLS Communication
Set the encrypted communication
of SSL/TLS.
• Ciphertext Only
• Ciphertext Priority
• Ciphertext / Clear Text
Note
❒ Default: Ciphertext Priority
❒ If you set to [Encryption Only], you
need to install the server authentification for the machine.
IEEE 1394
Preparation
You must install the optional IEEE
1394 interface board in the machine.
2
❖ IP Address
When you connect the machine to
a network using the IEEE 1394 interface, you must configure the IP
address and subnet mask.
• Auto-Obtain (DHCP)
• Specify
When you select [Specify], enter
the [IP Address] and [Sub-net
Mask] as “xxx.xxx.xxx.xxx”(“x”
indicates a number).
• IP Address: 011.022.033.044
• Sub-net Mask: 000.000.000.000
Note
❒ Default: Auto-Obtain (DHCP)
❒ If you use the interface for Ethernet and IEEE 1394 (IP over
1394) at the same time, settings
must be made carefully. See
p.139 “Using DHCP”
❒ When you use the IEEE 1394 interface on a network, you cannot use the Ethernet interface in
the same domain. To use both
interfaces in the same domain,
set different values for the [Subnet Mask].
❒ The physical address (EUI-64)
also appears.
❖ Host Name
Specify the host name.
❖ DDNS Configuration
You can specify the DDNS settings.
• Active
• Inactive
❖ Machine Name
Specify the machine name.
❖ Host Name
Specify the host name.
39
Connecting and Setting Up
❖ Domain Name
Make settings for the domain name.
• Auto-Obtain (DHCP)
• Specify
• Domain Name
Note
❒ Default: Auto-Obtain (DHCP)
2
❖ WINS Configuration
You can specify the WINS server
settings.
• On
If [On] is selected, specify the
[VWINS Server] IP address as
“xxx.xxx.xxx.xxx” (“xxx” indicates a number).
If DHCP is in use, specify the
[Scope ID].
• Primary WINS Server
• Secondary WINS Server
• Scope ID
• Off
Limitation
❒ Enter [Scope ID] using up to 31
alphanumeric characters.
Note
❒ Default: Off
❖ IP over 1394
When you use the IP over 1394 function of the IEEE 1394 interface to
connect the machine to the network,
or you print from computer with the
IP over 1394 driver, you must specify [Active]for [IP over 1394].
• Active
• Inactive
Limitation
❒ Printing with IP over 1394 is possible under Windows Me/XP and
Windows Server 2003
40
Note
❒ Default: Active
❖ SCSI print (SBP-2)
When you print using the SCSI
print client function supported by
Windows 2000/XP, or Windows
Server 2003, you must set [SCSI
print (SBP-2)].
• Active
• Inactive
Limitation
❒ The IEEE 1394 interface can be
used when Windows 2000 Service Pack 1 or later is installed. If
the Service Pack is not installed,
only one SCSI print device is
connectable via 1394 bus.
Note
❒ Default: Active
❖ Bidirectional SCSI print
Specifies the printer's response
mode etc. for status requests when
using the IEEE 1394 interface.
• On
• Off
Note
❒ Default: On
❒ If this is set to [Off], bidirectional
communication will not work.
Setting Up the Machine on a Network
IEEE 802.11b
Preparation
You must install the optional IEEE
802.11b interface unit into the machine.
Note
❒ Be sure to make all settings simultaneously.
❖ Communication Mode
Specifies the communication mode
of the wireless LAN.
• 802.11 Ad hoc
• Ad hoc
• Infrastructure
Note
❒ Default: 802.11 Ad hoc
❖ SSID Setting
Specifies SSID to distinguish the
access point in infrastructure
mode or 802.11 ad hoc mode.
Limitation
❒ The characters that can be used
are ASCII 0x20-0x7e (32 bytes).
Note
❒ Default: blank (ASSID)
❒ If blank is specified in 802.11b
ad hoc mode or ad hoc mode,
“ASSID” appears.
❖ Channel
Specifies a channel when you select 802.11b ad hoc mode or ad hoc
mode.
Note
❒ Default: 11
❒ The following channels are available:
• Metric version: 1-13
• Inch version: 1-11
❖ WEP (Encryption) Setting
Specifies the encryption of the
IEEE 802.11b (wireless LAN). If
this is set to [Active], you must enter the WEP key.
• VWEP
• Active
• Inactive
• VEncryption
10 alphanumeric characters
must be entered for 64 bit, 26
characters for 128 bit.
2
Note
❒ Default: Inactive
❖ Wireless LAN Signal
Shows the radio wave conditions
of the access point connected in infrastructure mode.
Note
❒ Radio wave status is displayed
when you press [Wireless LAN
Signal].
❖ Transmission Speed
Specifies th e comm unica tion
speed of the IEEE 802.11b (wireless
LAN).
• Auto
• 11Mbps Fixed
• 5.5Mbps Fixed
• 2Mbps Fixed
• 1Mbps Fixed
Note
❒ Default: Auto
❖ Return to Defaults
You can return the IEEE 802.11b
(wireless LAN) settings to their defaults.
• No
• Yes
41
Connecting and Setting Up
Print List
You can check items related to the
network in use.
Reference
For details about printing, see p.42
“Printing the Interface Settings”.
2
Printing the Interface Settings
The configuration page shows the
current network settings and network
information.
A Press the {User Tools/Counter/Inquiry}
key.
B Press [System Settings].
C Press [Interface Settings].
D Press [Print List].
E Press the {Start} key.
The configuration page is printed.
F Press [Exit].
G Press the {User Tools/Counter/Inquiry}
key.
Note
❒ You can also exit by pressing
[Exit] on the User Tools main
menu.
42
File Transfer
❖ Delivery Option
Enables or disables sending stored
or scanned documents via the
ScanRouter delivery software delivery server.
• On
• Main Delivery Server IP Address
• Sub Delivery Server IP Address
• Off
Note
❒ Default: Off
❒ Set this option when specifying
whether or not to use the ScanRouter delivery software. If you
do, you will have to re-register
I/O devices in the ScanRouter
delivery software.
❖ Capture Server IP Address
Specify the capture server IP address.
Note
❒ This setting appears when the
media link board is installed,
and that the capture function is
being used by the ScanRouter
delivery software.Set this option using the I/O device settings in the ScanRouter delivery
software.
Setting Up the Machine on a Network
❖ Fax RX File Transmission
• VSetting per Line
Specifies whether or not received fax documents are sent
to the ScanRouter delivery software for each fax line.
• Line 1: Deliver to Server/Do
not Deliver
• Line 2: Deliver to Server/Do
not Deliver
• E-mail: Deliver to Server/Do
not Deliver
• IP-Fax: Deliver to Server/Do
not Deliver
Note
❒ Default: Do not Deliver
• Print at Delivery
Specifies whether or not received fax documents sent to
the ScanRouter delivery software should also be printed at
the same time.
• Print
• Do not Print
Note
❒ Default: Do not Print
• File to Deliver
Specifies whether all received
fax documents or only received
fax documents that include delivery codes (documents with
an ID and SUB/SEP code) are
sent to the ScanRouter delivery
software.
• File with Delivery Code
• All Files
• VDelivery Failure File
• Print File
• Delete File
If a received fax document cannot be sent to the ScanRouter
delivery software, it is stored in
memory. To print a stored file,
select [Print File]; to delete, select
[Delete File].
2
Note
❒ If the machine can send the
data to the ScanRouter delivery software, it does so automatically.
❒ If you delete the data, you
will not be able to distribute
or print it.
❖ SMTP Server
Specify the SMTP server name.
If DNS is in use, enter the host
name.
If DNS is not in use, enter the
SMTP server IP address.
• Server Name
• Port No.:25
Limitation
❒ Enter the [Server Name] using up
to 127 alphanumeric characters.
Spaces cannot be used.
Note
❒ Enter[Port No.] between 1 and
65535 using the number keys,
and then press the [#]key.
❒ The SMTP server shares its port
number with direct SMTP.
Note
❒ Default: All Files
43
Connecting and Setting Up
❖ SMTP Authentication
You can configure SMTP authentication (PLAIN, LOGIN, CRAMMD5, DIGEST-MD5).
Authentication prevents unauthorized access, by making users enter a
user name and password when
sending e-mail to the SMTP server.
• On
If the SMTP server requires authentication, set [SMTP Authentication] to [On], and then specify
[User Name], [Password], and
[VEncryption].
• User Name
• E-mail Address
• Password
• VEncryption
Auto/On/Off
• Off
2
Limitation
❒ Enter [User Name] using up to
191 alphanumeric characters.
Spaces cannot be used.
❒ Depending on the SMTP server
type, "realm" must be specified.
Add "@" after the user name, as
in "user name@realm".
❒ Enter [Password] using up to 63
alphanumeric characters. Spaces cannot be used.
❒ Enter the user name and password to be set for [Administrator's E-mail Address] when using
Internet Fax.
44
Note
❒ Default: Off
❒ [VEncryption]-[Auto]: If the authentication method is P LAIN,
LOGIN, CRAM-MD5, or DIGEST-MD5.
❒ [VEncryption]-[On]: If the authentication method is CRAM-MD5 or
DIGEST-MD5.
❒ [VEncryption]-[Off]: If the authentication method is PLAIN, or
LOGIN.
❖ POP before SMTP
You can configure POP authentication (POP before SMTP).
Authentication prevents unauthorized access, by authenticating
with the POP server before sending e-mail to the SMTP server.
• On
To enable POP server authentication before sending e-mail via
the SMTP server, set [POP before
SMTP] to [On].
E-mail is sent to the SMTP server after the time specified for
[VWait Time after Auth.] has
elapsed.
• VWait Time after Auth.: 300msec
• User Name
• E-mail Address
• Password
• Off
Setting Up the Machine on a Network
Limitation
❒ Enter [User Name] using up to 63
alphanumeric characters. Spaces cannot be used.
❒ Enter [Password] using up to 63
alphanumeric characters. Spaces cannot be used.
Note
❒ Default: Off
❒ Using the number keys, you can
set [VWait Time after Auth.] from
zero to 10,000 milliseconds, in
increments of one millisecond.
❒ If you select [On], enter [Server
Name] in [POP3 Setting]. Also,
check the port num ber for
[POP3] in [E-mail Communication
Port].
❖ Reception Protocol
Specify Reception Protocol for receiving Internet faxes.
• Off
• POP3
• SMTP
Note
❒ Default: Off
❖ POP3 Setting
Specify the POP3 [Server Name] for
receiving Internet faxes.
The specified POP3 server name is
used for [POP before SMTP].
If DNS is in use, enter the host
name.
If DNS is not in use, enter the POP3
or server IP address.
• Server Name
• VEncryption
• Auto
• On
• Off
Limitation
❒ Enter POP3 [Server Name] using
up to 127 alphanumeric characters. Spaces cannot be used.
Note
❒ VEncryption-[Auto]: Password
encryption is automatically set
according to the POP server settings.
2
❒ VEncryption-[On]: Encrypt password.
❒ VEncryption-[Off]: Do not encrypt
password.
❖ Administrator's E-mail Address
On e-mailed scanned documents,
if the sender is not specified this
appears as the sender’s address.
This can be used as the sender with
SMTP authentication for Internet
Fax. If [On] is selected for [SMTP Authentication] be sure to enter the administrator's e-mail address here.
This can be used as the destination
for data transmission result cc emails, as well as the destination for
data communication management
e-mail.
Limitation
❒ Enter up to 128 alphanumeric
characters.
❖ E-mail Communication Port
Specify the [POP3] port numbers
for receiving Internet faxes.
The specified POP3 port number is
used for [POP before SMTP].
• POP3: 110
Note
❒ Default: POP3/110
❒ Enter a port number between 1
and 65535 using the number
keys, and then press the [#]
key.
45
Connecting and Setting Up
❖ E-mail Reception Interval
Specify, in minutes, the time limit
for receiving Internet faxes via
POP3 or IMAP4 server.
• On: 15 minute(s)
• Off
Note
❒ Default: On/15 minute(s)
❒ If [On] is selected, the number of
times can be set from 1 to 1440
in increments of one minute, using the number keys.
2
❖ Max. Reception E-mail Size
Specify the [Max. Reception E-mail
Size] for receiving Internet faxes.
Note
❒ Default: 2MB
❒ Using the number keys, enter a
size from one to 50 MB in increments of one megabyte.
❖ E-mail Storage in Server
You can specify whether or not to
store received Internet fax e-mails
on the POP3 or IMAP4 server.
• Off
• All
• Errors Only
Note
❒ Default: Off
❖ Default User Name / Password (Send)
You can specify the user name and
password required when sending
scan file directly to a shared folder
on a computer running Windows,
or to an FTP server.
• SMB User Name
• SMB Password
• FTP User Name
• FTP Password
46
Limitation
❒ Enter up to 128 alphanumeric
characters.
❖ Program / Change / Delete E-mail Message
You can program, change, or delete the e-mail message used when
sending an Internet fax or scan file
as an attachment.
• Program / Change
• Delete
Note
❒ Enter a name using up to 20 alphanumeric characters.
❒ Enter up to five lines of text.
Each line can consist of up to 80
alphanumeric characters.
❖ Program / Change / Delete Subject
You can program, change, or delete the subject used when sending
an Internet fax or scan file as an attachment.
• Program / Change
• Delete
Note
❒ Enter a subject using up to 20 alphanumeric characters.
❖ Scanner Recall Interval Time
Specifies the interval the machine
waits before resending scan file, if
they cannot be sent to the delivery
server or mail server.
Note
❒ Default: 300 seconds
❒ The interval time can be set
from 60 to 999 seconds in one
second increments, using the
number keys.
❒ This setting is for the scanner
function.
❖ Number of Scanner Recalls
Sets a maximum number of times
scan file is resent to the delivery
server or mail server.
• On: 3 time(s)
Setting Up the Machine on a Network
• Off
Note
❒ Default: On/3 time(s)
❒ If [On] is selected, the number of
times can be set from 1 to 99 using the number keys.
❒ This setting is for the scanner
function.
❖ E-mail Account
Specify [E-mail Address], [User
Name], and [Password] for receiving
Internet faxes.
• VFax Mail Reception
• E-mail Address
• User Name
• Password
Limitation
❒ Enter an e-mail address using up
to 128 alphanumeric characters.
❒ Enter a user name using up to
64 alphanumeric characters.
❒ Enter a password using up to 64
alphanumeric characters.
❖ Auto Specify Sender Name
Set name of the sender when sending an e-mail.
• On
• Scanner: If the sender is not
specified, the administrator's
e-mail address is entered in
the [From:] box. If the sender
is specified, the specified email address is entered in the
[From:] box.
• Fax: If the sender is not specified, the machine's e-mail
address is entered in the
[From:] box. If the machine's
e-mail address is not set, or
the e-mail address is not registered, the administrator's email address is entered in the
[From:] box.
• Off
• Scanner: If the sender is not
specified, the e-mail cannot be
sent. If the sender is specified,
the specified e-mail address is
entered in the [From:] box.
• Fax: If the sender is not specified, the e-mail cannot be sent.
If the sender is specified, the
specified e-mail address is entered in the [From:] box.
2
47
Connecting and Setting Up
Programming, changing, or deleting an
e-mail message
Limitation
❒ Enter a name using up to 20 alphanumeric characters.
❒ Enter up to five lines of text. Each
line can consist of up to 80 alphanumeric characters.
2
A Press
the {User Tools/Counter/Inquiry} key.
B Press [System Settings].
C Press [File Transfer].
D Press [T Next].
The next screen appears.
E Press [Program / Change / Delete Email Message].
Programming an e-mail message
A Press [*Not programed].
B Press [Change], and then enter
the name.
Reference
For more information about
entering text, see “Entering
Text”, General Settings Guide.
C Press [OK].
D Press [Edit], and then enter the
text.
To start a new line, press [OK] to
return to the e-mail message
screen, and then press [T] in [Select Line to Edit:].
E Press [OK].
The e-mail message screen appears.
F Press [OK].
48
Changing an e-mail message
A Select the e-mail message to
change.
B If you want to change the subject, press [Change].
C Change the subject, and then
press [OK].
D If you want to change the text,
press [Edit].
E Press [U] or [T] to select the
line to change.
F Change the text, and then press
[OK].
G Press [OK].
Deleting an e-mail message
A Press [Delete].
B Select the e-mail message to
delete.
T h e c on firm a tio n m ess a g e
about deleting appears.
C To delete the data, press [Yes].
F Press [Exit].
G Press [Exit].
H Press the {User
Tools/Counter/In-
quiry} key.
Note
❒ You can also exit by pressing
[Exit] on the User Tools main
menu.
Setting Up the Machine on a Network
Programming, changing, or deleting a
subject
Limitation
❒ Enter a subject using up to 20 alphanumeric characters.
Note
❒ [Urgent] and [High] are programmed
as the e-mail subjects.
A Press
the {User Tools/Counter/Inquiry} key.
B Press [System Settings].
C Press [File Transfer].
D Press [TNext]. The next screen ap-
Deleting a subject
A Press [Delete].
B Select the subject to delete.
T h e c on firm a tio n m ess a g e
about deleting appears.
C To delete the subject, press [Yes].
2
F Press [Exit].
G Press [Exit].
H Press the {User Tools/Counter/Inquiry}
key.
You can also exit by pressing [Exit]
on the User Tools main menu.
pears.
E Press [Program / Change / Delete Subject].
Programming a subject
A Press [*Not programed], and then
enter the text.
Reference
For more information about
entering text, see “Entering
Text”, General Settings Guide.
B Press [OK].
Changing a subject
A Select the subject to change.
B Enter the text.
C Press [OK].
49
Connecting and Setting Up
LDAP Server Settings
Program the LDAP server to find up
e-mail destinations in the LDAP server Address Book directly. This function is possible when sending scan
files by e-mail using the scanner or
fax function, or when entering authentication information.
2
Before using this function
Program/Change/Delete LDAP
Server
To enter Program/Change/Delete
LDAP Server
A Press the {User Tools/Counter/Inquiry}
key.
To start an LDAP search, make sure
that the items listed below are set. For
other items, check your environment
and make any necessary changes.
• Server Name
• Search Base
• Port No.
• Search Conditions
• Authentication method selection
Note
❒ For authentication method, select from [High Security], [On], or
[Off].
• User Name/Password
The settings above differ depending on server environment. Check
your environment and make any
necessary changes.
Note
❒ To use the LDAP server in Administrator Tools, select [On] under
[LDAP Server].
❒ This function supports LDAP Version 2.0 and 3.0. Ver 2.0 does not
support High Security authentication.
50
B Press [System Settings].
C Press [Administrator Tools], and then
press [TNext] twice.
D Press [Program / Change / Delete LDAP
Server].
To program/change the LDAP
server
A Select the LDAP server you want
to program or change.
When programming the server, select [*Not Programmed].
B Set each item as necessary.
LDAP Server Settings
To finish programming/changing the
LDAP Server
Programming the LDAP Server
A Press [Change] after setting each item.
To enter an identification name
Register a name for the LDAP server
that will appear on the server selection
screen of the LDAP search operation.
2
A Press [Change] under [Identification
B Press [Exit].
C Press [Exit].
D Press the {User Tools/Counter/Inquiry}
key.
To delete the programmed LDAP
server
A Press [Delete].
Name].
B Enter the server’s identification name.
C Press [OK].
To enter a server name
Register the LDAP server’s host name
or IP address.
A Press [Change] under [Server Name].
B Enter the LDAP server name.
C Press [OK].
B Select the LDAP server you want
to delete.
C Press [Yes].
51
Connecting and Setting Up
2
To enter the search base
To enter a port number
Select a route folder defined by the
LDAP server to start the search from
e-mail addresses registered in the selected folder are search targets.
Specify the port number for communicating with the LDAP server. Specify a port that is compliant with your
environment.
A Press [Change] under [Search Base].
B Enter the search base.
A Press [Change] under [Port No.].
B Enter the port number using the
Note
❒ For example, if the search target
is the sales department of ABC
company, enter “dc=sales department, o=ABC”. (In this example, the description is for an
active directory. “dc” is for the
organization unit, and “o” is for
the company.)
❒ Search base registration may be
required depending on your
server environment. When registration is required, unspecified searches will result in error.
Check you server environment
and enter any required specifications.
C Press [OK].
52
number keys, and then press [#].
Note
❒ When SSL is set to [On], the port
number automatically changes
to “689”.
❒ This function supports the TLS
v1, SSL v3 and v2.
To start SSL communication
Use SSL to communicate with the
LDAP server.
A Press [On].
Note
❒ To use SSL, the LDAP server
must support SSL.
❒ When SSL is set to [On], the port
number automatically changes
to “689”.
❒ SSL setting must be enabled on
this machine. For details, consult
your network administrator.
LDAP Server Settings
To set authentication
To make a search request to the LDAP
server, use the administrator account
for authentication.
For details about the administrator
account, see “To enter the user name
and password”.
A Press [TNext].
B Press [On] or [High Security] under
To enter the user name and
password
When [On] or [High Security] is selected
for the authentication setting, use the
administrator account name and
password. Do not enter the administrator account name and password
when using authentication for each
individual or each search.
A Press [TNext].
[Authentication].
B Press [Change] under [User Name].
Note
❒ Authentication settings must
comply with your server’s authentication settings. Check
your server settings before setting this machine.
C Enter
❒ [High Security] is available only
with LDAP Version 3.0.
❒ When [High Security] is selected,
the administrator password is
encrypted before it is sent to the
network. When [On] is selected,
the password is sent without
encryption.
2
the user name, and then
press [OK].
Note
❒ Procedures for the user name
setting differ depending on
server environment. Check
your server environment before
making the setting.
• Example setting procedures:
Domain Name\User Name
User Name@Domain Name
CN=Name, OU=Department
Name, DC=Server Name
D Press [Change] under [Password].
E Enter the password, and then
press [OK].
53
Connecting and Setting Up
Note
❒ The user name and password
are required for administrator
access to the LDAP server.
❒ You can set the user name and
password in this machine’s Address Book to allow individual
authentication access to the
LDAP server. Use Administrator Tools to select the user name
and password you want to use.
For details, see General Settings
Guide.
2
To test the connection
Access the LDAP server to check the
proper connection is established.
Check authentication works according to the authentication settings.
A Press [Connection Test].
A connection test is carried out.
B Press [Exit].
Note
❒ If the connection test fails, check
your settings and try again.
❒ This function does not check search
conditions or the search base.
To set search conditions
You can enter an attribute as a typical
search keyword. Using the entered attribute, the function searches the
LDAP server’s Address Book.
A Press [TNext]twice.
54
B Press [Change] for items you want
to use as search conditions from
the following: [Name], [E-mail Address], [Fax Number], [Company
Name], and [Department Name].
C Enter the attribute you want to use
when searching for e-mail addresses, and then press [OK].
Note
❒ The attribute value may change
depending on the server environment. Check the attribute
value complies with your server
environment before setting it.
❒ You can leave items blank, but
you cannot leave attributes
blank when searching for e-mail
addresses from the LDAP server Address Book.
LDAP Server Settings
To set search options
To search the LDAP server data using
a keyword other than prepared keywords such as Name, E-mail Address, FAX Number, Company
Name, and Department Name, specify the attribute for the keyword registered in your LDAP server, and the
name to be displayed on the control
panel during the search. For example,
to search e-mail addresses by employee number, enter “employeeNo.”
in the Attribute field, and “Employee
No.” in the key display field.
A Press [TNext] three times.
• Without key display registration
• With key display registration
2
Note
❒ The key does not appear on the
search screen unless both “Attribute” and “Key Display” are
registered. Make sure you register both to use the optional
search.
B Press [Change] under [Attribute].
C Enter
the attribute you want to
use when searching for e-mail addresses, and then press [OK].
Note
❒ The attribute value may change
depending on the server environment. Check the attribute
complies with your server environment before setting it.
D Press [Change] under [Key Display].
E Enter the key display, and then
press [OK].
The registered “key display” appears as a keyword for searching
LDAP.
55
Connecting and Setting Up
2
56
3. Using a Printer Server
Preparing Printer Server
This section explains how to configure
the machine as a Windows network
printer. The machine is configured to
enabling network clients to use it.
When the network printer is connected via SmartDeviceMonitor for Client,
you can set the printing notification
function to notify clients of the results
of their print jobs.
Important
❒ Under Windows 2000, Windows
XP Professional, or Windows Server 2003, to change printer properties in the [Printer] folder, you need
Printer Management access authentication; under Windows NT
4.0, Full Control access authentication. Log on to the file server as an
Administrator or member of the
PowerUsers group.
A Open the [Printers] window from
the [Start] menu.
The [Printers] window appears.
B Click the icon of the machine you
want to use. On the [File] menu,
click [Properties]. The printer
properties appear.
C On the [Sharing] tab, click [Shared as:].
D To share the machine with users
using a different version of Windows, click [Additional Drivers...].
Note
❒ If you have installed an alternative
driver by selecting [Shared as:]
during the printer driver installation, this step can be ignored.
E Click [OK]. Close the printer properties.
Printing notification via
SmartDeviceMonitor for Client
Follow the procedure below to configure the machine to use the printing
notification function of SmartDeviceMonitor for Client.
Setting the print server
Important
❒ Under Windows 2000, Windows
XP Professional, or Windows Server 2003, to change printer properties in the [Printer] folder, you need
Printer Management access authentication; under Windows NT
4.0, Full Control access authentication. Log on to the file server as an
Administrator or member of the
PowerUsers group.
A From the [Start] button on the task
bar, point to [Program], point to
[SmartDeviceMonitor for Client], and
then click [Print Server Settings].
The print server setting dialog box
appears.
B Select the [Notify Client of Printing]
check box, and click [OK].
After print server setting is made, a
dialog box appears. Confirm the
dialog box content, and click [OK].
Click [Cancel] to interrupt the procedure.
CA
dialog box appears for client
setting. Click [OK].
57
Using a Printer Server
The print server setting is complete. Each client must be set to receive print notification.
Note
❒ Current printing jobs restart
from the beginning after the
spooler pauses briefly.
❒ When the expansion function is
not used, the function is automatically set as available.
❒ If you log on using an account
that does not have Administrator privileges, the client may not
be notified.
3
Setting a Client
A From the [Start] button on the task
bar, point to [Program], point to
[SmartDeviceMonitor for Client], and
then click [Setting Expansion Function].
A dialog box for setting the expansion function appears.
B Select the [Use the expansion function] check box in [Notify Printing].
C Select the [Notify when using the print
server] check box.
D Click [OK].
The dialog box for setting the expansion function closes. The client
setting is completed.
Note
❒ Set the printing notification function on the printer driver as well
as on SmartDeviceMonitor for
Client.
58
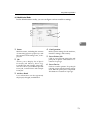
Using NetWare
Using NetWare
This section describes the setting procedure for network printers in the
NetWare environment. In the NetWare environment, you can connect
the machine as a “print server” or “remote printer”.
❖ Setting procedure
• When using the machine as a
print server
A Installing SmartDeviceMonitor for Admin
B Setting the network interface
board.
C Turning the machine off and
then back on.
• When using the machine as a
remote printer
A Installing SmartDeviceMonitor for Admin.
B Setting the network interface
board.
C Setting NetWare.
D Starting the print server.
Note
❒ This procedure assumes an environment is already prepared for
normal NetWa re running the
printing service setting.
❒ The procedure is explained with
the following example settings:
• File server’s name …CAREE
• Print server’s name …PSERV
• Printer’s name …R-PRN
• Queue name …R-QUEUE
❖ Using SmartDeviceMonitor for Admin
To use the machine in a NetWare
environment, use SmartDeviceMonitor for Admin to set the NetWare printing environment.
Note
❒ The NetWare Client provided
by Novell is required to set the
printing environment using
SmartDeviceMonitor for Admin under the following environments:
3
• NDS mode in Windows 95/
98/Me
• NDS or Bindery mode in Windows 2000/XP, Windows NT
4.0
Reference
For details about installing
SmartDeviceMonitor for Admin, see p.77 “Installing SmartDeviceMonitor for Admin”.
❖ Printers listed by SmartDeviceMonitor for Admin
SmartDeviceMonitor for Admin
lists printers connected to the network. If you cannot identify the
machine you want to configure,
print configuration page, and then
check the machine name.
Setting Up as a Print Server
(NetWare 3.x)
Follow the procedure below to connect the machine as a print server using NetWare 3.x.
A Log on to the file server as a su-
pervisor or supervisor equivalent.
B Start
NIB Setup Tool from the
[Start] menu.
C Click [Wizard], and then click [OK].
D Select a machine you want to configure.
59
Using a Printer Server
E Enter the printer name in the [Device name:] box and a comment in
the [Comment] box, and then click
[Next].
F Select
the [NetWare] check box,
and then click [Next].
G Click [Bindery mode], enter the file
server name in the [File Server
Name:] box, and then click [Next].
In the [File Server Name:] box, enter
the name of the file server in which
a print server is created. You can
also click [Browse...] to browse
through available file servers.
3
H Enter the print server name in the
[Print Server Name:] box, the printer
name in the [Printer Name:] box,
and the print queue name in the
[Print Queue Name] box, and then
click [Next].
• In the [Print Server Name:] box,
enter the name of the NetWare
print server using up to 47 characters.
• In the [Printer Name:] box, enter
the name of the NetWare printer.
• In the [Print Queue Name] box, enter the name of the print queue
to be added to NetWare.
I Check the settings, and then click
[Next].
The settings are applied, and NIB
Setup Tool quits.
J Turn the printer off and then on
again.
Note
❒ To check that the configuration
is made correctly, enter the following fro m the com mand
prompt.
F:> USERLIST
60
❒ If the printer works as configured, the name of the print server appears as a connected user.
❒ If you cannot identify the printer you want to configure, check
the printer name with the configuration page printed from
the printer. For details about
printing a configuration page,
see Printer Reference.
❒ If no printer names appear in
the list, match the frame types
of IPX/SPXs for the computer
and printer. Use the [Network]
d ia l o g bo x o f W in d o w s t o
change the frame type of the
computer.
Setting Up as a Print Server
(NetWare 4.x, 5/5.1, 6/6.5)
Follow the procedure below to connect the printer as a print server using
NetWare 4.x, NetWare 5/5.1, or NetWare 6/6.5.
Important
❒ When using the printer as a print
server in NetWare 4.x, NetWare
5/5.1, or NetWare 6/6.5, set it to
the NDS mode.
❒ When using NetWare 5/5.1 or
NetWare 6/6.5, set the printer as a
print server.
A Log on to the file server as a su-
pervisor or supervisor equivalent.
B Start NIB Setup Tool on the [Start]
menu.
C Click [Wizard], and then click [OK].
D Select a printer you want to configure.
Using NetWare
E Enter the printer name in the [Device name:] box and a comment in
the [Comment] box, and then click
[Next].
F Select
the [NetWare] check box,
and then click [Next].
G Click
[NDS mode], enter the file
server name in the [File Server
Name:] box, the NDS tree name in
the [NDS Tree] box, and the context
in the [NDS Context:] box, and then
click [Next].
In the [File Server Name:] box, enter
the name of the file server in which
a print server is created. You can
also click [Browse...] to browse
through available file servers and
NDS context names.
In the [NDS Tree] box, enter the
name of the NDS tree in which a
print server is created using up to
32 alphanumeric characters. Hyphens and underscores can also be
used. You can also click [Browse...]
to browse through available NDS
trees.
For a context, object names are entered from the lowest object with
each object separated by a period.
For example, if you want to create
a print server in NET under DS, enter "NET.DS".
H Enter the print server name in the
[Print Server Name:] box, the printer
name in the [Printer Name:] box, the
print queue name in the [Print
Queue Name] box, and the print
queue volume in the [Print Queue
Volume] box, and then click [Next].
• In the [Print Server Name:] box,
enter the name of the NetWare
print server using up to 47 characters.
• In the [Printer Name:] box, enter
the name of the NetWare printer.
• In [Print Queue Name] box, enter
the print queue volume.
• In [Print Queue Volume], type the
print queue volume. For a volume, object names are entered
from the lowest object with each
object separated by a period.
You can also click [Browse...] to
browse through available volumes.
3
I Check the settings, and then click
[Next].
The settings are applied, and NIB
Setup Tool quits.
J Turn the printer off and then on
again.
Note
❒ To check that the configuration
is made correctly, enter the following from the comm and
prompt.
F:> NLIST USER /A/B
❒ If the printer works as configured, the name of the print server appears as a connected user.
61
Using a Printer Server
❒ If you cannot identify the printer you want to configure, check
the printer name with the configuration page printed from
the printer. For details about
printing a configuration page,
see Printer Reference.
❒ If no printer names appear in
the list, match the frame types
of IPX/SPXs for the computer
and printer. Use the [Network]
d ia l o g b o x o f W i n d o w s t o
change the frame type of the
computer.
3
Reference
When using the printer in a
pure IP environment of NetWare 5/5.1 or NetWare 6.0, see
p.62 “Using Pure IP in the NetWare 5/5.1 or 6/6.5 Environment”.
Using Pure IP in the NetWare
5/5.1 or 6/6.5 Environment
Follow the procedure below to connect the printer as a print server in a
pure IP environment of NetWare
5/5.1 or NetWare 6/6.5.
Important
❒ When creating a queued print server in a pure IP environment of NetWare 5/5.1 or NetWare 6/6.5,
create a print queue on the file server using NetWare Administrator.
❒ This printer is not available as a remote printer for use in a pure IP
environment.
❒ To use the printer in a pure IP environment, set it to TCP/IP.
62
Setting up using NIB Setup Tool
A Log on to the file server as an adm inistrator or adm inistrator
equivalent.
B Start NIB Setup Tool on the [Start]
menu.
C Click
[Property Sheet], and then
click [OK].
D Select a printer you want to configure.
E On the [NetWare] tab, Select [File
Server Mode] or [NDS mode] in the
[Logon Mode] area.
When [File Server Mode] is selected,
the network connection is established based on the string entered
in the [File Server Name(F):] box.
When [NDS mode] is selected, the
network connection is established
based on the string entered in the
[NDS Tree] box.
F In the [Print Server Name:] box, enter the name of the print server.
G In the [File Server Name:] box, enter
the name of the file server in
which a print server is created.
You can also click [Browse...] to browse
through available file servers.
H Enter the NDS tree name in the
[NDS Tree] box.
Enter up to 32 alphanumeric characters. Hyphens and underscores
can also be used.
Using NetWare
I In the [NDS Context:] box, enter the
context of the print server.
You can also click [Browse...] to
browse through available NDS
trees and NDS contexts.
For a context, object names are entered from the lowest object with
each object separated by a period.
For example, if you want to create
a print server in Net under DS, enter "NET.DS".
G Check the settings, and then click
[Create].
H Select
the object in which the
printer is located, and then click
[Create] on the [Object] menu.
I In
the [Class of new object] box,
click [Printer], and then click [OK].
For NetWare 5, click [Printer (Non
NDPS)].
3
J In the [Printer name] box, enter the
printer name
K Select the [Define additional properties] check box, and then click
[Create].
J In the [Print Server Operation Mode]
area, click [As Print Server].
K Click [OK] to close the [NIB Setup
Tool] dialog box.
Setting up using NWadmin
A From Windows, start NWadmin.
For details about NWadmin, see
the NetWare manuals.
B Select
the object in which the
print queue is located in the directory tree, and then click [Create] on
the [Object] menu.
C In
the [Class of new object] box,
click [Print Queue], and then click
[OK].
D In the [Print Queue Name] box, enter
the name of the print queue.
E In
the [Print Queue Volume] box,
click [Browse].
F In the [Available objects] box, click
the volume in which the print
queue is created, and then click
[OK].
L Click [Assignments], and then click
[Add] in the [Assignments] area.
M In the [Available objects] box, click
the queue you, and then click
[OK].
N Click [Configuration], click [Parallel]
in the [Printer type] list, and then
click [Communication].
O Click [Manual load] in the [Communication type] area, and then click
[OK].
P Check the settings, and then click
[OK].
Q Select
a context specified using
NIB Setup Tool, and then click
[Create] on the [Object] menu.
R In
the [Class of new object] box,
click [Print Server], and then click
[OK]. For NetWare 5, click [Print
Sever (Non NDPS)].
S In the [Print Server Name] box, enter
the print server name.
Use the same print server name
specified using NIB Setup Tool.
63
Using a Printer Server
T Select the [Define additional proper-
E On
U Click [Assignments], and then click
F In the [File Server Name:] box, enter
ties] check box, and then click
[Create].
[Add] in the [Assignments] area.
V In the [Available objects] box, click
the queue you created, and then
click [OK].
W Check the settings, and then click
3
[OK].
X Start the print server by entering
the following from the console of
the NetWare server.
If the print server is in operation,
quit and restart it.
❖ To exit
CAREE: unload pserver
❖ To start
CAREE: load pserver
print_server_name
Setting Up as a Remote Printer
(NetWare 3.x)
Follow the procedure below to use
the printer as a remote printer under
NetWare 3.x.
Setting up using NIB Setup Tool
A Log on to the file server as a supervisor or supervisor equivalent.
B Start NIB Setup Tool from [Start]
menu.
C Click
[Property Sheet], and then
click [OK].
D Select a printer you want to configure.
64
the [NetWare] tab, enter the
name of the print server in the
[Print Server Name:] box.
the name of the file server in
which a print server is created.
You can also click [Browse...] to
browse through available file servers.
G In the [Print Server Operation Mode]
area, click [As Remote Printer].
H In the [Remote Printer No.] box, en-
ter the printer number.
Use the same printer number created in the print server.
I A confirmation message appears.
Click [OK].
J On the [NIB] menu, click [Exit].
Setting up using PCONSOLE
A Enter “PCONSOLE” from the command prompt.
F:> PCONSOLE
B Create a print queue.
When using the existing print
queue, go to the procedure for creating a printer.
C From the [Available Options] menu,
select [Print Queue Information], and
then press the {Enter} key.
D Press {Insert} key, and then enter a
print queue name.
E Press {ESC} key to return to the
[Available Options] menu.
F Set up the network connection to
a printer.
Using NetWare
G On
the [Available Options] menu,
click [Print Server Information], and
then press the {ENTER} key.
H To create a new print server, press
the {INSERT} key, and then enter a
print server name.
For a currently defined print server, select a print server in the [Print
Server] list.
Use the same printer name specified using NIB Setup Tool.
I From
the [Print Server Information]
menu, select [Print Server Configuration].
J From the [Print Server Configuration]
menu, select [Printer Configuration].
K Select the printer indicated as [Not
Installed].
Use the same printer number specified as the remote printer number
using NIB Setup Tool.
L To change the printer name, enter
a new name.
A name “Printer x” is assigned to
the printer. The “x” stands for the
number of the selected printer.
M As type, select [Remote Parallel, LPT1].
R Select the printer created.
S Press the {INSERT} key to select a
queue serviced by the printer.
You can select several queues.
T Follow
the instructions on the
screen to make other necessary
settings.
Following these steps, check that
the queues are assigned.
3
U Press the {ESC} key until "Exit?"
appears, and then select [Yes] to
exit PCONSOLE.
V Start the print server by entering
the following from the console of
the NetWare server.
If the print server is in operation,
quit and restart it.
❖ To quit
CAREE: unload pserver
❖ To start
CAREE: load pserver
print_server_name
Note
❒ If the printer works as configured, the message "Waiting for
job" appears.
The IRQ, Buffer size, Starting form,
and Queue service mode are automatically configured.
N Press
the {ESC} key, and then
click [Yes] on the confirmation
message.
O Press the {ESC} key to return to
[Print Server Configuration Menu].
P Assign print queues to the created
printer.
Q From [Print Server Configuration Menu],
select [Queues Serviced By Printer].
65
Using a Printer Server
Setting Up as a Remote Printer
(NetWare 4.x, 5/5.1, 6/6.5)
Follow the procedure below to use
the printer as a remote printer under
NetWare 4.x, 5/5.1 and 6/6.5.
Important
❒ To use the printer as a remote
printer under NetWare 4.x, 5/5.1,
6/6.5, set it to NDS mode.
3
❒ Do not use the printer as a remote
printer when Pure IP is used.
Setting up using NIB Setup Tool
A Log on to the file server as an ad-
m inistrator or administrator
equivalent.
B Start NIB Setup Tool from [Start]
menu.
C Click
[Property Sheet], and then
click [OK].
D Select a printer you want to configure.
E Click [NetWare].
F In the [Logon Mode] area, click [File
Server Mode] or [NDS mode].
If [File Server Mode] is selected, the
network connection is established
based on the string you entered.
If [NDS mode] is selected, the network connection is established
based on the string you entered.
G In the [Print Server Name(P):] box,
enter the name of the print server.
Use the same print server name in
NWadmin. Enter up to 47 alphanumeric characters.
66
H In the [File Server Name(F):] box, en-
ter the name of the file server in
which a print server is created.
You can also click [Browse...] to
browse through available file servers. Enter up to 47 alphanumeric
characters.
I In the [NDS Tree(T):] box, enter the
NDS tree name and create the file
server.
You can also click [Browse...] to
browse through available NDS
trees and NDS contexts. Enter up
to 32 alphanumeric characters. Hyphens and underscores can also be
used.
J In the [NDS Context(C):] box, enter a
context in which the print server
is created.
Enter up to 127 alphanumeric
characters.
For context, object names from
Root are entered from the lowest
object, with each object separated
by a period. For example, to create
a print server in the NETWORK
object under the organization object DS of R oo t , en te r “ N E T WORK.DS".
K In the [Print Server Option Mode] area, click [As Remote Printer(R)].
L In the [Remote Printer No.(N)] box,
enter the printer number. Use the
same printer number created.
M Click [OK] to close [NIB Setup Tool ].
Using NetWare
Setting up using NWadmin
A From Windows, start NWadmin.
For details about NWadmin, see
the NetWare manuals.
B Set up the network connection to
a print queue. Select the object in
which the print queue is located
in the directory tree, and then
click [Create] on the [Object] menu.
C In
the [Class of new object] box,
click [Print Queue], and then click
[OK].
D In the [Print Queue Name] box, enter
the name of the print queue.
E In
the [Print Queue Volume] box,
click [Browse].
F In the [Available objects] box, click
the volume in which the print
queue is created, and then click
[OK].
G Check the settings, and then click
[Create].
H Set up the network connection to
a printer. Select the object in
which the printer is located, and
then click [Create] on the [Object]
menu.
I In
the [Class of new object] box,
click [Printer], and then click [OK].
For NetWare 5, click [Printer (Non
NDPS)].
J In the [Printer name] box, enter the
printer name
K Select the [Define additional properties] check box, and then click
[Create].
L Assign print queues to the created
printer. Click [Assignments], and
then click [Add] in the [Assignments] area.
M In the [Available objects] box, click
the queue you created, and then
click [OK].
N Click [Configuration], click [Parallel]
in the [Printer type] list, and then
click [Communication].
3
O Click [Manual load] in the [Communication type] area, and then click
[OK]. Check the settings, and then
click [OK].
P Set up the network connection to
a print server. Select a context
specified using NIB Setup Tool,
and then click [Create] on the [Object] menu.
Q In
the [Class of new object] box,
click [Print Server], and then click
[OK]. For NetWare 5, click [Print
Sever (Non NDPS)].
R In the [Print Server Name:] box, enter the print server name.
Use the same print server name
specified using NIB Setup Tool.
S Select the [Define additional properties] check box, and then click
[Create].
T Assign the printer to the created
print server. Click [Assignments],
and then click [Add] in the [Assignments] area.
U In the [Available objects] box, click
the queue you created, and then
click [OK].
V In the [Printers] area, click the print-
er you assigned, and then click
[Printer Number]
67
Using a Printer Server
W Enter
the printer number, and
then click [OK]. Check the settings, and then click [OK].
Use the same printer number specified as the remote printer number
using NIB Setup Tool.
X Start the print server by entering
the following from the console of
the NetWare server.
If the print server is in operation,
quit and restart it.
3
❖ To exit
CAREE: unload pserver
❖ To start
CAREE: load pserver
print_server_name
68
4. Monitoring and Configuring
the Printer
Using Web Image Monitor
Using Web Image Monitor, you can check the machine status and change settings.
❖ Available operations
The following operations can be remotely performed using Web Image Monitor from a client computer.
• Displaying machine status or settings
• Checking the print job status or history
• Checking, modifying, printing, or deleting print jobs stored in the Document Server
• Interrupting currently printing jobs
• Resetting the printer
• Managing the Address Book
• Making machine settings
• Making network protocol settings
• Making security settings
❖ Configuring the machine
To perform the operations from Web Image Monitor, TCP/IP is required. After the machine is configured to use TCP/IP, operations from Web Image
Monitor become available.
❖ Recommended Web browser
• Windows:
Internet Explorer 5.5 SP1 or higher
Netscape Navigator 7.0 or higher
• Mac OS:
Netscape Navigator 7.0 or higher
Safari 1.0 or higher
Note
❒ To use Netscape Navigator with Secured Sockets Layer (SSL: an encryption
protocol), use Netscape Navigator 7.0 or higher.
❒ If the previous versions of the Web browser above are used or JavaScript and
cookies are not enabled with the Web browser used, display and operation
problems may occur.
❒ If you are using a proxy server, change the Web browser settings. Contact
your network administrator for information about the settings.
❒ The previous page may not appear even after the back button of a Web
browser is clicked. If this happens, click the refresh button of a Web browser.
❒ Updating the machine information is not automatically performed. Click [Refresh] in the display area to update the machine information.
69
Monitoring and Configuring the Printer
Displaying Top Page
This section explains the Top Page and how to display Web Image Monitor.
A Start your Web browser.
B Enter “http: //(machine's address)/” in the address bar of a Web browser.
Top Page of Web Image Monitor appears.
Note
❒ If the machine's host name has been registered on the DNS or WINS server,
you can enter it. For details, see p.139 “Using DHCP”.
❒ When setting SSL, a protocol for encrypted communication, under environment which server authentification is issued , enter "https://(machine's address)/".
Every Web Image Monitor page is divided into the following areas:
4
4
4
1
2
3
ZZZ008S
1. Header area
The link to help and dialog box for
keyword search appears.
2. Menu area
The dialog box for switching to the
user mode and administrator mode
appears, and each mode's menu will
be displayed.
If you select menu, it's content will be
shown on the work area, or the sub area.
3. Display area
Displays the contents of the item selected in the menu area.
Machine information in the display
area is not automatically updated.
Click [Refresh] at the upper right in the
display area to update the machine information. Click the Web browser's
[Refresh] button to refresh the entire
browser screen.
Machine status, network interface
board names, and comments are displayed.
4. Help
Use Help to view or download Help
file contents.
70
Using Web Image Monitor
When user authentication is
set
Login (using Web Image Monitor)
Follow the procedure below to log on
when user authentication is set.
A Click [Login].
B Enter a login user name and pass-
word, and then click [OK].
For details about the user name
and password, consult your network administrator.
4
Note
❒ For user code authentication,
enter a user code in [User Name],
and then click [OK].
❒ The procedure may differ depending on the Web browser
used.
Log Off (using Web Image Monitor)
Click [Logout] to log off.
Note
❒ When you log on and made the
setting, always click [Logout].
71
Monitoring and Configuring the Printer
About Menu and Mode
There are two modes available with Web Image Monitor: user mode and administrator mode.
Displayed Items may differ depending on the machines.
❖ About User Mode
In the user mode, machine status, settings, and print job status can be viewed,
but the machine settings cannot be changed.
4
1
2
3
ZZZ009S
1. Status
Machine status, including the amount
of remaining paper in paper trays and
the amount of remaining toner, is displayed.
2. Job
Allows you to display list of Spooled
print Job, Job History, Error Log,
Locked Print and Sample Print jobs.
This also perform or delete Locked
Print and Sample print jobs.
72
3. Configuration
Display current machine and network settings, and download help
files.
Using Web Image Monitor
❖ Administrator Mode
In the administrator mode, you can configure various machine settings.
1
2
3
4
5
6
4
ZZZ010S
1. Status
Machine status, including the amount
of remaining paper in paper trays and
the amount of remaining toner, is displayed.
2. Job
Allows you to display list of Spool
Print Job, Job History, Error Log,
Locked Print and Sample Print jobs.
This also allows you to delete Spooled
Print Job, Locked Print and Sample
Print jobs.
3. Address Book
4. Configuration
Make system settings for the machine,
interface settings, and security.
5. Reset Printer Job
Click to reset current print jobs and
print jobs in queue. This button is located on Top Page.
6. Reset Device
Click to reset the printer. If a print job
is being processed, the printer will be
reset after the print job is completed.
This button is located on Top Page.
User information can be registered,
displayed, changed, and deleted.
73
Monitoring and Configuring the Printer
Access in the Administrator
Mode
Displaying Web Image Monitor
Help
Follow the procedure below to access
Web Image Monitor in the administrator mode.
When using Help for the first time,
clicking either [Help] in the header
area or the icon marked "?" in the display area makes the following screen
appear, in which you can view Help
in two different ways, as shown below:
A On Top Page, click [Login].
The dialog box for entering the
user name and password appears.
B Enter your user name and pass-
word, and then click [OK].
For details about the user name
and password, consult your network administrator.
4
❖ Viewing Help on our Web site
Downloading Help to your computer
Note
❒ For user authentication, enter a
login user name and password,
and then click [OK].
❖ Downloading and Checking Help
You can download Help to your
computer. As the Help URL, you
can specify the path to the local file
to view the Help without connecting to the Internet.
❒ For user code authentication,
enter a user code in [User Name],
and then click [OK].
Note
❒ By clicking [Help] in the header area, the contents of Help appear.
❒ By clicking "?", the Help icon in the
display area, Help for the setting
items in the display area appears.
74
Using Web Image Monitor
Downloading Help
A In the [OS] list, select the operating system.
B In
the [Language] list, select the
language.
C Click [Download].
D Download Help by following the
instructions on the screen.
E Store the downloaded compressed
file in a location, and then decompress the file.
To view the downloaded Web Image Monitor Help, set the path to
the location of the decompressed
file.
Linking the URL of the Help File to the
[Help] Button.
You can link the URL of the help file
on a computer or Web server to the
[Help] button.
A Log on to Web Image Monitor in
the administrator mode.
B In the menu area, click [Configuration].
C Click [Webpage].
D In the [Help URL]
4
box, enter the
URL of the help file.
I f y o u s a v e d t h e h el p f i l e t o
"C:\HELP\EN", enter "file://C:/
HELP/". For example, if you saved
the file to a Web server, and the
URL of the index file is "http://
a.b.c.d/HELP/EN/index.html",
enter "http://a.b.c.d/HELP/".
E Click [Apply].
75
Monitoring and Configuring the Printer
Using SmartDeviceMonitor for Admin
Using SmartDeviceMonitor for Admin, you can monitor the network
printers. Also, you can change the
configuration of the network interface board using TCP/IP or IPX/SPX.
❖ Protocol stack provided with Operating System
• Windows 95/98/Me
TCP/IP
IPX/SPX
NetWare
NetWare Client32 for Windows
95
IntraNetWare Client for Windows 95
Novell Client for Windows
95/98/Me
• Windows 2000
TCP/IP
IPX/SPX
NetWare
Novell Client for Windows
NT/2000/XP
• Windows Server 2003
TCP/IP
IPX/SPX
• Windows XP
TCP/IP
IPX/SPX
Novell Client for Windows
NT/2000/XP
• Windows NT 4.0
TCP/IP
IPX/SPX
Client Service for NetWare
NetWare Client32 for Windows
NT
IntraNetWare Client for Windows NT
Novell Client for Windows
NT/2000/XP
4
76
❖ Available operations
The following functions are available:
• Limits settings done from the
control panel, and disables
changes made to certain items.
• Enables selection of paper type
loaded in the machine.
• Switches to, and comes out of
Energy Saver mode.
• Checks information about printing, paper quantity, etc.
• Simultaneously monitors multiple printers. When there are
many printers, you can create
groups and classify printers to
facilitate management.
• Checks the machine's network settings and detailed device information.
• Enables you to change the machine's network settings.
• You can check details of print
jobs sent from a computer.
• Allows you to check job histories
of printed, faxed (LAN-Fax),
scanned, and photocopied documents identified by user codes.
• Allows selection of functions such as
printing and scanning for each user code.
• Fax numbers and e-mail addresses stored in the machine can be
changed and saved by computer.
• You can check each fax job history entry.
• You can make settings for and
display the status changes of
group devices.
• Using Address Management Tool,
you can manage LAN-Fax numbers, user names for Scan to
Folder, and addresses for sending and receiving Internet faxes.
• The e-mail sender’s name and
folder can be protected.
Using SmartDeviceMonitor for Admin
Installing SmartDeviceMonitor
for Admin
Changing the Network
Interface Board Configuration
Follow the procedure below to install
SmartDeviceMonitor for Admin
Follow the procedure below to
change the network interface board
configuration using SmartDeviceMonitor for Admin.
A Quit all applications currently running.
B Insert the CD-ROM into the CDROM drive.
The installer starts.
Note
❒ Auto Run may not work under
certain operating system settings. In this case, launch “Setup.exe” located on the CDROM root directory.
C Select an interface language, and
then click [OK].
The following languages are available: Czech, Danish, German, English,
Spanish, French, Italian, Hungarian,
Dutch, Norwegian, Polish, Portuguese , Finnish, Swedish, Chinese
Simple and Chinese Traditional.
D Click [SmartNetMonitor for Client/Admin]
installation, and then click [Next].
E The software license agreement appears
in the [License Agreement] dialog box.
After reading through its contents,
click [I accept the agreement] if you
agree, and then click [Next >].
F Follow the instructions on the screen.
A message appears when the installation is complete.
G
Click [OK].
Note
❒ If you are required to restart the
computer after installing SmartDeviceMonitor for Admin, restart the computer and continue
the configuration.
A Start SmartDeviceMonitor for Admin.
B On the [Group] menu, point to [Search
Device], and then click [TCP/IP],
[IPX/SPX] or [TCP/IP(SNMPv3)]. A list of
machines using the selected protocol appears.
4
Note
❒ Select the protocol of the machine whose configuration you
want to change.
❒ If you are using TCP/IP SNMP
v3, enter the user authentication.
C In the list, select a machine whose
configuration you want to change.
D On the [Tools] menu, click [NIB Set-
up Tool].
A Web browser opens and the dialog box for entering the user name
and password for the Web Image
Monitor administrator appears.
For details about the user name
and password, consult your network administrator.
NIB Setup Tool starts when the network interface board is default. Click
[Web Browser], and then click [OK].
E Enter required setting items.
Configure settings using Web Image Monitor. For details, see p.69
“Using Web Image Monitor”.
F Quit Web Image Monitor.
G Quit SmartDeviceMonitor for Admin.
77
Monitoring and Configuring the Printer
Locking the Menus on the
Machine's Control Panel
Follow the procedure below to lock the
menus on the machine's control panel.
A Start SmartDeviceMonitor for Admin.
B On the [Group] menu, point to [Search
Device], and then click [TCP/IP],
[IPX/SPX] or [TCP/IP(SNMPv3)].
A list of machines using the selected protocol appears.
4
Note
❒ Select the protocol of the machine whose configuration you
want to change.
❒ If you are using TCP/IP SNMP
v3, enter the user authentication.
C Select a machine.
D On the [Tools] menu, point to [De-
vice Settings], and then click [Lock
Operation Panel Menu].
A Web browser opens and the dialog box for entering the password
for the Web Image Monitor administrator appears.
Follow the procedure below to change
the paper type.
A Start SmartDeviceMonitor for Admin.
B On the [Group] menu, point to [Search
Device], and then click [TCP/IP],
[IPX/SPX] or [TCP/IP(SNMPv3)].
A list of machines using the selected protocol appears.
Note
❒ Select the protocol of the machine whose configuration you
want to change.
❒ If you are using TCP/IP SNMP
v3, enter the user authentication.
C In the list, select a machine whose
configuration you want to change.
D On the [Tools] menu, point to [De-
vice Settings], and then click [Select
Paper Type].
A Web browser opens and the dialog box for entering the password
for the Web Image Monitor administrator appears.
E Enter
E Enter
F Select [Level 1] or [Level 2] in the
F Select a paper type in the [Paper
G Click [Apply].
H Quit Web Image Monitor.
G Click [Apply].
H Quit Web Image Monitor.
the user name and password, and then click [OK].
For details about the user name
and password, consult your network administrator.
The [System] page of Web Image
Monitor appears.
[Protect Printer Operation Panel] list.
78
Changing the Paper Type
Reference
For details about setting items,
see Help in the [General Settings]
on [Configuration] page.
the user name and password, and then click [OK].
For details about the user name
and password, consult your network administrator.
The [Paper] page appears.
Type] list for each tray.
Reference
For details about setting items,
see Help in the [General Settings]
on [Configuration] page.
Using SmartDeviceMonitor for Admin
Managing User Information
Displaying the Number of Sheets Printed
Follow the procedure below to manage the user's information using
SmartDeviceMonitor for Admin.
Prints jobs can be managed and functions restricted by user codes.
Follow the procedure below to display the number of sheets printed under each user code.
Starting User Management Tool
A Start SmartDeviceMonitor for Admin
User Information Management Tool.
B Click the [User Page Count] tab of
User Management Tool.
The number of pages printed under each user code appears.
Follow the procedure below to start
User Management Tool.
A Start SmartDeviceMonitor for Admin.
B On the [Group] menu, point to [Search
Device], and then click [TCP/IP],
[IPX/SPX] or [TCP/IP(SNMPv3)].
A list of machines using the selected protocol appears.
Note
❒ Select the protocol of the machine whose configuration you
want to change.
❒ If you are using TCP/IP SNMP
v3, enter the user authentication.
C In the list, select a machine you
want to manage.
D On
the [Tools] menu, click [User
Management Tool].
The dialog box for entering the
user name and password appears.
E Enter
the user name and password, and then click [OK].
For details about the user name
and password, consult your network administrator.
User Management Tool starts.
C
4
Click [Finish] on the [File] menu to
quit User Management Tool.
Exporting the information about the
number of pages printed
Follow the procedure below to export
the information of the number of pages printed under each user code as a
.csv file.
A Start SmartDeviceMonitor for Admin
User Information Management Tool.
B Click the [User Page Count] tab of
User Management Tool.
C On
the [File] menu, click [Export
User Statics List].
D Specify the save location and file
name, and then click [Save].
E
Click [Finish] on the [File] menu to
quit User Management Tool.
Reference
For details about User Management Tool, see SmartDeviceMonitor for Admin Help.
79
Monitoring and Configuring the Printer
Resetting the number of pages printed to 0.
Restricting Functions
Follow the procedure below to reset
the number of pages printed under
each user code to 0.
Follow the procedure below to restrict use of individual functions.
A Start SmartDeviceMonitor for Admin
User Information Management Tool.
B Click the [User Page Count] tab of
User Management Tool.
B On the [Edit] menu of User Management Tool, click [Restrict Access To Device].
C Select the check box of the func-
D On
D Click [OK].
the [Edit] menu, click [Reset
User Counters].
E Select the check box of the items
you want to reset, and then click
[OK].
A confirmation message appears.
F Click [Yes].
The number of pages printed is reset to 0.
G On
the [Edit] menu, click [Apply
Settings].
Changes are applied to information on the [User Page Count] tab.
H
80
User Information Management Tool.
C Click the user whose information
you want to reset.
4
A Start SmartDeviceMonitor for Admin
Click [Finish] on the [File] menu to
quit User Management Tool.
tions you want to restrict.
A confirmation message appears.
E Click [Yes].
The settings are applied.
Using SmartDeviceMonitor for Admin
Setting Applicable Functions to New
Users
Configuring the Energy Saver
Mode
Follow the procedure below to add
new users and set functions applicable to them.
Follow the procedure below to configure Energy Saver mode.
A Start SmartDeviceMonitor for Admin
User Information Management Tool.
B Click the [Access Control List] tab of
A Start SmartDeviceMonitor for Admin.
B On the [Group] menu, point to [Search
C On the [Edit] menu, click [Add New
Device], and then click [TCP/IP],
[IPX/SPX] or [TCP/IP(SNMPv3)].
A list of machines using the selected protocol appears.
D Enter the user code and user name.
E Select the check box of the func-
Note
❒ Select the protocol of the machine whose configuration you
want to change.
User Management Tool.
User].
tions applicable to the new user.
Note
❒ If the check boxes are unavailable, there is no restriction to use
that function. For details, see
SmartDeviceMonitor for Admin Help.
❒ If you are using TCP/IP SNMP
v3, enter the user authentication.
C Select the machine whose settings
you want to make.
To make settings for all machines in
the selected group, select no machine.
F Click [OK].
The new user is added.
G On
the [Edit] menu, click [Apply
Settings].
The settings are applied.
H
D On the [Group] menu, point to [Energy Save Mode], point to [Set Individually] to make the settings for
only the selected machine or
point to [Set By Group] to make the
settings for all machines in the selected group, and then click [On]
or [Off].
Click [Finish] on the [File] menu to
quit User Management Tool.
Reference
For details about setting restrictions, see SmartDeviceMonitor
for Admin Help.
4
E
Quit SmartDeviceMonitor for
Admin.
Reference
For details about the setting value for Energy Saver mode, see
SmartDeviceMonitor for Admin Help.
81
Monitoring and Configuring the Printer
Setting a Password
Follow the procedure below to set a
password.
A Start SmartDeviceMonitor for Admin.
B On the [Group] menu, point to [Search
Device], and then click [TCP/IP],
[IPX/SPX] or [TCP/IP(SNMPv3)].
A list of machines using the selected protocol appears.
Note
❒ Select the protocol of the machine whose configuration you
want to change.
4
❒ If you are using TCP/IP SNMP
v3, enter the user authentication.
C In the list, select a machine whose
configuration you want to change.
D On the [Tools] menu, click [NIB Set-
up Tool].
A Web browser opens and the dialog box for entering the password
for the Web Image Monitor administrator appears.
NIB Setup Tool starts when the
network interface board is default.
Click [Web Browser], and then click
[OK].
E Enter
the user name and password, and then click [OK].
For details about the user name
and password, consult your network administrator.
Top Page of Web Image Monitor
appears.
82
F Click [Configuration].
G Click [Device Settings].
H Click [Program/Change Administrator].
I Click [Change].
J On the [New Password], enter a password.
Enter the same password in [Confirm Password] .
K Click [OK].
L Quit Web Image Monitor.
M Quit SmartDeviceMonitor for Admin.
Using SmartDeviceMonitor for Admin
Checking the Machine Status
Changing Names and Comments
Follow the procedure below to check
machine status.
Follow the procedure below to
change the names and comments of
the machine.
A Start SmartDeviceMonitor for Admin.
B On the [Group] menu, point to [Search
Device], and then click [TCP/IP],
[IPX/SPX] or [TCP/IP(SNMPv3)].
The status of machines is indicated
by icons in the list.
Note
❒ For details about status icons,
see SmartDeviceMonitor for
Admin Help.
❒ If you are using TCP/IP SNMP
v3, enter the user authentication.
C To obtain status details, click the
machine in the list, and then click
[Open] on the [Device] menu.
The machine status appears in the
dialog box.
D Quit SmartDeviceMonitor for Admin.
Note
❒ For details about items in the dialog box, see SmartDeviceMonitor for Admin Help.
A Start SmartDeviceMonitor for Admin.
B On the [Group] menu, point to [Search
Device], and then click [TCP/IP],
[IPX/SPX] or [TCP/IP(SNMPv3)].
A list of machines using the selected protocol appears.
4
Note
❒ Select the protocol of the machine whose configuration you
want to change.
❒ If you are using TCP/IP SNMP
v3, enter the user authentication.
C Select a machine in the list.
D On the [Tools] menu, click [NIB Set-
up Tool].
A Web browser opens and the dialog box for entering the password
for the Web Image Monitor administrator appears.
NIB Setup Tool starts when the
network interface board is default.
Click [Web Browser], and then click
[OK].
E Enter the user name and password,
and then click [OK].
Top Page of Web Image Monitor appears.
For details about the user name
and password, consult your network administrator.
F Click [Configuration].
G Click [Device Settings].
83
Monitoring and Configuring the Printer
H On the [System] page, enter the de-
vice name in the [Device name:] box
and a comment in the [Comment]
box, and click [Apply].
• In the [Device name:] box, enter a
device name on the machine using up to 31 characters.
• In the [Comment] box, enter a
comment on the machine using
up to 31 characters.
I Click [OK].
J Quit Web Image Monitor.
K Quit SmartDeviceMonitor for Admin.
4
Load Fax Journal
A Start SmartDeviceMonitor for Admin.
B On the [Group] menu, point to [Search
Device], and then click [TCP/IP],
[IPX/SPX] or [TCP/IP(SNMPv3)].
A list of machines using the selected protocol appears.
Note
❒ Select the protocol of the machine whose configuration you
want to change.
❒ If you are using TCP/IP SNMP
v3, enter the user authentication.
C Select a machine.
D On the [Tools] menu, click [Load
Fax Journal].
A Web browser opens and the dialog box for entering the user name
and password for the Web Image
Monitor administrator appears.
For details about the user name
and password, consult your network administrator.
E Check the Load Fax Journal area
that appears in the Web Image
Monitor.
Reference
For details, see Help in Load
Fax Journal area.
84
Using SmartDeviceMonitor for Admin
Viewing and Deleting Spool
Print Jobs
Managing Address
Information
A Start SmartDeviceMonitor for Admin.
B On the [Group] menu, point to [Search
A Start SmartDeviceMonitor for Admin.
B On the [Group] menu, point to [Search
Note
❒ Select the protocol of the machine whose configuration you
want to change.
Note
❒ Select the protocol of the machine whose configuration you
want to change.
❒ If you are using TCP/IP SNMP
v3, enter the user authentication.
❒ If you are using TCP/IP SNMP
v3, enter the user authentication.
C Select a machine.
D On the [Tools] menu, click [Spool
C Select a machine.
D On the [Tools] menu, click [Address
Device], and then click [TCP/IP],
[IPX/SPX] or [TCP/IP(SNMPv3)].
A list of machines using the selected protocol appears.
Printing Job List(Printer)].
A Web browser opens and the dialog box for entering the user name
and password for the Web Image
Monitor administrator appears.
For details about the user name
and password, consult your network administrator.
E Check the Spool Printing Job List
that appears in the Web Image
Monitor.
To delete the Spool Printing Job,
select the document you want to
delete and then click [Delete].
Device], and then click [TCP/IP],
[IPX/SPX] or [TCP/IP(SNMPv3)].
A list of machines using the selected protocol appears.
4
Management Tool].
The dialog box for entering the
user name and password appears.
E Enter
the user name and password, and then click [OK].
Address Management Tool starts.
For details about the user name
and password, consult your network administrator.
Reference
For details, see Address Management Tool Help.
Note
❒ To display Spool Printing Job List,
spool must be set to [Enable] on
Web Image Monitor in advance.
Reference
For details, see Help in Spool
Printing Job List area.
85
Monitoring and Configuring the Printer
Using SmartDeviceMonitor for Client
To view the status of machines using
SmartDeviceMonitor for Client, configure SmartDeviceMonitor for Client
beforehand.
Monitoring Printers
Follow the procedure below to monitor the machine using SmartDeviceMonitor for Client.
A Start SmartDeviceMonitor for Client.
4
The SmartDeviceMonitor for Client icon appears in the task tray.
B Right-click the SmartDeviceMon-
itor for Client icon, and check that
the machine appears on the popup menu.
C Click
[Options...] on the pop-up
menu if the machine does not appear on the pop-up menu.
The [SmartDeviceMonitor for Client Options] dialog box appears.
D Click
the machine you want to
monitor, and then select the [To Be
Monitored] check box in the [Monitoring Information Settings] area.
Note
❒ To display the machine status in
the task tray using the SmartDeviceMonitor for Client icon, select the [Displayed on Task Bar]
check box.
❒ For details about status icons,
see SmartDeviceMonitor for
Client Help.
E Click [OK].
The dialog box closes and the configured machine is monitored.
86
Checking the Machine Status
Follow the procedure below to check
machine status using SmartDeviceMonitor for Client.
A Start SmartDeviceMonitor for Client.
B For status details, right-click the
SmartDeviceMonitor for Client
icon, and then click the machine.
The machine status appears in the
dialog box.
Note
❒ For details about items in the dialog box, see SmartDeviceMonitor for Client Help.
Using SmartDeviceMonitor for Client
When Using IPP with
SmartDeviceMonitor for Client
When using IPP with SmartDeviceMonitor for Client, note the following:
• The network printer can only receive one print job from SmartDeviceMonitor for Client at a time.
While the network printer is printing, another user cannot access it
until the job is finished. In this
case, SmartDeviceMonitor for Client tries to access the network
printer until the retry interval expires.
• If SmartDeviceMonitor for Client
cannot access the network printer
and times out, it will stop sending
the print job. In this case, you
should cancel the paused status
from the print queue window.
SmartDeviceMonitor for Client
will resume access to the network
printer. You can delete the print
job from the print queue window,
but canceling a print job printed by
the network printer might cause
the next job sent from another user
to be incorrectly printed.
• If a print job sent from SmartDeviceMonitor for Client is interrupted and the network printer cancels
the job because something went
wrong, send the print job again.
• Print jobs sent from another computer do not appear in the print
queue window, regardless of protocol.
• If various users send print jobs using SmartDeviceMonitor for Client
to network printers, the printing
order might not be the same as that
in which the jobs were sent.
• An IP address cannot be used for
the IPP port name because the IP
address is used for the SmartDeviceMonitor for Client port name.
• When setting SSL, a protocol for
encrypted communication, under
environment which server authentification is issued, enter "https://(ma chine's a ddress)/".
Internet Explorer must be installed
on your computer. Use the highest
version. Internet Explorer 6.0 or
higher is recommended.
• If the [Security Alert] dialog box appears when accessing the machine
using IPP to create or configure an
IPP port, or when printing, install
the certificate. To select the certificate store location when using Certificate Import Wizard, click [Place
all certificates in the following store],
and then click [Local Computer] under [Trusted Root Certification Authorities].
4
Note
❒ For details about SSL settings,
consult your network administrator.
87
Monitoring and Configuring the Printer
Remote Maintenance by telnet
Important
❒ Remote Maintenance should be
password-protected so that access
is allowed to administrators only.
❒ The password is the same as the
one of Web Image Monitor administrator. When the password is
changed using "mshell", other
passwords change also.
❒ Some command cannot be set depending on the model type.
4
Using telnet
Follow the procedure below to use
telnet.
Important
❒ Only one user at a time can log on
to perform remote maintenance.
A Use the IP address or the host name
of the machine to start telnet.
% telnet IP_address
B Enter your user name and password.
For details about the user name
and password, consult your network administrator.
Note
❒ For user authentication, enter a
login user name and password,
and then click [OK].
❒ For user code authentication,
enter a user code in [User Name],
and then click [OK].
C Enter a command.
88
D Quit telnet.
msh> logout
The configuration message about
saving the changes appears.
E Enter "yes" to save the changes,
and then press the {# Enter} key.
If you do not want to save the
changes, enter "no", and then press
the {# Enter} key. To make further
changes, enter "return" at the command line, and then press the {# Enter} key.
Note
❒ If the message "Can not write
NVRAM information" appears,
the changes are not saved. Repeat the procedure above.
❒ When the changes are saved,
the network interface board is
reset automatically with that
changes.
❒ When the network interface
board resets, the print job in print
process will be printed. However, print jobs in queue will be
canceled.
Remote Maintenance by telnet
access
appletalk
Use the “access” command to view
and configure access control. You can
also specify two or more access ranges.
Use the “appletalk” command to view
and configure Appletalk parameters.
❖ View settings
msh> access
❖ Configuration
msh> access ✩ range “startaddress end-address”
• ✩ represents a target number
between 1 and 5. (Up to five access ranges can be registered
and selected.)
Example: to specify accessible IP
addresses between 192.168.0.10
and 192.168.0.20:
msh>
access
1
range
192.168.0.10 192.168.0.20
❖ View settings
msh> appletalk
• [2] means "active" and [0]
means "inactive".
• The default is [2].
❖ Changing PAP timeout configuration
msh> appletalk ptimeout
value > 0
• Timeout value becomes effective.
msh> appletalk ptimeout
value = 0
• Timeout value becomes ineffective.
4
❖ Access control initialization
msh> access flush
• Use the "flush" command to restore the default settings so that
all access ranges become
"0.0.0.0".
Note
❒ The access range restricts computers from use of the machine by IP
address. If you do not need to restrict printing, make the setting
"0.0.0.0".
❒ Valid ranges must be from lower
(start address) to higher (end address).
❒ Up to five access ranges can be
specified. The entry is invalid if the
target number is omitted.
❒ You cannot access Web Image Monitor from a restricted IP address.
89
Monitoring and Configuring the Printer
autonet
btconfig
Use the “autonet” command to configure AutoNet parameters.
Use the "btconfig" command to make
Bluetooth settings.
❖ View settings
The following command displays
the current AutoNet settings:
msh> autonet
❖ View settings
Bluetooth settings are displayed.
msh> btconfig
❖ Configuration
You can configure AutoNet settings.
msh> autonet {on|off}
• {on} means "active" and {off}
means "inactive".
4
❖ Current interface priority configuration display
msh> autonet priority
❖ Interface priority configuration
msh> autonet priority
“interface_name”
• You can give interface's AutoNet parameter priority.
• Priority settings are available
when multiple interfaces are installed.
• ip1394 can be specified only
when the IEEE 1394 interface is
installed.
• wlan can be specified only when
the IEEE 802.11b interface is installed.
90
Interface name
Interface configured
ether
Ethernet interface
ip1394
IEEE 1394 interface
wlan
IEEE 802.11b interface
Note
❒ If an interface is not selected, the
current interface connection settings remain in effect.
❖ Mode settings
You can set the Bluetooth operation mode to {private} or {public}.
msh> btconfig {private |
public}
• The default is {public}.
devicename
Use the "devicename" command to
display and change the printer name.
❖ View settings
msh> devicename
❖ Printer name configuration
msh> devicename
“string”
name
• Enter a printer name using up
to 31 alphanumeric characters.
• Set single names for each printer.
❖ Printer name initialization
msh> devicename clear name
• Reset the printer name to its default.
Remote Maintenance by telnet
dhcp
Use the "dhcp" command to configure DHCP settings.
❖ View settings
The following command displays
the current DHCP settings.
msh> dhcp
❖ Configuration
You can configure DHCP.
msh> dhcp “interface_name”
{on|off}
• Click {on} to enable dhcp. Click
{off} to disable DHCP.
• If the DNS server address and
domain name are obtained from
DHCP, be sure to click {on}.
• ip1394 can be specified only
when the IEEE 1394 interface is
installed.
• wlan can be specified only
when the IEEE 802.11b interface
is installed.
Interface name
Interface configured
ether
Ethernet interface
ip1394
IEEE 1394 interface
wlan
IEEE 802.11b interface
❖ DNS server address selection
msh> dhcp dnsaddr {dhcp |
static}
• Specify whether to obtain the
DNS server address from the
DHCP server or use the address
set by a user.
• To obtain the DNS server address
from the DHCP server, specify
"dhcp". To use the address set by
a user, specify "static".
❖ Domain name selection
msh> dhcp domainname {dhcp
| static}
• Specify whether to obtain the
domain name from the DNS
server or use the domain name
set by a user.
• To obtain the domain name from
the DHCP server, specify "dhcp".
To use the domain name set by a
user, specify "static".
4
Reference
For details about DHCP functions,
see p.139 “Using DHCP”.
For details about setting the DNS
server address, see p.92 “dns”.
For details about setting the domain name, see p.93 “domainname”.
❖ Current interface priority configuration display
msh> dhcp priority
❖ Interface priority configuration
msh>
dhcp
priority
“interface_name”
• You can select which interface
has DHCP parameter priority.
• Priority settings are available
when multiple interfaces are installed.
91
Monitoring and Configuring the Printer
diprint
dns
The direct printing port enables direct
printing from a network-connected
computer.
Use the “diprint” command to change
direct printing port settings.
Use the “dns” command to configure
or display DNS (Domain Name System) settings.
❖ View settings
The following command displays
the current direct printing port settings:
msh> diprint
Example output:
port 9100
timeout=300(sec)
bidirect on
• The “port” specifies the port
number of the direct printing
port.
• The “bidirect” setting indicates
whether the direct printing port
is bidirectional or not.
4
❖ Setting timeout
msh> diprint timeout {30–
65535}
• You can specify the timeout interval to use when the printer is
expecting data from the network.
• The default is 300 seconds.
❖ Setting bidirect
msh> diprint bidirect { on
| off }
• You can specify whether the direct printing port is bidirectional or not.
92
❖ View settings
The following command displays
current DNS settings:
msh> dns
❖ DNS server configuration
The following command enables or
disables the DNS server address:
msh> dns “number” server
“server address”
The following command displays
a configuration using the IP address 192.168.15.16 on a DNS 1
server:
msh> dns 1 server 192.168.
15.16
• You can register up to three
DNS server numbers.
• You cannot use “255.255.255.255”
as the DNS server address.
❖ Dynamic DNS function setting
msh> dns “interface_name”
ddns {on|off}
• You can set the dynamic DNS
function "active" or "inactive".
• {on} means "active" and {off}
means "inactive".
• ip1394 can be specified only
when the IEEE 1394 interface is
installed.
• wlan can be specified only
when the IEEE 802.11b interface
is installed.
Interface name
Interface configured
ether
Ethernet interface
ip1394
IEEE 1394 interface
wlan
IEEE 802.11b interface
Remote Maintenance by telnet
❖ Specifying the record overlap operation
msh> dns overlap {update|add}
• You can specify operations performed when records overlap.
• update
To delete old records and register new records.
• add
To add new records and store
the old records.
• When CNAME overlaps, it is always changed, irrespective of
settings.
❖ CNAME registration
msh> dns cname {on|off}
• You can specify whether to register CNAME.
• {on} means "active" and {off}
means "inactive".
• The CNAME registered is the
default name beginning with
rnp. CNAME cannot be
changed.
❖ A records registration
msh> dns arecord {dhcp|own}
• {dhcp}
You can specify the method of
registering an A record when
the dynamic DNS function is
enabled and DHCP is used.
• {own}
To register an A record using
the printer as the DNS client.
The DNS server address and the
domain name already designated are used for the registration.
❖ Record updating interval settings
msh> dns interval “time”
• You can specify the interval after which records are updated
when using the dynamic DNS
function.
• The updating interval is specified hourly. It can be entered between 1 and 255 hours.
• The default is 24 hours.
domainname
4
Use the "domainname" command to
display or configure the domain
name settings.
You can configure the Ethernet interface, IEEE 1394 interface, or IEEE
802.11b interface.
❖ View settings
The following command displays
the current domain name:
msh> domainname
❖ Interface domain configuration
msh> domainname “interface_
name”
93
Monitoring and Configuring the Printer
❖ Setting the Domain Name
msh> domainname “interface_
name” name “domain name”
• A domain name can be entered
using up to 63 alphanumeric
characters.
• The Ethernet interface and IEEE
802.11b interface will have the
same domain name.
• ip1394 can be specified only
when the IEEE 1394 interface is
installed.
• wlan can be specified only when
the IEEE 802.11b interface is installed.
4
Interface
Interface set
ether
Ethernet interface
ip1394
IEEE 1394 interface
wlan
IEEE 802.11b interface
❖ Deleting the Domain Name
msh> domainname “interface_
name” clear name
help
Use the "help" command to display
the available command list and the
procedures for using those commands.
❖ Command list display
msh> help
❖ Display of procedure for using commands
msh> help “command_name”
94
hostname
Use the “hostname” command to
change the printer name.
❖ View settings
msh> hostname
❖ Configuration
msh> hostname “interface_
name ” “printer_name”
• Enter the printer name using
up to 63 alphanumeric characters.
• You cannot use a printer name
starting with "RNP" or "rnp".
• The Ethernet interface and IEEE
802.11b interface will have the
same printer name.
• ip1394 can be specified only
when the IEEE 1394 interface is
installed.
• wlan can be specified only
when the IEEE 802.11b interface
is installed.
Interface name
Interface configured
ether
Ethernet interface
ip1394
IEEE 1394 interface
wlan
IEEE 802.11b interface
❖ Initializing the printer name for each
interface
msh> hostname “interface_
name” clear name
Remote Maintenance by telnet
ifconfig
Use the "ifconfig" command to configure TCP/IP (IP address, subnet
mask, broadcast address, default
gateway address) for the printer.
❖ View settings
msh> ifconfig
❖ Configuration
msh> ifconfig “interface_
name” “parameter” “address”
• If you did not enter an interface
name, it is automatically set to
the Ethernet interface.
• ip1394 can be specified only
when the IEEE 1394 interface is
installed.
• wlan can be specified only
when the IEEE 802.11b interface
is installed.
Interface name
Interface configured
ether
Ethernet Interface
ip1394
IEEE 1394 interface
wlan
IEEE 802.11b interface
❖ Netmask configuration
msh> ifconfig “interface_
name” netmask “address”
❖ Broadcast address configuration
msh> ifconfig “interface_
name” broadcast “address”
❖ Changing the Interface
msh> ifconfig “interface” up
• You can specify either the Ethernet interface or IEEE 802.11b
interface when using the optional IEEE 802.11b interface
unit.
You cannot specify the IEEE
1394 interface.
The following explains how to
configure an IP address
192.168.15.16 on Ethernet interface.
msh> ifconfig ether 192.168.
15.16
The following explains how to
configure a subnet mask
255.255.255.0 on Ethernet interface.
msh> ifconfig ether netmask 255.255.255.0
4
Note
❒ To get the above addresses, contact
your network administrator.
❒ Use the default configuration if you
cannot obtain setting addresses.
❒ The IP address, subnet mask and
broadcast address are the same as
that for the ethernet interface and
IEEE 802.11b interface.
❒ When installing the optional 1394
Interface board, set the IP address
and subnet mask so that it does not
overlap with the ethernet interface
or the IEEE 1394 interface.
❒ TCP/IP configuration is the same
for both Ethernet and IEEE 802.11b
interface. If interfaces are changed,
the new interface inherits the configuration.
❒ Use "0x" as the initial two letters of
a hexadecimal address.
95
Monitoring and Configuring the Printer
info
Use the "info" command to display
printer information such as paper
tray, output tray, and printer language.
❖ Printer information display
msh> info
Reference
For details about displayed contents, see p.112 “Getting Printer Information over the Network”.
4
ipp
Use the “ipp” command to configure
IPP settings.
❖ Viewing settings
The following command displays
the current IPP settings:
msh> ipp
Example output:
timeout = 900(sec)
auth = basic
• The “timeout” setting specifies
how many seconds the computer tries to send print jobs when
no connection can be made to
the network printer.
• The “auth” setting indicates the
user authorization mode.
❖ IPP timeout configuration
Specify how many seconds the
computer waits before canceling
an interrupted print job. The time
can be entered between 30 to 65535
seconds.
msh> ipp timeout {30 65535}
96
❖ IPP user authorization configuration
Use IPP user authorization to restrict users to print with IPP. The
default is “off”.
msh> ipp auth {basic|digest|off}
• User authorization settings are
“basic” and “digest”.
• Use “off” to remove a user's authorization.
• If user authorization is specified, register a user name. You
can register up to 10 users.
❖ IPP user configuration
Use the following command:
msh> ipp user
The following message appears:
msh> Input user number (1
to 10):
Enter the number, user name, and
password.
msh> IPP user name:user1
msh> IPP password:*******
After configuring the settings, the
following message appears:
User configuration changed.
netware
Use the “netware” command to configure the NetWare settings such as
the print server name or file server
name.
❖ Netware Printer Server Names
msh> netware pname
• Enter the NetWare print server
name using up to 47 characters.
❖ Netware File Server Names
msh> netware fname
• Enter the NetWare file server
name using up to 47 characters.
Remote Maintenance by telnet
❖ Encap type
msh>
netware
encap
{802.3|802.2|snap|etherne
t2|auto}
❖ Remote Printer Number
msh> netware rnum
❖ Timeout
msh> netware timeout
❖ Printer server mode
msh> netware mode pserver
msh> netware mode ps
❖ Remote printer mode
msh> netware mode rprinter
msh> netware mode rp
❖ NDS context name
msh> netware context
❖ SAP interval
msh> netware “sap_interval”
❖ Setting login mode for file server
msh> netware login server
❖ Setting login mode for NDS tree
msh> netware login tree
❖ Setting login mode for NDS tree name
msh> netware tree “NDS name”
passwd
Use the “passwd” command to
change the remote maintenance password.
❖ Changing the Password
msh> passwd
• Enter the current password.
• Enter the new password.
• Enter the new password once
again.
4
Note
❒ Be sure not to forget or lose the
password.
❒ The password can be entered using up to 32 alphanumeric characters. Passwords are case-sensitive.
For example, "R" is not the same as
"r".
prnlog
Use the “prnlog” command to obtain
printer log information.
❖ Print logs display
msh> prnlog
• Displays 16 previous print jobs.
msh> prnlog “ID Number”
• Specify the ID number of the
displayed print log information
to display additional details
about a print job.
Note
❒ For details about displayed contents, see p.112 “Getting Printer Information over the Network”.
97
Monitoring and Configuring the Printer
rendezvous
Use the “rendezvous” command to
display rendezvous-related settings.
❖ View settings
R endez vous settings a re displayed.
msh> rendezvous
❖ Current computer name display
msh> rendezvous cname
❖ Display information about the current
printer location
msh> rendezvous location
4
98
❖ Setting order of priority for each protocol
• diprint
msh> rendezvous diprint
{0–99}
• lpr
msh> rendezvous lpr {0–
99}
• ipp
msh> rendezvous ipp {0–
99}
You can specify the order of priority for “diprint”, “1pr”, and “ipp”.
Smaller numbers indicate higher
priority.
❖ Rendezvous computer name setting
You can specify the rendezvous
computer name.
msh> rendezvous cname
“computer name”
• The computer name can be entered using up to 63 alphanumeric characters.
❖ IP TTL setting
msh> rendezvous ipttl {1255}
You can specify the IP TTL (the
number of routers a packet can
pass through).
❖ rendezvous Installation location information setting
You can enter information about
the location where the printer is installed.
msh> rendezvous location
“location”
• Information about location can
be entered using up to 32 alphanumeric characters.
❖ Resetting the computer name and location information
You can reset the computer name
and location information.
msh> rendezvous clear {cname
| location}
• cname
Reset the computer name. The
default computer name will be
displayed when the computer is
restarted.
• location
Reset the location information.
The previous location information will be deleted.
Note
❒ The default is 255.
Remote Maintenance by telnet
❖ Interface configuration
msh> rendezvous linklocal
“interface_name”
• If many types of interface are installed, configure the interface
that communicates with linklocal address.
• If you do not specify an interface, the Ethernet interface is
automatically selected.
• ip1394 can be specified only
when the IEEE 1394 interface is
installed.
• wlan can be specified only when
the IEEE 802.11b interface is installed.
❖ Adding Routing Table
msh> route add {host|net}
“destination” “gateway”
• Adds a host or network route to
“destination”, and a gateway
address to “gateway” in the table.
• Specify the IP address to destination and gateway.
• Host becomes the default setting.
❖ Setting Default Gateway
msh> route add default
“gateway”
route
❖ Deleting Specified destination from
Routing Table
msh> route delete {host|net}
“destination”
• Host becomes the default setting.
• IP address of destination can be
specified.
Use the “route” command to control
the routing table.
❖ Route Flush
msh> route flush
Interface
Interface configured
ether
Ethernet interface
ip1394
IEEE 1394 interface
wlan
IEEE 802.11b interface
❖ All route information display
msh> route
❖ Specified route information display
msh> route “destination”
• Specify the IP address to destination.
❖ Enabling/disabling Specified Destination
msh> route active {host|net}
“destination” {on | off}
• You can turn the specified destination on or off. Host becomes
the default setting.
4
Note
❒ The maximum number of routing
tables is 16.
❒ Set a gateway address when communicating with devices on an external network.
❒ The same gateway address is
shared by all interfaces.
99
Monitoring and Configuring the Printer
set
Use the "set" command to set the protocol information display "active" or
"inactive".
❖ View settings
The following command displays
protocol information (active/inactive).
msh> set tcpip
msh> set appletalk
msh> set netware
msh> set smb
msh> set scsiprint
• scsiprint is available when the
optional IEEE 1394 interface
board is installed.
msh> set ip1394
• ip1394 can be specified only
when the IEEE 1394 interface is
installed.
msh> set protocol
• When protocol is specified, information about TCP/IP, appletalk, netware, and smb appears.
msh> set lpr
msh> set ftp
msh> set rsh
msh> set diprint
msh> set web
msh> set snmp
msh> set ssl
msh> set nrs
msh> set rfu
msh> set ipp
msh> set http
msh> set rendezvous
4
100
❖ Configuration
• Enter “up”to enable protocol,
and enter “down” to disable
protocol.
You can set the protocol to "active"
or "inactive".
msh> set tcpip {up | down}
• If you disable TCP/IP, you cannot use remote access after logging off. If you did this by
mistake, you can use the control
panel to enable remote access
via TCP/IP.
• Disabling TCP/IP also disables
ip1394, lpr, ftp, rsh, diprint,
web, snmp, ssl, ipp, http, and
rendezvous
msh> set appletalk {up | down}
msh> set netware {up | down}
msh> set smb {up | down}
msh> set scsiprint {up | down}
• scsiprint is available when the
optional IEEE 1394 interface
board is installed.
msh > se t i p1394 {up |
down}
• ip1394 can be specified only
when the IEEE 1394 interface is
installed.
msh> set lpr {up | down}
msh> set ftp {up | down}
msh> set rsh {up | down}
msh> set diprint {up | down}
msh> set web {up | down}
msh> set snmp {up | down}
msh> set ssl {up | down}
Remote Maintenance by telnet
• If Secured Sockets Layer (SSL,
an encryption protocol) function is not available for the
printer, you cannot use the
function by enabling it.
msh> set nrs {up | down}
msh> set rfu {up | down}
msh> set ipp {up | down}
msh> set http {up | down}
msh> set rendezvous {up | down}
show
Use the "show" command to display
network interface board configuration settings.
❖ View settings
msh> show
• If "-p" is added, you can view
settings one by one.
slp
Use “slp” command to configure SLP
settings.
msh> slp ttl “ttl_val”
• You can search the NetWare server
using SLP in the PureIP environment of NetWare 5/5.1 and Netware 6/6.5. Using the "slp"
command, you can configure the
value of TTL which can be used by
SLP multicast packet.
• The default value of TTL is 1. A
search is executed only within a local segment. If the router does not
support multicast, the settings are
not available even if the TTL value
is increased.
• The acceptable TTL value is between 1 and 255.
4
Reference
For details about the information
displayed, see p.122 “Configuring
the Network Interface Board”.
101
Monitoring and Configuring the Printer
smb
snmp
Use the “smb” command to configure
or delete the computer or workgroup
name for SMB.
Use the “snmp” command to display
and edit SNMP configuration settings
such as the community name.
❖ Computer Name settings
msh> smb comp
• Set computer name using up to
15 characters. Names beginning
with "RNP" or "rnp" cannot be
entered.
❖ View settings
msh> snmp
• Default access settings 1 is as
follows:
Community name:public
IP address:0.0.0.0
Access type:read-only / trap off
• Default access settings 2 is as
follows:
Community name:admin
IP address:0.0.0.0
Access type:read-write / trap
off
• If "-p" is added, you can view
settings one by one.
• To display the current community, specify its registration
number.
❖ Working Group Name settings
msh> smb group
• Set workgroup name using up
to 15 characters
4
❖ Comment settings
msh> smb comment
• Set comment using up to 31
characters
❖ Notify print job completion
msh> smb notif {on | off}
• To notify print job completion,
specify “on”. Otherwise, specify
“off”
❖ Deleting Computer Name
msh> smb clear comp
❖ Deleting Group Name
msh> smb clear group
❖ Deleting Comment
msh> smb clear comment
❖ Protocol settings
msh> smb protocol [netbeui
{up | down} | tcpip {up |
down}]
• Enable or disable NetBEUI and
TCP/IP. Specify “up” to enable,
and “down” to disable.
102
❖ Display
msh> snmp ?
❖ Community name configuration
msh> snmp “number” name
“community_name”
• You can configure ten SNMP
access settings numbered 1-10.
• The printer cannot be accessed
from SmartDeviceMonitor for
Admin or SmartDeviceMonitor
for Client if “public” is not registered in numbers 1-10. When
changing the community name,
use SmartDeviceMonitor for
Admin and SNMP Setup Tool
to correspond with printer settings.
• The community name can be
entered using up to 15 characters.
Remote Maintenance by telnet
❖ Deleting community name
msh> snmp “number” clear
name
❖ Access type configuration
msh> snmp “number” type
“access_type”
Access type
Type of access
permission
no
not accessible
read
read only
write
read and write
trap
user is notified of
trap messages
❖ Protocol configuration
msh> snmp {ip | ipx} {on |
off}
• Use the following command to
set protocols "active" or "inactive": If you set a protocol "inactive", all access settings for that
protocol are disabled.
• Specify "ip" for TCP/IP, or "ipx"
for IPX/SPX.
• {on} means "active" and {off}
means "inactive".
• IEEE 1394 interface is available
for TCP/IP only.
❖ Configuration of protocol for each
registration number
msh> snmp “number” active
{ip | ipx} {on | off}
• To change the protocol of access
settings, use the following command. However, if you have
disabled a protocol with the
above command, activating it
here has no effect.
❖ Access configuration
msh> snmp “number” {ip/addr | ipx} “address”
• You can configure a host address according to the protocol
used.
• The network interface board accepts requests only from hosts
that have addresses with access
types of "read-only" or "readwrite". Enter “0” to have network interface board accept requests from any host without
requiring a specific type of access.
• Enter a host address to deliver
"trap" access type information to.
• To specify TCP/IP, enter "ip"
followed by a space, and then
the IP address.
• To specify IPX/SPX, enter "ipx"
followed by a space, the IPX address followed by a decimal,
and then the MAC address of
the network interface board.
4
❖ sysLocation configuration
msh> snmp location
❖ Deleting sysLocation
msh> snmp clear location
❖ sysContact setting
msh> snmp contact
❖ Deleting sysContact
msh> snmp clear contact
❖ SNMP v1v2 function configuration
msh> snmp v1v2 {on | off}
• Specify "on" to enable, and "off"
to disable.
103
Monitoring and Configuring the Printer
❖ SNMP v3 function configuration
msh> snmp v3 {on | off}
• Specify "on" to enable, and "off"
to disable.
❖ SNMP TRAP configuration
msh> snmp trap {v1 | v2 |
v3} {on | off}
• Specify "on" to enable, and "off"
to disable.
❖ Remote Configuration Authorization
configuration
msh> snmp remote {on |
off}
• Specify "on" to enable, and "off"
to disable.
4
❖ SNMP v3 TRAP configuration display
msh> snmp v3trap
msh> snmp v3trap {1- 5}
• If a number from 1-5 is entered,
settings are displayed for that
number only.
❖ Configuring a sending address for
SNMP v3 TRAP
msh> snmp v3trap {1-5}
{ip| ipx} “address”
104
❖ Configuring a sending protocol for
SNMP v3 TRAP
msh> snmp v3trap {1-5} active {ip/addr | ipx} {on |
off}
❖ Configuring a user account for SNMP
v3 TRAP
msh> snmp v3trap {1-5} account “account_name”
• Enter an account name using up
to 32 alphanumeric characters.
❖ Deleting an SNMP v3 TRAP user account
msh> snmp v3trap {1-5}
clear account
❖ Configuring an SNMP v3 encryption
algorithm
msh> snmp v3auth {md5 |
sha1}
❖ Configuring SNMP v3 encryption
msh> snmp v3priv {auto |
on}
• Set "auto" for automatic encryption configuration
• Set "on" for mandatory encryption configuration.
Remote Maintenance by telnet
sntp
spoolsw
The printer clock can be synchronized
with a NTP server clock using Simple
Network Time Protocol (SNTP). Use
the "sntp" command to change SNTP
settings.
Use the “spoolsw” command to configure Job Spool settings.
You can only specify diprint, lpr, ipp,
ftp and smb protocol.
• The “spoolsw” command for configuring Job Spool settings is available only when the optional hard
disk is installed.
❖ View settings
msh> sntp
❖ NTP server address configuration
You can specify the IP address of
the NTP server.
msh> sntp server “IP_
address”
❖ Interval configuration
msh> sntp interval “polling_
time”
• You can specify the interval at
which the printer synchronizes
with the operator-specified
NTP server. The default is 60
minutes.
• The interval can be entered between 16 and 16,384 minutes.
• If you set 0, the printer synchronizes with the NTP server only
when you turn the printer on.
After that, the printer does not
synchronize with the NTP server.
❖ Time-zone configuration
msh> sntp timezone “+/hour_time”
• You can specify the time difference between the printer clock
and NTP server clock. Time is in
24-hour format.
❖ View settings
The Job Spool setting appears.
msh> spoolsw
4
❖ Job Spool setting
msh> spoolsw spool {on | off}
Note
❒ Specify "on" to enable Job Spool,
or "off" to disable it.
❖ Resetting Job spool setting
msh> spoolsw clear job {on
| off}
• When the printer power is cut
during job spooling, this determines whether to reprint the
spooled job.
❖ Protocol configuration
msh> spoolsw diprint {on | off}
msh> spoolsw lpr {on | off}
msh> spoolsw ipp {on | off}
msh> spoolsw smb {on | off}
msh> spoolsw ftp {on | off}
• You can specify the settings for
diprint, lpr, ipp, and smb.
105
Monitoring and Configuring the Printer
sprint
syslog
Use the "sprint" command to make
settings for IEEE 1394 (SCSI print).
Use the “syslog” command to display
the information stored in the printer's
system log.
❖ View settings
IEEE 1394 (SCSI print) settings are
displayed.
msh> sprint
❖ Bidirectional configuration for IEEE
1394 (SCSI print)
Use this setting to set IEEE 1394
(SCSI print) bidirectional.
The default is “on”.
msh> sprint bidi {on | off}
4
Reference
For details about the information
displayed, see p.127 “System Log
Information”.
upnp
status
Use the "upnp" command to display
and configure the universal plug and
play.
The printer status can be checked using the following command:
❖ Public URL display
msh> upnp url
❖ Messages
msh> status
Reference
For details, see p.112 “Current
Printer Status”
106
❖ View message
msh> syslog
❖ Public URL configuration
msh> upnp "url string"
• Enter the URL string in the character string.
Remote Maintenance by telnet
web
wiconfig
Use the “web” command to display
and configure parameters on Web
Image Monitor.
Use the "wiconfig" command to make
settings for IEEE 802.11b.
❖ View Settings
msh> web
❖ URL Configuration
You can set URLs linked by clicking [URL] on Web Image Monitor.
Specify "1" or "2" for x as the
number corresponding to the URL.
Up to two URLs can be registered
and specified.
msh> web url http://”The
URL or IP address you want
to register”/
❖ Deleting URLs registered as link destinations
msh> web x clear url
Specify "1" or "2" for x as the corresponding number to the URL.
❖ Link name configuration
You can enter the name for [URL] that
appears on Web Image Monitor.
Specify "1" or "2" for x as the corresponding number to the link name.
msh> web name “Name you
want to display”
❖ Deleting URL names registered as
link destinations
msh> web x clear name
Specify "1" or "2" for x as the number
corresponding to the link name.
❖ Help URL Configuration
You can set URLs linked by clicking [Help] or [?] on Web Image
Monitor.
msh> web help http://”Help
URL or IP address”/help/
❖ Deleting Help URL
msh> web clear help
❖ View settings
msh> wiconfig
❖ View IEEE 802.11b settings
msh> wiconfig cardinfo
• If IEEE 802.11b is not working
correctly, its information is not
displayed.
4
❖ Configuration
msh> wiconfig “parameter”
Parameter
Value configured
mode {ap|adhoc|802.11adhoc}
You can set the infrastructure mode
(ap) , the 802.11 Ad
hoc mode
(802.11adhoc), or
the ad hoc mode
(adhoc).
The default is ad
hoc mode.
ssid “ID value”
You can make settings for the SSID
in the infrastructure mode.
Usable characters
are ASCII 0x200x7e (32 bytes).
An SSID value is
set automatically
to the nearest access point if no setting is made.
If no setting is
made for the ad
hoc mode, the
same value as for
the infrastructure
mode or an ASSID
value is automatically set.
107
Monitoring and Configuring the Printer
Parameter
Value configured
Parameter
Value configured
channel frequency
“channel no.”
You can enable or
disable the WEP
function. To enable
the WEP function,
specify [on]; to disable it, specify
[off].
key { “key value” }
val {1|2|3|4}
You can specify
the WEP key when
entering in hexadecimal.
To start the WEP
function, enter the
correct WEP key.
enc {on|off}
4
You can enable or
disable the WEP
function. To enable
the WEP function,
specify [on]; to disable it, specify
[off].
To start the WEP
function, enter the
correct WEP key.
With a 64-bit WEP,
you can use 10 digit hexadecimals.
With a 128-bit
WEP, you can use
26 digit hexadecimals.
Up to four WEP
keys can be registered. Specify the
number to be registered with “val”.
When a WEP is
specified by key,
the WEP specified
by key phrase is
overwritten.
To use this function, set the same
key number and
WEP key for all
ports that transmit
data to each other.
You can omit the
numbers with
“val”. The key
number is set to 1
when making
these omissions.
108
Remote Maintenance by telnet
Parameter
Value configured
Parameter
Value configured
keyphrase {
“phrase” } val
{1|2|3|4}
You can specify
the WEP key when
entering in ASCII.
rate {auto|11m|5.5m|2m
|1m}
You can set the
IEEE 802.11b transmitting speed.
With a 64-bit WEP,
you can use 10 digit hexadecimals.
With a 128-bit
WEP, you can use
26 digit hexadecimals.
Up to four WEP
keys can be registered. Specify the
number to be registered with “val”.
When a WEP is
specified by key
phrase, the WEP
specified by key is
overwritten.
The speed you
specify here is the
speed at which
data is sent. You
can receive data at
any speed.
auto: automatically set (default)
11m: 11 Mbps
fixed
4
5.5m: 5.5 Mbps
fixed
2m: 2 Mbps fixed
1m: 1 Mbps fixed
To use this function, set the same
key number and
WEP key for all
ports that transmit
data to each other.
You can omit the
numbers with
“val”. The key
number is set to 1
when making
these omissions.
encval {1|2|3|4}
You can specify
which of the four
WEP keys is used
for packet encoding. “1” is set if a
number is not
specified.
auth
{open|shared}
You can set an authorization mode
when using WEP.
The specified value and authorized
mode are as follows:
open: open system
authorized (default)
shared: shared key
authorized rate
109
Monitoring and Configuring the Printer
wins
Use the "wins" command to configure
WINS server settings.
❖ Viewing settings
msh> wins
• If the IP address obtained from
DHCP differs from the WINS IP
address, the DHCP address is
the valid address.
❖ Configuration
msh> wins “interface_name”
{on | off}
• {on} means "active" and {off}
means "inactive".
• Be sure to specify the interface.
• ip1394 can be specified only
when the IEEE 1394 interface is
installed.
• wlan can be specified only
when the IEEE 802.11b interface
is installed.
4
110
Interface name
Interface configured
ether
Ethernet interface
ip1394
IEEE 1394 interface
wlan
IEEE 802.11b interface
❖ Address configuration
Use the following command to
configure a WINS server IP address:
msh> wins “interface_name”
{primary|secondary} “IP address”
• Use the “primary” command to
configure a primary WINS server IP address.
• Use the "secondary" command
to configure a secondary WINS
server IP address.
• Do not use “255.255.255.255” as
the IP address.
❖ NBT (NetBIOS over TCP/IP) Scope ID
Selection
You can specify the NBT scope ID.
msh>
wins
“interface_name” scope
“scope ID”
• The scope ID can be entered using up to 31 alphanumeric characters.
• Be sure to specify the interface.
• ip1394 can be specified only
when the IEEE 1394 interface is
installed.
• wlan can be specified only
when the IEEE 802.11b interface
is installed.
Interface name
Interface configured
ether
Ethernet interface
ip1394
IEEE 1394 interface
wlan
IEEE 802.11b interface
SNMP
SNMP
The SNMP agent operating on UDP
and IPX is incorporated into the builtin Ethernet board and optional IEEE
802.11b interface unit of this printer.
Also, the SNMP agent operating on
UDP is incorporated in the optional
IEEE 1394 interface board.
Using the SNMP manager, you can
get information about the printer.
Important
❒ If you changed the printer's community name, change the configuration of the connected computer
accordingly, using SNMP Setup
Tool. For details, see SNMP Setup
Tool Help.
The default community names are
[public] and [admin]. You can get MIB
information using these community
names.
❖ Supported MIBs(SNMP v1/v2)
• MIB-II
• PrinterMIB
• HostResourceMIB
• RicohPrivateMIB
❖ Supported MIBs(SNMP v3)
• MIB-II
• PrinterMIB
• HostResourceMIB
• RicohPrivateMIB
• SNMP-FRAMEWORK-MIB
• SNMP-TARGET-MIB
• SNMP-NOTIFICATION-MIB
• SNMP-USER-BASED-SM-MIB
• SNMP-VIEW-BASED-ACMMIB
4
❖ Start SNMP Setup Tool
• Windows 95/98/Me, Windows
2000, Windows NT 4.0:
Click the [Start] button.
Point to [SmartDeviceMonitor for
Admin] on the [Programs] menu.
Click [SNMP Setup Tool].
• Windows XP:
Click the [Start] button.
Point to [SmartDeviceMonitor for
Admin] on the [All Programs]
menu.
Click [SNMP Setup Tool].
111
Monitoring and Configuring the Printer
Getting Printer Information over the
Network
This section explains details of each item displayed in the printer status and information.
This manual covers all models, and therefore contains functions and settings
that may not be available for your model.
Current Printer Status
The printer status can be checked using the following commands:
• UNIX: Use the "lpq" command and "rsh", "rcp", and "ftp" parameters.
• mshell: Use the "status" command.
4
Messages
112
Description
Access Restricted
The job was canceled because user have no authority.
Add staples (Booklet: Back)
The staple of booklet finisher (back) is exhausted.
Add staples (Booklet: Both)
The staple of booklet finisher is exhausted.
Add staples (Booklet: Front)
The staple of booklet finisher (front) is exhausted.
Adjusting...
The machine is initializing or calibrating.
Call Service Center
There is a malfunction in the machine.
Canceled
The job is reset.
Canceling Job…
The job is being reset.
Card/Counter not inserted
The machine is waiting for prepaid card or key.
Coin or amount not inserted
The machine is waiting for coin to be inserted.
Coin/Key Counter not inserted
The machine is waiting for coin or key counter.
Configuring...
Setting is being changed.
Cover Open: ADF
The document feeder is open.
Cover Open: Duplex Unit
The cover of the duplex unit is open.
Cover Open: Finisher
The cover of Finisher is open.
Cover Open: Finisher Cover
The cover of Finisher is open.
Cover Open: Finisher Front
The front cover of Finisher is open.
Cover Open: Finisher Upper
The upper cover of Finisher is open.
Cover Open: Finisher Upper-L
A upper left cover of Finisher is open.
Cover Open: Finisher Upper-R
A upper right cover of Finisher is open.
Cover Open: Front
The front cover is open.
Cover Open: Front Cover
The front cover is open.
Cover Open: Fusing Unit Cover
The cover of the fusing unit is open.
Getting Printer Information over the Network
Messages
Description
Cover Open: Lower Right
The lower right cover is open.
Cover Open: Mailbox
The mailbox is open.
Cover Open: Right
The right cover is open.
Cover Open: Shift Tray Cover
The shift tray cover is open.
Cover Open: Upper Left
The upper left cover is open.
Cover Open: Upper Right
The upper right cover is open.
Cover Open: Z-folding Upper
The upper Z fold unit cover on is open.
Data Size Error
The data size error occurred.
Empty: Black Toner
The black toner cartridge is almost empty.
Empty: Cyan Toner
The cyan toner cartridge is almost empty.
Empty: Magenta Toner
The magenta toner cartridge is almost empty.
Empty: Toner
The toner cartridge is almost empty.
Empty: Yellow Toner
The yellow toner cartridge is almost empty.
Energy Saver Mode
The machine is in Energy Saver Mode.
Error
An error has occurred.
Error: Address Book
An error has occurred in the data of the address book.
Error: Command Transmission
An error has occurred in the machine.
Error: DIMM Value
A memory error occurred.
Error: Ethernet Board
An Ethernet board error has occurred.
Error: HDD Board
A hard disk drive board error has occurred.
Error: IEEE1394 Board
An IEEE 1394 interface board error has occurred.
Error: Media Link Board
An error has occurred on the media link board.
Error: Memory Switch
A memory switch error has occurred.
Error: Optional Font
An error has occurred in the font file of the machine.
Error: Optional RAM
An error has occurred in the optional memory unit.
Error: Parallel I/F Board
An error has occurred in the parallel interface.
Error: PDL
An error has occurred in the page description language.
Error: USB Interface
An error has occurred in the USB interface.
Error: Wireless Card
Wireless card is not inserted during start up, or the IEEE
802.11b interface unit or the wireless card is taken out after
start up .
Error: Wireless Card or Board
An error has occurred in the IEEE 802.11b interface unit.
Exceed Booklet Stapling Limit
The printing has exceeded the stapling limit of the booklet
finisher.
Full: Copy Tray
The output paper tray is full.
Full: Finisher
Finisher tray is full.
4
113
Monitoring and Configuring the Printer
Messages
4
114
Description
Full: Finisher Booklet Tray
Booklet tray of Finisher is full .
Full: Finisher Shift Tray
Shift tray of Finisher is full.
Full: Finisher Shift Tray 1
Shift tray 1 of Finisher is full.
Full: Finisher Shift Tray 1, 2
The shift tray 1 and 2 of Finisher are full.
Full: Finisher Shift Tray 2
Shift tray 2 of Finisher is full.
Full: Finisher Upper Tray
The upper tray of Finisher is full.
Full: Hole Punch Receptacle
Punch Chip receptacle for hole punch is full.
Full: Internal Tray
The output paper tray is full.
Full: Mailbox Tray 1
Tray 1 of the mailbox is full.
Full: Mailbox Tray 2
Tray 2 of the mailbox is full.
Full: Mailbox Tray 3
Tray 3 of the mailbox is full.
Full: Mailbox Tray 4
Tray 4 of the mailbox is full.
Full: Mailbox Tray 5
Tray 5 of the mailbox is full.
Full: Mailbox Tray 6
Tray 6 of the mailbox is full.
Full: Mailbox Tray 7
Tray 7 of the mailbox is full.
Full: Mailbox Tray 8
Tray 8 of the mailbox is full.
Full: Mailbox Tray 9
Tray 9 of the mailbox is full.
Full: Waste Oil Bottle
The abolition oil bottle is full.
Full: Waste Toner
Waste toner is full.
Full: Waste Toner Bottle
Waste toner bottle is full.
Hex Dump Mode
It is a hex dump mode.
Immed. Trans. not connected
It did not connect directly with the other party of the transmission.
Immediate Transmission Failed
An error has occurred while transmitting directly.
In Use: Copier
The copier is being used.
In Use: Fax
The fax is being used.
In Use: Finisher
Other functions is using Finisher.
In Use: Input Tray
Other functions is using the input tray.
In Use: Staple Unit
Other functions is using the staple unit.
Independent-supplier Toner
Toner that is not recommended is set.
Key Card not inserted
The machine is waiting for key card to be inserted.
Key Card/Counter not inserted
The machine is waiting for key card or key counter to be
inserted.
Key Counter not inserted
The machine is waiting for key counter to be left in it.
Loading Toner...
Toner is being supplied.
Getting Printer Information over the Network
Messages
Description
Low: Black Toner
The black toner cartridge is not set correctly, or toner is almost running out.
Low: Cyan Toner
The cyan toner cartridge is not set correctly, or toner is almost running out.
Low: Magenta Toner
The magenta toner cartridge is not set correctly, or toner is
almost running out.
Low: Toner
The toner cartridge is not set correctly, or toner is almost
running out.
Low: Yellow Toner
The yellow toner cartridge is not set correctly, or toner is
almost running out.
Malfunction: Booklet Processor
There is a problem with booklet finisher.
Malfunction: Ext. Charge Unit
There is a problem with external charge unit.
Malfunction: Finisher
There is a problem with Finisher.
Malfunction: Interposer
There is a problem with Interposer.
Malfunction: LargeCapacity Tray
There is a problem with LargeCapacity tray.
Malfunction: Output Tray
There is a problem with output tray.
Malfunction: Staple Unit
There is a problem with the staple unit.
Malfunction: Tray 1
There is a problem with tray 1.
Malfunction: Tray 2
There is a problem with tray 2.
Malfunction: Tray 3
There is a problem with tray 3.
Malfunction: Tray 3 (LCT)
There is a problem with tray 3 (LCT).
Malfunction: Tray 4
There is a problem with tray 4.
Malfunction: Z-folding unit
There is a problem with the Z fold unit.
Memory Low: Copy
Memory shortage has occurred while the copy was operating.
Memory Low: Data Storage
Memory shortage has occurred while the document was
being accumulated.
Memory Low: Fax Scanning
Memory shortage has occurred while transmitting the fax.
Memory Low: Scanning
Memory shortage has occurred while the scanner was
working.
Miscellaneous Error
Other error has occurred.
Mismatch: Paper Size
Indicated paper tray does not contain paper of selected size.
Mismatch: Paper Size and Type
Indicated paper tray does not contain paper of selected
size and type.
Mismatch: Paper Type
Indicated paper tray does not contain paper of selected type.
Near Replacing: Black PCU
Prepare the new black photoconductor unit.
Near Replacing: Develop. Unit C
Prepare the new development unit (cyan).
Near Replacing: Develop. Unit K
Prepare the new development unit (black).
Near Replacing: Develop. Unit M
Prepare the new development unit (magenta).
4
115
Monitoring and Configuring the Printer
Messages
4
116
Description
Near Replacing: Develop. Unit Y
Prepare the new development unit (yellow).
Near Replacing: Fusing Unit
Prepare the new fusing unit.
Near Replacing: Maintenance Kit
Prepare the new maintenance kit.
Nearly Full: Waste Toner
Waste toner bottle is nearly full.
Need more Booklet Staples
Stapler has almost run out of staples.
No Paper: Interposer Tray
There is no paper in interposer unit.
No Paper: LCT
There is no paper in Large Capacity tray.
No Paper: Selected Tray
There is no paper in specified tray.
No Paper: Tray 1
There is no paper in tray 1.
No Paper: Tray 2
There is no paper in tray 2.
No Paper: Tray 3
There is no paper in tray 3.
No Paper: Tray 3 (LCT)
There is no paper in tray 3 (Large Capacity tray).
No Paper: Tray 4
There is no paper in tray 4.
Not Detected: B2 Lever
B2 lever is not correctly set.
Not Detected: Black Toner
Black toner is not correctly set.
Not Detected: Cyan Toner
Cyan toner is not correctly set.
Not Detected: Develop. Unit (C)
The development unit (cyan) is not correctly set.
Not Detected: Develop. Unit (K)
The development unit (black) is not correctly set.
Not Detected: Develop. Unit (M)
The development unit (magenta) is not correctly set.
Not Detected: Develop. Unit (Y)
The development unit (yellow) is not correctly set.
Not Detected: Duplex Feed Unit
The duplex feed unit is not correctly set.
Not Detected: Finisher
Finisher is not correctly set.
Not Detected: Fusing Unit
The fusing unit is not correctly set.
Not Detected: Input Tray
The paper feed tray is not correctly set.
Not Detected: Interposer
Interposer unit is not correctly set.
Not Detected: LCT
A large amount of paper feed tray is not correctly set.
Not Detected: Magenta Toner
Magenta toner is not correctly set.
Not Detected: PCU (C)
The photoconductor unit (cyan) is not correctly set.
Not Detected: PCU (K)
The photoconductor unit (black) is not correctly set.
Not Detected: PCU (M)
The photoconductor unit (magenta) is not correctly set.
Not Detected: PCU (Y)
The photoconductor unit (yellow) is not correctly set.
Not Detected: Tray 1
Tray 1 is not correctly set.
Not Detected: Tray 2
Tray 2 is not correctly set.
Not Detected: Tray 3
Tray 3 is not correctly set.
Not Detected: Tray 3 (LCT)
Tray 3 (Large Capacity tray) is not correctly set.
Getting Printer Information over the Network
Messages
Description
Not Detected: Tray 4
Tray 4 is not correctly set.
Not Detected: WasteToner Bottle
Waste toner bottle is not correctly set.
Not Detected: Yellow Toner
Yellow toner is not correctly set.
Not Detected: Z-fold’g Internal
The Z fold unit is not correctly set.
Not Reached, Data Deleted
Unreached job is deleted.
Not Reached, Data Stored
Unreached job is preserved.
Offline
Printer is offline.
Original on Exposure Glass
The original remains on the exposure glass.
Panel Off Mode
The machine is in Panel-Off mode.
Panel Off Mode>>Printing ava.
The machine is in Control Panel-Off mode.
Paper in Duplex Unit
The paper remains in the duplex unit.
Paper in Finisher
The paper remains in Finisher.
Paper Misfeed: ADF
The paper has jammed in Document Feeder.
Paper Misfeed: BookletProcessor
The paper has jammed in booklet finisher.
Paper Misfeed: Duplex Feed Unit
The paper has jammed in duplex feed unit.
Paper Misfeed: Duplex Unit
The paper has jammed in the duplex unit.
Paper Misfeed: Finisher
The paper has jammed in Finisher.
Paper Misfeed: Input Tray
The paper has jammed in the input tray.
Paper Misfeed: Internal Path
The paper has jammed inside the machine.
Paper Misfeed: Internal/Output
The paper has jammed inside the machine.
Paper Misfeed: Interposer
The paper has jammed in interposer unit.
Paper Misfeed: Mailbox
The paper has jammed in the mailbox.
Paper Misfeed: Output Tray
The paper has jammed in output tray.
Paper Misfeed: Z-folding unit
The paper has jammed in the Z fold unit.
Paper on Finisher Shift Tray 2
The paper remains in Finisher Shift Tray 2.
Paper on FinisherShiftTray1, 2
The paper remains in Finisher Shift Tray 1 and 2.
Paper on Paper Bypass
The paper remains in the bypass tray.
Prepaid Card not inserted
The machine is waiting for prepaid card to be inserted.
Print Complete
The print was completed.
Printing
Printing is in progress.
Processing
Data is being processed.
RC Gate Connection Error
Failed connection with RC Gate.
Ready
The machine is ready to print.
Replace Black PCU
It is time to replace the black photoconductor unit.
Replace Charger Kit
It is time to replace the charger kit.
4
117
Monitoring and Configuring the Printer
Messages
4
Description
Replace Cleaning Web
It is time to replace the Cleaning Web.
Replace Color PCU
It is time to replace the photoconductor unit (color).
Replace Develop. Unit (Black)
It is time to replace the development unit (black).
Replace Develop. Unit (Color)
It is time to replace the development unit (color).
Replace Develop. Unit (Cyan)
It is time to replace the development unit (cyan).
Replace Develop. Unit (Magenta)
It is time to replace the development unit (magenta).
Replace Develop. Unit (Yellow)
It is exchange time of the development unit (yellow).
Replace Feed Roller
It is time to replace the transfer roller.
Replace Fuser Oil Unit
It is time to replace the fuser oil unit.
Replace Fusing Unit
It is time to replace the fusing unit.
Replace Maintenance Kit
It is time to replace the maintenance kit.
Replace PCU
It is time to replace the photoconductor unit.
Replace Toner Suction Motor
It is time to replace the toner Suction motor.
Replace Transfer Belt
It is time to replace the transfer belt.
Replace Transfer Cleaning Unit
It is time to replace the transfer cleaning unit.
SD Card Authentication failed
SD card authentication failed.
Setting Remotely
The RDS setting is being processed.
Skipped due to Error
Skipped the error.
Storage Complete
The storage is complete.
Storage Failed
The storage has failed.
Supplies Order Call failed
The supply order call has failed.
Suspend / Resume Key Error
Finisher stop button was pressed.
Transmission Aborted
The transmission was interrupted.
Transmission Complete
The transmission completion was completed.
Transmission Failed
The transmission has failed.
Tray Error: Chaptering
The paper feed tray specification error has occurred because chaptering as well as the normal paper use the same
tray for printing.
Tray Error: Duplex Printing
Selected paper tray cannot be used for duplex printing.
Unit Left Open: ADF
Document feeder is opened.
Warming Up...
The machine is warming up.
Note
❒ For details about UNIX commands, see UNIX Supplement.
❒ Check the error contents that may be printed in the configuration page. For
details about printing a configuration page, see Printer Reference.
118
Getting Printer Information over the Network
Printer configuration
You can check the printer configuration using telnet.
This section explains the checking procedure for input/output tray and printer
language.
• UNIX: Use the "info" command and "rsh", "rcp", and "ftp" parameters.
• mshell: Use the "info" command.
❖ Input Tray
Item
Description
No.
ID number of the paper tray
Name
Name of the paper tray
PaperSize
Size of paper loaded in the paper tray
status
Current status of the paper tray
4
• Normal:Normal
• NoInputTray: No tray
• PaperEnd:No paper
❖ Output Tray
Item
Description
No.
ID number of the output tray
Name
Name of the output tray
status
Current status of the output tray
• Normal:Normal
• PaperExist:Paper exist
• OverFlow:Paper is full
• Error:Other errors
❖ Emulation
Item
Description
No.
ID number of the printer language used by the
printer
Name
Name of the printer language used in the
printer
Version
Version of the printer language
Note
❒ For details about UNIX commands and parameters, see UNIX Supplement.
❒ For details about mshell info commands, see p.96 “info”.
119
Monitoring and Configuring the Printer
Understanding the Displayed Information
This section explains how to read status information returned by the network interface board.
Print Job Information
Use the following command to display print job information:
• UNIX: Use the "info" command and "rsh", "rcp", and "ftp" parameters.
• mshell: Use the "info" command.
4
Item
Description
Rank
Print job status.
• Active
Printing or preparing for printing.
• Waiting
Waiting to be transferred to the printer.
Owner
Print request user name.
Job
Print request number.
Files
The name of the document.
Total Size
The size of the data (spooled).
The default is 0 bytes.
Note
❒ For details about UNIX commands and parameters, see UNIX Supplement.
❒ For details about mshell info commands, see p.96 “info”.
120
Understanding the Displayed Information
Print Log Information
This is a record of the most recent 16 jobs printed.
Use the following command to display print log information:
• UNIX: Use the "prnlog" command and "rsh", "rcp", and "ftp" parameters.
• telnet : Use the “prnlog” command. See p.97 “prnlog”.
Item
Description
ID
Print request ID.
User
Print request user name.
Page
Number of pages printed
Result
Print Request Result
4
Communication Result
• OK
Print was completed normally. However, the print result may
not be as required due to printer problems.
• NG
Printing was not completed normally.
• Canceled
An "rcp", "rsh", or "lpr" command print request was canceled,
possibly due to the printing application. Not applicable to the
"ftp" or "rprinter" command.
Time
Time the print requested was received.
Time of print request reception
User ID
Printer driver-configured User ID.
Appears when the print request ID is specified.
JobName
Name of the document for printing
Appears when the print request ID is specified.
Note
❒ For details about UNIX commands and parameters, see UNIX Supplement.
❒ For details about mshell prnlog commands, see p.97 “prnlog”.
121
Monitoring and Configuring the Printer
Configuring the Network Interface Board
Use the following command to display network interface board settings:
• telnet : Use the “show” command. See p.101 “show”.
Item
Description
Common
mode
Protocol Up/Down
[up] means "active" and [down] means "inactive".
appletalk
TCP/IP
netware
4
SMB
IP over 1394
SCSI print
Ethernet interface
Internal version number
Syslog priority
NVRAM version
Internal version number
Device name
Printer name
Comment
Comment
location
Location of the printer in the SNMP and Rendezvous information
Contact
Administrator information for the printer and contact
information in the SNMP information
Soft switch
appletalk
122
mode
AppleTalk protocol in selection
Net
Network number
Object
Macintosh printer name
Type
Type of printer
Zone
Name of the zone that the printer belongs to
Understanding the Displayed Information
Item
Description
TCP/IP
mode
[up] means "active" and [down] means "inactive".
ftp
lpr
rsh
telnet
diprint
web
http
ftpc
4
snmp
ipp
autonet
rendezvous
ssl
rfu
nbt
EncapType
Frame type
dhcp
Dynamic Host Configuration Protocol (on/off)
Host name
Address
IP address
netmask
Subnet mask
broadcast
Broadcast address
DNS Domain
DNS domain type
gateway
Default gateway address
Access Range[✩]
Access control range
Time server
NTP server address
Time Zone
NTP server time difference
Time server polling time
NTP server interval
SYSLOG server
Home page URL
URL of homepage.
Home page link name
URL of home page
123
Monitoring and Configuring the Printer
Item
Description
netware
EncapType
Frame type
RPRINTER number
Remote printer number
Print server name
Print server name
File server name
Name of the connect file server
Context name
Context of print server
Switch
mode
Active mode
NDS/Bindery
(this value is fixed)
Packet negotiation
4
Login Mode
Login mode
Print job timeout
Packet timeout
protocol
Protocol used
SAP interval time
NDS Tree Name
NDS tree name
SMB
Switch
mode
(this value is fixed)
Direct print
(this value is fixed)
Notification
Notification of print job completion
Workgroup name
Name of the workgroup
Computer name
Name of the computer
Comment
Comment
Share name[1]
Share name (model of the printer)
protocol
124
Understanding the Displayed Information
Item
Description
IEEE 802.11b
Device Name
Printer name
dhcp
DHCP (on/off)
Address
IP address
netmask
Subnet mask
broadcast
Broadcast address
DNS Domain
DNS domain type
ssid
SSID used
Channel range
Channels available for use
Channel
Channel used
Communication mode
IEEE 802.11b interface transmitting mode
4
Authentication
TX Rate
IEEE 802.11b interface speed
WEP encryption
WEP enabled or disabled
Encryption key
WEP key
IP over 1394
Host name
DHCP
Address
IP address
netmask
Subnet mask
broadcast
Broadcast address
DNS Domain
SCSI print
Bidi.
Bidirectional setting (on/off)
Bluetooth
Bluetooth mode
Bluetooth connection mode
UPnP
URL
dns
Server[X]:
IP address of the DNS server
Selected DNS Server
Selected DNS server
Domain Name
ether
Domain name on an Ethernet connection
wlan
Domain name on a wireless LAN connection
ip1394
125
Monitoring and Configuring the Printer
Item
Description
rendezvous
4
Computer Name
Computer name
Rendezvous Name (ether)
Rendezvous name on an Ethernet connection
Rendezvous Name (wlan)
Rendezvous name on a wireless LAN connection
Rendezvous Name (ip1394)
Rendezvous name on an IP over 1394 connection
location
Location of the printer
Priority (diprint)
diprint priority number
Priority (lpr)
lpr priority number
Priority (ipp)
ipp priority number
IP TTL
IP TTL value
LinkLocal Route for Multi I/F:
Ethernet (ether)
[IEEE 802.11b (wlan)] appears when IEEE 802.11b is selected.
[IP over 1394 (ip1394)] appears when IEEE1394 is selected.
DDNS
ether
Dynamic DNS function on an Ethernet connection (on/off)
wlan
Dynamic DNS function on a wireless LAN connection (on/off)
ip1394
Dynamic DNS function on an IP over 1394 connection (on/off)
wins
ether
Primary WINS
IP address of the primary WINS server on an Ethernet
connection
Secondary WINS
IP address of the secondary WINS server on an Ethernet
connection
ip1394
Primary WINS
IP address of the primary WINS server on an IP over
1394 connection
Secondary WINS
IP address of the secondary WINS server on an IP over
1394 connection
SNMP
SNMPv1v2
SNMPv3
protocol
v1Trap
v2Trap
v3Trap
SNMPv1v2 Remote Setting
SNMPv3 Privacy
Shell mode
126
Remote maintenance tool mode
Message List
Message List
This is a list of messages that appear in the printer's system log. The system log
can be viewed using the "syslog" command.
System Log Information
Use the following command to display the system log information:
• UNIX: Use the "syslog" command and "rsh", "rcp", and "ftp" parameters.
• telnet : Use the “syslog” command.
Message
Problem and solutions
Access to NetWare server <file server name>
denied. Either there is no account for this print
server on the NetWare server or the password
was incorrect.
(In the print server mode) Login to the file
server failed. Make sure that the print server is
registered on the file server. If a password is
specified for the print server, delete it.
add_sess: bad trap addr:<IpAddress>, community:<community name>
The IP address (0.0.0.0.) is unavailable when
the community access type is TRAP. Specify
the host IP address for the TRAP destination.
add_sess: community<community name> already defined.
The same community name already exists.
Use another community name.
add_sess_ipx: bad trap addr: <IPXaddress>,
community:<community name>
The IPX address (00:00:00:00:00:00) is unavailable when the community access type is
TRAP. Specify the host IPX address for the
TRAP destination.
add_sess_ipx: community <community
name> already defined.
The same community name already exists.
Use another community name.
ANONYMOUS FTP LOGIN FROM <IP address>, <password>
An anonymous login has been made with a
password <password> from the host <IP address>.
anpd start. (AppleTalk)
The ANPD (AppleTalk Network Package Daemon) service has started.
Attach FileServer= <file server name>
Connection to the file server as the nearest
server has been established.
Attach to print queue <print queue name>
(In the print server mode) Attached to the
print queue.
Cannot create service connection
(In the remote printer mode) Connection to the
file server has not been established. The
number of file server users may have exceeded
the maximum capacity of the file server.
Cannot find rprinter (<print server
name>/<printer number>)
The printer with the number displayed on the
print server does not exist. Make sure that the
printer number is registered on the print server.
Change IP address from DHCP Server.
The IP address changes when DHCP lease is renewed. To always assign the same IP address,
set a static IP address to the DHCP server.
4
127
Monitoring and Configuring the Printer
Message
Problem and solutions
child process exec error! (process name)
The network service failed to start. Turn the
printer off and then on. If this does not work,
contact your service or sales representative.
Connected DHCP Server(<DHCP server address>).
The IP address was successfully received from
the DHCP server.
connection from <IP address>
Login was from the host IP address.
Could not attach to FileServer<error number> (In the remote printer mode) Connection to the
file server has not been established. The file
server has refused the connection. Check the
file server configuration.
Could not attach to PServer<print server>
(In the remote printer mode) Connection to the
print server has not been established. The
print server has refused the connection. Check
the print server configuration.
Current Interface Speed:xxxMbps
Speed of the network (10 Mbps or 100 Mbps)
Current IP address <current IP address>
The IP address <current IP address> was received from the dhcp server.
Current IPX address<IPX address>
Current ipx address
DHCP lease time expired.
DHCP lease time has expired. The printer tries
to discover the DHCP server again. The IP address until now becomes invalid.
DHCP server not found.
The DHCP server was not found. Make sure
that the DHCP is on the network.
dhcpcd start.
The DHCPCD service (dhcp client service) has
started.
Duplicate IP=<IP address>(from <MAC address>).
The same IP address is used. Each IP address
must be unique. Check the address of the device indicated in [MAC address].
Established SPX Connection with PServer,(RPSocket=<socket number>, connID=<connection ID>)
(In the remote printer mode) Connection to the
print server has been established.
exiting
The lpd service has ended and the system is
exiting the process.
Exit pserver
(In the print server mode) The print server
function is disabled because the necessary
print server settings have not been made.
Frametype =<frame type name>
The frame type name is configured to be used
on NetWare.
httpd start.
The httpd service has started.
inetd start.
The inetd service has started.
IPP cancel-job: permission denied.
The printer could not authenticate the name of
the user attempting to cancel a job.
ipp disable.
Printing with ipp is disabled.
4
128
Message List
Message
Problem and solutions
ipp enable.
Printing with ipp is enabled.
IPP job canceled. jobid=%d.
The spooled job was canceled due to error or
user request.
LeaseTime=<lease time>(sec), RenewTime=<renew time>(sec).
The resource lease time received from the
DHCP server is displayed in [lease time] in
seconds. The renewal time is displayed in [renew time] in seconds.
Login to fileserver <file server name>
(<IPX|IP>,<NDS|BINDERY|NDS|BINDERY>)
(In the print server mode) Login to the file
server is in the NDS or BINDERY mode.
multid start.
Data transmission service for multiprotocols
has started.
nbstart start. (NetBEUI)
The service for NetBEUI protocol stack setting
has started.
NBT Registration Broadcast(<NetBIOS
name>)
Use a local broadcast to map the NetBIOS
name with the IP address.
nbtd start.
The nbtd service has started (available only in
the DHCP mode).
NetBEUI Computer Name =<computer
name>
The NetBEUI computer name is specified.
nmsd start. (NetBEUI)
The nmsd (Name Server Daemon) service has
started.
npriter start. (NetWare)
(In the remote printer mode) The NetWare
service has started.
nwstart start. (NetWare)
The service for NetWare protocol stack setting
has started.
Open log file <file name>
(In the print server mode) The specified log file
has been opened.
papd start. (AppleTalk)
The AppleTalk print service has started.
phy release file open failed.
Replacing the network interface board is required. Contact your sales or service representative.
Print queue <print queue name> cannot be
serviced by printer 0, <print server name>
(In the print server mode) The print queue
cannot be established. Make sure that print
queue exists on the specified file server.
Print server <print server name>has no printer.
(In the print server mode) The printer is not assigned to the print server. Using NWadmin,
assign the printer, and then restart it.
print session full
No more print jobs can be accepted.
Printer <printer name> has no queue
(In the print server mode) The print queue is
not assigned to the printer. Using NWadmin,
assign the print queue to the printer, and then
restart it.
4
129
Monitoring and Configuring the Printer
4
Message
Problem and solutions
pserver start. (NetWare)
(In the print server mode) The NetWare service has started.
Required computer name (<Computer
name>) is duplicated name
The start job found the computer name by
adding the computer name to the suffix (0,1...).
Set a new computer name that is unique.
Required file server (<file server name>) not
found
The required file server is not found.
restarted.
The lpd service has started.
sap enable, saptype=<SAP type>, sapname=<SAP name>
The SAP function has started. The SAP packet
is issued to advertise the service on the SAP table on the NetWare server.
session <community name> already defined.
The requested community name is not defined.
session_ipx <community name> not defined.
The requested community name is not defined.
Set context to <NDS context name>
An NDS context name has been set.
shutdown signal received. network service re- The network service is rebooting.
booting...
smbd start. (NetBEUI)
The smbd service has started.
SMTPC: failed to get smtp server ip-address.
The SMTP server IP address could not be obtained. This could be because:
• The specified DNS server could not be
found.
• No connection to the network has been established.
• The specified DNS server could not be
found.
• An incorrect DNS server is specified.
• The specified SMTP server IP address
could not be found in the DNS server.
SMTPC: failed to connect smtp server. timeout.
Connection to the SMTP server failed due to
timeout. This could be because:
• The specified SMTP server name is incorrect.
• No connection to the network has been established.
• The network configuration is incorrect, so
there is no response from the SMTP server.
SMTPC: refused connect by smtp server.
Connection to the SMTP server is denied. This
could be because:
• A server other than the SMTP server has
been specified.
• The specified SMTP server port number is
incorrect.
130
Message List
Message
Problem and solutions
SMTPC: no smtp server. connection close.
Connection to the SMTP server failed due to
no response from SMTP. This could be because:
• A server other than the SMTP server has
been specified.
• The specified SMTP server port number is
incorrect.
SMTPC: failed to connect smtp server.
Connection to the SMTP server failed. This
could be because:
• No connection to the network has been established.
• The network configuration is incorrect, so
there is no response from the SMTP server.
4
• The specified SMTP server name is incorrect.
• An incorrect SMTP server is specified.
• The specified SMTP server IP address
could not be found in the DNS server.
• A server other than the SMTP server has
been specified.
• The specified SMTP server port number is
incorrect.
SMTPC: username or password wasn’t correct. [response code] (information)
Connection to the SMTP server failed. This
could be because:
• The specified SMTP user name is incorrect.
• The specified SMTP password is incorrect.
Check the SMTP user name and password.
Snmp over ip is ready.
Communication over TCP/IP with snmp is
available.
Snmp over IP over 1394 is ready.
Communication over IP over 1394 with snmp
is available.
Snmp over ipx is ready.
Communication over IPX with snmp is available.
SNMPD: account is unavailable:
User account is disabled. This could be because it use the same account name as the administrator account.
Same account name be used.
SNMPD: account is unavailable:
The authentication password is not set up.
SNMPD: account is unavailable:
encryption is impossible.
User account is disabled. This could be because the authentication password is not set,
and only the encryption account is set.
Encryption is not possible and account is disabled. This could be because:
• Security option is not installed.
• Encryption password has not been specified.
SNMPD: trap account is unavailable.
v3Trap cannot be sent. This could be because
the Trap destination account is different from
the account specified by the printer.
131
Monitoring and Configuring the Printer
4
Message
Problem and solutions
snmpd start.
The snmpd service has started.
started.
The direct print service has started.
Started.
The rendezvous function is enabled.
Terminated.
The rendezvous function is disabled.
Terminated. (PS not found)
The rendezvous function is disabled because
PS is not found.
The print server received error <error
number> during attempt to log in to the network. Access to the network was denied. Verify that the print server name and password
are correct.
Login to the file server failed. The print server
is not registered or a password is specified.
Register the print server without specifying a
password.
WINS name refresh :Server No Response
There was no response to the update request
from the print server. Check that the WINS
server address is correct and the WINS server
is working properly.
WINS name registration/refresh error
code(errornumber)
Set unique NetBIOS names.
WINS name registration:Server No Response
There was no response to the registration request from the server. Check that the WINS
server address is correct and the WINS server
is working properly.
WINS server address0.0.0.0
The WINS server was not specified. Specify
the WINS server address to match the printer
name with WINS.
WINS Server=<WINS server address> NetBIOS Name=<NetBIOS name>
The printer name was successfully registered.
WINS wrong scopeID
The scope ID is incorrect.
Check that the WINS server address is correct
and the WINS server is working properly.
Specify the correct scope ID.
Note
❒ For details about UNIX commands and parameters, see UNIX Supplement.
❒ For details about “syslog” command, see p.106 “syslog”.
132
5. Special Operations under
Windows
Printing Files Directly from Windows
You can print files directly using
Windows commands. For example,
you can print PostScript files for PostScript 3.
❖ Windows 95/98/Me
You can print files directly using
ftp command.
❖ Windows 2000/XP, Windows Server
2003, Windows NT 4.0
You can print files directly using
lpr, rcp or ftp command.
Setup
Follow the procedure below to make
network environment settings.
Reference
For details about setting the IP
address of the printer using
DHCP, see p.139 “Using DHCP”.
This completes the setup for
specifying a printer using an IP
address when printing. When
using a host name to specify a
printer, proceed to p.133 “Using
a Host Name Instead of an IP
Address” and continue the setup.
Using a Host Name Instead of
an IP Address
A Enable
When a host name is defined, you can
specify a printer by host name instead
of IP address. The host names vary
depending on the network environment.
B Install a TCP/IP in Windows to set
When using DNS
C To print under Windows 2000/XP,
When setting the IP address of a printer
using DHCP
TCP/IP with the control
panel, and then set up the printer’s network environment about
TCP/IP including IP addresses.
TCP/IP of the printer is set as default.
up the network environment.
Consult the network administrator
for the local setting information.
Windows Server 2003, or Windows NT 4.0, install “Printing
service for UNIX” as the network
application. To print under Windows NT 4.0, install “Microsoft
TCP/IP printing” as the network
application.
Use the host name set to the data file
on the DNS server.
Use the printer name on the configuration page as the host name.
Reference
For details about printing a configuration page, see Printer Reference.
133
Special Operations under Windows
In other cases
Add the IP address and host name of
the network printer to the hosts file
on the computer used for printing.
Methods of addition vary depending
on operating systems.
Windows 95/98/Me
A Copy \WINDOWS\HOSTS.SAM
to the same directory and name it
“HOSTS” with no extension.
B Open the "\WINDOWS\HOSTS"
file created using memo pad files,
for instance.
5
C Add an IP address and host name
to the hosts file using the following format:
192.168.15.16 host # NP
"192.168.15.16" is the IP address,
"host" is the printer's host name,
and "#NP" is replaced by comments. Insert a space or tab between "192.168.15.16" and "host",
between "host" and "#NP" respectively, using one line for this format.
D Save the file.
Windows 2000/XP, Windows Server
2003, Windows NT 4.0
A Open the hosts file using memo
pad files, for instance.
The hosts file is in the following
folder:
\WINNT\SYSTEM32\DRIVERS\ETC\HOSTS
"\WINNT" is the directory of the
installation destination for Windows 2000/XP, Windows Server
2003, and Windows NT 4.0.
134
B Add an IP address and host name
to the hosts file using the following format:
192.168.15.16 host # NP
"192.168.15.16" is the IP address,
"host" is the printer's host name,
and "#NP" is replaced by comments. Insert a space or tab between "192.168.15.16" and "host",
between "host" and "#NP" respectively, using one line for this format.
C Save the file.
Printing Commands
The following explains printing operations using the “lpr”, “rcp”, and
“ftp” commands.
Enter commands using the command
prompt window. The location of the
command prompts varies depending
on operating systems:
• Windows 95/98
[Start] - [Programs] - [MS-DOS
Prompt]
• Windows Me
[Start] - [Programs] - [Accessories] [MS-DOS Prompt]
• Windows 2000
[Start] - [Programs] - [Accessories] [Command Prompt]
• Windows XP, Windows Server
2003
[Start] - [All Programs] - [Accessories] - [Command Prompt]
• Windows NT 4.0
[Start] - [Programs] - [Command
Prompt]
Note
❒ Match the data format of the file to
be printed with the emulation
mode of the printer.
Printing Files Directly from Windows
❒ If the message "print requests full"
appears, no print jobs can be accepted. Try again when sessions
end. For each command, the
amount of possible sessions is indicated as follows:
• lpr: 5(When the spool printing
function is available: 10)
• rcp, rsh: 5
• ftp: 3
❒ Enter the file name in a format including the path from the directory executing commands.
Reference
The “option” specified in a command is an intrinsic printer option
and its syntax is similar to printing
from UNIX. For details, see UNIX
Supplement.
rcp
First, register the printer's host name
in the hosts file.
c:> rcp [-b] \pass name\file
name [pass name\file name...]
printer's host name:[option]
Note
❒ In file names, "*" and "?" can be used
as wild cards.
❒ When printing a binary file, add
the “-b” option.
When using a printer with the host
name "host" to print a PostScript file
named "file 1" or "file 2" located in the
"C:\PRINT" directory, the command
line is as follows:
c:> rcp -b C:\PRINT\file1
C:\PRINT\file2 host:filetype=RPS
lpr
❖ When specifying a printer by IP address
c:> lpr -Sprinter's IP address [-Poption] [-ol]
\pass name\file name
❖ When using a host name instead of an
IP address
c:> lpr -Sprinter's host
name [-Poption] [-ol] \pass
name\file name
When printing a binary file, add
the "-ol" option (lowercase O, and
lowercase L).
When using a printer with the host
name "host" to print a PostScript file
named "file 1" located in the
"C:\PRINT" directory, the command
line is as follows:
c:> lpr -Shost -Pfiletype=RPS
-ol C:\PRINT\file1
5
Reference
For details about registering the
printer's host name in the hosts
file, see p.133 “Using a Host Name
Instead of an IP Address”.
ftp
Use the "put" or "mput" command according to the number of files to be
printed.
❖ When one file is printed
ftp> put \pass name\file
name [option]
❖ When multiple files are printed
ftp> mput \pass name\file
n a m e [ \ p a s s n a m e\ f i l e
name...] [option]
Follow the procedure below to print
using the "ftp" command.
135
Special Operations under Windows
A Formulate the printer's IP address
or the host name of the hosts file
printer as an argument and use
the "ftp" command.
% ftp printer's IP address
B Enter
the user name and password, and then press the {# Enter}
key.
To use the default account, enter
“admin” as user name, and leave
the password blank.
User:
Password:
When user authentication is set,
enter a login user name and password.
5
C When printing a binary file, set
the file mode to binary.
ftp> bin
When printing a binary file in ASCII mode, print may not come out
correctly.
D Specify files to be printed.
The following shows the examples
of printing a PostScript file named
"file 1" in the "C:\PRINT" directory
and printing file 1 and file 2.
ftp> put C:\PRINT\file1
filetype=RPS
ftp> mput C:\PRINT\file1
C:\PRINT\file2
E Quit ftp.
ftp> bye
Note
❒ “=”, “,”, “_”, and “;”cannot be
used for filenames. File names
will be read as option strings.
136
❒ For “mput” command, option
can not be defined.
❒ For “mput” command, “*” and
“?” can be used as wild cards in
file names.
❒ When printing a binary file in
ASCII mode, print may not
come out correctly.
6. Appendix
When Using Windows Terminal
Service/MetaFrame
The following explains how to use
Windows Termina l Service and
Maintenance.
Operating Environment
The following operating systems and
MetaFrame versions are supported.
❖ Windows NT Server 4.0 Terminal
Server Edition
• MetaFrame 1.8 SP3/FR1 SP3/SP4
• MetaFrame XP 1.0 SP1/SP2/FR1
❖ Windows 2000 Server/Advanced Server
• MetaFrame 1.8 SP3/FR1 SP3/SP4
• MetaFrame XP 1.0 SP1/SP2/FR1/
FR2
Supported Printer Drivers
❖ When Windows Terminal Service is
operating
• PCL drivers
• PostScript 3
Note
❒ The RPCS printer driver is not supported.
❒ Some RPCS printer driver functions do not work if Windows Terminal Service is installed.
Limitations
The following limitations apply to the
Windows Terminal Service environment.
These limitations are built in Windows Terminal Service or MetaFrame.
❖ Windows Terminal Service
In the Windows Terminal Service
environment, some of the printer
driver’s functions is unavailable.
In an environment where Windows Terminal Service is installed,
some of the printer driver’s functions is unavailable, even if any
function of Windows Terminal
Service is not used. When you install SmartDeviceMonitor for Client in an environment where the
Terminal Service is running on a
Windows NT Server 4.0 Terminal
Server Edition or the Windows
2000 Server family computer, be
sure to install it using the install
mode. The following are the two
methods of installation using the
install mode:
A Use [Add/Remove Programs] in
[Control Panel] to install SmartDeviceMonitor for Client.
B Enter the following command
in the MS-DOS command
prompt:
To quit the install mode, enter the
following command in the MSDOS command prompt.
137
Appendix
❖ MetaFrame's [Auto-creating client
printers]
Using [Auto-creating client printers]
can select a logical printer created
by copying the client's local printer
data to the MetaFrame server. We
strongly recommend testing this
function in your network environment before using it for your work.
• The settings for optional equipment will not be stored in the
server after the equipment is
disconnected. The settings for
optional equipment will be restored to its defaults each time
the client computer logs on to
the server.
• When printing a large number
of bitmap images or using the
server in a WAN environment
over dial-up lines such as ISDN,
printing may not be possible or
errors may occur, depending on
data transfer rates.
• When using MetaFrame XP 1.0
or higher versions, we recommend making settings in [Client
Printer bandwidth] under [Citrix
Management Console] according
to the environment.
6
138
• If a print error occurs on the
server and the print job or a
printer created in [Auto-creating
client printers] cannot be deleted,
we recommend the following:
• MetaFrame 1.8 SP3, MetaFrame XP 1.0 SP1/FR1
Make settings in [Delete unfinished print jobs] in the registry.
For details, see the Readme
file provided with MetaFrame.
• MetaFrame XP 1.0 FR2
Make settings in [Delete pending print jobs at logout] under
[Printer Properties Management]
of Citrix Management Console.
❖ MetaFrame's [Printer driver replication]
Using [Printer driver replication] can
distribute printer drivers across all
servers in a server farm. We
strongly recommend testing this
function in your network environment before using it for your work.
• If the printer drivers are not
properly copied, install them directly onto each server.
Using DHCP
Using DHCP
You can use the printer in a DHCP environment. You can also register the
printer NetBIOS name on a WINS
server when it is running.
If you connect an Ethernet interface
and IEEE 1394 (IP over 1394) interface
simultaneously, pay attention to the
following:
❖ When a static IP address is set for
both interfaces
• IP Address: If interface IP addresses overlap, the Ethernet interface is selected.
• Subnet Mask: If interface subnet
masks overlap, the Ethernet interface is selected.
• Gateway Address: The selected
value is applied.
Note
❒ Make the gateway address setting inside the subnet set in the
interface.
❒ If a value is beyond the range of
the subnet selected by the interface, the machine operates using "0.0.0.0".
❖ When obtaining addresses from the
DHCP server
• IP Address, Subnet Mask: you
can configure addresses assigned by a DHCP server.
Note
❒ If IP addresses overlap or the
same subnet IP addresses are
selected, the effective value is
assigned only to the prioritized interface.
❒ Ethernet has default interface
priority.
• AutoNet: A temporary IP address starting with 169.254 and
not used on the network, is assigned to the prioritized interface.
6
Note
❒ Default interface priority is
IEEE 1394 (IP over 1394).
• Gateway Address, DNS Server
Address, and Domain Name:
You can configure the addresses
assigned by DHCP to the prioritized interface.
If the gateway address is beyond the range of the subnet selected for the interface, the
machine operates using
"0.0.0.0".
Note
❒ Ethernet has default interface
priority.
139
Appendix
❖ When there are static IP addresses
and addresses assigned by DHCP
• IP Address and subnet mask: if a
static IP address is the same as
an address assigned by DHCP,
or the static subnet mask address
and the subnet mask address assigned by DHCP overlap, the
machine uses the static IP address interface.
Note
❒ The interface with the DHCP
setting is set by default.
• Gateway Address: operates using the address entered manually.
Note
❒ If a static address is not selected,
or is set to 0.0.0.0, the interface
using the address assigned by
DHCP is used.
6
Note
❒ Printers that register the printer
NetBIOS name on a WINS server
must be configured for the WINS
server. See p.110 “wins”.
❒ Supported DHCP servers are Microsoft DHCP Server included
with Windows 2000 Server, Windows Server 2003, and Windows
NT 4.0, and the DHCP server included with NetWare and UNIX.
❒ If you do not use the WINS server,
reserve the printer's IP address in
the DHCP server so the same IP
address is assigned every time.
❒ To use the WINS server, change
the WINS server setting to “active”
using the control panel.
❒ Using the WINS server, you can
configure the host name via the remote network printer port.
140
❒ DHCP relay-agent is not supported. If you use DHCP relay-agent
on a network via ISDN, it will result in increased line charges. This
is because your computer connects
to the ISDN line whenever a packet
is transferred from the printer.
❒ If there is more than one DHCP
server, use the same setting for all
servers. The machine operates using data from the DHCP server
that responds first.
Using AutoNet
If the printer IP address is not automatically assigned by the DHCP server, a temporary IP address starting
with 169.254 and not used on the network can be automatically selected by
the printer.
Note
❒ The IP address assigned by the
DHCP server is given priority over
that selected by AutoNet.
❒ You can confirm the current IP address on the configuration page.
For more information about the
configuration page, see Printer Reference.
❒ When AutoNet is running, the
NetBIOS name is not registered on
the WINS server.
❒ The machine cannot communicate
with devices that do not have the
AutoNet function. However, this
machine can communicate with
Macintosh computers running
Mac OS X 10.2.3. or higher.
Precautions
Precautions
Please pay attention to the following
when using the network interface
board. When configuration is necessary, follow the appropriate procedures below.
Connecting a Dial-Up Router
to a Network
When using NetWare (file server)
If the NetWare file server and printer
are on opposite sides of a router,
packets are sent back and forth continuously, possibly incurring communications charges. Because packet
transmission is a feature of NetWare,
you need to change the configuration
of the router. If the network you are
using does not allow you to configure
the router, configure the machine instead.
❖ Configuring the router
Filter packets so they do not pass
over the dial-up router.
Note
❒ The MAC address of the filtering printer is printed on the
printer configuration page. For
more information about printing a configuration page, see
Printer Reference.
❒ For more information about
configuring the printer if the
router cannot be configured, see
the following instructions.
Configuring the printer with
NetWare
A Following the setup method described earlier in this manual,
configure the file server.
B Set
the frame type for NetWare
environment.
Reference
For more information about selecting a frame type, see p.14
“Setting Up the Machine on a
Network”.
Configuring the printer without
NetWare
6
A When not printing, the network
interface board sends packets
over the network. Set NetWare to
“inactive”.
Reference
For more information about selecting a protocol, see p.14 “Setting Up the Machine on a
Network”.
141
Appendix
When Using Network Utility
If the machine is connected to a network, observe the following points
when setting up the machine or
changing settings:
For more details, see the operating instructions and Help for the ScanRouter
delivery software and DeskTopBinder
Lite/Professional.
❖ When a dial-up router is connected in
a network environment
The settings for the delivery server
to be connected must be made appropriately for the machine with
the ScanRouter delivery software,
Auto Document Link, or DeskTopBinder Lite/Professional. In addition, set up connected devices
using the I/O settings of ScanRouter V2 Administration Utility.
If the network environment changes, make the necessary changes for
the delivery server using the machine, the administration utility of
client computers, Auto Document
Link, and DeskTopBinder Lite/Professional. Also, set the correct information for the connected devices
using the I/O settings of ScanRouter V2 Administration Utility.
6
Important
❒ If the machine is set up to connect to the delivery server via a
dial-up router, the router will
dial and go online whenever a
connection to the delivery server is made. Telephone charges
may be incurred.
142
❖ When connected to a computer that
uses dial-up access
• Do not install the ScanRouter
delivery software on a computer which uses dial-up access.
• When using the ScanRouter delivery software, DeskTopBinder
Lite/Professional, Auto Document Link, or a TWAIN driver
on a computer with dial-up access, a dial-up connection may
be performed when connecting
to the delivery server and other
equipment, depending on the
setup. If the computer is set up
to connect to the Internet automatically, the confirmation dialog box will not appear, and
telephone charges may be incurred without your being
aware of it. To prevent unnecessary connections, the computer
should be set up so the confirmation dialog box always appears before establishing a
connection. Do not make unnecessary connections when using
the above listed software.
Precautions
NetWare Printing
Form feed
You should not configure form feed
on NetWare. Form feed is controlled
by the printer driver on Windows. If
NetWare form feed is configured, the
printer might not work properly. If
you want to change form feed settings, always configure them using
Windows.
• Under Windows 95/98/Me, clear
the [Form feed] check box on the
[Printer Settings] tab in the printer
properties dialog box.
• Under Windows 2000/XP and Windows Server 2003, clear the [Form
feed] check box on the [NetWare Settings] tab in the printer properties dialog box.
• Under Windows NT 4.0, clear the
[Form feed] check box on the [NetWare Settings] tab in the printer
properties dialog box.
Banner page
You should not configure a banner
page on NetWare. If you want to
change the banner page setting, always configure it using Windows.
• Under Windows 95/98/Me, clear
the [Enable banner] check box on the
[Printer Settings] tab in the printer
properties dialog box.
• Under Windows 2000/XP and
Windows Server 2003, clear the
[Enable banner] check box on the
[NetWare Settings] tab in the printer
properties dialog box.
• Under Windows NT 4.0, clear the
[Enable banner] check box on the
[NetWare Settings] tab in the printer
properties dialog box.
6
Printing after resetting the machine
After resetting the remote printer, the
connection from the print server will
be cut off for about 30-40 seconds before re-connecting. Depending on the
NetWare specification, print jobs may
be accepted, but they will not be
printed during this interval.
When using the machine as a remote
printer, wait about two minutes after
resetting before attempting to print.
143
Appendix
When the optional IEEE
802.11b interface unit Is
Installed
When using the wireless LAN interface on the network, note the following:
❖ When moving the machine
Detach the antennas when relocating the machine locally.
After moving the machine, reattach the antennas, ensuring that:
• The antennas are positioned clear
of obstacles.
• There is 40 to 60 mm between
the antennas, so that they do not
touch.
• The exposure glass cover and
the Auto Document Feeder
(ADF) do not knock the antennas.
6
❖ If the network area provides poor radio environment
Where radio wave conditions are
bad, the network may not function
due to interrupted or failed connections. When checking the wireless LAN signal and the access
point, follow the procedure below
to improve the situation:
• Position the access point nearer
to the machine.
• Clear the space between access
point and machine of obstructions.
• Move radio wave generating
a p p l i a n ce s , s u ch a s m i c r owaves, away from the machine
and access point.
Reference
For information about how to
check radio wave status, see p.13
“Checking the machine's radio
wave status”.
For more information about access
point radio wave conditions, refer
to the access point manual.
144
Information about Installed Applications
Samba(Ver 2.2.2-1.1)
Copyright © Andrew Tridgell 19941998
This program is free software; you
can redistribute it and/or modify it
under the terms of the GNU General
Public License as published by the
Free Software Foundation; either version 2 of the License, or (at your option) any later version. This program
is distributed in the hope that it will
be useful, but WITHOUT ANY WARRANTY; without even the implied
warranty of MERCHANTABILITY or
FITNESS FOR A PARTICULAR PURPOSE. See the GNU General Public
License for more details. You should
have received a copy of the GNU
General Public License along with
this program; if not, write to the Free
Software Foundation, Inc., 675 Mass
Ave, Cambridge, MA 02139, USA.
RSA® BSAFE™
• This product includes RSA® BSAFE™
cryptographic or security protocol
software from RSA Security Inc.
• RSA is a registered trademark and
BSAFE is a registered trademark of
RSA Security Inc.in the United
States and/or other countries.
• RSA Security Inc. All rights reserved.
6
145
Appendix
Specifications
Interface
100BASE-TX, 10BASE-T, IEEE 1394 (IP over 1394) *1 , IEEE 802.11b
Frame type
EthernetII, IEEE 802.2, IEEE 802.3, SNAP
Protocol
• Printer (LAN-Fax)
TCP/IP
LPR
RSH
RCP
DIPRINT
FTP
IPP *2 *3
SMB *2 *5
IPX/SPX (NetWare)
AppleTalk *4
NetBEUI
• Internet Fax
TCP/IP
SMTP
POP
IMAP
6
• Network Scanner
TCP/IP
RSH
FTP
SMTP
POP
SMB *6
• Document Server
TCP/IP
FTP
HTTP
• Management Function
TCP/IP
RSH
RCP
FTP
SNMP
HTTP
TELNET (mshell)
NBT
DHCP
DNS
LDAP
146
SNMP v1/v2
MIB-II, PrinterMIB, HostResourceMIB, RicohPrivateMIB
SNMP v3
MIB-II, PrinterMIB, HostResourceMIB, RicohPrivateMIB, SNMPFRAMEWORK-MIB, SNMP-TARGET-MIB, SNMP-NOTIFICATION-MIB, SNMP-USER-BASED-SM-MIB, SNMP-VIEWBASED-ACM-MIB
Specifications
*1
*2
*3
*4
*5
*6
The optional IEEE 1394 interface board supports only TCP/IP.
Use the SmartDeviceMonitor for Client port.
To use IPP under Windows XP, Windows Server 2003, use the Standard IPP port.
Note, in SmartDeviceMonitor for Client however, this port does not support digest
access authentication.
This can be used when the PostScript 3 module is installed.
Under Windows, this function can be used with TCP/IP and NetBEUI.
SMB using NetBEUI is unavailable.
6
147
INDEX
A
Access Control, 89
Administrator's E-mail Address, 45
appletalk
telnet, 89
AutoNet, 140
Autonet
telnet, 90
Auto Specify Sender Name, 47
F
Fax RX File Transmission, 43
File Transfer, 42
G
Gateway Address, 37
Getting Printer Information over the
Network, 112
Going to the Top Page
Web Image Monitor, 70
B
Bidirectional SCSI print, 40
Bluetooth
telnet, 90
C
Capture Server IP Address, 42
Changing the Network Interface Board
Configuration
SmartDeviceMonitor for Admin, 77
Changing the Paper Type
SmartDeviceMonitor for Admin, 78
Channel, 41
Communication Mode, 41
Configuring the Energy Saver Mode
SmartDeviceMonitor for Admin, 81
D
DDNS Configuration, 37, 39
Default User Name / Password (Send), 46
Delivery Option, 42
DHCP, 91, 139
dial-up router, 141
DNS, 92
dns
telnet, 92
DNS Configuration, 37
Domain Name, 37, 40, 93
E
Effective Protocol, 38
E-mail Account, 47
E-mail Communication Port, 45
E-mail Reception Interval, 46
E-mail Strage in Server, 46
Ethernet Speed, 38
148
H
Host Name, 39, 94
I
IEEE 802.11b, 107
setting, 11
ifconfig, 95
info, 96
information
Network Interface Board configuration, 122
Network interface board configuration, 101
print job, 120
print log, 121
system log, 106, 127
Installing
SmartDeviceMonitor for Admin, 77
Interface Settings/IEEE 1394, 39
Interface Settings/IEEE 802.11b, 41
Interface Settings/Network, 37
IP Address, 37, 39
IP over 1394, 40
IPP, 96
J
Job Spool, 105
L
LAN Type, 38
Locking the Menus on the machine's
Control Panel
SmartDeviceMonitor for Admin, 78
M
Machine Name, 39
Managing User Information
SmartDeviceMonitor for Admin, 79
Max. Reception E-mail Size, 46
message, 127
MIB, 111
N
netware, 96
NetWare 5/5.1, 60, 62
NetWare 6/6.5, 60, 62
Number of Scanner Recalls, 46
NW Frame Type, 38
P
passwd, 97
Password, 97
Permit SNMP V3 Communication, 39
Permit SSL / TLS, 39
Ping Command, 39
POP3 Setting, 45
POP before SMTP, 44
precautions, 141
Printing Commands
Printing Files Directly from Windows, 134
Printing Files Directly from Windows, 133
prnlog, 97
Program / Change / Delete E-mail
Message, 46
Program / Change / Delete Subject, 46
Pure IP, 62
R
Reception Protocol, 45
remote printer, setup
NetWare4.x, 5/5.1, 6/6.5, 66
Rendezvous, 98
Return to Defaults, 41
route, 99
S
Scanner Recall Interval Time, 46
SCSI print (SBP-2), 40
set, 100
Setting a Password
SmartDeviceMonitor for Admin, 82
Setting Up as a Print Server, 62
NetWare3.x, 59
NetWare 4.x, 60
Setting Up as a Remote Printer
NetWare3.x, 64
NetWare4.x, 5/5.1, 6/6.5, 66
Setup
Printing Files Directly from Windows, 133
show, 101
slp, 101
SmartDeviceMonitor for Admin
Installing, 77
smb, 102
SMB Computer Name, 38
SMB Work Group, 38
SMTP Authentication, 44
SMTP Server, 43
SNMP, 111
snmp, 102
sntp, 105
specifications, 146
spoolsw, 105
SSID Setting, 41
status
telnet, 106
T
TCP/IP address, 95
telnet, 88
Autonet, 90
WINS, 110
Transmission Speed, 41
Types of Menu Configuration and Mode
Web Image Monitor, 72
U
upnp, 106
Using a Host Name Instead of an IP
Address
Printing Files Directly from Windows, 133
149
W
Web Image Monitor, 69
WEP (Encryption) Setting, 41
WINS
telnet, 110
WINS Configuration, 38, 40
Wireless LAN Signal, 41
150
GB
GB
EN
USA
B180-7515A
Copyright © 2004, 2005
Network Guide
GB GB
EN USA B180-7515A