1
9LSHU
81,;&203$7,%,/,7<*8,'(
6HDJDWH
7DSH 2SHUDWLRQV
&RVWD 0HVD &$
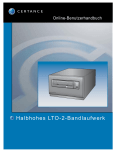
Viper® 200 LTO Tape Drive
Unix Compatibility Guide
Introduction ................................................................................................ 2
Configuring for the DEC/Compaq Unix Environment ............................. 3
Configuring for the Sun Environment
(Solaris 2.4, 2.5, 2.6, 7, and 8) ................................................................... 5
Configuring for the IBM AIX Environment
(AIX Version 4.1.x and later)...................................................................... 7
Configuring for SCO Open Server 5.0.x ................................................... 9
Configuring for Linux .............................................................................. 11
Configuring for SGI Irix ........................................................................... 12
Configuring for HP-UX 11.0 ..................................................................... 14
© 2000-2001 Seagate Removable Storage Solutions, LLC. All rights reserved
Seagate and the Seagate logo are trademarks of Seagate Technology, LLC. Viper is a trademark of Seagate
Removable Storage Systems, LLC. Other product names are trademarks or registered trademarks of their
owners.
Seagate reserves the right to change, without notice, product offerings or specifications. No part of this
publication may be reproduced in any form without written permission from Seagate Removable Storage
Solutions, LLC.
T-010, Rev. B
November 13, 2001
9LSHU
81,;&203$7,%,/,7<*8,'(
6HDJDWH
7DSH 2SHUDWLRQV
&RVWD 0HVD &$
Introduction
This document describes how to configure various UNIX systems to
recognize and obtain optimal performace from the Seagate Viper 200 LTO
Ultrium tape drive. It summarizes drive configuration options, as well as
changes that may be required at the operating system level.
Note: Seagate makes no Warranty of any kind with regard to this
document. Seagate shall not be liable for any errors contained
herein, or indirect, special, incidental or consequential damages in
connection with the furnishing, performance, or use of this
document.
A word about SCSI controllers
The Viper 200 is capable of transferring date at 32 Mbytes per second with
2:1 compression of the data. The Viper 200 also supports the SCSI Ultra2
specification and can transfer data at burst rates of up to 80 Mbytes per
second . In order to achieve maximum drive performance, it is important to
choose high performance disk drives for your system, as well as high
performance SCSI controllers. The table below lists the types of SCSI
controllers that Seagate recommends, in order of least preferred to most
preferred.
Controller type
Maximum Transfer rate
Fast Wide SCSI
20 Mbytes per second
Wide Ultra SCSI
40 Mbytes per second
Wide Ultra2 SCSI
80 Mbytes per second
Ultra 3 SCSI
160 Mbytes per second
(For definitions of the terms used above, please refer to SCSI Trade
Organization web site: http://www.scsita.org/aboutscsi/index01.html)
T-010, Rev. B
November 13, 2001
9LSHU
81,;&203$7,%,/,7<*8,'(
6HDJDWH
7DSH 2SHUDWLRQV
&RVWD 0HVD &$
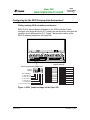
Configuring for the DEC/Compaq Unix Environment
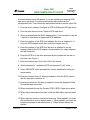
Finding existing SCSI controllers and devices
SCSI ID #7 is almost always dedicated to the SCSI controller. Never
configure your target device for ID 7 unless you are absolutely sure that the
controller is not addressed for ID 7. Figure 1 shows the locations of the
SCSI ID address jumpers for the Viper 200.
Jumper Settings:
Drive-configuration jumper pins
Default
settings:
Pins: Function:
1-2 SCSI ID bit 0
3-4 SCSI ID bit 1
5-6 SCSI ID bit 2
7-8 SCSI ID bit 3
9-10 Reserved
11-12 Termination Power
SCSI ID=0
SCSI ID=8
SCSI ID=1
SCSI ID=9
SCSI ID=2
SCSI ID=10
SCSI ID=3
SCSI ID=11
SCSI ID=4
SCSI ID=12
SCSI ID=5
SCSI ID=13
SCSI ID=6
SCSI ID=14
SCSI ID=7
SCSI ID=15
Term. power
Figure 1: SCSI jumper settings for the Viper 200
T-010, Rev. B
November 13, 2001
9LSHU
81,;&203$7,%,/,7<*8,'(
6HDJDWH
7DSH 2SHUDWLRQV
&RVWD 0HVD &$
Digital Unix Version 4.0 and later/Compaq Tru64 Unix 5.x
Use File Manager to open the file /etc/ddr.dbase and create an entry as
follows:
SCSIDEVICE
#
Type = tape
Name = "SEAGATE" "ULTRIUM"
#
PARAMETERS:
TypeSubClass
= tk
TagQueueDepth
= 0
MaxTransferSize
= 0x0ffffff # (16MB - 1)
ReadyTimeSeconds
= 180
# seconds
CMD_PreventAllow
= supported
CMD_ExtReserveRelease = supported
BlockSize
= 0
PwrMgmt_capable
= 0
DENSITY:
#
DensityNumber = 0,2,3,4,5,6,7
DensityCode = default
CompressionCode = 0x0
Buffered = 0x1
DENSITY:
#
DensityNumber = 1
DensityCode = default
CompressionCode = 0x1
Buffered = 0x1
Save the file.
Run the following command:
ddr_config -c
ddr_config will take the default input file, ddr.dbase, and build a new device
database. This is effective immediately, and there is no need to rebuild the
kernel.
T-010, Rev. B
November 13, 2001
9LSHU
81,;&203$7,%,/,7<*8,'(
6HDJDWH
7DSH 2SHUDWLRQV
&RVWD 0HVD &$
Note: ddr.dbase is a unix shell script and is not written in C. This means #
is used to signify a comment, not /* and */ or //, as used in C. Make
sure any comments included in this file are preceded with the #
character.
To enable the tape driver to turn on data compression when writing data to
tape use the ‘c’ option.
For commands that use density and tape size settings the tape density is
124,000 bpi and the tape length is 1800 feet. For commands that use a
blocking factor we recommend a blocking factor of 64 as a minimum,
preferably 128.
Configuring for the Sun Environment
(Solaris 2.4, 2.5, 2.6, 7, and 8)
Use the following for attaching the Viper 200 to Sun Sparc and Intel
systems.
Finding current SCSI controllers and targets
In order to properly attach SCSI devices to hosts it is necessary to ensure
that each target device has a unique SCSI address. The commands
‘modinfo’ and ‘dmesg’ can be used to find the SCSI controllers in use and
the SCSI target devices installed.
For example, the command “dmesg | egrep “target” | sort | uniq” can find
all SCSI controllers and SCSI targets. The output may look similar to:
sd32
sd34
st21
st22
at
at
at
at
ithps0:
ithps0:
ithps1:
ithps1:
target
target
target
target
2
4
0
1
lun 0
lun 0
lun 0
lun0
In this case the Viper 200 could be set for SCSI ID address 2 thru 6 and
attached to controller ithps1 (this particular controller also supports SCSI
addresses 8 thru 15). See figure 1 to view how to set the SCSI ID address
jumpers for the Viper 200.
Types of controllers
You may be able to view the man pages of three types of SCSI controllers
for Sun Sparc systems, esp, glm and isp. We recommend that the Viper
T-010, Rev. B
November 13, 2001
9LSHU
81,;&203$7,%,/,7<*8,'(
6HDJDWH
7DSH 2SHUDWLRQV
&RVWD 0HVD &$
200 not be attached to esp controllers. This controller is not fast enough to
work with the Viper 200. The minimum recommended controller would be a
glm controller which is a Ultra Wide controller.
We recommend Ultra2 SCSI capable controllers capable of 80MB/s data
transfer. Ultra 3 controllers supporting 160MB/s transfer rates can also be
used.
Configuring the device file st.conf
To configure Solaris 2.4 and above to use the Viper 200 correctly, add the
following lines to the file st.conf in the directory /kernel/drv.
tape-config-list=
"SEAGATE ULTRIUM06242-XXX","Seagate LTO","SEAGATE_LTO";
SEAGATE_LTO = 1,0x36,0,0x1d639,4,0x00,0x00,0x00,0x00,1;
Note: The inquiry string above contains one space between SEAGATE
and ULTRIUM.
The value 0x1d639 equates to the manner in which the Viper 200 will be
configured to operate in the Solaris environment. This value enables the
Viper 200 to:
•
Support variable length records (variable length block size)
•
Backspace over files (same as ‘mt bsf’ command to backspace over
filemarks)
•
Backspace over records (same as ‘mt bsr’, backspace over individual
tape blocks)
•
Long timeout for long erase function (it is not recommended to try and
erase the entire tape)
•
Viper 200 knows when end of data has been encountered
•
Device driver is unloadable
•
Long timeouts ( 5 times longer than normal)
•
Buffered writes supported
•
Variable record size not limited to 64k
T-010, Rev. B
November 13, 2001
9LSHU
81,;&203$7,%,/,7<*8,'(
•
6HDJDWH
7DSH 2SHUDWLRQV
&RVWD 0HVD &$
Uses Mode Select Page 10h to enable/disable compression
Once st.conf has been modified, the kernel must be reconfigured by
booting the system using the boot -r command. If you are replacing a
tape device with the same SCSI ID you may want to delete the st devices
from the /dev/rmt directory (recommended).
When using commands that require a blocking factor such as tar, ufsdump,
ect., we suggest a minimum factor of 64. The preferred factor is 128.
For commands that use density and tape size settings the tape density is
124,000 bpi and the tape length is 1800 feet. We suggest using the
ufsdump/ufsrestore commands. These commands automatically detect end
of tape without the need of the density and tape length settings.
To enable the st driver to turn on data compression when writing data to
tape use the ‘c’ option. For example, tar cf /dev/rmt/0c would cause the
Seagate Ultrium tape drive to compress the data before writing the data to
tape.
Configuring for the IBM AIX Environment
(AIX Version 4.1.x and later)
Finding existing SCSI controllers and devices
Enter the following command: lsdev –Cs scsi. This will show all of the
SCSI target id’s known to the system. Note the SCSI target id’s and choose
a SCSI id for the Viper 200 that will not conflict with the id’s shown from the
lsdev command. SCSI ID #7 is almost always dedicated to the SCSI
controller. Never configure your target device for ID 7 unless you are
absolutely sure that the controller is not addressed for ID 7. See figure 1 to
view how to set the SCSI ID address jumpers for the Viper 200.
Configuring the Viper 200 using SMIT
The Seagate Viper 200 tape drive can be configured to work with AIX
Versions 4.1.x and later by using the SMIT “Other SCSI Tape Drive” option.
NOTE: Record the SCSI ID of the tape drive before installing it. To
configure AIX using the SMIT utility, use the following procedure:
1. Enter SMIT at the Tape Drive menu by typing “smit tape”
T-010, Rev. B
November 13, 2001
9LSHU
81,;&203$7,%,/,7<*8,'(
6HDJDWH
7DSH 2SHUDWLRQV
&RVWD 0HVD &$
2. Select “Add a tape Drive”
3. Select the type of tape drive you will be adding. Use the “Other SCSI
Tape Drive” option.
4. Select the Parent SCSI Adapter from the available list
5. The Add a tape Drive “Entry Fields” now appear. Some of the standard
options need can be changed to maximize drive performance and
functionality:
1. Set the Connection Address with the Drives Target and Lun (
always use Lun 0 ). In the list, the Target is the first number
and the Lun is the second. For example, if the drive is ID 5,
choose 5,0
2. Set the “BLOCK size” to 0
3. Set “Use DEVICE BUFFERS during writes” to yes.
4. Set “RETURN error on ape change or reset” to no
5. Set “Use EXTENDED file marks” to yes.
6. Set “RESERVE/RELEASE support” to yes
7. Set “BLOCK SIZE for variable length support(Num.)” to 0
8. Set “Density 1” to 0
Leave the “Set delay. . .” and “Set timeout. . .” lines at the default value.
Click on OK and the drive will be installed in the system database, and
devices created. There is no need to reboot the system.
Now exit SMIT
Notes: We suggest using the AIX commands ‘backup’ and ‘restore’ when
transferring data to and from the Viper 200. These commands
transfer data more quickly than other commands such as tar and
cpio. For cpio we suggest a blocking factor of 128. For tar we
suggest using the –N option and a factor of 128. Some older
systems with poor video controllers may experience a reduction in
performance when using the –v option which prints the path names
T-010, Rev. B
November 13, 2001
9LSHU
81,;&203$7,%,/,7<*8,'(
6HDJDWH
7DSH 2SHUDWLRQV
&RVWD 0HVD &$
on the standard console during the backup. Unless there is a real
need to see the filenames as they are backed up we suggest not
using the –v option. For commands that use density and tape size
settings the tape density is 124,000 bpi and the tape length is 1800
feet.
Configuring for SCO Open Server 5.0.x
Finding existing SCSI controllers and devices
The files /usr/adm/hwconfig and /var/adm/messages list the devices found
during boot up of Open Server. The current SCSI controllers can be found
using the command:
grep adapter /usr/adm/hwconfig
which will produce and out similar to:
%adapter 0x6400 – 0x64FF
fts=st0.
11
type=alad
ha=0
bus=0
id=7
The current tape drives can be found using the command:
grep tape /usr/adm/hwconfig
which will produce and out similar to:
%tape type=S ha=0 id=6 lun=0 bus=0 ht=alad
The information above shows that an Adaptec SCSI controller is installed
(alad) and a SCSI tape drive (type=S) is installed as target id 6. SCSI ID
#7 is almost always dedicated to the SCSI controller. Never configure your
target device for ID 7 unless you are absolutely sure that the controller is
not addressed for ID 7. See figure 1 to view how to set the SCSI ID
address jumpers for the Viper 200.
Configuring the Viper 200 with mkdev
Once connected to the system, installation of the drive is carried out using
the following command:
mkdev tape
T-010, Rev. B
November 13, 2001
9LSHU
81,;&203$7,%,/,7<*8,'(
6HDJDWH
7DSH 2SHUDWLRQV
&RVWD 0HVD &$
A numeric based menu will appear. If you are replacing an existing SCSI
tape drive use option 3 to remove the existing tape drive from the
configuration files. Then follows the instructions below to add the Viper 200.
1. From the menu choose “Configure a SCSI or Enhanced IDE tape drive”.
2. From the next menu choose “Install a SCSI tape drive”.
3. When prompted enter the SCSI adapter string. You may want to use the
h option to view the list of supported SCSI adapters.
4. Enter the number of the SCSI host adapter the drive is attached to. If
only one SCSI adapter exists then enter the number zero (0).
5. Enter the number of the SCSI bus the drive is attached to on the
adapter. Refer to the SCSI adapter documentation (for many adapters
this will be zero(0).
6. Enter the SCSI id of the drive as shown by the jumpers on the rear of
the drive (see Figure 1).
7. Enter the number zero (0) for the LUN of the device.
8. When prompted to “Update the SCSI configuration? (y/n)” enter y.
9. Enter “SEAGATE” when prompted for Vendor Identification string (no
quote marks).
10. Enter the number three (3) when prompted to enter the SCSI version
that the tape drive conforms to.
11. Enter the number two (2) when prompted to enter the Response Data
Format the tape drive uses.
12. When prompted choose the Generic SCSI-1/SCSI-2 tape drive option.
13. When the process takes you back to the two Main Menu screens press
‘q’.
14. When asked to create a new kernel enter yes. When asked if you want
the new kernel to boot by default press ‘y’. When asked if you want the
kernel environment to be rebuilt press ‘y’. When finished reboot the
system.
T-010, Rev. B
November 13, 2001
9LSHU
81,;&203$7,%,/,7<*8,'(
6HDJDWH
7DSH 2SHUDWLRQV
&RVWD 0HVD &$
Notes:
Not all of the SCO ‘tape’ commands will operate or be applicable to the
Seagate Viper 200 drive (execute the command ‘man tape’ for the specifics
on how the tape command works). The following tape commands are not
available for use with the Viper 200: getcomp, setcomp (the Viper 200 will
always compress the data before writing the data to tape under SCO Open
Server 5.0.x), partition, setpart, getpart, getspeed, setspeed, rsm, wsm.
The following tape commands are available for use with the Viper 200:
status, load, reset, rewind, retention, getblk, setblk, unload, eod.
When using the GUI Backup Manager utility set the block size to 32768
minimum, 65536 preferred. When using commands such as tar we suggest
using the tape command to set the block size to 512 and then using a
blocking factor of 80 for the tar command. For commands that use density
and tape size settings the tape density is 124,000 bpi and the tape length is
1800 feet.
Configuring for Linux
Finding existing SCSI controllers and devices
Before installing the Seagate Viper Ultrium tape drive first ensure that the
requisite SCSI controllers and device drivers are installed on your system.
To find existing SCSI controllers execute the command:
dmesg | grep SCSI
You may see output similar to:
(scsi0)<Adaptec AHA-294XX Ultra2 SCSI host adapter> found at
PCI 0/16/0
To find existing SCSI devices execute the command:
cat /proc/scsi/scsi
You may see output similar to:
Host: scsi0 Channel: 0 Id:6 Lun:00
Vendor: SEAGATE
Model: ULTRIUM06242-XXX
Type: Sequential Access
ANSI SCSI Revision 03
T-010, Rev. B
November 13, 2001
9LSHU
81,;&203$7,%,/,7<*8,'(
6HDJDWH
7DSH 2SHUDWLRQV
&RVWD 0HVD &$
Use the output of these two commands to see which SCSI target id
numbers are free. In the above example a tape drive is attached at target id
6. SCSI ID #7 is almost always dedicated to the SCSI controller. Never
configure your target device for ID 7 unless you are absolutely sure that the
controller is not addressed for ID 7. See figure 1 to view how to set the
SCSI ID address jumpers for the Viper 200.
The widely available distributions of Linux will automatically install the
proper SCSI and tape device drivers. If you executed the cat command
above you are already ensured that the SCSI driver for your controller is
installed. To view currently loaded modules execute the lsmod command.
Ensure that one of the entries is st.
To view the st device number for your attached tape drive execute the
command:
dmesg | grep tape
You should see output similar to:
Detected SCSI tape st0 and scsi0 . . .
Using the Viper 200
The Viper 200 can be configured via the mt command options and a default
configuration can be setup using the ‘stsetoptions’ command from within
the mt command. Refer to the man page for mt for details. We suggest not
using the erase command nor commands which attempt to partition the
tape. Partitioning is not suppported in the LTO format.
For commands that use density and tape size settings the tape density is
124,000 bpi and the tape length is 1800 feet. For commands which use a
blocking factor we suggest a factor of 128.
Configuring for SGI Irix
Finding current SCSI controllers and targets
In order to properly attach SCSI devices to hosts it is necessary to ensure
that each target device has a unique SCSI address. The command hinv
T-010, Rev. B
November 13, 2001
9LSHU
81,;&203$7,%,/,7<*8,'(
6HDJDWH
7DSH 2SHUDWLRQV
&RVWD 0HVD &$
can be used to find all attached SCSI controllers and target devices. To
search for all SCSI controllers and devices use the command:
hinv –v | grep SCSI
The output of the command will be similar to the following:
Integral SCSI controller 0: Version ADAPTEC 7880
Disk drive unit 1 on SCSI controller 0
CD ROM unit 4 on SCSI controller 0
Integral SCSI controller 1: Version ADAPTEC 7880
Tape drive: unit 6 on SCSI controller 1: DAT
This output shows that a tape drive is present on SCSI controller 1 at SCSI
ID address #6. Available SCSI ID’s are 0,2,3,5 6, 8 – 15 on controller 0 and
ID’s 1 – 5 and 8 – 15 on controller 1 (this particular controller supports
Wide/Ultra SCSI).
Note: SCSI ID #7 is almost always dedicated to the SCSI controller. Never
configure your target device for ID 7 unless you are absolutely sure
that the controller is not addressed for ID 7. See figure 1 to view how
to set the SCSI ID address jumpers for the Viper 200.
Modifying the configuration file
To attach the Viper 200 to IRIX the file ‘scsi’ needs to be modified by a text
editor. The file can be found in /var/sysgen/master.d . Open the file and use
the text editor to add the following at the end of the tape device entries:
For IRIX 6.2 :
{DATTAPE, TPDAT, 7, 7, “SEAGATE”, “ULTRIUM06242”, 0,0, {0},
MTCAN_BSF | MTCAN_BSR | MTCAN_APPEND | MTCAN_SETMK |
MTCAN_PREV | MTCAN_SYNC | MTCAN_SPEOD | MTCAN_CHKRDY |
MTCAN_VAR | MTCAN_SETSZ | MTCAN_SILI | MTCAN_SEEK |
MTCAN_COMPRESS,
40, 5*60, 10*60, 10*60, 3*3600, 512, 256*512, 0, (u_char*)
0},
T-010, Rev. B
November 13, 2001
9LSHU
81,;&203$7,%,/,7<*8,'(
6HDJDWH
7DSH 2SHUDWLRQV
&RVWD 0HVD &$
For IRIX 6.4/6.5:
{DATTAPE, TPDAT, 7, 7, “SEAGATE”, “ULTRIUM06242”, 0,0, {0},
MTCAN_BSF | MTCAN_BSR | MTCAN_APPEND | MTCAN_SETMK |
MTCAN_PREV | MTCAN_SYNC | MTCAN_SPEOD | MTCAN_CHKRDY |
MTCAN_VAR | MTCAN_SETSZ | MTCAN_SILI | MTCAN_SEEK |
MTCAN_COMPRESS,
40, 5*60, 10*60, 10*60, 3*3600, 512, 256*512,
tpsc_default_dens_count, tpsc_defalt_hwg_dens_names,
tpsc_default_alias_dens_names, {0}, 0, 0, 0, 0, (u_char*)
0},
After modifying the configuration file, recompile the kernel with the
“autoconfig” command and reboot the system. If you are replacing an
existing storage device with the same SCSI ID remove the device files prior
to using the autoconfig command and rebooting the system.
Configuring for HP-UX 11.0
Finding current hardware/driver configuration
To find currently installed SCSI controllers and devices the ioscan
command can be used. The syntax would be ioscan –f. This command
will list all of the system devices and their device names.
Attaching the Seagate Viper 200
Choose a SCSI address which does not conflict with any already attached
SCSI devices on your SCSI controller. See figure 1 for jumper installation
for the Viper 200. Attach the Viper 200 LTO drive and apply power to the
Viper 200 and the host system. After the boot process is complete and you
have logged in as superuser issue the command:
ioscan –C tape –f.
You should see output similar to:
Class
I
H/W Path
Driver
S/W State
Tape
7
8/12.6.0
stape
Claimed
T-010, Rev. B
H/W type
Device
Description
SEAGATE ULTRIUM
November 13, 2001
9LSHU
81,;&203$7,%,/,7<*8,'(
6HDJDWH
7DSH 2SHUDWLRQV
&RVWD 0HVD &$
From the root directory and as superuser issue the command:
/sbin/insf –C tape.
Now issue the command:
/sbin/mksf –d stape –H x/x.x.x –I y –c 1 –n –u /dev/rmt/zcnb
Where x is the data under H/W Path from the ioscan , y is the data
under I from the ioscan and z is tape device identifier number. You can
execute an ls command for the /dev/rmt directory to choose an identifier
number which has not already been used. Also, you can choose a unique
device name such as cnb to more easily remember which device name will
enable data compression during write. Please refer to the man pages for
mksf to review settings for rewind/no rewind, Berkeley mode, AT&T mode,
ect.
After performing the insf and mksf commands check the installation by
using the command ioscan –fn | grep –C tape. You should see output
showing the hardware and device addressing and also the device name
attached to the Viper 200.
T-010, Rev. B
November 13, 2001