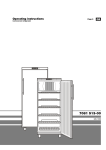
1
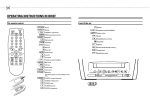
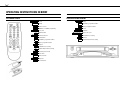
2.
PLAYBACK
1 Insert the cassette into the cassette slot.
Still picture
1 Press the
STILL R
button. You see a still picture.
Interference stripes will appear on the screen.
2 Each time you press
STILL R
again, the picture will
move on one step.
PLAY G
2 Press the playback button
3 Picture scanning: Press the
I
.
Note: If the still picture vibrates vertically, hold the
P r or the P q button at step 1until the vibration is
minimal. This setting will be stored automatically.
Please note, however, that interference may still occur
with poor quality cassettes.
H
(reverse) or
(forward) button once or several times.
4 Interrupt: Press the
STOP h
button.
5 Wind and rewind: Interrupt the playback function and
press the
H
(rewind) or
I
(wind) button.
0:20
If, during wind/rewind, you want to have a quick access
to picture scanning, use the ’Instant View’ function.
6 INSTANT VIEW: If you hold the
H
(Rewind) or
(Wind) button during wind or rewind, you will
switch to picture scanning. If you release the buttons,
the video recorder will automatically switch back to
rewind or wind again.
I
7 Eject a cassette: Interrupt the playback function and
press the
hSTOP/JEJECT
button on the video recorder.
Notes: Some functions switch off automatically after a
while (e.g.: Pause, Still Picture, Scanning). This helps to
protect the cassette and prevent unnecessary power
consumption.
* The picture quality will deteriorate during Picture
Scanning. The sound is turned off.
Tape position/Index search
Tape position: The elapsed playback time, given to the hour
and minute, appears in the display.
If you want to set the indicator to ’0:00’ , press the
CLEAR (CL) button.
When you insert a cassette, the indicator is automatically
set to ’0:00’ .
Index search: At the beginning of each recording, the video
recorder marks the tape with a code mark. You can search
for these code marks on the tape. Once the video recorder
finds the code mark or a blank space it will automatically
switch to playback.
INDEX E button and then press the I
button to select the next code mark or the H button
for the previous code mark.
1 Press the
Note: You cannot use the function ’Index search’ with
recordings made on another video recorder that does
not have this code mark function.
5