1
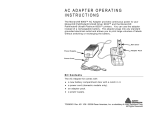
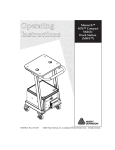
User Manual TC9416CTIUM Rev. AB 12/06 Monarch® Printers Intelligent Kit ©2006 Paxar Americas, Inc. All rights reserved. Each product and program carries a respective written warranty, the only warranty on which the customer can rely. Paxar reserves the right to make changes in the product, the programs, and their availability at any time and without notice. Although Paxar has made every effort to provide complete and accurate information in this manual, Paxar shall not be liable for any omissions or inaccuracies. Any update will be incorporated in a later edition of this manual. ©2006 Paxar Americas, Inc. All rights reserved. No part of this publication may be reproduced, transmitted, stored in a retrieval system, or translated into any language in any form by any means, without the prior written permission of Paxar Americas, Inc. WARNING This equipment has been tested and found to comply with the limits for a Class A digital device, pursuant to Part 15 of the FCC Rules. These limits are designed to provide reasonable protection against harmful interference when the equipment is operated in a commercial environment. This equipment generates, uses, and can radiate radio frequency energy and, if not installed and used in accordance with the instruction manual, may cause harmful interference to radio communications. Operation of this equipment in a residential area is likely to cause harmful interference in which case the user will be required to correct the interference at his own expense. CANADIAN D.O.C. WARNING This digital apparatus does not exceed the Class A limits for radio noise emissions from digital apparatus set out in the Radio Interference Regulations of the Canadian Department of Communications. Le présent appareil numérique n'émet pas de bruits radioélectriques dépassant les limites applicables aux appareils numériques de la classe A prescrites dans le Réglement sur le brouillage radioélectrique édicte par le ministère des Communications du Canada. Trademarks MONARCH®, 9416®, 939i, 9825, and 9855 are registered trademarks of Paxar Americas, Inc. Paxar® is a trademark of Paxar Corporation. Paxar Americas, Inc. 170 Monarch Lane Miamisburg, Ohio 45342 TA B L E O F C O N T E N T S INTRODUCTION ...........................................................................................1-1 Audience ................................................................................................1-1 Overview ................................................................................................1-1 Using This Manual ...................................................................................1-2 Unpacking the Kit Components .................................................................1-2 Connecting the Cables to a 9416 Printer ....................................................1-2 Connecting the Cables to a 9416 Printer ....................................................1-3 Connecting the Cables to a 9825 Printer ....................................................1-4 Connecting the Cables to a 9855 Printer ....................................................1-5 Using the Keyboard .................................................................................1-6 Control Keys ........................................................................................1-7 SETTING UP THE PRINTER...........................................................................2-1 Selecting the Format Sending Mode ..........................................................2-2 Using Batch Separators............................................................................2-2 Using Data Preloading .............................................................................2-3 Setting the Print Mode .............................................................................2-4 Setting the Supply Type ...........................................................................2-4 Setting the Ribbon ...................................................................................2-5 Sending the Printer Reset Command .........................................................2-5 Sending a Virgin Reset Command .............................................................2-5 Printing a Test Label................................................................................2-6 Setting the Packet Delay ..........................................................................2-6 i Setting the Print Contrast .........................................................................2-7 Setting the Print Position..........................................................................2-8 Setting the Supply Position .......................................................................2-9 Resetting the Configuration .................................................................... 2-10 PRINTING LABELS .......................................................................................3-1 Format 1 .................................................................................................3-1 Format 2 .................................................................................................3-2 Format 3 .................................................................................................3-2 Format 4 .................................................................................................3-3 Format 5 .................................................................................................3-4 TROUBLESHOOTING ....................................................................................4-1 Technical Support....................................................................................4-1 ii INTRODUCTION 1 The Monarch® Intelligent and Industrial Kits allow you to print bar code labels offline using the Monarch® 9416®, 9825, or 9855 printers. For information about supply loading or care and maintenance, refer to the printer’s Equipment Manual or Operator’s Handbook on our Web site (www.paxar.com). Note: Information in this document supercedes information in previous versions. Refer to our Web site for any updates. Audience This manual is for the operator who enters data and prints and applies labels. Overview The keyboard may contain up to five preset formats (software order number – 126932) for your data. ♦ Format 1 (1.2” width x 1.1” length) ♦ Format 2 (1.2” width x 1.1” length) ♦ Format 3 (1.2” width x 1.1” length) ♦ Format 4 (1.5” width x 2.7” length) ♦ Format 5 (1.5” width x 2.7” length) Introduction 1-1 Using This Manual Following is a summary of the contents of this manual. Chapter Contents 1 Introduction Explains how to connect the cables and use the keyboard. 2 Setting Up the Printer Configuring the supply type, print mode, ribbon, and other settings for your printer. 3 Printing Labels Shows examples of the available formats and how to enter data for each one. 4 Troubleshooting Common problems and their solutions. Unpacking the Kit Components After you unpack the kit, you should have the keyboard, the printer, and a power cord. Depending on the kit ordered, you may have two power supplies and an adaptor cable. Look through all packaging material for parts. Keep the box and packaging material in case an item needs sent in for repair. 1. Pull the long, coiled cable out from the bottom of the keyboard’s base. 2. Slide the first loop in the cable slot as shown. Cable Slot 1-2 User Manual Connecting the Cables to a 9416 Printer 1. Turn OFF the printer before you connect the keyboard's cable. 2. Plug the 9-pin coiled keyboard cable into the end of the adaptor cable. ON/OFF Sw itch Optional Scanner Cable Keyboard Cable goes here Printer’s Pow er Supply (24V) Adaptor Cable Pow er Connector Pow er Cords Keyboard Pow er Supply (5V) 3. Secure the other end of the adaptor cable to the 9-pin port on the printer. Tighten the screws on the cables. 4. Connect the power cord to the power supplies. 5. Connect the power supply (24V) to the printer. 6. Connect the small power supply (5V) to the adaptor cable's power connector. 7. Turn ON the printer. The keyboard receives power from the auxiliary power supply (5V). Introduction 1-3 Connecting the Cables to a 9825 Printer 1. Turn OFF the printer before you connect the keyboard’s cable. 2. Plug the 9-pin coiled keyboard cable into the adaptor cable. 3. Plug the 25-pin serial cable into the back of the printer. 4. Tighten the screws on the cables. 5. Plug the auxiliary power supply into the adaptor cable as shown. 6. Plug the power supply into an electrical outlet. 7. Auxiliary Pow er Supply Turn ON the printer. On the back of the printer, press (I) to turn on and (O) to turn off the printer. Keyboard Cable goes here 1-4 User Manual Connecting the Cables to a 9855 Printer 1. Turn OFF the printer before you connect the keyboard’s cable. 2. Plug the 9-pin coiled keyboard cable into the back of the printer. 3. Tighten the screws on the cable to secure the cable to the printer. 4. Turn ON the printer. On the back of the printer, press (I) to turn on and (O) to turn off the printer. Keyboard Cable goes here Introduction 1-5 Using the Keyboard The keyboard has full alphabetic keys with 10 numeric keys, five function keys, four arrow keys, and several special keys. 1-6 User Manual Control Keys Escape. Returns the display to the previous menu. Also clears an error. Clear. Clears the entire field. Pause. Stops printing. Feed. Feeds a blank label if there is no print job. Prints a label in on-demand mode. Prints a label with error information that is useful to your System Administrator if an error is displayed. Cut. Cuts the supply. Displays menu items and allows you to move the cursor. Moves between fields in Batch Entry. Enter. Selects the displayed menu item. Shift. Toggles between upper and lower-case. Use with other keys to display ¢, ", @, :, ;, -, =, +, #, %, (, ), &, *. Caps Lock. Allows you to type all upper-case characters. When the caps lock is on, a padlock symbol is displayed in the upper right hand corner. Exit and delete application. Note: Do not press F1. There is a service charge to reload the application. If you press F1, press Escape to return to the Main Menu. Configuration Menu. Allows you to change the printer settings. See Chapter 2, “Setting Up the Printer” for more information. Reset defaults. Enters an international character for printing when pressed and held along with a character code. Space. Inserts a blank space between characters. Introduction 1-7 1-8 User Manual SETTING UP THE PRINTER 2 You must configure the printer before printing formats. The most common configuration options are listed in the following table: Option Choices Default Format Sending Mode As Needed/Always As Needed Separators Enabled/Disabled Disabled Preloading Enabled/Disabled Disabled Print Mode Continuous/On Demand Continuous Supply Type Black Mark/Die Cut Black Mark Ribbon With Ribbon/Without Without 1. Press from the Main Menu. You see -=Config Menu=--Esc to exit 1. Format Sending Mode 2. Press ← or → to move through the Configuration Menu. Setting Up the Printer 2-1 Selecting the Format Sending Mode There are two Format Sending Modes: As Needed and Always. To send all formats at once, select Always. To send only the correct format, select As Needed. The default is As Needed. 1. From the Config Menu, press ← or → until you see 1. Set Format Sending Mode 2. Press Enter. You see Select format sending mode 1=AS NEEDED, 2=Always > The current setting is displayed in all caps. 3. Press 1 or 2 to select the mode you need. You return to the Config Menu. Using Batch Separators A batch separator is an extra label printed in between batches (print jobs) with a pinstripe pattern. Only the 9825 and 9855 printers use this option. For non-indexed supply, the batch separator is always six inches long. The name of the print job is shown on the batch separator. Note: The 9416 printer does not use batch separators and ignores this setting. Batch Separator 2-2 User Manual 1. From the Config Menu, press ← or → until you see 2. Set Separators 2. Press Enter. You see Set Batch Separators 1=Enabled, 2=DISABLED > The current setting is displayed in all caps. 3. Press 1 or 2 to enable or disable the separators. The default is Disabled. You return to the Config Menu. Using Data Preloading The Preload Data function keeps any data you enter in memory when enabled. The default is Disabled. 1. From the Config Menu, press ← or → until you see 3. Set Preloading 2. Press Enter. You see Set Data Preloading 1=Enabled, 2=DISABLED > The current setting is displayed in all caps. 3. Select 1 to retain data. If you press 2, the printer does not keep data you previously entered in memory. You return to the Config Menu. Setting Up the Printer 2-3 Setting the Print Mode There are two print modes: continuous (no peel) and on-demand (peel). Continuous mode prints labels or tags in continuous strips. On-Demand mode separates the backing paper from the label as each label prints. 1. From the Config Menu, press ← or → until you see 4. Set Print Mode 2. Press Enter. You see Select Print Mode 1=CONTINUOUS, 2=On-Demand > The current setting is displayed in all caps. 3. Press 1 or 2 to select the print mode you need. The default is Continuous. You return to the Config Menu. Setting the Supply Type The printer has a black mark/die cut sensor, which it uses to properly calibrate supplies. Determine which type of supply you are using. Black mark supply has sense marks (black marks) on the back of them. Die cut supply does not have any black marks. 1. From the Config Menu, press ← or → until you see 5. Set Supply Type 2. Press Enter. You see Select Supply Type 1=BLACK MARK, 2=Die Cut > The current setting is displayed in all caps. 3. Press 1 or 2 to select the supply you need. The default is Black Mark. You return to the Config Menu. 2-4 User Manual Setting the Ribbon Thermal direct supply does not require a ribbon. Thermal Transfer supply does require a ribbon. 1. From the Config Menu, press ← or → until you see 6. Set Ribbon 2. Press Enter. You see Set Ribbon Value 1=With Ribbon, 2=WITHOUT The current setting is displayed in all caps. 3. Press 1 or 2 to choose the setting you need. The default is Without. You return to the Config Menu. Sending the Printer Reset Command This function resets the printer, which is the same as turning the printer off and then back on. The printer’s LED turns amber and then green when the printer returns to Ready mode. 1. From the Config Menu, press ← or → until you see 7. Send Printer Reset 2. Press Enter. You briefly see Command Sent The printer resets and you return to the Config Menu. Sending a Virgin Reset Command A virgin reset sets the printer back to factory defaults. Note: Do not virgin reset the printer. This function is for service use only and deletes any custom configurations from your printer. Setting Up the Printer 2-5 Printing a Test Label The test label shows the printer settings. Refer to your Equipment Manual for more information. 1. From the Config Menu, press ← or → until you see 9. Print test label 2. Press Enter. You briefly see Command Sent A test label prints and you return to the Config Menu. 9855 Test Labels Setting the Packet Delay This function adjusts the delay between processing MPCL packets so the printer does not lock up. Note: Call Service before changing the Packet Delay setting. The default setting should work for most packets. 2-6 User Manual Setting the Print Contrast The print contrast controls the darkness of the printing on your supply. The range is –699 to +699 and the default is 0. The correct print contrast setting affects how well your bar codes scan and how long your printhead lasts. Note: The specific range for the 9416 printer is –390 to +156. The printer ignores values set outside this range. 1. From the Config Menu, press ← or → until you see 11. Set Contrast 2. Press Enter. You see Enter contrast [-699/699] +0 3. Press ← or → to change the contrast in increments of 1. Press ↑ or ↓ to change the contrast in increments of 10. Pressing → or ↑ darkens the print; → or ↓ lightens the print. 4. When you are finished, press Enter. You return to the Config Menu. We recommend you check the bar code print quality with a bar code verifier. If you do not have a bar code verifier or scanner, check the bar code visually. A bar code that is in spec has complete bars, clear spaces, and small alphanumeric characters that look complete. An in spec bar code may not look as good as one that is too dark, but it has the highest scan rate. Dark IN SPEC Light Setting Up the Printer 2-7 Setting the Print Position This function adjusts where data prints vertically on the supply. Adjust the print if it is too close to the top or bottom of the supply, or overtypes the pre-printed area. The adjustments are in dots (0.0049 inch). The range is -99 to +99 and the default is 0. ♦ If the data is too close to the bottom, increase the number. ♦ If the data is too close to the top, decrease the number. 1. From the Config Menu, press ← or → until you see 12. Set Print Position 2. Press Enter. You see Enter print pos [-99/99] +0 3. Press ← or → to change the contrast in increments of 1 dot. Press ↑ or ↓ to change the contrast in increments of 10 dots. Pressing ← or ↓ decreases the value (moves the image down); → or ↑ increases it (moves the image up). 4. When you are finished, press Enter. You return to the Config Menu. 2-8 User Manual Setting the Supply Position This function adjusts the printer to print at the vertical 0,0 point on the supply. Note: The supply position adjustment should only be made on initial printer setup. For format adjustments, change the print position. You may need to adjust the supply in or out to allow supplies to be removed. The adjustments are in dots (0.0049 inch). The range is –300 to +300 and the default is 0. 1. From the Config Menu, press ← or → until you see 13. Set Supply Position 2. Press Enter. You see Enter supply pos [-300/300] +0 3. Press ← or → to change the contrast in increments of 1 dot. Press ↑ or ↓ to change the contrast in increments of 10 dots. Pressing ← or ↓ decreases the value (feeds less supply); ← or ↑ increases it (feeds more supply). 4. When you are finished, press Enter. You return to the Config Menu. Setting Up the Printer 2-9 Resetting the Configuration To change all configurations back to the default settings: 1. From the Main Menu, press . You see Reset Defaults – Are you sure? Y/N 2. Press Y. The application returns to the default settings. This may take a few minutes. When it is finished resetting, you return to the Main Menu. 2-10 User Manual PRINTING LABELS 3 This chapter describes the data entry procedures for each format. Your keyboard may contain custom formats that do not match the ones shown in this manual. Follow the prompts as necessary for entering your data. See your System Administrator for details. Note: 1. Press to backspace one character. If you make a mistake entering data, press the Clear key to clear the row. Turn ON the printer. On the back of the printer, press (I) to turn on and (O) to turn off the printer. FORMAT 1 2. Press Å or Æ to select the format you need, then press Enter. See the following Format descriptions to enter the data. Format 1 1. Load 1.2” width x 1.1” length supply. 2. Enter the data as prompted: Line 1 Line 2 Line 3 Line 4 Prompt What You Do LINE 1 Enter up to ten characters. Press Enter. LINE 2 Enter up to ten characters. Press Enter. LINE 3 Enter up to ten characters. Press Enter. LINE 4 Enter up to ten characters. Press Enter. PRINT QTY Enter up to three numeric digits. Press Enter. Printing Labels 3-1 Format 2 1. Load 1.2” width x 1.1” length supply. 2. Enter the data as prompted: UPCA Barcode Prompt What You Do UPCA Barcode Enter up to 12 numeric digits. Press Enter. PRINT QTY Enter up to three numeric digits. Press Enter. Format 3 1. Load 1.2” width x 1.1” length supply. 2. Enter the data as prompted: Line 1 UPCA Barcode Line 2 Prompt What You Do LINE 1 Enter up to 12 characters. Press Enter. UPCA Barcode Enter up to 12 numeric digits. Press Enter. LINE 2 Enter up to 12 characters. Press Enter. PRINT QTY Enter up to three numeric digits. Press Enter. 3-2 User Manual Format 4 1. Load 1.5” width x 2.7” length supply. 2. Enter the data as prompted: Line 1 Line 2 Line 3 Line 4 UPC Barcode Line 5 Prompt What You Do LINE 1 Enter up to 15 characters. Press Enter. LINE 2 Enter up to 15 characters. Press Enter. LINE 3 Enter up to 15 characters. Press Enter. LINE 4 Enter up to 15 characters. Press Enter. UPC BARCODE Enter up to 12 numeric digits. Press Enter. LINE 5 Enter up to 15 characters. Press Enter. PRINT QTY Enter up to three numeric digits. Press Enter. Printing Labels 3-3 Format 5 1. Load 1.5” width x 2.7” length supply. 2. Enter the data as prompted: Line 1 Line 2 Line 3 Line 4 Line 5 Line 6 Prompt What You Do LINE 1 Enter up to 15 characters. Press Enter. LINE 2 Enter up to 15 characters. Press Enter. LINE 3 Enter up to 15 characters. Press Enter. LINE 4 Enter up to 15 characters. Press Enter. LINE 5 Enter up to 15 characters. Press Enter. LINE 6 Enter up to 15 characters. Press Enter. PRINT QTY Enter up to three numeric digits. Press Enter. 3-4 User Manual TROUBLESHOOTING 4 Use this chapter to correct some problems that may occur. Problem Action The keyboard display is blank. Make sure the printer is on and the keyboard cable is attached securely to the printer. If the keyboard was attached while the printer was on, turn the printer OFF and then back ON. You tried to skip a required field. This field requires data before continuing to the next field. Enter data and press ENTER. Letters are not in the expected case. Make sure the caps lock is not on. Script is not running. Turn the printer OFF and then back ON. If this does not solve the problem, call Service. Optional scanner does not work. Make sure the scanner has been enabled. Refer to the 939i Operating Instructions “ for more information. Technical Support If these solutions do not work, call Service at the number listed on the back of this manual. Troubleshooting 4-1 4-2 User Manual