1
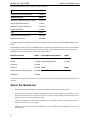
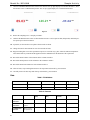
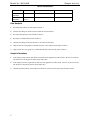
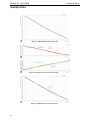
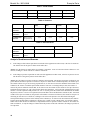
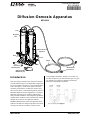
Instruction Manual 012-10962A ® *012-10962* Diffusion-Osmosis Apparatus ME-6940 Caps Alignment Tabs Diffusion-Osmosis Apparatus Bolts Bolt Tubing Sensor Mounting Stud Bolt Quick-release Connectors Semi-permeable Membranes (25) Introduction Open any biology textbook to the osmosis section and you will find the image of a U-shaped tube composed of two clear columns separated by a semi-permeable membrane. (See Figure 1.) This classic figure is the most commonly used model to visualize the osmotic movement of water due to a concentration gradient. PASCO's ME-6940 Diffusion-Osmosis Apparatus is a U-shaped apparatus consisting of two cylinders separated by a semi-permeable membrane. The transparent, graduated cylinders allow students to observe and measure volume changes due to osmosis. In conjunction with the PASPORT Dual Pressure Sensor, the apparatus allows students to measure the changes in pressure and volume caused by the osmotic movement of water across a 800-772-8700 semi-permeable membrane. With the use of other sensors like conductivity, pH, carbon dioxide gas or oxygen gas, students can explore the diffusion of molecules across the semipermeable membrane. Figure 1 www.pasco.com Model No. ME-6940 About the Membrane The ME-6940 Diffusion-Osmosis Apparatus is patent pending. Sensor Model PASPORT Dual Pressure Sensor PS-2181 Optional Sensors Model PASPORT Carbon Dioxide Gas Sensor PS-2110 Carbon Dioxide Gas Sensor CI-6561 PASPORT Oxygen Gas Sensor PS-2126 Oxygen Gas Sensor CI-6562 Other Model Replacement Membranes (20) ME-6941 Diffusion-Osmosis Kit* ME-6942 *The ME-6942 Diffusion-Osmosis Kit includes the Diffusion-Osmosis Apparatus and the PASPORT Dual Pressure Sensor. The PASPORT sensors work with a PASPORT interface such as the ones listed below. The CI-6561 Carbon Dioxide Oxygen Gas Sensor and CI-6562 Oxygen Gas Sensor work with a ScienceWorkshop interface or can work with a PASPORT interface when connected to a PS-2158 Analog Adapter.. PASPORT Interface Model ScienceWorkshop Interface Model Xplorer GLX PS-2002 ScienceWorkshop 750 CI-7650 Xplorer PS-2000 ScienceWorkshop 500 CI-6400 PowerLink PS-2001 USB Link PS-2100 Other Model SPARK Science Learning System PS-2008 PASPORT Analog Adapter PS-2158 SPARKlink PS-2009 See the PASCO catalog or the PASCO web site at www.pasco.com for more information about PASCO sensors and interfaces. About the Membrane 2 • The Diffusion/Osmosis membrane is a regenerated cellulose membrane preserved in glycerol. • In order to conserve moisture, membranes should be stored in an airtight, moisture-proof container in a cool location. If the membranes are not stored correctly, they can dry out, lose flexibility and develop microscopic holes that will alter expected experimental results. • Tension on the membrane in one direction can reduce pore size slightly. Tension on the membrane in both directions can increase pore size slightly. • Membranes can be reused if the wetted membranes are stored in either acid or formaldehyde. Be sure to soak and rinse again. Model No. ME-6940 Using the Apparatus • Membranes cannot be reused if they are allowed to dry out. Drying causes unrecoverable collapse of the pore structure. • Membranes are resistant to the following groups: halogenated hydrocarbons, alcohols, ketones, esters, oxides and solvents containing nitrogen. • Membranes are not resistant to the following: greater than 25% hydrochloric, nitric or perchloric acids; 96% sulfuric acid; 1 N potassium hydroxide; and 10% phenol. Specifications Pore size 40-50 m (micrometers) Molecular weight cut-off 6,000 daltons Temperature range 4 °C - 60 °C pH range 2 - 12 Maintenance and Care • Always disassemble the apparatus after an experiment. Empty all fluid from the cylinders and separate the two cylinders to remove the membrane. Rinse the inside and outside of the cylinders, including the O-rings and the area around the O-rings, with cool, warm or hot water. Soap may be used, but is not necessary. Dry the rinsed pieces of the apparatus on a paper towel or drying rack. • Reassembling the apparatus before long-term storage will help to ensure that all of the pieces stay together. • The columns are dishwasher-safe but be sure to remove the O-rings first! Do not put the blue caps and plastic tubing in the dishwasher. Safety • Be careful when removing the caps from the columns as pressure may have built up during your experiment. • Protect your eyes by wearing protective eyewear. Do not lean over the apparatus if pressure has accumulated, or when removing the caps. • Pressure in the columns can be as great as 15 pounds per square inch (psi). Using the Apparatus 1. Soak the membranes: Before using the membrane, soak it in distilled water for at least 30 minutes (at room temperature) to remove the preservative on the membrane. Then rinse the membrane thoroughly with distilled water. 2. Prepare your solutions: Prepare the solutions necessary for your experiment. If the solutions have been prepared beforehand and stored in refrigerator, be sure to bring the solutions to room temperature before starting the experiment. 3. Assemble the apparatus: 3 • Start with a clean, dry apparatus and a soaked, rinsed membrane. Unscrew the four bolts and place them in a safe location. Separate the two cylinders. • Line up two of the four corner holes on the soaked membrane with the two raised pegs on one of the cylinders. It does not matter which cylinder you put the membrane on. Model No. ME-6940 Using the Apparatus • Ensure that the two holes of the membrane are lined up with the pegs on the cylinder and then carefully place the other cylinder against the membrane so that the two raised pegs on the second cylinder go into the two empty holes on the membrane. Ensure that the membrane is securely in place between the two O-rings, all four raised pegs are inserted into the membranes holes and the membrane is pulled tightly across the space, with no folds or gaps. Make sure that the two alignment tabs near the top of the cylinders are aligned. • Quickly and carefully, screw in the four bolts and ensure that they are tight. The two cylinders should be tightly secured to each other with the membrane separating the space between the two cylinders. Cylinder Membrane Peg Peg Figure 2 *You may wish to label the two cylinders (1 & 2) with a sticker or marker. This will help reduce confusion if the solutions are similar in color. 4. Fill the cylinders: Immediately after placing the membrane in the apparatus, fill the cylinders with your solutions. Do not allow the membrane to dry out! Pour the required amount of solution into the first cylinder. Tilt the apparatus in all directions (careful not to spill the solution) to allow any bubbles in the bottom of the cylinder to escape. Repeat with the second cylinder. If you expect the volume within the cylinder to increase during your experiment, do no fill the cylinder with greater than 60 mL of solution, as the solution will overflow, or enter the plastic tubing and harm the sensor. If you are using a Dual Pressure Sensor (or other PASPORT pressure sensor) in your experiment, place the blue cap into the first cylinder, press it down and then turn the cap to seal the cylinder. Repeat with the second cylinder. 5. Set up your interface: Connect the sensor to the interface. View Absolute Pressure 1, Absolute Pressure 2 and 1-2 Differential pressure in a digits display. Also view 1-2 Differential Pressure in a graph display. 6. Reduce the sampling rate: Because diffusion and osmosis experiments take time, reducing the sampling rate of the sensor is necessary so that the interface is not overloaded with massive amounts of data. The default sampling rate of the PASPORT Dual Pressure Sensor is 10 Hz (or 10 samples per second). Reduce the sampling rate to 1 or 2 samples per minute. 7. Connect the apparatus to the sensor: Attach the quick-release connectors at the ends of the two plastic tubes to the Dual Pressure Sensor. (See Figure 3.) After you connect the apparatus to the pressure sensor, allow the system to equilibrate for five minutes before beginning data collection. 8. 4 Calibrate the sensor: If you are using the PASPORT Dual Pressure Sensor, calibrate Absolute Pressure 1 and Absolute Pressure 2 Dual Pressure Sensor Figure 3 Model No. ME-6940 Sample Activity so that they both measure atmospheric pressure (102 kilopascals) at the start of the experiment. If you are using other PASPORT sensors, calibrate them as instructed by the manual. 9. Experiment: Allow the processes of diffusion and osmosis to occur within the apparatus by leaving the experiment setup in an "out-of-the-way" place where the ambient temperature will remain relatively constant and the apparatus will be undisturbed for the duration of the experiment. Sample Activity Using 2.0 M Sucrose Solution and Distilled Water to Explore the Osmotic Movement of Water across a Semipermeable Membrane Materials and Equipment Materials and Equipment PASPORT Interface Distilled water (40 mL) Diffusion-Osmosis Apparatus 2.0 M Sucrose solution (40 mL) Pre-cut Membrane Graduated cylinder (2) PASPORT Dual Pressure Sensor Small beaker with distilled water* *To soak the membrane Procedure 1. Soak one pre-cut dialysis membrane in distilled water for at least 30 minutes (at room temperature) to remove the preservative on the membrane. When ready to use, rinse the membrane thoroughly with distilled water. 2. Obtain 40 mL of 2.0 M sucrose solution. To make 1 L of 2.0 M sucrose solution, place 684.6 g sucrose (table sugar) in a large flask or beaker. Add distilled water until the solution's volume equals one liter. Place the solution on a hot plate/magnetic stirrer. Stir the solution while bringing it up to a boil. Continue until all of the solute is dissolved in the water. Remove from heat and cool to room temperature before using. If you are not using the solution immediately, cover and store in a sterile container in a refrigerator or cool place. Improper storage will quickly result in mold growth. 3. Obtain 40 mL of distilled water. 4. Assemble the apparatus as described above. 5. Fill cylinder #1 with 40 mL of distilled water. Tilt the apparatus to get rid of any air bubbles around the membrane. 6. Fill cylinder #2 was filled with 40 mL of 2.0 M sucrose solution. Tilt the apparatus to get rid of any air bubbles around the membrane. 5 Model No. ME-6940 7. Sample Activity Connect a PASPORT Dual Pressure Sensor to the interface. Set up digits displays for Absolute Pressure 1, Absolute Pressure 2 and 1-2 Differential pressure. Also set up a graph display for 1-2 Differential Pressure. Figure 4 8. Reduce the sampling rate to 1 sample per minute. 9. Calibrate the Dual Pressure Sensor so that Absolute Pressure 1 and 2 equal 102 kPa (kilopascals) with both pressure ports open to the environment. 10. If possible, set the interface to stop data collection after 24 hours. 11. Change the unit of measurement for time from seconds to hours. 12. Begin recording data. Leave the experiment setup in an "out-of-the-way" place where the ambient temperature will remain relatively constant and the apparatus will be undisturbed for the duration of the experiment. 13. Record the initial volume of the solutions in the columns in Table 1. 14. Record the initial pressure of the solutions in the columns in Table 2. 15. Record the initial concentration of each solution in Table 3. 16. After 24 hours, stop recording data and save the experiment as directed by your instructor. 17. Carefully remove the blue caps and clean up as directed by your instructor. Data Table 1: Fluid Volume Solution Initial Volume (mL) Absolute Pressure 1 Distilled water Absolute Pressure 2 2.0 M Sucrose solution Final Volume (mL) Change in Volume Table 2: Pressure Solution 6 Absolute Pressure 1 Distilled water Absolute Pressure 2 2.0 M Sucrose solution 1-2 Differential Pressure (Abs. pressure 1 Abs. pressure 2) Initial Pressure (kPa) Final Pressure (kPa) Change in Pressure Slope (kPa/hour) Model No. ME-6940 Sample Activity Table 3: Concentration Solution Absolute Pressure 1 Distilled water Absolute Pressure 2 2.0 M Sucrose solution Initial Concentration (mol/L) Final Concentration (mol/L Data Analysis 1. Record the final volume of each solution in Table 1. 2. Calculate the change in volume in each column and record in Table 1. 3. Record the final pressure in the columns in Table 2. 4. Record the 1-2 Differential Pressure in Table 2. 5. Calculate the change in Absolute Pressure 1 and 2. Record in Table 2. 6. Apply a linear fit to the graphs of Absolute Pressure 1 and 2 and record the slopes in Table 2. 7. Apply a linear fit to your graph of 1-2 Differential Pressure and record the slope in Table 2. Analysis Questions 1. Is the change in fluid volume equivalent on each side of the apparatus? In other words, is the loss of volume on one side the same as the gain of volume on the other side? 2. Is the change in pressure equivalent on each side of the apparatus? In other words, is the loss of pressure on one side the same as the gain of pressure on the other side? 3. Calculate the final molarity of the solution in column #2 at the end of the experiment. Record in Table 3. 7 Model No. ME-6940 8 Model No. ME-6940 Sample Data Sample Data Graph of 1-2 Differential Pressure versus Time Graphs of Absolute Pressure 1 and 2 with Linear Fit Graph of 1-2 Differential Pressure with Linear Fit 9 Model No. ME-6940 Sample Data Table 1: Fluid Volume Solution Initial Volume (mL) Final Volume (mL) Change in Volume Absolute Pressure 1 Distilled water 40 30 -10 Absolute Pressure 2 2.0 M Sucrose 40 50 +10 Table 2: Pressure Solution Initial Pressure (kPa) Final Pressure (kPa) Change in Pressure Slope (kPa/hour) Absolute Pressure 1 Distilled water 102.17 89.03 -13.14 -0.613 Absolute Pressure 2 2.0 M Sucrose solution 102.49 126.27 +23.78 +0.965 1-2 Differential Pressure (Abs. pressure 1 Abs. pressure 2) -0.32 -37.24 -37.24 -1.580 Table 3: Concentration Solution Initial Concentration (mol/L) Final Concentration (mol/L Absolute Pressure 1 Distilled water 0.0 0.0 Absolute Pressure 2 2.0 M Sucrose solution 2.0 1.6 Analysis Questions and Answers 1. Is the change in fluid volume equivalent on each side of the apparatus? In other words, is the loss of volume on one side the same as the gain of volume on the other side? Answer: Yes, the change in volume in the two columns is equivalent. 10 mL of water moved from column #1 to column #2, resulting in a 10 mL increase in volume in column #2. 2. Is the change in pressure equivalent on each side of the apparatus? In other words, is the loss of pressure on one side the same as the gain of pressure on the other side? Answer: No, the change in pressure in the two columns is not equivalent. The increase in pressure in column #2 was greater than the decrease in pressure in column #1. Boyle's law states that at constant temperature, the absolute pressure and the volume of a gas are inversely proportional. So, as water moves across the membrane from column #1 to column #2, the volume of available space within column #1 increases. According to Boyle's law, this results in a decrease in pressure within the column. But, as the water moves into column #2, the volume of free space decreases, and the pressure increases. So, why is the pressure change not equivalent? Let's look at the combined gas law equation PV = nrT. The equation to find pressure is P = nrT / V. So, the greater the volume in the denominator, the smaller the pressure, and vice versa. For our experiment, this means that as more and fluid enters column #2 (aka - decreased volume of free space in column #2), the pressure will continue to increase. In column #1, the volume of free space is increasing as water moves to column #1, resulting in a decrease in the pressure. One other factor affecting the non-equivalent change in pressure is the molarity of the solutions (n). As water moves into column #2, the solution becomes more and more dilute, resulting in a decrease in n. Column #1 only contains water, so n remains constant. When n and V both decrease in column #2, a compounded increase in pressure results in column #2. N remains constant in column #1, so only the change in volume affects the pressure of this side. Therefore, the change in pressure is not equivalent. 10 Model No. ME-6940 3. Additional Experiments Calculate the final molarity of the solution in column #2 at the end of the experiment. Record in Table 3. Answer: First, determine the number of moles in column #2 at the beginning of the experiment. The initial volume of fluid in column #2 was 40 ml (0.04 L) and the initial molarity was 2.0 mol/L. • 2.0 mol/L * 0.04 L = 0.08 moles The final volume of solution in column #2 was 50 mL (0.05 L). Since sucrose could not cross the membrane, we know that we still have 0.08 moles of sucrose in the solution, but the volume has changed. Find the molarity of a solution that contains 0.08 moles in 0.05 L. • 0.08 mol / 0.05 L = 1.6 mol/L The solution in column #2 was diluted from 2.0 mol/L to 1.6 mol/L after 24 hours. Additional Experiments • Simply observe the osmotic movement of water (without observing pressure changes) by filling the columns with solutions of varying solute concentration, as long as the solute does not cross the membrane, you will observe the volume of change. Examples of substances that are too large to cross the membrane: disaccharides, ex. Sucrose; polysaccharides ex. Starch; proteins. Examples of substances that are small enough to cross the membrane: monosaccharides, ex. Glucose; ions, ex. Na+, Cl-, protons; Gases, ex. CO2, O2. • Explore the concept of semi-permeability by observing the movement of solutes across the membrane. Fill one column with distilled water and the other column with pickle juice. Test the initial conductivity, pH and blue Absorbance of the water and pickle juice. After 45-60 minutes, measure the final conductivity, pH and Absorbance of the fluids to determine whether salts, acetic acid and yellow dye diffused across the membrane. • Determine the size of solute molecules by comparing their rate of diffusion across the membrane. • Add a few grams of dry yeast and a few grams of sugar to 50 mL of distilled water to create an activated yeast solution. Allow the yeast 15-20 minutes to become active. Make a 10% glucose solution by dissolving 10 g of glucose in 100 mL of water. (Remember table sugar is not glucose! It is sucrose!) Fill column #1 with 30 mL of yeast solution and column #2 with 30 mL of glucose solution. Place the CO2 gas sensor into column #1 and the O2 gas sensor into column #2. Measure the increase in CO2 and the decrease in O2 as the glucose diffuses across the membrane and is used in the respiration of the yeast. • Chemistry and physical science classes can use the appartus to study the gas laws. Explore the effects of volume on pressure changes within the columns. • Find the molecular mass (M2) of an unknown solute in solution. Create a solution containing an "unknown" solute that cannot cross the membrane. Give the student the mass of the solute in the solution and the volume of the solution in the columns. Fill column #1 with the protein solution and column #2 with distilled water. Measure the pressure changes for 24 hours. Use the equation below to find the molecular mass of the unknown substance. RT M 2 = C 2 ------P where M2 = molar mass (g), C2 = molarity (mass of the solute in the solution (g) / volume of the solution (L)), R = 0.0083145 L kPa/ mol K, T = 298 K, and P = Final Absolute pressure #1. AP® Biology Lab 1: Diffusion and Osmosis* • 11 Part one: Make a 15% glucose/1% starch solution. Using glucose test strips and iodine test for the initial presence of sucrose and starch. Fill column #1 with distilled water and column #2 with the glucose/starch solution. Do not put the caps on the apparatus, leave it open to the environment. After 45-60 minutes, test Model No. ME-6940 Technical Support again for the presence of starch and glucose on both sides of the membrane. Students should observe the presence of glucose on both sides of the membrane because glucose is small enough to cross the membrane. Starch is too large to cross the membrane, so students should not observe starch on both sides of the membrane. • Part two: Measure the effects of varying the sucrose concentrations on the pressure in the columns. Create a variety of sucrose solutions (0.2 M, 0.4 M, 0.6 M, 0.8 M and 1.0 M). Assign one solution to each group. Instruct students to place the sucrose solution in one column and distilled water in the other. Students should measure the pressure and volume within the columns for 24 hours. After 24 hours, students should share their data with all groups and compare the rate of pressure change related to the varying sucrose concentrations. *AP® is a registered trademark of the College Board, which was not involved in the production of, and does not endorse this product. Technical Support For assistance with any PASCO product, contact PASCO at: Address: PASCO scientific 10101 Foothills Blvd. Roseville, CA 95747-7100 Phone: 916-786-3800 (worldwide) 800-772-8700 (U.S.) Fax: (916) 786-7565 Web: www.pasco.com Email: [email protected] For more information about the Diffusion-Osmosis Apparatus and the latest revision of this Instruction Manual, visit: www.pasco.com/go?ME-6940 Limited Warranty For a description of the product warranty, see the PASCO catalog. Copyright The PASCO scientific 012-10962A Diffusion-Osmosis Apparatus Instruction Manual is copyrighted with all rights reserved. Permission is granted to non-profit educational institutions for reproduction of any part of this manual, providing the reproductions are used only in their laboratories and classrooms, and are not sold for profit. Reproduction under any other circumstances, without the written consent of PASCO scientific, is prohibited. Trademarks PASCO and PASCO scientific are trademarks or registered trademarks of PASCO scientific, in the United States and/or in other countries. AP® is a registered trademark of the College Board, which was not involved in the production of, and does not endorse this product. All other brands, products, or service names are or may be trademarks or service marks of, and are used to identify, products or services of their respective owners. For more information visit www.pasco.com/legal. Patents Pending The following PASCO products have Patents Pending: ME-6990 Truss Set PS-2198 Load Cell Amplifier ME-6991 Bridge Set PS-2199 Load Cell and Amplifier Set ME-6992 Advanced Structures Set PS-2200 100 N Load Cell ME-6995 Road Bed Spares Replacement Parts Item Model Sensor Mounting Stud 648-08372 Bolt 648-10839 12 ME-6940 Diffusion-Osmosis Apparatus