1
Oricom eco90 Series
DECT Digital Cordless Phone
USER GUIDE
Keep this user guide for future reference.
TABLE OF CONTENTS
WARNINGS AND SAFETY INFORMATION
1
GETTING STARTED
3
FEATURES
5
BASIC OPERATION
8
MULTI-HANDSET OPERATION
10
REDIAL OPERATION
11
CALLER ID OPERATION
12
PHONE BOOK
15
MENU OPERATION
17
REGISTRATION
24
TECHNICAL SPECIFICATIONS
26
TROUBLESHOOTING GUIDE
27
APPENDIX
29
WARNINGS AND SAFETY INFORMATION
IMPORTANT
s !VOIDEXPOSUREOFTHISTELEPHONETOMOISTUREORLIQUID
s 4OPREVENTELECTRICSHOCKDONOTOPENTHEHANDSETOR
base cabinet.
s !VOIDMETALLICCONTACTEGMETALCLIPSKEYSBETWEEN
the battery contacts and charging conductors.
s 4HEREISASLIGHTCHANCETHATTHETELEPHONECOULDBE
damaged by an electrical storm. It is recommended
that users unplug the phone from the mains supply
and telephone socket during a storm.
s $ONOTUSETHEHANDSETINANEXPLOSIVEHAZARDAREA
such as where there is gas leaking.
s &OLLOWTHELOCALREGULATIONSREGARDINGTHEDISPOSALOF
your packing materials, exhausted batteries and used
phone. Wherever possible, recycle those materials.
s 7EADVISETHATTHISPHONESHOULDNOTBEUSEDNEAR
INTENSIVECAREMEDICALEQUIPMENTORBYPERSONSWITH
pacemakers. Persons with pacemakers should seek
advice from their doctor before using this product.
s #LEANWITHADRYSOFTLINTFREECLOTH.EVERUSECLEANING
agents, particularly aggressive solvents.
1
s "ECAUSE THE PHONE WORKS BY SENDING RADIO SIGNALS
between base station and handset, wearers of
hearing aids may experience interference in the form
of a humming noise. The telephone is compatible with
most popular hearing aids on the market. However,
due to the wide range of hearing aids available,
there is no guarantee that the telephone will function
"problem free" with every model.
s 9OUR PHONE CAN INTERFERE WITH ELECTRICAL EQUIPMENT
such as answering machines, TV and radio sets,
clock radios and computers if placed too close. It is
recommended that you position the base unit at least
one metre from such appliances.
s 4HIS TELEPHONE COMPLIES WITH APPLICABLE SAFETY
REQUIREMENTS FOR EXPOSURE TO RADIO WAVES %-2
The mean power of this telephone does not exceed
M7LIMITATWHICHPOINTTESTINGISREQUIRED
s 4HEEARPIECEOFTHEHANDSETMAYATTRACTSMALLMETAL
objects such as staples and pins. Care should be
taken when placing the handset near these items.
s 4HISTELEPHONEISNOTDESIGNEDFORMAKINGEMERGENCY
telephone calls when the mains power fails. Always
have a corded phone available to be able to make
and receive calls to emergency services if the mains
power fails.
2
WARNINGS AND SAFETY INFORMATION
s $ONOTUSEYOURTELEPHONEDURINGANELECTRICALSTORM
thunderstorm as it is possible to get an electric shock.
2EFERTOINFORMATIONCONTAINEDIN7HITEPAGESDIRECTORY
s 4HIS PHONE IS DESIGNED FOR CONNECTION TO A 034.
telephone line or an analogue extension port of a
PBX system. If you connect this device to a digital
extension of a PBX, damage may result to the PBX.
CAUTION
!
Use only the mains adaptors supplied with this product.
Incorrect adaptor polarity or voltage can seriously
damage the unit.
Adaptor for base unit:
).0546!#(Z
/540546$#M!
Adaptor for charger:
).0546!#(Z
/540546$#M!
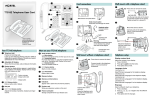
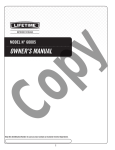
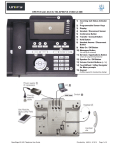
GETTING STARTED
Installation and Charger
1. Connect the mains adaptor (supplied) to the socket on
the back of the base unit and to the wall mains supply.
2. Connect the telephone cord to the phone socket on the
back of the base unit and into the wall phone socket.
)NSERT RECHARGEABLE .I-( !!!
batteries (included), observing the
correct polarity, into the battery
compartment on the handset. Slide
the battery door firmly into place.
4. Place the handset on the charging
cradle and charge the batteries for a full 16 hours before
using it for the first time.
Note:
It may take some time for the cordless handset to power
up, and it may get warm during initial charge. This is
normal.
Tip!
It is good practice to put the cordless handset on the
charging cradle when it is not in use to ensure that the
handset is always fully charged.
3
WARNING
!
$/ ./4 53% 34!.$!2$!,+!,).% "!44%2)%3 ).
4()302/$5#4!34(%2%)3!2)3+/&%80,/3)/.
!.$/2 ).*529 53% /.,9 .)-( 2%#(!2'%!",%
"!44%2)%3 !3 30%#)&)%$ ).4()3 53%2 '5)$%
#/.4!#4/2)#/-&/22%0,!#%-%.4"!44%2)%3
2)3+ /& %80,/3)/. )& "!44%29 )3 2%0,!#%$ "9
!.).#/22%#4490%
.EVERUSENONRECHARGEABLEBATTERIES5SERECOMMENDED
type supplied with this product.
s .EVERUSEALKALINEORLITHIUMBATTERIES
s $O NOT DISPOSE OF THE BATTERIES IN A FIRE AS THEY CAN
explode.
s $O NOT OPEN OR MUTILATE THE BATTER Y 2ELEASED
electrolyte is corrosive and can cause damage to the
eyes or skin. It can be toxic if swallowed.
s !VOID CONTACT WITH METAL OBJECTS WHEN HANDLING THE
battery. These objects could short out the batteries or
cause the conductor to overheat resulting in burns.
s $ONOTATTEMPTTORECHARGETHEBATTERYCELLBYHEATING
it. Sudden release of battery electrolyte can cause
burns or irritation to the eyes or skin.
s /BSERVETHEPROPERPOLARITYORDIRECTIONOFANYBATTERY
2EVERSE INSERTION OF THE BATTERY CELL CAN RESULT IN
leakage or explosion.
s 2EMOVE THE BATTERIES IF YOU DO NOT PLAN TO USE THE
product for several months at a time.
s &OLLOW THE LOCAL REGULATIONS REGARDING THE DISPOSAL OF
your packing materials, exhausted batteries and used
phone. Wherever possible, recycle those materials.
4
GETTING STARTED
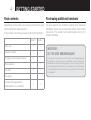
Pack contents
Purchasing additional handsets
$EPENDING ON THE MODEL YOU HAVE PURCHASED THIS PACK
should contain the following items:
9OU MAY EXPAND YOUR ECO BY ADDING MORE HANDSETS
(eco9050). These can be purchased directly from Oricom
(Australia). The eco90 can accommodate a total of 6
cordless handsets.
If any of these are missing, please contact Oricom directly.
ECO
ECO
Base units
1
1
Cordless handsets
1
2
Charging cradle and power adaptor
0
1
Power adaptors
1
1
Line cord
1
1
User guide
1
1
(ANDSET2ECHARGEABLE!!!
.I-("ATTERIES6M!H
2
4
IMPORTANT:
DO YOU HAVE BROADBAND/ADSL?
If you do, you must connect an in line filter (not supplied) between
the telephone socket and your eco90 base to ensure that your
broadband and eco90 will work properly. If you do not install the filter
you will experience interference on the eco90 and your Broadband
may suffer dropouts. Please refer to the user guide of the in line filter
for installation.
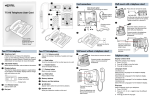
FEATURES
5
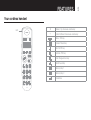
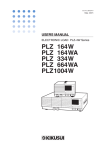
Your cordless handset
,%$
+
–
2EDIAL5P)NCREASEVOLUMEKEY
#ALLER)$$OWN$ECREASEVOLUMEKEY
-ENU/+KEY
#ANCEL2ECALLKEY
4ALK/N/FFKEY
!STERISK).4KEY
(ASH+EYPADLOCKKEY
:ERO0AUSE+EY
-EMORY+EY
-EMORY+EY
Handsfree
6
FEATURES
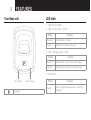
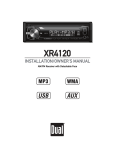
Your Base unit
LED state
,%$ONBASESTATION
A ,%$n)NUSE#OLORn'REEN
Pattern
Function
Steady On
7HENHANDSETISOFFHOOK
Flashes
When there is incoming ring signal
B ,%$n#HARGING#OLORn2ED
Pattern
Function
Steady On
When handset is in the cradle and charging
Flashes
When paging, in cadence with ringing signal
,%$ON(3
,%$n).53%
,%$n#HARGING
Pattern
Flashes
Paging key
Function
When message waiting received, or incoming
ring signal.
FEATURES
LCD Display
Icon
Description
Antenna icon
Phone icon
Key lock icon
2INGOFFICON
Speakerphone icon
Battery level indicator
New call icon
Alarm icon
7
8
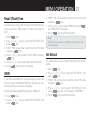
BASIC OPERATION
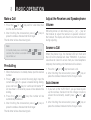
Make a Call
1. Press the [
] or [
] key, wait for a dial tone, then
dial the desired number.
2. After finishing the conversation, press [
] key or
place the cordless handset into the charger.
The talk timer will be shown during talk.
Note:
] or [
] for 1.5
In standby mode press and holding [
] or [
]
seconds, the number associated with the [
key will dial out.
Pre-dialling
1. When the handset is in standby mode, input the desired
number.
] key to cancel the wrong digit, input the
2. Press [
correct one again. If a pause is needed during dialling,
] key for a while and character “P”
press and hold [
will be shown. A 3 seconds pause will be added while
dialling.
3. Press the [
] or [
] key, the number will be
automatically dialled out.
4. After finishing the conversation, press [
] key or
place the cordless handset into the charger.
The talk timer will be shown during talk.
Adjust the Receiver and Speakerphone
Volume
7HILETHEPHONEISINTALKMODEPRESS;=OR;n=KEYON
the handset to adjust the receiver or speaker volume of
the handset. The display will show the current volume level
during adjusting.
Answer a Call
7HEN THE PHONE RINGS THE HANDSET ,%$ WILL FLASH AND
THE,#$ONTHEHANDSETWILLSHOWh2).').'v)FYOUHAVE
SUBSCRIBEDTO#ALLER)$SERVICEFROMYOURLOCALTELEPHONE
company, the incoming call information will be shown.
] or [
] key to answer a call.
1. Press the [
2. After finishing the conversation, press [
] key or
place the cordless handset into the charger cradle.
Auto Answer
1. If you turn on the “AUTO TALK”, you just need to pick
up the cordless handset from the charger cradle to
] or [
]
answer the call directly, needn’t press [
key.
2. After finishing the conversation, press [
] key or
place the cordless handset into the charger cradle.
BASIC OPERATION
9
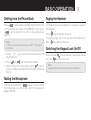
Dialling from the Phone Book
Paging the Handset
Press [
=BUTTONWHENINSTANDBYMODEANDTHE,#$
on the handset will display “PHONEBOOK”, then press
] button and the first entry in the phone book
[
appears.
If a handset has been misplaced, it is possible to page all
the handsets.
Note:
)FTHEREISNORECORDINPHONEBOOKh%-049vINFORMATION
will display.
0
RESS;=OR;n=KEYTOSELECTTHEREQUIREDRECORDFROM
the phone book.
2. Press [
] or [
] key to dial out the number.
3. After finishing the conversation, press [
] key or
place the cordless handset into the charger to terminate
the call.
Muting the Microphone
Pressing and holding the [
] key for 1.5s can switch
the microphone on or off during a call. The handset will
DISPLAYh-54%$v
Press [
] key on the base to station.
To stop the page call: Press any key on the handset or
] key again on the base.
press [
Switching the Keypad Lock On/Off
Press and hold [
] key to activate or deactivate the key
lock. The [
] icon turns on or off.
Note:
Incoming calls can still be received when key locked.
10 MULTI-HANDSET OPERATION
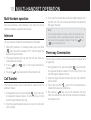
Multi-Handset operation
9OU CAN USE THESE USEFUL FEATURES IF YOU HAVE OR MORE
cordless handsets registered to the base.
Intercom
9OUCANMAKEANINTERCOMCALLBETWEENTWOHANDSETS
1. When the handset is in standby mode, press and hold
=KEYTHE,#$WILLDISPLAYh).4vANDTHENINPUTTHE
[
desired handset number.
4HETARGETHANDSETWILLRINGANDTHE,#$WILLSHOWTHE
calling handset number.
3. Press [
] or [
] key in the target handset to
answer.
4. Pressing [
] key to disconnect the intercom call.
Call Transfer
The function allows you to transfer an external call to
another handset.
] key and input
$
URINGEXTERNALCALLPRESSANDHOLD;
the desired handset number. The line will put on hold
and the target handset will ring.
2. After the target handset answers the call, the intercom
will be made.
3. If you want to transfer the call to the target handset, only
end the call. The call will be automatically transferred to
the target handset.
Note:
If the handset doesn’t answer within 30 seconds, the
call transfer will be cancelled and the external call
] or
will return to the original handset. Press the [
[
] key to answer the call.
Three-way Conversation
9OUMAYHAVEAWAYCONVERSATIONUSINGTHEINTERCOMAND
an open line.
] key and input
$
URINGEXTERNALCALLPRESSANDHOLD;
the desired handset number. The line will put on hold
and the target handset will ring.
2. After the target handset answers the call, the intercom
will be made.
3. Press and hold the [
] key for 2s on the handset to
INITIATETHETHREEWAYCONFERENCE
4. By pressing [
= KEY ANY OF THE HANDSETS CAN QUIT
from the conference and the other handsets continues
with external call.
REDIAL OPERATION 11
Redial Function
The last 10 numbers you dialed out will be separately
stored in handset redial memory.
Review Redial Record
1. When the handset is in standby mode, press [
].
0
RESS ; = OR ; n = KEY TO SELECTh2%$)!,v MENU THEN
press [
] key.
0
RESS;=OR;n=KEYTOREVIEWALLREDIALRECORDS
Or
1. Press [ + ] key to display the information for the redial
records.
0
RESS;=OR;n=KEYTOREVIEWALLREDIALRECORDS
Note:
)FTHEREDIALRECORDISEMPTYh%-049vWILLBESHOWN
Save Redial Number
1. Select a redial record.
2. Press [
=KEYTOENTERMENUPRESS;=OR;n=KEY
to select “SAVE TO PHONEBOOK”.
3. Press [
=KEYTHEh.!-%vWILLBESHOWNANDINPUT
THEDESIREDNAME9OUMUSTINPUTANAMEOTHERWISETHE
record can’t be saved.
4. Press [
] key again, the selected number will be
shown.
5. Press [
] key to save.
Delete a Single Redial Record
1. Select a redial record.
2. Press [
=KEYTOENTERMENUPRESS;=OR;n=KEY
TOSELECTh$%,%4%2%#/2$v
3. Press [
=KEYh#/.&)2-vWILLBESHOWN
4. Press [
] key to confirm.
Delete All Redial Records
1. Select a redial record.
2. Press [
=KEYTOENTERMENUPRESS;=OR;n=KEY
TOSELECTh$%,%4%!,,v
3. Press [
=KEYh#/.&)2-vWILLBESHOWN
4. Press [
] key to confirm.
Note:
$URING REDIAL FUNCTION IF YOU WANT TO RETURN TO THE UPPER
layer menu, press [
] key.
12 CALLER ID OPERATION
Caller ID Service
Call waiting
The caller’s information will be displayed and recorded if
YOU HAVE SUBSCRIBED TO #ALLER )$ SERVICE FROM YOUR LOCAL
telephone company.
9OUCANUSETHERECALLBUTTONTOANSWERASECONDCALLWHILE
you are on the phone. However this service will need to
be turned on. For example to turn on Telstra’s Call Waiting
service:
When the telephone rings, the caller’s information will be
DISPLAYED ON THE HANDSET ,#$ DISPLAY4HIS INFORMATION
includes the phone number and name (if supported). The
handset can store up 20 calls for later review (a name of
16 characters and a phone number of 24 digits for each
record). When the memory is full, a new call automatically
replaces the oldest call in the memory.
Note:
)F THE CALLERS INFORMATION INCLUDES $ATE4IME THE $ATE
Time will be stored with the record.
If the caller number is the same as one of phonebook
memory, the matched name stored in the phonebook
memory will be displayed.
The handset will prompt user if there is a missed call. When
the handset is in standby mode, “ ” will be displayed prior
to other display information.
If all the missed calls are reviewed, the display “
disappear.
” will
1. Press [
] to wait for dial tone then Press [
].
[3][
9OUWILLHEARASERVICETONETHEN0RESS;
].
][4]
Take two different calls at the same time
If you have subscribed to your telephone network operators
#ALL7AITING#ALLER)$SERVICEYOURPHONEWILLDISPLAYTHE
number of the second incoming call for around 20 seconds
while you are talking on the phone.
$URINGACALLYOUWILLHEARTWOLOUDBEEPSPERIODICALLYTO
notify you of another incoming call. If you wish to answer
this call
1. When the handset receives a second call, the number
of the caller appears on the display. It will display for 20
seconds or until you press a key on the phone. Press
[
] to listen for dial tone then Press [ 2 ] to put the
current call on hold and talk with the second caller.
] to listen for dial tone
3UBSEQUENT PRESSES OF ;
then Press [ 2 ] will toggle you between these 2 callers.
CALLER ID OPERATION 13
Note:
1. If you reviewed all the missed calls from one handset,
the display “ ” will show on other handsets.
2. Press [
] key to toggle the display of the caller
IDENTITYNUMBERAND$ATE4IME
Review Call Log Record
1. When the handset is in standby mode, press [
].
0
RESS;=OR;n=KEYTOSELECTh#!,,,/'vMENUTHEN
press [
] key.
0
RESS;=OR;n=KEYTOREVIEWALLCALLLOGRECORDS
Or
0
RESS;n=KEYTODISPLAYTHEINFORMATIONFORTHELASTCALL
received.
0
RESS;=OR;n=KEYTOREVIEWALLCALLLOGRECORDS
Note:
1. The “ ” icon will turn on if the call is a missed call.
h%-049vWILLBEDISPLAYEDABOUTSECONDSANDTHEN
return to standby mode if you have not received any
call.
] key to review the incoming call
3. User can press [
time.
Save Call Log Record
1. Select a call log record.
4HE RECORD COULD BE INSERTED A PREFIX WITHhv DIGITS
key (use [
] keys to delete the digits, but the last 6
digits can’t be deleted) before save to phone book.
3. Press [
=KEYTOENTERMENUPRESS;=OR;n=KEY
] key,
to select “SAVE TO PHONEBOOK”, press [
THE,#$WILLDISPLAYh.!-%v
4. Edit name and Press [
=KEYTHE,#$WILLDISPLAY
] key to save.
h.5-"%2vPRESS;
Delete a Single Call Log Record
1. Select a call log record
2. Press [
= KEY TO ENTER MENU PRESS ; = OR ; n =
] key,
KEYTOSELECTh$%,%4%2%#/2$vPRESS;
h#/.&)2-vWILLBESHOWN
3. Press [
] key to confirm.
Delete All Call Log Record
1. Select a call log record.
2. Press [
= KEY TO ENTER MENU PRESS ; = OR ; n =
KEY TO SELECT h$%,%4% !,,v PRESS ;
] key,
h#/.&)2-vWILLBESHOWN
3. Press [
] key to confirm.
14 CALLER ID OPERATION
Dial back from a Call Log Record
1. Select a call log record
4
HERECORDCOULDBEEDITEDAPRElXWITHhvDIGITSKEYS
(use [
] keys to delete the digits, but the last 6 digits
can’t be deleted) before dial out.
3. Press [
] or [
] key, the number is dialed out
PHONE BOOK 15
The telephone can store up to 25 entries in the phone book
with name and call number. When the function is supported
by the telephone provider service and the caller, the
handset displays the name of the caller (when stored in the
phone book).
Store Entries
1. Press [
] key to access phone book memory.
2. Press [
=KEYTHE,#$ONTHEHANDSETWILLDISPLAY
the stored number.
3. Press [
=KEYTHE,#$ONTHEHANDSETWILLDISPLAY
] key,
h!$$.%7%.429vTHENPRESS;
4. Enter name (maximum 16 characters) and press
[
] key, enter number and press [
] key when
finished.
Note:
7HENTHECAPACITYISFULLh-%-/29&5,,vWILLDISPLAY
2. Any incorrect input can be deleted by pressing [
]
key.
Key assignment overview
Key
Capital letter
1
<space> 1
2
ABC2
3
$%&
4
'()
5
*+,
6
-./
7
0123
8
TUV8
9
789:
0
0
*
#
:“ $ £
¥#
16 PHONE BOOK
Edit Entries
Delete Entries
Press [
Press [
] key to access phone book memory.
=KEYANDPRESS;=OR;n=KEYTOSCROLL
1. Press [
Press [
] key to select a desired entry, and then
PRESS;=OR;n=TOSELECTTHESUBMENUh%$)4v
2. Press [
=TOSTART.!-%EDITIONANDPRESS;
]
KEYAGAINTOSTART.5-"%2EDITION
3. Press [
] key to confirm.
Note:
Press [
] key to delete any incorrect input.
=KEYANDPRESS;=OR;n=KEYTOSCROLL
1. Press [
Press [
] key to select a desired entry, and then
PRESS ; = OR ; n = TO SELECT THE SUBMENUh$%,%4%
2%#/2$v
2. Press [
=KEYh#/.&)2-vWILLBESHOWN
3. Press [
] key again to confirm.
Delete All Entries
Press [
Edit [
] or [
]
!TTHEPREDIALSCREENORANYOFTHEMAINMENUPHONEBOOK
call log or redial review screens, pressing and holding the
] or [
] keys for 1.5 seconds will store the shown
[
number.
] key to access phone book memory.
] key to access phone book memory.
=KEYANDPRESS;=OR;n=KEYTOSCROLL
1. Press [
] key to select a desired entry, and then
Press [
PRESS;=OR;n=TOSELECTTHESUBMENUh$%,%4%!,,v
2. Press [
=KEYh#/.&)2-vWILLBESHOWN
3. Press [
] key again to confirm.
MENU OPERATION 17
Alarms
9OUCANSETTWOALARMSONTHEHANDSET
1. Press [
] key.
0
RESS ; = OR ; n = KEY TO SELECTh!,!2-3v AND PRESS
[
] key.
0
RESS;=OR;n=KEYTOSELECTh!,!2-vORh!,!2-v
and press [
] key.
0
RESS;=OR;n=KEYTOSELECTh#,%!2vORh3%4v
)FYOUSELECTh#,%!2vANDPRESS;
] key, the alarm
will be cleared. If you select “SET” and press [
],
ENTER((--INHOURFORMATORINHOURFORMAT
6. Press [
] key to confirm.
Note:
7HEN !LARM TIME IS REACHEDh!,!2- v ORh!,!2- v
and time will display and alarm sound will stop after around
1 minute. The Alarm establishes prompt ring everyday.
Handset Settings
Ring Melody
9OU MAY SELECT ONE OF THE AVAILABLE RINGER TONES FOR
your incoming calls alert tone. The default setting is “01” for
external call and “02” for internal call.
1. Press [
] key.
0RESS ; = OR ; n = KEY TO SELECTh(3 3%44).'3v AND
press [
] key.
0
RESS;=OR;n=KEYTOSELECTh2).'%2-%,/$9vAND
press [
] key.
0
RESS ; = OR ; n = KEY TO SELECTh%84%2.!, #!,,
-%,/$9v ORh).4%2.!, #!,, -%,/$9v AND PRESS
[
] key.
0RESS;=OR;n=KEYTOSELECTTHEDESIREDRINGMELODY
the selected melody will sound.
6. Press [
] key to confirm the setting.
Ring Volume
9OU MAY SELECT VOLUMEhv ORh/&&v FOR RING TONE4HE
default setting is volume 3.
] key.
1. Press [
0RESS ; = OR ; n = KEY TO SELECTh(3 3%44).'3v AND
press [
] key.
0
RESS;=OR;n=KEYTOSELECTh(32).'%26/,5-%v
and press [
] key.
0
RESS;=OR;n=KEYTOSELECTTHEDESIREDRINGVOLUME
the selected volume will sound.
5. Press [
] key to confirm the setting.
18 MENU OPERATION
Date / Time format
Set Date
9OUCANSETTHE$ATE4IMEFORMATDISPLAYED
9OUCANSETTHE$ATE4IMEDISPLAYED
] key.
1. Press [
0
RESS;=OR;n=KEYTOSELECTh(33%44).'3v
3. Press [
=KEYANDPRESS;=OR;n=KEYTOSELECT
h$!4%4)-%3%44).'3v
4. Press [
=KEYANDPRESS;=OR;n=KEYTOSELECT
h$!4%4)-%&/2-!4v
5. Press [
=KEYANDPRESS;=OR;n=KEYTOSELECT
h$!4%vORh4)-%v
6. Press [
=KEYANDPRESS;=OR;n=KEYTOSELECT
THEDESIRED$ATE4IMEFORMAT
7. Press [
] key to confirm.
] key.
1. Press [
0RESS;=OR;n=KEYTOSELECTh(33%44).'3v
3. Press [
=KEYANDPRESS;=OR;n=KEYTOSELECT
h$!4%4)-%3%44).'3v
4. Press [
=KEYANDPRESS;=OR;n=KEYTOSELECT
h$!4%4)-%v
5. Press [
=KEYANDPRESS;=OR;n=KEYTOSELECT
h$!4%v
6. Press [
] key.
)NPUT THE CORRECT LAST TWO DIGITS OF YEAR RANGE using the keypad, press [
] key to confirm the
setting.
)NPUTTHECORRECTMONTHANDDATETHEFORMATISDATE
MONTHDATERANGEMONTHRANGEUSING
numeric keys, press [
] key to confirm the setting.
9. Press [
] key to confirm the setting.
Note:
4HEREARETWOCHOICESFORDATEFORMAT$$--OR--$$
ANDTWOCHOICESFORTIMEFORMAT(2OR(2
Note:
If the input value is over the range, the handset will beep
and will not store the input value. Please input the correct
setting again.
MENU OPERATION 19
Set Time
Earpiece Boost Mode
1. Press [
] key.
0
RESS ; = OR ; n = KEY TO SELECTh(3 3%44).'3v AND
press [
=KEYPRESS;=OR;n=KEYTOSELECTh$!4%
] key, then press [ + ] or
4)-%3%44).'3vPRESS;
] key, press
;n=KEYTOSELECTh$!4%4)-%vPRESS;
;=OR;n=KEYTOSELECTh4)-%vPRESS;
] key.
) NPUT THE CORRECT TIME USING THE KEYPAD THE (2
FORMATISHOURMINUTEHOURRANGEMINUTERANGE
THE (2 FORMAT IS HOURMINUTE HOUR RANGE
MINUTERANGE
4. Press [
] key to confirm the setting.
It is possible to select different options with boost mode
and be able to adjust the level during a call.
Note:
If the input value is over the range, the handset will beep
and will not store the input value. Please input the correct
setting again.
] key.
1. Press [
0RESS ; = OR ; n = KEY TO SELECTh(3 3%44).'3v AND
press [
] key.
0
RESS ; = OR ; n = KEY TO SELECTh"//34 -/$%v AND
press [
] key.
0
RESS;=OR;n=KEYTOSELECTTHEDESIREDOPTIONSEE
table below for options).
5. Press [
] key to confirm the setting.
Option
Description
Off
No boost mode access
/.,/7
$URINGACALLPRESS;=KEYTOACCESSUPTO
the lowest boost level with receiver.
/.-%$)5-
$URINGACALLPRESS;=KEYTOACCESSUPTO
the medium boost level with receiver.
/.()'(
$URINGACALLPRESS;=KEYTOACCESSUPTO
the highest boost level with receiver.
AUTO
$URINGACALLPRESSANDHOLD;=KEYTO
access up to the highest boost level with
receiver.
However, the handset will restore to normal
volume after you end the call.
20 MENU OPERATION
Key Tone
Handset Name
9OUMAYSETTHEKEYTONETOh/.vORh/&&vWHENYOUPRESS
the keypad. The default setting is “ON”.
9OUCANSETTHECORDLESSHANDSETNAMETHATYOULIKE
] key.
1. Press [
0
RESS ; = OR ; n = KEY TO SELECTh(3 3%44).'3v AND
press [
] key.
0
RESS;=OR;n=KEYTOSELECTh+%94/.%vANDPRESS
[
] key.
0RESS;=OR;n=KEYTOSELECTh/.vORh/&&v
5. Press [
] key to confirm the setting.
Display Contrast
9OURCORDLESSHANDSETHASDIFFERENTDISPLAYCONTRAST
] key.
1. Press [
0
RESS ; = OR ; n = KEY TO SELECTh(3 3%44).'3v AND
press [
] key.
0
RESS;=OR;n=KEYTOSELECTh$)30,!9#/.42!34v
and press [
] key.
0RESS;=OR;n=KEYTOSELECTCONTRAST
5. Press [
] key to confirm the setting.
] key.
1. Press [
0RESS ; = OR ; n = KEY TO SELECTh(3 3%44).'3v AND
press [
] key.
0
RESS;=OR;n=KEYTOSELECTh(!.$3%4.!-%vAND
press [
] key.
4. Input the desired name using the keypad.
5. Press [
] key to confirm the setting.
Backlight Setting
9OURCORDLESSHANDSETHASDIFFERENTBACKLIGHTTIME
] key.
1. Press [
0RESS ; = OR ; n = KEY TO SELECTh(3 3%44).'3v AND
press [
] key.
0
RESS;=OR;n=KEYTOSELECTh"!#+,)'(43%44).'v
and press [
] key.
0
RESS;=OR;n=KEYTOSELECTBACKLIGHTTIME
5. Press [
] key to confirm the setting.
MENU OPERATION 21
Auto Talk
Set Default
This option allows user to pick up the cordless handset
from the charger to answer an incoming call without
] or [
] key. The default setting is “OFF”.
pressing [
This option allows user to restore the cordless handset to
the factory default settings.
] key.
1. Press [
0
RESS ; = OR ; n = KEY TO SELECTh(3 3%44).'3v AND
press [
] key.
0
RESS;=OR;n=KEYTOSELECTh!54/4!,+vANDPRESS
[
] key.
0RESS;=OR;n=KEYTOSELECTh/.vORh/&&v
5. Press [
] key to confirm the setting.
Language
9OUCANSETDIFFERENTDISPLAYLANGUAGES
] key.
1. Press [
0
RESS ; = OR ; n = KEY TO SELECTh(3 3%44).'3v AND
press [
] key.
0
RESS;=OR;n=KEYTOSELECTh,!.'5!'%vANDPRESS
[
] key.
0RESS;=OR;n=KEYTOSELECTLANGUAGE
5. Press [
] key to confirm the setting.
] key.
1. Press [
0RESS ; = OR ; n = KEY TO SELECTh(3 3%44).'3v AND
press [
] key.
0
RESS ; = OR ; n = KEY TO SELECTh3%4 $%&!5,4v AND
press [
=KEYTHE,#$WILLDISPLAYh#/.&)2-v
4. Press [
] key to confirm the setting.
Base Settings
Base Ringer Melody
9OU MAY SELECT ONE OF THE AVAILABLE RING TONES FOR YOUR
incoming calls.
] key.
1. Press [
0RESS ; = OR ; n = KEY TO SELECTh"3 3%44).'3v AND
press [
] key.
3. “INPUT PIN” will be shown, Input the correct PIN code
and press [
] key.
0
RESS ; = OR ; n = KEY TO SELECT h"!3% 2).'%2
-%,/$9vANDPRESS;
] key.
0RESS;=OR;n=KEYTOSELECTTHEDESIREDRINGTONETHE
selected music will sound.
6. Press [
] key to confirm the setting.
22 MENU OPERATION
Base Ringer Volume
Change PIN
9OU MAY SELECT ONE OF THE AVAILABLE VOLUMES FOR YOUR
incoming call alert tone. The default setting is volume 3.
PIN is your base’s identification number, the default setting
IShv9OUMAYCHANGETHE0).0LEASETAKENOTEOFTHE
change.
] key.
1. Press [
0
RESS ; = OR ; n = KEY TO SELECTh"3 3%44).'3v AND
press [
] key.
3. “INPUT PIN” will be shown, Input the correct PIN code
and press [
] key.
0
RESS ; = OR ; n = KEY TO SELECT h"!3% 2).'%2
6/,5-%vANDPRESS;
] key.
0
RESS;=OR;n=KEYTOSELECTTHEDESIREDRINGVOLUME
the selected volume will be sounded.
6 Press [
] key to confirm the setting.
] key.
1. Press [
0RESS ; = OR ; n = KEY TO SELECTh"3 3%44).'3v AND
press [
] key.
3. “INPUT PIN” will be shown, input the correct PIN code
and press [
] key.
0
RESS;=OR;n=KEYTOSELECTh#(!.'%0).vANDPRESS
[
=KEYTHE,#$WILLSHOWh.%70).v
5. Press number key to input the new PIN code and press
[
=KEYTHE,#$WILLSHOWh#/.&)2-0).vPROMPT
you to input the new PIN code again.
6. Input the new PIN code again and press [
] key to
confirm the setting.
Note:
1. The PIN code must be 4 digits.
2. If the new PIN code that you input two times is different,
the change will fail, the display will return to step 4.
MENU OPERATION 23
Recall (Flash) Time
9OUMAYNEEDTOCHANGETHEmASHTIMESHORTMEDIUMLONG
if you use this on a PBX system in a office. The default is
short.
] key.
1. Press [
0
RESS ; = OR ; n = KEY TO SELECTh"3 3%44).'3v AND
press [
] key.
3. “INPUT PIN” will be shown, Input the correct PIN code
and press [
] key.
0
RESS;=OR;n=KEYTOSELECTh&,!3(4)-%vANDPRESS
[
] key.
0
RESS;=OR;n=KEYTOSELECTTHEDESIREDmASHTIME
6. Press [
] key to confirm the setting.
VMWI
If you have subscribed to a voice messaging service, the
,#$ WILL DISPLAYh-%33!'%7!)4).'v AND FLASH TO ALERT
you that you have received new message.
4OTURN6ISUAL-ESSAGE7AITING)NDICATION6-7)OFF
] key.
1. Press [
0
RESS ; = OR ; n = KEY TO SELECTh"3 3%44).'3v AND
press [
] key.
3. “INPUT PIN” will be shown, Input the correct PIN code
and press [
] key.
0
RESS;=OR;n=KEYTOSELECTh6-7)vANDPRESS;
]
KEYh6-7)/&&vWILLDISPLAY
5. Press [
] key to confirm the setting.
Note:
6-7) SERVICE REQUIRES A SUBSCRIPTION THROUGH YOUR LOCAL
service provider.
Set Default
This option allows user to restore the base to the default
setting.
] key.
1. Press [
0RESS;=OR;n=KEYTOSELECTh"33%44).'3vAND
press [
] key.
3. “INPUT PIN” will be shown, Input the correct PIN code
and press [
] key.
0
RESS ; = OR ; n = KEY TO SELECTh3%4 $%&!5,4v AND
press [
=KEYTHE,#$WILLDISPLAYh#/.&)2-v
5. Press [
] key to confirm the setting.
24 REGISTRATION
Register
2EGISTERINGYOURHANDSET
2EGISTRATIONALLOWSCOMMUNICATIONBETWEENYOURBASEUNIT
and handset(s). If your handset is not registered, you will
not be able to make a call or use some of the functions and
features on the phone.
The handsets in this pack do not need registering. If your
HANDSETDISPLAYSh3%!2#().'vFOLLOWTHESTEPSBELOWTO
register your handset.
Note:
1. If the handset is registered to the base. Cordless
handset number will be shown after it returns to
standby mode.
2. If the cordless handset fails to register to the base,
register the handset again.
3. Up to 6 cordless handsets can be registered to one
base.
Select Base
Handset
This option allows user to select a base.
1. Press [
] key.
0
RESS;=OR;n=KEYTOSELECTh2%')342!4)/.vAND
press [
] key.
0
RESS;=OR;n=KEYTOSELECTh2%')34%2vANDPRESS
[
] key,
4
HE,#$WILLDISPLAYh).0540).v
5. Input the correct PIN code and press [
] key to
BEGINTOREGISTERTHECORDLESSHANDSETTHE,#$WILLBLINK
h2EGISTRATIONv
Press and hold the [
] key for about 15 seconds until
LONGBEEPSOUNDANDINUSE,%$mASHES
] key.
1. Press [
0RESS;=OR;n=KEYTOSELECTh2%')342!4)/.vAND
press [
] key.
0
RESS ; = OR ; n = KEY TO SELECTh3%,%#4 "!3%v AND
press [
= KEY 0RESS ; = OR ; n = KEY TO SELECT A
specific base.
4. Press [
] key to comfirm the setting.
REGISTRATION 25
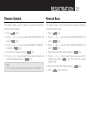
Remove Handset
Remove Base
This option allows user to remove a registered cordless
handset from the base.
This option allows user to remove the registered cordless
handset from the base.
] key.
1. Press [
0
RESS;=OR;n=KEYTOSELECTh2%')342!4)/.vAND
press [
] key.
0
RESS;=OR;n=KEYTOSELECTh2%-/6%(!.$3%4v
and press [
] key.
4. Input the PIN code and press [
] key.
0RESS;=OR;n=KEYTOSELECTTHECORDLESSHANDSETYOU
want to remove and press [
] key.
] key.
1. Press [
0RESS;=OR;n=KEYTOSELECTh2%')342!4)/.vAND
press [
] key.
0
RESS;=OR;n=KEYTOSELECTh2%-/6%"!3%vAND
press [
] key,
4. Input the correct PIN code and press [
] key.
0
RESS ; = OR ; n = KEY TO SELECT THE BASE YOU WANT TO
remove and press [
= KEY4HE ,#$ WILL DISPLAY
“INPUT PIN”.
6. Input the correct PIN code and press [
] key.
7. Press [
] key to confirm.
Note:
4HE,#$OFTHEREMOVEDHANDSETWILLSHOWh3%!2#().'v
26 TECHNICAL SPECIFICATIONS
Handset Operating Time: (average values*)
Approx. 10 hours talk time
Approx. 100 hours standby
!#$#!DAPTER&OR"ASE
-/$%,./33!7!5&
).0546!#(Z
/540546$#M!
!#$#!DAPTER&OR(ANDSETCHARGER
twin pack only)
-/$%,./33!7!5&
).0546!#(Z
/540546$#M!
2ECHARGEABLE
Battery
'0!!!(#6M!H.I-(!!!X
* For guidance only, depends on initial battery charge.
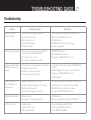
TROUBLESHOOTING GUIDE 27
Troubleshooting
Problem
Possible cause(s)
Solution(s)
No dial tone on the
cordless handset.
1. The base unit is not properly connected.
2. Too far from the base unit.
3. Battery charge is low.
4. Incorrect battery polarity.
2EREGISTERHANDSET
1. Check CONNECTION to power and telephone line.
-OVEHANDSET#,/3%2TOBASEUNIT
#(!2'%BATTERY
2%).3%24BATTERIESANDCHECKAND .
5. Handset not registered.
!NTENNASYMBOLISmASHING
1. The handset is not registered. If the handset is
UNREGISTEREDITDISPLAYS3%!2#().'
2. The handset is out of range.
3. The product is not properly connected.
2%')34%2THEHANDSET
-OVE#,/3%2TOTHEBASEUNIT
3. Check power CONNECTION to the base.
No beep when the cordless
handset is placed on the
charger.
1. The handset is not placed properly on the charger.
2. Charging contacts are dirty.
3. No power connection to base unit.
4. The handset’s power is turned off.
,IFTHANDSETOFFTHECHARGERCAREFULLYAND2%0/3)4)/.
correctly.
2. CLEAN charging contacts with a clean and dry cloth.
3. Check power CONNECTION to the base.
4. CHECK batteries.
Handset charged for 24
hours but Battery icon
remains empty.
1. Handset battery is defective or faulty.
2. Handset is not placed properly on the charger.
3. Battery installed incorrectly.
4. The product is not properly connected.
2%0,!#%WITHNEW!!!RECHARGEABLE.I-(BATTERIES
2. CHECK to make sure the battery icon is scrolling.
2%).3%24BATTERIESANDCHECKAND .
4.Check power CONNECTION to the base.
No symbol on the display.
1. Battery is empty.
2. The product is not properly connected.
#(!2'%BATTERY
-AKESUREYOURPRODUCTISPROPERLY0,5''%$).
Can’t transfer a call.
1. Handset is busy.
2. Handset is out of range.
3. Wrong handset number.
#HECK!,,HANDSETSAND%.$ALLCALLS
-OVEHANDSET#,/3%2TOBASEUNIT
#HECK(!.$3%4.5-"%2
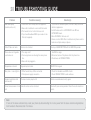
28 TROUBLESHOOTING GUIDE
Problem
Possible cause(s)
Solution(s)
"ADAUDIOQUALITY
(crackles,echo, etc.).
1. Interference from nearby electrical appliance.
2. Base unit is installed in a room with thick walls.
3. The handset is too far from the base unit.
)FYOUHAVE"ROADBAND!$3,YOUNEEDAINLINE
filter (not supplied).
1. Try a different connection point, one that is away from other
electrical appliances.
)NSTALLTHEBASEUNITINA$)&&%2%.4ROOM/2USE
EXTENSION leads.
-OVE#,/3%2TOTHEBASEUNIT
%NSUREAINLINE!$3,lLTERISINSTALLEDONALLPHONESOCKETS
between wall plate and your phone.
#ALLER)$DOESNOTWORK
Service not activated.
#HECKYOUR35"3#2)04)/.WITHTHE3%26)#%PROVIDER
Phone does not ring when
a call comes in.
1. The ringer is off.
2. Too many phones are sharing the same phone
line.
3. Base unit not plugged in.
1. Turn ON the ringer.
$ISCONNECTSOMEOFTHEPHONESFROMTHEPHONELINE
3. Check base unit CONNECTIONS.
Keypad does not work.
Keypad may be locked.
UNLOCK the keypad.
Busy tone + in use light on.
1. Other handset may still be connected.
2. Check power supply connection.
#HECK!,,HANDSETSAND%.$ALLCALLS
2. Check CONNECTIONS to wall and base.
Handset registration fails
continuously.
The base memory may be full.
$ELETEUNUSEDHANDSETANDTRYAGAIN
#ANNOTMAKEANSWERAND 2nd call service can be activated.
call
Check with your service provider. Check the recall selection is
correct.
Note:
If none of the above solutions help, reset your phone by disconnecting the mains power from the base and removing batteries
FROMHANDSETS2ECONNECTAFTERMINUTES
APPENDIX 29
Warranty Information (Australia)
(i)
(a) Warranty
Oricom warrants that the product is free from defects in
materials and workmanship for a period of 12 months
effective from the date of purchase. This warranty in
no way affects your statutory warranty under the Trade
Practices Act 1974 or any other similar legislation. It is
important that you read the Warranty Card as it contains
full and additional details of the warranty, limitation
of warranty and conditions for receiving the warranty
services during the warranty period. The Warranty
Card is located in the package. If you cannot locate the
Warranty Card, please contact our Customer Support
Service on 1300 889 785.
(b) Exclusion and limitation of liability.
Oricom will not be in breach of a warranty or condition
EXPRESSLY STATED IN THIS 5SER 'UIDE OR THE7ARRANTY
Card or implied by the Trade Practices Act and excludes
any liability arising under any statutory or common law
for damages or any other remedy if the damage occurs
as a result of:
(ii)
III
(iv)
(v)
failure by you to follow the instructions in the User
'UIDEFORTHEINSTALLATIONANDPROPERFUNCTIONINGOF
THEPRODUCT
negligence on your part or misuse by you of the
PRODUCT
ANYUNCONTROLLEDEXTERNALCAUSETOTHEPHONENOT
functioning including but not limited to electricity
FAILURELIGHTINGOVERVOLTAGE
non adherence by you to the warnings in the User
'UIDEANDTHE5SER'UIDEGENERALLY
modification to the product or services carried out
to the product by anyone other than Oricom or on
Oricom’s behalf.
/RICOMWILLNOTBELIABLEFORCONSEQUENTIALLOSSESINCLUDING
loss of profits arising from a cause of action in contract, tort
or any other statutory or common law (except where a statute
or any law prohibits this exclusion). The warranty does not
extend to damage caused by misuse, negligence, excessive
voltage, faults on the telephone line or lightning. This warranty
in no way affects your statutory rights. Full details of the
warranty are contained in the enclosed warranty card.
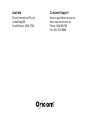
Australia
Customer Support
Oricom International Pty Ltd
Locked Bag 658
South Windsor, NSW 2756
Email: [email protected]
Web: www.oricom.com.au
Phone: 1300 889 785
Fax: (02) 4574 8898