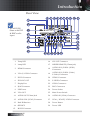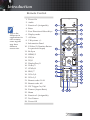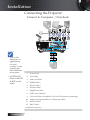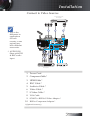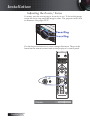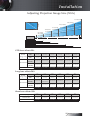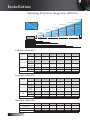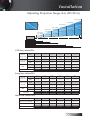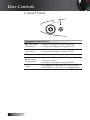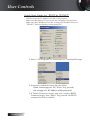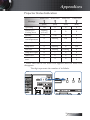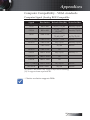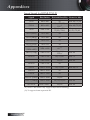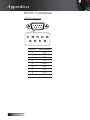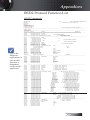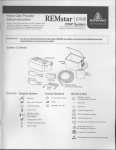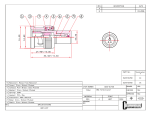
1
Table of Contents
Usage Notice....................................................................................................................... 3
Safety Information.........................................................................................................................3
Class B emissions limits....................................................................................................................................3
Important Safety Instruction............................................................................................................................3
Precautions......................................................................................................................................5
Eye Safety Warnings......................................................................................................................7
Introduction........................................................................................................................ 8
Product Features............................................................................................................................8
Package Overview.........................................................................................................................9
Product Overview........................................................................................................................10
Main Unit..........................................................................................................................................................10
Control Panel....................................................................................................................................................11
Rear View.........................................................................................................................................................12
Remote Control................................................................................................................................................13
Installation......................................................................................................................... 14
Connecting the Projector.............................................................................................................14
Connect to Computer / Notebook................................................................................................................14
Connect to Video Sources...............................................................................................................................15
Installing or Removing the Optional Lens...............................................................................16
Removing the Existing Lens From the Projector........................................................................................16
Installing the New Lens..................................................................................................................................17
Powering On/Off the Projector.................................................................................................18
Powering On the Projector.............................................................................................................................18
Powering Off the Projector.............................................................................................................................20
Warning Indicator...........................................................................................................................................20
Adjusting the Projected Image...................................................................................................21
Adjusting the Projector’s Height...................................................................................................................21
Adjusting Projected Image Position Using Lens Shift............................................................21
Adjusting the vertical image position..........................................................................................................22
Adjusting the horizontal image position.....................................................................................................23
Lens Shift Range Diagram..............................................................................................................................23
Adjusting the Zoom / Focus..........................................................................................................................24
Adjusting Projection Image Size (XGA).......................................................................................................25
Adjusting Projection Image Size (WXGA)...................................................................................................26
Adjusting Projection Image Size (WUXGA)................................................................................................27
User Controls.................................................................................................................... 28
Control Panel................................................................................................................................28
Remote Control............................................................................................................................29
On-screen Display Menus...........................................................................................................31
How to operate................................................................................................................................................31
Menu Tree.........................................................................................................................................................32
Image.............................................................................................................................................34
Display...........................................................................................................................................40
Setup..............................................................................................................................................43
Options..........................................................................................................................................56
LAN_RJ45......................................................................................................................................65
Table of Contents
Appendices....................................................................................................................... 75
Troubleshooting...........................................................................................................................75
Image Problems...............................................................................................................................................75
Intermission Problems....................................................................................................................................77
HDMI Q & A....................................................................................................................................................78
Projector Status Indication.............................................................................................................................79
Remote Control Problems..............................................................................................................................80
Audio Problems...............................................................................................................................................80
Replacing the Lamp........................................................................................................................................81
Cleaning the Projector.................................................................................................................83
Compatibility Modes...................................................................................................................84
Video Compatibility........................................................................................................................................84
Video timing detail describe..........................................................................................................................84
Computer Compatibility - VESA standards................................................................................................85
RS232 Commands........................................................................................................................88
RS232 Protocol Function List......................................................................................................89
Telnet Commands........................................................................................................................93
AMX Device Discovery commands..........................................................................................93
PJLink™ supported commands.................................................................................................94
Trademarks...................................................................................................................................96
Ceiling Installation.......................................................................................................................97
Optoma Global Offices................................................................................................................98
Regulation & Safety notices......................................................................................................100
Operation conditions.................................................................................................................101
Usage Notice
Safety Information
The lightning flash with arrow head within an equilateral triangle is
intended to alert the user to the presence of uninsulated “dangerous
voltage” within the product’s enclosure that may be of sufficient
magnitude to constitute a risk of electric shock to persons.
The exclamation point within an equilateral triangle is intended to alert
the user to the presence of import operating and maintenance (servicing)
instructions in the literature accompanying the appliance.
WARNING: TO REDUCE THE RISK OF FIRE OR ELECTRIC SHOCK, DO NOT EXPOSE
THE PROJECTOR TO RAIN OR MOISTURE. DANGEROUS HIGH VOLTAGES ARE
PRESENT INSIDE THE ENCLOSURE. DO NOT OPEN THE CABINET.
REFER SERVICING TO QUALIFIED PERSONNEL ONLY.
Class B emissions limits
This Class B digital apparatus meets all requirements of the Canadian
Interference-Causing Equipment Regulations.
Important Safety Instruction
1. Read these instructions –before using this projector.
2. Keep these instructions –for future reference.
3. Follow all instructions.
4. Install in accordance with the manufacturer’s instructions :
A. Do not block any ventilation openings. To ensure reliable
operation of the projector and to protect it from overheating,
put the projector in a position and location that will not
interfere with its proper ventilation. For example, do not
place the projector on a bed, sofa, carpet, or similar surface
that may block the ventilation openings. Do not put it in an
enclosure, such as a bookcase or a cabinet that may keep air
from flowing through its ventilation openings.
B. Do not use this projector near water or moisture. To reduce
the risk of fire or electric shock, do not expose the projector to
rain or moisture.
C. Do not install near any heat sources, such as radiators, heaters,
stoves or other apparatus (including amplifiers) that produce heat.
5. Clean only with a dry cloth.
6. Only use attachments/accessories specified by the manufacturer.
7. Refer all servicing to qualified service personnel. Servicing is required
when the projector has been damaged in any way, such as:
r Power supply cord or plug is damaged.
r Liquids have spilled or objects have fallen into the apparatus.
r The projector has been exposed to rain or moisture, does not
operate normally, or has been dropped.
3
English
Usage Notice
Do not attempt to service this projector yourself. Opening or
removing covers may expose you to dangerous voltages or
other hazards. Please call Optoma to be referred to an
authorized service center near you.
8. Do not let objects or liquids enter the projector as they may touch
dangerous voltage points or short-out parts that could result in a
fire or electric shock.
9. See projector enclosure for safety related markings.
10. The projector should not be adjusted or repaired by anyone
except properly qualified service personnel.
English
4
Usage Notice
Precautions
Please follow all warnings, precautions and
maintenance as recommended in this user’s
guide.
▀■ Warning - Do not look into the projector’s lens when the lamp is
on. The bright light may damage your eyes.
▀■ Warning - To reduce the risk of fire or electric shock, do not
expose this projector to rain or moisture.
▀■ Warning - Please do not open or disassemble the projector as this
may cause electric shock.
▀■ Warning - When replacing the lamp, please allow unit to cool down,
and follow all replacement instructions. See page 81.
v When the
▀■ Warning - This projector will detect the life of the lamp itself. Please
lamp reaches
be sure to change the lamp when it shows warning
the end of its
messages.
life, the
projector will
▀■ Warning - Use the “Lamp Reset” function from the on-screen display
not turn back
“Options|Lamp Setting” menu after replacing the lamp
on until the
module (see page 63).
lamp
module has
been replaced. ▀■ Warning - When switching the projector off, please ensure the
To replace the
cooling cycle has been completed before disconnecting
lamp, follow
the power. Allow 90 seconds for the projector to cool
the procedures
down.
listed under
“Replacing the
▀■ Warning - Do not use the lens cap when projector is in operation.
Lamp” on page
81.
▀■ Warning - When the lamp is approaching the end of its life, the
message “Lamp is approaching the end of its useful
life” displays on the screen. Please contact your local
reseller or service center to change the lamp as soon
as possible.
5
English
Usage Notice
Do:
v Turn off the product before cleaning.
v Use a soft cloth moistened with a mild detergent to clean the
display housing.
v Disconnect the power plug from the AC outlet if the product
is not being used for a long period of time.
Do not:
v Block the ventilation slots and openings on the unit.
v Use abrasive cleaners, waxes or solvents to clean the unit.
v Use under the following conditions:
- In extremely hot, cold or humid environments. Ensure that
the ambient room temperature is within 5-40 °C and relative
humidity is 10-85% (max.), non-condensing.
- In areas susceptible to excessive dust and dirt.
- Near any appliance that generates a strong magnetic field.
- In direct sunlight.
English
6
Usage Notice
Eye Safety Warnings
▀■ Avoid staring directly into the projector’s beam of light at all times.
▀■ Minimize standing facing into the beam. Keep your back to the
beam as much as possible.
▀■ Using a stick or laser pointer is recommended to avoid the need
for the presenter to enter the beam.
▀■ Ensure that projectors are located out of the line of sight from
the screen to the audience; this ensures that, when presenters
look at the audience, they do not also have to stare at the
projector lamp. The best way to achieve this is by ceilingmounting the projector rather than placing it on floor or table
top.
▀■ When projector is used in a classroom, adequately supervise
students when they are asked to point out something on the
screen.
▀■ In order to minimize the lamp power needed, use room blinds
to reduce ambient light levels.
7
English
Introduction
Product Features
This product is a single chip 0.7” XGA, 0.67 WUXGA and 0.65”
WXGA series DLP® projector. Outstanding features include:
u Texas Instruments Single chip DLP® Technology
u Computer Compatibility:
Apple Macintosh, iMac, and VESA Standards:
UXGA, SXGA+, SXGA, WXGA, XGA, SVGA, VGA
u Video Compatibility:
■ NTSC, NTSC4.43
■ PAL/PAL-M/PAL-N/SECAM
■ SDTV and EDTV compatible
■ HDTV compatible (720p, 1080i, 1080p)
u Auto source detection with user definable settings
u Fully featured IR remote control with wired remote
control
u User friendly multilingual On Screen Menu
u Advanced digital keystone correction and high
quality full screen image re-scaling
u User friendly control panel
u Macintosh and PC compatible
u HDMI compatible
u Closed Captioning equipped
u DisplayPort compatible
u Full 3D Support
u Eco AV Mute
u Wireless dongle support (via VGA port)
u USB Charger
English
8
Introduction
Package Overview
This projector comes with all the items shown below. Check to
make sure your unit is complete. Contact your dealer
immediately if anything is missing.
Projector with lens cap
Option Lens
(Standard lens/
Long throw lens/
Short throw lens)
Power Cord 1.8m
v Due to the
difference in
applications for
each country,
some regions
may have
different
accessories.
For European
warrant
information
please
visit www.
optomaeurope.
com
IR Remote Control
(with 2 x AAA Batteries)
VGA Cable 1.8m
USB Cable
(A to B) 1.8m
(optional)
Documentation:
þ
þ
þ
þ
User’s Manual
Warranty Card
Quick Start Card
WEEE Card
9
English
Introduction
Product Overview
Main Unit
3
2
4
5
1
10 9
11
8
7
6
12 13
14
15
19
18
17
16
1. Front IR Receiver
10. Focus
2. Top Cover
11. Lens CAP
3. Lens Release Button
12. Power Button
4. Vertical and Horizontal Lens
13. LED Indicators
Shift Adjustment Controls
English
10
14. Input/Output Connections
5. Control Panel
15. Back IR Receiver
6. Lamp Cover
16. Main Power Switch
7. Tilt-Adjustment foot
17. Power Socket
8. Zoom
18. Security Bar
9. Lens
19. Kensington™ Lock
Introduction
Control Panel
1
2
3
6
5
4
1. Source / ◄
2. Keystone + / ▲
3. Re-Sync / ►
4. Menu
5. Enter
6. Keystone - / ▼
11
English
Introduction
Rear View
1
2 3 4 5 6 7 8 9 10 11
29
v AUDIO2-IN:
Share with DVI
& BNC audio
input.
28
27
12
13
26
25
14
15
16
24
23
22 21 20 19 18 17
1.
Temp LED
16.
12V OUT Connector
2.
Lamp LED
17.
WIRED REMOTE (3.5mm jack)
3.
HDMI Connector
18.
AUDIO IN L/R RCA (YPbPr)
Connectors
4.
VGA 2/ YPbPr Connector
19.
AUDIO IN L/R RCA (Video/
S-Video) Connectors
5.
DVI-D Connector
20.
VIDEO Connector
6.
3D SYNC OUT
21.
S-VIDEO Connector
7.
DisplayPort
22.
YPbPr Connectors
8.
RJ-45 Connector
23.
BNC Connectors
9.
USB Power
24.
Power Socket
10.
VGA OUT
25.
Main Power Switch
11.
AUDIO OUT 3.5mm Jack
26.
AUDIO IN (VGA1) Connector
12.
AUDIO 2 IN (VGA2) Connector
27.
VGA 1/ SCART/ YPbPr Connector
13.
Back IR Receiver
28.
Power Button
14.
SERVICE
29.
Power LED
15.
RS-232 Connector
English
12
Introduction
Remote Control
1. Power On
2. Audio
3. Function 2 (Assignable)
4. Enter
v Due to the
difference in
applications for
each country,
some regions
may have
different
accessories.
5. Four Directional Select Keys
6. Display mode
28
1
27
2
26
3
7. AV Mute
4
8. V Keystone +/-
5
9. Information Panel
10. S-Video/2 (Number Button
for password input)
11. Re-Sync
12. HDMI/3
13. DVI/6
14. 3D/0
15. DisplayPort/9
24
7
23
8
17. YPbPr/8
22
21
18. BNC/7
20
16. Video/5
19. VGA-2/4
20. VGA-1/1
6
25
9
10
11
12
13
19
14
21. Remote code 01~99
15
22. Remote code All
23. 12V Trigger On/Off
24. Format (Aspect Ratio)
25. Menu
18 17 16
26. Function 1 (Assignable)
27. Test Pattern
28. Power Off
13
English
Installation
Connecting the Projector
Connect to Computer / Notebook
3D Adapter
2
3 4
5
6
8
7
9 10
11
1
12
v Due to the
difference in
applications
for each
country, some
regions may
have different
accessories.
v AUDIO2-IN:
Share with DVI
& BNC audio
input.
1.
Power Cord
2.
VGA Cable
3.
Audio-in Cable *
4.
HDMI Cable *
5.
DVI-D Cable *
6.
3D Sync Cable *
7.
DisplayPort Cable *
8.
USB Power Charger *
9.
VGA-out Cable (Available for VGA1 VGA signal loop through)
10.
Audio-out (Optional RCA to 3.5mm jack cable)
11.
RS-232 Cable *
12.
BNC Cable *
*(Optional accessory)
English
14
Installation
Connect to Video Sources
DVD Player,Set-top Box,
HDTV receiver
2
v Due to the
difference in
applications
for each
country, some
regions may
have different
accessories.
3
4
1
10
7
2
8
4
v AUDIO2-IN:
Share with DVI
& BNC audio
input.
7
6
5
9
DVD Player,Set-top Box,
HDTV receiver
Vide
o Output
1. Power Cord
2. Component Cable *
3. HDMI Cable *
4. BNC Cable *
5. Audio-in Cable *
6. Video Cable *
7. S-Video Cable *
8. VGA Cable
9. SCART to RGB & S-Video Adapter *
10. RGB to Component Adapter *
*(Optional accessory)
15
English
Installation
Installing or Removing the Optional Lens
Caution
• Do not shake or place excessive pressure on the projector or the
lens components as the projector and lens components contain
precision parts.
• Before removing or installing the lens, be sure to turn off the
projector, wait until the cooling fans stop, and turn off the main
power switch.
• Do not touch the lens surface when removing or installing the lens.
• Keep fingerprints, dust or oil off the lens surface. Do not scratch
the lens surface.
• Work on a level surface with a soft cloth under it to avoid scratching.
• If you remove and store the lens, attach the lens cap to the
projector to keep off dust and dirt.
Removing the Existing Lens From the Projector
1. Push down and
release the top cover
to open.
v Removal of
the plastic
body cap
before
inserting a
lens for the
first time.
English
2. Push the LENSE
RELEASE button to
the unlock position.
3. Grasp the lens.
4. Rotate the lens
counterclockwise.
The existing lens will
be disengaged.
16
Installation
5. Pull out the existing
lens slowly.
Installing the New Lens
Remove both end caps from the lens.
v Electrical
contact pins
should be in
the direction as
shown in the
picture.
1. Align the notches and
correctly position the
electrical contact pad as
shown in the picture.
Electrical
contact
pins
2. Rotate the lens
clockwise until you feel
it click into place.
17
English
Installation
Powering On/Off the Projector
Powering On the Projector
1. Remove the lens cover.
2. Connect the power cord to the projector.
3. Turn On the connected devices.
4. Ensure the Power LED turns red and then press the power
button to turn On the projector.
The Power LED will now flash blue.
The startup screen will display in approximately 30 seconds. The
first time you use the projector, you can select your preferred
language and Power Mode setup after the startup screen display.
v Turn on the
projector first
and then
select the
signal sources.
If the connected device is a PC, ensure the display is set to output
to the projector via the connected output. (Check the user manual
of the PC to determine the appropriate Fn key combination to
change display output.)
English
18
Installation
See Security Setting on page 46 if security lock is enabled.
5. If more than one input device is connected, press the “Source”
button sequentially to switch between devices.
For direct source selection, see page 29.
19
English
Installation
Powering Off the Projector
1. Press POWER to turn off the projector lamp, a message displays on the
projector’s screen.
2. Press POWER again to confirm, otherwise the message disappears
after 15 seconds.
3. The cooling fans continue to operate for about 180 seconds for
cooling cycle and the Power Led will turn blue. When the light is
solid red, the projector has entered standby mode.
(If you wish to turn the projector back on, you must wait until the
projector has completed the cooling cycle and has entered standby
mode. Once in standby mode, simply press POWER to restart the
projector.)
4. Turn off the main power switch. Disconnect the power cord from
the electrical outlet and the projector.
5. Do not turn on the projector immediately following a power off
procedure.
Warning Indicator
v When the LAMP LED indicator lights red, the projector will
automatically shut itself down. Please contact your local reseller
or service center. See pages 79-80.
v When the TEMP LED is on a steady (not flashing) red, the
projector will automatically shut itself down. Under normal
conditions, the projector can be switched on again after it has
cooled down. If the problem persists, you should contact your
local dealer or our service center. See pages 79-80.
v When the TEMP LED flashes red, it indicates the fan has failed.
Please contact your local dealer or our service center. See pages
79-80.
English
20
Installation
Adjusting the Projected Image
Adjusting the Projector’s Height
The projector is equipped with elevator foot for adjusting the image height.
To raise the image:
Use screw in foot u to rise the image to the desired height angle and
fine-tune the display angle.
To lower the image:
Use screw in foot u to lower the image to the desired height angle
and to fine-tune the display angle.
1
1
Adjusting Projected Image Position
for ensure
Using Lens Shift Screw
Lens Release
the lens position
v Suggest to
loosen the
screw before
lens shift
adjustment
and tighten up
after finished
adjustment.
Horizontal Lens
Shift Lever
Vertical Lens
Shift Lever
21
English
Installation
The Lens Shift function can be used to adjust the position of the
projected image either horizontally or vertically within the range
detailed below.
Adjusting the vertical image position
The vertical image height can be adjusted between 50% and -10%
for XGA, 55% and -15% for WXGA/WUXGA of offset position.
Please consult the Lens Shift Range diagram below for further
clarification.
Screen Height
(H)
Screen
H x 35%
100%
H x 15%
H x 55%
H x 5%
Distance
(L)
WXGA/WUXGA
Screen Height
(H)
Screen
H x 40%
H x 10%
100%
H x 50%
Distance
(L)
XGA
English
22
Installation
Adjusting the horizontal image position
With the lens in the center position the
horizontal image position can be adjusted
to the left or right by up to a maximum of
5% of the image width. Please consult the
Lens Shift Range diagram below for
further clarification.
Screen Width
(W)
Left Side
Right Side
(W/2) x 10% (W/2) x 10%
Lens Shift Range Diagram
W
H5%
W5%
W5%
H50%
When W and H at 0% offset position
The max. H up shift=Hx55%
The max. H down shift=Hx15%
The max. W shift=Wx5%
H
When max. W shift is Wx5%
Max. H shift=Hx50%
When max. H shift is Hx55%
Max. W shift=Hx0%
H15%
WXGA / WUXGA
W
W5%
H5%
W5%
H45%
When W and H at 0% offset position
The max. H up shift=Hx50%
The max. H down shift=Hx10%
The max. W shift=Wx5%
When max. W shift is Wx5%
Max. H shift=Hx45%
When max. H shift is Hx50%
Max. W shift=Hx0%
H
H10%
XGA
23
English
Installation
Adjusting the Zoom / Focus
You may turn the zoom ring to zoom in or out. To focus the image,
rotate the focus ring until the image is clear. The projector will focus
at distances. See pages 25-27.
Use the keystone buttons to correct image distortion. They can be
found on the remote control and on the projector’s control panel.
English
24
Installation
Adjusting Projection Image Size (XGA)
65.6' (20.00m)
ag
Height
Di
53.8' (16.40m)
on
al
32.0' (9.76m)
42.0' (12.80m)
30.2' (9.20m)
Width
18.4' (5.60m)
6.6' (2.00m)
4.9' (1.50m)
26.2' (8.00m)
20.2' (6.16m)
9.8' (3.00m)
14.4' (4.40m)
8.9' (2.72m)
8.2' (2.50m)
6.6' (2.00m)
4.9' (1.50m)
3.3' (1.00m)
Hd
1.6' (0.50m)
STD lens: offset=50%
Max.
46.1’’
(117.2cm)
83.7’’
(212.5cm)
135.3’’
(343.8cm)
189.5’’
(481.3cm)
246.1’’
(625.0cm)
300.2’’
(762.5cm)
Min.
36.9’’
(93.8cm)
66.9’’
(170.0cm)
108.3’’
(275.0cm)
151.6’’
(385.0cm)
196.9’’
(500.0cm)
240.2’’
(610.0cm)
Max
(WxH).
36.9’’x27.7’’
93.8x70.3cm
66.9’’x50.2’’
170.0 x127.5cm
108.3’’x81.2’’
275.0 x206.3cm
151.6’’ x113.7’’
385.0 x288.8cm
196.9’’ x147.6’’
500.0 x375.0cm
240.2’’ x180.1’’
610.0 x457.5cm
Min.
(WxH)
29.5’’ x22.1’’
75.0 x56.3cm
53.5’’x40.2’’
136.0 x102.0cm
86.6’’x65.0’’
220.0 x165.0cm
121.3’’x90.9’’
308.0 x231.0cm
157.5’’x118.1’’
400.0 x300.0cm
192.1’’ x144.1’’
488.0 x366.0cm
4.9’ (1.50m)
8.9’ (2.72m)
14.4’ (4.40m)
20.2’ (6.16m)
26.2’ (8.00m)
32.0’ (9.76m)
Max.
49.2’’
(125.0cm)
137.8’’
(350.0cm)
226.4’’
(575.0cm)
315.0’’
(800.0cm)
403.5’’
(1025.0cm)
492.1’’
(1250.0cm)
Min.
32.8’’
(83.3cm)
91.9’’
(233.3cm)
150.9’’
(383.3cm)
210.0’’
(533.3cm)
269.0’’
(683.3cm)
328.1’’
(833.3cm)
Max
(WxH).
39.4’’x29.5’’
100.0x75.0cm
110.2’’x82.7’’
280.0x210.0cm
181.1’’x135.8’’
460.0x345.0cm
252.0’’x189.0’’
640.0x480.0cm
322.8’’x242.1’’
820.0x615.0cm
393.7’’x295.3’’
1000.0x750.0cm
Min.
(WxH)
26.2’’x19.7’’
66.7x50.0cm
73.5’’x55.1’’
186.7x140.0cm
120.7’’x90.6’’
306.7x230.0cm
168.0’’x126.0’’
426.7x320.0cm
215.2’’x161.4’’
546.7x410.0cm
262.5’’x196.9’’
666.7x500.0cm
6.6’(2.00m)
18.4’(5.60m)
30.2’(9.20m)
42.0’(12.80m)
53.8’(16.40m)
65.6’(20.00m)
Screen (Diagonal)
30.8’’
(78.1cm)
61.5’’
(156.3cm)
92.3’’
(234.4cm)
123.0’’
(312.5cm)
153.8’’
(390.6cm)
184.5’’
(468.8cm)
Screen size
24.6’’x18.5’’
62.5x46.9cm
49.2’’x36.9’’
125.0x93.8cm
73.8’’x55.4’’
187.5x140.6cm
98.4’’x73.8’’
250.0x187.5cm
123.0’’x92.3’’
312.5x234.4cm
147.6’’x110.7’’
375.0x281.3cm
Distance
1.6’ (0.50m)
3.3’ (1.00m)
4.9’ (1.50m)
6.6’ (2.00m)
8.2’ (2.50m)
9.8’ (3.00m)
Screen
(Diagonal)
Screen size
Distance
Long lens: offset=50%
Screen
(Diagonal)
Screen size
Distance
Short lens: offset=50%
25
English
Installation
Adjusting Projection Image Size (WXGA)
65.6' (20.00m)
ag
Height
Di
53.8' (16.40m)
on
al
34.4' (10.47m)
42.0' (12.80m)
30.2' (9.20m)
Width
18.4' (5.60m)
6.6' (2.00m)
4.9' (1.50m)
9.6' (2.92m)
28.2' (8.59m)
21.7' (6.61m)
15.5' (4.72m)
9.8' (3.00m)
8.2' (2.50m)
6.6' (2.00m)
4.9' (1.50m)
3.3' (1.00m)
1.6' (0.50m)
Hd
STD lens: offset=55%
Max.
43.0’’
(109.2cm)
83.7’’
(212.6cm)
135.3’’
(343.6cm)
189.4’’
(481.2cm)
246.2’’
(625.3cm)
300.1’’
(762.1cm)
Min.
34.3’’
(87.1cm)
66.8’’
(169.6cm)
107.9’’
(274.2cm)
151.2’’
(384.0cm)
196.5’’
(499.0cm)
239.5’’
(608.2cm)
Max
(WxH).
36.5’’x22.8’’
92.6x57.9cm
71.0’’x44.4’’
180.2x112.7cm
114.7’’x71.7’’
291.4x182.1cm
160.6’’x100.4’’
408.0x255.0cm
208.8’’x130.5’’
530.2x331.4cm
254.4’’x159.0’’
646.3x403.9cm
Min.
(WxH)
29.1’’x18.2’’
73.9x46.2cm
56.6’’x35.4’’
143.8x89.9cm
91.5’’x57.2’’
232.5x145.3cm
128.2’’x80.1’’
325.6x203.5cm
166.6’’x104.1’’
423.2x264.5cm
203.1’’x126.9’’
515.8x322.4cm
Max.
1.1’’ (2.9cm)
2.2’’ (5.6cm)
3.6’’ (9.1cm)
5.0’’ (12.8cm)
6.5’’ (16.6cm)
8.0’’ (20.2cm)
Min.
0.9’’ (2.3cm)
1.8’’ (4.5cm)
2.9’’ (7.3cm)
4.0’’ (10.2cm)
5.2’’ (13.2cm)
6.3’’ (16.1cm)
4.9’ (1.50m)
9.6’ (2.92m)
15.5’ (4.72m)
21.7’ (6.61m)
28.2’ (8.59m)
34.4’ (10.47m)
Max.
45.7’’
(116.2cm)
128.1’’
(325.3cm)
210.4’’
(534.4cm)
292.7’’
(743.6cm)
375.1’’
(952.7cm)
457.4’’
(1161.8cm)
Min.
30.4’’
(77.3cm)
85.2’’
(216.5cm)
140.0’’
(355.7cm)
194.8’’
(494.9cm)
249.6’’
(634.1cm)
304.4’’
(773.3cm)
Max
(WxH).
38.8’’x24.2’’
98.5x61.6cm
108.6’’x67.9’’
275.9x172.4cm
178.4’’x111.5’’
453.2x283.3cm
248.2’’x155.2’’
630.5x394.1cm
318.1’’x198.8’’
807.9x504.9cm
387.9’’x242.4’’
985.2x615.8cm
Min.
(WxH)
25.8’’x16.1’’
65.6x41.0cm
72.3’’x45.2’’
183.6x114.8cm
118.8’’x74.2’’
301.6x188.5cm
165.2’’x103.3’’
419.7x262.3cm
211.7’’x132.3’’
537.7x336.1cm
258.2’’x161.4’’
655.7x409.8cm
Max.
1.2’’ (3.1cm)
3.4’�