1
Nortel Ethernet Routing Switch 8300
Installation — AC Power Supply
NN46200-301
.
(316797-C Rev 01)
Document status: Standard
Document version: 03.01
Document date: 27 August 2007
Copyright © 2007, Nortel Networks
All Rights Reserved.
Sourced in Canada and the United States of America
The information in this document is subject to change without notice. The statements, configurations, technical
data, and recommendations in this document are believed to be accurate and reliable, but are presented without
express or implied warranty. Users must take full responsibility for their applications of any products specified in this
document. The information in this document is proprietary to Nortel Networks Inc.
Restricted rights legend
Use, duplication, or disclosure by the United States Government is subject to restrictions as set forth in subparagraph
(c)(1)(ii) of the Rights in Technical Data and Computer Software clause at DFARS 252.227-7013.
Notwithstanding any other license agreement that may pertain to, or accompany the delivery of, this computer
software, the rights of the United States Government regarding its use, reproduction, and disclosure are as set forth
in the Commercial Computer Software-Restricted Rights clause at FAR 52.227-19.
Statement of conditions
In the interest of improving internal design, operational function, and/or reliability, Nortel Networks Inc. reserves the
right to make changes to the products described in this document without notice.
Nortel Networks Inc. does not assume any liability that may occur due to the use or application of the product(s) or
circuit layout(s) described herein.
Portions of the code in this software product may be Copyright © 1988, Regents of the University of California. All
rights reserved. Redistribution and use in source and binary forms of such portions are permitted, provided that the
above copyright notice and this paragraph are duplicated in all such forms and that any documentation, advertising
materials, and other materials related to such distribution and use acknowledge that such portions of the software
were developed by the University of California, Berkeley. The name of the University may not be used to endorse or
promote products derived from such portions of the software without specific prior written permission.
SUCH PORTIONS OF THE SOFTWARE ARE PROVIDED "AS IS" AND WITHOUT ANY EXPRESS OR IMPLIED
WARRANTIES, INCLUDING, WITHOUT LIMITATION, THE IMPLIED WARRANTIES OF MERCHANTABILITY AND
FITNESS FOR A PARTICULAR PURPOSE.
In addition, the program and information contained herein are licensed only pursuant to a license agreement that
contains restrictions on use and disclosure (that may incorporate by reference certain limitations and notices
imposed by third parties).
3
Contents
New in this release
Features 5
Other changes
5
5
Preface
7
Command line interfaces 7
NNCLI command modes 7
Accessing the NNCLI 9
Returning to the CLI 10
Text conventions 10
Hard-copy technical manuals 11
How to get help 12
Power supply installation
13
Navigation 13
Power supplies 13
Removing and installing a power filler panel 17
Installing the AC power supply 18
Removing the AC power supply 20
Electrical specifications for the AC power supply
Nortel Ethernet Routing Switch 8300
Installation — AC Power Supply
NN46200-301 03.01 Standard
4.0 27 August 2007
Copyright © 2007, Nortel Networks
.
23
4 Contents
Nortel Ethernet Routing Switch 8300
Installation — AC Power Supply
NN46200-301 03.01 Standard
4.0 27 August 2007
Copyright © 2007, Nortel Networks
.
5
New in this release
See the following sections for details about what’s new in Nortel Ethernet
Routing Switch 8300 Installation — MAC Addresses (NN46200-600) for
Release 4.0:
•
"Features" (page 5)
•
"Other changes" (page 5)
Features
There are no new feature-related changes for this document release.
Other changes
This document is reformatted to comply with Nortel Customer
Documentation Standards.
Nortel Ethernet Routing Switch 8300
Installation — AC Power Supply
NN46200-301 03.01 Standard
4.0 27 August 2007
Copyright © 2007, Nortel Networks
.
6 New in this release
Nortel Ethernet Routing Switch 8300
Installation — AC Power Supply
NN46200-301 03.01 Standard
4.0 27 August 2007
Copyright © 2007, Nortel Networks
.
7
Preface
The Nortel Ethernet Routing Switch 8300 is a flexible and multifunctional
Layer 2/Layer 3 switch that supports diverse network architectures and
protocols. The Ethernet Routing Switch 8300 provides security and control
features such as Extensible Authentication Protocol over LAN (EAPoL),
Simple Network Management Protocol, Version 3 (SNMP3), and Secure
Shell (SSH). The Ethernet Routing Switch 8300 provides quality of service
(QoS) for a high number of attached devices and supports future network
requirements for QoS for critical applications, such as Voice over IP (VoIP).
This guide is intended for qualified service personnel who need to add or
replace an AC power supply in an Ethernet Routing Switch 8300 Series
chassis. A qualified service person should have appropriate technical
training and experience and be aware of the hazards involved in installing
and replacing customer-replaceable units.
This guide provides information about the AC power supply used in the
Ethernet Routing Switch 8300 Series chassis and instructions for adding
and replacing an AC power supply in the following Ethernet Routing Switch
8300 Series chassis models:
•
Ethernet Routing Switch 8306 chassis
•
Ethernet Routing Switch 8310 chassis
Command line interfaces
See the following sections for information about the CLI and the NNCLI.
NNCLI command modes
The NNCLI has four major command modes, listed in order of increasing
privileges:
•
User EXEC
•
Privileged EXEC
•
Global configuration
•
Interface configuration
Nortel Ethernet Routing Switch 8300
Installation — AC Power Supply
NN46200-301 03.01 Standard
4.0 27 August 2007
Copyright © 2007, Nortel Networks
.
8 Preface
Each mode provides a specific set of commands. The command set of
a higher-privilege mode is a superset of a lower-privilege mode. That
is, all lower-privilege mode commands are accessible when using a
higher-privilege mode.
The command modes are as follows:
•
User EXEC mode
This is the initial mode of access. By default, the User Access
Verification Password for this mode is empty, and password checking
is disabled. The password can be changed (and password checking
enabled) by the system administrator in Global configuration mode.
Once the password is changed, it is activated immediately.
•
Privileged EXEC mode
This mode is accessed from the User EXEC mode. When accessing
this mode, you are prompted to provide a login name and password.
The login name and password combination determines your access
level in the Privileged EXEC mode and other higher modes.
•
Global configuration mode
This mode allows you to make changes to the running configuration. If
the configuration is saved, these settings survive reboots of the switch.
•
Interface configuration mode
This mode allows you to modify either a logical interface, such as a
VLAN, or a physical interface, such as a port/slot.
From either the Global configuration mode or the Interface configuration
mode, all the configuration parameters (both global and interface) can be
saved to a file. The default name for the configuration parameters file is
config.cfg. Alternative filenames can also be used.
Table 1 "NNCLI command modes" (page 9) lists the NNCLI command
modes, the prompts for each mode, the abbreviated name for each mode,
and how to enter and exit each mode.
Prompts are expressed in this table using the format ERS-8300:5; however,
prompts returned from your switch typically reflect the specific chassis you
use. For example, if you use the 8310 chassis, the prompts use the format
ERS-8310:5. Prompts can be customized, also, using the NNCLI command
snmp-server name <prompt>.
Nortel Ethernet Routing Switch 8300
Installation — AC Power Supply
NN46200-301 03.01 Standard
4.0 27 August 2007
Copyright © 2007, Nortel Networks
.
Command line interfaces 9
Table 1
NNCLI command modes
Command
mode
Prompt
Mode
name
Command/mode
to enter or exit mode
User EXEC
ERS-8300:5>
Exec
Default mode
when NNCLI is started
logout to exit
Privileged
EXEC
ERS-8300:5#
privExec enable to enter
from User EXEC mode
disable to exit
to User EXEC mode
Global
Configuration
ERS-8300:5(config)#
config
configure to enter
from Privileged EXEC
mode
exit to exit
to Privileged EXEC
mode
Interface
Configuration
ERS-8300:5(config-if)#
config-if
interface to
enter from Global
Configuration mode
exit to exit
to Global Configuration
mode
Accessing the NNCLI
When you first power up the Ethernet Routing Switch 8300, the default
interface is the Ethernet Routing Switch 8300 CLI. To switch from the CLI
to the NNCLI, you must change the NNCLI boot flag to true and save the
boot configuration file using the following commands:
ERS-8310:5# config boot flags nncli true
ERS-8310:5# save boot
You must reboot the switch for this change to take effect. After you reboot
the switch, access the NNCLI using Telnet, rlogin, or the local console port.
You can log in to the switch using your password and the default privilege
password nortel.
Use the following commands to:
•
log in to the software using the default user name and password
•
access Global Configuration mode
Login: xxxxx
Password: xxxxx
ERS-8310:5> enable
Nortel Ethernet Routing Switch 8300
Installation — AC Power Supply
NN46200-301 03.01 Standard
4.0 27 August 2007
Copyright © 2007, Nortel Networks
.
10 Preface
Password: nortel
ERS-8310:5# configure terminal
ERS-8310:5(config)#
Returning to the CLI
The config.cfg file for the CLI and the config.cfg file for the NNCLI are not
compatible. If you decide to change the CLI mode to NNCLI, or the reverse,
you must use the config.cfg file for the selected mode.
To switch from the NNCLI to the CLI, enter the following commands:
ERS-8310:5(config)# no boot flags nncli
ERS-8310:5(config)# exit
ERS-8310:5(config)# save boot
You must reboot the switch for this change to take effect.
Text conventions
This guide uses the following text conventions:
angle brackets (< >)
Indicate that you choose the text to enter based on
the description inside the brackets. Do not type the
brackets when entering the command.
Example: If the command syntax is
ping <ip_address>, you enter
ping 192.32.10.12
bold body text
Indicates objects such as window names, dialog box
names, and icons, as well as user interface objects
such as buttons, tabs, and menu items.
bold Courier text
Indicates command names, options, and text that
you must enter.
Example: Use the dinfo command.
Example: Enter show ip {alerts|routes}.
braces ({})
Indicate required elements in syntax descriptions
where there is more than one option. You must
choose only one of the options. Do not type the
braces when entering the command.
Example: If the command syntax is
show ip {alerts|routes}, you must enter
either
show ip alerts or show ip routes, but not
both.
Nortel Ethernet Routing Switch 8300
Installation — AC Power Supply
NN46200-301 03.01 Standard
4.0 27 August 2007
Copyright © 2007, Nortel Networks
.
Hard-copy technical manuals
brackets ([ ])
11
Indicate optional elements in syntax descriptions.
Do not type the brackets when entering the
command.
Example: If the command syntax is
show ip interfaces [-alerts], you can
enter
either show ip interfaces or
show ip interfaces -alerts.
ellipsis points (. . . )
Indicate that you repeat the last element of the
command as needed.
Example: If the command syntax is
ethernet/2/1 [<parameter> <value>]... ,
you enter ethernet/2/1 and as many
parameter-value pairs as needed.
italic text
Indicates variables in command syntax descriptions.
Also indicates new terms and book titles. Where
a variable is two or more words, the words are
connected by an underscore.
Example: If the command syntax is
show at <valid_route>,
valid_route is one variable and you substitute one
value for it.
plain Courier text
Indicates command syntax and system output, for
example, prompts and system messages.
Example: Set Trap Monitor Filters
separator ( > )
Shows menu paths.
Example: Protocols > IP identifies the IP command
on the Protocols menu.
vertical line ( | )
Separates choices for command keywords and
arguments. Enter only one of the choices. Do not
type the vertical line when entering the command.
Example: If the command syntax is
show ip {alerts|routes}, you enter either
show ip alerts or show ip routes, but not
both.
Hard-copy technical manuals
You can download current versions of technical documentation for your
Ethernet Routing Switch 8300 from the Nortel customer support web site
at www.nortel.com/support.
Nortel Ethernet Routing Switch 8300
Installation — AC Power Supply
NN46200-301 03.01 Standard
4.0 27 August 2007
Copyright © 2007, Nortel Networks
.
12 Preface
You can print the technical manuals and release notes free, directly from
the Internet. Use Adobe Acrobat Reader to open the manuals and release
notes, search for the sections you need, and print them on most standard
printers. Go to Adobe Systems at the www.adobe.com URL to download a
free copy of the Adobe Acrobat Reader.
How to get help
If you purchased a service contract for your Nortel product from a distributor
or authorized reseller, contact the technical support staff for that distributor
or reseller for assistance.
If you purchased a Nortel service program, contact Nortel
Technical Support. To obtain contact information online, go to the
www.nortel.com/contactus web page and click Technical Support.
Information about the Nortel Technical Solutions Centers is available from
the www.nortel.com/callus web page.
An Express Routing Code (ERC) is available for many Nortel products and
services. When you use an ERC, your call is routed to a technical support
person who specializes in supporting that product or service. To locate the
ERC for your product or service, go to the www.nortel.com/erc web page.
Nortel Ethernet Routing Switch 8300
Installation — AC Power Supply
NN46200-301 03.01 Standard
4.0 27 August 2007
Copyright © 2007, Nortel Networks
.
13
Power supply installation
This guide contains information about installing power supplies.
Navigation
•
"Power supplies" (page 13)
•
"Removing and installing a power filler panel" (page 17)
•
"Installing the AC power supply" (page 18)
•
"Removing the AC power supply" (page 20)
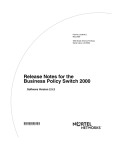
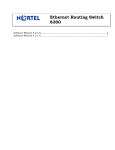
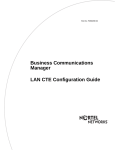
Power supplies
The Ethernet Routing Switch 8306 and 8310 chassis have three bays for
power supplies. Use the AC power supply for AC input power. The following
figure shows an Ethernet Routing Switch 8301AC power supply. The
nominal input voltage range for the 8301AC power supply is 100-120 VAC
and 200-240VAC, however, the output power is limited to 1140 W maximum
at 100-120 VAC nominal input voltage conditions. To obtain full output
power (1770 W), you must connect the 8301AC power supply to a 200-240
VAC nominal input voltage source.
Nortel Ethernet Routing Switch 8300
Installation — AC Power Supply
NN46200-301 03.01 Standard
4.0 27 August 2007
Copyright © 2007, Nortel Networks
.
14 Power supply installation
Figure 1
8301AC power supply
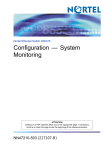
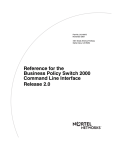
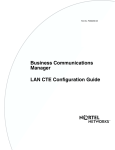
Figure 2 "8302AC power supply" (page 14) shows an Ethernet Routing
Switch 8302AC power supply.
The nominal input voltage range for the 8302AC power supply is 100-120
VAC and 200-240VAC, however, the output power is limited to 850 W
maximum at 100-120 VAC nominal input voltage conditions. To obtain full
output power (1400W), you must connect the 8302AC power supply to a
200-240 VAC nominal input voltage source.
Figure 2
8302AC power supply
Nortel Ethernet Routing Switch 8300
Installation — AC Power Supply
NN46200-301 03.01 Standard
4.0 27 August 2007
Copyright © 2007, Nortel Networks
.
Power supplies
15
The following table describes the power supply LED on the AC power supply.
Table 2
Power supply LEDs
State
Meaning
Off
Power supply not operational. Contact your Nortel Technical
Solutions Center.
On (green)
Power supply is ok.
The Ethernet Routing Switch 8300 chassis ships with no installed power
supplies. Install the first power supply in the leftmost bay. Power supply
bays are logically numbered 1, 2, and 3 left to right as viewed from the front
of the chassis for the 8306 and 8310.
Do not install the 8301AC power supply and the 8302AC power supply
within the same chassis. This configuration is not supported.
For the 8306 and 8310 chassis, the number of power supplies that you need
to install—1, 2, or 3—depends on the following:
•
the number of modules installed in the chassis
•
PoE requirements
•
whether you want an optional redundant power supply or not
Table 3 "Recommended 8301AC/8302AC power supplies" (page 15) lists
the number of 8301AC or 8302AC power supplies to install based on the
number of installed modules and your power supply redundancy choice.
To provide the required PoE for powered devices (PDs), use Table 4
"8306/8310 chassis available system power" (page 16) to determine the
source input power (100-120 VAC or 200-240 VAC) and the number
of power supplies. For the input power specifications for each of the
modules, see Nortel Ethernet Routing Switch 8300 Installation — Modules
(NN46200-305).
Table 3
Recommended 8301AC/8302AC power supplies
Number of power supplies
Chassis
Number of
modules
Required
Redundant
configuration
8306
1-6
1
2
8310
1-6
1
2
7-10
2
3
Nortel Ethernet Routing Switch 8300
Installation — AC Power Supply
NN46200-301 03.01 Standard
4.0 27 August 2007
Copyright © 2007, Nortel Networks
.
16 Power supply installation
Note the following information:
•
If a power supply fails when you have a redundant power supply
installed, the Ethernet Routing Switch 8300 continues to operate with
no interruption of service. The chassis will continue to supply the same
module and PoE output power with the remaining power supplies. A trap
and syslog message will indicate that the configuration is non-redundant.
•
Nortel recommends that you operate the Ethernet Routing Switch 8300
in a redundant configuration at all times to ensure maximum network
up time.
•
Nortel recommends that you install each power supply on its own
dedicated branch circuit. When you plug the power cord for each power
supply into a separate AC circuit, the redundant power supply also
provides protection against the disconnection or failure of an individual
branch circuit or power supply failure.
•
If you have installed a redundant power supply, power available for PoE
is always determined on an N+1 redundancy. If you have 1 or 2 power
supplies in the chassis, you will be allocated PoE power equivalent to
one power supply. If you have 3 power supplies in the chassis, you will
be allocated PoE power equivalent to 2 power supplies.
Table 4
8306/8310 chassis available system power
Power
Supply
Power supply
rating
Number
of
power
supplies
Redundancy
Module
PoE
Fans
Total
8301AC
100-120VAC
1
No
600 W
450 W
90 W
1140 W
2
Yes 1+1
600 W
450 W
90 W
1140 W
1140W
3
Yes 2+1
1290 W
900 W
90 W
2280 W
200-240VAC
1
No
780 W
900 W
90 W
1770 W
2
Yes 1+1
780 W
900 W
90 W
1770 W
1770W
3
Yes 2+1
1650 W
1800 W
90 W
3540 W
100-120VAC
1
No
535 W
225 W
90 W
850 W
2
Yes 1+1
535 W
225 W
90 W
850 W
850W
3
Yes 2+1
1160 W
450 W
90 W
1700 W
200-240VAC
1
No
860 W
450 W
90 W
1400 W
2
Yes 1+1
860 W
450 W
90 W
1400 W
3
Yes 2+1
1810 W
900 W
90 W
2800 W
8302AC
1400W
Nortel Ethernet Routing Switch 8300
Installation — AC Power Supply
NN46200-301 03.01 Standard
4.0 27 August 2007
Copyright © 2007, Nortel Networks
.
Removing and installing a power filler panel 17
Removing and installing a power filler panel
A power filler panel maintains the proper cooling airflow in the Ethernet
Routing Switch 8300 Series chassis. If you remove a power supply from the
Ethernet Routing Switch 8300 Series chassis without replacing it, you must
install a power filler panel. When you install a power supply, you must first
remove the power filler panel from the power bay.
To remove a filler panel:
Step
Action
1
Using a Phillips screwdriver, loosen the two captive screws that
fasten the power filler panel to the chassis until the screws are free
of the threads in the chassis frame.
2
Pull the power filler panel out of the Ethernet Routing Switch 8300
Series chassis.
Save the power filler panel in case you need to operate the Ethernet
Routing Switch 8300 Series chassis with a power supply removed.
—End—
To install a power filler panel:
Step
Action
1
Place the power filler panel in the empty power supply bay.
2
Tighten the two captive screws until the power filler panel is seated
firmly.
Nortel Ethernet Routing Switch 8300
Installation — AC Power Supply
NN46200-301 03.01 Standard
4.0 27 August 2007
Copyright © 2007, Nortel Networks
.
18 Power supply installation
—End—
Installing the AC power supply
Install the AC power supply to provide AC power for components.
Do not install the 8301AC power supply and the 8302AC power supply
within the same chassis. This configuration is not supported.
When you first install a 8000 Series chassis that requires two power
supplies, you must turn on both power supply units within 2 seconds of
each other. If you wait longer to turn on the second power supply, both
power supplies shut down. To correct this condition, turn off both power
supplies, wait at least 30 seconds, and then turn on both power supplies
again within 2 seconds.
DANGER
Due to high-energy hazards of working with components of greater
than 240 VA, only qualified service personnel are permitted to
install and replace Ethernet Routing Switch 8300 components.
To install an AC power supply:
Step
Action
1
Remove the filler panel from the power bay if necessary.
For instructions, see "Removing and installing a power filler panel"
(page 17).
Nortel Ethernet Routing Switch 8300
Installation — AC Power Supply
NN46200-301 03.01 Standard
4.0 27 August 2007
Copyright © 2007, Nortel Networks
.
Installing the AC power supply
19
CAUTION
Save the power filler panel in case you need to operate
the 8300 Series chassis with a power supply removed.
2
If you are replacing a failed power supply, then remove the failed
supply.
For instructions, see "Removing the AC power supply" (page 20).
3
Grasp the handle of the new power supply.
4
Push the power supply firmly into the bay.
5
Tighten the retaining screws until the power supply is seated firmly.
6
Connect the power cord to the power supply and to an AC power
outlet that is on a circuit with no other equipment connected to it.
Connect each power supply in the chassis to a separate AC circuit.
Nortel Ethernet Routing Switch 8300
Installation — AC Power Supply
NN46200-301 03.01 Standard
4.0 27 August 2007
Copyright © 2007, Nortel Networks
.
20 Power supply installation
7
Turn on the power switch.
The power supply LED on the power supply should light green.
—End—
Removing the AC power supply
DANGER
Due to high-energy hazards of working with components of greater
than 240 VA, only qualified service personnel are permitted to
install and replace Ethernet Routing Switch 8300 components.
You can remove a redundant power supply without affecting the operation
of the Ethernet Routing Switch 8300 Series switch. When you remove a
power supply, the LED on the power supply turns off, and the Ethernet
Routing Switch 8300 Series Chassis automatically redistributes the load to
the remaining power supplies.
Nortel Ethernet Routing Switch 8300
Installation — AC Power Supply
NN46200-301 03.01 Standard
4.0 27 August 2007
Copyright © 2007, Nortel Networks
.
Removing the AC power supply
21
You should replace a failed power supply as soon as possible to restore
high-availability operation.
CAUTION
To maintain proper cooling, never operate the Ethernet Routing
Switch 8300 Series chassis with an empty power supply bay. If
you are replacing a failed power supply and you do not have a
power filler panel, leave the failed power supply installed until a
replacement power supply is available.
To remove an AC power supply:
Step
Action
1
Turn off the power switch on the power supply that you are replacing.
2
Disconnect the power cord from the power outlet and from the power
supply.
3
Loosen the two retaining screws on the power supply.
Nortel Ethernet Routing Switch 8300
Installation — AC Power Supply
NN46200-301 03.01 Standard
4.0 27 August 2007
Copyright © 2007, Nortel Networks
.
22 Power supply installation
4
Lift the extractor lever to disconnect the power supply from the
backplane connector.
5
Pull the power supply out of the chassis.
6
Install a new power supply (see "Installing the AC power supply"
(page 18)) or install a power filler panel (see "Removing and
installing a power filler panel" (page 17)).
—End—
Nortel Ethernet Routing Switch 8300
Installation — AC Power Supply
NN46200-301 03.01 Standard
4.0 27 August 2007
Copyright © 2007, Nortel Networks
.
23
Appendix
Electrical specifications for the AC
power supply
This appendix lists the electrical specifications for the Ethernet Routing
Switch 8301AC power supply. Refer to your chassis installation manual for
system power specifications.
The following table list the power specifications for the Ethernet Routing
Switch 8301AC power supply.
Table 5
Ethernet Routing Switch 8301AC power specifications
AC Input Power Ratings
Input voltage range (nominal):
100-120 VAC
200-240 VAC
Input current (nominal):
16 A
12 A
Frequency range (nominal):
50-60 Hz
50-60 Hz
Input VA
1600 VA
2234 VA
Input power consumption:
1584 W
2212 W
Heat dissipation
(thermal/output):
1515 BTU/hr
1508 BTU/hr
Hold-up time:
20 ms
20 ms
DC Output Power Ratings
Max. output power (combined):
1140W (1050W + 90W fans)
1770 W (1680W + 90W fans)
Non-PoE:
3.3 VDC @ 150 A
3.3 VDC @ 150 A
12 VDC @ 65 A
12 VDC @ 65 A
PoE:
50 VDC @ 18 A
50 VDC @ 18 A
Fans:
12 VDC @ 7.5 A
12 VDC @ 7.5 A
Nortel Ethernet Routing Switch 8300
Installation — AC Power Supply
NN46200-301 03.01 Standard
4.0 27 August 2007
Copyright © 2007, Nortel Networks
.
24 Appendix Electrical specifications for the AC power supply
Note the following information:
•
The maximum steady-state output power is limited to a total of 1140 W
for any combination of output voltages/currents at low-line 100-120 VAC
nominal input voltage conditions.
•
The maximum steady-state output power is limited to a total of 690 W
for any combination of output voltages/currents, excluding the 50 VDC
source at low-line 100-120VAC nominal input voltage conditions. This
limitation is required to ensure that there is sufficient PoE power or 450
W total at this input voltage condition.
•
The maximum steady-state output power is limited to a total of 870W
for any combination of output voltages/currents, excluding the 50 VDC
source at high-line 200-240VAC nominal input voltage conditions. This
limitation is required to ensure maximum PoE power or 900 W total for
the 50 VDC source at this input voltage condition.
•
To obtain the full output power rating of 1770 W, you must connect the
power supply to a nominal (200-240VAC) input voltage source.
The following table list the power specifications for the Ethernet Routing
Switch 8302AC power supply.
Table 6
Ethernet Routing Switch 8302AC power specifications
AC Input Power Ratings
Input voltage range (nominal):
100-120 VAC
200-240 VAC
Input current (nominal):
12 A
9A
Frequency range (nominal):
50-60 Hz
50-60 Hz
Input VA
1192 VA
1768 VA
Input power consumption:
1180 W
1750 W
Heat dissipation
(thermal/output):
1126BTU/hr
1195 BTU/hr
Hold-up time:
20 ms
20 ms
DC Output Power Ratings
Max. output power (combined):
850W (760W + 90W fans)
1400 W (1310W + 90W fans)
Non-PoE:
3.3 VDC @ 150 A
3.3 VDC @ 150 A
12 VDC @ 65 A
12 VDC @ 65 A
PoE:
50 VDC @ 18 A
50 VDC @ 18 A
Fans:
12 VDC @ 7.5 A
12 VDC @ 7.5 A
Nortel Ethernet Routing Switch 8300
Installation — AC Power Supply
NN46200-301 03.01 Standard
4.0 27 August 2007
Copyright © 2007, Nortel Networks
.
Appendix
Electrical specifications for the AC power supply
25
Note the following information:
•
The maximum steady-state output power is limited to a total of 850 W
for any combination of output voltages/currents at low-line 100-120 VAC
nominal input voltage conditions.
•
The maximum steady-state output power is limited to a total of 625 W
for any combination of output voltages/currents, excluding the 50 VDC
source at low-line 100-120VAC nominal input voltage conditions. This
limitation is required to ensure that there is sufficient PoE power or 225
W total at this input voltage condition.
•
The maximum steady-state output power is limited to a total of 950 W
for any combination of output voltages/currents, excluding the 50 VDC
source at high-line 200-240VAC nominal input voltage conditions. This
limitation is required to ensure maximum PoE power or 450 W total for
the 50 VDC source at this input voltage condition.
•
To obtain the full output rating of 1400 W, you must connect the power
supply to a nominal (200-240 VAC) input power voltage source.
Nortel Ethernet Routing Switch 8300
Installation — AC Power Supply
NN46200-301 03.01 Standard
4.0 27 August 2007
Copyright © 2007, Nortel Networks
.
26 Appendix Electrical specifications for the AC power supply
Nortel Ethernet Routing Switch 8300
Installation — AC Power Supply
NN46200-301 03.01 Standard
4.0 27 August 2007
Copyright © 2007, Nortel Networks
.
Nortel Ethernet Routing Switch 8300
Installation — AC Power Supply
Copyright © 2007, Nortel Networks
All Rights Reserved.
Publication: NN46200-301
Document status: Standard
Document version: 03.01
Document date: 27 August 2007
Sourced in Canada and the United States of America
To provide feedback or report a problem in this document, go to www.nortel.com/documentfeedback
Nortel, the Nortel logo, and the Globemark are trademarks of Nortel Networks.
Adobe and Acrobat Reader are trademarks of Adobe Systems Incorporated.
Microsoft, Windows, and Windows NT are trademarks of Microsoft Corporation.
All other trademarks are the property of their respective owners.