1
Nortel Communication Server 1000
Linux Platform Base and
Applications Installation and
Commissioning
Release: Release 5.5
Document Revision: 02.09
www.nortel.com
NN43001-315
.
Nortel Communication Server 1000
Release: Release 5.5
Publication: NN43001-315
Document release date: 29 October 2008
Copyright © 2007–2008 Nortel Networks
All Rights Reserved.
Sourced in Canada
LEGAL NOTICE
While the information in this document is believed to be accurate and reliable, except as otherwise expressly
agreed to in writing NORTEL PROVIDES THIS DOCUMENT "AS IS" WITHOUT WARRANTY OR CONDITION OF
ANY KIND, EITHER EXPRESS OR IMPLIED. The information and/or products described in this document are
subject to change without notice.
Nortel, the Nortel logo, the Globemark, SL-1, Meridian 1, and Succession are trademarks of Nortel Networks.
All other trademarks are the property of their respective owners.
.
3
.
Contents
New in this Release
5
Security hardening 5
Features 5
Installation times 5
CLI commands 6
Upgrade procedure 6
Alarms 6
Screen captures 6
Firewall ports 6
Task flow diagrams 6
Other changes 6
Revision history 7
How to get help
Getting
Getting
Getting
Getting
help
help
help
help
9
from the Nortel Web site 9
over the telephone from a Nortel Solutions Center 9
from a specialist by using an Express Routing Code 10
through a Nortel distributor or reseller 10
Introduction
11
Subject 11
Linux base overview 12
Key features 12
Linux base and applications installation and upgrade task
flow
Task flows for individual servers 13
Task flows for common combinations of servers
ECM Upgrade Procedures 28
13
21
Install Nortel Linux base
35
Prerequisites 35
Install the Linux base software on the IBM x306m and HP DL320 G4 servers 37
Upgrade Nortel Linux base
Prerequisites to upgrade Nortel Linux base 53
Nortel Communication Server 1000
Linux Platform Base and Applications Installation and Commissioning
NN43001-315 02.09
29 October 2008
Copyright © 2007–2008 Nortel Networks
.
53
4
Upgrading Nortel Linux base 54
Installation and configuration of applications on Linux base
69
Prerequisites to install and configure applications 70
Install the CS 1000 applications 70
Installing the NRS applications 71
Install the Element Manager applications 82
Configuration for Network Routing Service or Element Manager applications
in ECM 99
CS 1000 on Linux base
101
Linux Operating System and Distribution 101
Network and firewall 102
Software reliability 102
Linux Security Hardening 104
Patching 106
Software exceptions 109
User accounts and access control 109
Passwords 110
System upgrades 115
Logging 115
SNMP 115
Disaster recovery 116
Passthrough end user license agreement
121
COTS Servers
123
HP DL320 G4 server 123
HP DL320 G4 BIOS settings 126
IBM x306m server 131
IBM x306m BIOS settings 134
Nortel Linux base CLI commands
139
Network configuration for Secure File Transfer Protocol (SFTP)
data backup
143
Network configuration 143
SFTP logon 143
SFTP network configuration requirements
144
Nortel Communication Server 1000
Linux Platform Base and Applications Installation and Commissioning
NN43001-315 02.09
29 October 2008
Copyright © 2007–2008 Nortel Networks
.
5
.
New in this Release
ATTENTION
Do not contact Red Hat for technical support on your Nortel version of the Linux
base operating system. If technical support is required for the Nortel version of
the Linux base operating system, contact Nortel technical support through your
regular channels.
The following sections detail what’s new in Linux Platform Base and
Applications Installation and Commissioning (NN43001-315) () for release
5.5.
•
•
“Features” (page 5)
“Other changes” (page 6)
See the following sections for information about feature changes:
Security hardening
Features
See the following sections for information about feature changes:
Installation times
Installation times are added for the installation of the Nortel Linux base and
for the applications. Installation times are also added for the Nortel Linux
base upgrade and the applications upgrade. Installation times for these
features can be viewed in the following sections:
•
“Install the Linux base software on the IBM x306m and HP DL320 G4
servers” (page 37)
•
•
“Upgrading Nortel Linux base” (page 54)
“Install the CS 1000 applications” (page 70)
Nortel Communication Server 1000
Linux Platform Base and Applications Installation and Commissioning
NN43001-315 02.09
29 October 2008
Copyright © 2007–2008 Nortel Networks
.
6 New in this Release
CLI commands
Several new CLI commands are added for Release 5.5. The CLI
commands and a brief definition are listed in the following table:
•
Table 11 "Nortel Linux base CLI commands" (page 141)
Upgrade procedure
A procedure is added to upgrade the Linux base and applications from
Release 5.0 to 5.5. The procedure is shown in the following section:
•
“Upgrading Nortel Linux base” (page 54)
Alarms
A listing of system alarm thresholds is added for Release 5.5. The
thresholds can be viewed in the following table:
•
Table 2 "Warning and Critical thresholds" (page 103)
Screen captures
The installation procedure for the Linux base contains a revised set of
screen captures for Release 5.5. The procedure is shown in the following
section:
•
“Installing the Linux base on the IBM x306m server or HP DL320 G4”
(page 37)
Firewall ports
A list of open firewall ports is included in Release 5.5. The list can be
viewed in the following table:
•
Table 1 "Linux base open firewall ports" (page 102)
Task flow diagrams
Task flow diagrams for the installation and upgrade of the Linux base and
applications have been added for Release 5.5. The task flow diagrams
can be viewed in the chapter “Linux base and applications installation and
upgrade task flow” (page 13).
Other changes
See the following sections for information about changes that are not
feature-related.
Nortel Communication Server 1000
Linux Platform Base and Applications Installation and Commissioning
NN43001-315 02.09
29 October 2008
Copyright © 2007–2008 Nortel Networks
.
Other changes
Revision history
October 29, 2008
Standard 02.09. This document is
up-issued to include a note under
Disaster Recovery.
May 01, 2008
Standard 02.08. This document is
up-issued to update information in
the Upgrading Nortel Linux base
procedures.
April 18, 2008
Standard 02.07. This document is
up-issued to add information to the
procedure Installing the Primary
Security Service and Network Routing
Service and added ECM Upgrade
Procedures 5.00 GA to 5.50.12 to
Task Flow chapter.
April 15, 2008
Standard 02.06. This document is
up-issued to add lab trial information.
February 22, 2008
Standard 02.05. This document
is up-issued to include references
to host configuration scripts found
in Enterprise Common Manager
Fundamentals (NN43001-116) () .
February 4, 2008
Standard 02.04. This document
is up-issued to support changes
in technical content, including the
addition of task flow diagrams for the
installation and upgrade of the Linux
base and applications.
January 15, 2008
Standard 02.03. This document is
up-issued for changes in technical
content. New screen captures have
been included and an installation and
upgrade task flow section has been
added.
December 19, 2007
Standard 02.02. This document is
up-issued for changes in technical
content.
Nortel Communication Server 1000
Linux Platform Base and Applications Installation and Commissioning
NN43001-315 02.09
29 October 2008
Copyright © 2007–2008 Nortel Networks
.
7
8 New in this Release
December 7, 2007
Standard 02.01. This document
is up-issued to support Nortel
Communication Server 1000 Release
5.5. This document contains new
information on CLI commands, an
upgrade procedure, firewall ports,
and alarms. Screen captures for the
Linux base installation procedure are
updated.
November 27, 2007
Standard 01.04. This document is
up-issued for changes in technical
content.
September 10, 2007
Standard 01.03. This document is
up-issued to address changes in
technical content for release 5.0.
June 20, 2007
Standard 01.02. This document
is up-issued to remove the Nortel
Networks Confidential statement.
May 30, 2007
Standard 01.01. This document
is issued to support Nortel
Communication Server 1000 Release
5.0.
Nortel Communication Server 1000
Linux Platform Base and Applications Installation and Commissioning
NN43001-315 02.09
29 October 2008
Copyright © 2007–2008 Nortel Networks
.
9
.
How to get help
This chapter explains how to get help for Nortel products and services.
Getting help from the Nortel Web site
The best way to get technical support for Nortel products is from the Nortel
Technical Support Web site: www.nortel.com/support
This site provides quick access to software, documentation, bulletins, and
tools to address issues with Nortel products. From this site, you can:
•
•
download software, documentation, and product bulletins
•
sign up for automatic notification of new software and documentation
for Nortel equipment
•
open and manage technical support cases
search the Technical Support Web site and the Nortel Knowledge Base
for answers to technical issues
Getting help over the telephone from a Nortel Solutions Center
If you do not find the information you require on the Nortel Technical
Support Web site, and you have a Nortel support contract, you can also
get help over the telephone from a Nortel Solutions Center.
In North America, call 1-800-4NORTEL (1-800-466-7835).
Outside North America, go to the following Web site to obtain the
telephone number for your region:
www.nortel.com/callus
Nortel Communication Server 1000
Linux Platform Base and Applications Installation and Commissioning
NN43001-315 02.09
29 October 2008
Copyright © 2007–2008 Nortel Networks
.
10 How to get help
Getting help from a specialist by using an Express Routing Code
To access some Nortel Technical Solutions Centers, you can use an
Express Routing Code (ERC) to quickly route your call to a specialist in
your Nortel product or service. To locate the ERC for your product or
service, go to:
www.nortel.com/erc
Getting help through a Nortel distributor or reseller
If you purchased a service contract for your Nortel product from a
distributor or authorized reseller, contact the technical support staff for that
distributor or reseller.
Nortel Communication Server 1000
Linux Platform Base and Applications Installation and Commissioning
NN43001-315 02.09
29 October 2008
Copyright © 2007–2008 Nortel Networks
.
11
.
Introduction
ATTENTION
Do not contact Red Hat for technical support on your Nortel version of the Linux
base operating system. If technical support is required for the Nortel version of
the Linux base operating system, contact Nortel technical support through your
regular channels.
Linux Platform Base and Applications Installation and Commissioning
(NN43001-315) () provides a description of the features of Nortel Linux
base and details on the installation and configuration of Nortel Linux base
on commercial off-the-shelf (COTS) servers. This document also provides
installation instructions for Nortel Linux applications.
Subject
This document describes the installation and configuration of Nortel Linux
base on the HP DL320 G4 and IBM x306m COTS servers. The Linux base
server platform supports the following Nortel Communication Server 1000
(CS 1000) application configurations:
•
•
•
•
•
•
•
Primary Security Service and Network Routing Service
•
Backup Security Service, Subscriber Manager, and CS 1000 Element
Manager
Backup Security Service and Network Routing Service
Network Routing Service
Primary Security Service and CS 1000 Element Manager
Backup Security Service and CS 1000 Element Manager
CS 1000 Element Manager
Primary Security Service, Subscriber Manager, and CS 1000 Element
Manager
This document describes the upgrade and configuration of Nortel Linux
base on the HP DL320 G4 and IBM x306m COTS servers.
Nortel Communication Server 1000
Linux Platform Base and Applications Installation and Commissioning
NN43001-315 02.09
29 October 2008
Copyright © 2007–2008 Nortel Networks
.
12 Introduction
To view licensing information, see “ Passthrough end user license
agreement” (page 121).
Linux base overview
The Communication Server 1000 (CS 1000) Linux base system provides
a Linux server platform for applications on a commercial off-the-shelf
(COTS) Pentium server. The platform can support the new Session
Initiation Protocol Network Redirect Server (SIP NRS) and Enterprise
Common Manager (ECM) framework.
This system is supported on the HP DL320 G4 1u Pentium server and the
IBM x306m 1u Pentium server.
Key features
Linux base provides features and enhancements in the following areas:
•
•
•
•
•
•
•
•
•
•
•
•
Linux operating system and distribution
Firewall
Software reliability
Linux security hardening
Patching
User accounts and access control
Software installation and delivery
System upgrades
Debugging
Logging
Disaster recovery
Network Time Protocol (NTP)
Nortel Communication Server 1000
Linux Platform Base and Applications Installation and Commissioning
NN43001-315 02.09
29 October 2008
Copyright © 2007–2008 Nortel Networks
.
13
.
Linux base and applications
installation and upgrade task flow
Linux Platform Base and Applications Installation and Commissioning
(NN43001-315) () provides installation and upgrade information for the
Linux base and applications. You must follow the proper sequence of
events to correctly install or upgrade the Linux base and applications. Use
the task flow information in this chapter to determine the proper steps for
the installation or upgrade of the Linux base and applications.
The task flows for Linux base and applications installation and upgrades
are broken into two sections:
•
Task flows to install or upgrade individual servers, as shown in “Task
flows for individual servers” (page 13).
•
Task flows to install or upgrade commonly used combinations of
servers, as shown in “Task flows for common combinations of servers”
(page 21).
There is also a section for upgrading the ECM. See “ECM Upgrade
Procedures” (page 28).
Task flows for individual servers
This section provides high-level task flows for the installation and upgrade
of the Linux base and applications on commercial off-the-shelf (COTS)
servers. Refer to the chapters “Install Nortel Linux base ” (page 35) and
“Installation and configuration of applications on Linux base” (page 69) for
specific installation instructions. Refer to the chapter “Upgrade Nortel Linux
base ” (page 53) for specific upgrade instructions.
For more information refer to the following NTPs, which are referenced in
the task flow diagrams:
•
Linux Platform Base and Applications Installation and Commissioning
(NN43001-315) ()
•
Subscriber Manager Fundamentals (NN43001-120) ()
Nortel Communication Server 1000
Linux Platform Base and Applications Installation and Commissioning
NN43001-315 02.09
29 October 2008
Copyright © 2007–2008 Nortel Networks
.
14 Linux base and applications installation and upgrade task flow
•
•
Common Network Directory 2.2 Administration (NN43050-101) ()
Network Routing Service Installation and Commissioning
(NN43001-564) ()
This section contains the following task flows:
•
Figure 1 "Linux base and applications install for primary or backup
ECM server " (page 15)
•
Figure 2 "Linux base and applications install for member server" (page
16)
•
Figure 3 "Linux base and applications upgrade for primary or backup
ECM server with NRS" (page 17)
•
Figure 4 "Linux base and applications upgrade for primary or backup
ECM server with EM " (page 18)
•
Figure 5 "Linux base and applications upgrade for primary or backup
ECM server with EM and adding SM " (page 19)
•
Figure 6 "Linux base and applications upgrade for member server "
(page 20)
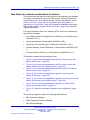
The task flow diagrams contain the following abbreviations:
•
•
•
•
•
SM: Subscriber Manager
ECM: Enterprise Common Manager
EM: Element Manager
CND: Common Network Directory
NRS: Network Routing Service
Nortel Communication Server 1000
Linux Platform Base and Applications Installation and Commissioning
NN43001-315 02.09
29 October 2008
Copyright © 2007–2008 Nortel Networks
.
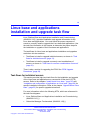
Task flows for individual servers 15
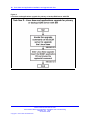
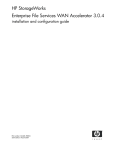
Figure 1
Linux base and applications install for primary or backup ECM server
Nortel Communication Server 1000
Linux Platform Base and Applications Installation and Commissioning
NN43001-315 02.09
29 October 2008
Copyright © 2007–2008 Nortel Networks
.
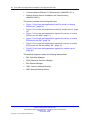
16 Linux base and applications installation and upgrade task flow
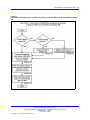
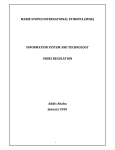
Figure 2
Linux base and applications install for member server
Nortel Communication Server 1000
Linux Platform Base and Applications Installation and Commissioning
NN43001-315 02.09
29 October 2008
Copyright © 2007–2008 Nortel Networks
.
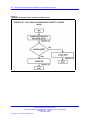
Task flows for individual servers 17
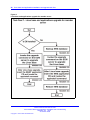
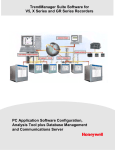
Figure 3
Linux base and applications upgrade for primary or backup ECM server with NRS
Nortel Communication Server 1000
Linux Platform Base and Applications Installation and Commissioning
NN43001-315 02.09
29 October 2008
Copyright © 2007–2008 Nortel Networks
.
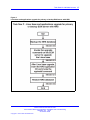
18 Linux base and applications installation and upgrade task flow
Figure 4
Linux base and applications upgrade for primary or backup ECM server with EM
Nortel Communication Server 1000
Linux Platform Base and Applications Installation and Commissioning
NN43001-315 02.09
29 October 2008
Copyright © 2007–2008 Nortel Networks
.
Task flows for individual servers 19
Figure 5
Linux base and applications upgrade for primary or backup ECM server with EM and adding
SM
Nortel Communication Server 1000
Linux Platform Base and Applications Installation and Commissioning
NN43001-315 02.09
29 October 2008
Copyright © 2007–2008 Nortel Networks
.
20 Linux base and applications installation and upgrade task flow
Figure 6
Linux base and applications upgrade for member server
Nortel Communication Server 1000
Linux Platform Base and Applications Installation and Commissioning
NN43001-315 02.09
29 October 2008
Copyright © 2007–2008 Nortel Networks
.
Task flows for common combinations of servers 21
Task flows for common combinations of servers
This section provides high-level task flows for the installation and upgrade
of common combinations of primary ECM servers, backup ECM servers,
single ECM servers, and member servers. Refer to the chapters “Install
Nortel Linux base ” (page 35) and “Installation and configuration of
applications on Linux base” (page 69) for specific installation instructions.
Refer to the chapter “Upgrade Nortel Linux base ” (page 53) for specific
upgrade instructions.
For more information refer to the following NTPs, which are referenced in
the task flow diagrams:
•
Linux Platform Base and Applications Installation and Commissioning
(NN43001-315) ()
•
•
•
Subscriber Manager Fundamentals (NN43001-120) ()
•
Common Network Directory 2.2 Administration (NN43050-101) ()
Enterprise Common Manager Fundamentals (NN43001-116) ()
Element Manager System Reference—Administration (NN43001-632)
()
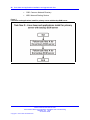
This section contains the following task flows:
•
Figure 7 "Linux base and applications install for primary server with
backup ECM server " (page 22)
•
Figure 8 "Linux base and applications install for primary server with
backup ECM server and member servers " (page 23)
•
Figure 9 "Linux base and applications install for primary ECM server
with member servers" (page 24)
•
Figure 10 "Linux base and applications upgrade for primary with
backup ECM server " (page 25)
•
Figure 11 "Linux base and applications upgrade for primary server with
backup ECM server and member servers " (page 26)
•
Figure 12 "Linux base and applications upgrade for primary ECM
server with member servers " (page 27)
•
Figure 13 "Subscriber Manager installation and configuration" (page
28)
The task flow diagrams contain the following abbreviations:
•
•
•
SM: Subscriber Manager
ECM: Enterprise Common Manager
EM: Element Manager
Nortel Communication Server 1000
Linux Platform Base and Applications Installation and Commissioning
NN43001-315 02.09
29 October 2008
Copyright © 2007–2008 Nortel Networks
.
22 Linux base and applications installation and upgrade task flow
•
•
CND: Common Network Directory
NRS: Network Routing Service
Figure 7
Linux base and applications install for primary server with backup ECM server
Nortel Communication Server 1000
Linux Platform Base and Applications Installation and Commissioning
NN43001-315 02.09
29 October 2008
Copyright © 2007–2008 Nortel Networks
.
Task flows for common combinations of servers 23
Figure 8
Linux base and applications install for primary server with backup ECM server and member
servers
Nortel Communication Server 1000
Linux Platform Base and Applications Installation and Commissioning
NN43001-315 02.09
29 October 2008
Copyright © 2007–2008 Nortel Networks
.
24 Linux base and applications installation and upgrade task flow
Figure 9
Linux base and applications install for primary ECM server with member servers
Nortel Communication Server 1000
Linux Platform Base and Applications Installation and Commissioning
NN43001-315 02.09
29 October 2008
Copyright © 2007–2008 Nortel Networks
.
Task flows for common combinations of servers 25
Figure 10
Linux base and applications upgrade for primary with backup ECM server
Nortel Communication Server 1000
Linux Platform Base and Applications Installation and Commissioning
NN43001-315 02.09
29 October 2008
Copyright © 2007–2008 Nortel Networks
.
26 Linux base and applications installation and upgrade task flow
Figure 11
Linux base and applications upgrade for primary server with backup ECM server and member
servers
Nortel Communication Server 1000
Linux Platform Base and Applications Installation and Commissioning
NN43001-315 02.09
29 October 2008
Copyright © 2007–2008 Nortel Networks
.
Task flows for common combinations of servers 27
Figure 12
Linux base and applications upgrade for primary ECM server with member servers
Nortel Communication Server 1000
Linux Platform Base and Applications Installation and Commissioning
NN43001-315 02.09
29 October 2008
Copyright © 2007–2008 Nortel Networks
.
28 Linux base and applications installation and upgrade task flow
Figure 13
Subscriber Manager installation and configuration
ECM Upgrade Procedures
The following describes the procedures for upgrading an Enterprise
Common Manager (ECM) system from Rls 5.00 to Rls 5.50.
Nortel Communication Server 1000
Linux Platform Base and Applications Installation and Commissioning
NN43001-315 02.09
29 October 2008
Copyright © 2007–2008 Nortel Networks
.
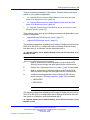
ECM Upgrade Procedures
29
There are several procedures in this section. Perform the first procedure
based on your system configuration:
•
“1a: Upgrade Primary server without Backup server and less than
three or no Member servers” (page 29)
•
“1b: Upgrade Primary server without Backup server and less than
three or no Member servers” (page 29)
•
“1c: Upgrade Primary server with Backup server and three or more
Member servers” (page 30)
Then perform one or both of the following procedures as applicable to your
system configuration:
•
•
“Upgrade Backup ECM Security server” (page 31)
“Upgrade ECM Member server” (page 33)
This procedure describes upgrading the Primary ECM Security server from
Rls 5.00 to Rls 5.50 in a configuration with no Backup ECM server and
less than three or no Member servers associated with it.
1a: Upgrade Primary server without Backup server and less than three or no
Member servers
Step
Action
There are no prerequisites for this procedure.
1
Open a command line interface session to the Primary ECM
Security Server through the serial port with the nortel account.
2
Perform the “Upgrading Nortel Linux base ” (page 54) procedure.
3
Open a command line interface session to the Primary ECM
Security Server through the serial port with the nortel account.
4
Install the following patches onto the Primary ECM Security
server using the “Patching Operation” (page 106) procedure.
•
•
MPLR25520
MPLR25521
--End--
This procedure describes upgrading the Primary ECM Security server from
Rls 5.00 to Rls 5.50 in a configuration with a Backup ECM server and less
than three or no Member servers associated with it.
1b: Upgrade Primary server without Backup server and less than three or no
Member servers
Nortel Communication Server 1000
Linux Platform Base and Applications Installation and Commissioning
NN43001-315 02.09
29 October 2008
Copyright © 2007–2008 Nortel Networks
.
30 Linux base and applications installation and upgrade task flow
Step
Action
There are no prerequisites for this procedure.
1
Open a command line interface session to the Primary ECM
Security Server through the serial port with the nortel account.
2
Switch user to the root account by typing SU and press <enter>.
3
Enter the root user password when prompted.
4
Execute the following script:
/opt/nortel/isclient/setup_ssha.sh deconfig
5
If a Backup ECM Security server is present in the system, switch
user to the root account and execute the script
/opt/nortel/isclient/failOver.sh <FQDN of Primary
ECM Security Server>
where <FQDN of Primary ECM Security Server> is set to the
FQDN of the Primary ECM Security server.
6
Wait for two minutes after the command completes before
proceeding.
7
Switch user back to the nortel account by typing exit.
8
Perform the “Upgrading Nortel Linux base ” (page 54) procedure.
9
Open a command line interface session to the Primary ECM
Security Server through the serial port with the nortel account.
10
Install the following patches onto the Primary ECM Security
server using the “Patching Operation” (page 106) procedure.
•
•
MPLR25520
MPLR25521
--End--
This procedure describes upgrading the Primary ECM Security server from
Rls 5.00 to Rls 5.50 in a configuration with a Backup ECM server and
three or more Member servers associated with it.
1c: Upgrade Primary server with Backup server and three or more Member
servers
Step
Action
There are no prerequisites for this procedure.
1
Open a command line interface session to the Primary ECM
Security Server through the serial port with the nortel account.
2
Switch user to the root account by typing SU and press <enter>.
Nortel Communication Server 1000
Linux Platform Base and Applications Installation and Commissioning
NN43001-315 02.09
29 October 2008
Copyright © 2007–2008 Nortel Networks
.
ECM Upgrade Procedures
31
3
Enter the root user password when prompted.
4
Execute the following script:
/opt/nortel/isclient/setup_ssha.sh deconfig
5
If a Backup ECM Security server is present in the system, switch
user to the root account and execute the script
/opt/nortel/isclient/failOver.sh <FQDN of Primary
ECM Security Server>
where <FQDN of Primary ECM Security Server> is set to the
FQDN of the Primary ECM Security server.
6
Wait for two minutes after the command completes before
proceeding.
7
Switch user back to the nortel account by typing exit.
8
Perform the “Upgrading Nortel Linux base ” (page 54) procedure
up to and including Step 14.
9
Switch user to the root account and disable network connectivity
to the TLAN ethernet port with the command:
ifconfig eth1 down
WARNING
This shuts down the eth1 port.
10
When complete, switch back to the nortel account.
11
Continue with Step 15 of the “Upgrading Nortel Linux base ”
(page 54) procedure.
12
Open a command line interface session to the Primary ECM
Security Server through the serial port with the nortel account.
13
Install the following patches onto the Primary ECM Security
server using the “Patching Operation” (page 106) procedure.
•
•
MPLR25520
MPLR25521
--End--
This procedure describes upgrading the Backup ECM Security server from
Rls 5.00 to Rls 5.50.
Upgrade Backup ECM Security server
Nortel Communication Server 1000
Linux Platform Base and Applications Installation and Commissioning
NN43001-315 02.09
29 October 2008
Copyright © 2007–2008 Nortel Networks
.
32 Linux base and applications installation and upgrade task flow
Step
Action
Prior to upgrading the Backup ECM Security server, the Primary ECM Security
server must be upgraded using one of the previous Upgrade a Primary ECM
Security server procedures.
1
Open a command line interface session to the Primary ECM
Security Server through the serial port with the nortel account.
2
Perform a backup of the Backup ECM Security server data using
the command
sysbackup –b
3
Perform a fresh install of the Nortel Linux base software using
the procedures in “Install Nortel Linux base ” (page 35).
4
Install the CS1000 application software using the procedures
described in “Install the CS 1000 applications” (page 70).
5
Install the following patches onto the Primary ECM Security
server using the “Patching Operation” (page 106) procedure:
•
•
MPLR25520
MPLR25521
6
Open a command line interface session to the Primary ECM
Security Server through the serial port with the nortel account.
7
Switch user to the root account by typing SU and press <enter>.
8
Enter the root user password when prompted.
9
Execute the following script:
/opt/nortel/isclient/setup_ssha.sh deconfig
10
Open a command line interface session to the Primary ECM
Security Server through the serial port with the nortel account.
11
In the command line interface, perform a restore of the ECM
data that was backed up in Step 2, using the command
sysrestore.
12
Switch user to the root account by typing SU and press <enter>.
13
Enter the root user password when prompted.
14
Execute the following script:
/opt/nortel/linuxTrustMgmt/setupNonCA.sh
This script prompts for certificate parameters to create a new
certificate for the Backup ECM Security server.
This script includes re-enabling of the High Availability mode;
therefore, there is no need to perform this separately.
--End--
Nortel Communication Server 1000
Linux Platform Base and Applications Installation and Commissioning
NN43001-315 02.09
29 October 2008
Copyright © 2007–2008 Nortel Networks
.
ECM Upgrade Procedures
33
This procedure describes upgrading an ECM Member server from Rls
5.00 to Rls 5.50. Perform this procedure for each ECM Member server
in the system.Prior to upgrading the Backup ECM Security server, the
Primary ECM Security server must be upgraded using one of the Upgrade
a Primary ECM Security server procedures.
Upgrade ECM Member server
Step
Action
If there is a Backup ECM Security server, it must be upgrading prior to completing
this procedure. Complete the previous procedure.
1
Open a command line interface session to the Primary ECM
Security Server through the serial port with the nortel account.
2
Perform a backup of the ECM Member server data using the
command
sysbackup –b
3
Perform a fresh install of the Nortel Linux base software using
the procedures in “Install Nortel Linux base ” (page 35).
4
Install the CS1000 application software using the procedures
described in “Install the CS 1000 applications” (page 70).
5
Install the following patches onto the Primary ECM Security
server using the “Patching Operation” (page 106) procedure:
•
•
MPLR25520
MPLR25521
6
Open a command line interface session to the Primary ECM
Security Server through the serial port with the nortel account.
7
Perform a restore of the ECM data using the command
sysrestore
8
Switch user to the root account and execute the script
/opt/nortel/linuxTrustMgmt/setupNonCA.sh
This script prompts for certificate parameters to create a new
certificate for the Backup ECM Security server.
--End--
Nortel Communication Server 1000
Linux Platform Base and Applications Installation and Commissioning
NN43001-315 02.09
29 October 2008
Copyright © 2007–2008 Nortel Networks
.
34 Linux base and applications installation and upgrade task flow
Nortel Communication Server 1000
Linux Platform Base and Applications Installation and Commissioning
NN43001-315 02.09
29 October 2008
Copyright © 2007–2008 Nortel Networks
.
35
.
Install Nortel Linux base
Nortel Communication Server 1000 (CS 1000) Linux base introduces
a two-stage installation procedure. The operating system is installed,
and then the applications. You can upgrade the current application
configuration using the existing operating system, or you can reinstall an
application configuration using the existing operating system.
Each Linux server platform requires an installation of the base-level
software. You start the installation from a bootable CD. The process
includes the partitioning of hard disk drives, installation of the Linux kernel
and the Linux root file system, associated device drivers, and the base
system commands and utilities. The process ends with a fully functional
Nortel Linux base server.
The Linux server supports two network interfaces, TLAN and ELAN. The
choice of network interface is based on network topology and application
deployment.
For a definition of the Embedded Local Area Network (ELAN) and the
Telephony Local Area Network (TLAN) see “Network configuration” (page
143).
Prerequisites
Before you install the Linux base you must complete the following tasks:
•
Gather the following necessary customer information:
— ELAN IP address
— ELAN gateway IP address
— ELAN netmask
— The host name associated with the TLAN
Nortel Communication Server 1000
Linux Platform Base and Applications Installation and Commissioning
NN43001-315 02.09
29 October 2008
Copyright © 2007–2008 Nortel Networks
.
36 Install Nortel Linux base
— The domain name
Note: A Fully Qualified Domain Name (FQDN) consists of a
host name and a domain name, and includes a top-level domain
name. Using kwei.ca.nortel.com as an example, kwei is the
host name, ca.nortel.com is the domain name, and .com is the
top-level domain name. The FQDN must contain at least three
fields separated by dots.
— TLAN IP address
— TLAN gateway IP address
— TLAN netmask
— Timezone
— IP address of Network Time Protocol (NTP) Server
— IP address of the Primary Domain Name Service (DNS) server
— Default system gateway associated with the network interface
(ELAN or TLAN)
Note 1: The choice of ELAN or TLAN as the default gateway
NIC can be influenced by the applications that you are going to
deploy on the server and by network topology. For a definition of
ELAN and TLAN see “Network configuration” (page 143).
Note 2: The CLI command routeconfig can be used to add
routing entries. The choice of routing entries will depend upon
the network topology and application deployment. For a list of
Nortel Linux base CLI commands see Table 11 "Nortel Linux
base CLI commands" (page 141).
The base parameters can be changed after the installation is complete
using the CLI command baseparamsconfig. A change in the base
parameters can affect other application components. For example, if
the current server is the Primary ECM security server and the FQDN is
changed it is necessary to reinstall the applications.
The CLI command baseparamsconfig is an umbrella command that
you can use to configure parameters for network settings, Network Time
Protocol settings, date and time settings, and DNS settings. You can
configure these parameters individually by using the CLI commands
Nortel Communication Server 1000
Linux Platform Base and Applications Installation and Commissioning
NN43001-315 02.09
29 October 2008
Copyright © 2007–2008 Nortel Networks
.
Install the Linux base software on the IBM x306m and HP DL320 G4 servers 37
networkconfig, ntpconfig, datetimeconfig, and dnsconfig. For
a list of Nortel Linux base CLI commands see Table 11 "Nortel Linux base
CLI commands" (page 141).
Note: Figure 114 "HP DL320 G4 rear view" (page 125) shows the
ELAN and TLAN network interfaces for the HP DL320 G4 server. Figure
123 "IBM x306m rear view" (page 133) shows the ELAN and TLAN
network interfaces for the IBM x306m server. For a definition of ELAN
and TLAN see “Network configuration” (page 143).
Install the Linux base software on the IBM x306m and HP DL320
G4 servers
Use the following procedure to install the Linux base software. The
installation time for Nortel Linux base is approximately 20 minutes.
Installing the Linux base on the IBM x306m server or HP DL320 G4
ATTENTION
This procedure documents the installation of Nortel Linux base on a commercial
off-the-shelf (COTS) server with no previous Nortel Linux base installation. If a
Nortel Linux base installation exists on the server and you are upgrading to a
newer Nortel Linux base version, see the chapter “Upgrade Nortel Linux base
” (page 53).
Step
Action
1
Connect to the COTS server using a serial console or keyboard,
video monitor, and mouse (kvm).
ATTENTION
Before installing the Linux base, read all of the documentation
provided by the manufacturer of the COTS server.
2
Insert the Linux base bootable CD-ROM in the CD-ROM tray.
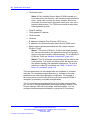
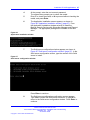
3
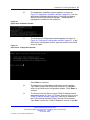
Reboot the server.
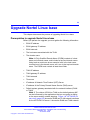
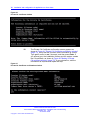
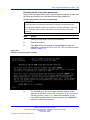
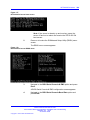
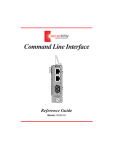
4
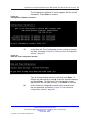
Choose the method of installation as shown in Figure 14 "CS
1000 Linux base system installer" (page 38).
•
To install using a serial console on COM1, type com1 at the
boot prompt and press Enter.
•
To install using an attached keyboard, video monitor, and
mouse, type kvm at the boot prompt and press Enter.
Note: It is not required to attach a keyboard, video monitor
and mouse (KVM) to view output. A console-based installation
will also provide output.
Nortel Communication Server 1000
Linux Platform Base and Applications Installation and Commissioning
NN43001-315 02.09
29 October 2008
Copyright © 2007–2008 Nortel Networks
.
38 Install Nortel Linux base
Figure 14
CS 1000 Linux base system installer
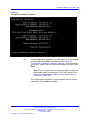
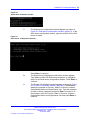
5
Type Y and press Enter as shown in Figure 15 "CS 1000 Linux
base system installer" (page 38).
Figure 15
CS 1000 Linux base system installer
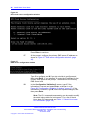
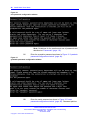
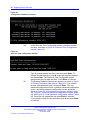
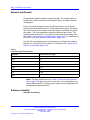
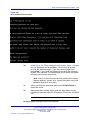
6
The Format all partitions screen appears, as shown in Figure 16
"Format all partitions" (page 39). Press Enter to continue.
Nortel Communication Server 1000
Linux Platform Base and Applications Installation and Commissioning
NN43001-315 02.09
29 October 2008
Copyright © 2007–2008 Nortel Networks
.
Install the Linux base software on the IBM x306m and HP DL320 G4 servers 39
Figure 16
Format all partitions
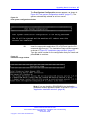
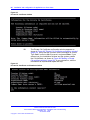
7
At the prompt, select the type of configuration data you wish
to use. Type 1 for Normal installation and press Enter, and
then press Enter again when prompted, as shown in Figure 17
"Configuration data selection window" (page 39).
Figure 17
Configuration data selection window
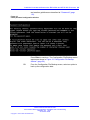
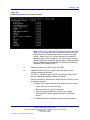
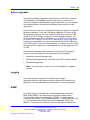
8
The System Configuration screen appears as shown in Figure
18 "System configuration window" (page 40). Press Enter to
continue.
Nortel Communication Server 1000
Linux Platform Base and Applications Installation and Commissioning
NN43001-315 02.09
29 October 2008
Copyright © 2007–2008 Nortel Networks
.
40 Install Nortel Linux base
Figure 18
System configuration window
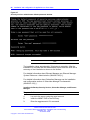
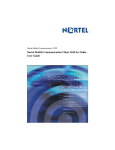
9
When prompted, in the Network configuration screen, enter
the customer information for ELAN IP address, ELAN gateway,
ELAN netmask, hostname, domain name, Machine TLAN IP
address, TLAN gateway, Default gateway, and TLAN netmask
, as shown in Figure 19 "Network configuration window" (page
40).
Figure 19
Network configuration window
Note 1: Figure 114 "HP DL320 G4 rear view" (page
125) shows the ELAN and TLAN network interfaces for the HP
Nortel Communication Server 1000
Linux Platform Base and Applications Installation and Commissioning
NN43001-315 02.09
29 October 2008
Copyright © 2007–2008 Nortel Networks
.
Install the Linux base software on the IBM x306m and HP DL320 G4 servers 41
DL320 G4 server. Figure 123 "IBM x306m rear view" (page
133) shows the ELAN and TLAN network interfaces for the
IBM x306m server. For a definition of ELAN and TLAN see
“Network configuration” (page 143).
Note 2: You can accept the default gateway values or choose
a value that is more appropriate to your needs. The choice of
ELAN or TLAN as the default gateway NIC can be influenced
by the applications that you are going to deploy on the server
and by your network topology. For a definition of ELAN
and TLAN see “Network configuration” (page 143).It is not
necessary to make changes to the default gateway during the
installation. After the installation, the default gateway NIC can
be changed by using the CLI commands baseparamsconfig
or networkconfig. Routing entries can be added or deleted
by using the CLI command routeconfig. For a list of Nortel
Linux base CLI commands see Table 11 "Nortel Linux base
CLI commands" (page 141).
Press Enter to continue. The Configuration Validation 1
screen appears as shown in Figure 23 "Configuration validation
1 window" (page 44).
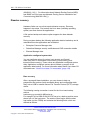
10
In the System Console Redirection screen appears as shown
in Figure 20 "System Console Redirection window" (page 41).
Select the redirection option and press Enter to continue.
Note: This screen appears only if you chose to install using
an attached keyboard, video monitor, and mouse.
Figure 20
System Console Redirection window
11
In the Time zone selection screen type the appropriate region
number at the prompt and then press Enter to continue.
Nortel Communication Server 1000
Linux Platform Base and Applications Installation and Commissioning
NN43001-315 02.09
29 October 2008
Copyright © 2007–2008 Nortel Networks
.
42 Install Nortel Linux base
Figure 21
Time zone selection window
The Time zone selection for region screen appears.
12
At the prompt, in the Timezone Selection for Region screen,
type the appropriate time zone number and then press Enter to
continue.
Nortel Communication Server 1000
Linux Platform Base and Applications Installation and Commissioning
NN43001-315 02.09
29 October 2008
Copyright © 2007–2008 Nortel Networks
.
Install the Linux base software on the IBM x306m and HP DL320 G4 servers 43
Figure 22
Time zone selection for region window
13
In the Configuration Validation 1 screen, type Y for yes or N for
no, and then press Enter to confirm the customer information
for Machine ELAN IP address, ELAN Gateway , ELAN Netmask,
Hostname, FQDN, Machine TLAN IP address, Default TLAN
Gateway, TLAN Netmask, and Timezone, as shown in Figure 23
"Configuration validation 1 window" (page 44). For a definition of
FQDN see "FQDN requirements, page 30" (page 36) .
If you select N, edit the information as required and repeat step
10.
Nortel Communication Server 1000
Linux Platform Base and Applications Installation and Commissioning
NN43001-315 02.09
29 October 2008
Copyright © 2007–2008 Nortel Networks
.
44 Install Nortel Linux base
Figure 23
Configuration validation 1 window
14
In the Network Time Protocol (NTP) Configuration screen, type Y
or N to choose the NTP transfer mode for the system. Type 1, 2,
or 3 and then press Enter to indicate the clock source function of
the Linux system, as shown in Figure 24 "Network time protocol
configuration window" (page 45).
Note: NTP uses Message Digest Algorithm 5 (MD5)
signatures to authenticate the exchange of timestamps when
operating in secure mode.
Nortel Communication Server 1000
Linux Platform Base and Applications Installation and Commissioning
NN43001-315 02.09
29 October 2008
Copyright © 2007–2008 Nortel Networks
.
Install the Linux base software on the IBM x306m and HP DL320 G4 servers 45
Figure 24
Network time protocol configuration window
15
In the NTP Clock Source Configuration screen type E for an
external clock source, or I for an internal clock source, as shown
in Figure 25 "NTP clock source configuration window" (page 45).
Press Enter to continue.
Figure 25
NTP clock source configuration window
16
At the prompt, type the machine TLAN IP address of the
clock source server as shown in Figure 26 "NTP clock source
configuration window" (page 46).
Nortel Communication Server 1000
Linux Platform Base and Applications Installation and Commissioning
NN43001-315 02.09
29 October 2008
Copyright © 2007–2008 Nortel Networks
.
46 Install Nortel Linux base
Figure 26
NTP clock source configuration window
Press Enter to continue.
17
At the prompt, configure the primary DNS server IP address as
shown in Figure 27 "DNS server configuration window" (page
46).
Figure 27
DNS server configuration window
Type Y to configure and N if you do not wish to configure and
then press Enter. If you selected Y , enter the IP address for the
Primary DNS server at the prompt. The default for the Primary
DNS server is N.
18
In the Configuration Validation 2 screen, type Y if the
information is correct and press Enter, as shown in n the
Figure 28 "Configuration Validation 2 window" (page 47). If the
information is incorrect, type N, make the required changes, and
then press Enter.
Note: The CLI command hostconfig can be used to modify
the static lookup table for host names. For a list of Nortel
Linux base CLI commands see Table 11 "Nortel Linux base
CLI commands" (page 141)
Nortel Communication Server 1000
Linux Platform Base and Applications Installation and Commissioning
NN43001-315 02.09
29 October 2008
Copyright © 2007–2008 Nortel Networks
.
Install the Linux base software on the IBM x306m and HP DL320 G4 servers 47
The Configuration Validation 2 screen appears with the correct
information. Press Enter to continue.
Figure 28
Configuration Validation 2 window
19
In the Date and Time Configuration screen, configure the date
and time, as shown in Figure 29 "Date and Time Configuration
window" (page 47).
Figure 29
Date and Time Configuration window
Type Y to keep the date and time, and then press Enter. To
change the date and time, press N, make the required changes,
and press Enter. The Date and Time Configuration screen
appears with the new date and time. Press Enter to continue.
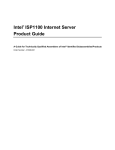
20
In the Password Configuration screen, at the prompt, enter
the root password, as shown in Figure 30 "root password
configuration window" (page 48).
Nortel Communication Server 1000
Linux Platform Base and Applications Installation and Commissioning
NN43001-315 02.09
29 October 2008
Copyright © 2007–2008 Nortel Networks
.
48 Install Nortel Linux base
Figure 30
root password configuration window
Note: Guidelines for the creation and use of passwords are
described at “Passwords” (page 110).
21
Enter the sysadmin password as shown in Figure 31 "sysadmin
password configuration window" (page 48).
Figure 31
sysadmin password configuration window
22
Enter the nortel password as shown in Figure 32 "nortel
password configuration window" (page 49). Password policies
Nortel Communication Server 1000
Linux Platform Base and Applications Installation and Commissioning
NN43001-315 02.09
29 October 2008
Copyright © 2007–2008 Nortel Networks
.
Install the Linux base software on the IBM x306m and HP DL320 G4 servers 49
and creation guidelines are described at “Passwords” (page
110).
Figure 32
nortel password configuration window
Press Enter to continue. The Configuration File Backup screen
appears as shown in Figure 33 "Configuration File Backup
window" (page 50).
23
From the Configuration File Backup screen, select an option to
back up the configuration data.
Nortel Communication Server 1000
Linux Platform Base and Applications Installation and Commissioning
NN43001-315 02.09
29 October 2008
Copyright © 2007–2008 Nortel Networks
.
50 Install Nortel Linux base
Figure 33
Configuration File Backup window
The naming convention for the Linux base backup archive is
hostname-install-yyyy.mm.dd.hh.MM.ss.tar.gz
The name for the backup archive is automatically generated
and includes the key word install to indicate that the archive is
generated as part of the installation or upgrade procedure. For
example, hp3-e-install-2008.09.04.18.54.47.tar.gz is a backup
archive name where hp3-e is the host name. The archive name
begins with the short host name (not the FQDN) and the key
word install, and contains the following fields:
•
•
•
•
•
•
yyyy - year
mm - month
dd - day
hh - hour
MM - minutes
ss - seconds
Note: Nortel Linux base uses the CLI command sysbackup
to back up system data to external storage. You can choose
to back up the data to a USB device or to an SFTP server.
For more information about SFTP data back up, see “Network
configuration for Secure File Transfer Protocol (SFTP) data
backup” (page 143). For a list of Nortel Linux base CLI
commands see Table 11 "Nortel Linux base CLI commands"
(page 141).
Nortel Communication Server 1000
Linux Platform Base and Applications Installation and Commissioning
NN43001-315 02.09
29 October 2008
Copyright © 2007–2008 Nortel Networks
.
Install the Linux base software on the IBM x306m and HP DL320 G4 servers 51
After you back up the configuration data, the Package Installation
screen appears, as shown in Figure 34 "Package Installation
window" (page 51).
Figure 34
Package Installation window
The Post System Configuration screen appears, as shown in
Figure 35 "Post system configuration window" (page 51). The
system automatically reboots as a Linux server.
Figure 35
Post system configuration window
--End--
Nortel Communication Server 1000
Linux Platform Base and Applications Installation and Commissioning
NN43001-315 02.09
29 October 2008
Copyright © 2007–2008 Nortel Networks
.
52 Install Nortel Linux base
Nortel Communication Server 1000
Linux Platform Base and Applications Installation and Commissioning
NN43001-315 02.09
29 October 2008
Copyright © 2007–2008 Nortel Networks
.
53
.
Upgrade Nortel Linux base
This chapter documents the process of upgrading Nortel Linux base.
Prerequisites to upgrade Nortel Linux base
Before you perform the upgrade you must gather the following information:
•
•
•
•
•
ELAN IP address
ELAN gateway IP address
ELAN netmask
The host name associated with the TLAN
The domain name
Note: A Fully Qualified Domain Name (FQDN) consists of a host
name and a domain name, and includes a top-level domain name.
Using kwei.ca.nortel.com as an example, kwei is the host name,
ca.nortel.com is the domain name, and .com is the top-level domain
name. The FQDN must contain at least three fields.
•
•
•
•
•
•
•
TLAN IP address
TLAN gateway IP address
TLAN netmask
Time zone
IP address of Network Time Protocol (NTP) Server
IP address of the Primary Domain Name Service (DNS) server
Default system gateway associated with the network interface (ELAN
or TLAN)
Note 1: The choice of ELAN or TLAN as the default gateway NIC
can be influenced by the applications that you are going to deploy
on the server and by network topology. Figure 114 "HP DL320 G4
rear view" (page 125) shows the ELAN and TLAN network interfaces
for the HP DL320 G4 server. It shows the ELAN and TLAN network
Nortel Communication Server 1000
Linux Platform Base and Applications Installation and Commissioning
NN43001-315 02.09
29 October 2008
Copyright © 2007–2008 Nortel Networks
.
54 Upgrade Nortel Linux base
interfaces for the IBM x306m server. For a definition of ELAN and
TLAN see “Network configuration” (page 143).
Note 2: Use the CLI command routeconfig to add routing
entries. The choice of routing entries will depend upon the network
topology and application deployment. For a list of Nortel Linux base
CLI commands see Table 11 "Nortel Linux base CLI commands"
(page 141).
You can change the base parameters after the upgrade is complete using
the CLI command baseparamsconfig. A change in the base parameters
can impact other application components. For example, if the current
server is the Primary ECM security server and the FQDN changes it is
necessary to reinstall the applications.
The CLI command baseparamsconfig is an umbrella command that
you can use to configure parameters for network settings, Network
Time Protocol settings, date and time settings, and DNS settings.
These parameters can also be configured individually by using the CLI
commands networkconfig, ntpconfig, datetimeconfig, and
dnsconfig. For a list of Nortel Linux base CLI commands see Table 11
"Nortel Linux base CLI commands" (page 141).
Upgrading Nortel Linux base
Use the following procedure to upgrade Nortel Linux base.
The time required to upgrade the Linux base is approximately 20 minutes.
The time required to upgrade the Nortel Linux base applications is
approximately 1 hour. Additionally, 30 minutes is required for Enterprise
Common Manager (ECM) configuration.
Upgrading Nortel Linux base
Step
Action
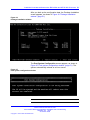
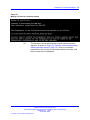
1
Insert the Linux base installation CD for the latest release and
use the CLI command upgrade to begin the upgrade process.
You are asked to continue with the upgrade, as shown in Figure
36 "Backup data window" (page 55). Type Y and press Enter
to continue. You are given the option to back up the data to an
external source. To back up data to an external source type
Y and press Enter. Select a backup media and supply the
necessary details. For more information about SFTP data back
up, see “Network configuration for Secure File Transfer Protocol
(SFTP) data backup” (page 143)Press Enter to continue.
Nortel Communication Server 1000
Linux Platform Base and Applications Installation and Commissioning
NN43001-315 02.09
29 October 2008
Copyright © 2007–2008 Nortel Networks
.
Upgrading Nortel Linux base 55
Figure 36
Backup data window
2
Confirm the values for the Local machine IP address, Local
machine netmask, Gateway, SFTP server’s IP address, SFTP
userid, SFTP password, and the SFTP directory as shown in the
Figure 37 "Remote Configuration File Validation window" (page
56).
Type Y to confirm the values and press Enter to continue.
Note: This example uses the choice of data backup to an
SFTP server. Data backup to a USB device will produce
different screens.
Nortel Communication Server 1000
Linux Platform Base and Applications Installation and Commissioning
NN43001-315 02.09
29 October 2008
Copyright © 2007–2008 Nortel Networks
.
56 Upgrade Nortel Linux base
Figure 37
Remote Configuration File Validation window
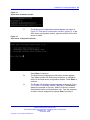
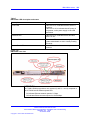
3
The backup archive name generates and you are prompted to
continue, as shown in Figure 38 "Backup data window 2" (page
56). Type Y to continue. The backup operation finishes and you
are prompted to insert the Linux base upgrade CD. Press Enter
after you insert the CD to reboot the system.
Figure 38
Backup data window 2
4
The CS 1000 Linux base system installer screen appears, as
shown in Figure 39 "CS 1000 Linux base system installer" (page
57). Choose one of the following methods of installation:
Nortel Communication Server 1000
Linux Platform Base and Applications Installation and Commissioning
NN43001-315 02.09
29 October 2008
Copyright © 2007–2008 Nortel Networks
.
Upgrading Nortel Linux base 57
•
To install using a serial console on COM1, type com1 at the
boot prompt and press Enter. to continue.
•
To install using an attached keyboard, video monitor, and
mouse, type kvm at the boot prompt and press Enter. to
continue.
Note: It is not required to attach a keyboard, video monitor
and mouse (KVM) to view output. A console-based installation
will also provide output.
Figure 39
CS 1000 Linux base system installer
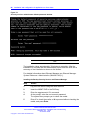
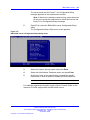
5
The Installation of New Linux Base Operating System screen
appears, as shown in Figure 40 "Installation of New Linux Base
Operating System window" (page 58). Type Y to accept the new
installation. Press Enter to continue.
Nortel Communication Server 1000
Linux Platform Base and Applications Installation and Commissioning
NN43001-315 02.09
29 October 2008
Copyright © 2007–2008 Nortel Networks
.
58 Upgrade Nortel Linux base
Figure 40
Installation of New Linux Base Operating System window
6
The Existing Configuration Partition Usage window appears,
as shown in Figure 41 "Existing Configuration Partition Usage
window" (page 59).
If this re-installation is due to a possible disk corruption, Nortel
recommends that you format this partition. Type Y to format the
partition.
If this re-installation is not due to disk corruption, leaving this
partition is a safe option. Type N to maintain the partition.
Press Enter to continue.
Nortel Communication Server 1000
Linux Platform Base and Applications Installation and Commissioning
NN43001-315 02.09
29 October 2008
Copyright © 2007–2008 Nortel Networks
.
Upgrading Nortel Linux base 59
Figure 41
Existing Configuration Partition Usage window
7
The Existing Partitions window appears as shown in Figure 42
"Existing Partitions window" (page 59). Press Enter to continue.
Figure 42
Existing Partitions window
8
The Configuration Data Selection window appears, as shown in
Figure 43 "Configuration Data Selection window" (page 60).
Nortel Communication Server 1000
Linux Platform Base and Applications Installation and Commissioning
NN43001-315 02.09
29 October 2008
Copyright © 2007–2008 Nortel Networks
.
60 Upgrade Nortel Linux base
Figure 43
Configuration Data Selection window
Type the option number corresponding to the data source that
you want to use and press Enter to continue.
Note: In this example the Figure 44 "Remote Configuration
File Operation window" (page 61) appears because option
3 is selected in the Figure 17 "Configuration data selection
window" (page 39). If you choose a different data configuration
option, different screens display.
9
For this example, option 3 is shown to illustrate the use of
previously backed up data during the Linux Base installation.
Enter the values for the ELAN IP address, ELAN gateway IP
address, ELAN netmask, secure FTP server’s IP address, SFTP
logon name, SFTP password, and the remote SFTP directory
as shown in the Figure 44 "Remote Configuration File Operation
window" (page 61).
Nortel Communication Server 1000
Linux Platform Base and Applications Installation and Commissioning
NN43001-315 02.09
29 October 2008
Copyright © 2007–2008 Nortel Networks
.
Upgrading Nortel Linux base 61
Figure 44
Remote Configuration File Operation window
Press Enter to continue.
10
Confirm the values for the Local machine IP address, Local
machine netmask, Gateway, SFTP server’s IP address, SFTP
userid, SFTP password, and the SFTP directory as shown in the
Figure 45 "Remote Configuration File Validation window" (page
61).
Type Y to confirm the values and press Enter to continue.
Figure 45
Remote Configuration File Validation window
11
The File Selection window appears as shown in Figure 46 "File
Selection window" (page 62). Type the option number for the
file name that corresponds to the backup archive you created in
step2, shown in Figure 38 "Backup data window 2" (page 56).
Nortel Communication Server 1000
Linux Platform Base and Applications Installation and Commissioning
NN43001-315 02.09
29 October 2008
Copyright © 2007–2008 Nortel Networks
.
62 Upgrade Nortel Linux base
Figure 46
File Selection window
12
In the Configuration Validation 1 screen, type Y for yes or N for
no, and then press Enter to confirm the customer information for
Machine ELAN IP, ELAN Gateway, ELAN Netmask, Hostname,
FQDN, Machine TLAN IP, Default TLAN Gateway, TLAN
Netmask, and Timezone, as shown in Figure 47 "Configuration
validation 1 window" (page 63). For a definition of FQDN see
"FQDN requirements, page 30" (page 36) .
If you select N, edit the information as required and repeat step
10.
Nortel Communication Server 1000
Linux Platform Base and Applications Installation and Commissioning
NN43001-315 02.09
29 October 2008
Copyright © 2007–2008 Nortel Networks
.
Upgrading Nortel Linux base 63
Figure 47
Configuration validation 1 window
13
In the Configuration Validation 2 screen, type Y if the information
is correct and press Enter, as shown in n the Figure 48
"Configuration Validation 2 window" (page 64). If the information
is incorrect, type N, make the required changes, and then press
Enter.
Note: The CLI command hostconfig is used to modify the
static lookup table for host names. For a list of Nortel Linux
base CLI commands see Table 11 "Nortel Linux base CLI
commands" (page 141)
The Configuration Validation 2 screen appears with the correct
information. Press Enter to continue.
Nortel Communication Server 1000
Linux Platform Base and Applications Installation and Commissioning
NN43001-315 02.09
29 October 2008
Copyright © 2007–2008 Nortel Networks
.
64 Upgrade Nortel Linux base
Figure 48
Configuration Validation 2 window
14
In the Date and Time Configuration screen, configure the date
and time, as shown in Figure 49 "Date and Time Configuration
window" (page 64).
Figure 49
Date and Time Configuration window
Type Y to keep the date and time, and then press Enter. To
change the date and time, press N, make the required changes,
and press Enter. The Date and Time Configuration screen
appears with the new date and time. Press Enter to continue.
15
The Existing Password Data screen appears, as shown in Figure
50 "Existing Password Data window" (page 65). If you choose
to enter new passwords type Y and press Enter. The root
password configuration screen, sysadmin password configuration
screen, and nortel password configuration screen appear as
shown in Figure 30 "root password configuration window" (page
48), Figure 31 "sysadmin password configuration window" (page
48), and Figure 32 "nortel password configuration window" (page
49). Enter the new passwords and press Enter to continue.
If you choose to keep the old passwords type N and press Enter
to continue.
Nortel Communication Server 1000
Linux Platform Base and Applications Installation and Commissioning
NN43001-315 02.09
29 October 2008
Copyright © 2007–2008 Nortel Networks
.
Upgrading Nortel Linux base 65
Figure 50
Existing Password Data window
16
The System-wide data recovery screen appears, as show in
Figure 51 "System-Wide Data Recovery window" (page 65).
If you want to recover the system-wide data, select Y.
If you do not want to recover the system-wide data, select N.
Press Enter to continue.
Figure 51
System-Wide Data Recovery window
17
The Configuration File Backup screen appears, as shown in
Figure 52 "Configuration File Backup window" (page 65). Select
an option to back up the configuration data.
Figure 52
Configuration File Backup window
The naming convention for the Linux base backup archive is
hostname-install-yyyy.mm.dd.hh.MM.ss.tar.gz
The name for the backup archive is automatically generated
and includes the key word install to indicate that the archive is
generated as part of the installation or upgrade procedure. For
example, hp3-e-install-2008.09.04.18.54.47.tar.gz is a backup
archive name where hp3-e is the host name. The archive name
begins with the short host name (not the FQDN) and the key
word install, and contains the following fields:
Nortel Communication Server 1000
Linux Platform Base and Applications Installation and Commissioning
NN43001-315 02.09
29 October 2008
Copyright © 2007–2008 Nortel Networks
.
66 Upgrade Nortel Linux base
•
•
•
•
•
•
yyyy—year
mm—month
dd—day
hh—hour
MM—minutes
ss—seconds
Note: Nortel Linux base uses the CLI command sysbackup
to backup system data to external storage. You can choose to
back up the data to a USB device or to an SFTP server. For
more information about SFTP data back up, see “Network
configuration for Secure File Transfer Protocol (SFTP) data
backup” (page 143). For a list of Nortel Linux base CLI
commands see Table 11 "Nortel Linux base CLI commands"
(page 141).
After you back up the configuration data, the Package
Installation screen appears, as shown in Figure 53 "Package
Installation window" (page 66).
Figure 53
Package Installation window
Nortel Communication Server 1000
Linux Platform Base and Applications Installation and Commissioning
NN43001-315 02.09
29 October 2008
Copyright © 2007–2008 Nortel Networks
.
Upgrading Nortel Linux base 67
The Post System Configuration screen appears, as shown in
Figure 54 "Post system configuration window" (page 67). The
system automatically reboots as a Linux server.
Figure 54
Post system configuration window
18
Insert the appropriate application CD or DVD and type the CLI
command appinstall. The Installation Stage window appears
as shown in Figure 55 "Installation stage window" (page 67).
Type the option number for the configuration that you chose and
press Enter to continue.
Figure 55
Installation stage window
Note: If you are installing ECM/EM/SM, the Application
Installation window appears instead, as shown in Figure 56
"Application Installation window" (page 68).
Nortel Communication Server 1000
Linux Platform Base and Applications Installation and Commissioning
NN43001-315 02.09
29 October 2008
Copyright © 2007–2008 Nortel Networks
.
68 Upgrade Nortel Linux base
Figure 56
Application Installation window
19
In the Figure 57 "Restore Application Data window" (page
68) you are given a prompt to restore application data. Type Y or
N to restore or reject the data. Press Enter to continue.
Figure 57
Restore Application Data window
At this point see the chapter “Installation and configuration of
applications on Linux base” (page 69). In the section “Install
the CS 1000 applications” (page 70) choose the installation
procedure for the application that you want to install, and follow
the instructions to complete the installation.
The system upgrade is complete after the installation of the
applications is finished.
--End--
Nortel Communication Server 1000
Linux Platform Base and Applications Installation and Commissioning
NN43001-315 02.09
29 October 2008
Copyright © 2007–2008 Nortel Networks
.
69
.
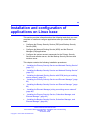
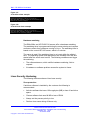
Installation and configuration of
applications on Linux base
This section provides information about the following tasks that you must
complete to install and configure applications after you install the Linux
base.
•
Configure the Primary Security Service (PSS) and Backup Security
Service (BSS)
•
Configure the Network Routing Service (NRS) and the Element
Manager (EM) applications
•
Configure the system account passwords for the Primary Security
Service and member server, and the Backup Security Services and
member server
This chapter contains the following installation procedures:
•
“Installing the Primary Security Service and Network Routing Service”
(page 71)
•
“Installing the Backup Security Service and Network Routing Service”
(page 76)
•
“Installing the Network Routing Service with ECM joining an existing
secure network” (page 79)
•
“Installing the Primary Security Service and Element Manager” (page
82)
•
“Installing the Backup Security Service and Element Manager” (page
86)
•
“Installing the Element Manager joining an existing secure network”
(page 89)
•
“Installing the Primary Security Service, Subscriber Manager, and
Element Manager” (page 92)
•
“Installing the Backup Security Service, Subscriber Manager, and
Element Manager” (page 96)
Nortel Communication Server 1000
Linux Platform Base and Applications Installation and Commissioning
NN43001-315 02.09
29 October 2008
Copyright © 2007–2008 Nortel Networks
.
70 Installation and configuration of applications on Linux base
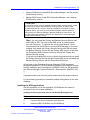
Prerequisites to install and configure applications
You must install the Communication Server 1000 (CS 1000) Linux base
software on the HP DL320 G4 or the IBM x306m servers before they
can install the applications. The Linux base software contains the Linux
operating system, the framework software, and the required third-party
software such as the Web server and Java runtime environment (JRE).
Before you install the Linux applications you must run host configuration
scripts on every server in the Enterprise Common Manager (ECM) domain.
For more information on running host configuration scripts see the Host
configuration section of Enterprise Common Manager Fundamentals
(NN43001-116) () .
WARNING
Nortel Linux applications are supported only on Nortel CS 1000
Linux base. Nortel Linux applications do not function on other
versions of Linux.
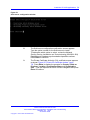
Install the CS 1000 applications
Use the following procedures to run the application CD-ROM or DVD
and install the applications. There is a CD for NRS applications that
contains three application configurations and a DVD for Element Manager
applications (MGMT DVD) that contains five application configurations.
The installation of Nortel Linux applications takes approximately 1 hour
to complete. Additionally, 30 minutes is required for Enterprise Common
Manager (ECM) configuration.
The NRS CD contains the following configuration options:
•
Primary ECM Server (install NRS and the primary ECM security
service)
•
•
Backup ECM Server (install NRS and a backup ECM security service)
Member Server (install NRS with ECM joining an existing secure
network)
The MGMT DVD contains the following configuration options:
•
•
•
Primary ECM Server (install EM and the primary ECM security service)
Backup ECM Server (install EM and a backup ECM security service)
Member Server (install EM with ECM joining an existing secure
network)
Nortel Communication Server 1000
Linux Platform Base and Applications Installation and Commissioning
NN43001-315 02.09
29 October 2008
Copyright © 2007–2008 Nortel Networks
.
Install the CS 1000 applications
71
•
Primary ECM Server (install EM, Subscriber Manager, and the primary
ECM security service)
•
Backup ECM Server (install EM, Subscriber Manager, and a backup
ECM security service)
ATTENTION
The first Linux server must be installed with the primary security service. Install
the second Linux server with the backup security service, and then install
any other required Linux servers. After the installation is complete for each
installation option, you must log on to ECM and add the element (Network
Routing Service or Element Manager) that was installed on each server. For
more information about adding elements, see Enterprise Common Manager
Fundamentals (NN43001-116) () .
Note: You can install the Primary and Backup Security Service with
either NRS or EM. The load on the NRS server is usually heavier
than the EM server. To optimize the servers load balance, Nortel
recommends that if both EM on Linux and NRS Manager on Linux are
installed, then install the Primary Security Service with EM and install
the Backup Security Service with the Primary NRS server. In this case
the Secondary NRS becomes a security client of the Primary and
Backup Security servers.
If you are not installing EM on Linux, Nortel recommends that you install
the Primary Security Service with the Primary NRS server and install the
Backup Security Service with the Secondary NRS server.
At first logon to the Enterprise Common Manager (ECM) framework,
change the password. For NRS password guidelines see Network Routing
Service Installation and Commissioning (NN43001-564); for EM guidelines
see Element Manager System Reference—Administration (NN43001-632)
() .
If a password does not meet the policy requirements, the system rejects it.
For the following procedures, installation initiates configuration of the solid
database.
Installing the NRS applications
Use this procedure to run the application CD-ROM after the reboot is
complete for the Linux base installation.
Installing the Primary Security Service and Network Routing Service
Step
Action
1
Log on to the server using the nortel account.
2
Insert the NRS CD-ROM in the CD-ROM tray.
Nortel Communication Server 1000
Linux Platform Base and Applications Installation and Commissioning
NN43001-315 02.09
29 October 2008
Copyright © 2007–2008 Nortel Networks
.
72 Installation and configuration of applications on Linux base
3
Enter the appinstall CLI command.
4
At the prompt, enter the root account password.
The system then prompts you to check the media.
5
Enter Y to check the media, or N to proceed without checking the
media, and press Enter.
6
The Application installation screen appears, as shown in
Figure 58 "Application Installation window" (page 72). From the
Application installation window select 1 to install the Primary
Security Service with NRS. The appropriate packages are
installed to the hard drive.
Figure 58
Application Installation window
7
The Solid server configuration confirmation screen appears.
Confirm the server selection by selecting Yes, or return to the
Solid server configuration window by selecting No. Press Enter
to continue.
Nortel Communication Server 1000
Linux Platform Base and Applications Installation and Commissioning
NN43001-315 02.09
29 October 2008
Copyright © 2007–2008 Nortel Networks
.
Install the CS 1000 applications
73
Figure 59
Solid server configuration window
8
The Solid server configuration confirmation screen appears.
Type the option number for the Solid server to install.
To determine which option to select, review the Network
Routing Service Installation and Commissioning (NN43001-564)
Database and Database synchronization/operation sections.
Press Enter to continue.
9
The Private Certificate Authority (CA) certificate screen appears
as shown Figure 60 "Private CA certificate window" (page
74). Press Enter to display the prompts for Country, State or
Province, Location, Organization Name and Organization
Unit . Type the response for each of these categories and press
Enter to continue.
Nortel Communication Server 1000
Linux Platform Base and Applications Installation and Commissioning
NN43001-315 02.09
29 October 2008
Copyright © 2007–2008 Nortel Networks
.
74 Installation and configuration of applications on Linux base
Figure 60
Private CA certificate window
10
The Private CA Certificate confirmation screen appears as
shown in Figure 61 "Private CA Certificate confirmation window"
(page 74). Verify that the common name information is correct.
Type yes if correct or no if incorrect, and then press Enter. If
you entered yes, the installation finishes and the system creates
the CA certificate, as shown in Figure 62 "Making a Private
CA certificate window" (page 75). If you selected no, edit the
information as required and repeat the step.
Figure 61
Private CA Certificate confirmation window
Nortel Communication Server 1000
Linux Platform Base and Applications Installation and Commissioning
NN43001-315 02.09
29 October 2008
Copyright © 2007–2008 Nortel Networks
.
Install the CS 1000 applications
75
Figure 62
Making a Private CA certificate window
11
The Security services administrator default password screen
appears, as shown in Figure 63 "Security services administrator
default password window" (page 76). Enter a new default
password for the security services administrator accounts, and
then re-enter the new password.
Nortel Communication Server 1000
Linux Platform Base and Applications Installation and Commissioning
NN43001-315 02.09
29 October 2008
Copyright © 2007–2008 Nortel Networks
.
76 Installation and configuration of applications on Linux base
Figure 63
Security services administrator default password window
--End--
The installation takes approximately 30 minutes to complete. After the
installation is complete the disk automatically ejects from the drive and a
summary of the installation is shown on the screen.
For detailed information about NRS see Network Routing Service
Installation and Commissioning (NN43001-564) () .
Installing the Backup Security Service and Network Routing Service
Step
Action
1
Log on to the server using the nortel account.
2
Insert the NRS CD-ROM in the CD-ROM tray.
3
Enter the appinstall CLI command
4
At the prompt, enter the root account password.
The system then prompts you to check the media.
5
Enter Y to check the media, or N to proceed without checking the
media, and press Enter.
Nortel Communication Server 1000
Linux Platform Base and Applications Installation and Commissioning
NN43001-315 02.09
29 October 2008
Copyright © 2007–2008 Nortel Networks
.
Install the CS 1000 applications
6
77
The Application installation screen appears, as shown in
Figure 64 "Application Installation window" (page 77). From the
Application installation window select 2 to install the Backup
Security Service with NRS. The appropriate packages are
installed to the hard drive.
Figure 64
Application Installation window
7
The Solid server window appears, as shown in Figure 65 "Solid
server configuration window" (page 77). In the Solid server
configuration screen, type the option number of the Solid server
to install and press Enter.
Figure 65
Solid server configuration window
Press Enter to continue.
8
The Solid server configuration confirmation screen appears.
Confirm the server selection by selecting Yes, or return to the
Nortel Communication Server 1000
Linux Platform Base and Applications Installation and Commissioning
NN43001-315 02.09
29 October 2008
Copyright © 2007–2008 Nortel Networks
.
78 Installation and configuration of applications on Linux base
Solid server configuration window by selecting No. Press Enter
to continue.
9
The Primary Security Service server TLAN IP address screen
appears as shown in Figure 66 "Primary Security Service server
TLAN IP address window" (page 78). Enter the IP address of the
TLAN network interface Primary Security Service server. Type
yes to confirm the TLAN IP address is correct.
Figure 66
Primary Security Service server TLAN IP address window
10
The Primary Security Service server Fully Qualified Domain
Name (FQDN) appears as shown in Figure 67 "Primary Security
Service server Fully Qualified Domain name window" (page 78).
Enter the Fully Qualified Domain name of the Primary Security
Service server. Type Yes to confirm the FQDN is correct. For
a definition of FQDN see "FQDN requirements, page 30" (page
36) .
Figure 67
Primary Security Service server Fully Qualified Domain name window
Note:
11
•
The Primary Security Service must be up and running
at this point.
•
You need to know the password for the nortel
account on the Primary Security Service server.
Installation fails if you do not know this password.
The Primary Security Service fingerprint screen appears as
shown in Figure 68 "Primary Security Service fingerprint window"
(page 79). Type Yes to verify the Primary Security Service
fingerprint.
Nortel Communication Server 1000
Linux Platform Base and Applications Installation and Commissioning
NN43001-315 02.09
29 October 2008
Copyright © 2007–2008 Nortel Networks
.
Install the CS 1000 applications
79
Figure 68
Primary Security Service fingerprint window
12
The nortel password screen appears. Type the password of the
nortel account and press Enter. The connection to the Primary
Security Service server is complete.
The installation takes approximately 30 minutes to complete.
After the installation is complete the disk automatically ejects
from the drive and a summary of the installation is shown on the
screen.
For detailed information about NRS, see Network Routing
Service Installation and Commissioning (NN43001-564) () .
--End--
Installing the Network Routing Service with ECM joining an existing secure
network
Step
Action
1
Log on to the server using the nortel account.
2
Insert the NRS CD-ROM in the CD-ROM tray.
3
Enter the appinstall CLI command
4
At the prompt, enter the root account password.
The system then prompts you to check the media.
5
Enter Y to check the media, or N to proceed without checking the
media, and press Enter.
6
The Application installation screen appears, as shown in
Figure 69 "Application Installation window" (page 80). From the
Application installation window, select 3 to install the Network
Routing Service with ECM joining an existing secure network.
The appropriate packages are installed to the hard drive.
Nortel Communication Server 1000
Linux Platform Base and Applications Installation and Commissioning
NN43001-315 02.09
29 October 2008
Copyright © 2007–2008 Nortel Networks
.
80 Installation and configuration of applications on Linux base
Figure 69
Application Installation window
7
The Solid server configuration window appears, as shown in
Figure 70 "Solid server configuration window" (page 80). In the
Solid server configuration screen, type the number of the Solid
server to install.
Figure 70
Solid server configuration window
Press Enter to continue.
8
The Solid server configuration confirmation screen appears.
Confirm the server selection by selecting Yes, or return to the
Solid server configuration window by selecting No. Press Enter
to continue.
9
The Primary Security Service server TLAN IP address screen
appears as shown in Figure 71 "Primary Security Service server
TLAN IP address window" (page 81). Enter the IP address of the
Nortel Communication Server 1000
Linux Platform Base and Applications Installation and Commissioning
NN43001-315 02.09
29 October 2008
Copyright © 2007–2008 Nortel Networks
.
Install the CS 1000 applications
81
TLAN network interface Primary Security Service server. Type
Yes to confirm the TLAN IP address is correct.
Figure 71
Primary Security Service server TLAN IP address window
10
The Primary Security Service server Fully Qualified Domain
Name (FQDN) appears as shown in Figure 72 "Primary Security
Service server Fully Qualified Domain name window" (page 81).
Enter the Fully Qualified Domain name of the Primary Security
Service server. Type Yes to confirm the FQDN is correct. For
a definition of FQDN see "FQDN requirements, page 30" (page
36) .
Figure 72
Primary Security Service server Fully Qualified Domain name window
Note:
11
•
The Primary Security Service must be up and running
at this point.
•
You need to know the password for the nortel
account on the Primary Security Service server.
Installation will fail if you do not know this password.
The Primary Security Service fingerprint screen appears as
shown in Figure 73 "Primary Security Service fingerprint window"
(page 82). Type Yes to verify the Primary Security Service
fingerprint.
Nortel Communication Server 1000
Linux Platform Base and Applications Installation and Commissioning
NN43001-315 02.09
29 October 2008
Copyright © 2007–2008 Nortel Networks
.
82 Installation and configuration of applications on Linux base
Figure 73
Primary Security Service fingerprint window
12
The nortel password screen appears. Type the password of the
nortel account and press Enter. The connection to the Primary
Security Service server is complete.
The installation takes approximately 30 minutes to complete.
After the installation is complete the disk automatically ejects
from the drive and a summary of the installation is shown on the
screen.
For detailed information about NRS, see Network Routing
Service Installation and Commissioning (NN43001-564) () .
--End--
Install the Element Manager applications
Use this procedure to run the application DVD after the reboot is complete
for the Linux base install.
Installing the Primary Security Service and Element Manager
Step
Action
1
Log on to the server using the nortel account.
2
Insert the MGMT DVD in the DVD tray.
3
Enter the appinstall CLI command.
4
At the prompt, enter the root account password.
The system then prompts you to check the media.
5
Enter Y to check the media, or N to proceed without checking the
media, and press Enter.
6
The Application Installation screen appears, as shown in
Figure 74 "Application Installation window" (page 83). From the
Application installation window select 1 to install the Primary
Security Service with Element Manager. The appropriate
packages are installed to the hard drive.
Nortel Communication Server 1000
Linux Platform Base and Applications Installation and Commissioning
NN43001-315 02.09
29 October 2008
Copyright © 2007–2008 Nortel Networks
.
Install the CS 1000 applications
Figure 74
Application Installation window
7
The Solid server configuration window appears, as shown in
Figure 75 "Solid server configuration window" (page 83). In the
Solid server configuration screen, type the number of the Solid
server to install.
Figure 75
Solid server configuration window
Press Enter to continue.
8
The Solid server configuration confirmation screen appears.
Type Yes to confirm the Solid server selection, or type No to
return to the Solid server configuration window. Press Enter to
continue.
9
The Private CA certificate window appears as shown in Figure
76 "Private CA certificate window" (page 84). Press Enter to
display the prompts for Country, State or Province, Location,
Organization Name and Organization Unit. Type the response
for each of these categories and press Enter to continue.
Nortel Communication Server 1000
Linux Platform Base and Applications Installation and Commissioning
NN43001-315 02.09
29 October 2008
Copyright © 2007–2008 Nortel Networks
.
83
84 Installation and configuration of applications on Linux base
Figure 76
Private CA certificate window
10
The Private CA Certificate confirmation window appears as
shown in Figure 77 "Private CA Certificate confirmation window"
(page 84). Verify that the common name information is correct.
Type Yes if correct or No if incorrect, and press Enter. If you
enter yes, the installation finishes and the system creates
the CA certificate, as shown in Figure 62 "Making a Private
CA certificate window" (page 75). If you enter no, edit the
information as required and repeat the step.
Figure 77
Private CA Certificate confirmation window
Nortel Communication Server 1000
Linux Platform Base and Applications Installation and Commissioning
NN43001-315 02.09
29 October 2008
Copyright © 2007–2008 Nortel Networks
.
Install the CS 1000 applications
85
Figure 78
Making a Private CA certificate window
11
The Security services administrator default password screen
appears, as shown in Figure 79 "Security services administrator
default password window" (page 86). Enter a new default
password for the security services administrator accounts, and
then re-enter the new password.
Nortel Communication Server 1000
Linux Platform Base and Applications Installation and Commissioning
NN43001-315 02.09
29 October 2008
Copyright © 2007–2008 Nortel Networks
.
86 Installation and configuration of applications on Linux base
Figure 79
Security services administrator default password window
--End--
The installation takes approximately 30 minutes to complete. After the
installation is complete the disk automatically ejects from the drive and a
summary of the installation is shown on the screen.
For detailed information about Element Manager see Element Manager
System Reference—Administration (NN43001-632) () .
Installing the Backup Security Service and Element Manager
Step
Action
1
Log on to the server using the nortel account.
2
Insert the MGMT DVD in the DVD tray.
3
Enter the appinstall CLI command.
4
At the prompt, enter the root account password.
The system then prompts you to check the media.
5
Enter Y to check the media, or N to proceed without checking the
media, and press Enter.
Nortel Communication Server 1000
Linux Platform Base and Applications Installation and Commissioning
NN43001-315 02.09
29 October 2008
Copyright © 2007–2008 Nortel Networks
.
Install the CS 1000 applications
6
87
The Application Installation screen appears, as shown in
Figure 74 "Application Installation window" (page 83). From the
Application installation window select 2 to install the Backup
Security Service with Element Manager. The appropriate
packages are installed to the hard drive.
Figure 80
Application Installation window
7
The Solid server configuration window appears, as shown in
Figure 81 "Solid server configuration window" (page 87). In the
Solid server configuration screen, type the number of the Solid
server to install.
Figure 81
Solid server configuration window
Press Enter to continue.
8
The Solid server configuration confirmation screen appears.
Type Yes to confirm the Solid server selection, or type No to
return to the Solid server configuration window. Press Enter to
continue.
9
The Primary Security Service server TLAN IP address screen
appears as shown in Figure 82 "Primary Security Service server
TLAN IP address window" (page 88). Enter the IP address of
the TLAN network interface Primary Security Service server.
Type Yes to confirm the TLAN IP address is correct or type No
Nortel Communication Server 1000
Linux Platform Base and Applications Installation and Commissioning
NN43001-315 02.09
29 October 2008
Copyright © 2007–2008 Nortel Networks
.
88 Installation and configuration of applications on Linux base
to return to the Primary Security Service server TLAN IP address
screen. Press Enter to continue.
Figure 82
Primary Security Service server TLAN IP address window
10
The Primary Security Service server Fully Qualified Domain
Name (FQDN) screen appears as shown in Figure 83 "Primary
Security Service server Fully Qualified Domain name window"
(page 88). Enter the Fully Qualified Domain name of the Primary
Security Service server. Type Yes to confirm the FQDN is
correct or type No to return to the Primary Security Service
server Fully Qualified Domain Name screen. For a definition of
FQDN see "FQDN requirements, page 30" (page 36) . Press
Enter to continue.
Figure 83
Primary Security Service server Fully Qualified Domain name window
Note:
11
•
The Primary Security Service must be up and running
at this point.
•
You need to know the password for the nortel
account on the Primary Security Service server.
Installation fails if you do not know this password.
The Primary Security Service fingerprint screen appears as
shown in Figure 84 "Primary Security Service fingerprint window"
(page 89). Type Yes to verify the Primary Security Service
fingerprint.
Nortel Communication Server 1000
Linux Platform Base and Applications Installation and Commissioning
NN43001-315 02.09
29 October 2008
Copyright © 2007–2008 Nortel Networks
.
Install the CS 1000 applications
89
Figure 84
Primary Security Service fingerprint window
12
The nortel password screen appears. Type the password of the
nortel account and press Enter. The connection to the Primary
Security Service server is complete and the installation finishes.
The installation takes approximately 30 minutes to complete.
After the installation is complete the disk automatically ejects
from the drive and a summary of the installation is shown on the
screen.
For detailed information about Element Manager see Element
Manager System Reference—Administration (NN43001-632) () .
--End--
Installing the Element Manager joining an existing secure network
Step
Action
1
Log on to the server using the nortel account.
2
Insert the MGMT DVD in the DVD tray.
3
Enter the appinstall CLI command.
4
At the prompt, enter the root account password.
The system then prompts you to check the media.
5
Enter Y to check the media, or N to proceed without checking the
media, and press Enter.
6
The Application Installation screen appears, as shown in
Figure 85 "Application Installation window" (page 90)From the
Application installation window select 3 to install the Element
Manager joining an existing secure network. The appropriate
packages are installed to the hard drive.
Nortel Communication Server 1000
Linux Platform Base and Applications Installation and Commissioning
NN43001-315 02.09
29 October 2008
Copyright © 2007–2008 Nortel Networks
.
90 Installation and configuration of applications on Linux base
Figure 85
Application Installation window
7
The Solid server configuration window appears, as shown in
Figure 86 "Solid server configuration window" (page 90). In the
Solid server configuration screen, type the number of the Solid
server to install.
Figure 86
Solid server configuration window
Press Enter to continue.
8
The Solid server configuration confirmation screen appears.
Type Yes to confirm the Solid server selection, or type No to
return to the Solid server configuration window. Press Enter to
continue.
9
The Primary Security Service server TLAN IP address screen
appears as shown in Figure 87 "Primary Security Service server
TLAN IP address window" (page 91). Enter the IP address of
the TLAN network interface Primary Security Service server.
Type Yes to confirm the TLAN IP address is correct or type No
to return to the Primary Security Service server TLAN IP address
screen. Press Enter to continue.
Nortel Communication Server 1000
Linux Platform Base and Applications Installation and Commissioning
NN43001-315 02.09
29 October 2008
Copyright © 2007–2008 Nortel Networks
.
Install the CS 1000 applications
91
Figure 87
Primary Security Service server TLAN IP address window
10
The Primary Security Service server Fully Qualified Domain
Name (FQDN) screen appears as shown in Figure 88 "Primary
Security Service server Fully Qualified Domain name window"
(page 91). Enter the Fully Qualified Domain name of the Primary
Security Service server. Type Yes to confirm the FQDN is
correct or type No to return to the Primary Security Service
server Fully Qualified Domain Name screen. For a definition of
FQDN see "FQDN requirements, page 30" (page 36) . Press
Enter to continue.
Figure 88
Primary Security Service server Fully Qualified Domain name window
Note:
11
•
The Primary Security Service must be up and running
at this point.
•
You need to know the password for the nortel
account on the Primary Security Service server.
Installation fails if you do not know this password.
The Primary Security Service fingerprint screen appears as
shown in Figure 89 "Primary Security Service fingerprint window"
(page 92). Type Yes to verify the Primary Security Service
fingerprint.
Nortel Communication Server 1000
Linux Platform Base and Applications Installation and Commissioning
NN43001-315 02.09
29 October 2008
Copyright © 2007–2008 Nortel Networks
.
92 Installation and configuration of applications on Linux base
Figure 89
Primary Security Service fingerprint window
12
The nortel password screen appears. Type the password of the
nortel account and press Enter. The connection to the Primary
Security Service server is complete and the installation finishes.
The installation takes approximately 30 minutes to complete.
After the installation is complete the disk automatically ejects
from the drive and a summary of the installation is shown on the
screen.
For detailed information about Element Manager see Element
Manager System Reference—Administration (NN43001-632) () .
--End--
Installing the Primary Security Service, Subscriber Manager, and Element
Manager
Step
Action
1
Log on to the server using the nortel account.
2
Insert the MGMT DVD in the DVD tray.
3
Enter the appinstall CLI command.
4
At the prompt, enter the root account password.
The system then prompts you to check the media.
5
Enter Y to check the media, or N to proceed without checking the
media, and press Enter.
6
The Application Installation screen appears, as shown in
Figure 90 "Application Installation window" (page 93). From the
Application installation window select 4 to install the Primary
Security Service with Subscriber Manager and Element
Manager. The appropriate packages are installed to the hard
drive.
Nortel Communication Server 1000
Linux Platform Base and Applications Installation and Commissioning
NN43001-315 02.09
29 October 2008
Copyright © 2007–2008 Nortel Networks
.
Install the CS 1000 applications
Figure 90
Application Installation window
7
The Solid server configuration window appears, as shown in
Figure 91 "Solid server configuration window" (page 93). In the
Solid server configuration screen, type the number of the Solid
server to install.
Figure 91
Solid server configuration window
Press Enter to continue.
8
The Solid server configuration confirmation screen appears.
Type Yes to confirm the Solid server selection, or type No to
return to the Solid server configuration window. Press Enter to
continue.
9
The Private CA certificate window appears as shown in Figure
92 "Private CA certificate window" (page 94). Press Enter to
display the prompts for Country, State or Province, Location,
Organization Name and Organization Unit. Type the response
for each of these categories and press Enter to continue. At
the prompts, enter the Country, State or Province, Location,
Organization Name and Organization Unit and press Enter to
continue.
Nortel Communication Server 1000
Linux Platform Base and Applications Installation and Commissioning
NN43001-315 02.09
29 October 2008
Copyright © 2007–2008 Nortel Networks
.
93
94 Installation and configuration of applications on Linux base
Figure 92
Private CA certificate window
10
The Private CA Certificate confirmation window appears as
shown in Figure 93 "Private CA Certificate confirmation window"
(page 94). Verify that the common name information is correct.
Type Yes if correct or No if incorrect, and press Enter. If you
entered yes, the installation finishes and the system creates
the CA certificate, as shown in Figure 94 "Making a Private
CA certificate window" (page 95). If you selected no, edit the
information as required and repeat the step.
Figure 93
Private CA Certificate confirmation window
Nortel Communication Server 1000
Linux Platform Base and Applications Installation and Commissioning
NN43001-315 02.09
29 October 2008
Copyright © 2007–2008 Nortel Networks
.
Install the CS 1000 applications
95
Figure 94
Making a Private CA certificate window
11
The Security services administrator default password screen
appears, as shown in Figure 95 "Security services administrator
default password window" (page 96). Enter a new default
password for the security services administrator accounts, and
then re-enter the new password.
Nortel Communication Server 1000
Linux Platform Base and Applications Installation and Commissioning
NN43001-315 02.09
29 October 2008
Copyright © 2007–2008 Nortel Networks
.
96 Installation and configuration of applications on Linux base
Figure 95
Security services administrator default password window
--End--
The installation takes approximately 30 minutes to complete. After the
installation is complete the disk automatically ejects from the drive and a
summary of the installation is shown on the screen.
For detailed information about Element Manager see Element Manager
System Reference—Administration (NN43001-632) () .
For detailed information about Subscriber Manager see the installation
and configuration section of Subscriber Manager Fundamentals
(NN43001-120) () .
Installing the Backup Security Service, Subscriber Manager, and Element
Manager
Step
Action
1
Log on to the server using the nortel account.
2
Insert the MGMT DVD in the DVD tray.
3
Enter the appinstall CLI command.
Nortel Communication Server 1000
Linux Platform Base and Applications Installation and Commissioning
NN43001-315 02.09
29 October 2008
Copyright © 2007–2008 Nortel Networks
.
Install the CS 1000 applications
4
At the prompt, enter the root account password.
The system then prompts you to check the media.
5
Enter Y to check the media, or N to proceed without checking the
media, and press Enter.
6
The Application Installation screen appears, as shown in
Figure 96 "Application Installation window" (page 97). From
the Application installation window select 5 to install the
Backup Security Service with Subscriber Manager and Element
Manager. The appropriate packages are installed to the hard
drive.
Figure 96
Application Installation window
7
The Solid server configuration window appears, as shown in
Figure 97 "Solid server configuration window" (page 97). In the
Solid server configuration screen, type the number of the Solid
server to install.
Figure 97
Solid server configuration window
Press Enter to continue.
8
The Solid server configuration confirmation screen appears.
Type Yes to confirm the Solid server selection, or type No to
return to the Solid server configuration window. Press Enter to
continue.
Nortel Communication Server 1000
Linux Platform Base and Applications Installation and Commissioning
NN43001-315 02.09
29 October 2008
Copyright © 2007–2008 Nortel Networks
.
97
98 Installation and configuration of applications on Linux base
9
The Primary Security Service server TLAN IP address screen
appears as shown in Figure 98 "Primary Security Service server
TLAN IP address window" (page 98). Enter the IP address of
the TLAN network interface Primary Security Service server.
Type Yes to confirm the TLAN IP address is correct or type No
to return to the Primary Security Service server TLAN IP address
screen. Press Enter to continue.
Figure 98
Primary Security Service server TLAN IP address window
10
The Primary Security Service server Fully Qualified Domain
Name (FQDN) screen appears as shown in Figure 99 "Primary
Security Service server Fully Qualified Domain name window"
(page 98). Enter the Fully Qualified Domain name of the Primary
Security Service server. Type Yes to confirm the FQDN is
correct or type No to return to the Primary Security Service
server Fully Qualified Domain Name screen. For a definition of
FQDN see "FQDN requirements, page 30" (page 36) . Press
Enter to continue.
Figure 99
Primary Security Service server Fully Qualified Domain name window
Note:
11
•
The Primary Security Service must be up and running
at this point.
•
You need to know the password for the "nortel"
account on the Primary Security Service server.
Installation will fail if you do not know this password.
The Primary Security Service fingerprint screen appears as
shown in Figure 100 "Primary Security Service fingerprint
Nortel Communication Server 1000
Linux Platform Base and Applications Installation and Commissioning
NN43001-315 02.09
29 October 2008
Copyright © 2007–2008 Nortel Networks
.
Install the CS 1000 applications
99
window" (page 99). Type Yes to verify the Primary Security
Service fingerprint.
Figure 100
Primary Security Service fingerprint window
12
The nortel password screen appears. Type the password of the
nortel account and press Enter. The connection to the Primary
Security Service server is complete and the installation finishes.
The installation takes approximately 30 minutes to complete.
After the installation is complete the disk automatically ejects
from the drive and a summary of the installation is shown on the
screen.
For detailed information about Element Manager see Element
Manager System Reference—Administration (NN43001-632) () .
For detailed information about Subscriber Manager see the
installation and configuration section of Subscriber Manager
Fundamentals (NN43001-120) () .
--End--
Configuration for Network Routing Service or Element Manager
applications in ECM
The Network Routing Service or Element Manager applications must
be configured in ECM after installation is complete. For details about
configuration and security certificate creation see Security Management
Fundamentals (NN43001-604) () .
Nortel Communication Server 1000
Linux Platform Base and Applications Installation and Commissioning
NN43001-315 02.09
29 October 2008
Copyright © 2007–2008 Nortel Networks
.
100
Installation and configuration of applications on Linux base
Nortel Communication Server 1000
Linux Platform Base and Applications Installation and Commissioning
NN43001-315 02.09
29 October 2008
Copyright © 2007–2008 Nortel Networks
.
101
.
CS 1000 on Linux base
Linux Operating System and Distribution
The selected distribution is Red Hat Enterprise Linux ES 4. This
distribution is built on a 2.6 kernel, and supports many Open Source
Development Lab (OSDL) Carrier Grade Linux (CGL) features.
Red Hat Enterprise Linux ES 4 supports Linux kernel version 2.6 and the
following for the Enterprise Common Manager (ECM) and the Network
Routing Service (NRS) :
•
•
•
•
•
•
•
•
•
•
Secure Internet Protocol (IPSec)
Sun JVM 1.4.x
Radvision Session Initiation Protocol (SIP) stack
OpenSSL
OpenSSH
Perl
Zlib
(S)FTP server
SNMPv3
A Web application server with support for the following technologies :
— HTTP Server (HTML, CGI)
— Web Container (Servlet, JSP, JSF)
— J2EE Container (EJB)
— Portal Container (Portlet)
— Web Services Simple Object Access Protocol (SOAP) (for example,
JBoss with appropriate optional packages)
Nortel Communication Server 1000
Linux Platform Base and Applications Installation and Commissioning
NN43001-315 02.09
29 October 2008
Copyright © 2007–2008 Nortel Networks
.
102
CS 1000 on Linux base
Network and firewall
All applications operate behind a network firewall. The firewall starts on
system boot, which invokes the Linux iptables facility to load the firewall
configuration.
Each Linux server supports at least two Ethernet ports; one for ELAN
subnet connectivity and another for TLAN subnet connectivity. By default,
the TLAN is open to the network, while the ELAN is reachable only within
the subnet. The Linux application selects the Ethernet port to use. The
firewall protects both ports. For a listing of Linux base open firewall ports
see Table 1 "Linux base open firewall ports" (page 102). For a definition of
ELAN and TLAN see “Network configuration” (page 143).
Use the CLI command basefirewallconfig to configure the network
firewall. For a list of Nortel Linux base CLI commands see “ Nortel Linux
base CLI commands” (page 139).
Table 1
Linux base open firewall ports
Protocol
Port number or range
TCP
22
UDP
22
UDP
53 (to DNS servers only)
UDP
123
UDP
500
UDP
514
TCP
2100
UDP
33434-33524
Note: The port numbers found in Table 1 "Linux base open firewall
ports" (page 102) apply only to the Linux base. Linux applications can
require different ports. For a list of ports opened for the application see
the appropriate application NTP .
Software reliability
Software monitoring
Nortel Communication Server 1000
Linux Platform Base and Applications Installation and Commissioning
NN43001-315 02.09
29 October 2008
Copyright © 2007–2008 Nortel Networks
.
Software reliability
103
MONIT is an open source package used for monitoring the important
daemon services automatically initiated at startup. If a malfunction occurs,
MONIT provides actions such as alert, start, stop, and restart. To provide
these actions, applications must be registered with MONIT, and the
appropriate actions for each application must be specified.
The following system parameters are monitored: memory, CPU, and
device space usage. If usage of one of them passes a warning threshold
then a message is displayed. The warning and critical thresholds are
shown in Table 2 "Warning and Critical thresholds" (page 103).
Table 2
Warning and Critical thresholds
System
Resource
Warning Clear
Warning Set
Critical Clear
Critical Set
Memory usage
-
-
90%
95%
CPU usage
-
-
90%
95%
/boot (/dev/sda1)
Size: 100 MB.
Critical.
70%
75%
80%
85%
admin (/dev/sda2)
Size: 4 GB.
80%
85%
85%
90%
80%
85%
85%
90%
/opt (/dev/sda7)
Size: 8 GB.
Not critical.
80%
85%
90%
95%
/home (/dev/sda8
) Size: 4 GB.
Not critical.
80%
85%
90%
95%
/tmp (/dev/sda9)
Size: 20 GB.
Critical.
80%
85%
85%
90%
/var (/dev/sda10)
Size: 30 GB.
Critical.
80%
85%
85%
90%
/ (/dev/sda6)
Size: 4 GB.
An example of a Critical Set alarm is shown at Figure 101 "Critical Set
alarm example" (page 104). An example of a Critical Clear alarm message
is shown at Figure 102 "Critical Clear alarm example" (page 104).
Note: If critical alarms persist, contact your Nortel technical support.
Nortel Communication Server 1000
Linux Platform Base and Applications Installation and Commissioning
NN43001-315 02.09
29 October 2008
Copyright © 2007–2008 Nortel Networks
.
104
CS 1000 on Linux base
Figure 101
Critical Set alarm example
Figure 102
Critical Clear alarm example
Hardware watchdog
The IBM x306m and HP DL320 G4 servers offer a hardware watchdog.
The watchdog timer is programmed during the server startup and requires
continuous resets from a daemon running in Linux. The watchdog timer is
based on the current ISP1100 server, which is 5 minutes.
The server is reset if the watchdog timer is not reset within the allotted
time. The operating system and applications are reloaded from disk and
started after the server reset occurs. The following conditions can trigger
the watchdog:
•
The software daemon, which notifies hardware watchdog, fails to
respond.
•
A hardware or software problem causes the system to freeze.
Linux Security Hardening
The following features enhance Linux base security.
Virus protection
If antivirus software is installed by the customer the following is
recommended:
•
Antivirus software that uses 100 megabytes (MB) or less of hard drive
space.
•
•
•
Choose software that uses 84 MB or less of RAM.
Always set the process priority to low.
Perform virus scans during off-hours only.
Nortel Communication Server 1000
Linux Platform Base and Applications Installation and Commissioning
NN43001-315 02.09
29 October 2008
Copyright © 2007–2008 Nortel Networks
.
Linux Security Hardening
105
•
Choose software you use to remove or clean the viruses, as well as
send warning messages.
•
Choose software that uses a maximum of 10% of CPU for a scheduled
scan and 3% for an active scan.
BIOS setting and password protection
To secure the server, Nortel recommends the following:
•
Disable boot from CD or DVD drive in the Basic Input Output System
(BIOS).
•
Add a BIOS password. For information about adding a BIOS password
to the HP DL320 G4 server see “Setting the HP DL320 G4 server
BIOS password” (page 130). For information about adding a BIOS
password to the IBM x306m server see “Setting the IBM x306m server
BIOS password” (page 136).
•
Add a boot loader password.
Removal of the Ctrl+Atl+Del keyboard shutdown command
The Ctrl+Alt+Del shutdown command is disabled.
Single-user-text-mode booting is disabled
This booting mode is disabled to prevent the unauthorized access of the
system.
Hardened communications by using secure protocols
Secure Shell (SSH) and its accompanying tools are included by default.
The secure protocols are also a replacement for some insecure protocols,
as shown in Table 3 "Security communication protocols" (page 105).
Table 3
Security communication protocols
Insecure protocols (disabled)
Replacement secure protocols (supported)
telnet
ssh
rsh
ssh
rlogin
ssh
tftp
sftp
ftp
sftp
rcp
scp
Nortel Communication Server 1000
Linux Platform Base and Applications Installation and Commissioning
NN43001-315 02.09
29 October 2008
Copyright © 2007–2008 Nortel Networks
.
106
CS 1000 on Linux base
Note 1: To establish a connection using SSH or SFTP you need to
have a valid server address, and you must connect through port 22.
Note 2: If SFTP or SCP is not available, File Transfer Protocol (FTP)
can be used. Invoke the CLI command ftpenable to access FTP; and
invoke the CLI command ftpdisable to close FTP. The ftpenable
command opens a timed window that closes after 5 minutes of inactivity.
The patch folder is the only folder that is visible if FTP is chosen.
Patching
Linux base supports two patch categories:
•
Patch: This category of patch changes program behavior for a period
of time. You can use it for such things as fixing bugs or for diagnostic
purposes. In some instances, you can apply this category of patch
without a program restart.
•
Service Update: A service update (SU) is a cumulative update of
patches. A service update is a full application Red Hat Package
Manager (RPM) package distribution that contains all patches that you
apply to a specific application, and replaces previous service updates.
An overview of the patching operation is provided in “Patching Operation”
(page 106).
Patching Operation
Step
Action
1
Log in using the nortel account.
2
Once you are logged in, enter the CLI command
swVersionShow and press Enter.
This displays the installed applications and the application
version numbers, as shown in Figure 103 "Installed applications
and version numbers" (page 107).
Nortel Communication Server 1000
Linux Platform Base and Applications Installation and Commissioning
NN43001-315 02.09
29 October 2008
Copyright © 2007–2008 Nortel Networks
.
Patching
107
Figure 103
Installed applications and version numbers
Note: Figure 103 "Installed applications and version numbers"
(page 107) contains the base or application name in the left
column and the corresponding version number in the right
column. Make note of the version number for the base or
application that you are patching. You must use the correct
version number to retrieve the correct patch or service update
from the Nortel Enterprise Solutions Product Enhancement
Package (PEP) Library (ESPL).
3
Retrieve a patch or an SU file from the ESPL.
4
Upload the patch file to the Linux server and save it in the
/var/opt/nortel/patch directory.
Secure File Transfer Protocol (SFTP) and Secure Copy (SCP)
are the supported methods of patch file transfer.
Patch file transfer is initiated from within the Linux server or from
an external machine.
•
To initiate the patch file transfer from within the Linux server:
— logon to the Linux server as nortel.
— Enter the sftp or scp CLI command.
— Type the get command (for sftp) or the scopy
command (for scp) to transfer the patch to the Linux
server.
•
To initiate the patch file transfer from an external machine:
Nortel Communication Server 1000
Linux Platform Base and Applications Installation and Commissioning
NN43001-315 02.09
29 October 2008
Copyright © 2007–2008 Nortel Networks
.
108
CS 1000 on Linux base
— Initiate an SFTP or Secure Shell (SSH) program.
— Provide the Linux server’s IP address (or host name), the
nortel user ID, and password as parameters.
— Type the put command (for sftp) or the scopy
command (for scp) to transfer the patch to the Linux
server.
Note: If you cannot access SFTP or SCP, File Transfer
Protocol (FTP) can be used. FTP can be accessed by invoking
the CLI command ftpenable, and closed by invoking the
CLI command ftpdisable. The ftpenable command
opens a timed window that closes after 5 minutes of inactivity.
5
Perform one or more of the following on-target patch
management CLI commands:
•
•
•
•
•
pload
pins
poos
pout
pstat
--End--
Target patcher CLI commands
The on-target patch management CLI provides an interface command
set similar to the CS 1000 patcher. Table 4 "Target-side patching CLI
commands" (page 108) lists target-side patching CLI commands.
Table 4
Target-side patching CLI commands
Command
Description
pload
Load a patch from a disk file and update the
on-switch database with the specific patch
information.
pins
Put a patch into service; the patch will be placed
into service for all processes to which it applies.
poos
Remove a patch from service. The patch is
removed from service from all processes in
which it was in service.
pout
Unload a patch that was loaded with the pload
command.
Nortel Communication Server 1000
Linux Platform Base and Applications Installation and Commissioning
NN43001-315 02.09
29 October 2008
Copyright © 2007–2008 Nortel Networks
.
User accounts and access control
109
pstat
Print a status summary of all loaded patches.
plis
Print detailed information about a specific patch.
Note: The nortel user account is the designated user account for the
execution of these CLI commands.
Patch retention
A patch is always retained until the poos CLI command explicitly puts the
patch out of service.
Note: In some cases you cannot remove a patch (the poos CLI
command fails).
Software exceptions
Linux kernel exceptions
If the Linux kernel encounters an unrecoverable error, it prints and logs
a short description of the problem, and can produce an undefined result.
Typical causes of such errors are unrecoverable hardware errors or bugs
in the kernel software.
A nonfatal kernel exception is reported through a log in the kernel, and
captured in the syslog. Kernel logs, due to invalid memory addresses,
do not normally result in a kernel panic (crash); instead the process that
triggers the fault terminates. These can produce a lasting negative impact
on the system. It is recommended that such events be monitored in user
space (using the syslog mechanism), and that a full system reboot be
triggered after receipt of a kernel log report.
User accounts and access control
User accounts and access control methods are managed by native Linux
user account management, and tools such as Radius and PAM. There is
a diagnostic group and some default diagnostic users for debugging and
maintenance purposes.
Linux base includes the following accounts:
•
root (as Linux default)
Note 1: Logging in as root is strongly discouraged unless you are
explicitly directed to do so. All of the base maintenance and debug
actions must be performed using the nortel or sysadmin accounts.
Nortel Communication Server 1000
Linux Platform Base and Applications Installation and Commissioning
NN43001-315 02.09
29 October 2008
Copyright © 2007–2008 Nortel Networks
.
110
CS 1000 on Linux base
Note 2: To log in directly as root you must log in through the COM1
console.
•
sysadmin: The user account designated for debugging and
maintenance. This account is intended for Nortel support.
•
nortel: The user account for the basic Linux base operation, including
patching and application installation. For a list of CLI commands that
can be invoked by nortel, see “ Nortel Linux base CLI commands”
(page 139).
Note 1: If you log in as root or nortel and your account is inactive for 15
minutes, you will automatically be logged out.
Note 2: A nortel or sysadmin user account (except root) that makes
three successive incorrect logon attempts will be locked for up to 1 hour.
Passwords
The following regulations govern the use of passwords:
Password Policy
•
System-level passwords (for example, application administration
account passwords) expire after three months.
•
A new password must differ from the previous three passwords.
Password creation guidelines
Passwords must meet the following criteria:
•
•
Passwords must contain both uppercase and lowercase letters.
•
•
The password must contain at least eight alphanumeric characters.
•
Passwords cannot use discernible character patterns such as abcdef
or 123123.
•
•
Passwords cannot use the backward spelling of a word.
•
You can change your password by using the passwd CLI command.
In addition to letters, passwords must use numeric digits (0 to 9) and
special characters (!@#$%^&*()_+|~-=\‘{}[]:";’&;<>?,./).
The password cannot be a word in the English language as defined in
the Linux Pluggable Authentication Module (PAM) module.
Passwords cannot be an English language word (as defined in the
Linux PAM module) preceded or followed by a digit. For example,
1secret or secret1.
Nortel Communication Server 1000
Linux Platform Base and Applications Installation and Commissioning
NN43001-315 02.09
29 October 2008
Copyright © 2007–2008 Nortel Networks
.
User accounts and access control
111
Resetting Nortel Linux base passwords
Nortel Linux base passwords can be reset if they are forgotten or lost. Use
the following procedures to reset Nortel Linux base passwords.
Resetting the Nortel Linux base root password
ATTENTION
Use this procedure to reset the local Nortel Linux base root password only.
You must have physical access to the system to use this procedure. You must
have a keyboard, video monitor, and mouse (kvm) connection to use this
procedure.
Step
Action
1
Insert the Linux base CD in the CD-ROM tray.
2
Reboot the system.
3
Type kvm at the boot prompt and press Enter to begin the
installation, as shown in Figure 104 "CS 1000 Linux base system
installer" (page 111).
Figure 104
CS 1000 Linux base system installer
4
The Installation of new Linux base operating system screen
appears, as shown in Figure 105 "Installation of new Linux base
operating system" (page 112). When the Installation of new
Linux base operating system screen appears press (Alt+F2) to
switch to a shell virtual console.
Nortel Communication Server 1000
Linux Platform Base and Applications Installation and Commissioning
NN43001-315 02.09
29 October 2008
Copyright © 2007–2008 Nortel Networks
.
112
CS 1000 on Linux base
Figure 105
Installation of new Linux base operating system
5
Type cd/tmp/ and press Enter to change the path to the tmp
directory.
6
Type mkdir mount and press Enter to create a new directory.
7
Type mount /dev/sda6 mount/ and press Enter to mount the
system image.
8
Type chroot /tmp/mount and press Enter.
9
Type passwd –f (user) and press Enter. The Root password
reset window appears, as shown in Figure 106 "Root password
reset window" (page 113).
Nortel Communication Server 1000
Linux Platform Base and Applications Installation and Commissioning
NN43001-315 02.09
29 October 2008
Copyright © 2007–2008 Nortel Networks
.
User accounts and access control
113
Figure 106
Root password reset window
10
In the Figure 106 "Root password reset window" (page 113) type
the new password and press Enter. You are then prompted
to enter the password again. Type the password again and
press Enter. If you typed the passwords correctly the message
System error appears. If the passwords do not match the system
prompts you to repeat the process.
Note: After you correctly enter the new password the screen
displays passwd: System error. Ignore the system error; the
password change is successful.
11
When you finish the password reset press Ctrl+Alt+Delete to
reboot the server.
12
When the system startup begins push the eject button on the
CD-ROM to manually eject the Linux base CD from the CD-ROM
tray.
--End--
Resetting Nortel Linux base non-root passwords
Nortel Communication Server 1000
Linux Platform Base and Applications Installation and Commissioning
NN43001-315 02.09
29 October 2008
Copyright © 2007–2008 Nortel Networks
.
114
CS 1000 on Linux base
ATTENTION
Use this procedure to reset local Nortel Linux base non-root passwords only.
You must have a serial connection to the system to use this procedure.
Step
Action
1
Open the serial connection and logon as root.
2
Type the CLI command passwd (user) and press Enter. The
Non-root password reset screen appears, as shown in Figure
107 "Non-root password reset window" (page 114).
Figure 107
Non-root password reset window
3
In the Figure 107 "Non-root password reset window" (page
114) type the new password and press Enter. You are then
prompted to enter the password again. Type the password
again and press Enter. If the passwords match the message all
authentication tokens updated successfully is displayed. If the
passwords do not match the system prompts you to repeat the
process.
4
When you finish the password reset type logout and press
Enter to log out of the root account.
--End--
Nortel Communication Server 1000
Linux Platform Base and Applications Installation and Commissioning
NN43001-315 02.09
29 October 2008
Copyright © 2007–2008 Nortel Networks
.
SNMP
115
System upgrades
The platform supports upgrades for the delivery of new interim releases.
The installation or reinstallation provides the option to preserve the
customer installation parameters for upgrade purposes. You can upgrade
the complete platform including the operating system and Linux base
applications.
Nortel Linux base uses the CLI upgrade command to reinstall or upgrade
the base installation. Insert the Linux base installation CD is and invoke
the upgrade command. You can choose to back up the data to a USB
device, to an SFTP server, or type q to exit the upgrade operation. For
more information about SFTP data back up, see “Network configuration
for Secure File Transfer Protocol (SFTP) data backup” (page 143) At the
beginning of reinstallation you can use the data stored in the USB device
or the SFTP server. After the base installation is complete, you can invoke
the appinstall command to install applications from the application CD
or DVD .
The following application data is backed up during the Linux upgrade
process and is restorable when the applications are reinstalled:
•
•
•
Enterprise Common Manager data
Subscriber Manager security certificates and CND connection details
Element Manager data
Note: You must logon as nortel to run the installation or upgrade
process.
Logging
Linux base supports syslog as the standard event logger.
Application-specific event logs are stored in directories created by the
application. See the application’s documentation for more information.
SNMP
Linux base supports standard server type Management Information
Base (MIB) II MIBs. Linux base does not generate SNMP alarms.
For information about the configuration of SNMP on Linux base see
Communication Server 1000 Fault Management — SNMP (NN43001-719)
() . For information about Enterprise Common Manager (ECM) and
SNMP on Linux base see Enterprise Common Manager Fundamentals
Nortel Communication Server 1000
Linux Platform Base and Applications Installation and Commissioning
NN43001-315 02.09
29 October 2008
Copyright © 2007–2008 Nortel Networks
.
116
CS 1000 on Linux base
(NN43001-116) () . For information about Network Routing Service (NRS)
and SNMP on Linux base see Network Routing Service Installation and
Commissioning (NN43001-564) () .
Disaster recovery
Hardware faults can occur that require disaster recovery. Recovery
happens in two steps. First restore the Linux base (including operating
system) and then restore the applications.
A file system backup and restore option supports the base disaster
recovery.
During a system backup the following application data is backed up and is
restorable when the applications are reinstalled:
•
•
•
Enterprise Common Manager data
Subscriber Manager security certificates and CND connection details
Element Manager data
Application configured system data
You can configure values for routes, host records, and firewall
rules using the CLI commands routeconfig, hostconfig, and
basefirewallconfig. These values are application configured system
data. Application configured system data is backed up as part of the
application data backup. For more information about Nortel Linux base CLI
commands see “ Nortel Linux base CLI commands” (page 139).
Base recovery
After a successful base installation, you can choose to back up
prespecified file systems (both executable binary and configuration data
files) onto a USB or network Secure File Transfer Protocol (SFTP) storage
device.
The following naming convention is used for the Linux base backup
archive:
hostname-yyyy.mm.dd.hh.MM.ss.tar.gz
For example, hp3-e-2008.09.04.18.54.47.tar.gz is a backup archive name
where hp3-e is the host name. The archive name begins with the short
host name (not the FQDN) and contains the following fields, which are
defined as follows:
Nortel Communication Server 1000
Linux Platform Base and Applications Installation and Commissioning
NN43001-315 02.09
29 October 2008
Copyright © 2007–2008 Nortel Networks
.
Disaster recovery
•
•
•
•
•
•
117
yyyy - year
mm - month
dd - day
hh - hour
MM - minutes
ss - seconds
Nortel Linux base uses the CLI command sysbackup to backup system
data to external storage. You can choose to back up the data to a USB
device or to an SFTP server. For more information about SFTP data back
up, see “Network configuration for Secure File Transfer Protocol (SFTP)
data backup” (page 143).
Note: Only one USB storage device should be attached during
backup/restore command execution.
The backup operation has two modes; interactive and noninteractive.
Interactive backup is performed by using the CLI command sysbackup
–b. Interactive backup performs a single backup operation and is intended
to backup data before and after critical changes to the system. Interactive
backup can be used as an irregular or on-demand backup. Noninteractive
backup is performed by using the CLI command sysbackup –c.
Noninteractive backup performs a regular or scheduled backup. You
can configure a Noninteractive backup as shown in Figure 108 "Backup
Scheduler 1" (page 117) and Figure 109 "Backup Scheduler 2" (page 118).
Note: The minutes parameter in the backup scheduler does not
support asterisk as a valid parameter.
Figure 108
Backup Scheduler 1
Nortel Communication Server 1000
Linux Platform Base and Applications Installation and Commissioning
NN43001-315 02.09
29 October 2008
Copyright © 2007–2008 Nortel Networks
.
118
CS 1000 on Linux base
Figure 109
Backup Scheduler 2
Note: The CLI command sysbackup can be used to make a system
backup. For a list of Nortel Linux base CLI commands see Table 11
"Nortel Linux base CLI commands" (page 141).
You can use the command sysrestore to perform system recovery, as
shown in Figure 110 "sysrestore command" (page 118).
Backup files generated by the sysrestore command are named
according to the Linux base backup archive naming convention.
Sysrestore provides a list of the archives that are available on the backup
media.
Sysrestore restores application-specific data. Application data backup
and restoration is determined by the individual applications; for more
information refer to the appropriate application NTP.
ATTENTION
Archives created prior to Release 5.5 do not contain application configured
system data. If you use an archive created prior to Release 5.5 you cannot
restore application configured system data.
Figure 110
sysrestore command
You can also use the installation media as rescue media (CD/DVD for HP
DL320 G4 and IBM x306m servers), which supports the recovery of the
base system.
Nortel Communication Server 1000
Linux Platform Base and Applications Installation and Commissioning
NN43001-315 02.09
29 October 2008
Copyright © 2007–2008 Nortel Networks
.
Disaster recovery
119
The following figure shows the base system recovery option.
Figure 111
Configuration Data Selection window
When a server boot-up with bootable installation media occurs, you can
choose from the following options:
•
•
•
Normal installation
Load recovery data from an external USB device
Load recovery data from a secure SFTP server that is accessible by
ELAN
Nortel Communication Server 1000
Linux Platform Base and Applications Installation and Commissioning
NN43001-315 02.09
29 October 2008
Copyright © 2007–2008 Nortel Networks
.
120
CS 1000 on Linux base
Nortel Communication Server 1000
Linux Platform Base and Applications Installation and Commissioning
NN43001-315 02.09
29 October 2008
Copyright © 2007–2008 Nortel Networks
.
121
.
Appendix
Passthrough end user license
agreement
ATTENTION
Do not contact Red Hat for technical support on your Nortel version of the Linux
base operating system. If technical support is required for the Nortel version of
the Linux base operating system, contact Nortel technical support through your
regular channels.
This section governs the use of the Red Hat Software and any updates
to the Red Hat Software, regardless of the delivery mechanism and is
governed by the laws of the state of New York in the U.S.A. The Red Hat
Software is a collective work under U.S. Copyright Law. Subject to the
following terms, Red Hat, Inc. (“Red Hat”) grants to the user (“Customer”)
a license to this collective work pursuant to the GNU General Public
License. Red Hat Enterprise Linux (the “Red Hat Software”) is a modular
operating system consisting of hundreds of software components. The end
user license agreement for each component is located in the component’s
source code. With the exception of certain image files identified below, the
license terms for the components permit Customer to copy, modify, and
redistribute the component, in both source code and binary code forms.
This agreement does not limit Customer’s rights under, or grant Customer
rights that supersede, the license terms of any particular component.
The Red Hat Software and each of its components, including the source
code, documentation, appearance, structure and organization are owned
by Red Hat and others and are protected under copyright and other
laws. Title to the Red Hat Software and any component, or to any copy,
modification, or merged portion shall remain with the aforementioned,
subject to the applicable license. The “Red Hat” trademark and the
“Shadowman” logo are registered trademarks of Red Hat in the U.S. and
other countries. This agreement does not permit Customer to distribute
the Red Hat Software using Red Hat’s trademarks. If Customer makes
a commercial redistribution of the Red Hat Software, unless a separate
agreement with Red Hat is executed or other permission granted, then
Nortel Communication Server 1000
Linux Platform Base and Applications Installation and Commissioning
NN43001-315 02.09
29 October 2008
Copyright © 2007–2008 Nortel Networks
.
122
Passthrough end user license agreement
Customer must modify any files identified as “REDHAT-LOGOS” and
“anaconda-images” to remove all images containing the “Red Hat”
trademark or the “Shadowman” logo. As required by U.S. law, Customer
represents and warrants that it: (a) understands that the Software is
subject to export controls under the U.S. Commerce Department’s Export
Administration Regulations (“EAR”); (b) is not located in a prohibited
destination country under the EAR or U.S. sanctions regulations (currently
Cuba, Iran, Iraq, Libya, North Korea, Sudan and Syria); (c) will not export,
re-export, or transfer the Software to any prohibited destination, entity, or
individual without the necessary export license(s) or authorizations(s) from
the U.S. Government; (d) will not use or transfer the Red Hat Software
for use in any sensitive nuclear, chemical or biological weapons, or
missile technology end-uses unless authorized by the U.S. Government
by regulation or specific license; (e) understands and agrees that if it is
in the United States and exports or transfers the Software to eligible end
users, it will, as required by EAR Section 740.17(e), submit semi-annual
reports to the Commerce Department’s Bureau of Industry & Security
(BIS), which include the name and address (including country) of each
transferee; and (f) understands that countries other than the United States
may restrict the import, use, or export of encryption products and that it
shall be solely responsible for compliance with any such import, use, or
export restrictions. Red Hat may distribute third party software programs
with the Red Hat Software that are not part of the Red Hat Software.
These third party programs are subject to their own license terms. The
license terms either accompany the programs or can be viewed at
http://www.redhat.com/licenses/. If Customer does not agree to abide by
the applicable license terms for such programs, then Customer may not
install them. If Customer wishes to install the programs on more than one
system or transfer the programs to another party, then Customer must
contact the licensor of the programs. If any provision of this agreement
is held to be unenforceable, that shall not affect the enforceability of the
remaining provisions. Copyright © 2003 Red Hat, Inc. All rights reserved.
"Red Hat" and the Red Hat "Shadowman" logo are registered trademarks
of Red Hat, Inc. "Linux" is a registered trademark of Linus Torvalds. All
other trademarks are the property of their respective owners.
Nortel Communication Server 1000
Linux Platform Base and Applications Installation and Commissioning
NN43001-315 02.09
29 October 2008
Copyright © 2007–2008 Nortel Networks
.
123
.
Appendix
COTS Servers
The Linux base is installed on one of two commercial off-the-shelf
(COTS) servers; the Hewlett Packard (HP) DL320-G4 1U server or the
International Business Machines (IBM) x306m 1U server.
This appendix provides a brief description of each server,
HP DL320 G4 server
The HP DL320 G4 server provides the following features:
•
•
•
•
•
•
•
•
Intel Pentium 4 processor (3.6 GHz)
Two 80 GB SATA Hard drives (1 configured)
4 GB PC2-4200 ECC DDR2 SDRAM (2 GB configured)
Two 10/100/1000BaseT Ethernet ports
Three USB ports
One CD-R/DVD ROM drive
One serial port
A reset button
Nortel Communication Server 1000
Linux Platform Base and Applications Installation and Commissioning
NN43001-315 02.09
29 October 2008
Copyright © 2007–2008 Nortel Networks
.
124
COTS Servers
Figure 112
HP DL320 G4 front view
Figure 113
HP DL320 G4 front view: LEDs
Table 5
HP DL320 G4 LED item description and status
Item
Description
Status
1
UID button LED (Unit
Identification)
Blue – Identification is activated.
Flashing blue – System is remotely managed.
Off – Identification is deactivated.
Nortel Communication Server 1000
Linux Platform Base and Applications Installation and Commissioning
NN43001-315 02.09
29 October 2008
Copyright © 2007–2008 Nortel Networks
.
HP DL320 G4 server
Item
Description
Status
2
Internal health LED
Green –- System health is normal.
Amber – System is degraded. To identify the
component, check the system board LEDs.
Red – Critical. To identify the component in a
critical state, check the system board LEDs.
Off – System health is normal (when in standby
mode).
3
NIC 1 link/activity LED
Green – Network link exists.
Flashing green – Network link and activity exist.
Off – No link to network exists.
4
NIC 2 link/activity LED
Green –Network link exists.
Flashing green – Network link and activity exist.
Off – No link to network exists.
5
Drive activity LED
Green – Drive activity is normal.
Amber – Drive failure occurred.
Off – No drive activity.
6
Power button and LED
Green – System is on.
Amber – System is shut down, but power is still
applied.
Off – Power not available.
125
Figure 114
HP DL320 G4 rear view
ATTENTION
The TLAN and ELAN port positions are reversed (L and R, 1 and 2) compared
to the IBM x306m server.
Nortel Communication Server 1000
Linux Platform Base and Applications Installation and Commissioning
NN43001-315 02.09
29 October 2008
Copyright © 2007–2008 Nortel Networks
.
126
COTS Servers
HP DL320 G4 BIOS settings
The Basic Input Output System (BIOS) settings on the HP DL320
G4 server shipped through Nortel are correct. The BIOS settings do
not require adjustment unless they are reset due to a fault or through
maintenance. If a reset of the BIOS settings occurs, check the serial port
option. The HP DL320 G4 BIOS settings can be seen at Table 6 "HP
DL320 G4 default BIOS settings" (page 126). The HP DL320 G4 servers
provide a physical COM1 serial port and a virtual (ILO) COM2 serial port.
If the setting for the serial console port is Auto, output can be directed
to either the COM1 port or COM2 ILO port. Set the serial console port
option to COM1 to ensure the console output goes to the physical COM1.
See “Configure the COM1 serial port on an HP DL320 G4 server” (page
126) for instructions.
The HP DL320 G4 server shipped through Nortel has a default baud rate
of 9600 b/ps and does not require a reset. If an error occurs and you want
to reset the baud rate, or if you want to change to another baud rate, see
“Changing the baud rate on an HP DL320 G4 Signaling Server” (page
128) for instructions.
For information about how to enable or disable the BIOS password on
the HP DL320 G4 server see “Setting the HP DL320 G4 server BIOS
password” (page 130).
Table 6
HP DL320 G4 default BIOS settings
BIOS value
Default setting
Devices and I/O port - serial port A
Enabled
Devices and I/O port - baud rate
9600 baud
Devices and I/O port - type of connector
9-pin serial female
Start options - legacy USB support
Disabled
Configure the COM1 serial port on an HP DL320 G4 server
Step
Action
1
Press Power to boot the server.
The server boots and the HP DL320 G4 boot screen appears.
Nortel Communication Server 1000
Linux Platform Base and Applications Installation and Commissioning
NN43001-315 02.09
29 October 2008
Copyright © 2007–2008 Nortel Networks
.
HP DL320 G4 server
127
Figure 115
HP DL320 G4 server boot screen
Note: If the server is already up and running, power the
server off and on to reboot and receive the HP DL320 G4
boot screen.
2
Press F9 to invoke the ROM-based setup utility (RBSU) menu
screen.
The RBSU menu screen appears.
Figure 116
HP DL320 G4 server RBSU menu
3
Navigate to the BIOS Serial Console & EMS option and press
Enter.
A BIOS Serial Console & EMS configuration menu screen
appears.
4
Navigate to the BIOS Serial Console Port option and press
Enter.
Nortel Communication Server 1000
Linux Platform Base and Applications Installation and Commissioning
NN43001-315 02.09
29 October 2008
Copyright © 2007–2008 Nortel Networks
.
128
COTS Servers
A BIOS Serial Console Port configuration screen appears. This
screen presents you with four options:
•
•
•
•
5
1 | Auto
2 | Disabled
3 | COM 1
4 | COM 2
Navigate to the COM 1 option and press Enter.
This configures the COM 1 port as the serial port for
communicating with the connected maintenance terminal.
The BIOS Serial Console & EMS configuration menu screen
reappears.
6
Press ESC to exit the BIOS Serial Console & EMS configuration
menu screen.
The RBSU menu screen reappears.
7
Press ESC to exit the ROM-based Setup Utility.
--End--
Changing the baud rate on an HP DL320 G4 Signaling Server
ATTENTION
The HP DL320 G4 server shipped through Nortel has a default Baud rate of
9600 b/ps and does not require a reset. Use this procedure only if you want to
use another Baud rate, or to correct the Baud rate after it is reset due to an
error.
Step
Action
1
Press Power to boot the server.
The server boots and the HP DL320 G4 boot screen appears.
Nortel Communication Server 1000
Linux Platform Base and Applications Installation and Commissioning
NN43001-315 02.09
29 October 2008
Copyright © 2007–2008 Nortel Networks
.
HP DL320 G4 server
129
Figure 117
HP DL320 G4 server boot screen
Note: If the server is already up and running, power the
server off and on to reboot and receive the HP DL320 G4
boot screen.
2
Press F9 to invoke the ROM-based Setup Utility (RBSU) menu
screen.
The RBSU menu screen appears.
Figure 118
HP DL320 G4 server RBSU menu
3
Navigate to the BIOS Serial Console & EMS option and press
Enter.
A BIOS Serial Console & EMS configuration screen appears.
4
Navigate to the BIOS Serial Console Baud Rate option and
press Enter.
Nortel Communication Server 1000
Linux Platform Base and Applications Installation and Commissioning
NN43001-315 02.09
29 October 2008
Copyright © 2007–2008 Nortel Networks
.
130
COTS Servers
A BIOS Serial Console Baud Rate configuration window
appears. This window presents you with four settings for the
serial port speed:
•
•
•
•
5
9600
19200
57600
115200
Navigate to the 9600 setting and press Enter.
This configures the serial port speed to 9600 b/ps.
The BIOS Serial Console & EMS configuration menu screen
reappears.
6
Press ESC to exit the BIOS Serial Console & EMS configuration
menu screen.
The RBSU menu screen reappears.
7
Press ESC to exit the ROM-based Setup Utility.
--End--
Setting the HP DL320 G4 server BIOS password
Step
Action
1
Press Power to boot the server.
The server boots and the HP DL320 G4 boot screen appears.
Figure 119
HP DL320 G4 server boot screen
Note: If the server is already up and running, power the
server off and on to reboot and receive the HP DL320 G4
boot screen.
2
Press F9 to invoke the ROM-based setup utility (RBSU) menu
screen.
The RBSU menu screen appears.
Nortel Communication Server 1000
Linux Platform Base and Applications Installation and Commissioning
NN43001-315 02.09
29 October 2008
Copyright © 2007–2008 Nortel Networks
.
IBM x306m server
131
Figure 120
HP DL320 G4 server RBSU menu
3
Select the Server Passwords option and press Enter.
4
Select the Set Admin Password option and press Enter.
5
At this point refer to the manufacturer’s manual for specific
instructions on how to enable or disable the BIOS password.
--End--
For additional operating information see the Server Product Guide on the
resource CD-ROM shipped with the HP DL320 G4 server .
IBM x306m server
The IBM x306m server provides the following features:
•
•
•
an Intel Pentium 4 processor (3.6 GHz)
•
•
•
Two Gigabit Ethernet ports
2 simple swap Serial ATA, 80 GB (1 drive configured)
8 GB of RAM PC4200 DDR II by means of 4 DIMM slots (2 GB
configured)
Four USB ports (two front, two back)
One DVD-COMBO (DVD/CD-RW) drive
Nortel Communication Server 1000
Linux Platform Base and Applications Installation and Commissioning
NN43001-315 02.09
29 October 2008
Copyright © 2007–2008 Nortel Networks
.
132
COTS Servers
— You use this to load the Signaling Server software files for the
Signaling Server, Voice Gateway Media Cards, and IP Phones
•
•
One serial port (back of Signaling Server)
A reset button
Figure 121
IBM x306m front view
Figure 122
IBM x306m front view: LEDs
Nortel Communication Server 1000
Linux Platform Base and Applications Installation and Commissioning
NN43001-315 02.09
29 October 2008
Copyright © 2007–2008 Nortel Networks
.
IBM x306m server
133
Table 7
IBM x306m LED description and status
Description
Status
Power LED
If this LED is lit, it indicates that the server is
turned on.
If this LED is off, it indicates that AC power is
not present, or the power supply or the LED
itself failed.
Hard disk LED
If this LED is lit, it indicates that a hard disk
drive is in use.
Locator LEDIf
When this LED is lit, it is lit remotely by the
system administrator to aid in visually locating
the server.
System Error LED
If this LED is lit, it indicates that a system error
occurred.
Figure 123
IBM x306m rear view
ATTENTION
The TLAN & ELAN port positions are reversed (L and R, 1 and 2) compared to
the HP DL320 server.Ethernet speed LED:
•
•
Lit indicates Ethernet network speed of 1 Gbps.
Off indicates Ethernet network speed is 10/100 Mbps.
Nortel Communication Server 1000
Linux Platform Base and Applications Installation and Commissioning
NN43001-315 02.09
29 October 2008
Copyright © 2007–2008 Nortel Networks
.
134
COTS Servers
IBM x306m BIOS settings
The BIOS settings on the IBM x306m server shipped through Nortel are
correct. These settings can be viewed at Table 8 "IBM x306m default
BIOS settings" (page 134).
Table 8
IBM x306m default BIOS settings
BIOS value
Default setting
Devices and I/O port - serial port A
Enabled
Devices and I/O port - baud rate
9600 baud
Devices and I/O port - console type
PC ANSI
Devices and I/O port - flow control
Off
Devices and I/O port - continue C.R. after POST
On
Devices and I/O port - type of connector
9-pin serial female
Start options - legacy USB support
Disabled
The IBM x306m server default BIOS settings can be changed by a BIOS
reset or other maintenance activity. To return the BIOS settings to the
appropriate values, see “Changing the BIOS settings on an IBM x306m
server” (page 134) for instructions.
For information about how to enable or disable the BIOS password on the
IBM x306m server see “Setting the IBM x306m server BIOS password”
(page 136).
Changing the BIOS settings on an IBM x306m server
Step
Action
1
Press the Power switch to boot the server.
The server boots and the Press F1 for Configuration/Setup
message appears on the maintenance terminal.
Note: If the server is already up and running, power the server
off and on or press the reset button to reboot and receive the
Press F1 for Configuration/Setup message.
2
Press F1 to invoke the IBM x306m server Configuration/Setup
Utility.
The Configuration/Setup Utility menu screen appears.
Nortel Communication Server 1000
Linux Platform Base and Applications Installation and Commissioning
NN43001-315 02.09
29 October 2008
Copyright © 2007–2008 Nortel Networks
.
IBM x306m server
135
Figure 124
IBM x306m server Configuration/Setup Utility menu
3
Navigate to the Devices and I/O Ports option and press Enter.
The Devices and I/O Ports menu screen appears.
Figure 125
Devices and I/O Ports menu
4
Navigate to the Remote Console Redirection option and press
Enter.
The Remote Console Redirection screen appears.
Nortel Communication Server 1000
Linux Platform Base and Applications Installation and Commissioning
NN43001-315 02.09
29 October 2008
Copyright © 2007–2008 Nortel Networks
.
136
COTS Servers
Figure 126
IBM x306m server Remote Console Redirection
5
Navigate to the option you wish to change and enter the
appropriate value.
6
Press Enter to change the setting.
7
Press ESC to exit the Remote Console Redirection option.
The Devices and I/O Ports menu screen appears.
8
Press ESC to exit the Devices and I/O Ports option.
The Configuration/Setup Utility menu screen appears.
9
Navigate to the Save Settings option and press Enter to save
the changed parameters.
10
Navigate to the Exit Setup option and press Enter to exit the
IBM x306m Configuration/Setup Utility.
The server will reboot automatically.
--End--
Setting the IBM x306m server BIOS password
Step
Action
1
Press the Power switch to boot the server.
Nortel Communication Server 1000
Linux Platform Base and Applications Installation and Commissioning
NN43001-315 02.09
29 October 2008
Copyright © 2007–2008 Nortel Networks
.
IBM x306m server
137
The server boots and the Press F1 for Configuration/Setup
message appears on the maintenance terminal.
Note: If the server is already up and running, power the server
off and on or press the reset button to reboot and receive the
Press F1 for Configuration/Setup message.
2
Press F1 to invoke the IBM x306m server Configuration/Setup
Utility.
The Configuration/Setup Utility menu screen appears.
Figure 127
IBM x306m server Configuration/Setup Utility menu
3
Select the System Security option and press Enter.
4
Select the Administrator Password option and press Enter.
5
At this point refer to the manufacturer’s manual for specific
instructions on how to enable or disable the BIOS password.
--End--
For additional operating information see the Server Product Guide on the
resource CD-ROM shipped with the IBM x306m server .
Nortel Communication Server 1000
Linux Platform Base and Applications Installation and Commissioning
NN43001-315 02.09
29 October 2008
Copyright © 2007–2008 Nortel Networks
.
138
COTS Servers
Nortel Communication Server 1000
Linux Platform Base and Applications Installation and Commissioning
NN43001-315 02.09
29 October 2008
Copyright © 2007–2008 Nortel Networks
.
139
.
Appendix
Nortel Linux base CLI commands
Table 11 "Nortel Linux base CLI commands" (page 141) contains a list of
the command line interface (CLI) commands used in Nortel Linux base.
Type (linuxbase-command) -h | --help at the command prompt to
display a brief summary of the CLI command, as shown in Table 9 "Linux
CLI command help" (page 139). Type man (linuxbase-command) at
the command prompt for a more detailed description, as shown in Table
10 "Linux man command example" (page 140).
Table 9
Linux CLI command help
$ poos --help
Usage:
poos (patch_id)|-app *(app_name)*|--help,-h
Options:
(patch_id)
Deactivate patch with (patch_id) handle.
-app *(app_name)*
Deactivate all patches for the application (app_name).
--help
Print this help message and exit.
Nortel Communication Server 1000
Linux Platform Base and Applications Installation and Commissioning
NN43001-315 02.09
29 October 2008
Copyright © 2007–2008 Nortel Networks
.
140
Nortel Linux base CLI commands
Table 10
Linux man command example
$ man poos
POOS(1) User Contributed Nortel Documentation POOS(1)
NAME
poos - Put a patch out of service.
SYNOPSIS
poos (patch_id)| -app (app_name) | --help,-h
DESCRIPTION
Remove a patch from service. The patch is removed from service from all processes in which it
was in service.
OPTIONS
(patch_id)
Deactivate patch with (patch_id) handle.
-app (app_name)
Deactivate all patches for the application (app_name).
--help Print this help message and exit.
EXAMPLES
Deactivate patch with 2 handle
$ poos 2
Patch handle: 2
Please ensure that the application solid is stopped before proceeding patch un-installation.
Do you want to continue patch un-installation? (Y/N) [N]? y
Performing the uninstallation:
Performing uninstall RPM patch...
Preparing... ########################################### [100%]
1:nortel-cs1000-solid ########################################### [100%]
executing Solid DB post install...
Installation nortel Solid database server completed.
Unstalling the Solid database server package done
Done.
The RPM patch uninstallation is completed.
The patch 2 has been deactivated successfully.
Deactivate all sunAm patches
$ poos -app sunAm
Patch handle: 0
Performing the uninstallation:
Nortel Communication Server 1000
Linux Platform Base and Applications Installation and Commissioning
NN43001-315 02.09
29 October 2008
Copyright © 2007–2008 Nortel Networks
.
IBM x306m server
The patch 0 has been deactivated successfully.
SEE ALSO pload, pout, pins, pstat, plis
5.50 2007-12-18 POOS(1)
Table 11
Nortel Linux base CLI commands
Command
Description
appinstall
Install Nortel applications.
appstart
Stop, start, or restart Nortel applications.
appVersionShow
Print the server’s application software version.
basefirewallconfig
Configure firewall settings.
baseparamsconfig
Configure base parameters.
baseVersionShow
Print the server’s base software version.
datetimeconfig
Configure the date and time.
dnsconfig
Configure DNS values.
ecnconfig
Configure Explicit Congestion Notification settings.
ftpdisable
Disable FTP.
ftpenable
Enable FTP.
ftpstatus
Show the current FTP status.
hostconfig
Configure the static lookup table for host names.
networkconfig
Configure network settings.
ntpconfig
Configure Network Time Protocol settings.
passwd
Change the user’s password.
pins
Put the patch in service.
plis
Show detailed information about the patch.
pload
Load the patch into the system database.
poos
Put the patch out of service.
pout
Unload the patch from the system database.
pstat
Show a list of installed patches.
reboot
Reboot the entire system.
routeconfig
Configure routing entries.
swVersionShow
Print the server’s software version.
sysbackup
Perform a system backup (both base and applications).
sysrestore
Perform a restore of the application data (backed up by sysbackup).
upgrade
Select the backup data source and reinstall Linux base.
Nortel Communication Server 1000
Linux Platform Base and Applications Installation and Commissioning
NN43001-315 02.09
29 October 2008
Copyright © 2007–2008 Nortel Networks
.
141
142
Nortel Linux base CLI commands
You might need to add the primary host entry in backup and member
server before you can access them using the hostconfig command.
The command syntax is nortel user ---> hostconfig add -ip
<PRIMARY SERVER IP> -host <PRIMARY SERVER HOST NAME>
-domain <PRIMARY SERVER DOMAIN NAME>.
Nortel Communication Server 1000
Linux Platform Base and Applications Installation and Commissioning
NN43001-315 02.09
29 October 2008
Copyright © 2007–2008 Nortel Networks
.
143
.
Appendix
Network configuration for Secure File
Transfer Protocol (SFTP) data backup
Use the guidelines in this appendix to assist in data backup to an SFTP
server. The section “Network configuration” (page 143) provides details on
network requirements and the section “SFTP logon” (page 143) provides
SFTP logon details. The section “SFTP network configuration
requirements” (page 144) provides specific Embedded Local Area Network
(ELAN) and Telephony Local Area Network (TLAN) requirements for SFTP
network configuration.
Network configuration
The network must be configured correctly for data backup to an SFTP
server. In order to configure the network you must understand the
difference between the ELAN and the TLAN. The ELAN and TLAN are
defined as follows:
•
ELAN - The ELAN is a secure local area network. The scope of
this network is limited to one subnet or node; however the scope of
the ELAN network can be expanded to cover multiple nodes with
advanced router (data path) configurations.
•
TLAN - The TLAN spans the entire enterprise network. Every node on
the TLAN has access to every other node.
Note: The definitions of ELAN and TLAN are a subset of the
definitions provided in the voice media gateway cards section of IP Line
Fundamentals (NN43100-500) () .
SFTP logon
Data backup to an SFTP server requires a user logon, password, and
path to access the SFTP server storage. The user logon can contain a
maximum of 32 characters comprised of lower and upper case letters,
Nortel Communication Server 1000
Linux Platform Base and Applications Installation and Commissioning
NN43001-315 02.09
29 October 2008
Copyright © 2007–2008 Nortel Networks
.
144
Network configuration for Secure File Transfer Protocol (SFTP) data backup
numeric digits, and the special characters _ . - and $. You cannot use the
character - at the beginning of the logon string and you can use $ only at
the end of the logon string.
Nortel Linux base does not recognize the \ character. Do not use the \
character when you specify the SFTP directory.
SFTP network configuration requirements
The SFTP option requires an operational ELAN network because the
backup and recovery of data must use the ELAN interface. Nortel
recommends the destination SFTP server reside on the same ELAN
network as the source SFTP server. If the destination SFTP server resides
outside the subnet of the source SFTP server, use one of the two options
shown in Table 12 "SFTP network configuration requirements" (page 144).
Table 12
SFTP network configuration requirements
Option
Details
1
The router connecting the two subnets must be configured to allow pings to pass
through. This ensures there is a valid data path between the two subnets
If the default gateway is set to the TLAN interface gateway, a routing entry is required
to ensure that all ELAN data uses only the ELAN NIC. Use the CLI command
routeconfig to add the routing entry. An example of the routeconfig command
is as follows:
routeconfig add -net destination_ip -netmask subnet_mask -gw gateway_ip -dev eth0
2
On the source server set the ELAN interface gateway as the default gateway.
Nortel Communication Server 1000
Linux Platform Base and Applications Installation and Commissioning
NN43001-315 02.09
29 October 2008
Copyright © 2007–2008 Nortel Networks
.
145
.
Index
A
P
Application installation
69
C
Configuration Data Selection window 39
Configuration for Network Routing
Service or Element Manager 99
Configuration Validation 1 window 43, 62
Configuration Validation 2 window 46, 63
D
Date and Time Configuration 47, 64
Disaster recovery 116
DNS Server Configuration window 46
E
ECM
upgrade 28
Element Manager applications
Package Installation window 51, 66
Password Configuration 47
Password recovery 111
Patching 106
Post System Configuration window 51
, 67
Prerequisites to install and configure 70
Primary Security Service server Fully
Qualified Domain Name 78,
81, 88, 91, 98
Primary Security Service server TLAN
IP address window 78, 80, 87,
90, 98
Private CA Certificate confirmation
window 74, 84, 94
S
Security hardening
104
82
T
I
Task flows 13
Install the CS 1000 applications 70
Install the Linux base software 37
Installation prompt window 38
U
Upgrade 53
ECM 28
User accounts
L
Linux base installation
109
35
N
Network Configuration window 40
Network firewall 102
Network Time Protocol Configuration
NRS applications 71
44
Nortel Communication Server 1000
Linux Platform Base and Applications Installation and Commissioning
NN43001-315 02.09
29 October 2008
Copyright © 2007–2008 Nortel Networks
.
146
Nortel Communication Server 1000
Linux Platform Base and Applications Installation and Commissioning
NN43001-315 02.09
29 October 2008
Copyright © 2007–2008 Nortel Networks
.
Nortel Communication Server 1000
Linux Platform Base and Applications Installation and
Commissioning
Copyright © 2007–2008 Nortel Networks
All Rights Reserved.
Release: Release 5.5
Publication: NN43001-315
Document revision: 02.09
Document release date: 29 October 2008
To provide feedback or to report a problem in this document, go to www.nortel.com/documentfeedback.
www.nortel.com
Sourced in Canada
LEGAL NOTICE
While the information in this document is believed to be accurate and reliable, except as otherwise expressly agreed to in writing
NORTEL PROVIDES THIS DOCUMENT "AS IS" WITHOUT WARRANTY OR CONDITION OF ANY KIND, EITHER EXPRESS
OR IMPLIED. The information and/or products described in this document are subject to change without notice.
Nortel, the Nortel logo, the Globemark, SL-1, Meridian 1, and Succession are trademarks of Nortel Networks.
All other trademarks are the property of their respective owners.