1
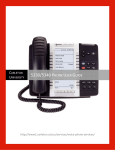
3300 CITELlink Gateway for 7000 Series Norstar Phones T7406 Phone User Guide NOTICE The information contained in this document is believed to be accurate in all respects but is not warranted by MITEL NETWORKSJ Corporation. The information is subject to change without notice and should not be construed in any way as a commitment by MITEL NETWORKS or any of its affiliates or subsidiaries. MITEL NETWORKS and its affiliates and subsidiaries assume no responsibility for any errors or omissions in this document. Revisions of this document or new editions of it may be issued to incorporate any such changes. Nothing in this document may be reproduced in any manner, either wholly or in part for any use whatsoever, without written permission from MITEL NETWORKS Corporation. IMPORTANT! This telephone is NOT suitable for direct connection to the public-switched telephone network. Connect the telephone to a Mitel Networks system only. Mitel Networks is a trademark of Mitel Networks Corporation. CITELlink is a trademark of CITEL Technologies Ltd. Nortel Networks is a trademark of Nortel Networks Corporation. Other product names mentioned in this document may be trademarks of their respective companies and are hereby acknowledged. Contents 1 ABOUT YOUR PHONE Conventions Using Your Norstar Phone with the 3300 CITELlink Gateway TIPS FOR YOUR COMFORT AND SAFETY Don't cradle the handset! Protect your hearing 2 3 3 3 3 ABOUT WIRELESS PHONES 4 USING A T7406 PHONE 5 Charging the Battery Telephone Setup Handset Lock Handset Asleep Mode Headset Calls Belt Clip Wrist Strap 5 7 9 9 9 10 10 CUSTOMIZING YOUR PHONE 11 Ringer Control Handset Receiver Volume Control Microphone Mute Feature Keys Language Change -i- 11 11 11 12 12 12 MAKING AND ANSWERING CALLS Make a call Answer a call End a call Redial - Saved Number Phonebook Speed Call Keys Speed Call - Personal Muting a Call 12 13 13 13 13 14 15 15 15 CALL HANDLING Hold Transfer Conference Conference Split Add Held Swap Call Forward Call Forward - Remote Call Forward - End Chaining Call Forward - Forced Call Forward - Override Messaging - Advisory Messaging - Callback Messaging - Cancel Callback Messaging - Cancel All Callbacks -ii- 15 16 16 16 17 17 18 19 19 20 20 20 21 22 22 23 USING ADVANCED FEATURES Account Codes Call Park Call Pickup Campon Do Not Disturb Override Paging Direct Paging Reminder Group Paging / Meet Me Answer Trunk Flash Record a Call -iii- 23 23 23 24 24 24 25 25 26 27 27 28 ABOUT YOUR PHONE The Mitel Networks 3300 CITELlink Gateway allows your Nortel Networks™ Norstar phone to work on a Mitel Networks 3300 Integrated Communications Platform (3300 ICP). When used with a 3300 ICP, your T7406 phone has five fixed-function keys ( (SUPERKEY), TRANS/CONF, MESSAGE, (HOLD), (CANCEL)), and four personal keys. The personal key on the bottom right is always your Prime Line; the remaining personal keys can be programmed as: z z z Feature keys (for example, Swap). You can program feature keys using your phone. The administrator can also program feature keys. Speed Call keys. You can program speed call keys from your phone. Line Appearances. Only the administrator can program line appearances. Your phone also features display-assisted selection of features, on-hook dialing, and an incoming call indicator light (at base of antenna). -1- Phone buttons Button Number 1 2 3 4 5-6, 12 7 8 9 10 11 Description Cancel Superkey Hold Prime Line Personal Keys Softkeys Options/Mute Volume Message Transfer/Conference Phone status indicators When line is Idle Busy Ringing On hold at your set On hold at another set the indicator is Off On Flashing slowly Flashing rapidly Flashing slow on/fast off Conventions The following conventions are used in this user guide: z z z Fixed-function keys are identified by bold uppercase letters (for example, TRANS/CONF ). Softkeys are identified by bold letters and the word "softkey" (for example, "Press the Yes softkey."). Text that appears on the display is identified by double quotes (for example, "Language?"). -2- Using Your Norstar Phone with the 3300 CITELlink Gateway Please note the following differences in the way your CITELlink Norstar phone now operates: z z z z You can program speed call numbers, personal keys as well as enable/disable features using . To navigate through the menus, use the YES and NO softkeys. Some features require you to dial a feature access code. You can use feature access codes whenever you have dial tone. The feature access codes in this user guide may be different from the ones programmed in your system. Ask your Administrator for the list of feature access codes you can use. When you have a message (including new voice mail messages), "Message" appears on the display, and the MESSAGE key indicator turns on. You do not need to select a line before dialing a number. See the Making and Answering Calls section for more information. TIPS FOR YOUR COMFORT AND SAFETY Don't cradle the handset! Prolonged use of the handset can lead to neck, shoulder, or back discomfort, especially if you cradle the handset between your ear and shoulder. Protect your hearing Your phone has a control for adjusting the volume of the handset receiver. Because continuous exposure to loud sounds can contribute to hearing loss, keep the volume at a moderate level. -3- ABOUT WIRELESS PHONES Wireless telephones use radio frequencies, which are susceptible to interference from electrical devices such as motors, computers, VHF radios, and fluorescent lights. Such interference can limit the operating range of the telephone and cause noisy or interrupted reception. Walls, building wiring, and metal structures such as filing cabinets can also affect the performance of the telephone. -4- USING A T7406 PHONE Charging the Battery To correctly connect the handset charger: 1. Plug the small connector of the power adapter to the back of the charger. 2. Plug the power adapter into a wall socket. To correctly charge a new battery pack: WARNING: The rechargeable battery pack must be fully charged before you use your T7406 phone for the first time. 1. Charge the battery pack in the battery port at the back of the charger for a minimum of 30 minutes. 2. Install the battery pack onto the back of the phone. 3. Put the phone in the phone port of the charger. When the contacts touch correctly, the phone charge indicator (left LED on charger) turns red. The battery pack is fully charged when the phone charge indicator turns green (three hours). 4. Place the spare battery pack in the back battery port on the charger. When the contacts touch correctly, the battery charge indicator (right LED on charger) turns red. The battery pack is fully charged when the battery charge indicator turns green (about 12 hours). -5- To change a battery pack: Note: You should exchange the phone battery packs regularly (once a week). 1. Press down on the battery pack latch at the back of the phone, and remove the battery pack from the phone. 2. Insert the battery pack in the back battery port of the charger. When the contacts touch correctly, the battery charge indicator (right LED on charger) turns red. The battery pack is fully charged when the battery charge indicator turns green (about 12 hours). 3. Insert the charged battery pack into the phone. 4. Insert the phone into the phone port of the charger. When the contacts touch correctly, the phone charge indicator (left LED on charger) turns on. The battery pack in the phone is fully charged when the phone charge indicator turns green. Recycle Note: Nickel metal hydride batteries are recyclable. Return your unwanted batteries to the nearest recycling center for proper disposal. Do not dispose of the batteries in office or household waste. Phone 1-800-8BATTERY to locate a Battery Recycling Center near you. -6- Telephone Setup Each T7406 phone must be registered to a base by sharing an identical security code. A base can support up to three independent phones. Each phone assigned to a base station must have a unique Set ID (1, 2 or 3). When viewing the back of the base station, the TCM/RJ-11 jacks from left to right correspond to the handset ID # 1, 2, and 3. To set your phone ID number 1. 2. 3. 4. 5. 6. 7. 8. 9. Press the Options button. Press the SHOW softkey. Press the NEXT softkey until the display shows "6. Handset ID". Press the SHOW softkey. The display shows the current phone ID number. To change the phone ID number, press the CHANGE softkey. The display shows "Enter Password". Enter the 6-digit password (default is 000000). Press the OK softkey. The display shows "Press Digit 1-3". Press the dial pad number corresponding to your phone ID number. Press the OK softkey to save the phone ID number. Note: Talk to your Administrator for information on changing your password. -7- To assign your phone to a base station: If your installer has already set up a base station, obtain the security code, and perform steps 1 to 7 of this procedure. If you need to assign a security code to the base station, perform all the steps in this procedure. 1. 2. 3. 4. 5. 6. 7. 8. 9. 0. Press the Options/Mute button. Press the SHOW softkey. Press the NEXT softkey until the display shows "4. Set S.S. Code". Press the SHOW softkey. The display shows "Press 6 digits". Using the keypad, enter the 6-digit security code assigned to the base station you are connecting to. Press the OK softkey. The display shows "4. Set S.S. Code". If you are assigning a phone to an existing base station, your phone is now connected to the system. If you are assigning the first phone to a new base station (which has no security code), continue with the following steps. When the display shows "4. Set S.S. Code", press the NEXT softkey to get ready to send the security code to the base station. The display shows "5. Send S.S. Code". Unplug the AC power adapter connected to the base station, and plug it back in again. Within 15 seconds, press and hold the OK softkey for 5 seconds to send the security code to the base. When the transfer is successful, the display shows "Send OK!" and you hear a beep. Note: If the security code transfer fails, the display shows "Send Error!". To correct this, repeat steps 9 and 10. Press the Options/Mute button. The display shows the time and date. -8- Handset Lock You can lock the handset to prevent unintentional button presses. To lock the handset: 1. 2. 3. 4. Press Press Press Press the the the the Options/Mute button. SHOW softkey. The display shows "1. Ring Type". NEXT softkey until the display shows "3. Lock Handset". OK softkey. The display shows "Handset Locked". To unlock the handset z Press then *. Handset Asleep Mode If your phone remains idle for more than 15 seconds, it automatically reverts to Handset Asleep mode. To wake up your handset, press any key. Call indications: While your phone is asleep, it does not display message waiting indicators or indications that the ring-again feature is active. Priority calls with Do Not Disturb active: When the phone is asleep and a priority call is made to the phone, it appears to the caller that the priority call was successfully connected, even though you receive no indication on your phone. To ensure that your phone provides proper audible and visual ring notification when Do Not Disturb is on, always press the line/intercom button and the button when the phone wakes up. Headset Calls Phone functions and features are the same when a headset is plugged into the headset port of the phone (on top of phone, above the volume button). -9- Belt Clip You can attach a belt clip to the back of the phone to provide handsfree portability. To attach the belt clip: 1. Line up the side tabs of the belt clip with the notches on each side of the phone (the belt clip is attached to the back of the phone, above the battery pack). 2. Snap the belt clip into place. To remove the belt clip: 1. Use a small coin the side tabs of the belt clip from the notches on each side of the phone. 2. Remove the belt clip by pulling it off the handset. Wrist Strap You can attach a wrist strap to the phone for easy carrying. 1. Put the loop of the wrist strap through the hook on the side of the handset (above the Volume button). 2. Put the other end of the wrist strap through the loop, and pull until the wrist strap is secure on the phone. -10- CUSTOMIZING YOUR PHONE Ringer Control To adjust the Ringer Volume while the phone is idle: 1. 2. 3. 4. 5. 6. Press Press Press Press Press Press the the the the the the Options/Mute button. SHOW softkey. The display shows "1. Ring Type". NEXT softkey. The display shows "2. Ringer Volume". SHOW softkey. The display shows "Press Volume bar". volume button to adjust the ringer volume. OK softkey. The display shows "2. Ringer Volume". To adjust the Ringer Type while the phone is idle: 1. Press the Options/Mute button. 2. Press the SHOW softkey. The display shows "1. Ring Type". 3. Press the CHANGE softkey to listen to the different types of ring available. 4. Press the OK softkey to select the desired ring type. The display shows the ring type number you chose. Note: To disable the ringer, select Ringer Off. Handset Receiver Volume Control To adjust the Handset Receiver Volume when you are using the handset: z Press the volume bar on the left side of the handset. Microphone Mute To toggle the microphone on and off while on a call z Press the Options/Mute button. Note: This applies only to the current call. If you get a second call and want to mute the microphone for that call, you must press the Options/Mute button again. -11- Feature Keys To display information about a key: 1. Press . 2. Press a personal key. 3. Press . To re-program a personal key: 1. 2. 3. 4. 5. 6. 7. 8. Press Press Press Press Press Press Press Press . the No softkey until "Personal Keys?" appears. the Yes softkey. a personal key that isn't a line key. the Change softkey. the No softkey until the desired feature appears. the Yes softkey. . Language Change To change the display language: 1. 2. 3. 4. 5. 6. Press Press Press Press Press Press the the the the the . No softkey until "Language?" appears. Yes softkey. Change softkey. No until the desired language appears. Yes softkey. MAKING AND ANSWERING CALLS Make a call 1. If you want to use a Non-Prime Line, press a Line Appearance key. 2. Dial the number, -ORPress a Speed Call key. -12- Answer a call z Press the Options/Mute button. End a call z Press . Redial - Saved Number To save the last number that you manually dialed: z Dial **79. To Redial a saved number: z Dial *6*. Phonebook For each letter in the name, press the appropriate key on the keypad until the letter is shown in the display; for example, if the letter C is required, press the digit 2 three times. Use the softkey to correct errors. If the next letter in a name is on the same key as the previous letter, press the softkey before proceeding. If required, use the softkey to add a space between the first and last name. To use Phonebook: 1. 2. 3. 4. 5. 6. Press the Phonebook softkey. Enter the name of the desired party using the keypad. Press the Lookup softkey. If no match exists, edit the original entry. If the name is not unique, press the Next softkey. Do one of the following: To make the call, press the Call softkey. To edit the entry, press the Retry softkey. To exit, press . -13- Speed Call Keys You may use Speed Call Keys to make a call or to send a string of digits during a call (press a Speed Call Key during a call to send a multi-digit password, for instance). To dial a stored Speed Call number: z Press a Speed Call key. To store a Speed Call number: 1. 2. 3. 4. 5. Press . Press a personal key that isn't a line key. Press the Change softkey. Press the Yes softkey. Do one of the following: To enter a new number, dial the number. Press between digits to create a pause during dialing; press more than once to lengthen the pause. To enter a trunk flash, press TRANS/CONF. (See Trunk Flash for more information about the use of this feature.) 6. To make the number private, press the Private softkey. 7. Press the Save softkey. 8. Press to exit, or select another personal key to program another speed dial number. -14- Speed Call - Personal Note: Personal Speed Call lists must be configured by the Administrator. To store a personal Speed Call number: 1. Dial 67. 2. Enter an index number between 00 and 09. 3. Dial the number to be stored (press between digits to create a pause during dialing - press more than once to lengthen the pause). 4. Press to hang up. To dial a stored personal Speed Call number: 1. Dial 58. 2. Enter an index number between 00 and 09. Muting a Call To disable/enable the handset microphone during a call: z Press the Options/Mute button. CALL HANDLING Hold To place a call on Hold: z Press . The line appearance flashes red. To retrieve a call from Hold: z Press the flashing line key. To retrieve a call from Hold at another station: z Press the flashing line key. -ORDial **1 and the number of the station that placed the call on Hold. -15- Transfer To Transfer an active call: 1. Press TRANS/CONF. 2. Dial the number of the third party. 3. Do one of the following: To complete the Transfer, press the Release softkey. To announce the Transfer, wait for an answer, consult, and press to hang up. To cancel the Transfer, press . Conference To form a Conference when a two-party call is already in place, or to add another party to an existing Conference: 1. 2. 3. 4. Press TRANS/CONF. Dial the number of the next party. Wait for an answer. Press TRANS/CONF. To leave a Conference: z Press to hang up. Conference Split To Split a Conference and speak privately with the original party: z Press the Split softkey. To return to the conference call: z Press TRANS/CONF. -16- Add Held To move a call on Hold to another line appearance: 1. Press an available line key. 2. Press the Addheld softkey. 3. Press the flashing line key. To add a call on Hold to an existing conversation or conference: 1. Press the Addheld softkey. 2. Press the flashing line key. Swap To call another party when you are in an established two-party call: 1. Press TRANS/CONF. 2. Dial the number. To alternate between the two parties: z Press the Trade softkey. -17- Call Forward Call Forward lets you redirect incoming calls to an alternate number. Always redirects all incoming calls regardless of the state of your phone. B-Int redirects internal calls when your phone is busy, and B-Ext redirects external calls when your phone is busy. NA-Int redirects internal calls after several rings if you don't answer, and NA-Ext redirects external calls after several rings if you don't answer. Note: For information about "I Am Here?", see Call Forward - Remote. To program Call Forward: 1. 2. 3. 4. 5. 6. 7. 8. 9. 0. Press . Press the No softkey until "Call Forwarding?" appears. Press the Yes softkey. Press the Next softkey until the desired type of Call Forward appears (see above). Press the Review softkey. If a number is already programmed, press the Change softkey. Press the Program softkey. Dial the destination number. Press the Save softkey. Press . To turn Call Forward on and off (once it has been programmed): 1. 2. 3. 4. 5. 6. 7. Press . Press the No softkey until "Call Forwarding?" appears. Press the Yes softkey. Press the Next softkey until the desired type of Call Forward appears. Press the Review softkey. Press the Change softkey. Do one of the following: To turn Call Forward on, press the TurnOn softkey. To turn Call Forward off, press the TurnOff softkey. 8. Press . -18- Call Forward - Remote To forward calls from a remote station to your current location: 1. 2. 3. 4. 5. 6. 7. Press . Press the No softkey until "Call Forwarding?" appears. Press the Yes softkey. Press the Next softkey until "I Am Here" appears. Press the Yes softkey. Dial the extension of the remote station. Press the Save softkey. To cancel Call Forward - Remote from the station that set the remote forwarding: 1. Dial **77. 2. Dial the extension of the remote station. 3. Press to hang up. To cancel Call Forward - Remote from the station that was forwarded: 1. 2. 3. 4. 5. 6. 7. Press Press Press Press Press Press Press the the the the the . No softkey until "Call Forwarding?" appears. Yes softkey. Review softkey. Change softkey. TurnOff softkey. . Call Forward - End Chaining To ensure that calls do not get forwarded again by the destination number: 1. Dial 64. 2. Press to hang up. To again allow calls to be forwarded by the destination number: 1. Dial **73. 2. Press to hang up. -19- Call Forward - Forced To force an incoming call to be forwarded: z Press the Forward softkey. Note: The Forward softkey will not appear if Call Forward is not programmed. Call Forward - Override To override Call Forward and ring a station: 1. Dial *1*. 2. Dial the extension number. Messaging - Advisory To turn Messaging - Advisory on: 1. 2. 3. 4. 5. Press Press Press Press Press the the the the . No softkey until "Advisory Msgs?" appears. Yes softkey. Next softkey until the desired message appears. TurnOn softkey. To turn Messaging - Advisory off: 1. 2. 3. 4. Press . Press the No softkey until "Advisory Msgs?" appears. Press the Yes softkey. Press the TurnOff softkey. -20- Messaging - Callback To leave a message waiting indication on a phone when you hear busy or ringback tone: z Press MESSAGE or the Callback softkey. To respond to a message waiting condition on your phone: 1. Press MESSAGE. 2. If a password is required, dial your password and press the Enter softkey. 3. Press the Yes softkey. The caller information is displayed. 4. To display the time the message was sent, press the More softkey. To display the number of the caller, press the More softkey twice. 5. Do one of the following: To call the message sender, press the Call softkey. To delete the message, press the Erase softkey. To view the next message, press MESSAGE. To answer a Callback: z Press the Options/Mute button on the right of the handset. To check for messages from a remote station: 1. 2. 3. 4. 5. 6. Press . Press the No softkey until "Remote Msging?" appears. Press the Yes softkey. Dial your extension number. Press the Enter softkey. If a password is required, enter your password and press the Enter softkey. 7. Press the Yes softkey to respond to the message. -21- To set, change, or clear a password (up to 7 digits, not including 0): 1. 2. 3. 4. 5. 6. 7. 8. 9. Press . Press the No softkey until "Set Password?" appears. Press the Yes softkey. Do one of the following: To enter a new password, enter your password. To change or clear your password, enter your current password. Press the Enter softkey. If you are changing or clearing your password, do one of the following: To change your password, enter your new password and press the Enter softkey. To clear your password, enter 0. Enter your new password again. If you are setting up or changing a password, press the Enter softkey. Press . Messaging - Cancel Callback To cancel a Callback: 1. Dial *1#. 2. Dial the number of the called station. 3. Press to hang up. Messaging - Cancel All Callbacks To cancel all Callbacks: 1. Dial #1. 2. Press to hang up. -22- USING ADVANCED FEATURES Account Codes To use Forced Account Codes: 1. Dial the Account Code digits. 2. Press #. To enter an Account Code during a call: 1. 2. 3. 4. 5. Press . Press the Yes softkey. Dial the Account Code digits. Press the Save softkey. Do one of the following: For a verified account code, press the Yes softkey. For a non-verified account code, press the No softkey. Call Park To retrieve a call parked by the attendant: 1. Dial *23. 2. Dial the console ID and the Hold Slot number. Call Pickup To answer a call that is ringing at another station in your Pickup Group: z Press the Pickup softkey. To answer a call that is ringing at a station not in your Pickup Group: 1. Dial **6. 2. Dial the number of the ringing station. -23- Campon To Campon to a busy station: z Press the Wait softkey. To retrieve a call when you hear Campon tone: z Press the Trade softkey. Do Not Disturb To activate or deactivate Do Not Disturb: z z z z Press the Do Not Disturb feature key. -ORPress . Press the NO softkey until "Do Not Disturb" appears. Do one of the following: Press TurnOn to activate Do Not Disturb. Press TurnOff to deactivate Do Not Disturb. To activate Do Not Disturb from a remote station: 1. Dial **5. 2. Dial the number of the station to which Do Not Disturb is to apply. 3. Press to hang up. To deactivate Do Not Disturb from a remote station: 1. Dial ##5. 2. Dial the number of the station with Do Not Disturb activated. 3. Press to hang up. Override To use Override when you encounter busy or DND tone: z Press the Intrude feature key. -24- Paging To use Paging: 1. Press the Pager feature key. 2. Dial the Paging zone number (if required). 3. Make the announcement. Direct Paging Direct Paging allows you to page a party through their phone speaker. If the paged party has Off-Hook Voice Announce enabled, the page will be heard even when the party is on a handset call. To page a party: 1. Press the Direct Paging feature key. 2. Dial the extension number. 3. Speak to the dialed party after the tone. To answer a Direct Page (indicated by a single burst of tone): z Press the Options/Mute button on the right of the handset. -25- Reminder To program a Reminder: 1. 2. 3. 4. 5. Press Press Press Enter Press the the the the . No softkey until "Timed Reminder?" appears. Yes softkey. time in 24-hour format. Save softkey. To view, change, and/or cancel a pending Reminder: 1. 2. 3. 4. Press . Press the No softkey until "Timed Reminder?" appears. Press the Yes softkey. Do one of the following: To change the Reminder, press the Change softkey, enter the new time, and press the Save softkey. To cancel the Reminder, press the Clear softkey. To exit without canceling the Reminder, press . To acknowledge a Reminder when your phone rings once: z Press the Confirm softkey. Note: If you are on a call when the reminder expires, you hear a single beep. If your phone is asleep when the reminder expires, you will only get a visual reminder (the phone will not ring). -26- Group Paging / Meet Me Answer Group Paging allows you to page a group of telephones through their built-in speakers. You can belong to as many as three paging groups with one group designated as your "prime" group. When you need to respond to a Group Page but don't know the identity or extension number of the paging party, use the Meet Me Answer feature. You have up to 15 minutes after receiving the page to use Meet Me Answer. To make a Group Page: 1. Press the Direct Page feature key or dial *37. 2. Do one of the following: To page your prime page group, press #. To page a specific page group, dial the page group directory number. 3. Speak to the dialed party after the tone. To respond to a Group Page by using Meet Me Answer: 1. Dial *88. 2. Do one of the following: To respond to a page from your prime page group, press #. To respond to a page from a specific page group, dial the page group directory number. Trunk Flash The Trunk Flash feature allows you to access Centrex features (if available) while you are talking on an outside call. To flash a trunk while talking on an outside call: 1. 2. 3. 4. Press TRANS/CONF. Dial *57 for a single flash or *56 for a double flash. Wait for dial tone. Dial the Centrex feature access code. -27- Record a Call This feature uses your voice mail system to record your phone conversations. Note: You may be required by law to inform the other party that you are recording the conversation. For specific instructions, consult your system administrator. To start recording while on a two-party call: z Press the Record Call feature key. Note: Your system may be programmed to automatically begin recording external calls when you or the other answers. To pause recording: z Press the Pause softkey. To resume recording after pausing: z Press the Resume softkey. To stop a recording without saving it: z Press the Stop&Erase softkey. To stop and save a recording: z z Press the Stop&Save softkey. Press the Record Call key. Putting the call on hold saves the recording; taking the call off hold starts a new recording. Depending on system programming, hanging up, or pressing TRANS/CONF or a DSS key, may also save the recording. To listen to a recording: 1. Access your voice mailbox. 2. Follow the prompts to retrieve the recording. -28- ®,™ Trademark of Mitel Networks Corporation © Copyright 2004, Mitel Networks Corporation All rights reserved