1
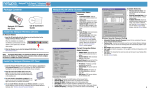
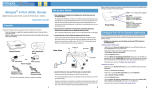
™
Netopia Router
Getting Started User Guide
Installationsanleitung
Guía de iniciación del usuario
Manuel de l’utilisateur : pour commencer
Manuale dell'utente
Introducerende gebruikershandleiding
Användarhandbok - Så här börjar du
Netopia R-Series Routers
Copyright
This manual and any associated artwork, software, and product designs are copyrighted with
all rights reserved. Under the copyright laws such materials may not be copied, in whole or
part, without the prior written consent of Netopia, Inc. Under the law, copying includes
translation to another language or format.
Netopia, Inc.
2470 Mariner Square Loop
Alameda, CA 94501-1010
U.S.A.
Part Number
For additional copies of this manual, order Netopia part number 6160014-00-01
English
©1999, Netopia, Inc., v.399
All rights reserved. Printed in the U.S.A.
4 Getting Started User Guide
INTRODUCTION
The Netopia™ Router is designed to be easy to connect, configure, and use. Netopia and your ISP together make it even easier for you to get your
router set up and connected to the Internet in a few minutes.
Once you’ve connected your router to your computer and to your telecommunications line and installed a web browser, you’re ready to run the
Netopia SmartStart Wizard.
Advanced users can find detailed documentation of advanced configuration options on the Netopia CD in the documentation folio accompanying your
Netopia Router.
CONTENTS
This booklet covers the following topics:
n
n
n
n
n
n
“Making the Physical Connections” on page 4
“Netopia Router Back Panel Por ts” on page 4
“Connecting to your Network” on page 5
“Before running SmartStart” on page 5
“Setting up your Router with the Smar tStart Wizard” on page 6
“Sharing the Connection” on page 10
MAKING THE PHYSICAL CONNECTIONS
Identify the connectors and switches on the back panel and attach the necessar y Netopia Router cables.
1.
2.
3.
Connect one of the RJ-45 cables to any of the Ethernet
ports on the router.
(If you are connecting the router to an existing Ethernet
hub, use Ethernet port #1 on the router and set the
crossover switch to the Uplink position.)
Connect one end of one of the RJ-45 cables to the “Telco
1" port, and the other end to your ISDN line outlet. (The
“Telco 2” port is reserved for future use.)
Connect the mini-DIN8 connector from the Power Adapter
to the Power port, and plug the other end into an electrical
outlet.
You should now have: the power adapter plugged in; the
Ethernet cable connected between the router and your
computer; and the telephone cables connected between
the router and the ISDN line jack.
NETOPIA ROUTER BACK PANEL PORTS
The figure below displays the back of the Netopia Router.
Netopia Router back panel
POTS ports (optional)
Line port
Termination switch
Ethernet
8
7
6
5
4
3
2
1
Telco 2
Phone 2
Auxiliary
Phone 1
Console
Telco 1
Power
Normal/Uplink
1
8 port Ethernet hub
Crossover switch
Auxiliary port
Console port
Power port
The following table describes all the Netopia Router back panel ports.
Port
Description
Power port
A mini-DIN8 power adapter cable connection.
Line port
An RJ-45 jack labelled “Telco1” for your WAN connection. (The “Telco 2” port is reserved for future use.)
Console port
A DE-9 console port for a direct serial connection to the console screens. You can use this if you are an experienced user. See the on-line User’s Reference Guide on your Netopia CD.
Auxiliary port
An HD-15 auxiliar y port for attaching an external modem or the optional AppleTalk kit or the optional Analog Dial-in
kit (for RAS).
5
Port
Description
Crossover switch
A crossover switch with Normal and Uplink positions. If you use Ethernet Port #1 for a direct Ethernet connection
between a computer and the router, set the switch to the Normal position. If you are connecting the router to an
Ethernet hub, use Ethernet port #1 on the router and set the switch to the Uplink position.
8-port Ethernet hub
Eight Ethernet jacks. You will use one of these to connect to the Netopia Router for configuration. For a new installation with SmartStart, use the Ethernet connection. You can either connect your computer directly to any of the
Ethernet ports on the router, or connect both your computer and the router to an existing Ethernet hub on your LAN.
Alternatively, you can use the console connection with a terminal emulator application and a direct serial connection, or Telnet via Ethernet, to run console-based management. See the on-line User’s Reference Guide on your
Netopia CD.
S/T Termination
switch
Netopia Router S/T models also provide an S/T termination switch. The S/T termination switch on the Netopia
Router back panel must be enabled to terminate the S/T bus. To enable this parameter, the switch must be toggled
to the left, which is the default setting.
2 Phone ports
(POTS models only)
Netopia Router models that support SmartPhone™ provide two RJ-11 telephone jacks for connecting analog
devices, such as a telephone, facsimile machine, or modem.
CONNECTING TO YOUR NETWORK
The Netopia Router in a 10Base-T network
Ether
8
4
To connect your 10Base-T network to the Netopia Router through an
Ethernet port, use a 10Base-T cable with RJ-45 connectors.
If you have more than eight devices to connect, you can attach
additional devices using either a 10Base-T hub or an EtherWave daisy
chain, or some combination of both.
If you add devices connected through a hub, connect the hub to
Ethernet port number 1 on the Netopia Router and set the
Normal/Uplink switch to Uplink.
Nor
1
BEFORE RUNNING SMARTSTART
The SmartStart Wizard will help you set up the router and let other users on the local area network (LAN) share the Internet connection. The
SmartStart Wizard walks you through a series of questions and based on your responses automatically configures the router for connecting your
LAN to the Internet or to your remote corporate network.
The SmartStart Wizard will:
n
n
n
n
n
automatically check your Windows 95, 98, or NT PC’s TCP/IP configuration to be sure you can accept a dynamically assigned IP address, and
change it for you if it is not set for dynamic addressing
check the physical connection from your computer to your router without your having to enter an IP address
assign an IP address to your router
allow you to enter your dial-up telephone numbers or other information
dial up and test your connection to your chosen ISP or other remote site
Be sure you have connected the cables and power source as described in “Making the Physical Connections” on page 4.
Before you launch the Smar tStart application, make sure your computer meets the following requirements:
PC
Macintosh
System software
Windows 95, 98, or NT operating system
MacOS 7.5 or later
Connectivity
software
TCP/IP must be installed and properly configured.
See “Configuring TCP/IP on Windows 95, 98, or NT
computers” on page 10
MacTCP or Open Transport TCP/IP must be installed and properly
configured. See “Configuring TCP/IP on Macintosh computers” on
page 11.
Connectivity
hardware
Ethernet card or transceiver (10Base-T)
Either a built-in or third-party Ethernet card or transceiver (10Base-T)
Browser
software
Netscape Communicator™ or Microsoft Internet Explorer, included on the Netopia CD. Required for web-based registration and web-based monitoring.
Notes:
• The computer running SmartStart must be on the same Ethernet cable segment as the Netopia Router.
Repeaters, such as 10Base-T hubs between your computer and the Netopia Router, are acceptable, but devices such as switches or other
routers are not.
• SmartStart for the PC will offer to set your TCP/IP control panel to “Obtain an IP address automatically” if it is not already set this way. This
will require you to reboot your computer. If you have a specified IP address configured in the computer, use the SmartStart advanced configuration option (see “Advanced option” on page 9) to change your Netopia default IP address (192.168.1.1). You should make a note of it
before running SmartStart, in case you do not want to use the dynamic addressing features built in to the Netopia Router and need to
restore the fixed IP address.
6 Getting Started User Guide
SETTING UP YOUR ROUTER WITH THE SMARTSTART WIZARD
The SmartStart Wizard is tailored for your computer platform, but it works the same way on either a PC or a Macintosh. Inser t the Netopia CD or
diskette (if that is what was supplied to you), and in the desktop navigation screen that appears, launch the SmartStart Wizard application.
The SmartStart Wizard presents a series of screens to guide you through the preliminary configuration of a Netopia Router. It will then create a
connection profile in your Netopia Router using the information you supply to it.
Welcome screen. The first screen welcomes you to the Smar tStart
Wizard configuration utility.
Click the Next button after you have responded to the interactive prompts
in each screen.
The Help button will display useful information to assist you in responding
to the interactive prompts.
Easy or Advanced options screen. You can choose either Easy or
Advanced setup.
n
If you choose Easy, SmartStart automatically uses the
preconfigured IP addressing setup built into your router. This is the
best choice if you are creating a new network or don’t already have
an IP addressing scheme on your new network.
If you choose Easy, you will see a Connection Test screen like the
one shown on page 6 while SmartStart checks the connection to
your router.
n
If you choose Advanced, skip to page 9 now. The SmartStart
Wizard displays the Router IP Address screen shown on page 9, in
which you can choose ways to modify your router’s IP address.
EASY OPTION
Connection Test screen. SmartStart tests the connection between
your computer and the router. While it is testing the connection, a
progress indicator screen is displayed and the router’s Ethernet LEDs
flash.
When the test succeeds, Smar tStart indicates success and presents the Connection Profile screen shown on page 8.
If the test fails, the wizard displays an error screen. If the test fails, check the following:
n
n
n
n
n
Check your cable connections. Be sure you have connected the router and the computer properly, using the correct cables. Refer to “Making
the Physical Connections” on page 4.
Make sure the router is turned on and that there is an Ethernet connection between your computer and the router.
Check the TCP/IP control panel settings to be sure that automatic IP Addressing (Windows) or DHCP (Macintosh) is selected. If you are using
a Windows PC, SmartStart will automatically detect a static IP address and offer to configure the computer for automatic addressing. On a
Macintosh computer, you must manually set the TCP/IP Control Panel to DHCP. See “Configuring TCP/IP on Macintosh computers” on
page 11. If you currently use a static IP address outside the 192.168.1.x network, and want to continue using it, use the Advanced option to
assign the router an IP address in your target IP range. See “Advanced option” on page 9.
On a Windows 95 or 98 system, Smar tStart will automatically disable DNS. On a Windows NT system you will need to click the DNS
Configuration tab on the TCP/IP properties display and then manually disable DNS See “Configuring TCP/IP on Windows 95, 98, or NT
computers” on page 10.
If all of the above steps fail to resolve the problem, reset the router to its factor y default settings and rerun SmartStart. See the on-line User’s
Reference Guide on the Netopia CD for instructions.
If you are configuring an ISDN router, you may see the ISDN Switch Type screen shown below, displaying the possible switch types available
for your region. This screen may not appear, if there is only one switch type in use in your region or you are using a customized version of
SmartStart.
7
ISDN Switch Type screen. If you have an ISDN router, the ISDN Switch
Type screen appears.
Select one of the suppor ted ISDN switch types for your ISDN line. Your
telephone company should have provided this information when your ISDN
line was installed.
When you have done this, click Next.
Note: The switch types listed are different for different regions. If your
region has only one switch type, this screen may not appear. In that case,
skip to the Manual or Automated Connection Profile screen below.
You may see an additional screen associated with ISDN and POTS,
depending on your configuration.
n
You will see the Manual or Automated Connection Profile screen shown below.
Manual or Automated Connection Profile screen. The SmartStart
Wizard asks you to select a method of creating a connection profile. The
connection profile tells your router how to communicate with your ISP or
other remote site, such as your corporate office. You can select either ISP
Automation or Manual Entry.
Options are explained below.
Make your selection and click Next.
If you select ISP Automation, SmartStart offers you the option of choosing one of several Netopia ISP par tners that support the Netopia Router.
You then see the Internet Service Provider Selection screen shown on page 7.
If you select Manual Entry, you must be prepared with the following information. You must enter:
n
n
n
n
n
n
Your dial-up number, sometimes referred to as an ISP POP number
Your Login name and Password. (These are case-sensitive.)
Any PBX phone system dialing prefix (such as “9” for an outside line)
Your PPP authentication method. Options are: PAP (Password Authentication Protocol), CHAP (Challenge Handshake Authentication Protocol),
or None. Most ISPs use PAP; this is the default.
A Domain Name Ser ver (DNS); this entr y must be an IP address in dotted decimal format. (for example, 192.168.4.10, not “joe.isp.com”)
Optionally, an alternate DNS if your ISP provided one
If you select Manual Entr y, the Connection Profile screen shown on page 8 appears.
Internet Service Provider Selection screen. Select an ISP from the
list of Netopia ISP par tners who have provided information for automatic
setup. Choose Generic ISP if your ISP is not included on the list. If you
don’t already have an account with the selected ISP, call and order
service using the listed customer ser vice telephone number, if provided.
When you have done this, click Next.
n
Most ISPs will provide you with information for you to enter in the Connection Profile screen (shown below). Generally, they will provide you
with:
n
n
Your dial-up number, sometimes referred to as an ISP POP number
Your Login name and Password. (These are case-sensitive.)
Note: Your ISP may provide you with additional values such as “Remote IP Gateway” or “Subnet Mask.” These entries are not required for the
SmartStart Wizard to configure your router.
If you have a PBX phone system, you may need a dialing prefix (such as “9” for an outside line). You will enter that information in the
Connection Profile screen shown below.
8 Getting Started User Guide
Connection Profile screen. Your ISP-supplied configuration information
may be displayed in grayed-out fields that you do not have to change. All
fields must be filled in except the Alternate DNS field if your ISP does not
provide one.
If you have a PBX system, you may need a dialing prefix (such as “9” for
an outside line). Enter that information here.
When you have done this, click Next.
The Name and Password screen (shown below) appears; this is where you
enter the username and password for your connection to your ISP.
Name and Password screen. Enter the username and password that
identifies you to your ISP.
When you have done this, click Next.
The SmartStart Wizard then posts your connection profile information to
your router.
Now the Connection Profile Test screen (shown below) appears. It allows
you to test your connection to your ISP using the connection profile you
have just created.
Connection Profile Test screen. SmartStart tests your connection
profile by attempting to connect to your ISP.
To test the connection profile with your ISP, click Next.
While the test is running, SmartStart reports its progress in a brief
succession of dialog boxes as described below.
Available Line Test Progress screen. SmartStart tests to see if the
router can place calls on your telephone line. While it is testing the
connection, a dialog box is displayed and the LEDs flash.
Connection Test Progress screen. SmartStart displays a dialog box
showing you that your connection profile is being tested. If this test fails,
check the physical connections between the computer, the router, and the
wall jack or jacks. Check for errors in any manual entries you made during
the configuration process.
Final screen. When the connection tests successfully, SmartStart
displays a screen telling you that your configuration is now complete.
In most cases, this Smar tStart configuration is all that you need to get your router up and running and connected to the Internet. However, you may
want to take advantage of additional features or special configuration options available through the console-based configuration inter face. For
detailed instructions, see the on-line User’s Reference Guide on your Netopia CD.
9
ADVANCED OPTION
Router IP Address screen. If you selected the Advanced option in the
Easy or Advanced options screen, SmartStart asks you to choose
between entering the router’s current IP address and assigning a new IP
address to the router.
If the router has already been assigned an IP address, select the first
radio button. If you do this, the Known IP Address screen appears (see
the next screen below.)
If you want to reconfigure the router with a new IP address and subnet
mask, typically to match the IP addresses currently used on your network,
select the second radio button. If you do this, the New IP Address screen
appears (see the second screen below.)
When you have done this, click Next.
Known IP Address screen. SmartStart displays a recommended
address for the router based on the IP address of the computer.
If you know the router has an IP address different from the default value,
enter it now. Otherwise, accept the recommended address.
When you have done this, click Next.
SmartStart tests the connection to your router.
SmartStart then returns you to the Connection Profile screen shown on
page 8.
New IP Address screen. If you want to change the router’s IP address,
you enter the new IP address, the subnet mask, and the router’s serial
number in this screen. Remember, the serial number is on the bottom of
the router. It is also found in your documentation folio.
Note: Forcing a new IP address may turn off the Netopia Router’s IP
address serving capabilities, if you assign an IP address and subnet
mask outside the router’s current IP address serving pool. The Netopia
Router does not allow an invalid address to be served. Use this option
with caution.
When you have done this, click Next.
SmartStart forces the new IP address into the router, tests the
connection, and then resets the router.
SmartStart then returns you to the Connection Profile screen shown on
page 8.
10 Getting Started User Guide
SHARING THE CONNECTION
CONFIGURING TCP/IP ON WINDOWS 95, 98, OR NT COMPUTERS
Configuring TCP/IP on a Windows computer requires the following:
n
n
An Ethernet card (also known as a network adapter)
The TCP/IP protocol must be “bound” to the adapter or card
DYNAMIC CONFIGURATION (RECOMMENDED)
If you configure your Netopia Router using SmartStart, you can accept the dynamic IP address assigned by your router. The Dynamic Host
Configuration Protocol (DHCP) ser ver, which enables dynamic addressing, is enabled by default in the router. If your PC is not set for dynamic
addressing, SmartStart will offer to do this for you when you launch it. In that case, you will have to restart your PC and relaunch SmartStart. If you
configure your PC for dynamic addressing in advance, Smar tStart need only be launched once. To configure your PC for dynamic addressing do the
following:
1.
2.
3.
4.
Go to the Start
Menu/Settings/Control Panels
and double click the Network
icon. From the Network
components list, select the
Configuration tab.
Select TCP/IP-->Your Network
Card. Then select Properties.
In the TCP/IP Properties screen (shown below), select the IP Address tab.
Click “Obtain an IP Address automatically.”
Click on the DNS Configuration tab. Click Disable DNS. DNS will be
assigned by the router with DHCP.
Click OK in this window, and the next window. When prompted, reboot the
computer.
Note: You can also use these instructions to configure other computers on your network to accept IP addresses served by the Netopia Router.
11
STATIC CONFIGURATION (OPTIONAL)
If you are manually configuring your computer on the Local Area Network for a fixed or static IP address, per form the following:
1.
Go to Start Menu/Settings/Control Panels and double click the Network icon. From the Network components list, select the Configuration
tab.
2.
Select TCP/IP-->Your Network Card. Then select Properties. In the TCP/IP Properties screen (shown below), select the IP Address tab. Click
“Specify an IP Address.”
Enter the following:
IP Address: 192.168.1.2
Subnet Mask: 255.255.255.0, or for 12-user models, 255.255.255.240
This address is an example of one that can be used to configure the router with the Easy option in the Smar tStart Wizard.
3.
Click on the Gateway tab (shown below). Under “New
gateway,” enter 192.168.1.1. Click Add. This is the
Netopia Router’s pre-assigned IP address.
Click on the DNS Configuration tab. Click Enable DNS. Enter the following
information:
Host: Type the name you
want to give to this
computer.
Domain: Type your domain
name. If you don't have a
domain name, type your
ISP's domain name; for
example, your ISP.com.
DNS Server Search
Order: Type the primar y
DNS IP address given to you
by your ISP. Click Add.
Repeat this process for the
secondary DNS.
Domain Suffix Search
Order: Enter the same
domain name you entered
above.
4.
Click OK in this window, and the next window. When prompted, reboot the computer.
Note: You can also use these instructions to configure other computers on your network with manual or static IP addresses. Be sure each computer
on your network has its own IP address.
CONFIGURING TCP/IP ON MACINTOSH COMPUTERS
The following is a quick guide to configuring TCP/IP for MacOS computers. Configuring TCP/IP in a Macintosh computer requires the following:
n
You must have either Open Transport or Classic Networking (MacTCP) installed.
Note: If you want to use the Dynamic Host Configuration Protocol (DHCP) ser ver built into your Netopia Router to assign IP addresses to your
Macintoshes, you must be running Open Transport, standard in MacOS 8, and optional for MacOS 7.5 and above. You can have your Netopia
Router dynamically assign IP addresses using MacTCP; however, to do so requires that the optional AppleTalk kit be installed which can only
be done after the router is configured.
12 Getting Started User Guide
n
You must have built-in Ethernet or a third-party Ethernet card and its associated drivers installed in your Macintosh.
DYNAMIC CONFIGURATION (RECOMMENDED)
If you configure your Netopia Router using SmartStart, you can accept the dynamic IP address assigned by your router. The Dynamic Host
Configuration Protocol (DHCP), which enables dynamic addressing, is enabled by default in the router. To configure your Macintosh computer for
dynamic addressing do the following:
1.
2.
3.
Go to the Apple menu. Select Control Panels and then TCP/IP.
With the TCP/IP window open, go to the Edit menu and select User Mode.
Choose Basic and click OK.
In the TCP/IP window, select “Connect via: Ethernet” and “Configure: Using
DHCP Server.”
Note: You can also use these instructions to configure other computers on your network to accept IP addresses served by the Netopia Router.
STATIC CONFIGURATION (OPTIONAL)
If you are manually configuring the computer on your Local Area Network for a
fixed or static IP address, per form the following:
1.
Go to the Apple menu. Select Control Panels and then TCP/IP or
MacTCP.
2.
With the TCP/IP window open, go to the Edit menu and select User
Mode. Choose Advanced and click OK.
Or, in the MacTCP window, select Ethernet and click the More button.
3.
In the TCP/IP window or in the MacTCP/More window, select or type information into the fields as shown in the following table.
Option:
Connect via:
4.
5.
Select/Type:
Ethernet
Configure:
Manually
IP Address:
192.168.1.2
Subnet mask:
255.255.255.0, or for 12-user models, 255.255.255.240
Router address:
192.168.1.1
Name server address:
Enter the primar y and secondar y name server addresses given to you by your ISP
Implicit Search Path:
Starting domain name:
Enter your domain name; if you do not have a domain name, enter the domain name
of your ISP
Close the TCP/IP or MacTCP control panel and save the settings.
If you are using MacTCP, you must restart the computer. If you are using Open Transport, you do not need to restart.
These are the only fields you need to modify in this screen.
Note: You can also use these instructions to configure other computers on your network with manual or static IP addresses. Be sure each computer
on your network has its own IP address.